SpringBoot3基础
一、
1、导入依赖
<parent><groupId>org.springframework.boot</groupId><artifactId>spring-boot-starter-parent</artifactId><version>3.2.8</version><!--检索parent的pom.xml--><relativePath/></parent><dependencies><!--引入IoC相关依赖--><dependency><groupId>org.springframework.boot</groupId><artifactId>spring-boot-starter</artifactId></dependency><!--小辣椒依赖--><dependency><groupId>org.projectlombok</groupId><artifactId>lombok</artifactId></dependency></dependencies>2、创建application-a1.xml文件,其中phone是student类下的一个类
# 书写了一个配置
student:id: 1001name: mmgender: 男loves:- 足球- 篮球- 排球phone:name: 华为price: 2999
3、构建功能类DemoA
import org.springframework.beans.factory.annotation.Value;
import org.springframework.stereotype.Component;@Component //生成对象
public class DemoA {//给属性赋值@Value("101")private Integer id;@Value("张三")private String name;@Value("男")private Character gender;@Overridepublic String toString() {return "DemoA{" +"id=" + id +", name='" + name + '\'' +", gender=" + gender +'}';}
}
4、在application.yml文件中加载application-a1.yml配置文件
# 这里将一些其他的配置文件加载进来spring:profiles:active: a1 # 将一个application-a1.yaml5、创建Student类和Phone类,因为phone是student类下的一个类,所以还需创建Phone类
import lombok.Data;
import org.springframework.boot.context.properties.ConfigurationProperties;
import org.springframework.stereotype.Component;//将将配置文件application中指定前缀的配置项student批量绑定到Java类的属性上
@ConfigurationProperties(prefix = "student")@Data
@Component
public class Student {private Integer id;private String name;private Character gender;private String[] loves;private Phone phone;
}
import lombok.Data;
import org.springframework.stereotype.Component;@Data
@Component
public class Phone {private String name;private Double price;
}
6、创建启动类Boot01Application
import com.jiazhong.component.DemoA;
import com.jiazhong.component.Student;
import lombok.extern.slf4j.Slf4j;
import org.springframework.boot.SpringApplication;
import org.springframework.boot.autoconfigure.SpringBootApplication;
import org.springframework.context.ConfigurableApplicationContext;import java.lang.module.Configuration;@Slf4j //打印日志
// 设置当前类是boot的启动类
@SpringBootApplication
public class Boot01Application {public static void main(String[] args) {//启动它ConfigurableApplicationContext context = SpringApplication.run(Boot01Application.class, args);DemoA a = context.getBean(DemoA.class);System.out.println(a);//控制台打印log.info("a:{}",a);//日志打印}
}
运行结果:

二、
1、创建Student2类
import lombok.Data;
import lombok.NoArgsConstructor;
import org.springframework.beans.factory.annotation.Value;
import org.springframework.stereotype.Component;@Data
@NoArgsConstructor //无参构造器
@Component
public class Student2 {@Value("${student.id}")private Integer id;@Value("${student.phone.name}")private String phoneName;@Value("${student.name}")private String studentName;// @Value("{student.loves}") Value注解只支持单个数据对象private String[] loves;
}
2、启动类Boot01Application
import com.jiazhong.component.Student2;
import lombok.extern.slf4j.Slf4j;
import org.springframework.boot.SpringApplication;
import org.springframework.boot.autoconfigure.SpringBootApplication;
import org.springframework.context.ConfigurableApplicationContext;import java.lang.module.Configuration;@Slf4j //打印日志
// 设置当前类是boot的启动类
@SpringBootApplication
public class Boot01Application {public static void main(String[] args) {//启动它ConfigurableApplicationContext context = SpringApplication.run(Boot01Application.class, args);Student2 stu = context.getBean(Student2.class);log.info("stu:{}",stu);}
}
运行结果

三、
1、创建Student3类
import lombok.Data;
import lombok.NoArgsConstructor;
import org.springframework.boot.context.properties.ConfigurationProperties;
import org.springframework.context.annotation.PropertySource;
import org.springframework.stereotype.Component;@Data
@NoArgsConstructor
@Component@ConfigurationProperties(prefix = "student")
// 已指定配置文件,所以在application.yml文件中不需要加载其他配置文件
@PropertySource(value = "classpath:student3.properties",encoding = "utf-8")
public class Student3 {private Integer id;private String name;private Character gender;private String[] loves;private Phone phone;
}
2、启动类Boot01Application
import com.jiazhong.component.Student3;
import lombok.extern.slf4j.Slf4j;
import org.springframework.boot.SpringApplication;
import org.springframework.boot.autoconfigure.SpringBootApplication;
import org.springframework.context.ConfigurableApplicationContext;import java.lang.module.Configuration;@Slf4j //打印日志
// 设置当前类是boot的启动类
@SpringBootApplication
public class Boot01Application {public static void main(String[] args) {//启动它ConfigurableApplicationContext context = SpringApplication.run(Boot01Application.class, args);Student3 stu = context.getBean(Student3.class);log.info("stu:{}",stu);}
}
3、创建student3.properties文件,使得配置类文件成模块,此外在application.yml文件中不需要再加载application-a1.yml配置文件,注解已经加载了
student.id=1
student.name=李四
student.gender=男
student.loves=足球,网球,羽毛球
student.phone.name=华为
student.phone.price=9.8
运行结果

四、在yml文件中支持字面量写法、数组写法和对象写法
1、字面量写法
# 字符量写法
# 数值写法
# int a = 1
a: 1
# double b=1.7
b: 1.7
# 字符串写法 三个写法完全一致
c1: admin
c2: 'admin'
c3: "admin"
# 对于某些以 0 开头的纯数字 建议添加''或者""
password: '010100'
# 布尔写法
d1: true
d2: false
# 时间日期
e1: 2000-1-1
e2: 2000-1-1 10:10:10
e3: 10:10:10
2、数组写法
# 数组写法
# 第一种写法
# String[] array1 = {"变量1","变量2","变量3"}
array1:- 变量1- 变量2- 变量3# 第一种写法
array2: ['变量1','变量2','变量3']
3、对象写法
# 对象写法
# 代表一个对象
student:id: 1name: xxgender: 男person:id: 1001name: mmage: 11classroom:id: 1001name: 一班teacher:id: 101name: 老师
五、mybatis-plus
1、引入依赖
    <dependencies><dependency><groupId>org.springframework.boot</groupId><artifactId>spring-boot-starter</artifactId></dependency><!--mysql--><dependency><groupId>com.mysql</groupId><artifactId>mysql-connector-j</artifactId></dependency><!--mysql-plus--><dependency><groupId>com.baomidou</groupId><artifactId>mybatis-plus-spring-boot3-starter</artifactId><version>3.5.12</version></dependency><dependency><groupId>org.projectlombok</groupId><artifactId>lombok</artifactId></dependency><!--数据库连接池--><dependency><groupId>com.alibaba</groupId><artifactId>druid-spring-boot-3-starter</artifactId><version>1.2.20</version></dependency><dependency><groupId>org.springframework.boot</groupId><artifactId>spring-boot-starter-test</artifactId></dependency>
</dependencies>
2、配置application.yml文件,连接数据库
spring:datasource:url: jdbc:mysql://localhost:3306/testdriver-class-name: com.mysql.cj.jdbc.Drivertype: com.alibaba.druid.pool.DruidDataSourceusername: rootpassword: 123456mybatis-plus:global-config:db-config:# 第二种写法 全局写法logic-not-delete-value: 0 #存在的值logic-delete-value: 1 # 删除后的值logic-delete-field: state # 那个属性是删除字段3、在bean包中创建Student实体类
package boot02.bean;import com.baomidou.mybatisplus.annotation.TableField;
import com.baomidou.mybatisplus.annotation.TableId;
import com.baomidou.mybatisplus.annotation.TableLogic;
import com.baomidou.mybatisplus.annotation.TableName;
import lombok.Data;
import lombok.NoArgsConstructor;
import org.apache.ibatis.type.JdbcType;import java.io.Serializable;@Data
@NoArgsConstructor
// 对应的表名
@TableName(value = "student",keepGlobalPrefix = true,excludeProperty = {"max"})
public class Student implements Serializable { //序列化@TableId(value = "id") //主键private Long id;@TableField(value = "name",select = true) //非主键private String name;@TableField(value = "stu_no",jdbcType = JdbcType.VARCHAR)private String stuNo;private String password;private Character gender;private String birthday;@TableField(value = "place_of_origin")private String placeOfOrigin;@TableField("create_time")private String createTime;@TableField("school_id")private Long schoolId;@TableField("course_id")private Long courseId;// 第一种写法:局部写法(逻辑删除)// @TableLogic(delval = "1",value = "0")private Integer state;private int max;
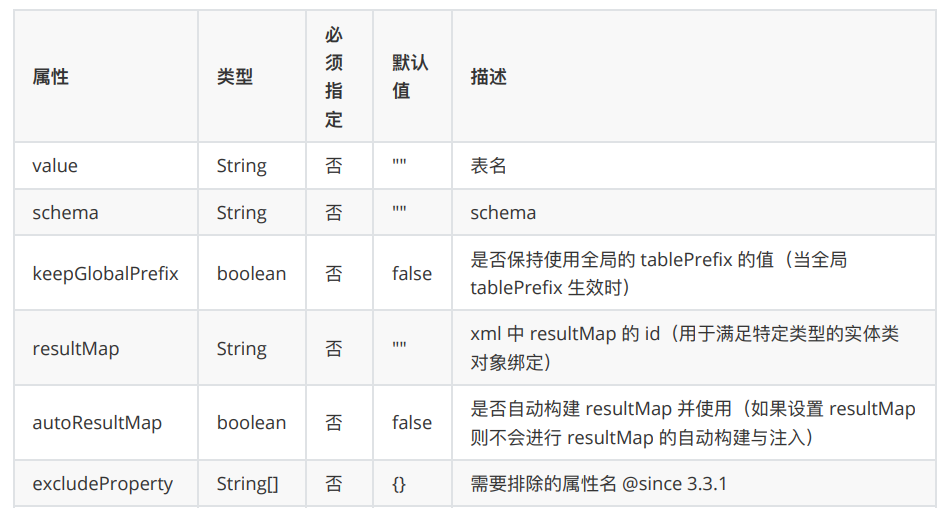
}@TableName注解的属性列表:
4、在mapper包下创建StudentMapper接口,并继承BaseMapper<>
package boot02.mapper;import com.baomidou.mybatisplus.core.mapper.BaseMapper;
import com.jiazhong.mingxing.boot.boot02.bean.Student;
import org.apache.ibatis.annotations.Mapper;@Mapper
public interface StudentMapper extends BaseMapper<Student> {
}
5、在service包下创建StudentService接口和StudentServiceImpl实现类
package boot02.service;import com.baomidou.mybatisplus.extension.service.IService;
import com.jiazhong.mingxing.boot.boot02.bean.Student;
import org.springframework.stereotype.Service;@Service
public interface StudentService extends IService<Student> {
}
package boot02.service.impl;import com.baomidou.mybatisplus.extension.service.impl.ServiceImpl;
import com.jiazhong.mingxing.boot.boot02.bean.Student;
import com.jiazhong.mingxing.boot.boot02.mapper.StudentMapper;
import com.jiazhong.mingxing.boot.boot02.service.StudentService;
import org.springframework.stereotype.Service;@Service
public class StudentServiceImpl extends ServiceImpl<StudentMapper,Student> implements StudentService {
}
6、创建启动类Boot02Application
import org.springframework.boot.SpringApplication;
import org.springframework.boot.autoconfigure.SpringBootApplication;@SpringBootApplication
public class Boot02Application {public static void main(String[] args) {SpringApplication.run(Boot02Application.class, args);}
}
7、在test包下创建测试类App
import com.jiazhong.mingxing.boot.boot02.bean.Student;
import com.jiazhong.mingxing.boot.boot02.service.StudentService;
import jakarta.annotation.Resource;
import lombok.extern.slf4j.Slf4j;
import org.junit.jupiter.api.Test;
import org.springframework.boot.test.context.SpringBootTest;import java.util.List;@Slf4j
@SpringBootTest
public class App {@Resourceprivate StudentService service;@Test //查看所有信息public void a(){List<Student> list = service.list();log.info("list={}",list);}@Test //添加数据public void b(){Student student = new Student();student.setName("小美");student.setStuNo("JK2025091317");student.setGender('男');student.setBirthday("2006-1-1");student.setCourseId(1965250815853547521L);student.setSchoolId(1965321181514842113L);student.setPlaceOfOrigin("陕西西安");student.setCreateTime("2025-9-13");// 调用save方法boolean b=service.save(student);log.info("b={}",b);}@Test //逻辑删除public void c(){boolean b=service.removeById(1965298441470828545L);log.info("b={}",b);}
}