鸿蒙:从相册中选取图片,并转成PixelMap作为UI显示
1、前言
PixelMap图像像素类,用于读取或写入图像数据以及获取图像信息。
2、参考文档
https://developer.huawei.com/consumer/cn/doc/harmonyos-references/arkts-apis-image-pixelmap![]() https://developer.huawei.com/consumer/cn/doc/harmonyos-references/arkts-apis-image-pixelmaphttps://developer.huawei.com/consumer/cn/doc/harmonyos-faqs/faqs-image-6
https://developer.huawei.com/consumer/cn/doc/harmonyos-references/arkts-apis-image-pixelmaphttps://developer.huawei.com/consumer/cn/doc/harmonyos-faqs/faqs-image-6![]() https://developer.huawei.com/consumer/cn/doc/harmonyos-faqs/faqs-image-6
https://developer.huawei.com/consumer/cn/doc/harmonyos-faqs/faqs-image-6
3、核心思路
1. 使用 photoPicker.select 拉起相册
2. 使用打开图片,获取文件描述符(fd)
3. 通过文件描述符创建图片源对象,用于后续图片解码
4、核心代码
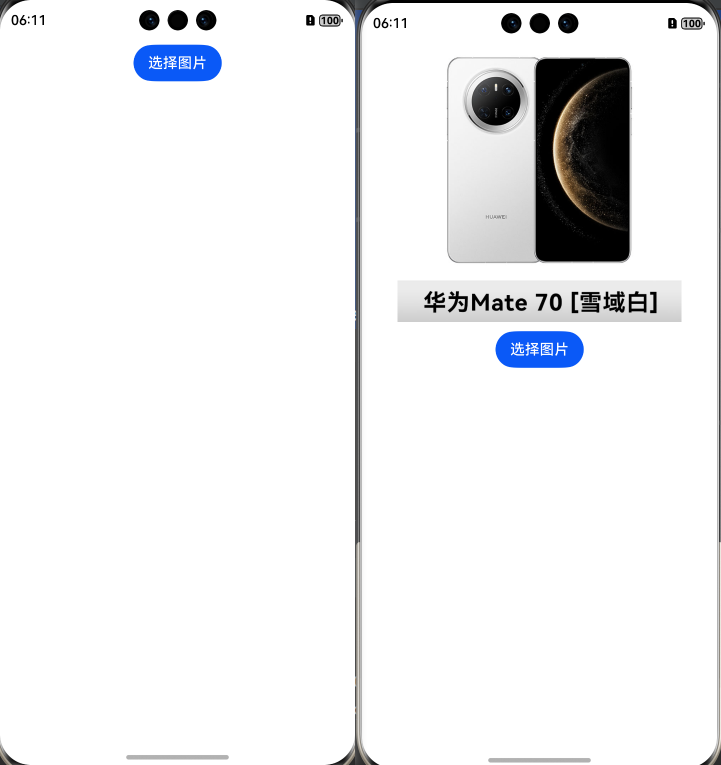
try {// 存储选中图片的URI数组let uris: Array<string> = [];// 创建相册选择配置对象let PhotoSelectOptions = new photoAccessHelper.PhotoSelectOptions();// 设置选择的文件类型为图片PhotoSelectOptions.MIMEType = photoAccessHelper.PhotoViewMIMETypes.IMAGE_TYPE;// 设置最大选择数量为1张PhotoSelectOptions.maxSelectNumber = 1;// 创建相册选择器实例let photoPicker = new photoAccessHelper.PhotoViewPicker();// 调用选择器的select方法,打开系统相册选择图片photoPicker.select(PhotoSelectOptions).then((PhotoSelectResult: photoAccessHelper.PhotoSelectResult) => {// 从选择结果中获取选中图片的URI列表uris = PhotoSelectResult.photoUris;// 以只读模式打开选中的图片文件,获取文件描述符(fd)// URI是图片在系统中的唯一标识,通过它可以访问文件let file = fileIo.openSync(uris[0], fileIo.OpenMode.READ_ONLY);console.info('文件描述符: ' + file.fd);// 通过文件描述符创建图片源对象,用于后续图片解码const imageSource: image.ImageSource = image.createImageSource(file.fd);// 定义图片解码选项let decodingOptions: image.DecodingOptions = {editable: true, // 允许对图片进行编辑操作desiredPixelFormat: 3 // 设置期望的像素格式(3通常表示RGBA8888格式)}// 从图片源创建像素映射(PixelMap)// 异步操作,通过回调返回结果imageSource.createPixelMap(decodingOptions, (err: BusinessError, pixelMap: image.PixelMap) => {if (err !== undefined) {// 若创建失败,打印错误信息console.error(`创建PixelMap失败,错误码: ${err.code}, 错误信息: ${err.message}`);} else {// 若创建成功,更新状态变量,触发UI刷新显示图片this.pixelMap = pixelMap;console.info('PixelMap创建成功');}})}).catch((err: BusinessError) => {// 捕获相册选择过程中的异常console.error(`相册选择失败,错误码: ${err.code}, 错误信息: ${err.message}`);})} catch (error) {// 捕获其他可能的异常(如文件操作失败等)let err: BusinessError = error as BusinessError;console.error('图片选择流程异常: ' + JSON.stringify(err));}5、运行效果
6、完整代码
Index.ets
import { photoAccessHelper } from '@kit.MediaLibraryKit';
import { BusinessError } from '@kit.BasicServicesKit';
import { image } from '@kit.ImageKit';
import { fileIo } from '@kit.CoreFileKit';@Entry
@ComponentV2
struct Index {// 定义状态变量,用于存储图片的像素映射对象,控制图片显示// pixelMap是图片在内存中的像素表示,可直接用于Image组件显示@Local pixelMap: image.PixelMap | undefined = undefinedbuild() {// 垂直布局容器,子组件间距为10vpColumn({ space: 10 }) {// 图片显示组件,根据pixelMap状态变量显示图片Image(this.pixelMap).width("80%") // 图片宽度占父容器的80%// 选择图片按钮,点击触发图片选择逻辑Button('选择图片').onClick(() => {try {// 存储选中图片的URI数组let uris: Array<string> = [];// 创建相册选择配置对象let PhotoSelectOptions = new photoAccessHelper.PhotoSelectOptions();// 设置选择的文件类型为图片PhotoSelectOptions.MIMEType = photoAccessHelper.PhotoViewMIMETypes.IMAGE_TYPE;// 设置最大选择数量为1张PhotoSelectOptions.maxSelectNumber = 1;// 创建相册选择器实例let photoPicker = new photoAccessHelper.PhotoViewPicker();// 调用选择器的select方法,打开系统相册选择图片photoPicker.select(PhotoSelectOptions).then((PhotoSelectResult: photoAccessHelper.PhotoSelectResult) => {// 从选择结果中获取选中图片的URI列表uris = PhotoSelectResult.photoUris;// 以只读模式打开选中的图片文件,获取文件描述符(fd)// URI是图片在系统中的唯一标识,通过它可以访问文件let file = fileIo.openSync(uris[0], fileIo.OpenMode.READ_ONLY);console.info('文件描述符: ' + file.fd);// 通过文件描述符创建图片源对象,用于后续图片解码const imageSource: image.ImageSource = image.createImageSource(file.fd);// 定义图片解码选项let decodingOptions: image.DecodingOptions = {editable: true, // 允许对图片进行编辑操作desiredPixelFormat: 3 // 设置期望的像素格式(3通常表示RGBA8888格式)}// 从图片源创建像素映射(PixelMap)// 异步操作,通过回调返回结果imageSource.createPixelMap(decodingOptions, (err: BusinessError, pixelMap: image.PixelMap) => {if (err !== undefined) {// 若创建失败,打印错误信息console.error(`创建PixelMap失败,错误码: ${err.code}, 错误信息: ${err.message}`);} else {// 若创建成功,更新状态变量,触发UI刷新显示图片this.pixelMap = pixelMap;console.info('PixelMap创建成功');}})}).catch((err: BusinessError) => {// 捕获相册选择过程中的异常console.error(`相册选择失败,错误码: ${err.code}, 错误信息: ${err.message}`);})} catch (error) {// 捕获其他可能的异常(如文件操作失败等)let err: BusinessError = error as BusinessError;console.error('图片选择流程异常: ' + JSON.stringify(err));}})}// 容器宽度和高度占满整个屏幕.width("100%").height("100%")}
}
感觉有帮助,可以点赞或收藏