阿里云服务器ECS上安装anaconda(jupyter)和OpenCV教程
目录
1. 环境介绍:
2. 安装Anaconda
2.1 下载anaconda的安装包
2.2 解决安装出现的bug
2.3 安装anaconda
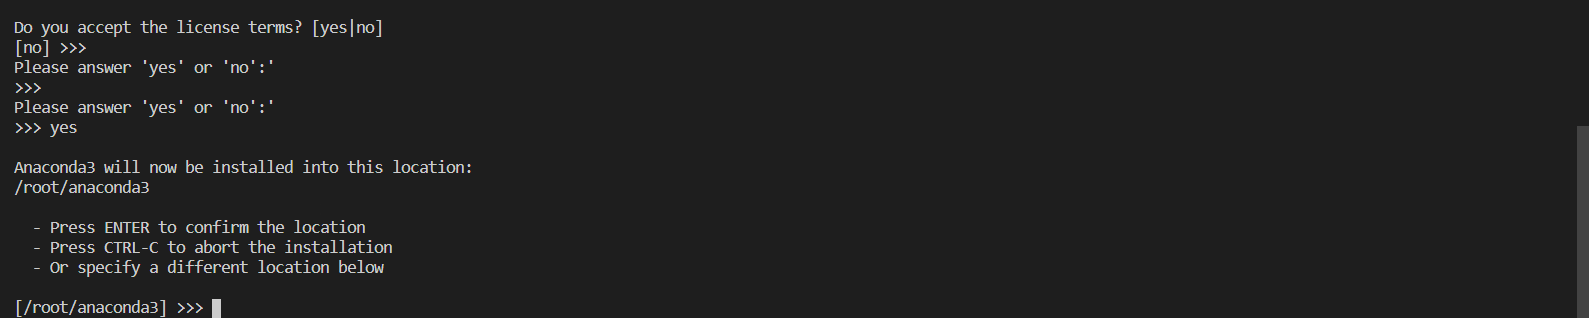
2.4 点击Enter(回车键)
2.5 输入 yes
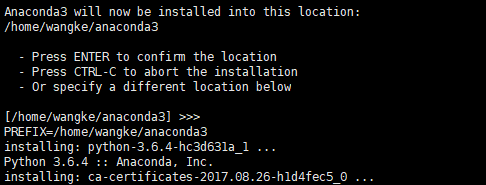
2.6 继续点击 Enter
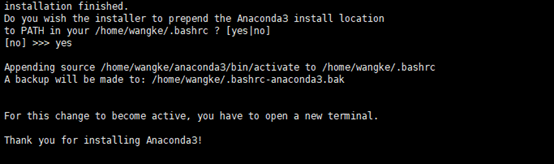
2.7 输入 yes,添加环境变量
2.8 完成安装以及检测是否安装成功
3. 安装OpenCV
3.1 离线包安装或者在线安装都行,这样介绍在线安装。
3.2 验证使用OpenCV报错解决
3.3 测试OpenCV成功
4. 配置jupyter
4.1 生成配置文件
4.2.生成密钥
4.3.打开/root/.jupyter/jupyter_notebook_config.py文件,配置固定端口、入口ip、工作目录等
6. 配置阿里云防火墙,使外网通过链接可以访问jupyter
7 运行和终止jupyter
7.1. 运行jupyter
7.2. 关闭后台的jupyter进程
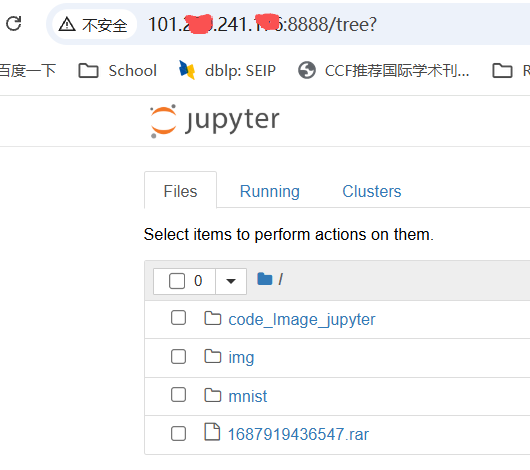
8.浏览器地址栏输入阿里云公网ip和jupyter端口,使用jupyter
1. 环境介绍:
操作系统:阿里云ECS的64位CentOS 7.9
Anaconda:Anaconda3-5.3.1-Linux-x86_64.sh
https://mirrors.tuna.tsinghua.edu.cn/anaconda/archive/
OpenCV:4.1.0
2. 安装Anaconda
2.1 下载anaconda的安装包
这里我们需要在官网上查找自己需要的版本,地址链接在下面:
https://repo.anaconda.com/archive/
https://mirrors.tuna.tsinghua.edu.cn/anaconda/archive/
Anaconda3-5.3.1-Linux-x86_64.sh
离线下载到本地电脑,再上传ECS可以
或者直接使用wget命令下载到ECS,如下命令:
wget https://repo.anaconda.com/archive/Anaconda3-5.3.1-Linux-x86_64.sh
2.2 解决安装出现的bug
当我们输入1.1的那一条命令时,有些人可能会出现下面这样的错误:
bash: wget: command not found
当然这也是我自己出现的错误,具体解决办法如下: centos系统,需要执行以下命令:
[work@ixxxx]$ sudo yum install wget
[sudo] password for work:
Loaded plugins: fastestmirror Loading mirror speeds from cached hostfile Package wget-1.14-18.el7_6.1.x86_64 already installed and latest version Nothing to do
2.3 安装anaconda
接下来我们需要首先赋权再执行安装程序,依次输入下面两句命令:
chmod +x Anaconda3-5.3.1-Linux-x86_64.sh
./Anaconda3-5.3.1-Linux-x86_64.sh
然后出现下面图所示:

2.4 点击Enter(回车键)
此时显示Anaconda的信息,并且会出现More,继续按Enter,直到如下图所示:

2.5 输入 yes
2.6 继续点击 Enter
2.7 输入 yes,添加环境变量
这里需要注意点的就是如果你直接跳过这部设置环境变量的话:
[no ] >>>
那你需要自己到这个文件夹设置你安装Anaconda路径(比如上面显示我的是)
/home/work/.bashrc
单击进去,在最后一行添加:
export PATH=/home/anaconda3/bin:$PATH
需要把之前的那句话给注释掉如下所示:
# export PATH=/usr/local/nvidia/bin:/usr/local/cuda/bin:/usr/local/sbin:/usr/sbin:/sbin:$PATH export PATH=/root/anaconda3/bin:$PATH
这里只是个示例,具体的还是要看你们自己安装的路径。
然后保存更改,输入下面这句指令:
source ~/.bashrc
2.8 完成安装以及检测是否安装成功
打开新的终端后,进入自己的文件夹目录下,输入anaconda -V(注意a要小写,V要大写),conda -V ,显示版本信息,若显示则表示安装成功。
[work@iZ2zee9xchiraox27ezl71Z old]$ conda -V
conda 4.5.11
3. 安装OpenCV
3.1 离线包安装或者在线安装都行,这样介绍在线安装。
安装指定版本(OpenCV-4.1.0.25)的命令如下:
pip install opencv-python==4.1.0.25 -i https://pypi.doubanio.com/simple
安装包的时候制定豆瓣源,下载包的速度会加快。
3.2 验证使用OpenCV报错解决
[work@iZ2zee9xchiraox27ezl71Z root]$ python
Python 3.7.0 (default, Jun 28 2018, 13:15:42)
[GCC 7.2.0] :: Anaconda, Inc. on linux
Type "help", "copyright", "credits" or "license" for more information.
>>> import cv2
Traceback (most recent call last):File "<stdin>", line 1, in <module>File "/home/work/anaconda3/lib/python3.7/site-packages/cv2/__init__.py", line 3, in <module>from .cv2 import *
ImportError: libXext.so.6: cannot open shared object file: No such file or directory
>>> exit()
ImportError: libXext.so.6: cannot open shared object file: No such file or directory
解决办法:
yum install libXrender
[root@iZ2zee9xchiraox27ezl71Z ~]# yum install libXrender
Loaded plugins: fastestmirror
Loading mirror speeds from cached hostfile
Resolving Dependencies
--> Running transaction check
---> Package libXrender.x86_64 0:0.9.10-1.el7 will be installed
--> Finished Dependency ResolutionDependencies Resolved======================================================================================================================================================================================================================================Package                                                  Arch                                                 Version                                                       Repository                                          Size
======================================================================================================================================================================================================================================
Installing:libXrender                                               x86_64                                               0.9.10-1.el7                                                  base                                                26 kTransaction Summary
======================================================================================================================================================================================================================================
Install  1 PackageTotal download size: 26 k
Installed size: 46 k
Is this ok [y/d/N]: y
Downloading packages:
libXrender-0.9.10-1.el7.x86_64.rpm                                                                                                                                                                             |  26 kB  00:00:00
Running transaction check
Running transaction test
Transaction test succeeded
Running transactionInstalling : libXrender-0.9.10-1.el7.x86_64                                                                                                                                                                                     1/1 Verifying  : libXrender-0.9.10-1.el7.x86_64                                                                                                                                                                                     1/1 Installed:libXrender.x86_64 0:0.9.10-1.el7                                                                                                                                                                                                    Complete!
[root@iZ2zee9xchiraox27ezl71Z ~]# yum install libXext
Loaded plugins: fastestmirror
Loading mirror speeds from cached hostfile
Resolving Dependencies
--> Running transaction check
---> Package libXext.x86_64 0:1.3.3-3.el7 will be installed
--> Finished Dependency ResolutionDependencies Resolved======================================================================================================================================================================================================================================Package                                                Arch                                                  Version                                                       Repository                                           Size
======================================================================================================================================================================================================================================
Installing:libXext                                                x86_64                                                1.3.3-3.el7                                                   base                                                 39 kTransaction Summary
======================================================================================================================================================================================================================================
Install  1 PackageTotal download size: 39 k
Installed size: 85 k
Is this ok [y/d/N]: y
Downloading packages:
libXext-1.3.3-3.el7.x86_64.rpm                                                                                                                                                                                 |  39 kB  00:00:00
Running transaction check
Running transaction test
Transaction test succeeded
Running transactionInstalling : libXext-1.3.3-3.el7.x86_64                                                                                                                                                                                         1/1 Verifying  : libXext-1.3.3-3.el7.x86_64                                                                                                                                                                                         1/1 Installed:libXext.x86_64 0:1.3.3-3.el7                                                                                                                                                                                                        Complete!
其他报错类似处理:
yum install ksh -y
yum install libXext.so.6 -y
yum install libXtst.so.6 –y
yum install libXt.so.6 -y
yum install libGLU.so.1 --setopt=protected_multilib=false
yum install libelf.so.1 -y
yum install libXrender.so.1 -y
yum install openmotif -y
yum install libXp.so.6 -y
yum install libXrandr.so.2 –y
yum install *xorg* -y
yum install libXp -y
yum install ld-linux.so.2 -y
yum install libstdc++.so.5 -y
yum install -y xterm
3.3 测试OpenCV成功
[root@iZ2zee9xchiraox27ezl71Z ~]# su work
[work@iZ2zee9xchiraox27ezl71Z root]$ python
Python 3.7.0 (default, Jun 28 2018, 13:15:42)
[GCC 7.2.0] :: Anaconda, Inc. on linux
Type "help", "copyright", "credits" or "license" for more information.
>>> import cv2
>>> cv2.__version__
'4.1.0'
>>>
4. 配置jupyter
完成前面的环境搭建后,我们对jupyter进行一些配置,使得我们使用的更加方便
4.1 生成配置文件
jupyter notebook --generate-config --allow-root
这里一般会返回文件生成在了那个位置,一般的话是配置文件是在/home/work/.jupyter/jupyter_notebook_config.py
[work@iZ2z old]$ ll /home/work/.jupyter/jupyter_notebook_config.py
-rw-rw-r-- 1 work work 28724 Sep 22 00:13 /home/work/.jupyter/jupyter_notebook_config.py
4.2.生成密钥
在配置配置文件时需要t填写秘钥等信息
[work@iZ2zee9xchiraox27ezl71Z ~]$ ipython
Python 3.7.0 (default, Jun 28 2018, 13:15:42)
Type 'copyright', 'credits' or 'license' for more information
IPython 6.5.0 -- An enhanced Interactive Python. Type '?' for help.In [1]: from notebook.auth import passwd In [2]: passwd()
Enter password:
Verify password:
Out[2]: 'sha1:897c838f5c82:2876d5327d1030077a0d72dc856a24c74526b9e5'In [3]:exit()
4.3.打开/root/.jupyter/jupyter_notebook_config.py文件,配置固定端口、入口ip、工作目录等
(jupyter) [root@rion jupyter]# vim /root/.jupyter/jupyter_notebook_config.py### 在文件底部加入下面的配置信息,并自主修改 ###
# 接收任何ip地址
c.NotebookApp.ip = '0.0.0.0'
# 对外提供访问的端口,端口自定义
c.NotebookApp.port = 12345
# 启动不打开浏览器
c.NotebookApp.open_browser = False
# 设置jupyter启动后默认文件夹
c.NotebookApp.notebook_dir = u'/home/work/project/jupyter_dir'    # 需要自己创建
# 允许root用户执行
c.NotebookApp.allow_root = True
6. 配置阿里云防火墙,使外网通过链接可以访问jupyter
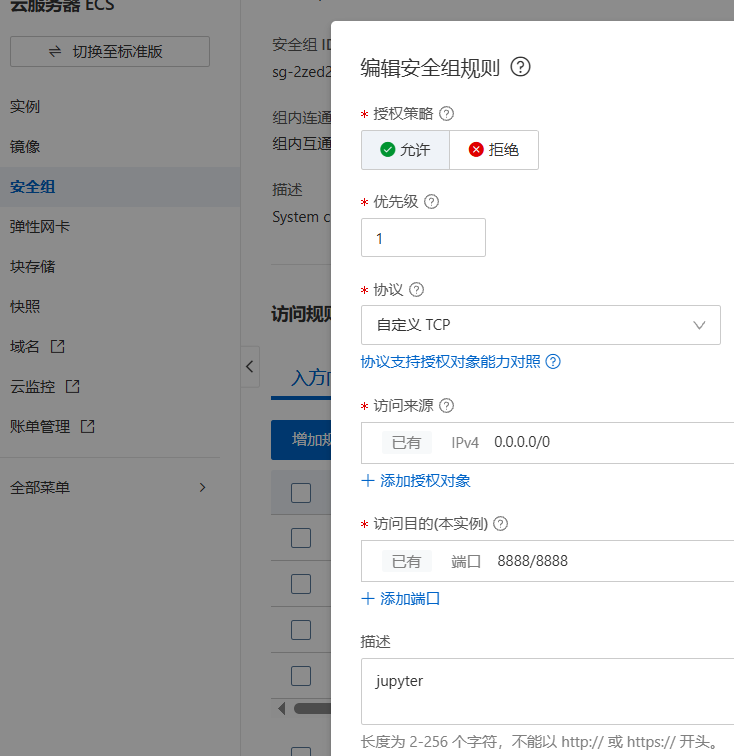
进入阿里云控制台,找到【安全】-- 【防火墙】,点击添加规则,配置我们在配置文件中定义好的端口。
7 运行和终止jupyter
7.1. 运行jupyter
[work@iZ2zee9xchiraox27ezl71Z ~]$ nohup nice  jupyter notebook >20250922_jupyter.res &
[1] 10969
[work@iZ2zee9xchiraox27ezl71Z ~]$ nohup: ignoring input and redirecting stderr to stdout[work@iZ2zee9xchiraox27ezl71Z ~]$ jobs
[1]+  Running                 nohup nice jupyter notebook > 20250922_jupyter.res &
[work@iZ2zee9xchiraox27ezl71Z ~]$ tail -f 20250922_jupyter.res
[I 17:30:18.784 NotebookApp] Serving notebooks from local directory: /home/work/project
[I 17:30:18.784 NotebookApp] The Jupyter Notebook is running at:
终端jupyter
jupyter notebook
后台运行jupyter
nohup jupyter notebook --allow-root > jupyter.log 2>&1 &
7.2. 关闭后台的jupyter进程
查询后台进程
ps -aux | grep jupyter
# ps -ef : 查看本机所有的进程;
# grep xxxx代表过滤找到条件xxxx的进程
杀掉后台进程
kill -9 PID # pid就是进程号
8.浏览器地址栏输入阿里云公网ip和jupyter端口,使用jupyter