第15章 报警管理
第15章 报警管理
简单的增删改查详情仅仅通过若依的模板代码生成就可以了。在业务的开发中需要注重需求的理解和对功能先设计后编码。设计中考虑未来的需求变更和高可靠的思路流程,复杂逻辑建议画图。
查询产品详情-接口开发
关注Service层的业务逻辑。
思路流程
1)校验 productKey 是否为空(向第三方接口发送请求前,保证productKey可用)。
2)向IoT平台查询产品详情(参考第三方 产品详情 的接口文档)。
3)校验 response 是否为空(保证第三方接口返回了预期数据)。
功能实现
/*** 查询产品详情** @param productKey 产品key* @return 结果*/@Overridepublic AjaxResult queryProduct(String productKey) {// 校验 productKey 是否为空if (StringUtils.isEmpty(productKey)){throw new BaseException("请输入正确的参数");}// 向IoT平台查询产品详情ShowProductRequest request = new ShowProductRequest();request.withProductId(productKey);ShowProductResponse response;try {response = client.showProduct(request);} catch (Exception e) {e.printStackTrace();throw new BaseException("查询产品详情失败");}// 校验 response 是否为空List<ServiceCapability> serviceCapabilities = response.getServiceCapabilities();if (CollUtil.isEmpty(serviceCapabilities)){return AjaxResult.success(Collections.emptyList());}// 返回 AjaxResult 的集合数据return AjaxResult.success(serviceCapabilities);}
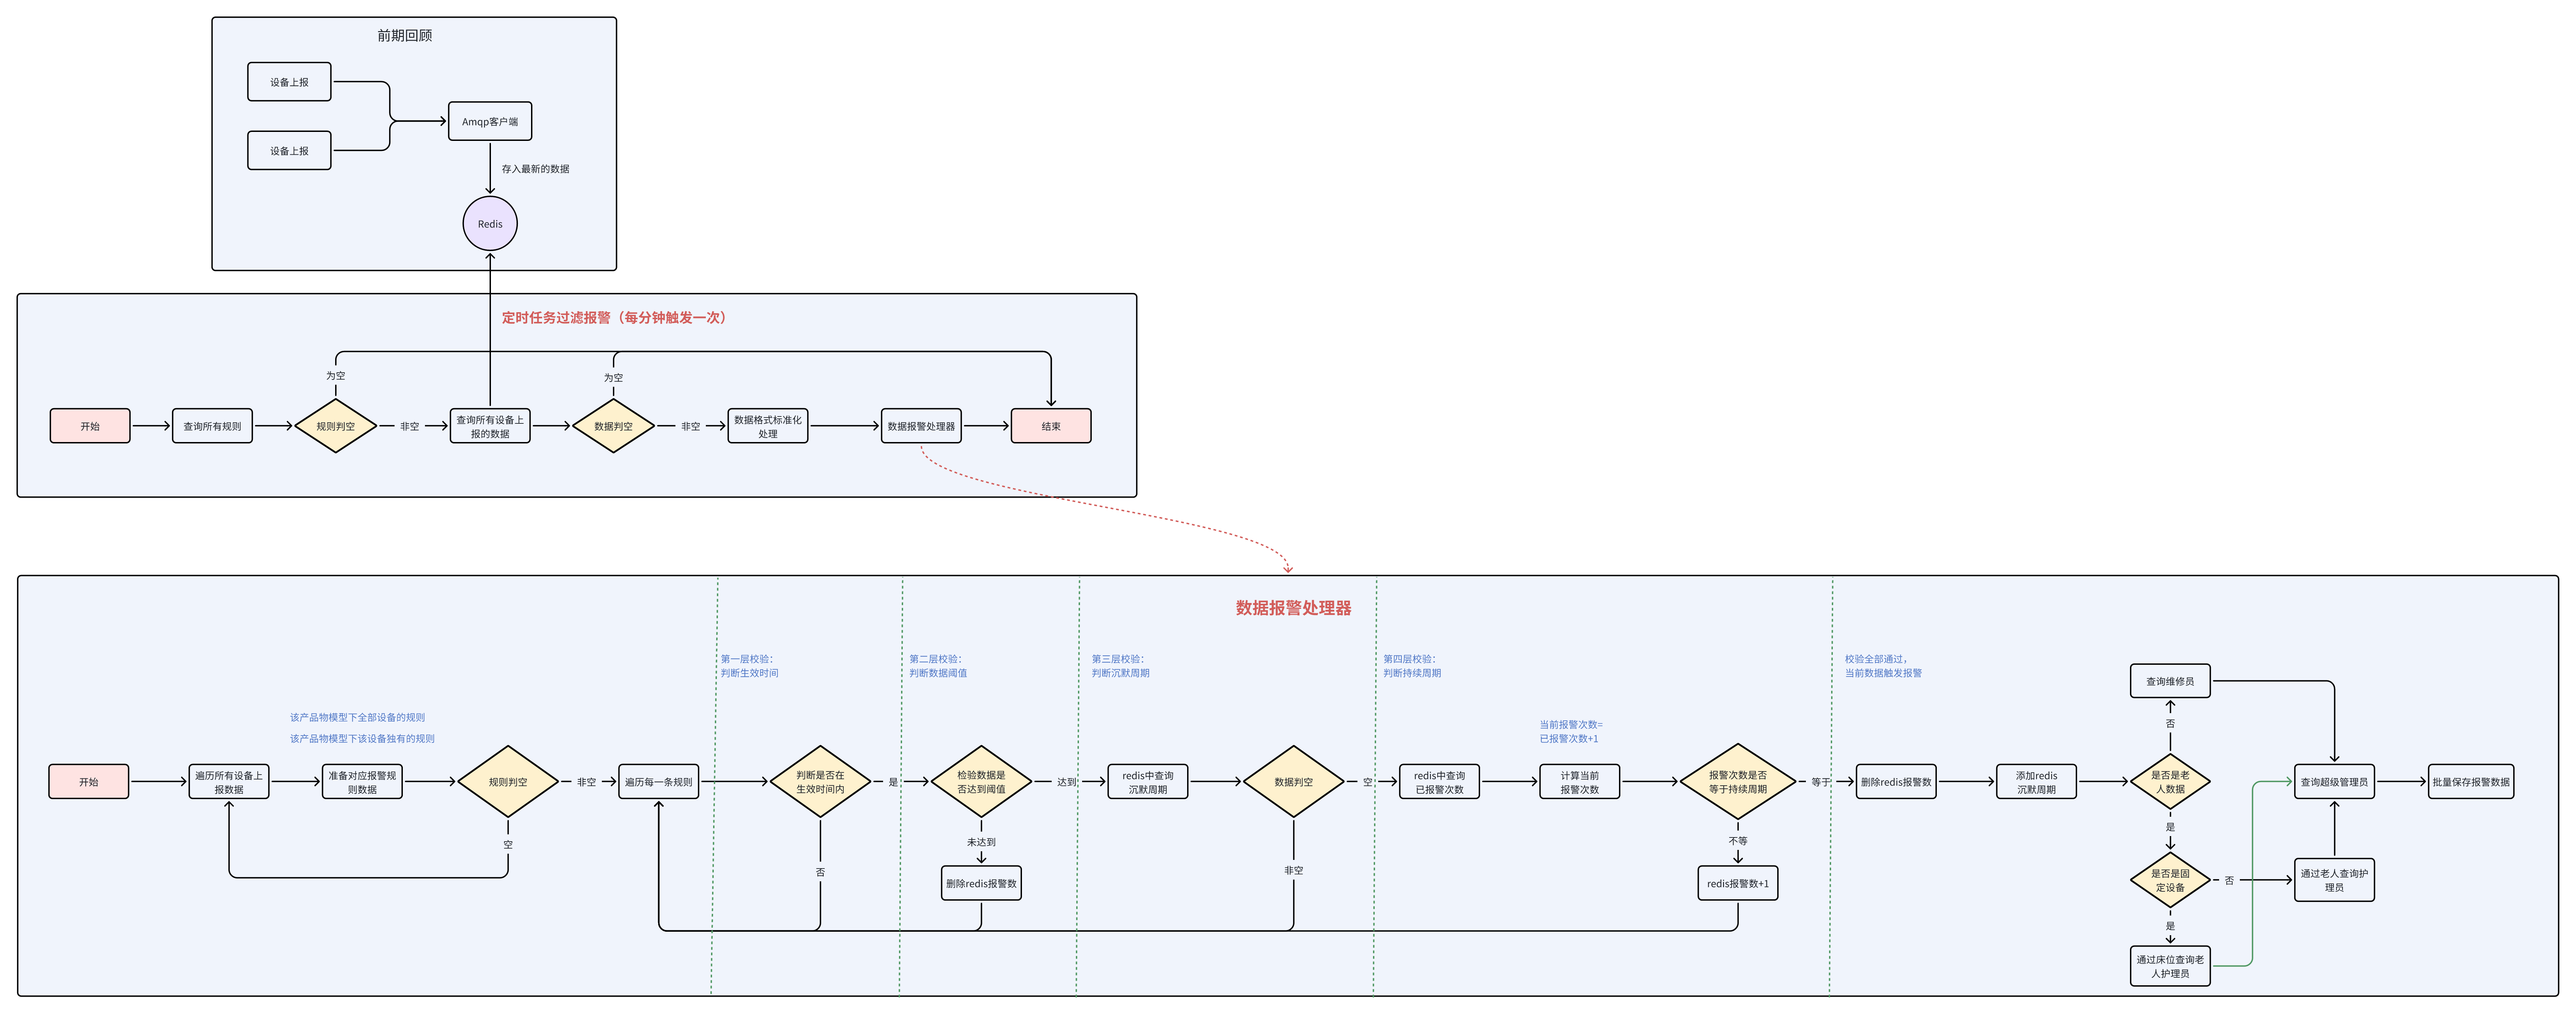
报警数据过滤及处理
思路流程
批量保存报警数据
一旦有了报警数据之后,可能需要通知多个人,咱们要为每一个要通知的人保存一条报警数据
告警数据表结构:alert_data(已提供)
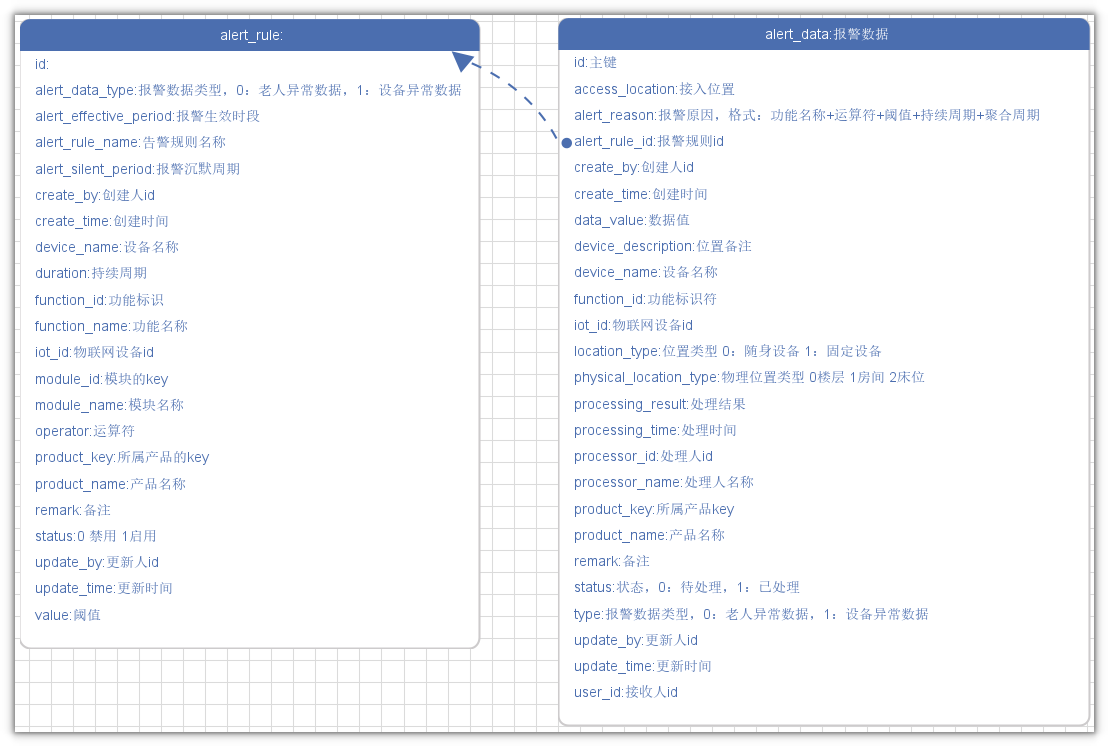
- 报警规则与报警数据为一对多的关系
- 重要字段提醒
- user_id:是指需要处理报警的用户
- 报警数据基础代码准备(若依的模板代码生成)
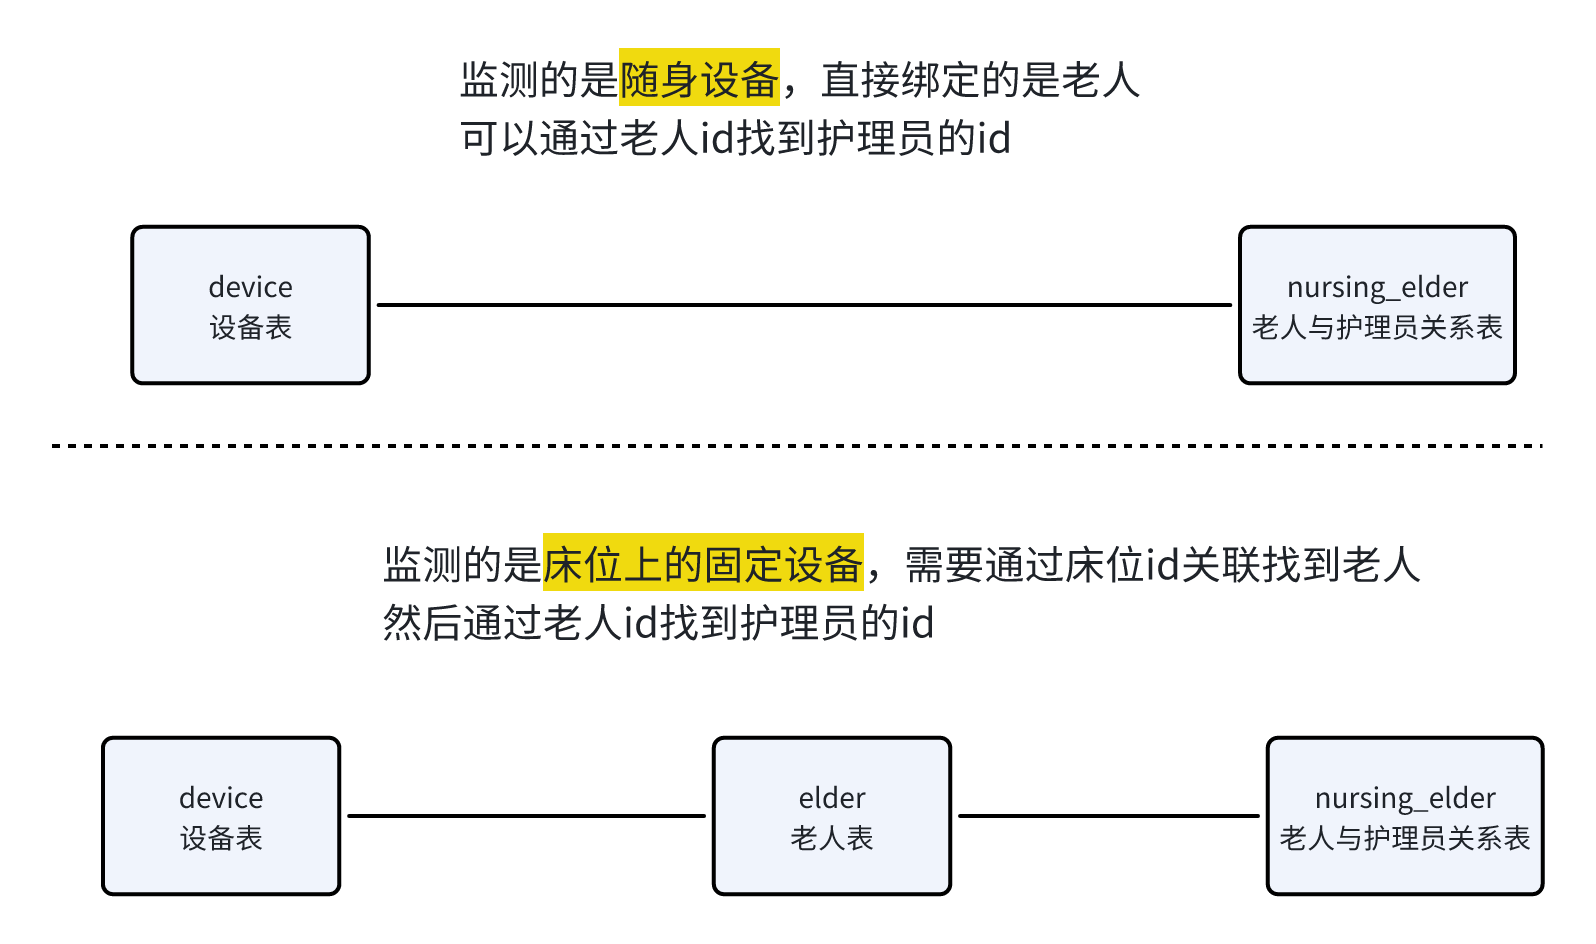
查询报警通知人 - 护理员
- 如果是随身设备,可以通过设备找到老人ID,然后通过老人id查询nursing_elder表找到护理员的ID
- 如果是床位上的固定设备,则需要通过设备表中存储的床位ID查询老人表找到老人ID,,然后通过老人id查询nursing_elder表找到护理员的ID
表关系:
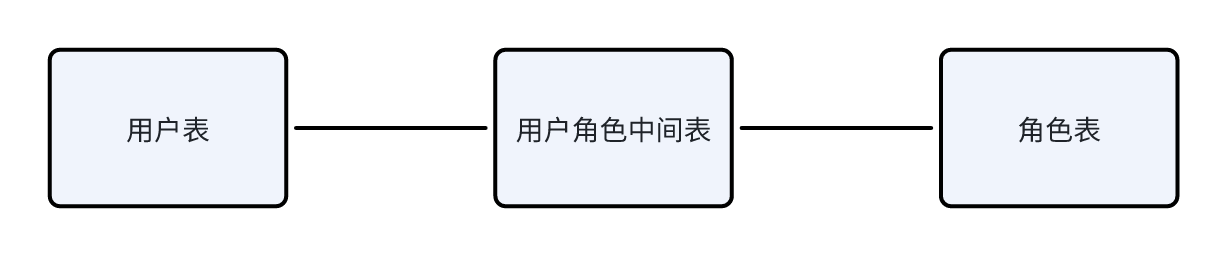
查询报警通知人 - 维修工及超级管理员
楼层或者房间中的固定设备,不需要通知护理员,需要根据维修工角色名称找到对应的维修工的ID
表关系:
定时任务
对报警数据的过滤要设置一个每一分钟触发的定时任务。
0 * * * * ?表示每分钟整执行一次
核心过滤逻辑
在编写代码的过程中,需要打开流程图,按图编写代码。
对于复杂逻辑的编写,要保证逻辑可用,注释尽量用词准确,贴近实际的代码编写。
功能实现
查询报警通知人 - 护理员
Mapper层:
/*** 根据随身设备id查询老人关联的护理人员id列表* @param iotId 设备id* @return  护理人员列表*/
List<Long> selectNursingIdsByIotIdWithElder(@Param("iotId") String iotId);/*** 根据固定设备id查询老人关联的护理人员id列表* @param iotId 设备id* @return  护理人员列表*/
List<Long> selectNursingIdsByIotIdWithBed(@Param("iotId") String iotId);
对应的xml映射文件
<select id="selectNursingIdsByIotIdWithElder" resultType="java.lang.Long">select ne.nursing_idfrom device dleft join nursing_elder ne on ne.elder_id = d.binding_locationwhere d.location_type = 0and d.iot_id = #{iotId}
</select>
<select id="selectNursingIdsByIotIdWithBed" resultType="java.lang.Long">select ne.nursing_idfrom device dleft join elder e on e.bed_id = d.binding_locationleft join nursing_elder ne on ne.elder_id = e.idwhere d.location_type = 1 and d.physical_location_type = 2and d.iot_id = #{iotId}
</select>
查询报警通知人 - 维修工及超级管理员
Mapper层:
@Select("select sur.user_id from sys_user_role sur left join sys_role sr on sur.role_id = sr.role_id where sr.role_name = #{roleName}")
List<Long> selectUserIdByRoleName(String roleName);
定时任务
在zzyl-nursing-platform中新增定时任务类,启动数据过滤
package com.zzyl.nursing.task;import com.zzyl.nursing.service.IAlertRuleService;
import lombok.extern.slf4j.Slf4j;
import org.springframework.beans.factory.annotation.Autowired;
import org.springframework.scheduling.annotation.Scheduled;
import org.springframework.stereotype.Component;@Component
@Slf4j
public class AlertTask {@Autowiredprivate IAlertRuleService alertRuleService;public void deviceDataAlertFilter() {alertRuleService.alertFilter();}
}
如果是若依项目,需要在后台管理系统中创建定时任务
核心过滤逻辑
Service层的核心过滤逻辑:
@Autowired
private SysUserRoleMapper userRoleMapper;@Autowired
private DeviceMapper deviceMapper;@Autowired
private IAlertDataService alertDataService;@Value("${alert.deviceMaintainerRole}")
private String deviceMaintainerRole;@Value("${alert.managerRole}")
private String managerRole;@Autowired
private RedisTemplate<String, String> redisTemplate;/*** 报警过滤*/
@Override
public void alertFilter() {// 查询所有规则,遍历规则long count = count(Wrappers.<AlertRule>lambdaQuery().eq(AlertRule::getStatus, 1));if (count <= 0) {return;}// 查询所有上报的数据List<Object> values = redisTemplate.opsForHash().values(CacheConstants.IOT_DEVICE_LAST_DATA);if (CollUtil.isEmpty(values)) {return;}// 解析上报的数据List<DeviceData> deviceDatas = new ArrayList<>();values.forEach(v -> deviceDatas.addAll(JSONUtil.toList(v.toString(), DeviceData.class)));// 遍历报警数据,逐条处理deviceDatas.forEach(d -> alertFilter(d));
}/*** 逐条过滤报警数据** @param deviceData 设备数据*/
private void alertFilter(DeviceData deviceData) {// 判断当前上报的数据是否超过了1分钟LocalDateTime alarmTime = deviceData.getAlarmTime();long between = LocalDateTimeUtil.between(alarmTime, LocalDateTime.now(), ChronoUnit.SECONDS);if (between > 60) {return;}// 查询所有的该产品规则和该物模型的规则List<AlertRule> allRules = list(Wrappers.<AlertRule>lambdaQuery().eq(AlertRule::getProductKey, deviceData.getProductKey()).eq(AlertRule::getIotId, "-1").eq(AlertRule::getFunctionId, deviceData.getFunctionId()).eq(AlertRule::getStatus, 1));List<AlertRule> iotIdRules = list(Wrappers.<AlertRule>lambdaQuery().eq(AlertRule::getProductKey, deviceData.getProductKey()).eq(AlertRule::getIotId, deviceData.getIotId()).eq(AlertRule::getFunctionId, deviceData.getFunctionId()).eq(AlertRule::getStatus, 1));// 合并Collection<AlertRule> allArertRules = CollUtil.addAll(allRules, iotIdRules);// 如果为空,则中断if (CollUtil.isEmpty(allArertRules)) {return;}// 按照过滤规则和上报的数据进行匹配allArertRules.forEach(alertRule -> deviceDataAlarmHandler(alertRule, deviceData));}/*** 过滤数据是否触发报警规则** @param rule* @param deviceData*/
private void deviceDataAlarmHandler(AlertRule rule, DeviceData deviceData) {// 判断上报时间是否在规则的生效时段内 00:00:00~23:59:59String[] split = rule.getAlertEffectivePeriod().split("~");LocalTime startTime = LocalTime.parse(split[0]);LocalTime endTime = LocalTime.parse(split[1]);// 获取上报时间LocalTime time = LocalDateTimeUtil.of(deviceData.getAlarmTime()).toLocalTime();// 不在上报时间内,则结束请求if (time.isBefore(startTime) || time.isAfter(endTime)) {return;}// 获取IOTIDString iotId = deviceData.getIotId();// 统计次数的keyString aggCountKey = CacheConstants.ALERT_TRIGGER_COUNT_PREFIX + iotId + ":" + deviceData.getFunctionId() + ":" + rule.getId();// 数据对比,上报的数据与规则中的阈值进行对比// 两个参数x,y(参数有顺序要求,左边是上报的数据,后边是规则的数据)  x==y 返回0  x>y 返回大于0  x<y 返回小于0的数值int compare = NumberUtil.compare(Double.valueOf(deviceData.getDataValue()), rule.getValue());if ((rule.getOperator().equals(">=") && compare >= 0) || (rule.getOperator().equals("<") && compare < 0)) {log.info("当前上报的数据符合规则异常");} else {// 正常的数据redisTemplate.delete(aggCountKey);return;}// 异常的数据会走到这里// 判断是否在沉默周期内String silentKey = CacheConstants.ALERT_SILENT_PREFIX + iotId + ":" + deviceData.getFunctionId() + ":" + rule.getId();String silentData = redisTemplate.opsForValue().get(silentKey);if (StringUtils.isNotEmpty(silentData)) {return;}// 持续周期的逻辑String aggData = redisTemplate.opsForValue().get(aggCountKey);int count = StringUtils.isEmpty(aggData) ? 1 : Integer.parseInt(aggData) + 1;// 如果count与持续周期的值相等,则触发报警if (ObjectUtil.notEqual(count, rule.getDuration())) {// 不相等redisTemplate.opsForValue().set(aggCountKey, count + "");return;}// 删除redis的报警数据redisTemplate.delete(aggCountKey);// 存储数据到沉默周期,设置一个过期时间,规则中的沉默周期redisTemplate.opsForValue().set(silentKey, "1", rule.getAlertSilentPeriod(), TimeUnit.MINUTES);// 报警数据,需要找到对应的人List<Long> userIds = new ArrayList<>();if (rule.getAlertDataType().equals(0)) {// 老人异常数据if (deviceData.getLocationType().equals(0)) {// 说明是报警手表,直接可以找到老人的id,通过老人id,找到对应的护理员userIds = deviceMapper.selectNursingIdsByIotIdWithElder(iotId);} else if (deviceData.getLocationType().equals(1) && deviceData.getPhysicalLocationType().equals(2)) {// 说明是床位设备,可以通过床位id找到老人,通过老人id,找到对应的护理员userIds = deviceMapper.selectNursingIdsByIotIdWithBed(iotId);}} else {// 设备异常数据,找维修工,或者是行政人员userIds = userRoleMapper.selectUserIdByRoleName(deviceMaintainerRole);}// 不论是哪种情况,都要通知超级管理员List<Long> managerIds = userRoleMapper.selectUserIdByRoleName(managerRole);Collection<Long> allUserIds = CollUtil.addAll(userIds, managerIds);// 去重allUserIds = CollUtil.distinct(allUserIds);// 保存报警数据insertAlertData(allUserIds, rule, deviceData);
}/*** 保存报警数据** @param allUserIds* @param rule* @param deviceData*/
private void insertAlertData(Collection<Long> allUserIds, AlertRule rule, DeviceData deviceData) {// 对象拷贝AlertData alertData = BeanUtil.toBean(deviceData, AlertData.class);alertData.setAlertRuleId(rule.getId());// 心率<60,持续3个周期就报警String alertReason = CharSequenceUtil.format("{}{}{},持续{}个周期就报警", rule.getFunctionName(), rule.getOperator(), rule.getValue(), rule.getDuration());alertData.setAlertReason(alertReason);alertData.setStatus(0);alertData.setType(rule.getAlertDataType());// 遍历allUserIdsList<AlertData> list = allUserIds.stream().map(userId -> {AlertData dbAlertData = BeanUtil.toBean(alertData, AlertData.class);dbAlertData.setUserId(userId);dbAlertData.setId(null);return dbAlertData;}).collect(Collectors.toList());// 批量保存alertDataService.saveBatch(list);}
上述代码中多次用到了redis,并且定义了常量来表示redis的key,需要在CacheConstants新增常量,如下:
/*** 报警规则连续触发次数,缓存前缀*/
public static final String ALERT_TRIGGER_COUNT_PREFIX = "iot:alert_trigger_count:";
/*** 报警规则沉默周期,缓存前缀*/
public static final String ALERT_SILENT_PREFIX = "iot:alert_silent:";
上述代码中,对于超级管理员和维修工是通过配置的方式读取的名字,需要在application-dev.yml文件中添加数据
alert:deviceMaintainerRole: 维修工managerRole: 超级管理员
写完代码一定要测试一下哦,如果测试没用通过,建议用idea的调试功能追踪问题。