快速上手大模型:深度学习5(实践:过、欠拟合)
目录
1 调用库
2 生成数据集
3 格式转换
4 检查数据是否正确生成及转换
5 模型训练及测试
6 拟合情况
6.1正常拟合
6.2 欠拟合
6.3 过拟合
6.3.1 权重衰退
6.3.2 Dropout
过拟合、欠拟合理论部分详见2https://blog.csdn.net/weixin_45728280/article/details/153703200?spm=1011.2415.3001.5331
1 调用库
import math
import numpy as np
import torch
from torch import nn      #PyTorch神经网络模块
from d2l import torch as d2l #课程的PyTorch工具模块
2 生成数据集
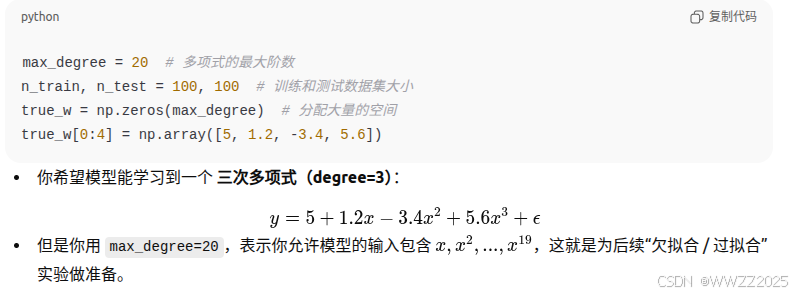
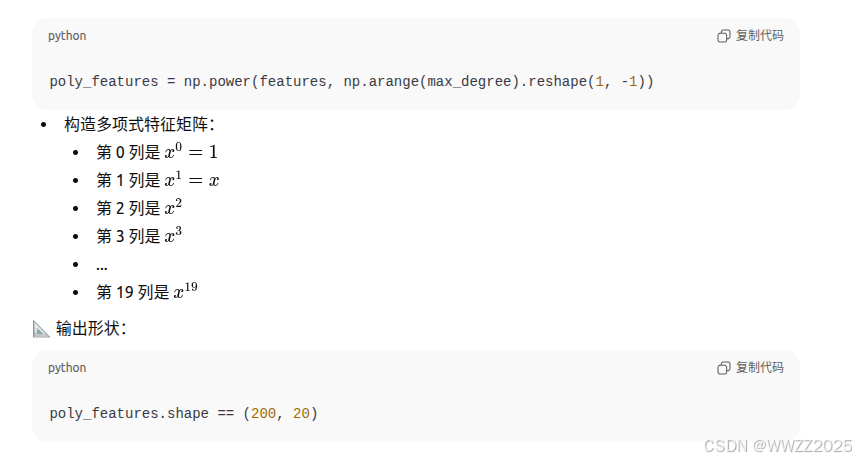
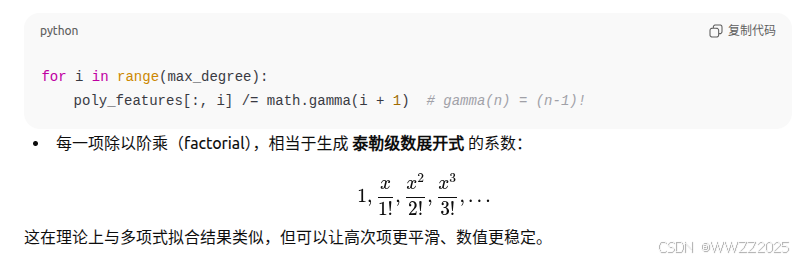
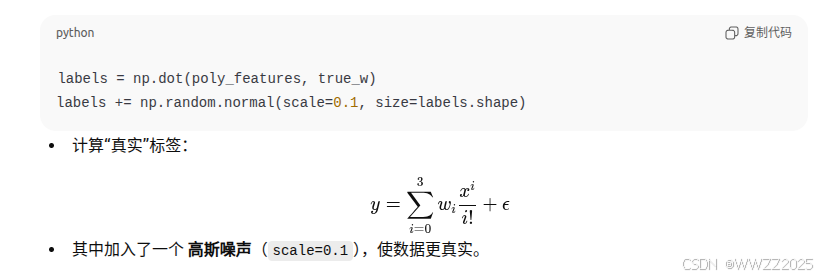
max_degree = 20  # 多项式的最大阶数
n_train, n_test = 100, 100  # 训练和测试数据集大小
true_w = np.zeros(max_degree)  # 分配大量的空间
true_w[0:4] = np.array([5, 1.2, -3.4, 5.6])features = np.random.normal(size=(n_train + n_test, 1))
np.random.shuffle(features)#生成200个随机输入x服从标准正态分布,打乱顺序防止训练集和测试集有序
poly_features = np.power(features, np.arange(max_degree).reshape(1, -1))
for i in range(max_degree):poly_features[:, i] /= math.gamma(i + 1)  # gamma(n)=(n-1)!
# labels的维度:(n_train+n_test,)
labels = np.dot(poly_features, true_w)
labels += np.random.normal(scale=0.1, size=labels.shape)
3 格式转换
# NumPy ndarray转换为tensor
true_w, features, poly_features, labels = [torch.tensor(x, dtype=torch.float32) for x in [true_w, features, poly_features, labels]]
把 NumPy的数组(
ndarray)批量转换为PyTorch的Tensor类型。
4 检查数据是否正确生成及转换
features[:2], poly_features[:2, :], labels[:2](1)features:原始输入特征,代码中为从索引0取到索引1;
(2)ploy_features:
,代码中为取0、1行所有列;
(3)labels:真实标签y,代码中为从索引0取到索引1。
5 模型训练及测试
def evaluate_loss(net, data_iter, loss): #@save"""评估给定数据集上模型的损失"""metric = d2l.Accumulator(2) # 损失的总和,样本数量for X, y in data_iter:out = net(X)y = y.reshape(out.shape) #将y的形状与out一样,便于后续运算l = loss(out, y)metric.add(l.sum(), l.numel())return metric[0] / metric[1](1)data_inter:数据迭代器
(2)metric.add:分别包含损失值之和metric[0],样本数metric[1]。
定义训练函数:
def train(train_features, test_features, train_labels, test_labels,num_epochs=400):loss = nn.MSELoss(reduction='none')input_shape = train_features.shape[-1]# 不设置偏置,因为我们已经在多项式中实现了它net = nn.Sequential(nn.Linear(input_shape, 1, bias=False))batch_size = min(10, train_labels.shape[0]) #取10和训练标签的小值做为批量大小train_iter = d2l.load_array((train_features, train_labels.reshape(-1,1)),batch_size)test_iter = d2l.load_array((test_features, test_labels.reshape(-1,1)),batch_size, is_train=False)trainer = torch.optim.SGD(net.parameters(), lr=0.01)animator = d2l.Animator(xlabel='epoch', ylabel='loss', yscale='log',xlim=[1, num_epochs], ylim=[1e-3, 1e2],legend=['train', 'test'])for epoch in range(num_epochs):d2l.train_epoch_ch3(net, train_iter, loss, trainer)if epoch == 0 or (epoch + 1) % 20 == 0:animator.add(epoch + 1, (evaluate_loss(net, train_iter, loss),evaluate_loss(net, test_iter, loss)))print('weight:', net[0].weight.data.numpy())(1)MSELoss:使用MSE损失函数,详见5.4.2https://blog.csdn.net/weixin_45728280/article/details/153778299?spm=1011.2415.3001.5331
(2)nn.Linear(input_shape, 1, bias=False):构造线性模型,(输入X的维度,输出只有1个,无偏置)
(3)is_train=False:打乱原数据顺序关
(4)torch.optim.SGD:随机梯度优化器
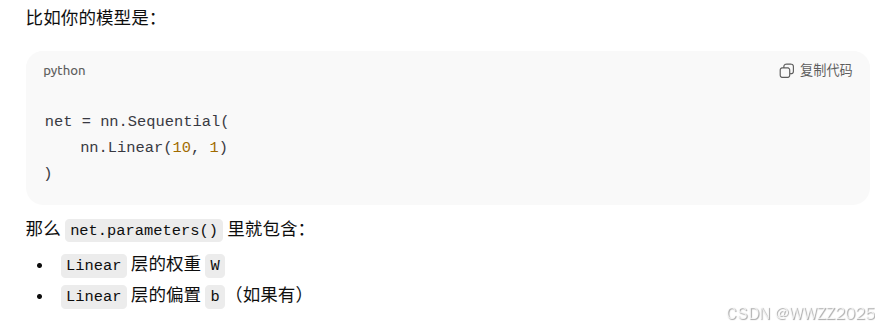
(5)net.parameters():包含所有需要优化的参数
(6)lr:学习率
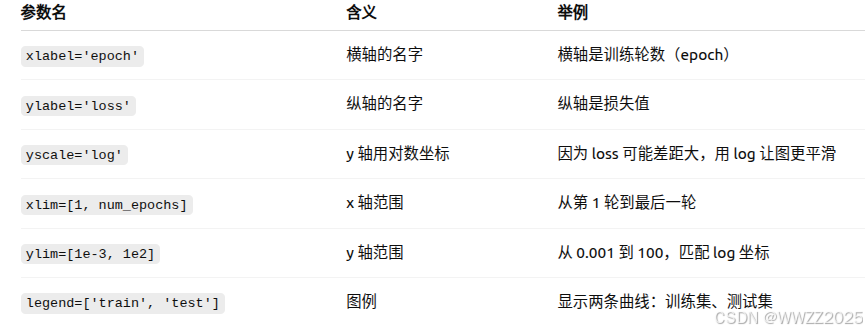
(7)animator = d2l.Animator:训练过程中动态地更新并绘制曲线图
(8)d2l.train_epoch_ch3
遍历数据集,对数据集进行前向计算,计算损失,反向传播,更新权重。
(9)epoch == 0 or (epoch + 1) % 20 == 0
第一个epoch或每隔20个epoch计算一次损失。
6 拟合情况
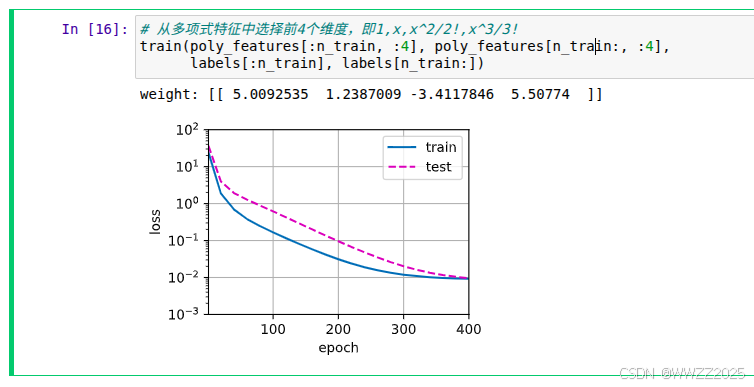
6.1正常拟合
# 从多项式特征中选择前4个维度,即1,x,x^2/2!,x^3/3!
train(poly_features[:n_train, :4], poly_features[n_train:, :4],labels[:n_train], labels[n_train:])
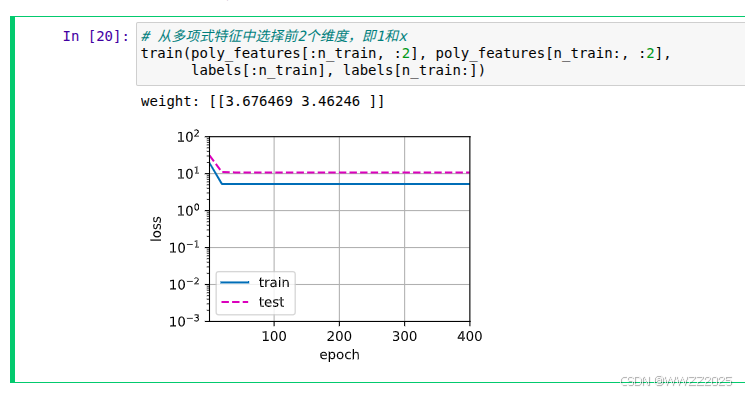
6.2 欠拟合
# 从多项式特征中选择前2个维度,即1和x
train(poly_features[:n_train, :2], poly_features[n_train:, :2],labels[:n_train], labels[n_train:])
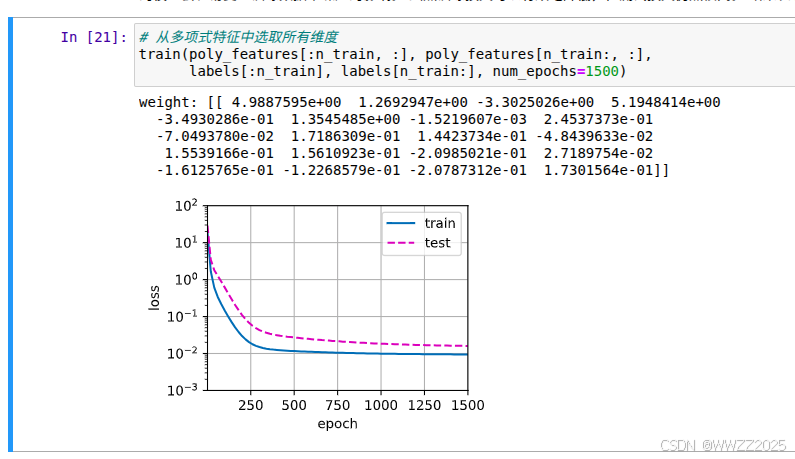
6.3 过拟合
# 从多项式特征中选取所有维度
train(poly_features[:n_train, :], poly_features[n_train:, :],labels[:n_train], labels[n_train:], num_epochs=1500)
6.3.1 权重衰退
防止归拟合的方法,理论详见3.5.1https://blog.csdn.net/weixin_45728280/article/details/153703200?spm=1011.2415.3001.5331
代码示例:
%matplotlib inline
import torch
from torch import nn
from d2l import torch as d2l
n_train, n_test, num_inputs, batch_size = 20, 100, 200, 5 true_w, true_b = torch.ones((num_inputs, 1)) * 0.01, 0.05 #生成训练数据 train_data = d2l.synthetic_data(true_w, true_b, n_train) #生成数据加载器 train_iter = d2l.load_array(train_data, batch_size) #生成测试数据与加载器 test_data = d2l.synthetic_data(true_w, true_b, n_test) test_iter = d2l.load_array(test_data, batch_size, is_train=False)(1)输入200维,输出1维,高维小样本问题用以演示过拟合;
(2)true_w, true_b
真实权重w为0.01,偏置为0.05
(3)is_train=False
不打乱数据
#随机初始化模型参数
def init_params():w = torch.normal(0, 1, size=(num_inputs, 1), requires_grad=True)b = torch.zeros(1, requires_grad=True)return [w, b]
(1)torch.normal(0, 1, size=(num_inputs, 1))
从标准正态中采样,均值0、标准差1,生成大小为(num_inputs, 1)的张量
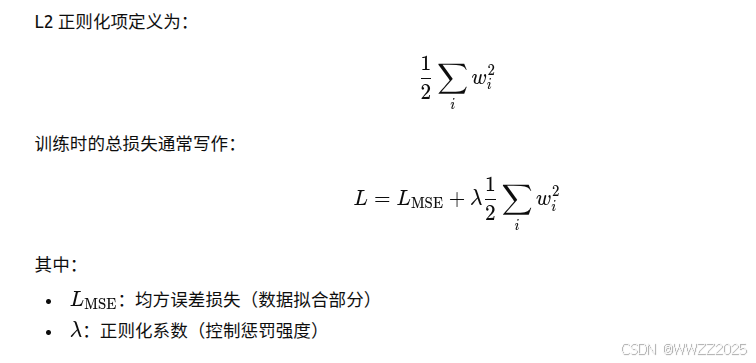
#定义L2正则化惩罚
def l2_penalty(w):return torch.sum(w.pow(2)) / 2
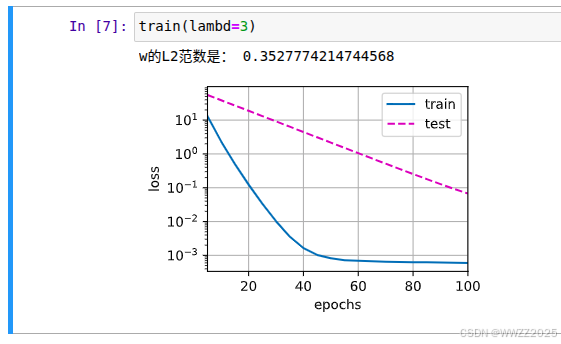
#定义训练代码实现
def train(lambd):w, b = init_params()net, loss = lambda X: d2l.linreg(X, w, b), d2l.squared_lossnum_epochs, lr = 100, 0.003animator = d2l.Animator(xlabel='epochs', ylabel='loss', yscale='log',xlim=[5, num_epochs], legend=['train', 'test'])for epoch in range(num_epochs):for X, y in train_iter:# 增加了L2范数惩罚项,# 广播机制使l2_penalty(w)成为一个长度为batch_size的向量l = loss(net(X), y) + lambd * l2_penalty(w)l.sum().backward()d2l.sgd([w, b], lr, batch_size)if (epoch + 1) % 5 == 0:animator.add(epoch + 1, (d2l.evaluate_loss(net, train_iter, loss),d2l.evaluate_loss(net, test_iter, loss)))print('w的L2范数是:', torch.norm(w).item())
(1)d2l.squared_loss
均方差损失函数MSE
(2)l.sum().backward()
对损失求梯度
(3)d2l.sgd()
使用随机梯度下降更新参数
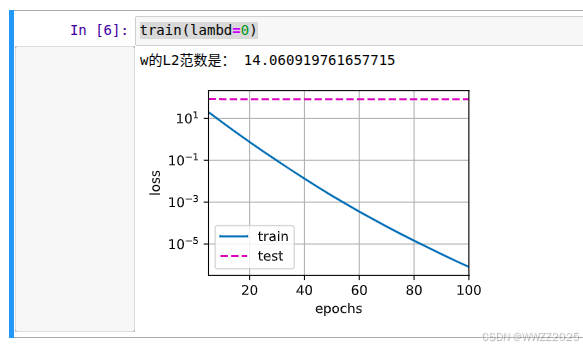
#忽视正则化直接训练
train(lambd=0)
#使用权重衰减
train(lambd=3)
简介实现
def train_concise(wd):net = nn.Sequential(nn.Linear(num_inputs, 1))for param in net.parameters():param.data.normal_()loss = nn.MSELoss(reduction='none')num_epochs, lr = 100, 0.003# 偏置参数没有衰减trainer = torch.optim.SGD([{"params":net[0].weight,'weight_decay': wd},{"params":net[0].bias}], lr=lr)animator = d2l.Animator(xlabel='epochs', ylabel='loss', yscale='log',xlim=[5, num_epochs], legend=['train', 'test'])for epoch in range(num_epochs):for X, y in train_iter:trainer.zero_grad()l = loss(net(X), y)l.mean().backward()trainer.step()if (epoch + 1) % 5 == 0:animator.add(epoch + 1,(d2l.evaluate_loss(net, train_iter, loss),d2l.evaluate_loss(net, test_iter, loss)))print('w的L2范数:', net[0].weight.norm().item())train_concise(0)train_concise(3)
6.3.2 Dropout
理论部分详见3.6https://blog.csdn.net/weixin_45728280/article/details/153703200?sharetype=blogdetail&sharerId=153703200&sharerefer=PC&sharesource=weixin_45728280&spm=1011.2480.3001.8118
代码:
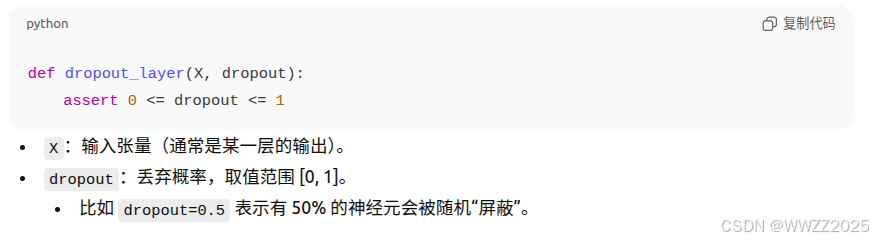
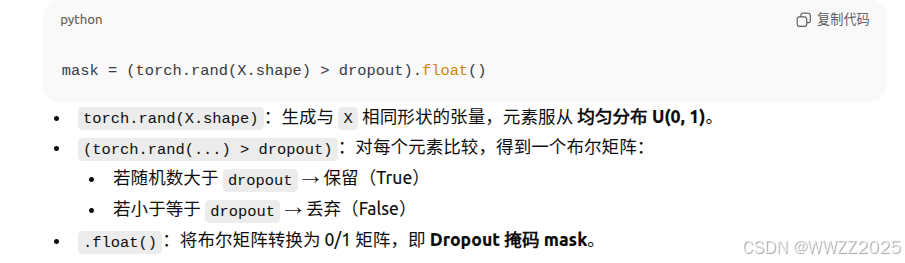
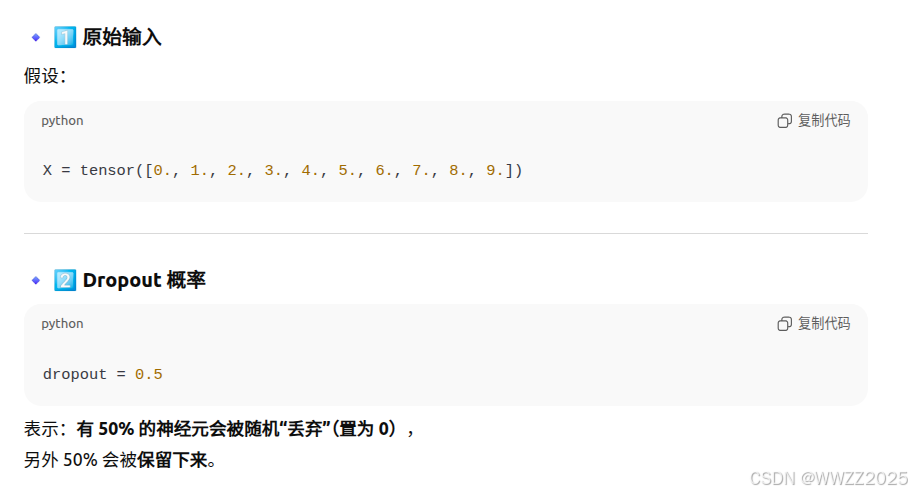
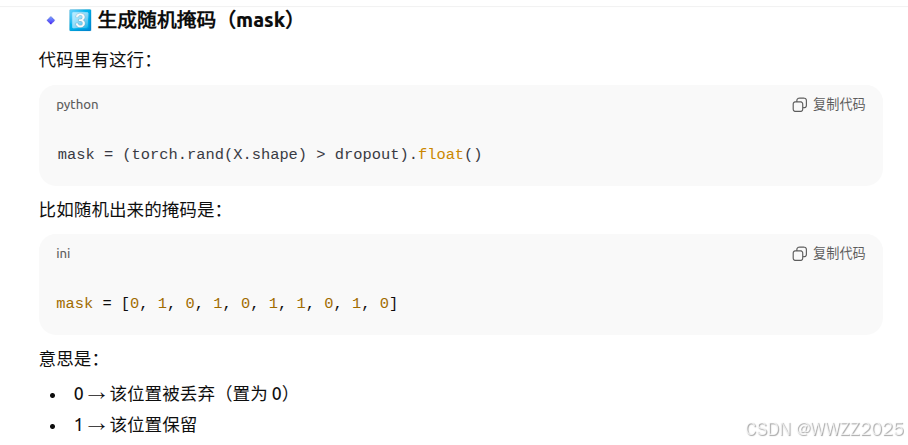
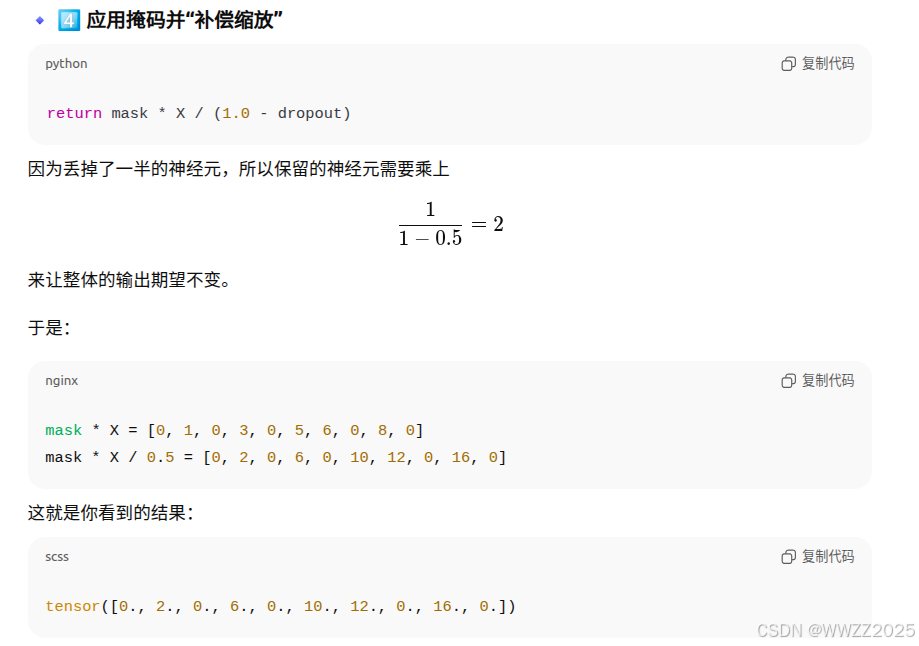
import torch
from torch import nn
from d2l import torch as d2l#定义函数
def dropout_layer(X, dropout):assert 0 <= dropout <= 1# 在本情况中,所有元素都被丢弃if dropout == 1:return torch.zeros_like(X)# 在本情况中,所有元素都被保留if dropout == 0:return X#生成随机掩码mask = (torch.rand(X.shape) > dropout).float()return mask * X / (1.0 - dropout)
(1)定义函数
(2)生成随机掩码mask
(3)应用掩码做缩放修正
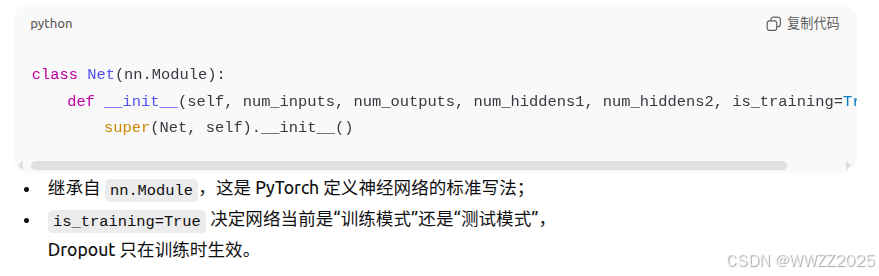
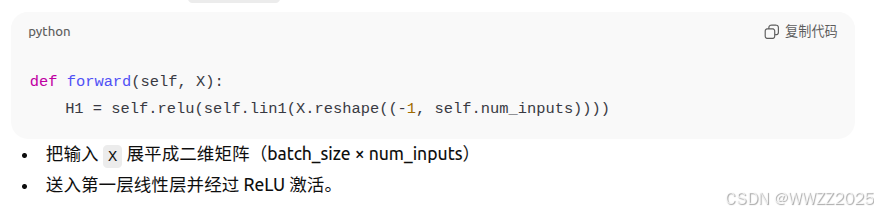
#定义模型参数
num_inputs, num_outputs, num_hiddens1, num_hiddens2 = 784, 10, 256, 256
dropout1, dropout2 = 0.2, 0.5class Net(nn.Module):def __init__(self, num_inputs, num_outputs, num_hiddens1, num_hiddens2,is_training = True):super(Net, self).__init__()self.num_inputs = num_inputsself.training = is_training#定义各层self.lin1 = nn.Linear(num_inputs, num_hiddens1)self.lin2 = nn.Linear(num_hiddens1, num_hiddens2)self.lin3 = nn.Linear(num_hiddens2, num_outputs)self.relu = nn.ReLU()#前向传播def forward(self, X):H1 = self.relu(self.lin1(X.reshape((-1, self.num_inputs))))# 只有在训练模型时才使用dropoutif self.training == True:# 在第一个全连接层之后添加一个dropout层H1 = dropout_layer(H1, dropout1)H2 = self.relu(self.lin2(H1))if self.training == True:# 在第二个全连接层之后添加一个dropout层H2 = dropout_layer(H2, dropout2)out = self.lin3(H2)return outnet = Net(num_inputs, num_outputs, num_hiddens1, num_hiddens2)(1)class Net(nn.Module)
(2)前向传播
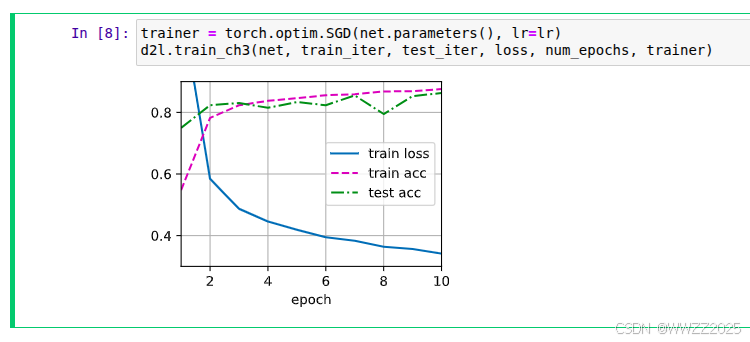
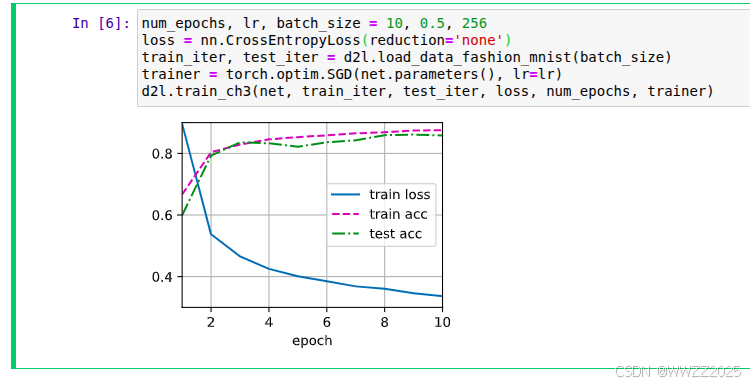
#训练与测试
num_epochs, lr, batch_size = 10, 0.5, 256
loss = nn.CrossEntropyLoss(reduction='none')
train_iter, test_iter = d2l.load_data_fashion_mnist(batch_size)
trainer = torch.optim.SGD(net.parameters(), lr=lr)
#调用训练函数
d2l.train_ch3(net, train_iter, test_iter, loss, num_epochs, trainer)
简洁实现:
net = nn.Sequential(nn.Flatten(),nn.Linear(784, 256),nn.ReLU(),# 在第一个全连接层之后添加一个dropout层nn.Dropout(dropout1),nn.Linear(256, 256),nn.ReLU(),# 在第二个全连接层之后添加一个dropout层nn.Dropout(dropout2),nn.Linear(256, 10))def init_weights(m):if type(m) == nn.Linear:nn.init.normal_(m.weight, std=0.01)net.apply(init_weights);trainer = torch.optim.SGD(net.parameters(), lr=lr)
d2l.train_ch3(net, train_iter, test_iter, loss, num_epochs, trainer)