Linux驱动第一期1-10-驱动基础总结
1.环境的安装
FTP-FileZilla软件
windows与ubuntu通信
窗口终端或者SSH MobaXterm
USB查看rk3568
adb
windows与rk3568通信
vscode
在linux下进行c文件写
交叉编译器
自己装了一个 /opt/atk-dlrk356x-toolchain/bin/aarch64-buildroot-linux-gnu-gcc -v
RKdev工具
烧写rk3568的镜像程序
2.GIT的使用
忘记了,哈哈哈,下次再学
重点:
编译驱动方法:
1.驱动编译成内核 : 在kernel/devices/下面各个设备驱动下编译
2.驱动编译成内核模块ko
绝对路径使用交叉编译器
/opt/atk-dlrk356x-toolchain/bin/aarch64-buildroot-linux-gnu-gcc -vLinux驱动的运行方式:
1.运行驱动编译进内核
Linux系统启动后会自动运行程序
2.运行驱动编译成模块
在Linux系统启动以后使用“insmod”命令加载驱动模块
3.实验1:驱动程序helloworld
驱动编译成内核模块 运行驱动编译成模块
#include <linux/module.h>
#include <linux/init.h>static int helloworld_init(void)
{printk("hello world\n");return 0;
}static void helloworld_exit(void)
{printk("goodbye world\n");
}module_init(helloworld_init);
module_exit(helloworld_exit);MODULE_LICENSE("GPL");
MODULE_AUTHOR("qiuiuiu");
MODULE_VERSION("V1.0");
MODULE_DESCRIPTION("A simple hello world module")
ARCH := arm64
CROSS_COMPILE := aarch64-rockchip1031-linux-gnu- #这个环境变量要在外面声明
export ARCH CROSS_COMPILE #声明路径
KDIR := /home/alientek/rk3568_linux5.10_sdk/kernel #内核的路径
PWD := $(shell pwd)
obj-m += helloworld.o #名字不要打错
all:make -C $(KDIR) M=$(PWD) modules #注意前面是个制表符TABclean:make -C $(KDIR) M=$(PWD) clean #注意前面是个制表符TAB驱动编译成内核模块
有了Makefile以后,输入“make”命令就可以编译helloworld驱动模块,helloworld.ko
运行驱动编译成模块
insmod helloworld.ko”命令可以加载驱动
3.实验2:驱动模块传参
驱动编译成内核模块 运行驱动编译成模块
#include <linux/init.h>
#include <linux/module.h>
static int number;//定义int类型变量number
static char *name;//定义char类型变量name
static int para[8];//定义int类型的数组
static char str1[10];//定义char类型字符串str1
static int n_para;//定义int类型的用来记录module_param_array函数传递数组元素个数的变量n_para
module_param(number, int, S_IRUGO);//传递int类型的参数number,S_IRUGO表示权限为可读
module_param(name, charp, S_IRUGO);//传递char类型变量name
module_param_array(para , int , &n_para , S_IRUGO);//传递int类型的数组变量para
module_param_string(str, str1 ,sizeof(str1), S_IRUGO);//传递字符串类型的变量str1
static int __init parameter_init(void)//驱动入口函数
{static int i;printk(KERN_EMERG "%d\n",number);printk(KERN_EMERG "%s\n",name);                                                                                                                                                          for(i = 0; i < n_para; i++){printk(KERN_EMERG "para[%d] : %d \n", i, para[i]);}printk(KERN_EMERG "%s\n",str1);return 0;
}
static void __exit parameter_exit(void)//驱动出口函数
{printk(KERN_EMERG "parameter_exit\n");
}
module_init(parameter_init);//注册入口函数
module_exit(parameter_exit);//注册出口函数
MODULE_LICENSE("GPL v2");//同意GPL开源协议
MODULE_AUTHOR("topeet"); //作者信息
ARCH := arm64
CROSS_COMPILE := aarch64-rockchip1031-linux-gnu-
export ARCH CROSS_COMPILE
KDIR := /home/alientek/rk3568_linux5.10_sdk/kernel
PWD ?= $(shell pwd)
obj-m += a.o
obj-m += b.o
all:make -C $(KDIR) M=$(PWD) modules
clean:make -C $(KDIR) M=$(PWD) clean
驱动编译成内核模块
有了Makefile以后,输入“make”命令就可以编译helloworld驱动模块,helloworld.ko
运行驱动编译成模块
insmod parameter.ko number=100 name="topeet" para=0,1,2,3,4,5,6,7 str="itop"
命令可以加载驱动rmmod parameter.ko
驱动的卸载
4.实验3:内核模块符号
驱动编译成内核模块 运行驱动编译成模块
编写Linux下的内核模块符号导出实例代码,总共有两个驱动程序,
第一个驱动文件名为mathmodule.c,用来定义参数num和函数add(a,b),
第二个驱动文件名为hello.c,会引用mathmodule.c驱动程序中的参数num和数学函数add(a,b),并将相应的参数值和函数返回值打印到串口终端上
mathmodule.c代码
#include <linux/init.h>
#include <linux/module.h>
int num = 10;//定义参数num
EXPORT_SYMBOL(num);//导出参数numint add(int a, int b)//定义数学函数add(),用来实现加法
{return a + b;
}
EXPORT_SYMBOL(add);//导出数学函数add()static int __init math_init(void)//驱动入口函数
{printk("math_moudle init\n");return 0;
}static void __exit math_exit(void)//驱动出口函数
{printk("math_module exit\n");
}module_init(math_init);//注册入口函数
module_exit(math_exit);//注册出口函数MODULE_LICENSE("GPL");//同意GPL开源协议
MODULE_AUTHOR("topeet");//作者信息
hello.c代码
#include <linux/init.h>
#include <linux/module.h>
extern int num;//导入int类型变量num
extern int add(int a, int b);//导入函数add
static int __init hello_init(void)//驱动入口函数
{static int sum;printk("num = %d\n", num);//打印num值sum = add(3, 4);//使用add函数进行3+4的运算                                                                                                                                                                          printk("sum = %d\n", sum);//打印add函数的运算值return 0;
}static void __exit hello_exit(void)//驱动出口函数
{printk("Goodbye hello module\n");
}module_init(hello_init);//注册入口函数
module_exit(hello_exit);//注册出口函数MODULE_LICENSE("GPL");//同意GPL开源协议
MODULE_AUTHOR("topeet");//作者信息
mathmodule.c和hello.c的同一目录下创建Makefile文件
export ARCH=arm64#设置平台架构
export CROSS_COMPILE=aarch64-linux-gnu-#交叉编译器前缀
obj-m := mathmodule.o
obj-m += hello.oKDIR :=/home/topeet/Linux/linux_sdk/kernel    #这里是你的内核目录
PWD ?= $(shell pwd)
all:make -C $(KDIR) M=$(PWD) modules    #make操作
clean:make -C $(KDIR) M=$(PWD) clean    #make clean操作
驱动编译成内核模块
编译完后会生成hello.ko和mathmodule.ko目标文件
运行驱动编译成模块
由于 hello.ko依赖于mathmodule.ko,所以mathmodule.ko需要先加载,分别使用以下命令进行模块的加载(加载顺序不能变)
insmod mathmodule.koinsmod hello.ko由于hello.ko文件使用了mathmodule.ko导出的符号,所以要先卸载hello.ko,卸载完成之后再卸载mathmodule.ko。
5.实验4:menuconfig实验
驱动编译成内核 运行驱动编译进内核
make ARCH=arm64 menuconfig三个文件 .c Makefile Kconfig
输入“cd drivers/char”进入到 drivers/char 目录下,然后输入“mkdir hello”建立hello文件夹,并输入“cd hello”进入hello文件夹
hello.c
#include <linux/module.h>
#include <linux/kernel.h>static int __init helloworld_init(void)    //驱动入口函数
{printk(KERN_EMERG "helloworld_init\r\n");//注意:内核打印用printk而不是printfreturn 0;
}static void __exit helloworld_exit(void)    //驱动出口函数
{printk(KERN_EMERG "helloworld_exit\r\n");
}module_init(helloworld_init);    //注册入口函数
module_exit(helloworld_exit);    //注册出口函数
MODULE_LICENSE("GPL v2");    //同意GPL开源协议
MODULE_AUTHOR("topeet");    //作者信息
输入“touch Kconfig”命令创建Kconfig文件
Kconfig
config HELLO
tristate "hello world"
helphello hello
touch Makefile”命令创建Makefile文件
Makefile
obj-$(CONFIG_HELLO)+=helloworld.o
修改上一级目录的Kconfig文件和Makefile文件,也就是driver/char目录
Kconfig
obj-y += hello/Makefile
source “drivers/char/hello/Kconfig”
打开menuconfig图形化配置工具, 用 * 来表示.驱动编译进Linux内核,保存到.config文件
编译源码
驱动编译成内核 会生成对应的.o文件
make savedefconfig
cp defconfig arch/arm64/configs/rockchip_linux_defconfig
cd ../
./build.sh kernel
运行驱动编译进内核
将编译好的内核镜像烧写到开发板上后,在开发板系统启动的时候也可以成功看到加载helloworld驱动
6.编译进内核的驱动系统是如何运行的?
驱动编译成内核 运行驱动编译进内核
驱动编译成内核 KBUILD_CFLAGS_KERNEL
module_init的具体内容由MODULE宏定义来决定,MODULE宏定义在内核源码的顶层Makefile中,
KBUILD_CFLAGS_KERNEL和KBUILD_CFLAGS_MODULE两个宏
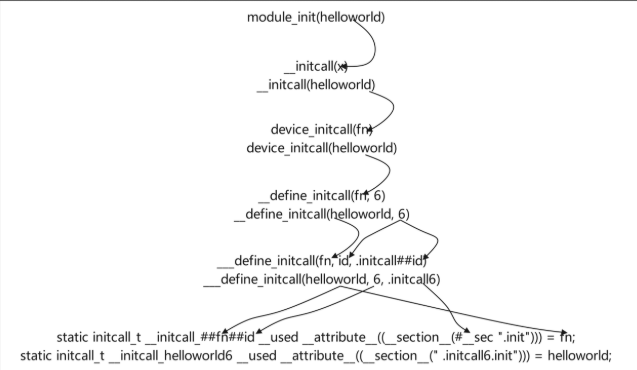
#ifndef MODULE
#define module_init(x)  __initcall(x);
#define module_exit(x)  __exitcall(x);#else /* MODULE */..........
#define module_init(initfn)                 \static inline initcall_t __maybe_unused __inittest(void)        \{ return initfn; }                  \int init_module(void) __copy(initfn) __attribute__((alias(#initfn)));
..........#endif
KBUILD_CFLAGS_KERNEL没有定义就选择了上面那个
#define module_init(x)  __initcall(x);
#define module_exit(x)  __exitcall(x);
宏定义展开到最后的initcall_t是一个函数指针,它的原型如下所示:
typedef int (*initcall_t)(void);
这个函数指针会被放置在.initcall6.init段,
“include/linux/module.h”文件
“include/linux/init.h”文件
include/linux/init.h 文件include/asm-generic/vmlinux.lds.h 链接脚本(linker script)
do_initcalls函数,该函数定义在内核源码的init/main.c目录 启动执行
内核源码中除了module_init,还有其他的宏定义接口用来完成初始化模块并注册模块的功能,他们的原型都是define_initcall,只是相应的优先级不同
#define pure_initcall(fn)		__define_initcall(fn, 0)#define core_initcall(fn)		__define_initcall(fn, 1)
#define core_initcall_sync(fn)		__define_initcall(fn, 1s)
#define postcore_initcall(fn)		__define_initcall(fn, 2)
#define postcore_initcall_sync(fn)	__define_initcall(fn, 2s)
#define arch_initcall(fn)		__define_initcall(fn, 3)
#define arch_initcall_sync(fn)		__define_initcall(fn, 3s)
#define subsys_initcall(fn)		__define_initcall(fn, 4)
#define subsys_initcall_sync(fn)	__define_initcall(fn, 4s)
#define fs_initcall(fn)			__define_initcall(fn, 5)
#define fs_initcall_sync(fn)		__define_initcall(fn, 5s)
#define rootfs_initcall(fn)		__define_initcall(fn, rootfs)
#define device_initcall(fn)		__define_initcall(fn, 6)
#define device_initcall_sync(fn)	__define_initcall(fn, 6s)
#define late_initcall(fn)		__define_initcall(fn, 7)
#define late_initcall_sync(fn)		__define_initcall(fn, 7s)
include/asm-generic/vmlinux.lds.h 链接脚本(linker script) 定义初始化调用函数的布局和顺序
#define INIT_CALLS_LEVEL(level)						\__initcall##level##_start = .;				\KEEP(*(.initcall##level##.init))			\__initcall##level##s_start = .;				\KEEP(*(.initcall##level##s.init))			\
#define INIT_CALLS							\__initcall_start = .;					\KEEP(*(.initcallearly.init))				\INIT_CALLS_LEVEL(0)					\INIT_CALLS_LEVEL(1)					\INIT_CALLS_LEVEL(2)					\INIT_CALLS_LEVEL(3)					\INIT_CALLS_LEVEL(4)					\INIT_CALLS_LEVEL(5)					\INIT_CALLS_LEVEL(rootfs)				\INIT_CALLS_LEVEL(6)					\INIT_CALLS_LEVEL(7)					\__initcall_end = .;
总结
1.在使用module_init(hello_world)时,hello_world()函数指针会被放置在.initcall6.init段处。
2.内核启动时,会执行do_initcall()函数,该函数根据指针数组initcall_levels[6]找到_initcall6_start,
3.在include/asm-generic/vmlinux.lds.h文件中可以查到_initcall6_start对应.initcall6.init段的起始地址。
4.然后,依次取出该段中的函数指针,并执行这些函数
7.实验5: 让驱动快一点被加载实验
驱动编译成内核 运行驱动编译进内核
四个文件 .c .c Makefile Kconfig
helloworld_a.c代码
#include <linux/module.h>
#include <linux/kernel.h>static int __init helloworld_init(void) //驱动入口函数
{printk(KERN_EMERG "This is helloworld A\r\n");//注意:内核打印用 printk 而不是 printfreturn 0;
}static void __exit helloworld_exit(void) //驱动出口函数
{printk(KERN_EMERG "helloworld_exit\r\n");
}arch_initcall(helloworld_init); //注册入口函数
module_exit(helloworld_exit); //注册出口函数
MODULE_LICENSE("GPL v2"); //同意 GPL 开源协议
MODULE_AUTHOR("topeet"); //作者信息
helloworld_b.c代码
#include <linux/module.h>
#include <linux/kernel.h>static int __init helloworld_init(void) //驱动入口函数
{printk(KERN_EMERG "This is helloworld B\r\n");//注意:内核打印用 printk 而不是 printfreturn 0;
}static void __exit helloworld_exit(void) //驱动出口函数
{printk(KERN_EMERG "helloworld_exit\r\n");
}device_initcall(helloworld_init); //注册入口函数
module_exit(helloworld_exit); //注册出口函数
MODULE_LICENSE("GPL v2"); //同意 GPL 开源协议
MODULE_AUTHOR("topeet"); //作者信息
arch_initcall的优先级为3,device_initcall的优先级为6,所以helloworld_a.c驱动会比helloworld_b.c驱动先加载
输入“touch Kconfig”命令创建Kconfig文件
Kconfig
config HELLO
tristate "hello world"
helphello hello
touch Makefile”命令创建Makefile文件 objs: 这是一个固定的后缀,意思是“...的目标文件列表”
Makefile
obj-$(CONFIG_HELLO)+=helloworld.o
修改上一级目录的Kconfig文件和Makefile文件,也就是driver/char目录
Kconfig
obj-y += hello/Makefile
source “drivers/char/hello/Kconfig”打开menuconfig图形化配置工具, 用 * 来表示.驱动编译进Linux内核,保存到.config文件
编译源码:
驱动编译成内核 会生成对应的.o文件
make savedefconfig
cp defconfig arch/arm64/configs/rockchip_linux_defconfig
cd ../
./build.sh kernel
运行驱动编译进内核
将编译好的内核镜像烧写到开发板上后,
dmesg | grep helloworld
可以看到驱动A的加载时间为内核启动后的0.52秒左右,驱动B的加载时间为内核启动后的1.78秒左右
8.实验6:驱动代码使用Makefile的宏
驱动编译成内核模块ko 运行驱动编译成模块
驱动编译成内核 KBUILD_CFLAGS_MODULE
例如: KBUILD_CFLAGS_MODULE += -DDEBUG表示将-DDEBUG编译选项添加到模块的编译命令中,定义了一个名为DEBUG的宏KBUILD_CFLAGS_MODULE += -DDEBUG=3 和宏#define DDEBUG 3 一样的意思
l两个文件: .c Makefile
define.c代码
#include <linux/module.h>
#include <linux/kernel.h>static int __init helloworld_init(void) //驱动入口函数
{
#ifndef DEBUGprintk("helloworld a!\n");
#elseprintk("helloworld b!\n");
#endifreturn 0;
}static void __exit helloworld_exit(void) //驱动出口函数
{printk(KERN_EMERG "helloworld_exit\r\n");
}module_init(helloworld_init); //注册入口函数
module_exit(helloworld_exit); //注册出口函数
MODULE_LICENSE("GPL v2"); //同意 GPL 开源协议
MODULE_AUTHOR("topeet"); //作者信息
Makefile代码
KBUILD_CFLAGS_MODULE += -DDEBUG
export ARCH=arm64#设置平台架构
export CROSS_COMPILE=aarch64-linux-gnu-#交叉编译器前缀
obj-m +=define.o    #此处要和你的驱动源文件同名
KDIR :=/home/topeet/Linux/linux_sdk/kernel    #这里是你的内核目录
PWD ?= $(shell pwd)
all:make -C $(KDIR) M=$(PWD) modules    #make操作
clean:make -C $(KDIR) M=$(PWD) clean    #make clean操作
驱动编译成内核模块
有了Makefile以后,输入“make”命令,形成define.ko目标文件
运行驱动编译成模块
开发板启动之后,使用以下命令进行驱动模块的加载
insmod define.ko命令可以加载驱动
最后,使用rmmod define.ko命令对该内核进行卸载
9.实验7:finit_module 内核是如何运行ko文件的_insmod
驱动编译成内核模块ko 运行驱动编译成模块
insmod的源码为 busybox-1.34.1/modutils/insmod.c
bb_init_module函数,正是通过该函数加载的内核模块。 该函数定义在busybox1.34.1/modutils/modutils.c文件中
helloworld.c代码 添加了dump_stack()函数,用来在内核中输出当前调用堆栈信息,在这里使用该函数的目的是验证在app中的finit_module系统调用是否生效
#include <linux/module.h>
#include <linux/kernel.h>static int __init helloworld_init(void) //驱动入口函数
{dump_stack();return 0;
}static void __exit helloworld_exit(void) //驱动出口函数
{printk(KERN_EMERG "helloworld_exit\r\n");
}module_init(helloworld_init); //注册入口函数
module_exit(helloworld_exit); //注册出口函数
MODULE_LICENSE("GPL v2"); //同意 GPL 开源协议
MODULE_AUTHOR("topeet"); //作者信息
Makefile 代码
export ARCH=arm64#设置平台架构
export CROSS_COMPILE=aarch64-linux-gnu-#交叉编译器前缀
obj-m += helloworld.o    #此处要和你的驱动源文件同名
KDIR :=/home/topeet/Linux/linux_sdk/kernel    #这里是你的内核目录
PWD ?= $(shell pwd)
all:make -C $(KDIR) M=$(PWD) modules    #make操作
clean:make -C $(KDIR) M=$(PWD) clean    #make clean操作
编写测试 APP 新目录 程序app.c代码 用finit_module系统调用加载模块到内核insmod
#include <stdio.h>
#include <sys/syscall.h>
#include <fcntl.h>
#include <unistd.h>#define finit_module(fd, uargs, flags) syscall(__NR_finit_module, fd, uargs, flags)int main(int argc, char **argv)
{int fd;     // 文件描述符int ret;    // 返回值fd = open(argv[1], O_RDONLY | O_CLOEXEC);    // 打开文件,以只读方式打开并设置O_CLOEXEC标志if (fd < 0) {    // 打开文件失败printf("open error\n");return -1;}ret = finit_module(fd, "", 0);    // 调用finit_module系统调用加载模块return ret;    // 返回加载结果
}
驱动编译成内核模块
有了Makefile以后,输入“make”命令,形成helloworld.ko目标文件
编译应用程序
aarch64-linux-gnu-gcc app.c -o app
运行驱动编译成模块
helloworld.ko驱动文件和app可执行文件,所以需要先将两个要用到的文件拷贝到开发板上
开发板启动之后,使用以下命令加载helloworld.ko驱动
./app helloworld.ko
dump_stack函数会打印调用的一系列函数,这些函数的具体调用已经在进阶第一章讲解过了,这里的重点为红色框中的倒数第二行,调用了finit_module函数加载了helloworld驱动
lsmod 查看驱动的加载情况
最后,使用rmmod helloworld.ko命令对该内核进行卸载
10.实验8:init_module 实现insmod命令
驱动编译成内核模块ko 运行驱动编译成模块
insmod的源码为 busybox-1.34.1/modutils/insmod.c
bb_init_module函数,正是通过该函数加载的内核模块。 该函数定义在busybox1.34.1/modutils/modutils.c文件中
helloworld.c代码
#include <linux/module.h>
#include <linux/kernel.h>static int __init helloworld_init(void) //驱动入口函数
{dump_stack();return 0;
}static void __exit helloworld_exit(void) //驱动出口函数
{printk(KERN_EMERG "helloworld_exit\r\n");
}module_init(helloworld_init); //注册入口函数
module_exit(helloworld_exit); //注册出口函数
MODULE_LICENSE("GPL v2"); //同意 GPL 开源协议
MODULE_AUTHOR("topeet"); //作者信息
Makefile 文件内容
export ARCH=arm64#设置平台架构
export CROSS_COMPILE=aarch64-linux-gnu-#交叉编译器前缀
obj-m += helloworld.o    #此处要和你的驱动源文件同名
KDIR :=/home/topeet/Linux/linux_sdk/kernel    #这里是你的内核目录
PWD ?= $(shell pwd)
all:make -C $(KDIR) M=$(PWD) modules    #make操作
clean:make -C $(KDIR) M=$(PWD) clean    #make clean操作
应用程序app.c代码 新目录 使用init_module系统调用加载模块到内核 insmod
#include <stdio.h>
#include <sys/syscall.h>
#include <fcntl.h>
#include <unistd.h>
#include <sys/types.h>
#include <sys/stat.h>
#include <stdlib.h>#define init_module(mod, len, opts) syscall(__NR_init_module, mod, len, opts)int main(int argc, char **argv)
{int fd;                  // 文件描述符int ret;                 // 返回值struct stat statbuf;     // 存储文件信息的结构体size_t image_size;       // 文件大小char *image;             // 文件内容缓冲区fd = open(argv[1], O_RDONLY | __O_CLOEXEC);  // 以只读方式打开文件if (fd < 0){printf("open error \n");  // 打开文件失败return -1;}fstat(fd, &statbuf);       // 获取文件信息image_size = statbuf.st_size;  // 获取文件大小image = malloc(image_size);  // 为文件内容分配内存空间read(fd, image, image_size);  // 读取文件内容到缓冲区ret = init_module(image, image_size, "");  // 调用系统调用初始化内核模块if (ret < 0){printf("error \n");  // 内核模块初始化失败}else{printf("ok \n");  // 内核模块初始化成功}free(image);  // 释放内存空间return ret;  // 返回结果
}
驱动编译成内核模块
有了Makefile以后,输入“make”命令,形成helloworld.ko目标文件
编译应用程序 译完成以后会生成一个app的可执行程序a.out
aarch64-linux-gnu-gcc myinsmod.c运行驱动编译成模块
helloworld.ko驱动文件和a.out可执行文件,需要先将两个要用到的文件拷贝到开发板上
开发板启动之后,使用以下命令加载helloworld.ko驱动
./a.out helloworld.ko
dump_stack函数会打印调用的一系列函数,这些函数的具体调用已经在进阶第一章讲解过了,这里的重点为红色框中的倒数第二行,调用了finit_module函数加载了helloworld驱动
lsmod 查看驱动的加载情况
最后,使用rmmod helloworld.ko命令对该内核进行卸载
11.实验9:向系统中添加一个系统调用
驱动编译成内核 运行驱动编译进内核
系统调用(system call)是操作系统提供给应用程序的编程接口 syscall函数是一个系统调用的包装函数
SYSCALL_DEFINE3(init_module, void __user *, umodunsigned long, len, const char __user *, uargs)
等价于__se_sys_init_module函数即可
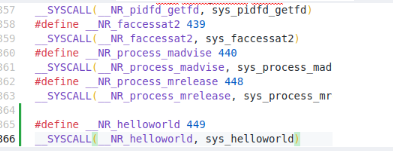
__NR_init_module include/uapi/asm-generic/unistd.h文件
文件 在实验4基础上 .c Makefile Kconfig 应用程序app的insmod
helloworld.c
#include <linux/kernel.h>
#include <linux/syscalls.h>
SYSCALL_DEFINE0(helloworld){printk("This is helloworld syscall\n");return 0;
}
添加系统调用号 Linux源码kernel/include/uapi/asm-generic/unistd.h文件中添加系统调用号
注意改名字
Kconfig
config HELLO
tristate "hello world"
helphello hello
Makefile
obj-$(CONFIG_HELLO)+=helloworld.o
修改上一级目录的Kconfig文件和Makefile文件,也就是driver/char目录
Kconfig
obj-y += hello/Makefile
source “drivers/char/hello/Kconfig”
打开menuconfig图形化配置工具, 用 * 来表示.驱动编译进Linux内核,保存到.config文件
编译源码
驱动编译成内核 会生成对应的.o文件
make savedefconfig
cp defconfig arch/arm64/configs/rockchip_linux_defconfig
cd ../
./build.sh kernel
编译好的内核镜像boot.img,烧写内核镜像,启动开发板
应用程序syscall.c代码 新目录
SYSCALL_DEFINE3(init_module, void __user *, umod,unsigned long, len, const char __user *, uargs)
{int err;struct load_info info = { };err = may_init_module();if (err)return err;pr_debug("init_module: umod=%p, len=%lu, uargs=%p\n",umod, len, uargs);err = copy_module_from_user(umod, len, &info);if (err)return err;return load_module(&info, uargs, 0);
}
进行应用程序编译,因为测试APP是要在开发板上运行的,所以需要aarch64-linux-gnu-gcc来编译,输入以下命令,编译完成以后会生成一个app的可执行程序
aarch64-linux-gnu-gcc syscall.c -o syscall
编译好的syscall程序拷贝到开发板上,然后运行程序
./syscall在运行应用程序之后,打印“This is helloworld syscall” 成功调用自定义的系统调用,至此,向系统中添加一个系统调用实验结束
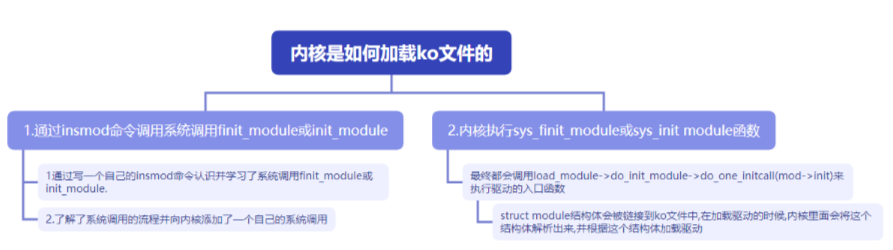
12.内核运行ko文件总结
要加载内核模块,通常需要使用insmod命令或类似工具触发系统调用,然后在内核中执行相应的系统调用函数(如sys_finit_module或sys_init_module)来加载模块。在加载过程中,会调用load_module函数,进而执行模块的初始化函数。这些过程构成了加载内核模块的流程