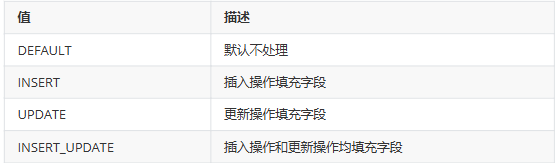
框架--MybatisPlus
一、MyBatis-Plus 基础认知:它是什么,能做什么?
MyBatis-Plus(简称 MP)是一个MyBatis的增强工具,在MyBatis 的基础上只做增强不做改变,为简化开发、提高效率而生。
官方网址:https://baomidou.com/
二、环境搭建:快速集成到项目中
(一)Spring 项目集成
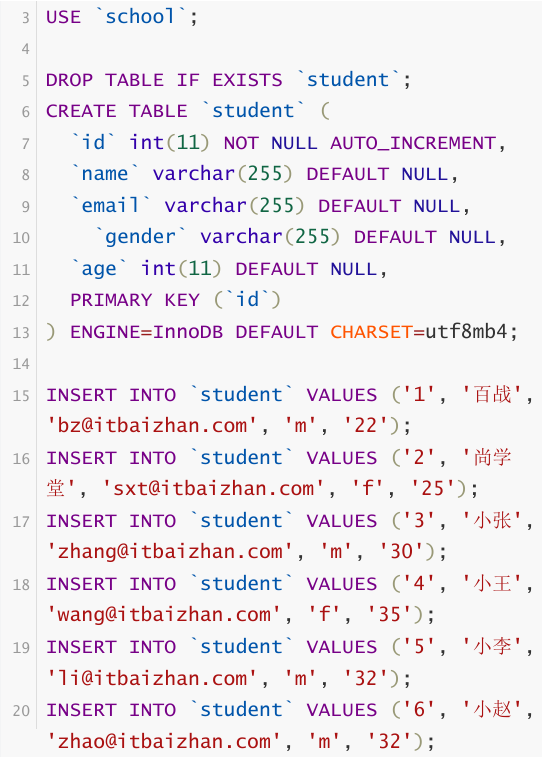
1. 前置准备:数据库与表

2. 创建Maven项目,依赖引入(Maven)
<!-- MyBatis-Plus 核心 -->
<dependency><groupId>com.baomidou</groupId><artifactId>mybatis-plus</artifactId><version>3.5.3</version> <!-- 替换为最新稳定版 -->
</dependency>
<!-- MySQL 驱动 -->
<dependency><groupId>mysql</groupId><artifactId>mysql-connector-java</artifactId><version>8.0.33</version> <!-- 适配你数据库的版本 -->
</dependency>
<!-- 连接池(可选,这里用 Druid) -->
<dependency><groupId>com.alibaba</groupId><artifactId>druid</artifactId><version>1.2.16</version>
</dependency>
<!-- Spring 相关 -->
<dependency><groupId>org.springframework</groupId><artifactId>spring-context</artifactId><version>5.3.27</version>
</dependency>
<dependency><groupId>org.springframework</groupId><artifactId>spring-orm</artifactId><version>5.3.27</version>
</dependency>
<!-- 测试与工具 -->
<dependency><groupId>junit</groupId><artifactId>junit</artifactId><version>4.13.2</version><scope>test</scope>
</dependency>
<dependency><groupId>org.projectlombok</groupId><artifactId>lombok</artifactId><version>1.18.28</version><scope>provided</scope>
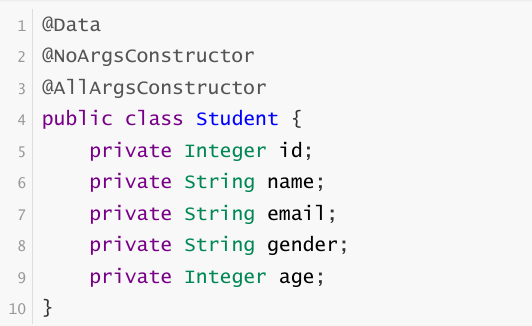
</dependency>3,创建实体类
@Data
@NoArgsConstructor
@AllArgsConstructor
public class Student {private Long id;private String name;private String email;private String gender;private Integer age;
}
4,创建Mapper接口
使用MyBatis时,在编写Mapper接口后,需要手动编写CRUD方法,并需要在Mapper映射文件中手动编写每个方法对应的SQL 语句。而在MyBatisPlus中,只需要创建Mapper接口并继承 BaseMapper,此时该接口获得常用增删改查功能,不需要自己手动编写Mapper配置文件
public interface StudentMapper extends BaseMapper<Student> {// 无需手写 CRUD 方法,继承后直接可用
}
5,创建Spring配置文件applicationContext.xml
<!-- 数据源 -->
<bean id="dataSource" class="com.alibaba.druid.pool.DruidDataSource"><property name="driverClassName" value="com.mysql.cj.jdbc.Driver"/><property name="url" value="jdbc:mysql://localhost:3306/school?serverTimezone=UTC"/><property name="username" value="root"/><property name="password" value="你的数据库密码"/>
</bean><!-- MyBatis-Plus 的 SqlSessionFactory -->
<bean id="sqlSessionFactory" class="com.baomidou.mybatisplus.extension.spring.MybatisSqlSessionFactoryBean"><property name="dataSource" ref="dataSource"/>
</bean><!-- Mapper 扫描 -->
<bean class="org.mybatis.spring.mapper.MapperScannerConfigurer"><property name="basePackage" value="com.xxx.mapper"/> <!-- Mapper 接口所在包 -->
</bean>
6,测试Mapper方法
@RunWith(SpringJUnit4ClassRunner.class)
@ContextConfiguration(locations = "classpath:applicationContext.xml")
public class StudentMapperTest {@Autowiredprivate StudentMapper studentMapper;@Testpublic void testSelectById() {Student student = studentMapper.selectById(1L);System.out.println(student);}
}
(二)SpringBoot 项目集成
1. 项目初始化
2. 依赖引入(pom.xml)
<!-- MyBatis-Plus 起步依赖 -->
<dependency><groupId>com.baomidou</groupId><artifactId>mybatis-plus-boot-starter</artifactId><version>3.5.3</version>
</dependency>
<!-- MySQL 驱动 -->
<dependency><groupId>mysql</groupId><artifactId>mysql-connector-java</artifactId>
</dependency>
<!-- Lombok(简化实体类) -->
<dependency><groupId>org.projectlombok</groupId><artifactId>lombok</artifactId><optional>true</optional>
</dependency>
<!-- 测试依赖 -->
<dependency><groupId>org.springframework.boot</groupId><artifactId>spring-boot-starter-test</artifactId><scope>test</scope>
</dependency>
3. 配置文件(application.yml)
spring:datasource:driver-class-name: com.mysql.cj.jdbc.Driverurl: jdbc:mysql://localhost:3306/school?serverTimezone=UTCusername: rootpassword: 你的数据库密码# 可选:开启 SQL 日志,方便调试
mybatis-plus:configuration:log-impl: org.apache.ibatis.logging.stdout.StdOutImpl
4,编写实体类
5,编写Mapper接口,继承BaseMapper

6,在SpringBoot启动类中添加@MapperScan注解,扫描Mapper文件夹
@SpringBootApplication
@MapperScan("com.xxx.mapper") // Mapper 接口所在包
public class MyApplication {public static void main(String[] args) {SpringApplication.run(MyApplication.class, args);}
}
7,测试Mapper方法
@SpringBootTest
class StudentMapperTest {@Autowiredprivate StudentMapper studentMapper;@Testvoid testSelectById() {Student student = studentMapper.selectById(1L);System.out.println(student);}
}
三、核心 CRUD 操作:一行代码实现单表操作
继承 BaseMapper 后,MP 为我们封装了全套单表 CRUD 方法,无需手写 SQL。
(一)新增(Insert)
@Test
void testInsert() {Student student = new Student();student.setName("张三");student.setEmail("zhangsan@example.com");student.setGender("男");student.setAge(20);int result = studentMapper.insert(student);System.out.println("插入结果:" + result); // 1 表示成功System.out.println("插入后主键:" + student.getId()); // MP 会自动回填主键
}
(二)修改(Update)
@Test
void testUpdate() {Student student = new Student();student.setId(1L); // 主键必须设置student.setAge(21); // 仅更新 age 字段int result = studentMapper.updateById(student);System.out.println("更新结果:" + result);
}
(三)删除(Delete)
@Test
void testDelete() {// 1. 按主键删除int result1 = studentMapper.deleteById(1L);// 2. 批量删除List<Long> idList = Arrays.asList(2L, 3L);int result2 = studentMapper.deleteBatchIds(idList);// 3. 按条件删除(Map 传条件,键是数据库列名)Map<String, Object> condition = new HashMap<>();condition.put("age", 20);int result3 = studentMapper.deleteByMap(condition);
}
(四)查询(Select)
@Test
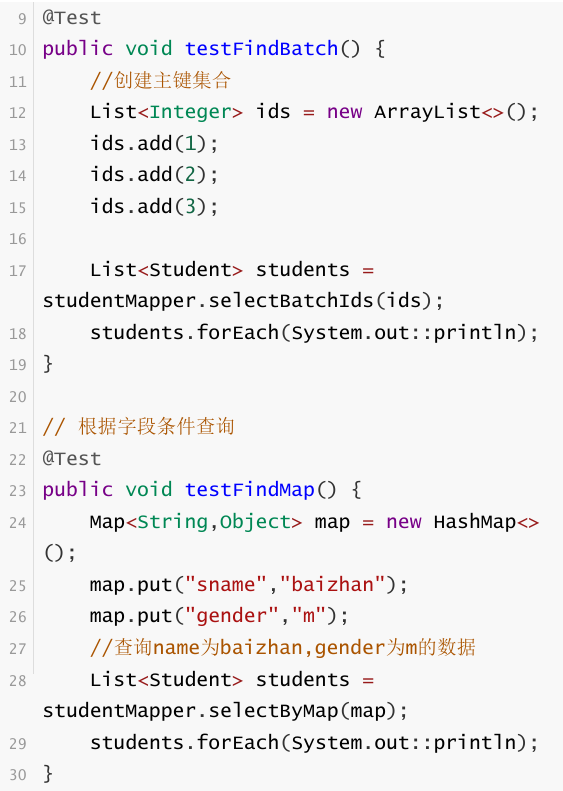
void testSelect() {// 1. 按主键查询Student student = studentMapper.selectById(1L);// 2. 批量查询List<Long> idList = Arrays.asList(1L, 2L, 3L);List<Student> students = studentMapper.selectBatchIds(idList);// 3. 按条件查询(Map 传条件)Map<String, Object> condition = new HashMap<>();condition.put("gender", "男");List<Student> maleStudents = studentMapper.selectByMap(condition);
}四、条件查询与分页:灵活处理复杂需求
实际开发中,“单条件 / 多条件查询”“分页展示” 是高频需求,MP 用 QueryWrapper 和分页插件简化这些操作
(一)条件构造器 QueryWrapper

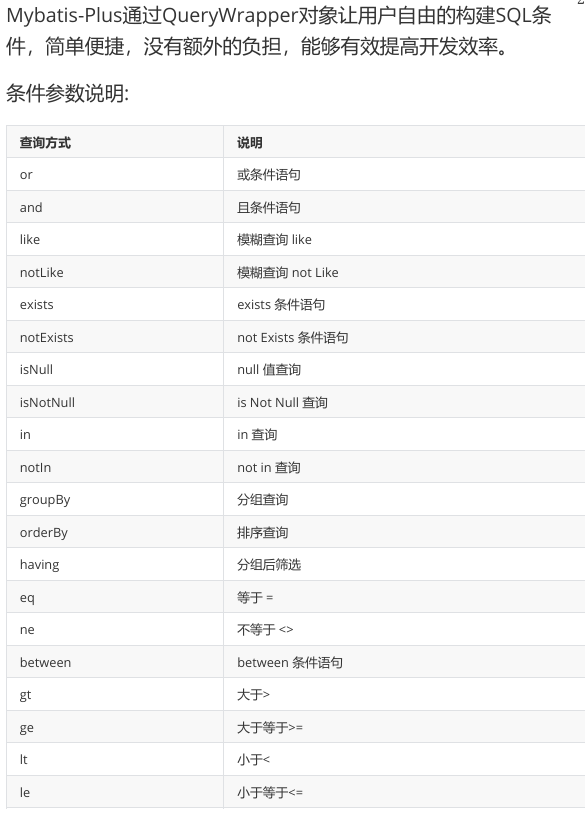
示例 1:多条件查询(性别为女,且年龄 ≤ 35)
@Test
void testQueryWrapper() {QueryWrapper<Student> wrapper = new QueryWrapper<>();wrapper.eq("gender", "女") // 等于:gender = '女'.le("age", 35);    // 小于等于:age <= 35List<Student> students = studentMapper.selectList(wrapper);students.forEach(System.out::println);
}
示例 2:模糊查询 + 排序(名字含 “小”,按年龄升序)
@Test
void testLikeAndOrder() {QueryWrapper<Student> wrapper = new QueryWrapper<>();wrapper.like("name", "小") // 模糊匹配:name like '%小%'.orderByAsc("age"); // 按 age 升序List<Student> students = studentMapper.selectList(wrapper);
}
(二)分页查询
MP 内置分页插件,只需简单配置即可实现分页
1. 配置分页插件(SpringBoot 示例)
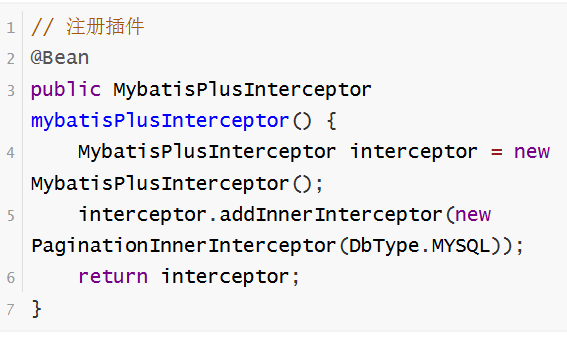
在配置类中注册 MybatisPlusInterceptor,并添加 PaginationInnerInterceptor
@Configuration
public class MyBatisPlusConfig {@Beanpublic MybatisPlusInterceptor mybatisPlusInterceptor() {MybatisPlusInterceptor interceptor = new MybatisPlusInterceptor();// 添加分页插件,指定数据库类型(如 MySQL)interceptor.addInnerInterceptor(new PaginationInnerInterceptor(DbType.MYSQL));return interceptor;}
}
2. 分页代码示例
@Test
void testPage() {// 1. 创建分页对象:第 1 页,每页 2 条Page<Student> page = new Page<>(1, 2);// 2. 构造查询条件(可选)QueryWrapper<Student> wrapper = new QueryWrapper<>();wrapper.eq("gender", "男");// 3. 执行分页查询Page<Student> studentPage = studentMapper.selectPage(page, wrapper);// 4. 获取分页结果List<Student> records = studentPage.getRecords(); // 当前页数据long total = studentPage.getTotal(); // 总条数long pages = studentPage.getPages(); // 总页数long current = studentPage.getCurrent(); // 当前页long size = studentPage.getSize(); // 每页条数System.out.println("当前页数据:" + records);System.out.println("总条数:" + total);
}
五、全局配置与高级特性:让开发更高效
(一)全局配置(统一规则,减少重复)
在 application.yml 中配置全局规则(以 SpringBoot 为例):

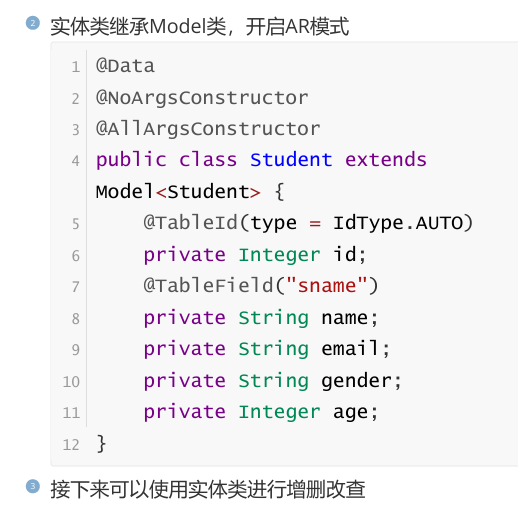
mybatis-plus:global-config:db-config:id-type: AUTO # 主键策略:自增(需数据库表支持自增)table-prefix: tb_ # 表名前缀:实体类自动匹配 tb_xxx 表table-underline: true # 驼峰转下划线:userName → user_name(二)ActiveRecord(AR)模式:实体类直接操作数据库
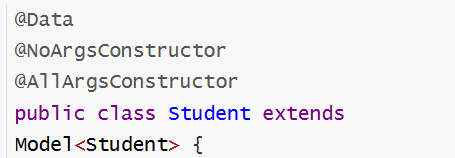
AR 模式让实体类自身拥有数据库操作能力,无需通过 Mapper 调用方法。
启用条件:
- Mapper 接口继承
BaseMapper<实体类>。 - 实体类继承
Model<实体类>。 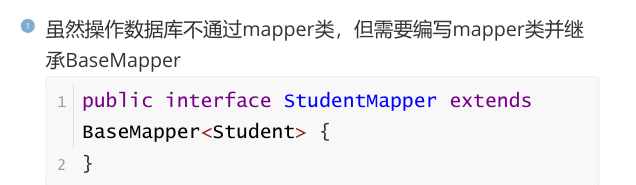
@Test
void testAR() {// 1. 新增Student student = new Student();student.setName("AR测试");student.insert(); // 直接调用 insert 方法// 2. 查询Student queryStudent = new Student();queryStudent.setId(1L);Student result = queryStudent.selectById(); // 按主键查询// 3. 修改result.setAge(22);result.updateById(); // 按主键更新// 4. 删除result.deleteById(); // 按主键删除
}
(三)常用插件:解决痛点场景
1. 防止全表更新 / 删除插件(
BlockAttackInnerInterceptor)作用:拦截 “全表更新 / 删除” 语句,避免误操作(如
update student set age=20会被拦截,需加条件)。 配置:
配置:@Bean public MybatisPlusInterceptor mybatisPlusInterceptor() {MybatisPlusInterceptor interceptor = new MybatisPlusInterceptor();interceptor.addInnerInterceptor(new PaginationInnerInterceptor(DbType.MYSQL));// 添加防止全表操作插件interceptor.addInnerInterceptor(new BlockAttackInnerInterceptor());return interceptor; }2. 乐观锁插件(
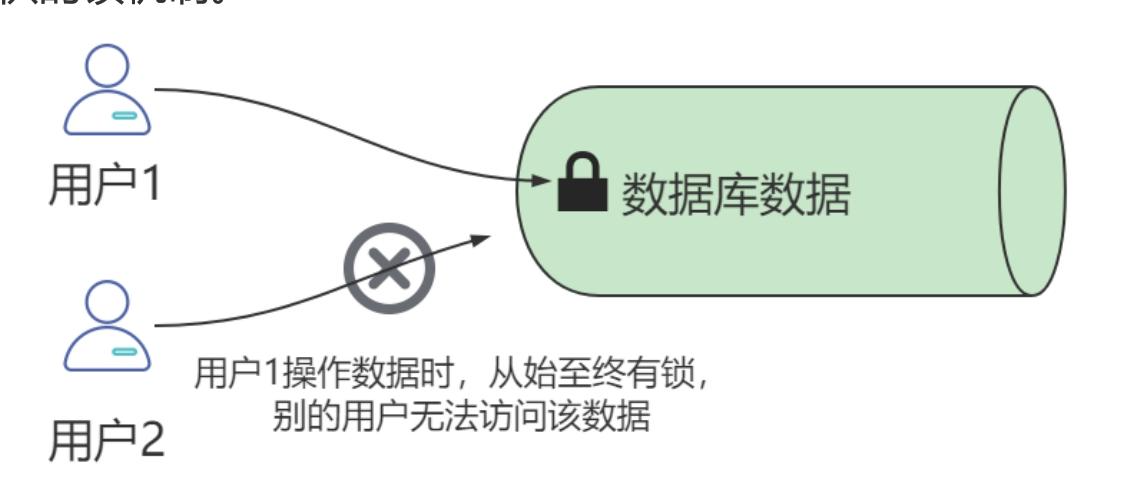
OptimisticLockerInnerInterceptor)- 修改数据库中的数据时,为了避免同时被其他人修改,最好的办法 就是对该数据进行加锁以防止并发。
- 锁的设计分为悲观锁和乐观锁:
- 悲观锁:悲观锁对数据被外界修改持保守态度。即在整个数据处 理过程中,将数据处于锁定状态。悲观锁的实现往往依靠数据库 提供的锁机制。
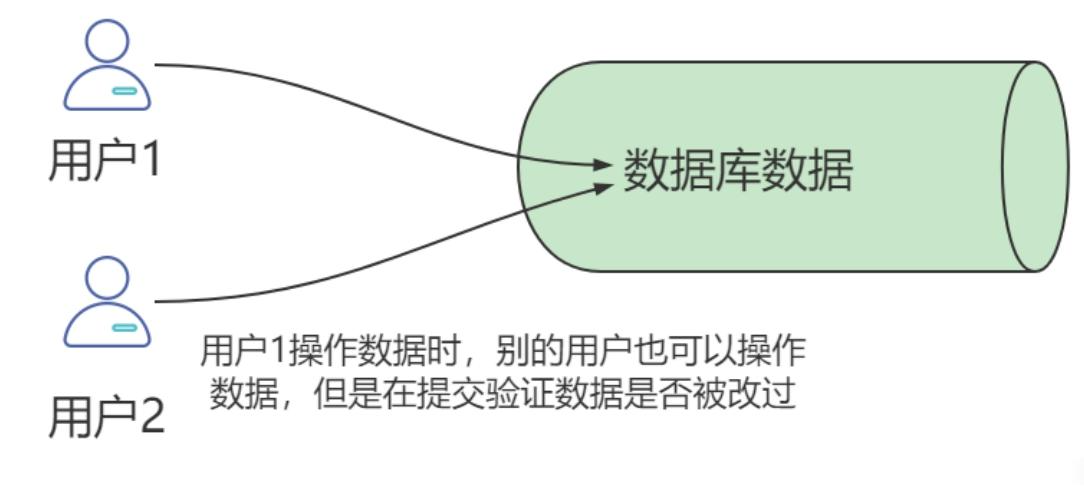
- 乐观锁:乐观锁在数据进行提交更新的时候,才会正式对数据的 冲突与否进行检测,如果冲突,则返回给用户异常信息,让用户 决定如何去做。
MyBatisPlus乐观锁插件实现方式:
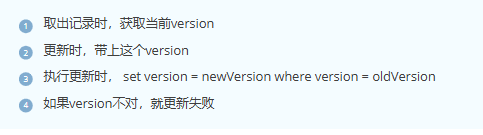
1,配置插件
interceptor.addInnerInterceptor(new OptimisticLockerInnerInterceptor());2,实体类加@Version
@Data
public class Student {private Long id;private String name;@Version // 乐观锁版本字段private Integer version;// 其他字段...
}
3,数据库加version字段:设默认值为0
4,测试
// 线程1查询
Student student = studentMapper.selectById(1L); // version=0
// 线程2同时查询并更新(模拟并发)
Student student2 = studentMapper.selectById(1L);
student2.setName("线程2更新");
studentMapper.updateById(student2); // version 从 0→1// 线程1更新(此时 version 还是 0,与数据库中 1 不一致,更新失败)
student.setName("线程1更新");
int result = studentMapper.updateById(student); // result=0(更新失败)
3,分页插件
(四)扩展功能:逻辑删除与自动填充
1. 逻辑删除(假删除,保留数据)

1,配置:

mybatis-plus:global-config:db-config:logic-delete-field: deleted # 逻辑删除字段名logic-delete-value: 1 # 已删除值logic-not-delete-value: 0 # 未删除值2,修改实体类,添加逻辑删除属性
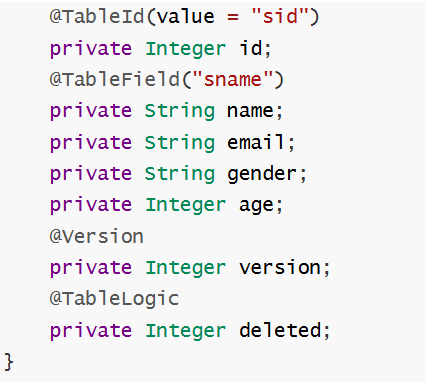
3,修改数据库表,添加一列整型deleted字段并设置默认值为0
4,测试删除和查询方法,会看到删除时将deleted字段变为1,查询 时添加条件deleted=0
2. 自动填充(插入 / 更新时自动赋值)

作用:插入或更新时,自动为指定字段(如 create_time、update_time)赋值。
1,实体类标记填充字段
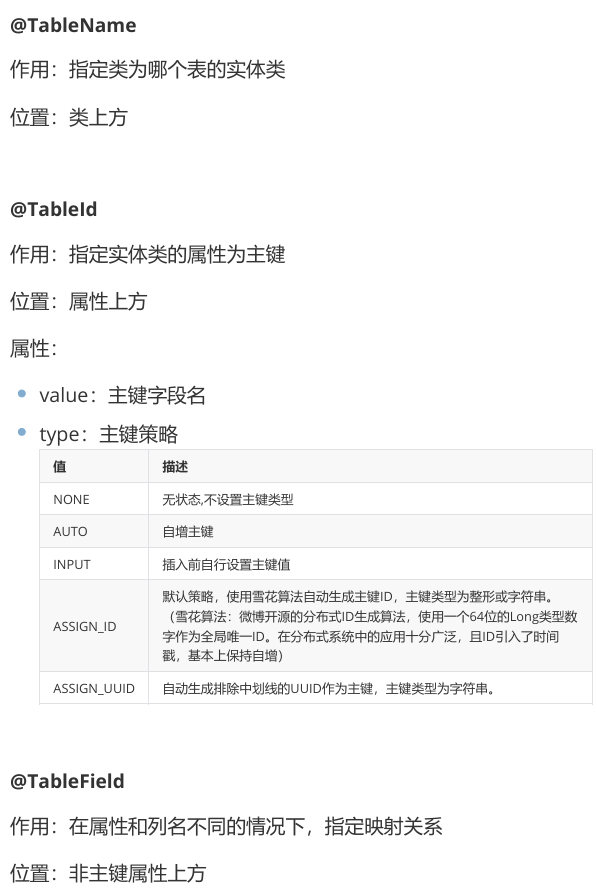
@Data
public class Student {private Long id;private String name;@TableField(fill = FieldFill.INSERT) // 插入时填充private LocalDateTime createTime;@TableField(fill = FieldFill.INSERT_UPDATE) // 插入、更新时都填充private LocalDateTime updateTime;
}
2,自定义填充类
@Component
public class MyMetaObjectHandler implements MetaObjectHandler {@Overridepublic void insertFill(MetaObject metaObject) {// 插入时,自动填充 createTime 和 updateTimethis.strictInsertFill(metaObject, "createTime", LocalDateTime::now, LocalDateTime.class);this.strictInsertFill(metaObject, "updateTime", LocalDateTime::now, LocalDateTime.class);}@Overridepublic void updateFill(MetaObject metaObject) {// 更新时,自动填充 updateTimethis.strictUpdateFill(metaObject, "updateTime", LocalDateTime::now, LocalDateTime.class);}
}
3,测试插入方法

六、开发工具:代码生成与插件
(一)代码生成器:一键生成全套代码
MP 提供的代码生成器(AutoGenerator)可读取数据库表,自动生成实体类、Mapper、Service、Controller等代码,极大节省重复劳动。
核心依赖:
<dependency><groupId>com.baomidou</groupId><artifactId>mybatis-plus-generator</artifactId><version>3.5.3</version>
</dependency>
<!-- 模板引擎(选 Velocity) -->
<dependency><groupId>org.apache.velocity</groupId><artifactId>velocity-engine-core</artifactId><version>2.3</version>
</dependency>
生成代码示例(Java 代码):
public class CodeGenerator {public static void main(String[] args) {// 代码生成器AutoGenerator mpg = new AutoGenerator();// 全局配置GlobalConfig gc = new GlobalConfig();String projectPath = System.getProperty("user.dir");gc.setOutputDir(projectPath + "/src/main/java"); // 生成路径gc.setAuthor("你的名字"); // 作者gc.setOpen(false); // 生成后是否打开文件夹mpg.setGlobalConfig(gc);// 数据源配置DataSourceConfig dsc = new DataSourceConfig();dsc.setUrl("jdbc:mysql://localhost:3306/school?serverTimezone=UTC");dsc.setDriverName("com.mysql.cj.jdbc.Driver");dsc.setUsername("root");dsc.setPassword("你的密码");mpg.setDataSource(dsc);// 包配置PackageConfig pc = new PackageConfig();pc.setModuleName("student"); // 模块名pc.setParent("com.xxx"); // 父包名mpg.setPackageInfo(pc);// 策略配置StrategyConfig strategy = new StrategyConfig();strategy.setInclude("student"); // 要生成的表名strategy.setNaming(NamingStrategy.underline_to_camel); // 下划线转驼峰strategy.setColumnNaming(NamingStrategy.underline_to_camel);strategy.setEntityLombokModel(true); // 实体类使用 Lombokmpg.setStrategy(strategy);// 执行生成mpg.execute();}
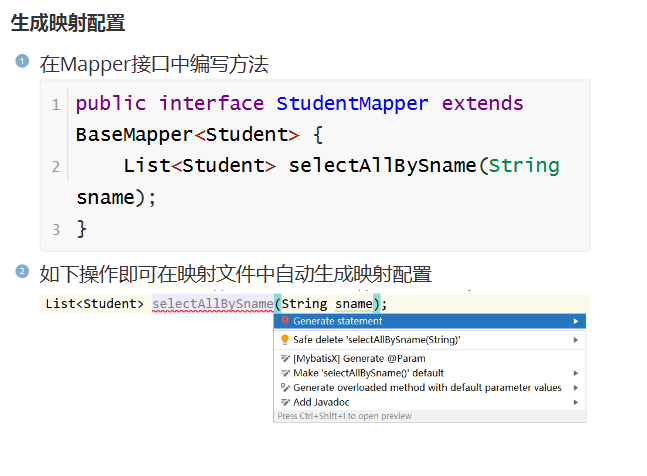
}(二)MybatisX 插件(IDEA 专属)
MybatisX 是 IDEA 的插件,能进一步提升 MP 开发效率:
- 代码生成:连接数据库后,一键生成 MP 风格代码。
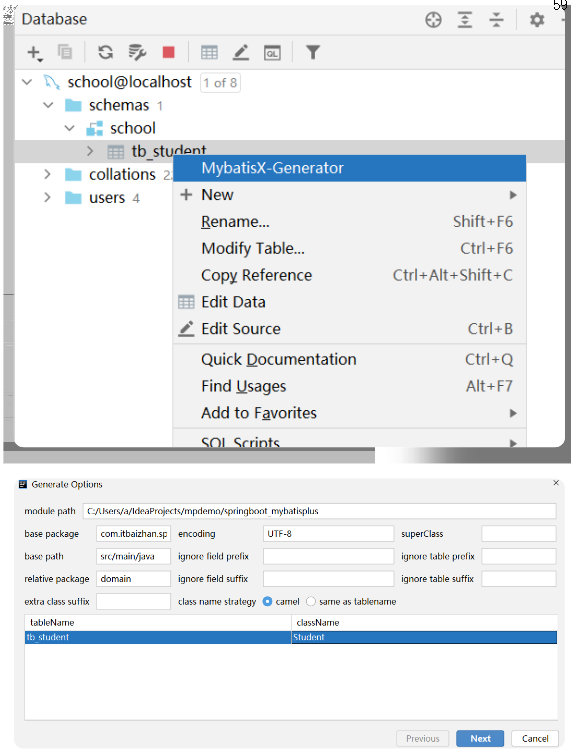
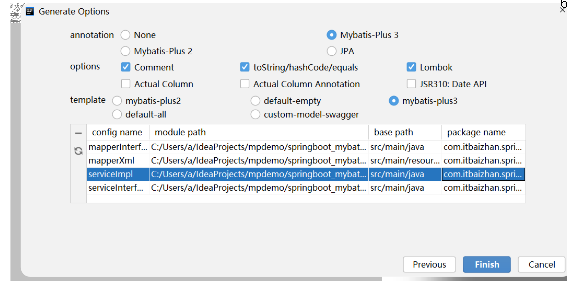
- 快速跳转:点击 Mapper 方法或 XML 标签前的 “小鸟” 图标,可在 Mapper 接口与 XML 之间快速跳转。

- XML 辅助:Mapper 接口写方法后,自动生成 XML 映射模板。
安装方式:IDEA → Settings → Plugins → 搜索 “MybatisX” → 安装并重启 IDEA。