K8S探针-Pod创建流程-kubeadm证书续期-VPA实战
🌟容器探针(Probe)
探针(Probe)的探测类型
livenessProbe
健康状态检查,周期性检查服务是否存活,检查结果失败,将"重启"容器(停止源容器并重新创建新容器)。
如果容器没有提供健康状态检查,则默认状态为Success。
readinessProbe
可用性检查,周期性检查服务是否可用,从而判断容器是否就绪。
若检测Pod服务不可用,会将Pod标记为未就绪状态,而svc的ep列表会将Addresses的地址移动到NotReadyAddresses列表。
若检测Pod服务可用,则ep会将Pod地址从NotReadyAddresses列表重新添加到Addresses列表中。
如果容器没有提供可用性检查,则默认状态为Success。
startupProbe(1.16+之后的版本才支持)
如果提供了启动探针,则所有其他探针都会被禁用,直到此探针成功为止。
如果启动探测失败,kubelet将杀死容器,而容器依其重启策略进行重启。
如果容器没有提供启动探测,则默认状态为 Success。
对于starup探针是一次性检测,容器启动时进行检测,检测成功后,才会调用其他探针,且此探针不再生效。
探针(Probe)检查机制
exec
执行一段命令,根据返回值判断执行结果。返回值为0或非0,有点类似于"echo $?"。
httpGet
发起HTTP请求,根据返回的状态码来判断服务是否正常。
200: 返回状态码成功301: 永久跳转302: 临时跳转401: 验证失败403: 权限被拒绝404: 文件找不到413: 文件上传过大500: 服务器内部错误502: 无效的请求504: 后端应用网关响应超时...
tcpSocket
测试某个TCP端口是否能够链接,类似于telnet,nc等测试工具。
grpc
k8s 1.19+版本才支持,1.23依旧属于一个alpha阶段。
探测结果
每次探测都将获得以下三种结果之一:
Success(成功)
容器通过了诊断。
Failure(失败)
容器未通过诊断。
Unknown(未知)
诊断失败,因此不会采取任何行动。
参考链接:
https://kubernetes.io/zh/docs/concepts/workloads/pods/pod-lifecycle/#types-of-probe
https://kubernetes.io/zh-cn/docs/concepts/workloads/pods/pod-lifecycle/#probe-check-methods
https://kubernetes.io/zh-cn/docs/concepts/workloads/pods/pod-lifecycle/#probe-outcome
🌟livenessProbe探针
exec探测方式
[root@master231 probe]# cat 01-deploy-livenessProbe-exec.yaml
apiVersion: apps/v1
kind: Deployment
metadata:name: deploy-livenessprobe-exec
spec:replicas: 5selector:matchLabels:apps: xiuxiantemplate:metadata:labels:apps: xiuxianspec:volumes:- name: dthostPath: path: /etc/localtime	restartPolicy: Alwayscontainers:- image: registry.cn-hangzhou.aliyuncs.com/yinzhengjie-k8s/apps:v1volumeMounts:- name: dtmountPath: /etc/localtime	   name: c1command: - /bin/sh- -c- touch /tmp/linux-healthy; sleep 20; rm -f /tmp/linux-healthy; sleep 600# 健康状态检查,周期性检查服务是否存活,检查结果失败,将重启容器。livenessProbe:# 使用exec的方式去做健康检查exec:# 自定义检查的命令command:- cat- /tmp/linux-healthy# 指定探针检测的频率,默认是10s,最小值为1.periodSeconds: 1# 检测服务失败次数的累加值,默认值是3次,最小值是1。当检测服务成功后,该值会被重置!failureThreshold: 3# 检测服务成功次数的累加值,默认值为1次,最小值1.successThreshold: 1# 指定多久之后进行健康状态检查,即此时间段内检测服务失败并不会对failureThreshold进行计数。initialDelaySeconds:  30# 一次检测周期超时的秒数,默认值是1秒,最小值为1.timeoutSeconds: 1
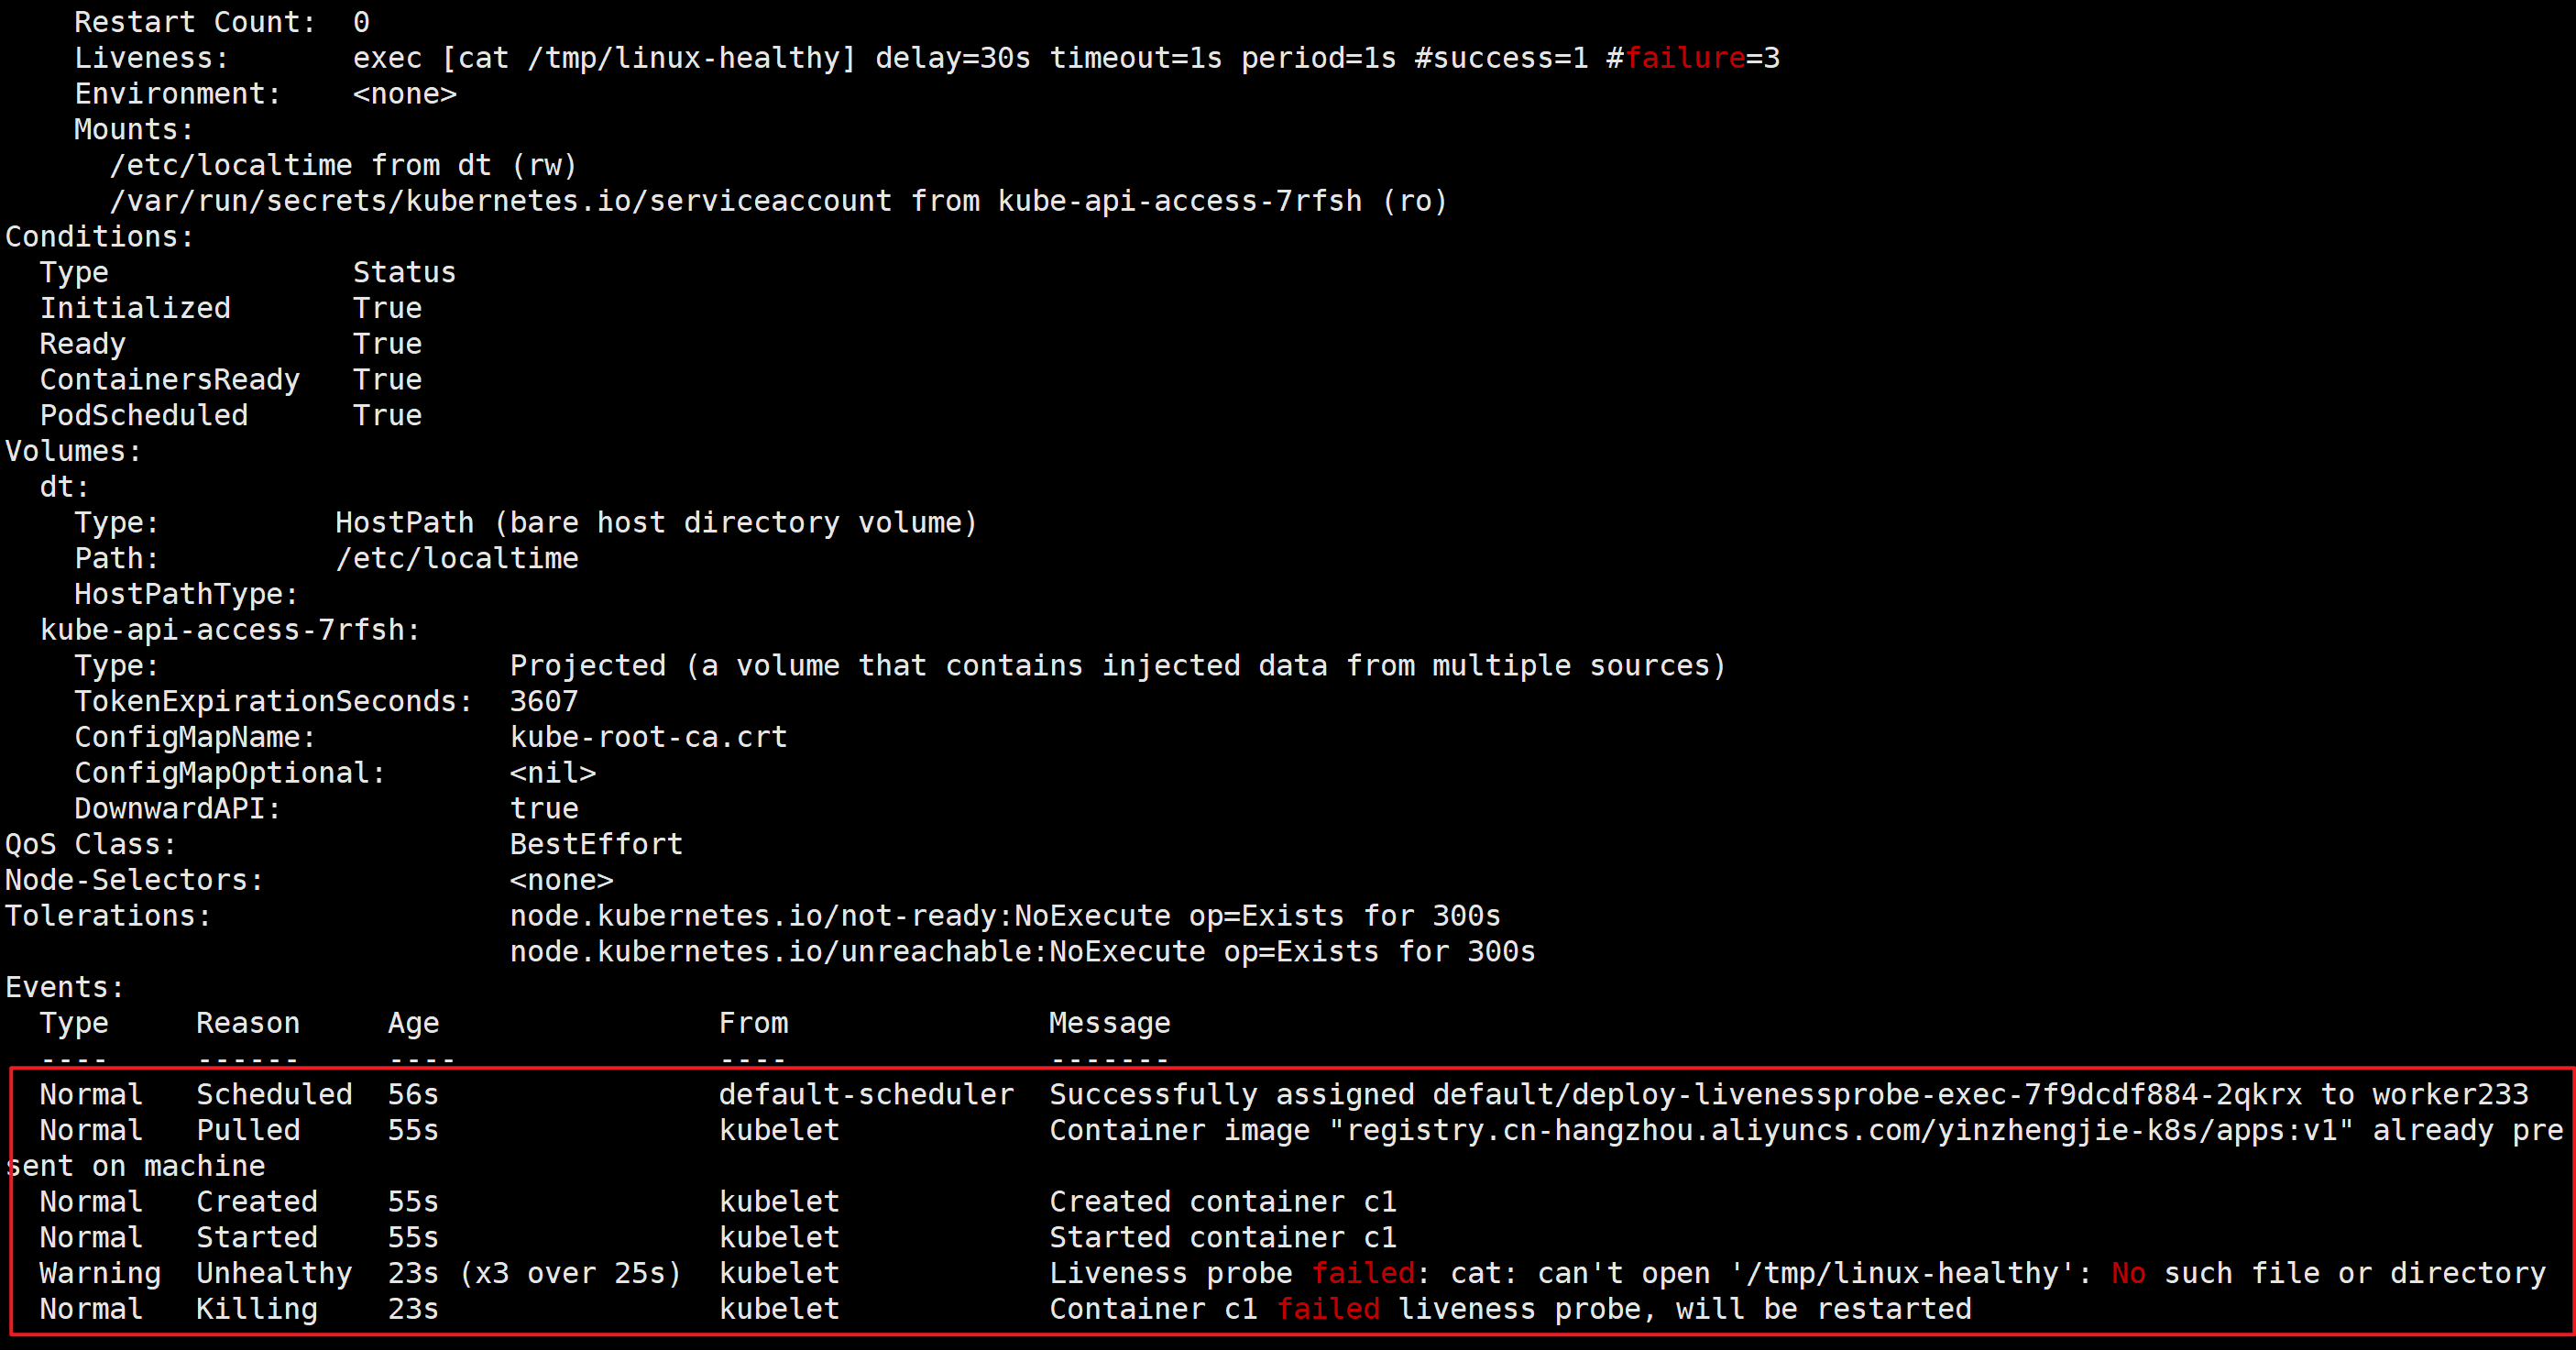
33秒左右会重启容器
httpGet探测方式
[root@master231 probe]# cat 02-deploy-livenessProbe-httpGet.yaml
apiVersion: apps/v1
kind: Deployment
metadata:name: deploy-livenessprobe-httpget
spec:replicas: 5selector:matchLabels:apps: xiuxiantemplate:metadata:labels:apps: xiuxianspec:restartPolicy: Alwaysvolumes:- name: dthostPath: path: /etc/localtimecontainers:- image: registry.cn-hangzhou.aliyuncs.com/yinzhengjie-k8s/apps:v1volumeMounts:- name: dtmountPath: /etc/localtimename: c1ports:- containerPort: 80name: web- containerPort: 22name: ssh# 健康状态检查,周期性检查服务是否存活,检查结果失败,将重启容器。livenessProbe:# 使用httpGet的方式去做健康检查httpGet:# 指定访问的端口号port: 80# 检测指定的访问路径path: /index.htmlfailureThreshold: 5initialDelaySeconds: 10periodSeconds: 2successThreshold: 1timeoutSeconds: 1
---apiVersion: v1
kind: Service
metadata:name: svc-xiuxian
spec:type: ClusterIPclusterIP: "10.200.0.200"selector:apps: xiuxianports:- port: 80targetPort: web
测试方式:可以在集群内部访问svc的地址,删除首页文件,会发现,会有短暂的'403 Forbidden'页面报错,状态码是404。[root@master231 ~]# for i in `seq 1000`;do curl 10.200.0.200;sleep 0.1;done
tcpSocket探测方式
[root@master231 probe]# cat 03-deploy-livenessProbe-tcpSocket.yaml
apiVersion: apps/v1
kind: Deployment
metadata:name: deploy-livenessprobe-tcpsocket
spec:replicas: 5selector:matchLabels:apps: xiuxiantemplate:metadata:labels:apps: xiuxianspec:volumes:- name: dthostPath: path: /etc/localtime	restartPolicy: Alwayscontainers:- image: registry.cn-hangzhou.aliyuncs.com/yinzhengjie-k8s/apps:v1volumeMounts:- name: dtmountPath: /etc/localtime	   name: c1# 健康状态检查,周期性检查服务是否存活,检查结果失败,将重启容器。livenessProbe:# 使用tcpSocket的方式去做健康检查tcpSocket:port: 80failureThreshold: 3initialDelaySeconds: 30periodSeconds: 10successThreshold: 1timeoutSeconds: 1
测试方式:可以在集群内部访问某个Pod的IP地址,而后进入该pod修改nginx的端口配置并热加载,15s内会自动重启。
grpc探测方式
[root@master231 probe]# cat 04-deploy-livenessProbe-grpc.yaml
apiVersion: apps/v1
kind: Deployment
metadata:name: deploy-livenessprobe-grpc
spec:replicas: 5selector:matchLabels:apps: xiuxiantemplate:metadata:labels:apps: xiuxianspec:volumes:- name: dthostPath: path: /etc/localtime		restartPolicy: Alwayscontainers:- image: registry.cn-hangzhou.aliyuncs.com/yinzhengjie-k8s/apps:v1name: webvolumeMounts:- name: dtmountPath: /etc/localtime			 imagePullPolicy: IfNotPresentcommand:- /opt/bitnami/etcd/bin/etcd- --data-dir=/tmp/etcd- --listen-client-urls=http://0.0.0.0:2379- --advertise-client-urls=http://127.0.0.1:2379- --log-level=debugports:- containerPort: 2379livenessProbe:# 对grpc端口发起grpc调用,目前属于alpha测试阶段,如果真的想要使用,请在更高版本关注,比如k8s 1.24+# 在1.23.17版本中,如果检测失败,会触发警告,但不会重启容器只是会有警告事件。grpc:port: 2379# 指定服务,但是服务名称我是瞎写的,实际工作中会有开发告诉你service: /healthfailureThreshold: 3initialDelaySeconds: 10periodSeconds: 1successThreshold: 1timeoutSeconds: 1
温馨提示:
对于grpc的探针发现检测失败并不会重启Pod,因为k8s 1.23.17版本中目前处于测试阶段(alpha field)。如果要使用该功能请使用K8S 1.24+。
[root@master231 probe]# kubectl explain po.spec.containers.livenessProbe.grpc
KIND:     Pod
VERSION:  v1RESOURCE: grpc <Object>DESCRIPTION:GRPC specifies an action involving a GRPC port. This is an alpha field andrequires enabling GRPCContainerProbe feature gate.FIELDS:port	<integer> -required-Port number of the gRPC service. Number must be in the range 1 to 65535.service	<string>Service is the name of the service to place in the gRPC HealthCheckRequest(see https://github.com/grpc/grpc/blob/master/doc/health-checking.md).If this is not specified, the default behavior is defined by gRPC.[root@master231 probe]#
🌟readinessProbe探针
exec探测方式
[root@master231 probe]# cat 05-deploy-readinessprobe-livenessProbe-exec.yaml
apiVersion: apps/v1
kind: Deployment
metadata:name: deploy-livenessprobe-readinessprobe-exec
spec:revisionHistoryLimit: 1strategy:type: "RollingUpdate"rollingUpdate:maxUnavailable: 1maxSurge: 2replicas: 3selector:matchLabels:apps: xiuxiantemplate:metadata:labels:apps: xiuxianspec:volumes:- name: dthostPath: path: /etc/localtime		restartPolicy: Alwayscontainers:- name: c1image:  registry.cn-hangzhou.aliyuncs.com/yinzhengjie-k8s/apps:v1imagePullPolicy: AlwaysvolumeMounts:- name: dtmountPath: /etc/localtime			ports:- containerPort: 80command: - /bin/sh- -c- nginx; touch /tmp/linux-healthy; sleep 40; rm -f /tmp/linux-healthy; sleep 600livenessProbe:exec:command:- cat- /tmp/linux-healthyfailureThreshold: 3initialDelaySeconds: 65periodSeconds: 1successThreshold: 1timeoutSeconds: 1# 可用性检查,周期性检查服务是否可用,从而判断容器是否就绪.readinessProbe:# 使用exec的方式去做健康检查exec:# 自定义检查的命令command:- cat- /tmp/linux-healthyfailureThreshold: 3initialDelaySeconds: 15periodSeconds: 1successThreshold: 1timeoutSeconds: 1---apiVersion: v1
kind: Service
metadata:name: svc-xiuxain
spec:clusterIP: "10.200.20.25"selector:apps: xiuxianports:- port: 80
[root@master231 probe]#
测试方式:
[root@master231 sts]# while true; do curl 10.200.20.25 ; sleep 0.1;done
httpGet探测方式
[root@master231 probe]# cat 06-deploy-readinessProbe-livenessProbe-httpGet.yaml
apiVersion: apps/v1
kind: Deployment
metadata:name: deploy-livenessprobe-readinessprobe-httpget
spec:revisionHistoryLimit: 1strategy:type: "RollingUpdate"rollingUpdate:maxUnavailable: 1maxSurge: 2replicas: 3selector:matchLabels:apps: xiuxiantemplate:metadata:labels:apps: xiuxianspec:volumes:- name: dthostPath: path: /etc/localtime		restartPolicy: Alwayscontainers:- name: c1volumeMounts:- name: dtmountPath: /etc/localtime		  image:  registry.cn-hangzhou.aliyuncs.com/yinzhengjie-k8s/apps:v1imagePullPolicy: Alwaysports:- containerPort: 80command: - /bin/sh- -c- touch /tmp/linux-healthy; sleep 30; rm -f /tmp/linux-healthy; sleep 600livenessProbe:exec:command:- cat- /tmp/linux-healthyfailureThreshold: 3initialDelaySeconds: 180periodSeconds: 1successThreshold: 1timeoutSeconds: 1# 可用性检查,周期性检查服务是否可用,从而判断容器是否就绪.readinessProbe:# 使用httpGet的方式去做健康检查httpGet:# 指定访问的端口号port: 80path: /index.htmlfailureThreshold: 3initialDelaySeconds: 15periodSeconds: 1successThreshold: 1timeoutSeconds: 1---apiVersion: v1
kind: Service
metadata:name: svc-xiuxain
spec:clusterIP: 10.200.20.25selector:apps: xiuxianports:- port: 80
[root@master231 probe]#
测试方式:
[root@master231 ~]# while true;do curl 10.200.20.25;sleep 0.5;done
tcpSocket探测方式
[root@master231 probe]# cat 07-deploy-readinessProbe-livenessProbe-tcpSocket.yaml
apiVersion: apps/v1
kind: Deployment
metadata:name: deploy-livenessprobe-readinessprobe-tcpsocket
spec:revisionHistoryLimit: 1strategy:type: "RollingUpdate"rollingUpdate:maxUnavailable: 1maxSurge: 2replicas: 3selector:matchLabels:apps: xiuxiantemplate:metadata:labels:apps: xiuxianspec:volumes:- name: dthostPath: path: /etc/localtime		restartPolicy: Alwayscontainers:- name: c1volumeMounts:- name: dtmountPath: /etc/localtime		  image:  registry.cn-hangzhou.aliyuncs.com/yinzhengjie-k8s/apps:v1imagePullPolicy: Alwaysports:- containerPort: 80command: - /bin/sh- -c- touch /tmp/linux-healthy; sleep 30; rm -f /tmp/linux-healthy; sleep 600livenessProbe:exec:command:- cat- /tmp/linux-healthyfailureThreshold: 3initialDelaySeconds: 300periodSeconds: 1successThreshold: 1timeoutSeconds: 1# 可用性检查,周期性检查服务是否可用,从而判断容器是否就绪.readinessProbe:# 使用tcpSocket的方式去做健康检查tcpSocket:# 探测80端口是否存活port: 80failureThreshold: 3initialDelaySeconds: 10periodSeconds: 1successThreshold: 1timeoutSeconds: 1---apiVersion: v1
kind: Service
metadata:name: svc-xiuxain
spec:clusterIP: 10.200.20.25selector:apps: xiuxianports:- port: 80
[root@master231 probe]#
测试方式:
[root@master231 ~]# while true;do curl 10.200.20.25;sleep 0.5;done
Pod的创建流程
Pod的创建,删除,修改流程
1️⃣执行kubectl命令时会加载"~/.kube/config",从而识别到apiserver的地址,端口及认证证书;
2️⃣apiserver进行证书认证,鉴权,语法检查,若成功则可以进行数据的读取或者写入;
3️⃣若用户是写入操作(创建,修改,删除)则需要修改etcd数据库的信息;
4️⃣如果创建Pod,此时scheduler负责Pod调度,将Pod调度到合适的worker节点,并将结果返回给ApiServer,由apiServer负责存储到etcd中;
5️⃣kubelet组件会周期性上报给apiServer节点,包括Pod内的容器资源(cpu,memory,disk,gpu,…)及worker宿主机节点状态,apiServer并将结果存储到etcd中,若有该节点的任务也会直接返回给该节点进行调度;
6️⃣kubelet开始调用CRI接口创建容器(依次创建pause,initContainers,containers);
7️⃣在运行过程中,若Pod容器,正常或者异常退出时,kubelet会根据重启策略是否重启容器(Never,Always,OnFailure);
8️⃣若一个节点挂掉,则需要controller manager介入维护,比如Pod副本数量缺失,则需要创建watch事件,要求控制器的副本数要达到标准,从而要创建新的Pod,此过程重复步骤4-6。
kubelet创建Pod的全流程
1️⃣kubelet调用CRI接口创建容器,底层支持docker|containerd作为容器运行时;
2️⃣底层基于runc(符合OCI规范)创建容器:
3️⃣优先创建pause基础镜像;
4️⃣创建初始化容器
5️⃣业务容器,业务容器如果定义了优雅终止,探针则顺序如下:
- 5.1 启动命令(COMMAND)
- 5.2 启动postStart;
- 5.3 Probe
- StartupProbe
- LivenessProbe | readinessProbe
- 5.4 启动PreStop 受限于优雅终止时间(默认30s)。
🌟startupProbe启动探针实战
[root@master231 probe]# cat 08-deploy-startupProbe-httpGet.yaml
apiVersion: apps/v1
kind: Deployment
metadata:name: deploy-livenessprobe-readinessprobe-startupprobe-httpget
spec:revisionHistoryLimit: 1strategy:type: "RollingUpdate"rollingUpdate:maxUnavailable: 1maxSurge: 2replicas: 3selector:matchLabels:apps: xiuxiantemplate:metadata:labels:apps: xiuxianspec:volumes:- name: dataemptyDir: {}- name: dthostPath: path: /etc/localtime				# 初始化容器仅在Pod创建时执行一次,容器重启时并不会调用初始化容器。initContainers:- name: init01image: registry.cn-hangzhou.aliyuncs.com/yinzhengjie-k8s/apps:v1volumeMounts:- name: datamountPath: /zhubaolincommand:- /bin/sh- -c- echo "liveness probe test page" >> /zhubaolin/huozhe.html- name: init02image: registry.cn-hangzhou.aliyuncs.com/yinzhengjie-k8s/apps:v2volumeMounts:- name: datamountPath: /zhubaolincommand:- /bin/sh- -c- echo "readiness probe test page" >> /zhubaolin/zhubaolin.html- name: init03image: registry.cn-hangzhou.aliyuncs.com/yinzhengjie-k8s/apps:v3volumeMounts:- name: datamountPath: /zhubaolincommand:- /bin/sh- -c- echo "startup probe test page" >> /zhubaolin/start.htmlcontainers:- name: c1image: registry.cn-hangzhou.aliyuncs.com/yinzhengjie-k8s/apps:v1volumeMounts:- name: dtmountPath: /etc/localtime			- name: datamountPath: /usr/share/nginx/html# 周期性:判断服务是否健康,若检查不通过,将Pod直接重启。livenessProbe:httpGet:port: 80path: /huozhe.htmlfailureThreshold: 3initialDelaySeconds: 5periodSeconds: 1successThreshold: 1timeoutSeconds: 1# 周期性: 判断服务是否就绪,若检查不通过,将Pod标记为未就绪状态。readinessProbe:httpGet:port: 80path: /zhubaolin.htmlfailureThreshold: 3initialDelaySeconds: 10periodSeconds: 3successThreshold: 1timeoutSeconds: 1# 一次性: 容器启动时做检查,若检查不通过,直接杀死容器。并进行重启!# startupProbe探针通过后才回去执行readinessProbe和livenessProbe哟~startupProbe:httpGet:port: 80path: /start.htmlfailureThreshold: 3# 尽管上面的readinessProbe和livenessProbe数据已经就绪,但必须等待startupProbe的检测成功后才能执行。initialDelaySeconds: 35periodSeconds: 3successThreshold: 1timeoutSeconds: 1---apiVersion: v1
kind: Service
metadata:name: svc-xiuxain
spec:clusterIP: 10.200.20.25selector:apps: xiuxianports:- port: 80
[root@master231 probe]#
测试验证:
[root@master231 sts]# while true; do curl 10.200.20.25/huozhe.html ; sleep 0.1;done
liveness probe test page
liveness probe test page
liveness probe test page
liveness probe test page
liveness probe test page
liveness probe test page
liveness probe test page
liveness probe test page
liveness probe test page
^C
[root@master231 sts]# while true; do curl 10.200.20.25/zhubaolin.html ; sleep 0.1;done
readiness probe test page
readiness probe test page
readiness probe test page
readiness probe test page
readiness probe test page
readiness probe test page
readiness probe test page
readiness probe test page
readiness probe test page
readiness probe test page
^C
[root@master231 sts]# while true; do curl 10.200.20.25/start.html ; sleep 0.1;done
startup probe test page
startup probe test page
startup probe test page
startup probe test page
startup probe test page
startup probe test page
startup probe test page
^C
[root@master231 sts]#
启动顺序
[root@master231 probe]# cat 09-deploy-shaonao-workflow.yaml
apiVersion: apps/v1
kind: Deployment
metadata:name: deploy-lifecycle
spec:replicas: 1selector:matchLabels:apps: xiuxiantemplate:metadata:labels:apps: xiuxianspec:volumes:- name: datahostPath:path: /shaonao- name: dthostPath:path: /etc/localtimeinitContainers:- name: init01image: registry.cn-hangzhou.aliyuncs.com/yinzhengjie-k8s/apps:v1volumeMounts:- name: datamountPath: /zhubaolin- name: dtmountPath: /etc/localtimecommand:- "/bin/sh"- "-c"- "echo \"initContainer at $(date +%F_%T)\" > /zhubaolin/haha.log"terminationGracePeriodSeconds: 3containers:- name: c1image: registry.cn-hangzhou.aliyuncs.com/yinzhengjie-k8s/apps:v3command:- /bin/sh- -c- "echo \"command at $(date +%F_%T)\" >> /usr/share/nginx/html/haha.log; sleep 600"volumeMounts:- name: datamountPath: /usr/share/nginx/html- name: dtmountPath: /etc/localtimeimagePullPolicy: IfNotPresentlivenessProbe:exec:command:- "/bin/sh"- "-c"- "echo \"livenessProbe at $(date +%F_%T)\" >> /usr/share/nginx/html/haha.log"failureThreshold: 3initialDelaySeconds: 0periodSeconds: 3successThreshold: 1timeoutSeconds: 1readinessProbe:exec:command:- "/bin/sh"- "-c"- "echo \"readinessProbe at $(date +%F_%T)\" >> /usr/share/nginx/html/haha.log"failureThreshold: 3initialDelaySeconds: 0periodSeconds: 3successThreshold: 1timeoutSeconds: 1startupProbe:exec:command:- "/bin/sh"- "-c"- "echo \"startupProbe at $(date +%F_%T)\" >> /usr/share/nginx/html/haha.log"failureThreshold: 3initialDelaySeconds: 0periodSeconds: 3successThreshold: 1timeoutSeconds: 1lifecycle:postStart:exec:command: - "/bin/sh"- "-c"- "sleep 10;echo \"postStart at $(date +%F_%T)\" >> /usr/share/nginx/html/haha.log"preStop:exec:command: - "/bin/sh"- "-c"- "echo \"preStop at $(date +%F_%T)\" >> /usr/share/nginx/html/haha.log;sleep 30"
[root@master231 probe]# - 测试验证
[root@worker233 ~]# tail -100f  /shaonao/haha.log
initContainer at 2025-04-20_07:34:44
command at 2025-04-20_07:34:45
postStart at 2025-04-20_07:34:55
startupProbe at 2025-04-20_07:34:56
readinessProbe at 2025-04-20_07:34:56
livenessProbe at 2025-04-20_07:34:59
readinessProbe at 2025-04-20_07:34:59
readinessProbe at 2025-04-20_07:35:02
livenessProbe at 2025-04-20_07:35:02
livenessProbe at 2025-04-20_07:35:05
...
preStop at 2025-04-20_07:36:29
🌟kubeadm集群的证书升级方案
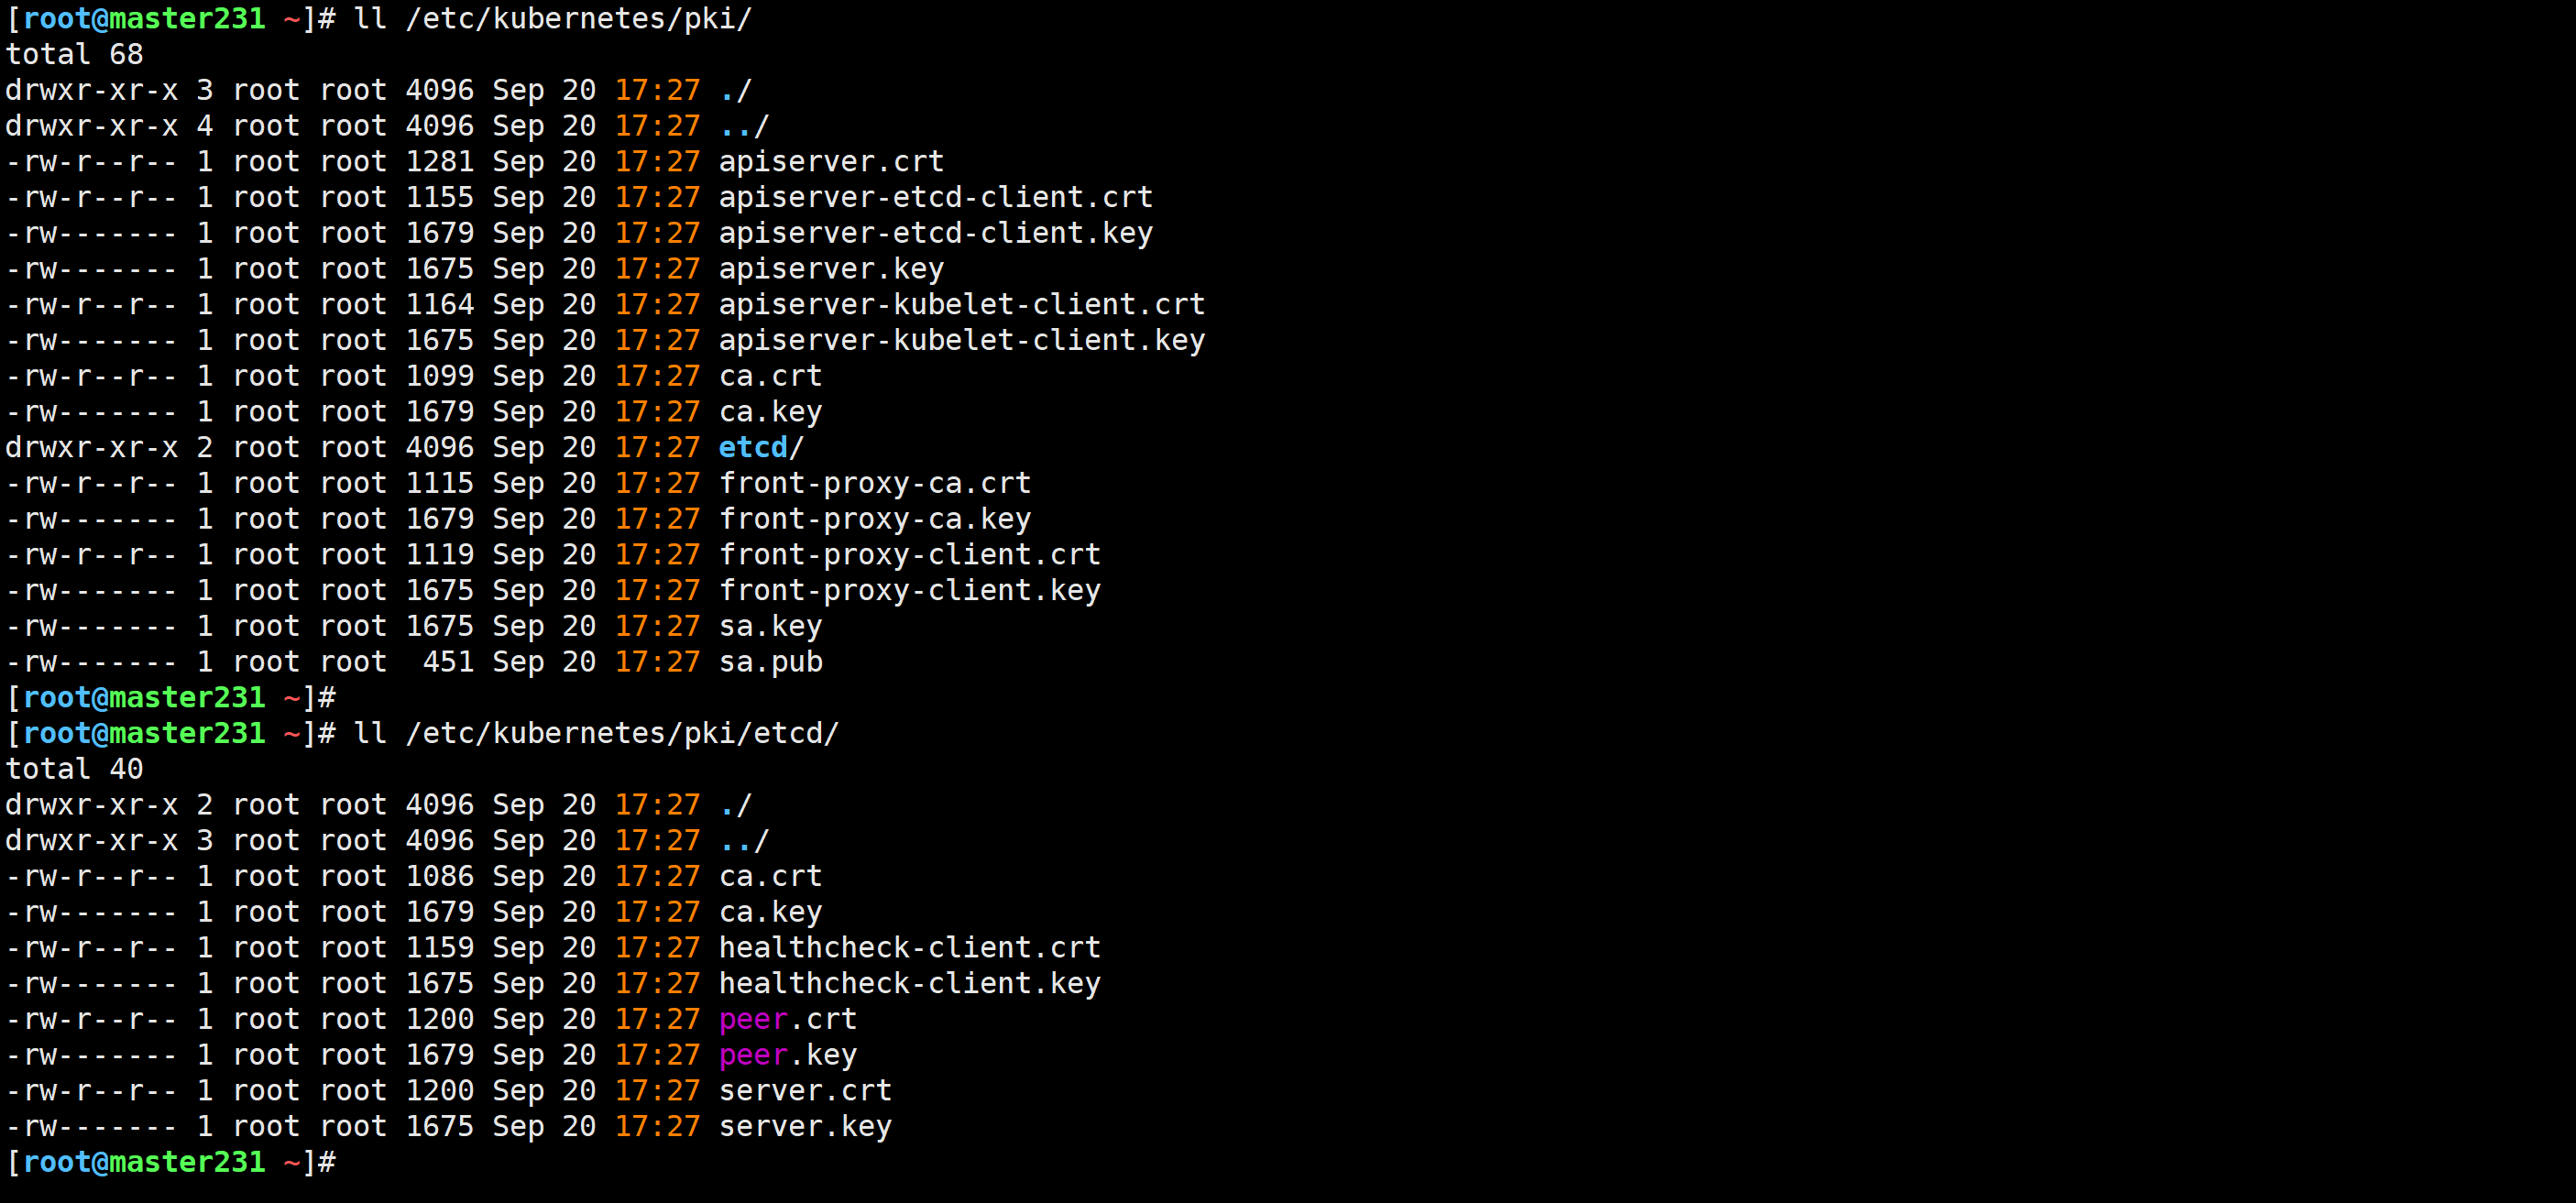
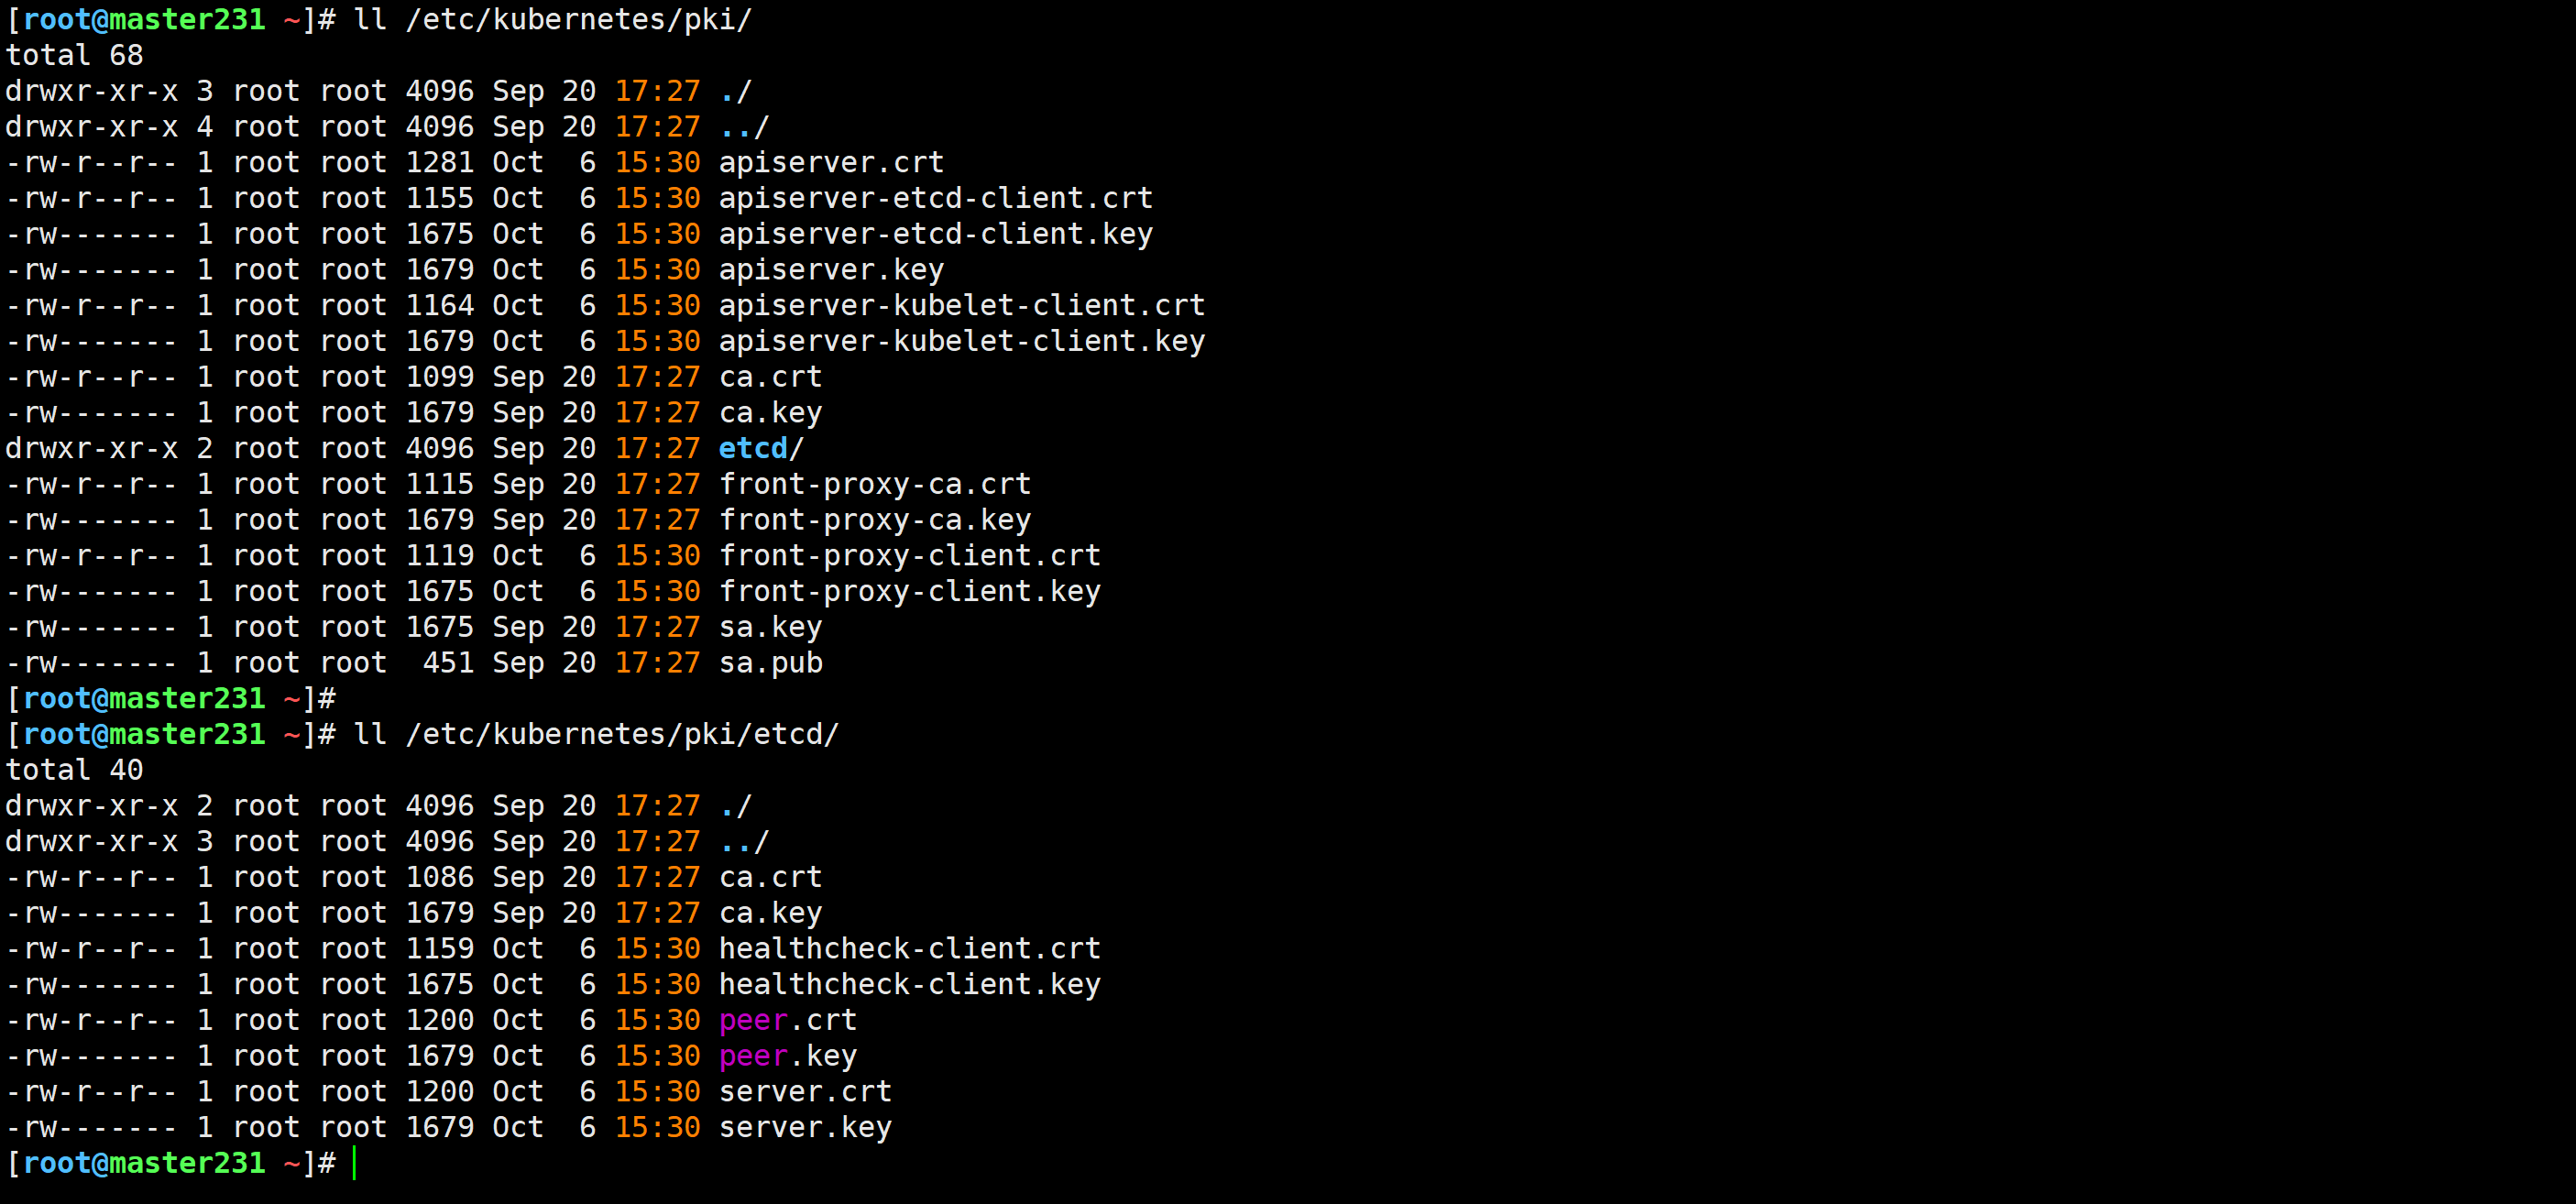
服务端证书存储路径
[root@master231 ~]# ll /etc/kubernetes/pki/
[root@master231 ~]# ll /etc/kubernetes/pki/etcd/
检查 kubeadm 管理的本地 PKI 中证书的到期时间
[root@master231 ~]# kubeadm certs check-expiration
[check-expiration] Reading configuration from the cluster...
[check-expiration] FYI: You can look at this config file with 'kubectl -n kube-system get cm kubeadm-config -o yaml'
W1006 15:28:37.824652    5318 utils.go:69] The recommended value for "resolvConf" in "KubeletConfiguration" is: /run/systemd/resolve/resolv.conf; the provided value is: /run/systemd/resolve/resolv.confCERTIFICATE                EXPIRES                  RESIDUAL TIME   CERTIFICATE AUTHORITY   EXTERNALLY MANAGED
admin.conf                 Sep 20, 2026 09:27 UTC   349d            ca                      no
apiserver                  Sep 20, 2026 09:27 UTC   349d            ca                      no
apiserver-etcd-client      Sep 20, 2026 09:27 UTC   349d            etcd-ca                 no
apiserver-kubelet-client   Sep 20, 2026 09:27 UTC   349d            ca                      no
controller-manager.conf    Sep 20, 2026 09:27 UTC   349d            ca                      no
etcd-healthcheck-client    Sep 20, 2026 09:27 UTC   349d            etcd-ca                 no
etcd-peer                  Sep 20, 2026 09:27 UTC   349d            etcd-ca                 no
etcd-server                Sep 20, 2026 09:27 UTC   349d            etcd-ca                 no
front-proxy-client         Sep 20, 2026 09:27 UTC   349d            front-proxy-ca          no
scheduler.conf             Sep 20, 2026 09:27 UTC   349d            ca                      no      CERTIFICATE AUTHORITY   EXPIRES                  RESIDUAL TIME   EXTERNALLY MANAGED
ca                      Sep 18, 2035 09:27 UTC   9y              no
etcd-ca                 Sep 18, 2035 09:27 UTC   9y              no
front-proxy-ca          Sep 18, 2035 09:27 UTC   9y              no
[root@master231 ~]#

推荐阅读: https://kubernetes.io/zh-cn/docs/reference/setup-tools/kubeadm/kubeadm-certs/
升级master节点的证书
[root@master231 ~]# kubeadm certs renew all

升级worker节点的证书
温馨提示:
请确保实验前所有的worker节点是正常工作的。如果有NotReady节点,可能会导致该节点证书无法自动续期,因为该节点可能无法和ApiServer建立链接。
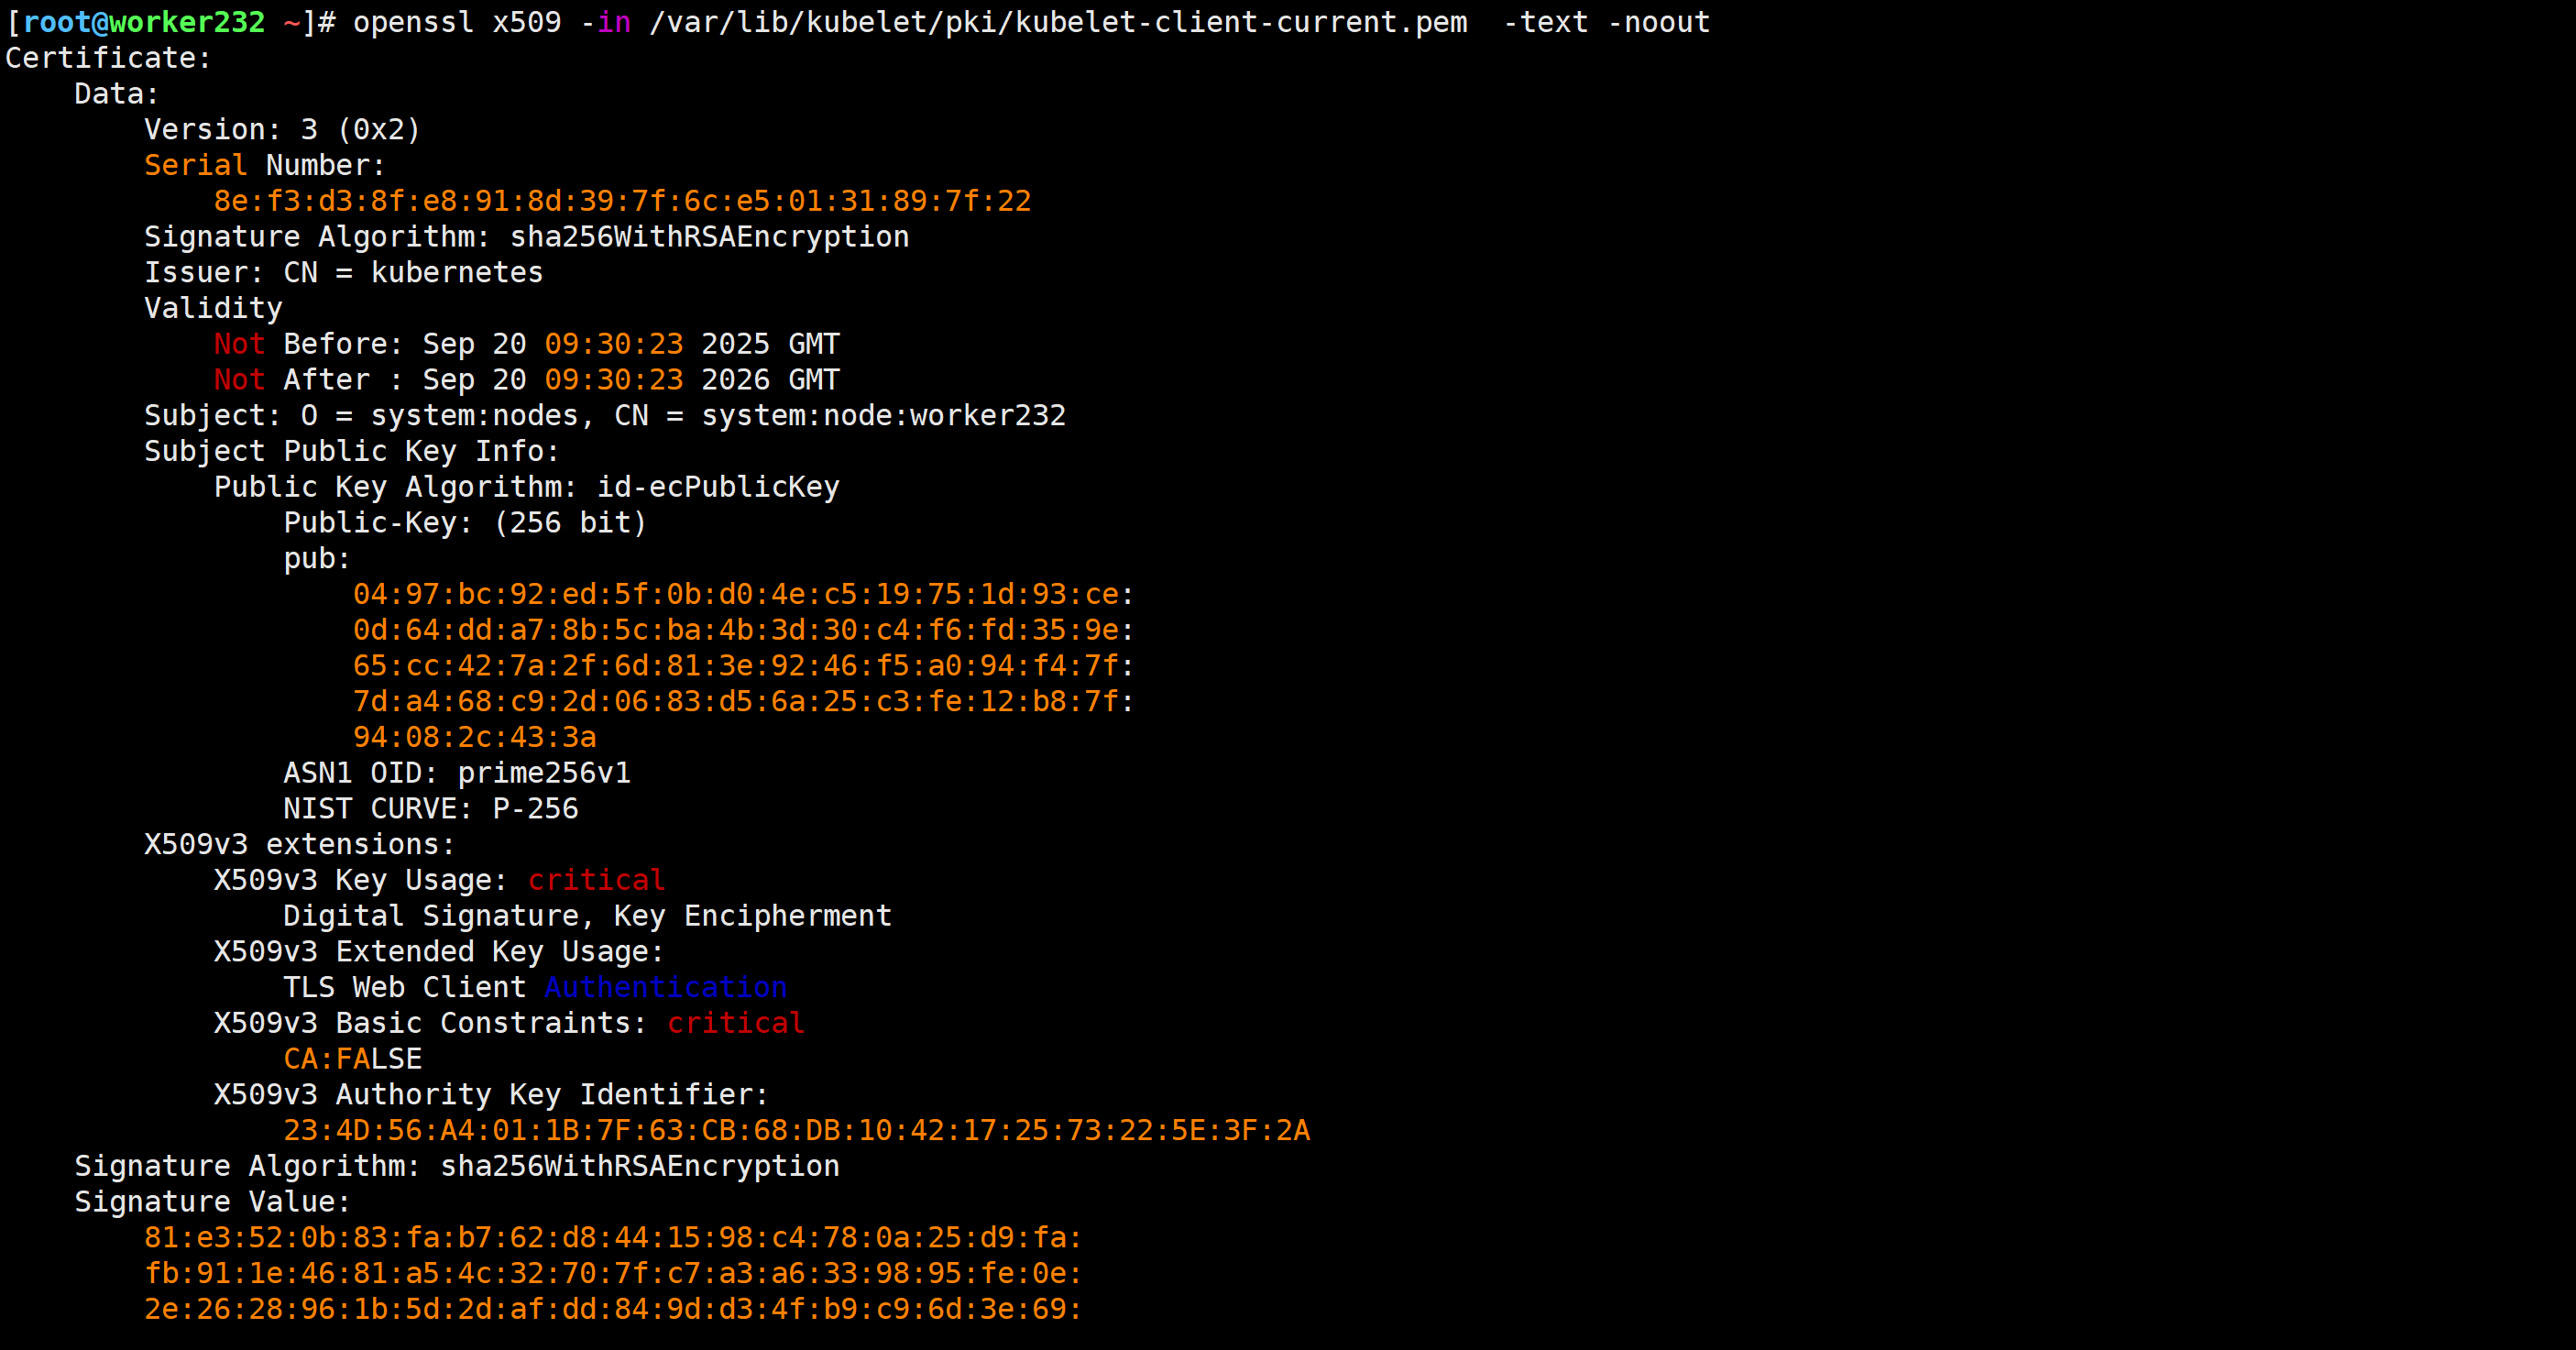
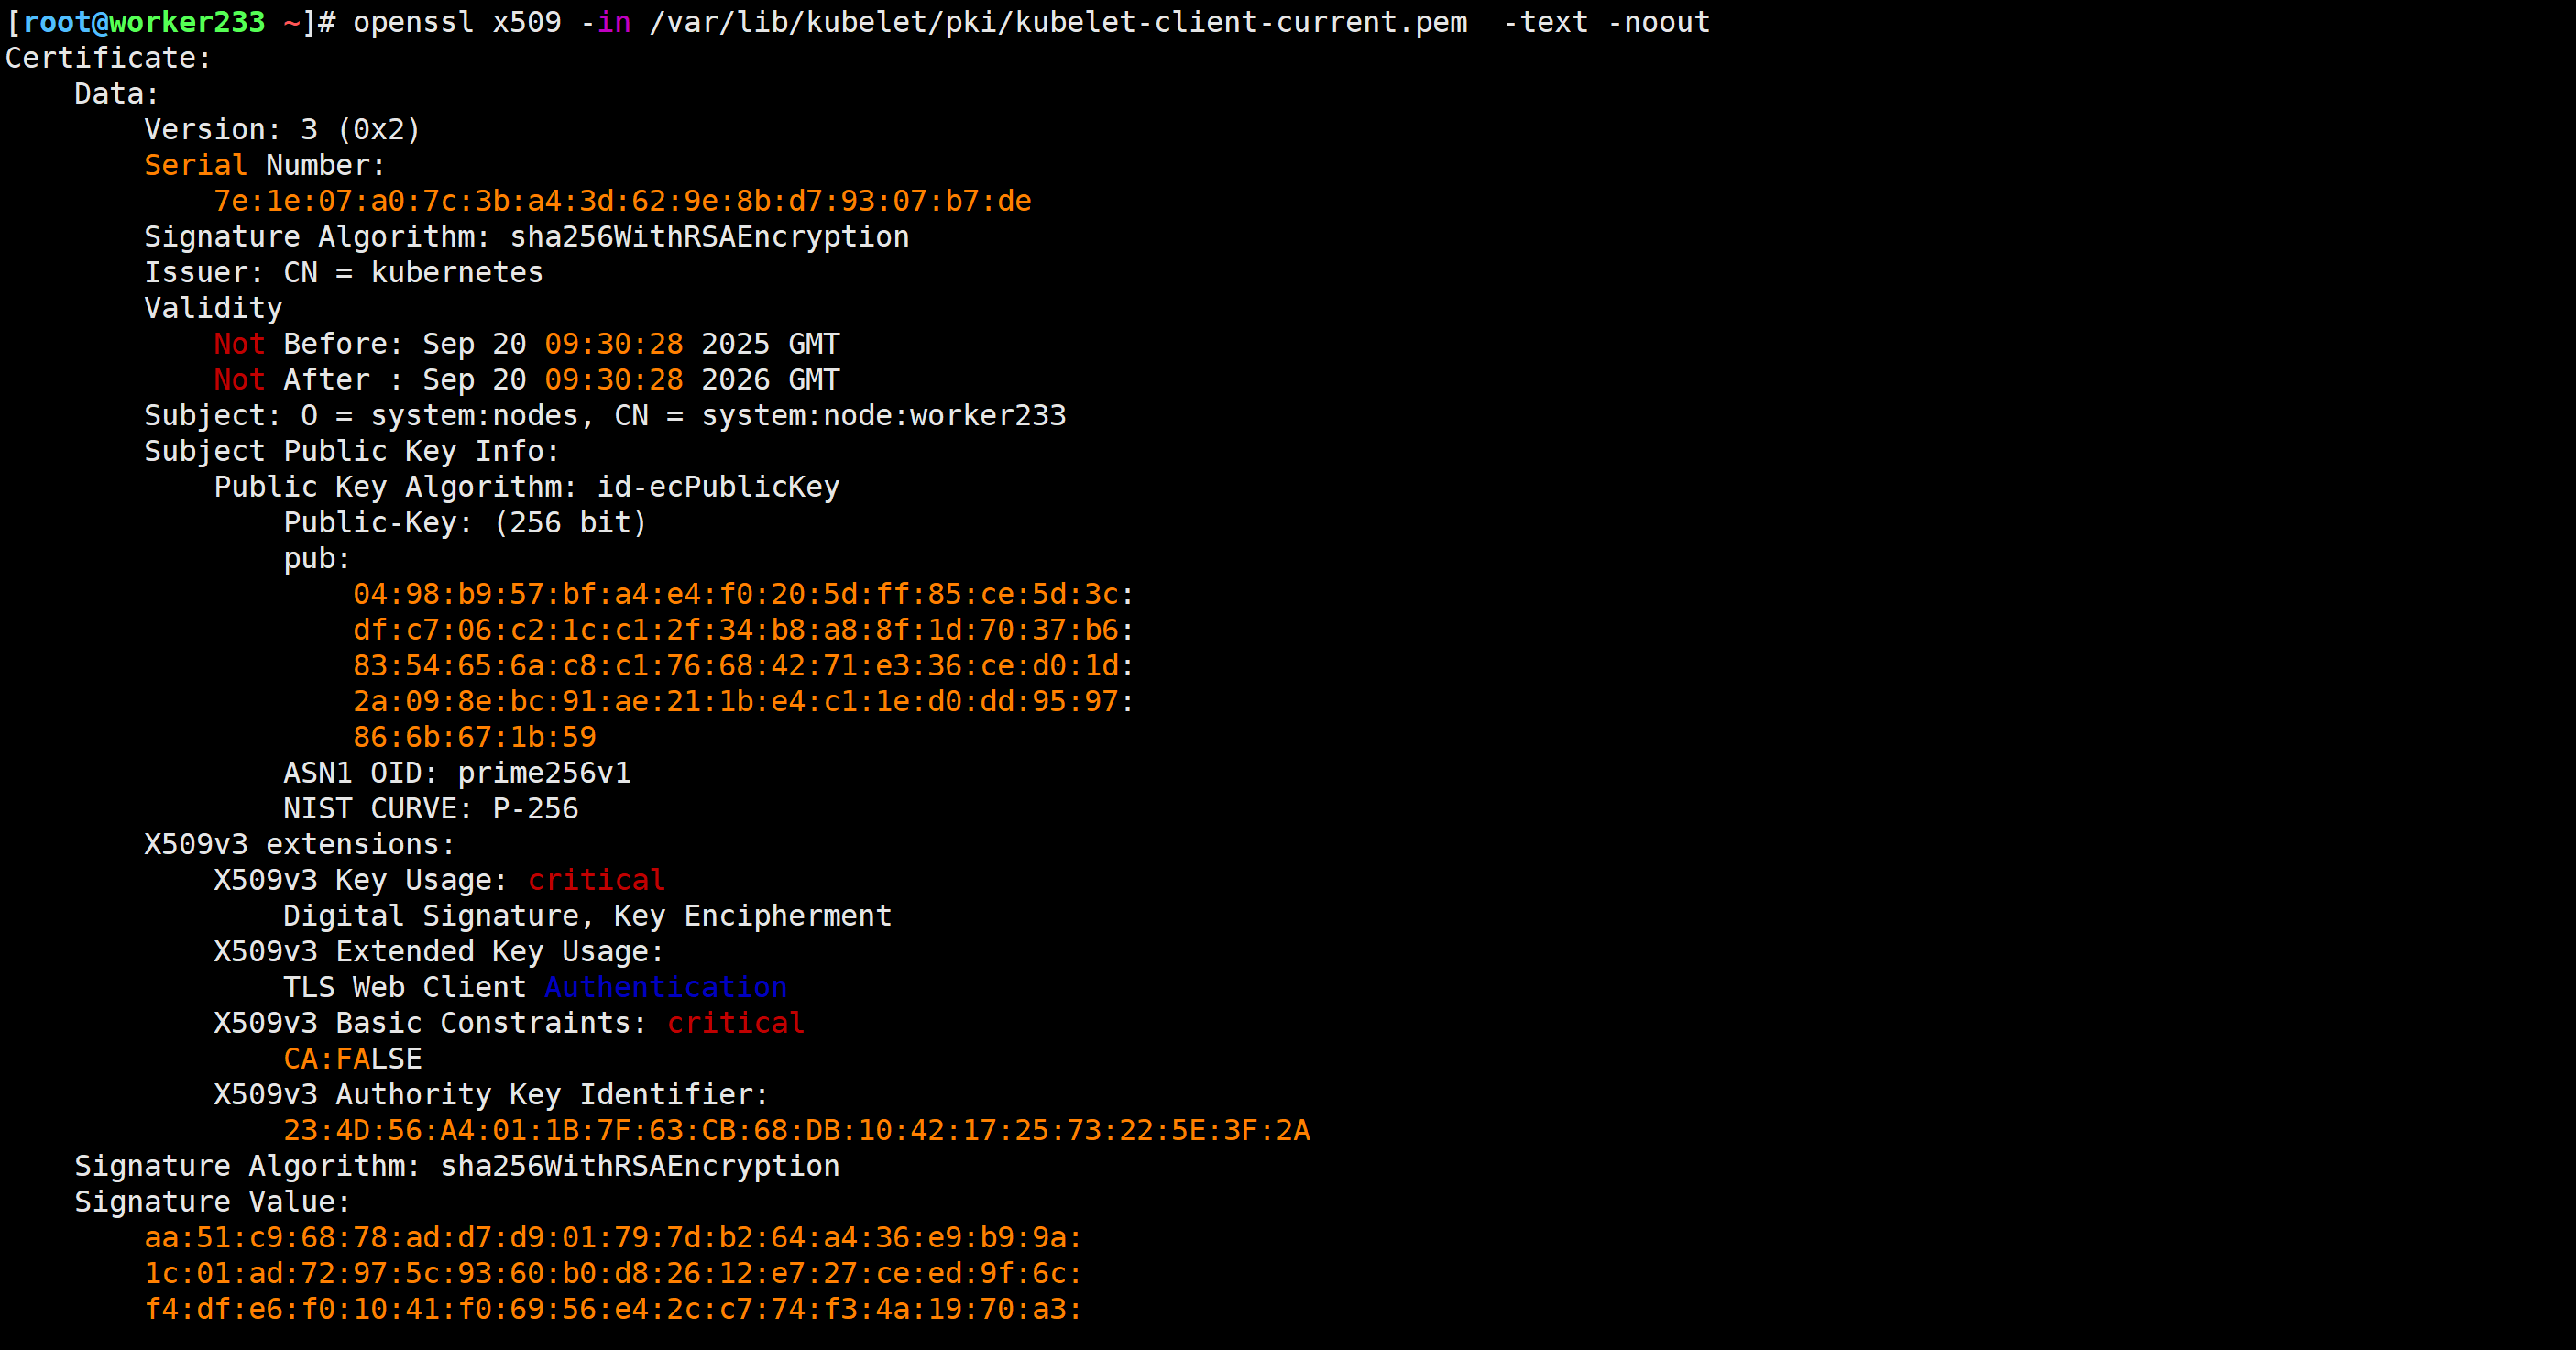
[root@worker232 ~]# openssl x509 -in /var/lib/kubelet/pki/kubelet-client-current.pem -text -noout
[root@worker233 ~]# openssl x509 -in /var/lib/kubelet/pki/kubelet-client-current.pem -text -noout
使用kube-controller-manager进行续签证书
参考链接:
https://kubernetes.io/zh-cn/docs/reference/command-line-tools-reference/kube-controller-manager/
修改静态Pod的kube-controller-manager资源清单
[root@master231 ~]# vim /etc/kubernetes/manifests/kube-controller-manager.yaml
...
spec:containers:- command:- kube-controller-manager...# 所签名证书的有效期限。每个 CSR 可以通过设置 spec.expirationSeconds 来请求更短的证书。- --cluster-signing-duration=87600h0m0s# 启用controner manager自动签发CSR证书,可以不配置,默认就是启用的,但是建议配置上!害怕未来版本发生变化!- --feature-gates=RotateKubeletServerCertificate=true
验证kube-controller-manager是否启动成功
[root@master231 ~]# kubectl get pods -n kube-system -l component=kube-controller-manager -o wide

要求kubelet的配置文件中支持证书滚动
默认是启用的,无需配置
[root@master231 ~]# grep rotateCertificates /var/lib/kubelet/config.yaml
rotateCertificates: true
[root@master231 ~]#
客户端节点修改节点的时间
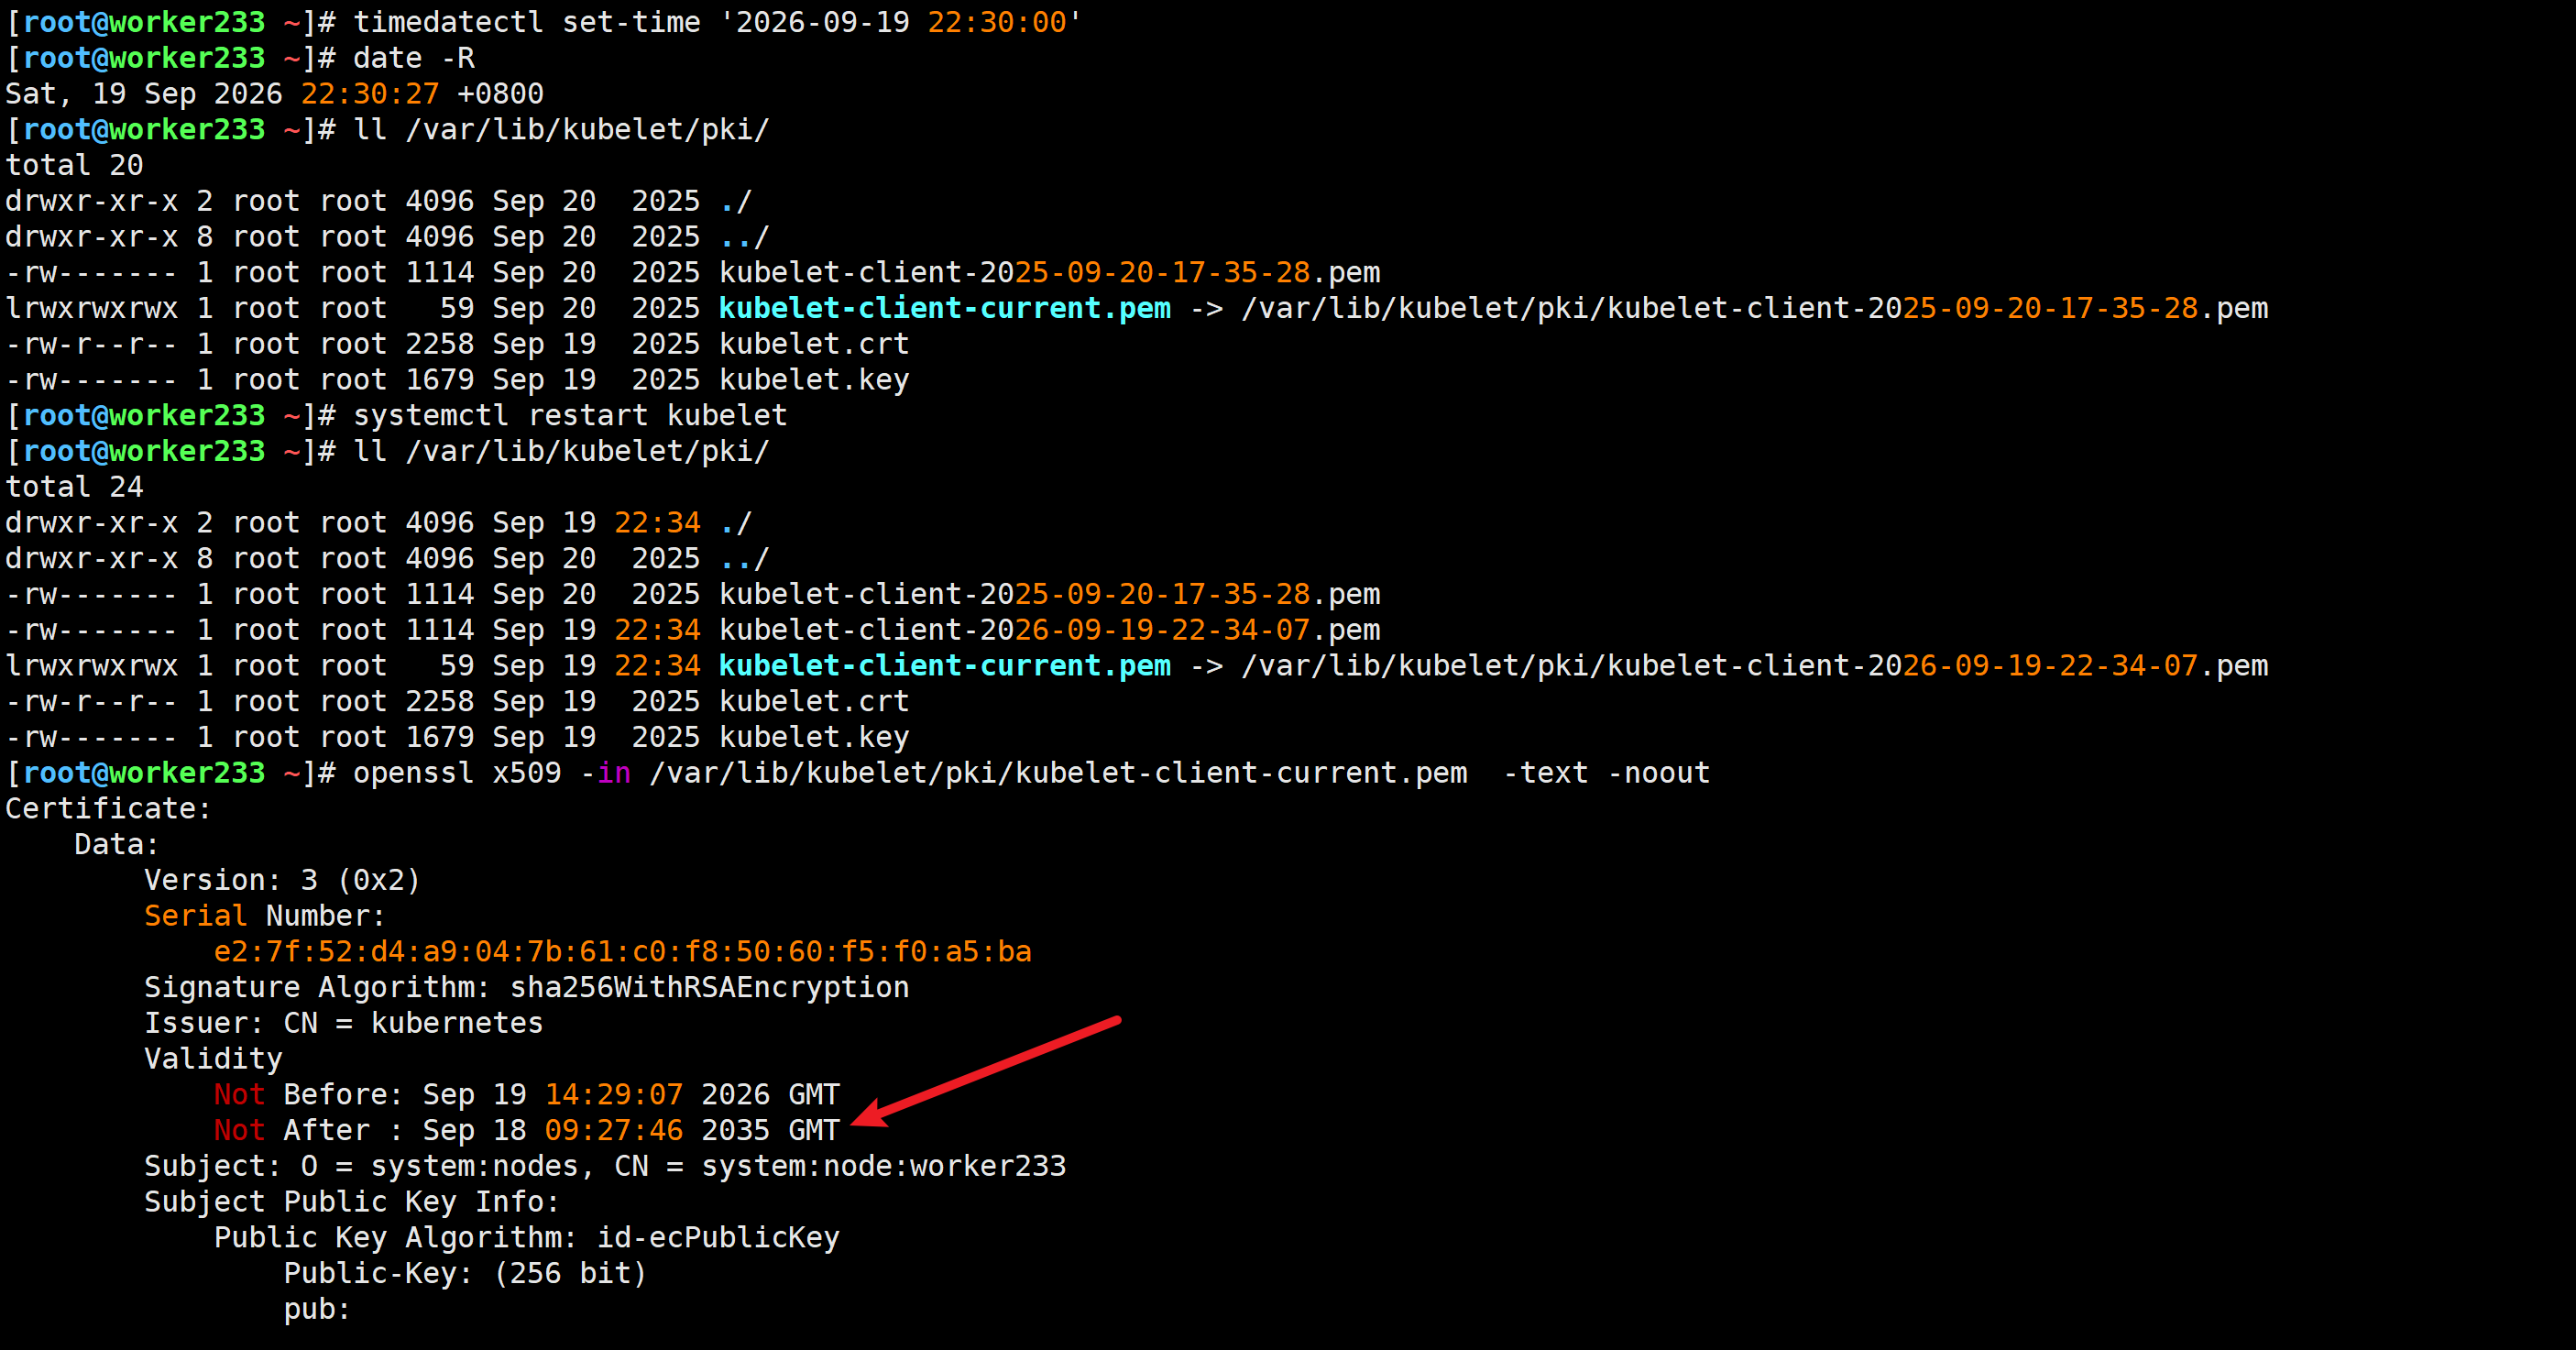
先关闭时间同步服务
[root@master231 ~]# timedatectl set-ntp off
[root@master231 ~]# [root@worker232 ~]# timedatectl set-ntp off
[root@worker232 ~]# [root@worker233 ~]# timedatectl set-ntp off
修改即将过期的时间的前一天
timedatectl set-time '2026-09-19 22:30:00'
date -R
Sat, 19 Sep 2026 22:30:27 +0800
重启kubelet
systemctl restart kubelet
查看客户端的证书有效期
openssl x509 -in /var/lib/kubelet/pki/kubelet-client-current.pem -text -noout
验证能够正常工作
生产环境中对于worker证书升级应该注意的事项
- 对生产环境一定要有敬畏之心,不可随意;
- 对证书有效期有效期进行监控,很多开源组件都支持,比如zabbix,prometheus等。
- 在重启kubelet节点时,应该注意滚动更新,不要批量重启,避免Pod大面积无法访问的情况,从而造成业务的损失,甚至生产故障;
- 尽量在业务的低谷期做升级,或者证书续期,备份,恢复等集群操作,影响最小;
🌟Kubernetes Autoscaler概述
Kubernetes Autoscaler项目主要包含三个部分,分别对应为: Cluster Autoscaler,Vertical Pod Autoscaler 和Addon Resizer。
Cluster Autoscaler(简称:"CA")是一个自动调整Kubernetes集群大小的组件,以确保所有Pod都有运行空间,且不存在多余的节点。该组件支持多家公有云提供商。其1.0版本(正式版)已随Kubernetes 1.8发布。Vertical Pod Autoscaler(简称:"VPA")一套可自动调整Kubernetes集群中运行的Pod所请求的CPU和内存量的组件。当前状态——测试版。Addon Resizer:VPA的简化版本,可根据Kubernetes集群中的节点数量调整部署的资源请求。当前状态 - 测试版。github地址: https://github.com/kubernetes/autoscaler
参考链接
参考链接:
https://github.com/kubernetes/autoscaler/blob/master/vertical-pod-autoscaler/docs/installation.md
克隆代码
[root@master231 ~]# git clone https://github.com/kubernetes/autoscaler.git
Cloning into 'autoscaler'...
remote: Enumerating objects: 229851, done.
remote: Counting objects: 100% (1561/1561), done.
remote: Compressing objects: 100% (1088/1088), done.
remote: Total 229851 (delta 990), reused 473 (delta 473), pack-reused 228290 (from 2)
Receiving objects: 100% (229851/229851), 251.90 MiB | 7.92 MiB/s, done.
Resolving deltas: 100% (149199/149199), done.
Updating files: 100% (8175/8175), done.
[root@master231 ~]#
切换分支
[root@master231 ~]# cd autoscaler/vertical-pod-autoscaler
[root@master231 vertical-pod-autoscaler]#
[root@master231 vertical-pod-autoscaler]# git branch
* master
[root@master231 vertical-pod-autoscaler]#
[root@master231 vertical-pod-autoscaler]# git checkout origin/vpa-release-0.11
Updating files: 100% (23665/23665), done.
Note: switching to 'origin/vpa-release-0.11'.You are in 'detached HEAD' state. You can look around, make experimental
changes and commit them, and you can discard any commits you make in this
state without impacting any branches by switching back to a branch.If you want to create a new branch to retain commits you create, you may
do so (now or later) by using -c with the switch command. Example:git switch -c <new-branch-name>Or undo this operation with:git switch -Turn off this advice by setting config variable advice.detachedHead to falseHEAD is now at 62c148acd Merge pull request #5272 from imageschool/patch-1
[root@master231 vertical-pod-autoscaler]#
[root@master231 vertical-pod-autoscaler]# git branch
* (HEAD detached at origin/vpa-release-0.11)master
[root@master231 vertical-pod-autoscaler]#
安装VPA
[root@master231 vertical-pod-autoscaler]# ./hack/vpa-up.sh
customresourcedefinition.apiextensions.k8s.io/verticalpodautoscalercheckpoints.autoscaling.k8s.io created
customresourcedefinition.apiextensions.k8s.io/verticalpodautoscalers.autoscaling.k8s.io created
clusterrole.rbac.authorization.k8s.io/system:metrics-reader created
clusterrole.rbac.authorization.k8s.io/system:vpa-actor created
clusterrole.rbac.authorization.k8s.io/system:vpa-checkpoint-actor created
clusterrole.rbac.authorization.k8s.io/system:evictioner created
clusterrolebinding.rbac.authorization.k8s.io/system:metrics-reader created
clusterrolebinding.rbac.authorization.k8s.io/system:vpa-actor created
clusterrolebinding.rbac.authorization.k8s.io/system:vpa-checkpoint-actor created
clusterrole.rbac.authorization.k8s.io/system:vpa-target-reader created
clusterrolebinding.rbac.authorization.k8s.io/system:vpa-target-reader-binding created
clusterrolebinding.rbac.authorization.k8s.io/system:vpa-evictionter-binding created
serviceaccount/vpa-admission-controller created
clusterrole.rbac.authorization.k8s.io/system:vpa-admission-controller created
clusterrolebinding.rbac.authorization.k8s.io/system:vpa-admission-controller created
clusterrole.rbac.authorization.k8s.io/system:vpa-status-reader created
clusterrolebinding.rbac.authorization.k8s.io/system:vpa-status-reader-binding created
serviceaccount/vpa-updater created
deployment.apps/vpa-updater created
serviceaccount/vpa-recommender created
deployment.apps/vpa-recommender created
Generating certs for the VPA Admission Controller in /tmp/vpa-certs.
Certificate request self-signature ok
subject=CN = vpa-webhook.kube-system.svc
Uploading certs to the cluster.
secret/vpa-tls-certs created
Deleting /tmp/vpa-certs.
deployment.apps/vpa-admission-controller created
service/vpa-webhook created
[root@master231 vertical-pod-autoscaler]#
验证组件是否安装正常
[root@master231 vertical-pod-autoscaler]# kubectl get pods -n kube-system -l 'app in (vpa-admission-controller,vpa-recommender,vpa-updater)' -o wide
NAME                                        READY   STATUS             RESTARTS   AGE   IP             NODE        NOMINATED NODE   READINESS GATES
vpa-admission-controller-6cd97b96bd-l8lnr   0/1     ImagePullBackOff   0          43s   10.100.2.79    worker233   <none>           <none>
vpa-recommender-649d9d8b7c-7j59k            0/1     ImagePullBackOff   0          45s   10.100.1.137   worker232   <none>           <none>
vpa-updater-549489d4d6-ggwwj                0/1     ImagePullBackOff   0          45s   10.100.2.78    worker233   <none>           <none>
[root@master231 vertical-pod-autoscaler]#
[root@master231 vertical-pod-autoscaler]#
[root@master231 vertical-pod-autoscaler]# kubectl get pods -n kube-system -l 'app in (vpa-admission-controller,vpa-recommender,vpa-updater)' -o yaml | grep "image:"  | awk '{print $3}' | sort  | uniq  k8s.gcr.io/autoscaling/vpa-admission-controller:0.11.0
k8s.gcr.io/autoscaling/vpa-recommender:0.11.0
k8s.gcr.io/autoscaling/vpa-updater:0.11.0
[root@master231 vertical-pod-autoscaler]#
温馨提示:
- 1.我们需要将这3个拉取到本地并上传到相应的节点即可。
- 2.手动修改控制器的镜像拉取策略为IfNotPresent;
vpa的工作模式
推荐阅读:
https://github.com/kubernetes/autoscaler/tree/vpa-release-0.11/vertical-pod-autoscaler#quick-start