【文件上传管理系统】实战详解 SpringBoot + Vue.js
一、介绍
这是一个基于 Spring Boot + Vue.js 的完整文件上传管理系统,提供了文件的上传、管理、查看、删除等功能。系统采用前后端分离架构,具有良好的用户界面和完善的功能体验。
二、核心功能
- 多文件上传: 支持同时上传多个文件,支持拖拽上传
- 文件管理: 查看文件列表、文件信息、文件大小等
- 文件操作: 文件预览、文件删除、文件搜索
- 用户体验: 现代化界面设计、响应式布局、操作反馈
三、效果展示
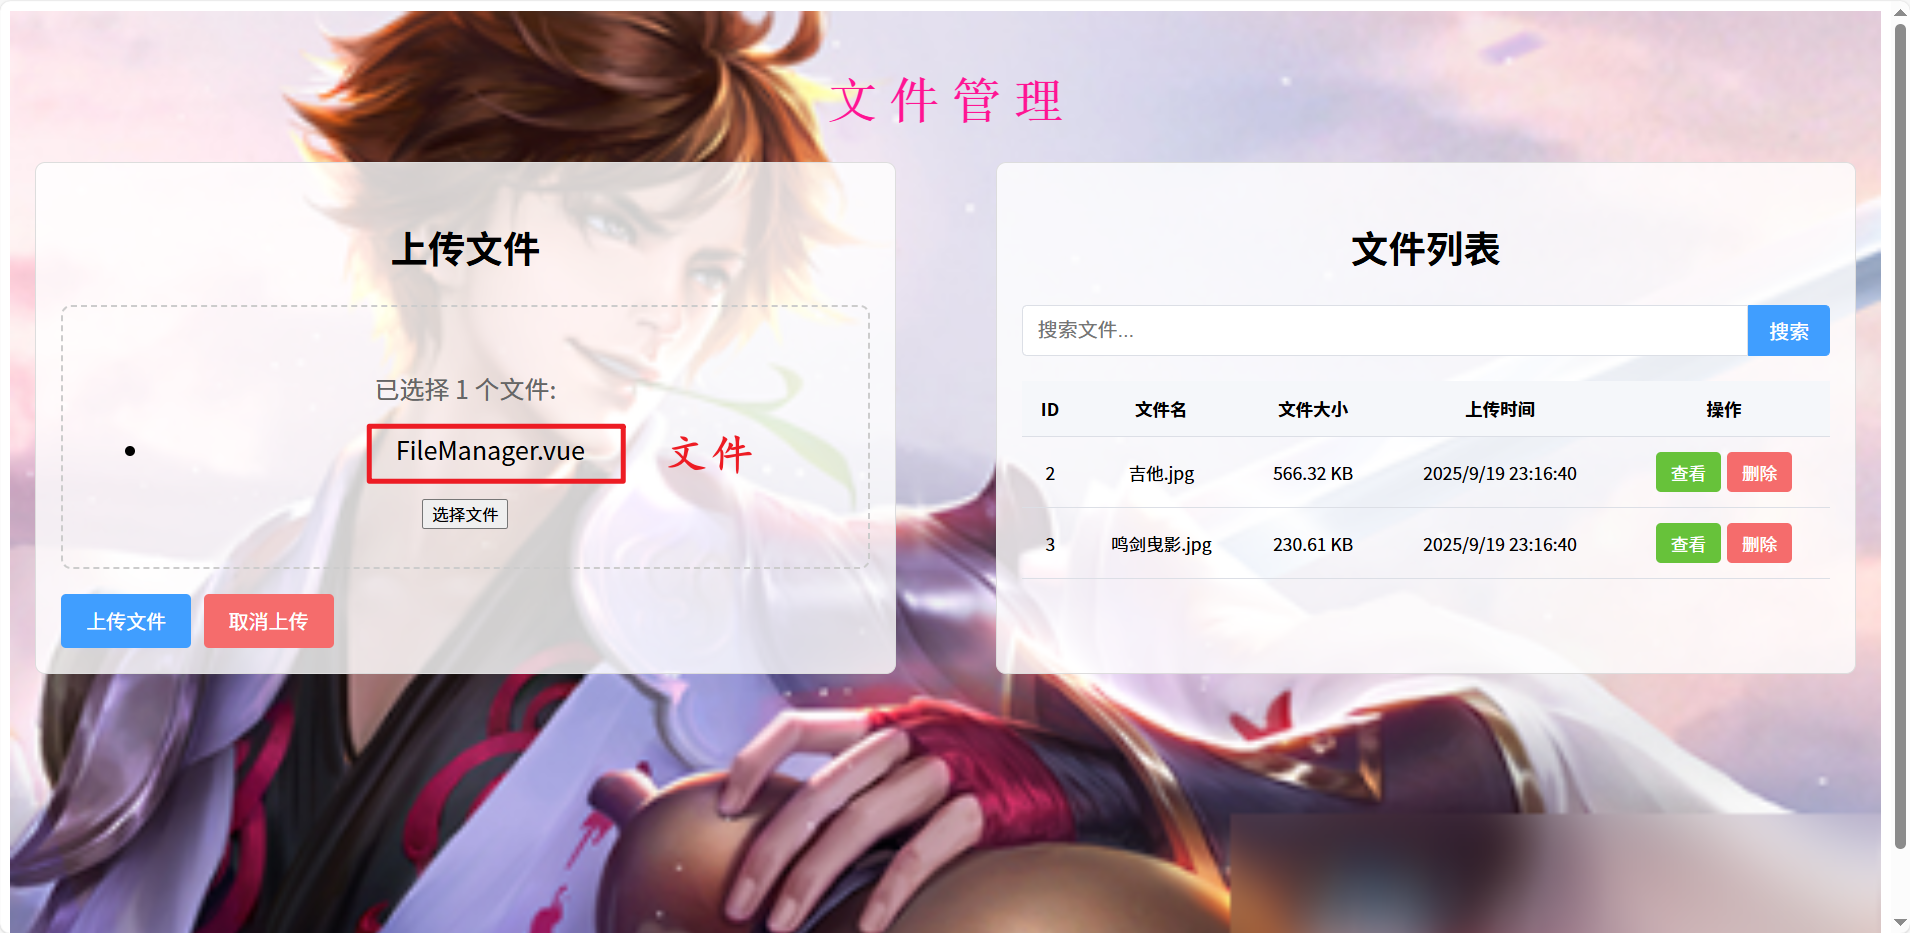
1. 整体页面效果

2. 上传文件功能
(1)选择图片,文件或视频

(2)文件上传到暂存区
(3)取消上传功能
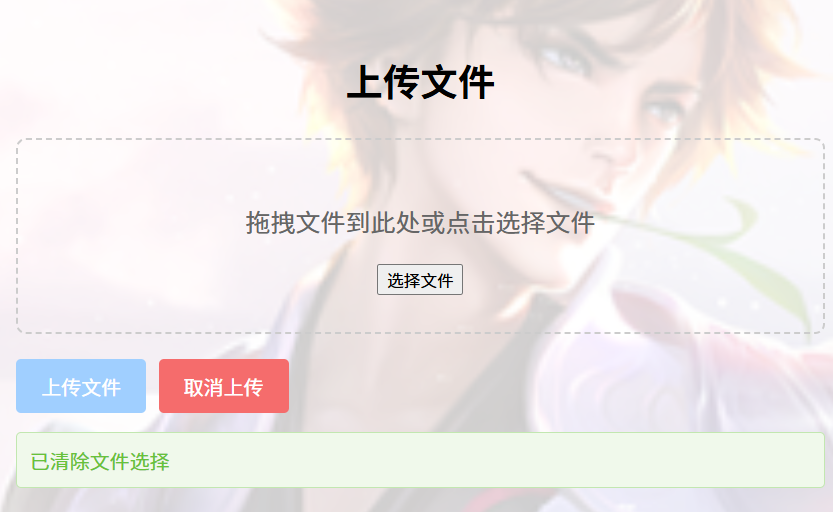
(4)上传成功效果图

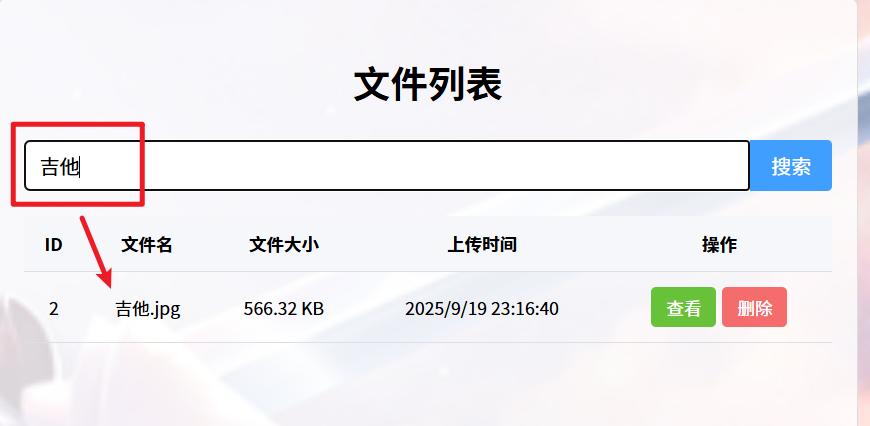
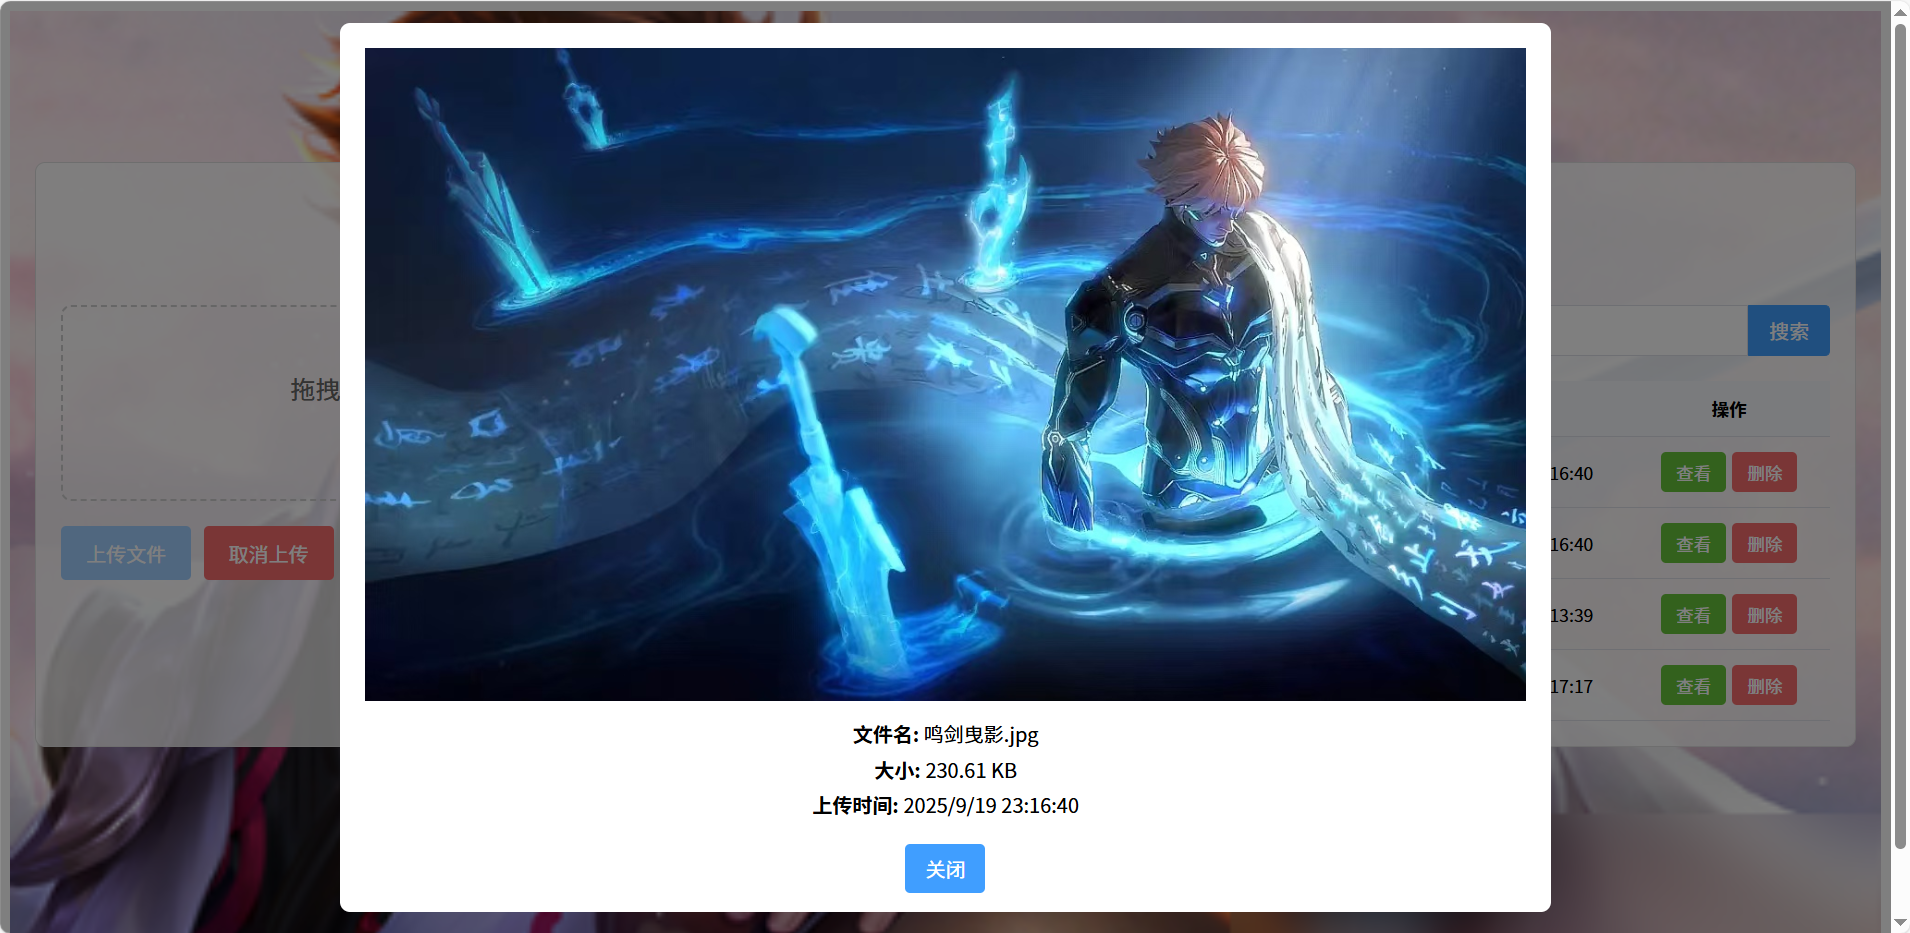
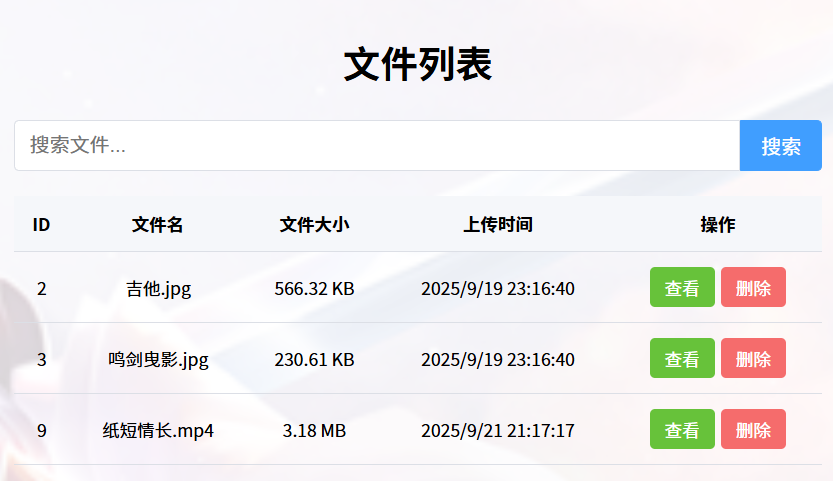
3. 文件列表管理
(1)搜索功能
(2)查看功能

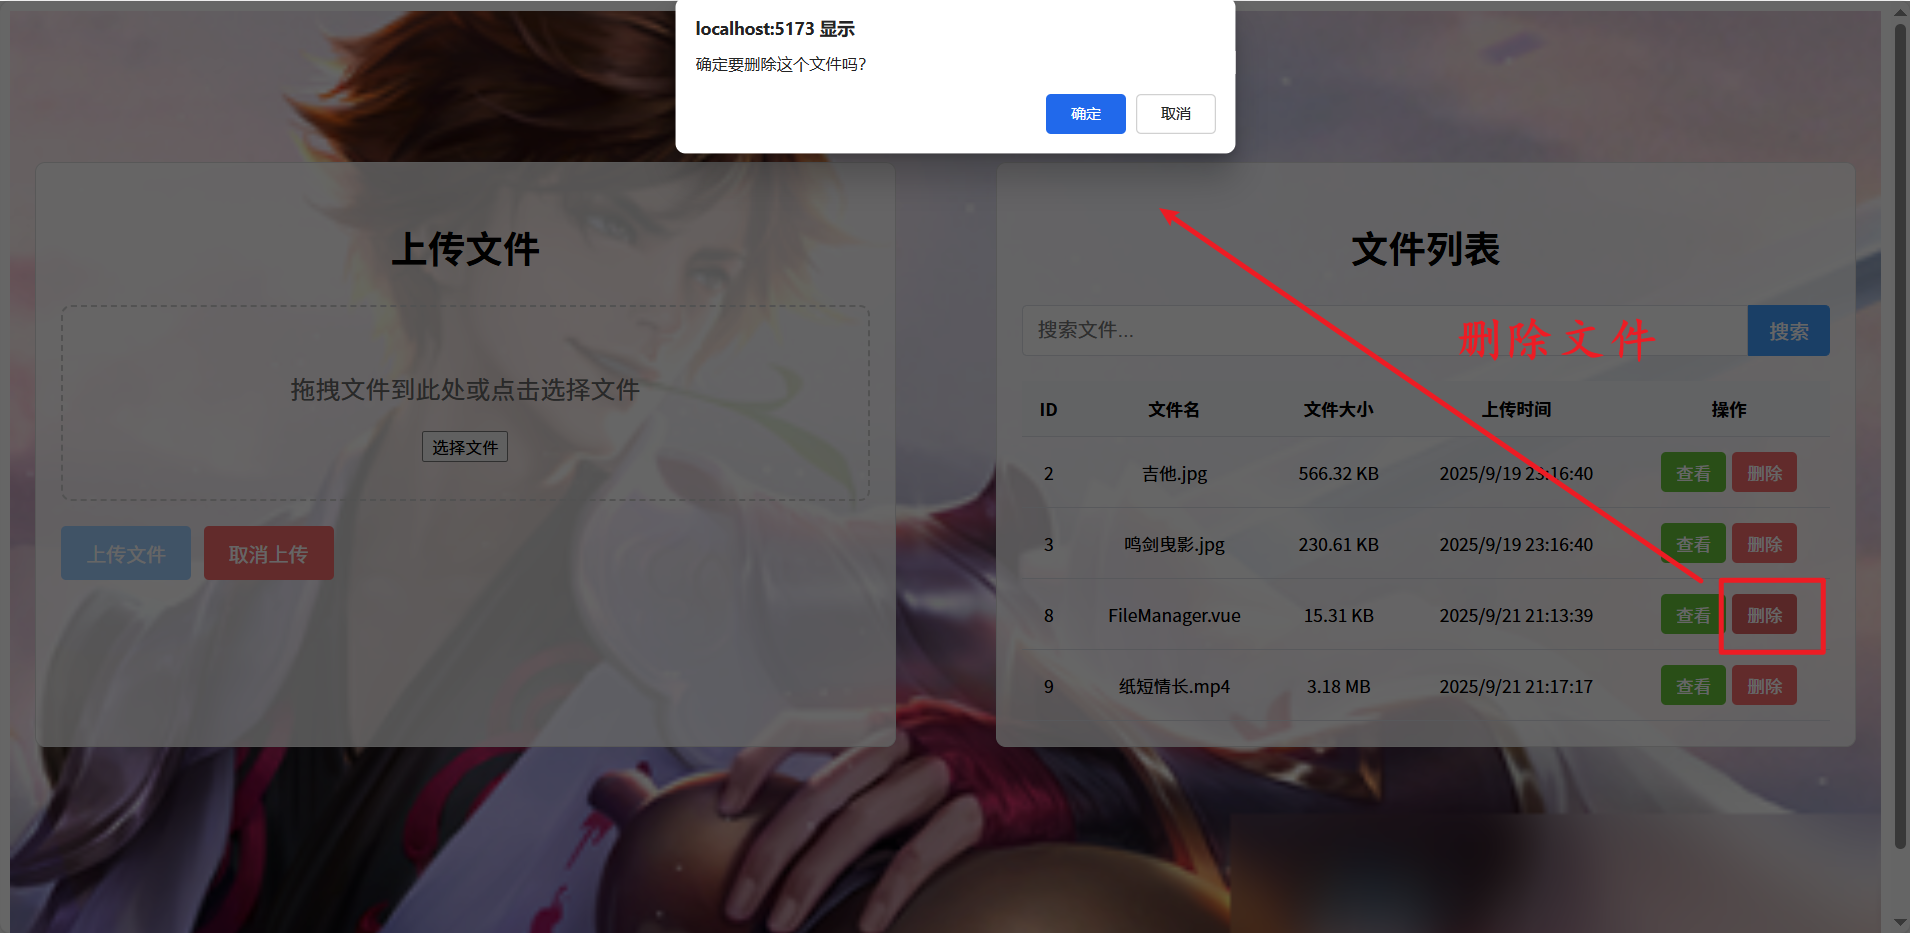
(3)删除功能
四、技术架构
1. 后端技术栈
技术 | 版本 | 用途 |
Spring Boot | 3.x | 应用框架 |
Spring MVC | 内置 | Web 框架 |
MyBatis | 3.x | ORM 框架 |
MySQL | 8.x | 数据库 |
Swagger | 3.x | API 文档 |
Lombok | 1.18.x | 代码简化 |
2. 前端技术栈
技术 | 版本 | 用途 |
Vue.js | 3.x | 前端框架 |
JavaScript | ES6+ | 脚本语言 |
CSS | 3 | 样式表 |
HTML | 5 | 页面结构 |
五、代码深度解析
1. 后端代码部分
(1)启动类 - UploadApplication.java
@SpringBootApplication
@MapperScan("com.breeze.upload.mapper")  // 指定MyBatis映射器扫描路径
public class UploadApplication implements WebMvcConfigurer {public static void main(String[] args) {// 启动Spring Boot应用SpringApplication.run(UploadApplication.class, args);}@Overridepublic void addResourceHandlers(ResourceHandlerRegistry registry) {// 配置上传文件的静态资源访问路径registry.addResourceHandler("/uploads/**").addResourceLocations("file:" + System.getProperty("user.dir") + "/uploads/");}
}
- @SpringBootApplication: 组合注解,包含@Configuration、@EnableAutoConfiguration、@ComponentScan
- @MapperScan: 告诉 MyBatis 扫描指定包下的 Mapper 接口
- main方法: 应用程序入口点
- addResourceHandlers: 配置静态资源访问,让前端可以直接访问上传的文件
(2)实体类 - File.java
@Data  // Lombok注解,自动生成getter、setter、toString等方法
public class File {private Long id;  // 文件IDprivate String originalName;  // 原始文件名private String fileName;  // 处理后的文件名(唯一)private String fileType;  // 文件类型(MIME类型)private Long fileSize;   // 文件大小(字节)private String filePath;   // 文件存储路径private LocalDateTime uploadTime;  // 上传时间private String fileUrl;  // 文件访问URL
}
(3)数据访问层 - FileMapper.java
@Mapper  // 标记为MyBatis映射器接口
public interface FileMapper {// 插入文件信息int insert(File file);// 根据id查询文件信息File findById(Long id);// 查询所有文件信息List<File> findAll();// 根据id删除文件信息int deleteById(Long id);
}
- @Mapper: 告诉 MyBatis 这是一个映射器接口
- 定义了基本的 CRUD 操作方法
- 方法名遵循 MyBatis 的命名规范,便于 XML 配置
(4)数据访问 XML 配置 - FileMapper.xml
<?xml version="1.0" encoding="UTF-8"?>
<!DOCTYPE mapper PUBLIC "-//mybatis.org//DTD Mapper 3.0//EN""http://mybatis.org/dtd/mybatis-3-mapper.dtd">
<!-- 命名空间,对应Mapper接口 -->
<mapper namespace="com.breeze.upload.mapper.FileMapper"><!-- 结果映射,将数据库字段映射到实体类属性 --><resultMap id="FileResultMap" type="com.breeze.upload.entity.File"><id property="id" column="id"/><result property="originalName" column="original_name"/><result property="fileName" column="file_name"/><result property="fileType" column="file_type"/><result property="fileSize" column="file_size"/><result property="filePath" column="file_path"/><result property="uploadTime" column="upload_time"/><result property="fileUrl" column="file_url"/></resultMap><!-- 插入文件记录 --><insert id="insert" parameterType="com.breeze.upload.entity.File" useGeneratedKeys="true" keyProperty="id">INSERT INTO files(original_name, file_name, file_type, file_size, file_path, upload_time)VALUES(#{originalName}, #{fileName}, #{fileType}, #{fileSize}, #{filePath}, #{uploadTime})</insert><!-- 根据ID查询文件 --><select id="findById" parameterType="java.lang.Long" resultMap="FileResultMap">SELECT * FROM files WHERE id = #{id} LIMIT 1</select><!-- 查询所有文件 --><select id="findAll" resultMap="FileResultMap">SELECT * FROM files</select><!-- 根据ID删除文件 --><delete id="deleteById" parameterType="java.lang.Long">DELETE FROM files WHERE id = #{id}</delete>
</mapper>
(5)服务层 - FileService.java
@Service  // 标记为服务层组件
public class FileService {@Autowiredprivate FileMapper fileMapper;// 从配置文件中读取文件上传目录@Value("${file.upload-dir:uploads}")private String uploadDir;/*** 获取文件上传目录*/public String getUploadDir() {return uploadDir;}/*** 获取所有文件*/public List<File> getAllFiles() {return fileMapper.findAll();}/*** 根据ID获取文件*/public File getFileById(Long id) {return fileMapper.findById(id);}/*** 保存文件*/public File saveFile(MultipartFile multipartFile) throws IOException {// 创建文件存储目录(如果不存在)Path uploadPath = Paths.get(uploadDir);if (!Files.exists(uploadPath)) {Files.createDirectories(uploadPath);}// 生成唯一文件名String originalFilename = multipartFile.getOriginalFilename();String fileExtension = getFileExtension(originalFilename);String uniqueFilename = UUID.randomUUID().toString() + "." + fileExtension;// 保存文件到磁盘Path filePath = uploadPath.resolve(uniqueFilename);Files.copy(multipartFile.getInputStream(), filePath, StandardCopyOption.REPLACE_EXISTING);// 生成文件访问URLString fileUrl = "/" + uniqueFilename;// 保存文件信息到数据库File file = new File();file.setOriginalName(originalFilename);file.setFileName(uniqueFilename);file.setFileType(multipartFile.getContentType());file.setFileSize(multipartFile.getSize());file.setFilePath(filePath.toString());file.setUploadTime(LocalDateTime.now());file.setFileUrl(fileUrl);fileMapper.insert(file);return file;}/*** 删除文件*/public boolean deleteFile(Long id) {// 先查询文件信息File file = fileMapper.findById(id);if (file == null) {return false;}// 删除磁盘上的文件try {Path filePath = Paths.get(file.getFilePath());Files.deleteIfExists(filePath);} catch (IOException e) {e.printStackTrace();}// 删除数据库记录int result = fileMapper.deleteById(id);return result > 0;}/*** 获取文件扩展名*/private String getFileExtension(String fileName) {if (fileName == null || fileName.lastIndexOf(".") == -1) {return "";}return fileName.substring(fileName.lastIndexOf(".") + 1);}
}
- @Service: 标记为 Spring 服务层组件
- @Value: 从配置文件中注入文件上传目录
- saveFile: 核心方法,包含文件保存的完整逻辑
- 创建目录(如果不存在)
- 生成唯一文件名(使用 UUID 避免重名)
- 保存文件到磁盘
- 保存文件信息到数据库
- deleteFile: 先删除磁盘文件,再删除数据库记录
(6)控制器 - FileController.java
/*** @author 邂逅星河浪漫* @date 2025/09/20*/
@RestController
@RequestMapping("/api/files")
@CrossOrigin
@Tag(name = "文件上传接口",description = "文件上传,搜索,查看接口")
public class FileController {@Autowiredprivate FileService fileService;@Operation(summary = "上传文件",description = "上传多个文件",tags = {"文件上传"})@PostMapping("/upload")public ResponseEntity<?> uploadFiles(@RequestParam(value = "files", required = false) MultipartFile[] files) {try {// 检查是否有文件被上传if (files == null || files.length == 0) {return ResponseEntity.badRequest().body("没有文件被上传,请确保选择了文件");}List<File> uploadedFiles = new ArrayList<>();for (MultipartFile file : files) {if (!file.isEmpty()) {File uploadedFile = fileService.saveFile(file);uploadedFiles.add(uploadedFile);}}// 检查是否有有效文件被处理if (uploadedFiles.isEmpty()) {return ResponseEntity.badRequest().body("没有有效的文件被处理,请确保选择的文件不为空");}return ResponseEntity.ok(uploadedFiles);} catch (IOException e) {return ResponseEntity.status(HttpStatus.INTERNAL_SERVER_ERROR).body("文件上传失败: " + e.getMessage());}}/*** @return*/@GetMappingpublic ResponseEntity<List<File>> getAllFiles() {List<File> files = fileService.getAllFiles();return ResponseEntity.ok(files);  // 返回所有文件}/*** @param id* @return*/@GetMapping("/{id}")public ResponseEntity<File> getFileById(@PathVariable Long id) {File file = fileService.getFileById(id);if (file != null) {return ResponseEntity.ok(file);  // 文件存在} else {return ResponseEntity.notFound().build();  // 文件不存在}}/*** @param id* @return*/@DeleteMapping("/{id}")public ResponseEntity<String> deleteFile(@PathVariable Long id) {boolean deleted = fileService.deleteFile(id);  // 调用删除文件方法if (deleted) {return ResponseEntity.ok("文件删除成功");} else {return ResponseEntity.status(HttpStatus.NOT_FOUND).body("文件不存在或删除失败");}}/*** @param filename* @return*/@GetMapping("/view/{filename}")public ResponseEntity<Resource> viewFile(@PathVariable String filename) {try {// 获取文件存储目录String uploadDir = fileService.getUploadDir();// 构建文件路径Path filePath = Paths.get(uploadDir).resolve(filename);  // 文件路径Resource resource = new UrlResource(filePath.toUri()); // 创建资源对象// 检查文件是否存在且可读if (resource.exists() || resource.isReadable()) {return ResponseEntity.ok()  // 返回文件内容.header(HttpHeaders.CONTENT_DISPOSITION, "inline; filename=\"" + resource.getFilename() + "\"").body(resource);  } else {return ResponseEntity.status(HttpStatus.NOT_FOUND).body(null); // 文件不存在}} catch (MalformedURLException e) {return ResponseEntity.status(HttpStatus.INTERNAL_SERVER_ERROR).body(null); // 文件路径错误}}
}- @RestController: 组合@Controller和@ResponseBody
- @RequestMapping("/api/files"): 设置基础 URL 路径
- @CrossOrigin: 允许跨域请求,解决前后端分离的跨域问题
- @Operation: Swagger 注解,用于 API 文档
- 每个方法对应一个 HTTP 请求处理:
- uploadFiles: 处理文件上传
- getAllFiles: 获取所有文件列表
- getFileById: 根据 ID 获取单个文件
- deleteFile: 删除文件
- viewFile: 查看文件内容
(7)配置文件 - application.yaml
spring:application:name: upload# 数据库配置datasource:url: jdbc:mysql://localhost:3306/file_upload?useUnicode=true&characterEncoding=utf8&useSSL=false&serverTimezone=GMT%2B8username: password: driver-class-name: com.mysql.cj.jdbc.Driver# 文件上传配置servlet:multipart:max-file-size: 100MB  # 单个文件最大max-request-size: 100MB # 请求最大# 静态资源配置web:resources:static-locations: file:uploads/# MyBatis配置
mybatis:configuration:map-underscore-to-camel-case: true # 开启驼峰命名mapper-locations: classpath:mapper/*.xml # mapper文件位置# 文件存储目录
file:upload-dir: uploads# springdoc swagger配置
springdoc:api-docs:enabled: true   # api-docs是否启用path: /v3/api-docs  # api-docs访问路径swagger-ui:enabled: true     # swagger-ui是否启用path: /swagger-ui.html   # swagger-ui访问路径packages-to-scan: com.breeze.upload.controller # 扫描的包,自行更改!路径要写对!paths-to-match: /api/**  # 匹配的接口路径,自行更改
- spring.datasource: 数据库连接配置
- spring.servlet.multipart: 文件上传大小限制
- mybatis.configuration.map-underscore-to-camel-case: 开启驼峰命名映射
- file.upload-dir: 文件存储目录配置
- springdoc: Swagger 文档配置
2. 前端代码部分
(1)核心数据存储(响应式状态定义)
<script setup>
import { ref, onMounted } from 'vue'// 1. 文件列表核心数据(后端返回的文件信息存储)
const files = ref([]) // 存储所有文件列表
const loading = ref(false) // 列表加载状态
const searchTerm = ref('') // 搜索关键词(关联后端搜索逻辑)// 2. 文件上传核心数据
const fileInput = ref(null) // 关联文件选择输入框
const selectedFiles = ref([]) // 存储待上传的本地文件
const uploading = ref(false) // 上传状态
const uploadMessage = ref('') // 上传结果消息
const uploadMessageType = ref('') // 消息类型(success/error)
const uploadController = ref(null) // 上传中断控制器// 3. 文件预览核心数据(关联后端预览接口)
const previewModal = ref(false) // 预览模态框状态
const previewUrl = ref('') // 后端返回的文件预览地址
const currentFile = ref(null) // 当前预览的文件信息
(2)与后端交互的核心接口调用
a. 获取文件列表(GET /api/files)
// 从后端获取文件列表,支持前端临时过滤(待后端搜索接口完善后可替换)
const fetchFiles = async () => {try {loading.value = truelet url = '/api/files' // 后端文件列表接口// 调用后端接口const response = await fetch(url)if (response.ok) {let result = await response.json() // 接收后端返回的文件列表数据// 前端临时过滤(若后端有搜索接口,可替换为带参数的GET请求)if (searchTerm.value.trim()) {const keyword = searchTerm.value.toLowerCase()result = result.filter(file =>file.originalName && file.originalName.toLowerCase().includes(keyword))}files.value = result // 将后端数据存入响应式状态,用于页面渲染} else {console.error('获取文件列表失败:', response.status)}} catch (error) {console.error('获取文件列表出错(网络/后端异常):', error)} finally {loading.value = false}
}// 组件挂载时自动调用,初始化文件列表
onMounted(() => {fetchFiles()
})
b. 文件上传(POST /api/files/upload)
// 向后端上传文件(支持多文件)
const uploadFiles = async () => {if (selectedFiles.value.length === 0) {showMessage('请选择文件', 'error')return}uploading.value = trueuploadMessage.value = ''try {const formData = new FormData()// 构建表单数据(与后端接口参数"files"对应)selectedFiles.value.forEach(file => {formData.append('files', file)})// 创建上传中断控制器(支持取消上传)uploadController.value = new AbortController()const signal = uploadController.value.signal// 调用后端上传接口const response = await fetch('/api/files/upload', {method: 'POST',body: formData,signal: signal // 绑定中断信号})if (response.ok) {await response.json() // 接收后端上传成功后的文件信息(可用于更新列表)showMessage('文件上传成功', 'success')selectedFiles.value = [] // 清空待上传列表fetchFiles() // 重新获取列表,同步后端数据} else {const errorText = await response.text() // 接收后端错误信息showMessage(`上传失败: ${errorText}`, 'error')}} catch (error) {if (error.name === 'AbortError') {showMessage('上传已取消', 'error')} else {showMessage(`上传出错(网络/后端异常): ${error.message}`, 'error')}} finally {uploading.value = falseuploadController.value = null}
}// 取消上传(调用AbortController中断请求)
const cancelUpload = () => {if (uploading.value && uploadController.value) {uploadController.value.abort() // 通知后端中断上传uploading.value = falseshowMessage('上传已取消', 'error')}selectedFiles.value = []if (fileInput.value) fileInput.value.value = '' // 重置文件输入框
}
c. 文件删除(DELETE /api/files/{id})
// 调用后端删除接口,删除指定ID的文件
const deleteFile = async (fileId) => {if (!confirm('确定要删除这个文件吗?')) returntry {// 调用后端删除接口(路径带文件ID)const response = await fetch(`/api/files/${fileId}`, {method: 'DELETE'})if (response.ok) {const message = await response.text() // 接收后端删除成功消息showMessage(message, 'success')fetchFiles() // 重新获取列表,同步后端删除后的数据} else if (response.status === 404) {showMessage('文件不存在(后端返回404)', 'error')} else {const errorText = await response.text() // 接收后端删除错误信息showMessage(`删除失败: ${errorText}`, 'error')}} catch (error) {console.error('删除文件出错(网络/后端异常):', error)showMessage(`删除出错: ${error.message}`, 'error')}
}
d. 文件预览(GET /api/files/view/{filename})
// 调用后端预览接口,获取文件预览地址
const viewFile = (file) => {currentFile.value = file // 存储当前预览文件信息// 拼接后端预览接口地址(路径带后端存储的文件名)previewUrl.value = `/api/files/view/${file.fileName}`previewModal.value = true // 打开预览模态框
}// 关闭预览(清空预览数据)
const closePreview = () => {previewModal.value = falsepreviewUrl.value = ''currentFile.value = null
}
六、 相关技术知识
1. Spring Boot 核心概念
依赖注入 (Dependency Injection)
Spring Boot 使用依赖注入来管理组件之间的关系:
@RestController public class FileController { @Autowired // 依赖注入 private FileService fileService; } |
控制反转 (Inversion of Control)
Spring 容器负责创建和管理对象的生命周期,开发者只需要定义组件,不需要关心对象的创建过程。
自动配置 (Auto-configuration)
Spring Boot 根据类路径上的依赖自动配置应用程序:
@SpringBootApplication // 启用自动配置 public class UploadApplication { // ... } |
2. 文件上传原理
MultipartFile 接口
Spring 提供的MultipartFile接口用于处理文件上传:
@PostMapping("/upload") public ResponseEntity<?> uploadFiles(@RequestParam("files") MultipartFile[] files) { // 处理文件上传 } |
文件存储策略
- 本地文件系统存储: 简单直接,适合小型应用
- 数据库存储: 将文件二进制数据存储在数据库中
- 云存储: AWS S3、阿里云 OSS 等
- 分布式文件系统: HDFS、FastDFS 等
安全考虑
- 限制文件大小和类型
- 生成唯一文件名避免冲突
- 存储文件到 Web 应用外部目录
- 对上传文件进行安全检查
3. 前后端通信
RESTful API 设计
遵循 RESTful 风格设计 API:
- GET: 获取资源
- POST: 创建资源
- PUT: 更新资源
- DELETE: 删除资源
HTTP 状态码使用
// 成功 ResponseEntity.ok() // 200 OK // 客户端错误 ResponseEntity.badRequest() // 400 Bad Request ResponseEntity.notFound() // 404 Not Found // 服务器错误 ResponseEntity.status(HttpStatus.INTERNAL_SERVER_ERROR) // 500 Internal Server Error |
CORS 配置
处理跨域请求:
@CrossOrigin // 允许所有来源的跨域请求 // 或更细粒度的配置 @CrossOrigin(origins = "http://localhost:8081", maxAge = 3600) |