UI Toolkit自定义元素
UI Toolkit 支持通过继承 VisualElement 实现自定义元素,便于通过脚本控制元素。另外,UI Toolkit 也支持将一个容器及其所有子元素作为一个模板,便于通过脚本复制模板。
自定义元素
UI搭建
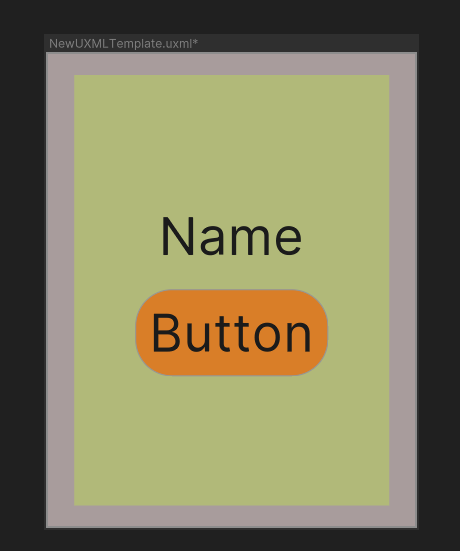
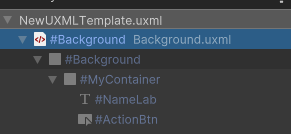
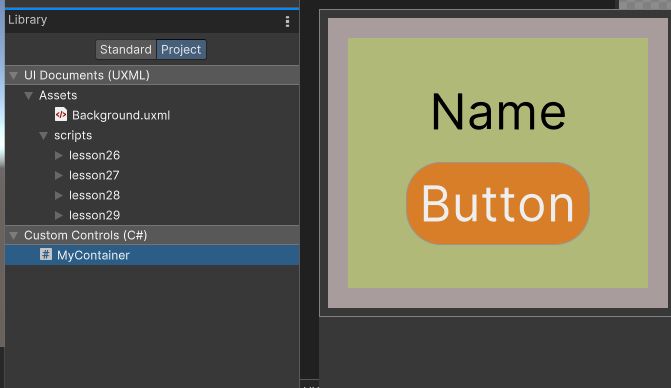
搭建 UI 如下,其中 Background 和 MyContainer 是 VisualElement,NameLab 是 Label,ActionBtn 是 Button。
<ui:UXML xmlns:ui="UnityEngine.UIElements" xmlns:uie="UnityEditor.UIElements" xsi="http://www.w3.org/2001/XMLSchema-instance" engine="UnityEngine.UIElements" editor="UnityEditor.UIElements" noNamespaceSchemaLocation="../../../UIElementsSchema/UIElements.xsd" editor-extension-mode="False"><ui:VisualElement name="Background" style="flex-grow: 1; background-color: rgb(168, 156, 156);"><ui:VisualElement name="MyContainer" style="flex-grow: 1; width: 300px; height: 250px; background-color: rgb(177, 185, 121); -unity-text-align: upper-center; align-items: center; justify-content: center; align-self: center; margin-left: 20px; margin-right: 20px; margin-top: 20px; margin-bottom: 20px;"><ui:Label tabindex="-1" text="Name" parse-escape-sequences="true" display-tooltip-when-elided="true" name="NameLab" style="font-size: 50px; -unity-font: url("project://database/Assets/UI%20Toolkit/UnityThemes/UnityDefaultRuntimeTheme.tss?fileID=2230732570650464555&guid=ac74db95a15f12a4ab456d82211a2949&type=3#NotInter-Regular"); margin-top: 10px; margin-right: 10px; margin-bottom: 10px; margin-left: 10px; padding-top: 0; padding-right: 0; padding-bottom: 0; padding-left: 0;" /><ui:Button text="Button" parse-escape-sequences="true" display-tooltip-when-elided="true" name="ActionBtn" style="font-size: 50px; margin-top: 10px; margin-right: 10px; margin-bottom: 10px; margin-left: 10px; background-color: rgb(217, 126, 40); border-top-width: 1px; border-right-width: 1px; border-bottom-width: 1px; border-left-width: 1px; border-top-left-radius: 35px; border-top-right-radius: 35px; border-bottom-right-radius: 35px; border-bottom-left-radius: 35px; justify-content: center;" /></ui:VisualElement></ui:VisualElement>
</ui:UXML>
显示如下
创建模板
选中 MyContainer,右键弹出菜单,选择 Create Template,选择 Resources 目录下保存 MyContainer.uxml 文件。
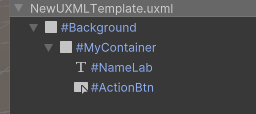
保存模板后,Hierarchy 层级结构如下。可以看到,原来的 MyContainer 变成不可编辑的了,并且其上又套了一个空对象。
自定义元素
using System.Collections;
using System.Collections.Generic;
using UnityEngine;
using UnityEngine.UIElements;public class MyContainer : VisualElement //MyContainer 继承自 VisualElement,这意味着它可以作为 UI 元素使用
{private TemplateContainer container;// 便于在UI Builder中导入自定义UI, 需要有无参构造函数public new class UxmlFactory : UxmlFactory<MyContainer> { }
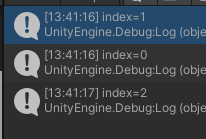
//这是一个工厂类,允许 MyContainer 在 UI Builder 和 UXML 文件中使用public MyContainer() {container = Resources.Load<VisualTreeAsset>("Background").Instantiate();container.style.flexGrow = 1.0f;hierarchy.Add(container);//将实例化的容器添加到当前元素的层次结构中}public MyContainer(int index) : this() {Label label = container.Q<Label>();label.text = "Name" + index;Button button = container.Q<Button>();button.clicked += () => Debug.Log("index=" + index);}
}编译后,在 UI Builder 中可以看到自定义的 UI,可以像内置 UI 一样拖拽到 Hierarchy 中使用。将鼠标悬浮在 MyContainer.cs 上,会弹出 UI 预览效果,如下。
加载元素
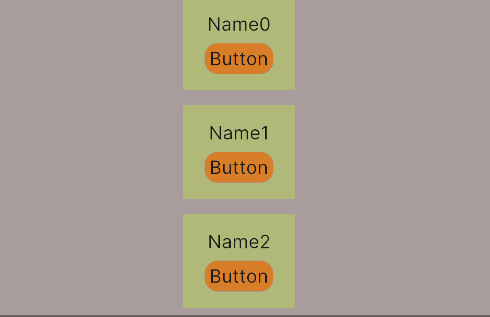
public class UILoader : MonoBehaviour
{ private VisualElement root; private void Awake(){ root = GetComponent<UIDocument>().rootVisualElement; VisualElement body = root.Q("Background"); body.Clear(); for (int i = 0; i < 3; i++) { MyContainer customContainer = new MyContainer(i); body.Add(customContainer); } }
}运行效果