探索 Event 框架 5:实现Spring Boot集成
在前面的章节中,我们已经实现了一个功能完整的事件框架,包括事件总线、事件监听器和注解支持。然而,在实际应用中,我们通常会使用Spring Boot等框架来构建应用。本章将介绍如何将我们的事件框架与Spring Boot集成,使其更加易用和强大。
5.1 Spring Boot集成的优势
将事件框架与Spring Boot集成有以下几个优势:
- 自动配置:利用Spring Boot的自动配置机制,自动创建和配置事件总线。
- 依赖注入:利用Spring的依赖注入机制,自动注入事件总线和其他组件。
- 组件扫描:利用Spring的组件扫描机制,自动发现和注册带有注解的事件监听器。
- 生命周期管理:利用Spring的生命周期管理机制,管理事件总线和监听器的生命周期。
- 与Spring事件的集成:可以与Spring的事件机制集成,实现更加强大的事件处理能力。
5.2 创建Spring Boot Starter
为了方便使用,我们将创建一个Spring Boot Starter,用于自动配置事件框架。首先,我们需要创建一个新的Maven项目,并添加以下依赖:
<dependencies><!-- Spring Boot Starter --><dependency><groupId>org.springframework.boot</groupId><artifactId>spring-boot-starter</artifactId></dependency><!-- Spring Boot AutoConfigure --><dependency><groupId>org.springframework.boot</groupId><artifactId>spring-boot-autoconfigure</artifactId></dependency><!-- 我们的事件框架 --><dependency><groupId>com.example</groupId><artifactId>event-framework</artifactId><version>1.0.0</version></dependency>
</dependencies>
5.3 创建自动配置类
接下来,我们需要创建一个自动配置类,用于自动创建和配置事件总线:
package com.example.eventframework.spring;import com.example.eventframework.EventBus;
import com.example.eventframework.DefaultEventBus;
import com.example.eventframework.AsyncEventBus;
import org.springframework.boot.autoconfigure.condition.ConditionalOnMissingBean;
import org.springframework.boot.autoconfigure.condition.ConditionalOnProperty;
import org.springframework.boot.context.properties.EnableConfigurationProperties;
import org.springframework.context.annotation.Bean;
import org.springframework.context.annotation.Configuration;import java.util.concurrent.Executors;@Configuration
@EnableConfigurationProperties(EventFrameworkProperties.class)
public class EventFrameworkAutoConfiguration {private final EventFrameworkProperties properties;public EventFrameworkAutoConfiguration(EventFrameworkProperties properties) {this.properties = properties;}/*** 创建默认的事件总线*/@Bean@ConditionalOnMissingBean@ConditionalOnProperty(name = "event-framework.async", havingValue = "false", matchIfMissing = true)public EventBus eventBus() {return new DefaultEventBus();}/*** 创建异步事件总线*/@Bean@ConditionalOnMissingBean@ConditionalOnProperty(name = "event-framework.async", havingValue = "true")public EventBus asyncEventBus() {int threadPoolSize = properties.getThreadPoolSize();return new AsyncEventBus(Executors.newFixedThreadPool(threadPoolSize));}
}
这个自动配置类使用了Spring Boot的条件注解,根据配置属性创建同步或异步事件总线。
5.4 创建配置属性类
为了支持自定义配置,我们需要创建一个配置属性类:
package com.example.eventframework.spring;import org.springframework.boot.context.properties.ConfigurationProperties;@ConfigurationProperties(prefix = "event-framework")
public class EventFrameworkProperties {/*** 是否使用异步事件总线*/private boolean async = false;/*** 异步事件总线的线程池大小*/private int threadPoolSize = Runtime.getRuntime().availableProcessors();/*** 是否自动扫描带有注解的监听器*/private boolean autoScan = true;// Getter和Setter方法public boolean isAsync() {return async;}public void setAsync(boolean async) {this.async = async;}public int getThreadPoolSize() {return threadPoolSize;}public void setThreadPoolSize(int threadPoolSize) {this.threadPoolSize = threadPoolSize;}public boolean isAutoScan() {return autoScan;}public void setAutoScan(boolean autoScan) {this.autoScan = autoScan;}
}
这个配置属性类定义了事件框架的配置选项,包括是否使用异步事件总线、线程池大小和是否自动扫描带有注解的监听器。
5.5 创建事件监听器注册器
为了自动扫描和注册带有 @EventSubscribe 注解的方法,我们需要创建一个事件监听器注册器:
package com.example.eventframework.spring;import com.example.eventframework.EventBus;
import org.springframework.beans.BeansException;
import org.springframework.beans.factory.config.BeanPostProcessor;
import org.springframework.context.ApplicationContext;
import org.springframework.context.ApplicationContextAware;public class EventListenerRegistrar implements BeanPostProcessor, ApplicationContextAware {private final EventBus eventBus;private final EventFrameworkProperties properties;private ApplicationContext applicationContext;public EventListenerRegistrar(EventBus eventBus, EventFrameworkProperties properties) {this.eventBus = eventBus;this.properties = properties;}@Overridepublic void setApplicationContext(ApplicationContext applicationContext) throws BeansException {this.applicationContext = applicationContext;}@Overridepublic Object postProcessAfterInitialization(Object bean, String beanName) throws BeansException {// 如果启用了自动扫描,则扫描带有注解的方法if (properties.isAutoScan()) {eventBus.scanAndRegister(bean);}return bean;}
}
这个注册器实现了 BeanPostProcessor 接口,在每个Bean初始化后,扫描其中带有 @EventSubscribe 注解的方法,并注册到事件总线。
5.6 注册事件监听器注册器
接下来,我们需要在自动配置类中注册事件监听器注册器:
@Configuration
@EnableConfigurationProperties(EventFrameworkProperties.class)
public class EventFrameworkAutoConfiguration {// 前面的代码.../*** 创建事件监听器注册器*/@Bean@ConditionalOnProperty(name = "event-framework.auto-scan", havingValue = "true", matchIfMissing = true)public EventListenerRegistrar eventListenerRegistrar(EventBus eventBus) {return new EventListenerRegistrar(eventBus, properties);}
}
5.7 创建Spring Boot Starter的元数据
为了让Spring Boot能够自动发现我们的自动配置类,我们需要创建一个 spring.factories 文件,放在 META-INF 目录下:
org.springframework.boot.autoconfigure.EnableAutoConfiguration=\
com.example.eventframework.spring.EventFrameworkAutoConfiguration
这个文件告诉Spring Boot,当启用自动配置时,应该加载我们的自动配置类。
5.8 使用Spring Boot Starter
现在,我们可以在Spring Boot应用中使用我们的事件框架了。首先,添加依赖:
<dependency><groupId>com.example</groupId><artifactId>event-framework-spring-boot-starter</artifactId><version>1.0.0</version>
</dependency>
然后,在 application.properties 或 application.yml 中配置事件框架:
# 使用异步事件总线
event-framework.async=true
# 设置线程池大小
event-framework.thread-pool-size=10
# 启用自动扫描
event-framework.auto-scan=true
最后,在Spring Boot应用中使用事件框架:
@Service
public class OrderService {private final EventBus eventBus;@Autowiredpublic OrderService(EventBus eventBus) {this.eventBus = eventBus;}public void createOrder(String orderId, double amount) {// 创建订单逻辑...// 发布事件Event event = new OrderCreatedEvent(orderId, amount);eventBus.publish(event);}@EventSubscribe(eventType = "ORDER_CREATED")public void handleOrderCreated(OrderCreatedEvent event) {System.out.println("Order created: " + event.getOrderId() + ", amount: " + event.getAmount());// 处理订单创建逻辑...}
}
在这个示例中,我们注入了事件总线,并使用它发布事件。同时,我们使用 @EventSubscribe 注解定义了一个事件监听方法,它会被自动注册到事件总线。
5.9 与Spring事件的集成
除了自己的事件框架,我们还可以与Spring的事件机制集成,实现更加强大的事件处理能力。
5.9.1 将Spring事件转发到我们的事件框架
@Component
public class SpringEventBridge implements ApplicationListener<ApplicationEvent> {private final EventBus eventBus;@Autowiredpublic SpringEventBridge(EventBus eventBus) {this.eventBus = eventBus;}@Overridepublic void onApplicationEvent(ApplicationEvent event) {// 将Spring事件包装为我们的事件Event wrappedEvent = new SpringEventWrapper(event);// 发布到我们的事件总线eventBus.publish(wrappedEvent);}/*** Spring事件包装类*/private static class SpringEventWrapper implements Event {private final ApplicationEvent springEvent;private final String id;public SpringEventWrapper(ApplicationEvent springEvent) {this.springEvent = springEvent;this.id = UUID.randomUUID().toString();}@Overridepublic String getId() {return id;}@Overridepublic String getType() {return "SPRING_EVENT_" + springEvent.getClass().getSimpleName();}@Overridepublic Object getData() {return springEvent;}@Overridepublic long getTimestamp() {return springEvent.getTimestamp();}@Overridepublic Map<String, Object> getMetadata() {Map<String, Object> metadata = new HashMap<>();metadata.put("springEventClass", springEvent.getClass().getName());return metadata;}}
}
这个组件实现了Spring的 ApplicationListener 接口,监听所有Spring事件,并将其转发到我们的事件总线。
5.9.2 将我们的事件转发到Spring事件
@Component
public class EventBusBridge implements EventListener {private final ApplicationEventPublisher eventPublisher;@Autowiredpublic EventBusBridge(ApplicationEventPublisher eventPublisher, EventBus eventBus) {this.eventPublisher = eventPublisher;// 注册到事件总线,监听所有事件eventBus.register("*", this);}@Overridepublic void onEvent(Event event) {// 将我们的事件包装为Spring事件ApplicationEvent springEvent = new EventWrapper(event);// 发布到Spring事件发布器eventPublisher.publishEvent(springEvent);}/*** 事件包装类*/private static class EventWrapper extends ApplicationEvent {private final Event event;public EventWrapper(Event event) {super(event);this.event = event;}public Event getEvent() {return event;}}
}
这个组件实现了我们的 EventListener 接口,监听所有事件,并将其转发到Spring的事件发布器。
5.10 Spring Boot集成的工作流程
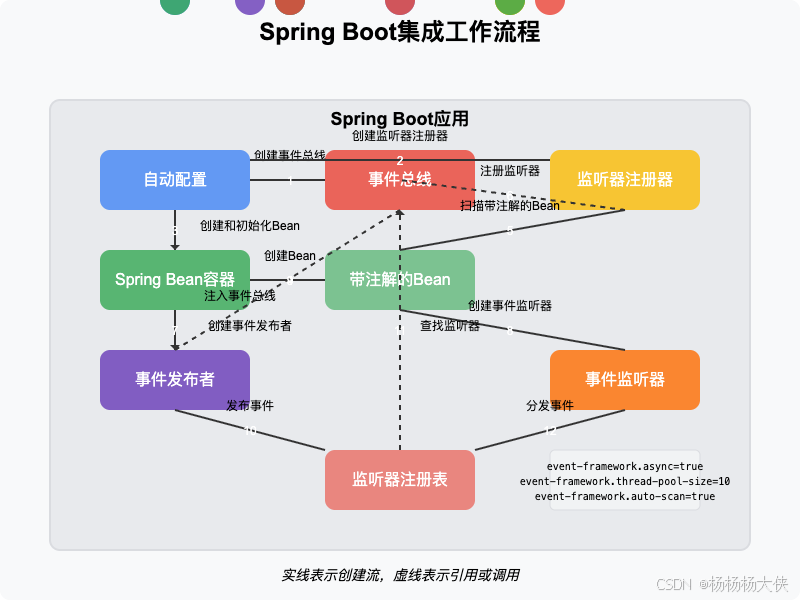
Spring Boot集成的工作流程如下:
- 自动配置:Spring Boot启动时,自动配置事件框架,创建事件总线和其他组件。
- Bean初始化:Spring创建和初始化所有Bean。
- 监听器注册:事件监听器注册器扫描所有Bean,查找带有
@EventSubscribe注解的方法,并注册到事件总线。 - 事件发布:应用代码通过注入的事件总线发布事件。
- 事件处理:事件总线将事件分发给已注册的监听器进行处理。
5.11 小结
在本章中,我们介绍了如何将事件框架与Spring Boot集成,使其更加易用和强大。我们创建了一个Spring Boot Starter,实现了自动配置、依赖注入、组件扫描和生命周期管理,并与Spring的事件机制集成。
通过这些集成,我们可以在Spring Boot应用中更加方便地使用事件框架,利用Spring的强大功能,实现更加灵活和可扩展的事件处理机制。
在下一章中,我们将介绍事件框架的高级特性和性能优化,使其更加强大和高效。
练习
- 扩展自动配置类,支持更多的配置选项,如事件过滤器、事件监控等。
- 实现一个Spring Boot Actuator端点,用于监控事件总线的状态和性能。
- 实现一个Spring Boot Admin集成,用于可视化事件流和监控事件处理性能。
- 扩展事件框架,支持Spring Cloud Stream,实现分布式事件处理。