SpringCloudConfig:分布式配置中心
目录
一、概念
1.1 概念
1.2 核心价值
1.3 能力边界
1.4 应用场景
1.5 与Nacos对比
二、架构与原理
2.1 架构
2.2 工作流程简述
2.3 工作原理
2.4 配置文件的匹配规则
2.5 安全与加密
三、使用
3.1 搭建步骤
3.1.1 准备配置仓库
3.1.2 创建 Config Server
3.1.3 创建 Config Client
3.2 配置动态刷新(无需重启服务)
3.3 配置详解
一、概念
1.1 概念
Spring Cloud Config 是一个为分布式系统提供外部化配置支持的配置管理框架。通俗来讲,它是一个“配置中心”,专门用来统一管理所有微服务应用程序的配置文件(如 application.yml, application.properties),并为它们提供集中式的、动态的配置服务。
核心思想:集中化、统一地管理所有微服务应用程序在不同环境(开发、测试、生产等)下的配置信息。
解决的问题:
-
配置管理混乱:成百上千个配置文件,修改一个配置需要逐个服务去找,极易出错。
-
环境隔离困难:为不同环境(dev, test, prod)维护不同的配置非常繁琐。
-
配置动态更新:修改配置后,需要重启服务才能生效,这对于生产环境是不可接受的。
-
安全性问题:敏感信息(如密码)以明文形式写在代码或配置文件中,存在泄露风险。
1.2 核心价值
-
集中化管理 (Centralized Management):
-
痛点:成百上千个微服务,每个都有各自的配置文件,散落在各个节点上。修改一个公共配置(如数据库地址)需要逐个服务去修改、重启,效率低下且极易出错。
-
价值:将所有配置集中在一个地方(如 Git 仓库、SCN、Vault、JDBC),实现“一处修改,处处生效”。管理、审计、版本控制都变得极其方便。
-
-
环境隔离 (Environment Separation):
-
痛点:开发、测试、生产环境的配置混合在一起,容易发生误用。
-
价值:通过简单的配置(如
spring.profiles.active=prod)即可为不同环境加载完全不同的配置,严格隔离环境,避免人为失误。
-
-
动态刷新 (Dynamic Refresh):
-
痛点:修改配置后必须重启应用才能生效,导致服务中断。
-
价值:结合 Spring Cloud Bus(消息总线),可以实现应用配置的动态刷新。修改 Git 仓库配置后,通过向 Bus 发送一个
/actuator/refresh或/actuator/bus-refresh请求,即可让所有相关服务不重启的情况下拉取最新配置。这是其最强大的能力之一。
-
-
版本控制与审计 (Version Control & Audit):
-
价值:由于配置存储在 Git 等版本控制系统中,所有的配置变更都有完整的提交历史记录。可以清晰地追踪“谁、在什么时间、为什么”修改了配置,方便回滚和审计。
-
-
加密与解密 (Encryption & Decryption):
-
价值:提供对敏感配置(如密码、密钥)的加密解密功能。配置文件中可以用
{cipher}...密文存储敏感信息,Config Server 在返回给 Client 前会对其进行解密,提高了安全性。
-
1.3 能力边界
-
它不是服务发现组件:
-
Config Server 负责管理配置,但不负责服务的注册与发现。那是 Eureka 或 Nacos 等组件的职责。通常,Config Server 的地址需要在 Client 的
bootstrap.yml中直接配置。
-
-
动态刷新能力有限:
-
虽然支持动态刷新,但默认是通过 Client 端的
@RefreshScope注解实现的,它只适用于标注了该注解的 Bean(通常是通过@Value注入配置的Bean)。 -
对于
@ConfigurationProperties注解的 Bean,动态刷新支持得更好。 -
对于一些在应用启动时就已经确定的配置(如数据库连接池的大小、服务器端口等),动态刷新可能无效或需要特殊处理。
-
-
它不持久化客户端状态:
-
Config Server 是无状态的,它本身不存储任何客户端的状态信息,它只是一个从仓库读取配置并对外提供接口的中间层。
-
-
高可用依赖外部组件:
-
Config Server 的高可用需要自行实现,通常是通过部署多个实例,并用负载均衡器(如 Nginx)或将其注册到 Eureka 来实现。其配置仓库(如 Git)的高可用也需要单独保障。
-
简单模式:部署多个 Config Server 实例,指向同一个 Git 仓库。然后通过负载均衡器(如 Nginx)对外提供一个统一的访问地址,Client 配置的是负载均衡器的地址。
-
服务发现模式:将 Config Server 自身注册到 Eureka 或 Consul 等注册中心。Config Client 也连接注册中心,通过服务名(如
config-server)来发现可用的 Config Server 实例。这是更“云原生”的做法。
-
-
不是实时推送:
-
配置变更后,需要手动触发
/refresh端点或依靠 Git 的 Webhook 自动触发,不是服务端主动的实时推送。这中间会有短暂的延迟。
-
1.4 应用场景
-
大型微服务生态系统:
-
当微服务数量非常多(几十个以上)时,集中式配置管理的优势会变得极其明显,能够大幅降低运维复杂度。
-
-
多环境部署需求:
-
项目需要同时部署在开发、测试、预发布、生产等多个环境中,且每个环境的配置(如数据源、第三方API密钥)差异很大。
-
-
配置频繁变更且要求不重启服务:
-
对于一些业务开关、功能降级、流量控制等需要频繁调整并立即生效的配置,结合 Spring Cloud Bus 可以完美满足需求。
-
-
对配置安全性和审计有要求:
-
在金融、政府等对安全合规要求较高的行业,配置的版本历史、变更追踪是刚需,Config Server 与 Git 的集成了天然地满足了这一需求。
-
-
混合云或多云部署:
-
服务可能部署在不同的云平台或私有云上,但都需要使用同一份中心化的配置,Config Server 提供了一个统一的配置入口。
-
1.5 与Nacos对比
| 特性 | Spring Cloud Config | Nacos |
|---|---|---|
| 核心功能 | 纯配置中心 | 服务发现 + 配置中心 |
| 配置格式 | 支持 YAML, Properties, JSON 等 | 支持 YAML, Properties, JSON 等 |
| 动态刷新 | 支持(需配合 Bus) | 原生支持,效率更高 |
| 管理界面 | 无(需自行开发或借助 Git) | 提供功能丰富的控制台 |
| 性能与一致性 | 依赖 Git,大规模部署时可能有性能瓶颈 | 内置分布式协议,性能和一致性更好 |
| 生态系统 | Spring Cloud 原生,与 Spring 项目无缝集成 | 阿里开源,对 Spring Cloud 兼容性好 |
技术选择:
-
如果项目是纯粹的 Spring Cloud 技术栈,且已经采用了 Eureka 等服务发现组件,那么 Spring Cloud Config 是一个稳健的选择。
-
如果是新项目选型,或者希望用一个组件同时解决服务发现和配置管理问题,并追求更强大的功能和更简单的运维,那么 Nacos 通常是更推荐的方案。
二、架构与原理
2.1 架构
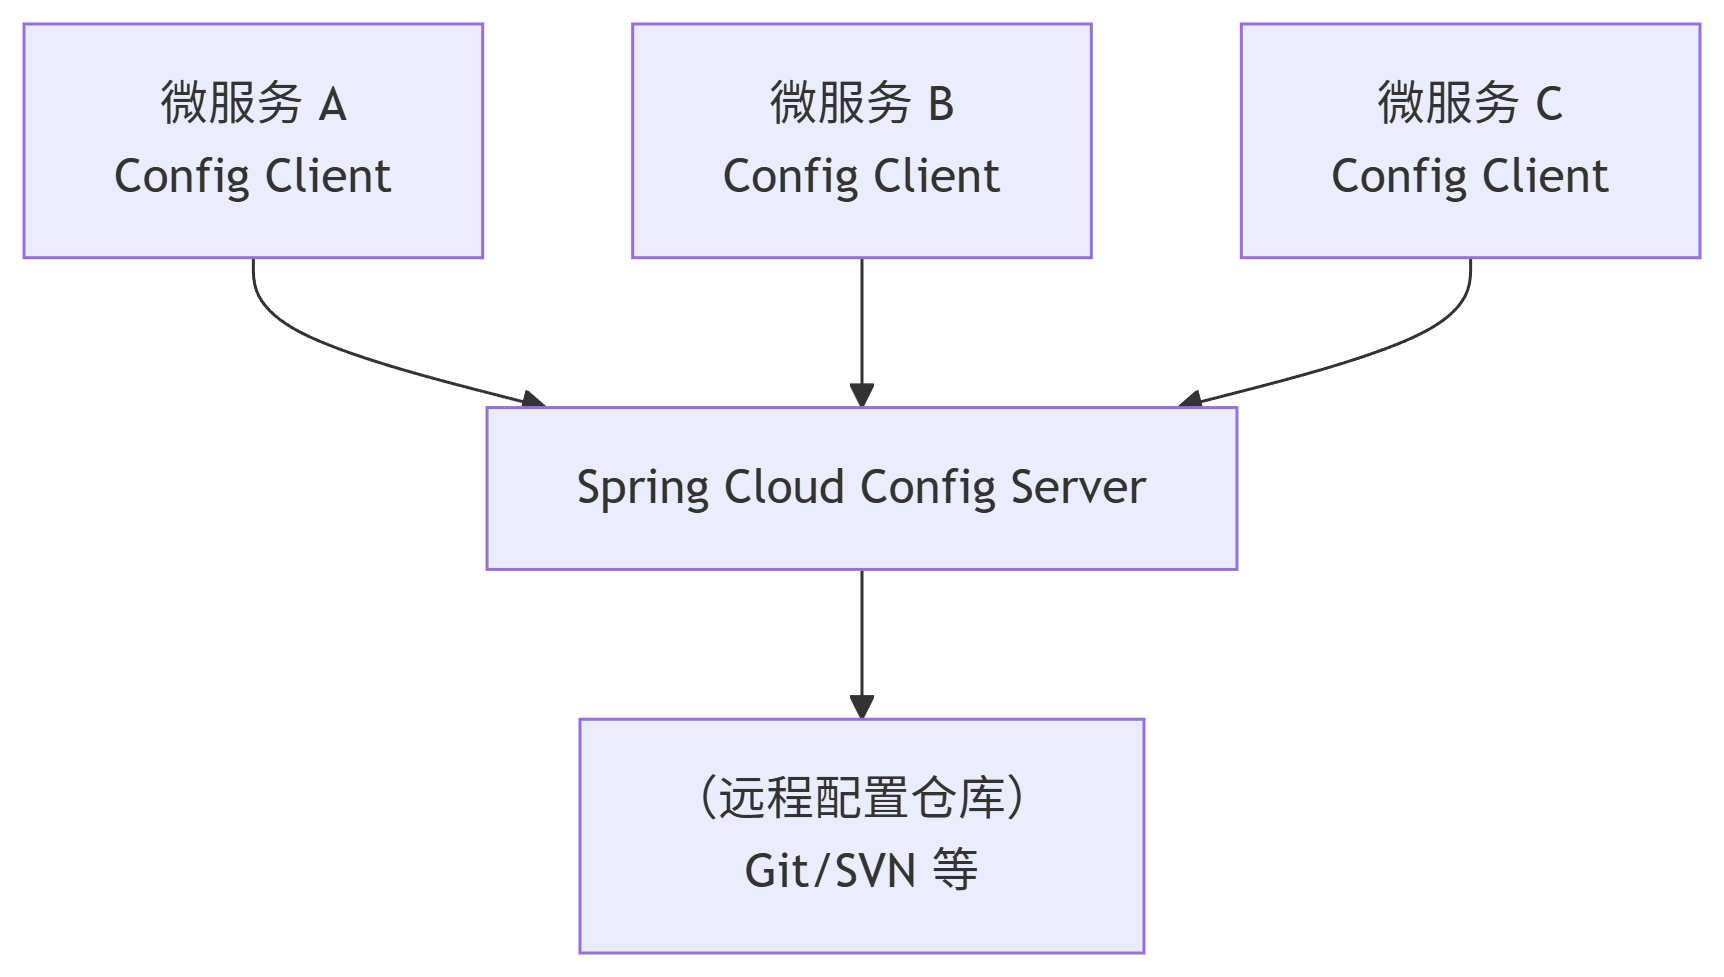
Spring Cloud Config 的架构主要由三个角色构成:
-
远程配置仓库(Remote Config Repository):
-
作用:这是配置信息的唯一真相源(Single Source of Truth)。所有应用的配置都集中存储在这里。
-
常用实现:Git(如 GitHub、GitLab、Gitee)、SVN、本地文件系统或 Vault(用于存储敏感信息)。Git 是最常用和推荐的方式,因为它天然支持版本控制、分支管理,便于审计和回滚。
-
-
配置服务端(Config Server):
-
作用:一个独立的微服务,它的唯一职责就是与远程配置仓库交互。它暴露 HTTP API(如
/{application}/{profile}[/{label}]和/ {application}-{profile}.yml等),客户端通过这些接口来获取配置。 -
功能:从远程仓库拉取配置、缓存配置、加密/解密敏感信息、提供 RESTful 接口。服务端本身不存储配置,只是一个中间代理。
-
-
配置客户端(Config Client):
-
作用:集成在各个微服务应用中的组件。在应用启动时(或特定时机),它会主动向 Config Server 发起请求,获取自己所需的配置信息,然后用这些配置来初始化应用的应用上下文(ApplicationContext)。
-
位置:通常作为微服务的一个依赖(如
spring-cloud-starter-config)引入。 -
实现:只需在项目中引入
spring-cloud-starter-config依赖,并在bootstrap.properties(或bootstrap.yml) 文件中配置 Config Server 的地址和应用信息即可。bootstrap.properties优先级高于application.properties,用于配置应用启动阶段的关键信息。可以通过启动多个 Config Server 实例并让 Client 配置多个spring.cloud.config.uri(逗号分隔)来实现高可用。
-
# bootstrap.properties
spring.application.name=user-service # 告诉ConfigServer“我是谁”
spring.cloud.config.profile=prod     # 告诉ConfigServer“我要哪个环境的配置”
spring.cloud.config.label=main       # 告诉ConfigServer“我要Git的哪个分支”
spring.cloud.config.uri=http://localhost:8888 # Config Server的地址
2.2 工作流程简述
-
开发者将配置文件推送到 Git 仓库(例如,为不同应用、不同环境创建
app1-dev.yml,app2-prod.yml等)。 -
Config Server 启动,并绑定到该 Git 仓库。
-
业务微服务(Config Client)启动时,根据自身的
application.name和profiles.active(如app1,dev),向 Config Server 发起请求。 -
Config Server 根据请求的应用名和环境,从 Git 仓库查找对应的配置文件,并将其返回给 Client。
-
Client 获取到配置后,完成启动。
2.3 工作原理
整个过程可以分为两个主要阶段:启动阶段和运行时阶段。
阶段一:应用启动/bootstrap 阶段
这是最关键的阶段,决定了客户端如何获取到初始配置。
-
客户端启动:当一个集成了 Config Client 的微服务应用启动时,由于
spring-cloud-starter-config依赖的存在,它会先创建一个 “bootstrap 上下文”。 -
读取本地配置:这个 bootstrap 上下文会从本地的
bootstrap.properties或bootstrap.yml文件中读取最基础的配置。这些配置通常只包含:-
spring.application.name:当前应用的名称(必填,用于匹配远程配置的{application}部分)。 -
spring.cloud.config.profile:当前激活的环境 profile(如dev,test,prod,用于匹配{profile}部分)。如果不配置,默认为default。 -
spring.cloud.config.label:指定远程仓库的分支(branch)、标签(tag)或提交ID(用于匹配{label}部分)。如果不配置,默认为master或main。 -
spring.cloud.config.uri:Config Server 的地址(例如http://localhost:8888)。
-
-
请求配置服务端:bootstrap 上下文利用上一步获取的地址,向 Config Server 发起 HTTP 请求。请求的 URL 格式通常为:
/{application}/{profile}[/{label}]。例如,一个名为order-service的应用,在dev环境,请求main分支的配置,会请求:http://config-server:8888/order-service/dev/main。 -
服务端响应:Config Server 接收到请求后:
-
根据
{application},{profile},{label}参数,去远程配置仓库(如 Git)查找对应的配置文件。 -
配置文件的命名规则是:
{application}-{profile}.yml或{application}-{profile}.properties。例如,它会查找order-service-dev.yml。 -
服务端将找到的配置内容组装成 JSON 格式(或指定的格式)返回给客户端。响应体中包含了配置的所有键值对信息,以及配置的来源(label,profile等)信息。
-
-
客户端初始化:Config Client 拿到服务端返回的配置后,用这些配置来初始化主应用上下文。此时,应用程序中通过
@Value注解或@ConfigurationProperties绑定的属性都被注入成功。 -
应用正式启动:主应用上下文初始化完成,应用启动完毕。此时,应用的行为完全由从 Config Server 获取到的集中式配置所控制。
关键点:
bootstrap.properties的加载优先级远高于application.properties。它是为了获取外部配置而存在的“引导”文件。
阶段二:运行时/动态刷新阶段
在传统的启动时加载配置的模式下,修改配置后必须重启客户端应用才能生效,这在生产环境是不可接受的。因此,Spring Cloud Config 提供了动态刷新机制。
-
暴露刷新端点:在需要动态刷新的 Config Client 应用中,添加
@RefreshScope注解(通常标注在@Configuration或@Bean上),并引入spring-boot-starter-actuator依赖。这会暴露一个/actuator/refresh的 HTTP POST 端点。 -
修改配置:运维人员在 Git 仓库中修改配置文件并提交。
-
通知变更:注意:Config Server 不会主动推送配置变更。需要以下两种方式之一来触发客户端刷新:
-
手动刷新:调用客户端的
/actuator/refresh端点。这会强制该客户端重新请求 Config Server,获取最新配置,并刷新所有@RefreshScope注解下的 Bean。 -
自动刷新(结合 Spring Cloud Bus):这是更优雅的解决方案。引入消息代理(如 RabbitMQ, Kafka)。当配置更新后,通过向 Config Server 发送
/actuator/bus-refresh请求,Config Server 会通过 Spring Cloud Bus 向所有连接到消息总线的客户端发送一个刷新事件。所有客户端监听此事件并自动完成刷新,实现一次通知,全部更新。
-
2.4 配置文件的匹配规则
Config Server 在查找配置时,遵循一个非常灵活的叠加(Overlay)和合并(Merge) 策略。它会查找多个相关的配置文件并将它们合并。优先级从低到高如下:
-
application.yml(所有应用共享的默认配置) -
{application}.yml(指定应用名的配置) -
application-{profile}.yml(某个环境的所有应用共享配置) -
{application}-{profile}.yml(指定应用在指定环境的配置,优先级最高)
例如:对于 order-service 应用和 prod 环境,Config Server 会尝试查找并合并以下四个文件(如果存在的话):
-
application.yml(共享基础配置) -
order-service.yml(order-service 的默认配置) -
application-prod.yml(所有生产环境应用的配置) -
order-service-prod.yml(order-service 的生产环境专属配置,优先级最高)
高优先级配置中的属性会覆盖低优先级配置中的相同属性。
Config Server 根据客户端发来的应用名(
name)、环境(profile)和分支(label)三个参数,去仓库中查找对应的配置文件。查找规则如下:
它会尝试匹配
{application}-{profile}.yml或{application}-{profile}.properties。如果没找到,则会回退到匹配
{application}.yml或{application}.properties。例如,一个名为
user-service的应用,在prod环境下,会尝试查找user-service-prod.yml->user-service.yml。
2.5 安全与加密
对于数据库密码、API密钥等敏感信息,直接明文存储在 Git 中是非常危险的。Spring Cloud Config 提供了加密解密功能。
-
加密:在配置文件中,可以使用
{cipher}前缀来表示加密值。例如:password: '{cipher}FKSAJDFGYI8UF7AGYASDFAS...'。 -
加解密端点:Config Server 提供了
/encrypt和/decrypt端点(默认关闭,需要配置encrypt.key或使用 Keystore 才能开启)。 -
流程:运维人员通过
/encrypt端点将明文加密得到密文,然后将密文写入配置文件。Config Client 获取到加密的配置后,Config Server 会在传输前后自动对其进行解密(如果客户端请求中包含有效的认证信息),或者客户端本地解密(需配置密钥)。 -
配置:为 Config Server 添加安全依赖(如
spring-boot-starter-security)并配置用户名密码后,Client 端配置spring.cloud.config.uri时需包含凭证,格式为:http://{username}:{password}@host:port。
三、使用
3.1 搭建步骤
搭建一个最简单的可工作模型,包含:
-
一个 Git 仓库(以 Gitee/Github 为例,也可以用本地文件系统)。
-
一个 Config Server(配置中心服务端)。
-
一个 Config Client(配置中心客户端),它会从 Server 拉取配置。
3.1.1 准备配置仓库
首先需要在版本控制工具(如 Git)上创建一个仓库,用于存放配置文件。
-
在 Gitee 或 Github 上创建一个新的公开仓库,例如名为
spring-cloud-config-repo。 -
在仓库中创建几个配置文件,为了模拟不同环境,这里创建三个文件:
命名规则:
{application-name}-{profile}.yml或{application-name}-{profile}.properties-
config-client-dev.yml(开发环境) -
config-client-test.yml(测试环境) -
config-client-prod.yml(生产环境)
-
-
为每个文件添加一些简单配置。例如,在
config-client-dev.yml中写入:
# config-client-dev.yml
my:config:message: "Hello from Git DEV config!"info: "This is a development environment."
server:port: 8081 # 为了测试,让客户端也启动在8081,避免冲突
在 config-client-prod.yml 中写入:
# config-client-prod.yml
my:config:message: "Hello from Git PROD config!"info: "This is a production environment."
server:port: 8082-
提交并推送到远程仓库。记住仓库地址,例如:
https://gitee.com/your-username/spring-cloud-config-repo.git
3.1.2 创建 Config Server
使用 Spring Initializr 来快速生成项目。
-
创建项目:
访问 https://start.spring.io
-
Project: Maven
-
Language: Java
-
Spring Boot: 选择最新的稳定版(如 3.2.5)
-
Group:
com.example -
Artifact:
config-server -
Dependencies: 搜索并添加
Config Server和Actuator(Actuator 用于健康检查等)。
-
-
启用 Config Server:
在生成的项目主类上添加
@EnableConfigServer注解。
// src/main/java/com/example/configserver/ConfigServerApplication.java
package com.example.configserver;import org.springframework.boot.SpringApplication;
import org.springframework.boot.autoconfigure.SpringBootApplication;
import org.springframework.cloud.config.server.EnableConfigServer;@SpringBootApplication
@EnableConfigServer // 启用配置中心服务端功能
public class ConfigServerApplication {public static void main(String[] args) {SpringApplication.run(ConfigServerApplication.class, args);}
}- 配置 Server:
修改 application.properties 文件,指定 Git 仓库地址。
# src/main/resources/application.properties
server.port=8888 # Config Server 默认端口是8888spring.application.name=config-server# 配置 Git 仓库地址
spring.cloud.config.server.git.uri=https://gitee.com/your-username/spring-cloud-config-repo.git# 如果仓库是公开的,不需要用户名密码;如果是私有的,需要配置
# spring.cloud.config.server.git.username=your-username
# spring.cloud.config.server.git.password=your-password# 可选:指定仓库的分支,默认为 main 或 master
spring.cloud.config.server.git.default-label=main
如果配置文件不在仓库根目录,可以在 Server 端配置搜索路径:
spring.cloud.config.server.git.search-paths=config-files,another-dir/*.yml-
启动并测试 Server:
运行
ConfigServerApplication的 main 方法。
在浏览器中访问http://localhost:8888/config-client/dev。
会看到一个 JSON 格式的响应,其中包含了你在 Git 上创建的config-client-dev.yml文件的内容。这证明 Config Server 已经从 Git 拉取配置并可以通过 HTTP 访问了。URL 路径格式解释:
/{application}/{profile}[/{label}]也可以试试其他端点:
-
application:客户端的应用名,对应配置文件中的{application-name}部分,这里是config-client。 -
profile:对应的环境,如dev,test,prod。 -
label:Git 的分支(branch),可选,默认为main或master。 -
http://localhost:8888/config-client/prod -
http://localhost:8888/config-client/test
-
3.1.3 创建 Config Client
现在创建一个普通的 Spring Boot 应用,作为从 Config Server 获取配置的客户端。
-
创建项目:
再次访问 https://start.spring.io
-
Project: Maven
-
Language: Java
-
Spring Boot: 与 Server 版本一致
-
Group:
com.example -
Artifact:
config-client -
Dependencies: 搜索并添加
Config Client和Web(用于创建简单的Controller测试)。
-
-
配置 Client:
客户端的配置比较特殊。它需要在获取到远程配置之前就知道 Config Server 的地址。因此,这个配置不能放在
application.properties里,而要放在bootstrap.properties(或bootstrap.yml)中。
bootstrap.yml的加载优先级比application.yml更高,它用于配置应用启动时的引导上下文。创建/修改
src/main/resources/bootstrap.properties:
# src/main/resources/bootstrap.properties
# 指定应用名称,这个名称必须与远程配置文件中的 {application} 部分一致!
spring.application.name=config-client# 指定激活的环境,这将决定拉取哪个 profile 的配置
spring.profiles.active=dev# 告诉客户端配置中心的位置
spring.cloud.config.uri=http://localhost:8888- 创建一个 Controller 来测试配置:
// src/main/java/com/example/configclient/ConfigClientController.java
package com.example.configclient;import org.springframework.beans.factory.annotation.Value;
import org.springframework.web.bind.annotation.GetMapping;
import org.springframework.web.bind.annotation.RestController;@RestController
public class ConfigClientController {// 注入远程配置中的属性@Value("${my.config.message:Default message...}") // 冒号后面是默认值,如果获取失败则使用默认值private String message;@Value("${my.config.info}")private String info;@GetMapping("/message")public String getMessage() {return "Message from Config Server: " + message + ", Info: " + info;}
}- 启动并测试 Client:
首先确保 Config Server 正在运行(端口 8888)。
然后运行 ConfigClientApplication 的 main 方法。
观察客户端启动日志,会看到类似这样的信息,表明它正在从 Config Server 拉取配置:
Fetching config from server at : http://localhost:8888
在浏览器中访问 http://localhost:8081/message(因为在 dev 配置中我们指定了 server.port=8081)。
应该能看到返回的消息:"Message from Config Server: Hello from Git DEV config!, Info: This is a development environment."
测试切换环境:
-
停止客户端应用。
-
修改
bootstrap.properties中的spring.profiles.active=prod。 -
重新启动客户端应用。
-
此时客户端会从 Config Server 拉取
config-client-prod.yml的配置,并监听在 8082 端口。 -
访问
http://localhost:8082/message,会看到生产环境的配置信息。
3.2 配置动态刷新(无需重启服务)
在 Client 端添加 actuator 依赖(如果创建时没加,现在在 pom.xml 里加上)。
<dependency><groupId>org.springframework.boot</groupId><artifactId>spring-boot-starter-actuator</artifactId>
</dependency>
在 Client 的 bootstrap.properties 中暴露 refresh 端点:
# 暴露 actuator 端点,包括 refresh
management.endpoints.web.exposure.include=refresh,health,info
在需要刷值的 Bean 上添加 @RefreshScope 注解:
import org.springframework.cloud.context.config.annotation.RefreshScope;@RestController
@RefreshScope // 添加此注解
public class ConfigClientController {// ...
}流程:
-
修改 Git 配置并提交。
-
手动向 Client 发送一个 POST 请求:
curl -X POST http://localhost:8081/actuator/refresh -
这个请求会刷新所有带有
@RefreshScope注解的 Bean,下次再调用/message接口时,就能获取到最新的配置值。
注意:这只是半自动的。全自动的动态刷新需要与 Spring Cloud Bus(消息总线)结合使用,通过广播消息通知所有客户端刷新。
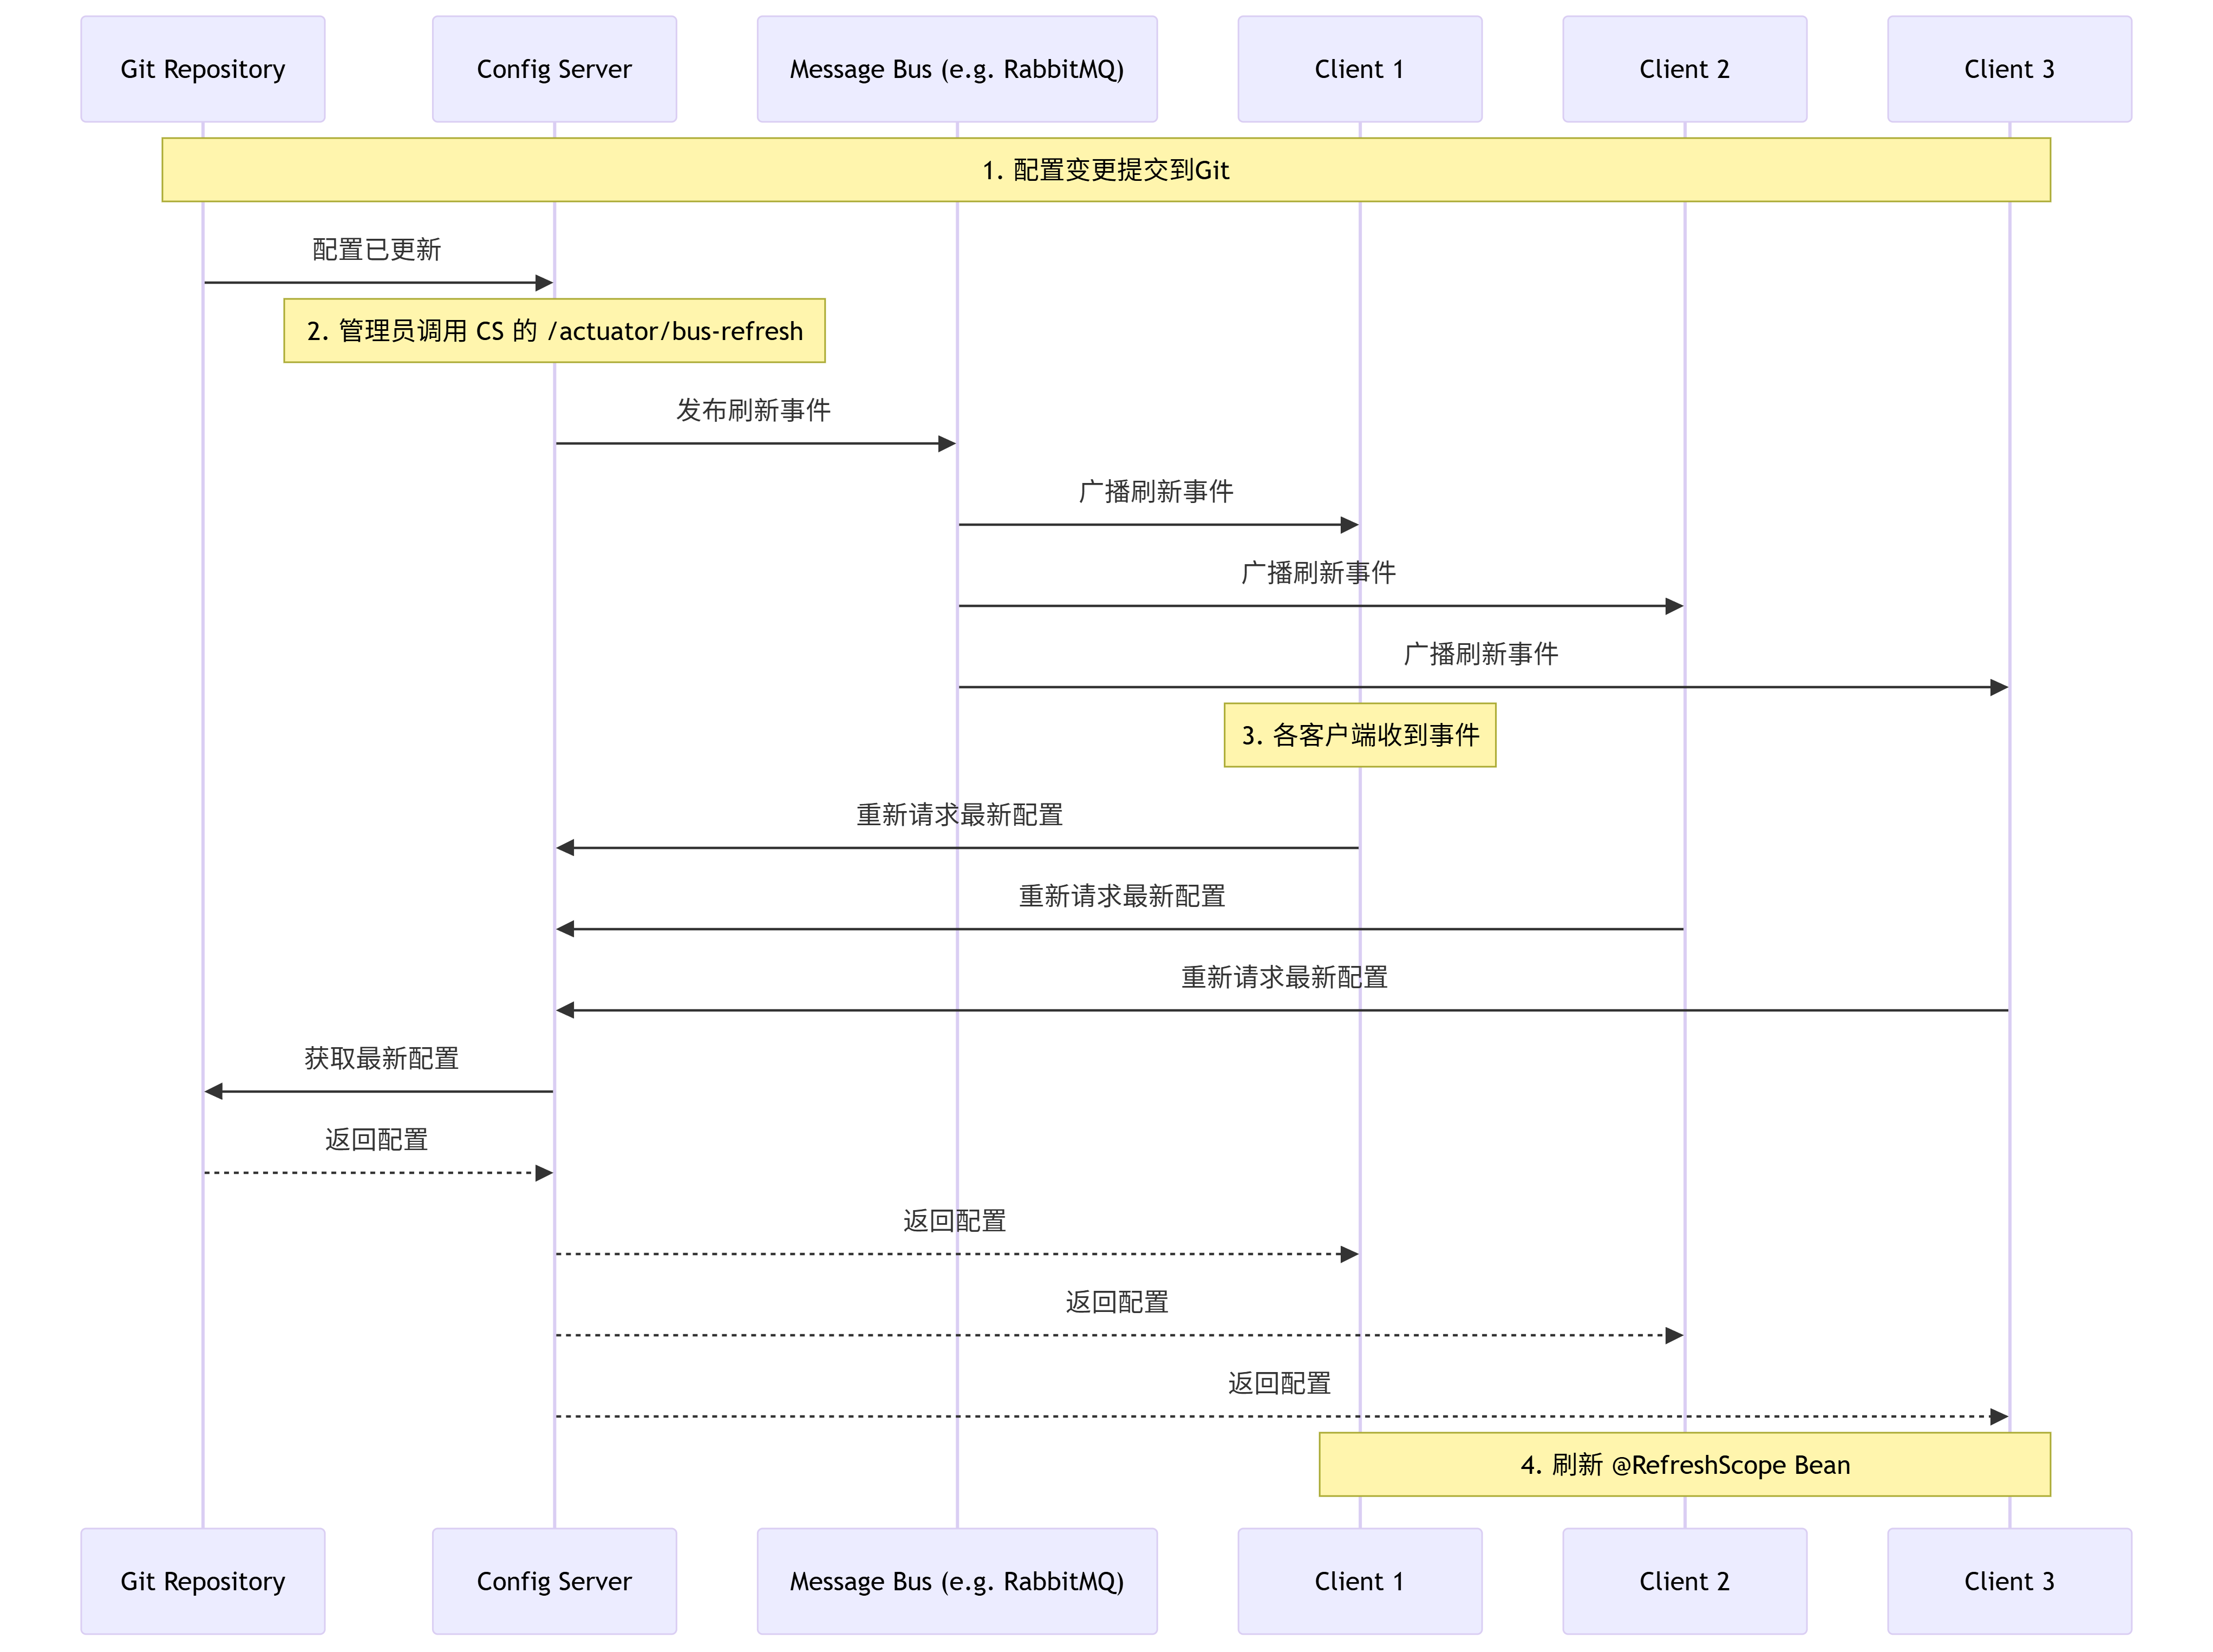
与 Spring Cloud Bus 集成实现全局刷新:Spring Cloud Bus 使用轻量级消息代理(如 RabbitMQ, Kafka)连接分布式系统的节点,可以用于广播状态更改(如配置更新)。工作流程:
-
修改 Git 配置并提交。
-
向 任意一个 客户端发送 POST 请求:
/actuator/busrefresh。 -
该客户端通过消息总线将刷新事件广播出去。
-
所有监听该总线的其他客户端都会收到消息,并自动完成各自的刷新。
-
这样就实现了一次请求,全部更新的效果。
3.3 配置详解
| 配置类别 | 配置项 | 说明 | 默认值 | 示例/可选值 |
|---|---|---|---|---|
| 📋 Config Server 核心配置 | server.port | Config Server 服务端口 | 8888 | 8888 |
| 🔧 Git 仓库配置 | spring.cloud.config.server.git.uri | Git 仓库地址 | 无 | https://github.com/your-repo.git |
spring.cloud.config.server.git.username | 访问 Git 仓库的用户名 | 无 | your-username | |
spring.cloud.config.server.git.password | 访问 Git 仓库的密码 | 无 | your-password | |
spring.cloud.config.server.git.default-label | 默认分支 | master | main, dev | |
spring.cloud.config.server.git.search-paths | 相对搜索路径,可配置多个 | 根目录 | '{application}', subdir/config | |
spring.cloud.config.server.git.basedir | 本地缓存目录 | 系统临时目录 | /tmp/config-repo | |
spring.cloud.config.server.git.force-pull | 强制拉取远程配置覆盖本地 | false | true | |
spring.cloud.config.server.git.refresh-rate | 定期刷新配置的间隔(秒) | 0 (每次请求刷新) | 30 | |
spring.cloud.config.server.git.clone-on-start | 启动时是否克隆完整仓库 | false | true | |
| 📁 本地文件配置 | spring.profiles.active | 设置 Config Server 使用本地文件 | 无 | native |
spring.cloud.config.server.native.searchLocations | 本地文件系统搜索路径 | 无 | file:/path/to/config | |
| 📋 Config Client 核心配置 | spring.cloud.config.uri | Config Server 的地址 | 无 | http://localhost:8888 |
spring.cloud.config.fail-fast | 是否启用快速失败(启动时连不上则报错) | false | true | |
spring.cloud.config.retry.initial-interval | 初始重试间隔(启用 fail-fast 时) | 1000ms | 2000ms | |
spring.cloud.config.retry.max-attempts | 最大重试次数(启用 fail-fast 时) | 6 | 10 | |
| 🔍 定位配置 | spring.application.name | 应用名称,对应 {application} | 无 | my-app |
spring.cloud.config.profile | 环境 profile,对应 {profile} | 无 | dev, test, prod | |
spring.cloud.config.label | Git 分支/标签,对应 {label} | master | dev-branch, v1.0 | |
| 🤝 服务发现集成 | spring.cloud.config.discovery.enabled | 是否通过服务发现查找 Config Server | false | true |
spring.cloud.config.discovery.service-id | Config Server 注册的服务名 | 无 | config-server | |
| 🔄 动态刷新 | management.endpoints.web.exposure.include | 暴露的 actuator 端点 | info, health | *, refresh |
management.security.enabled | 是否启用安全管理(Spring Boot 1.x) | true | false (不推荐生产) |