Python测试框架之pytest详解
零基础1小时快速入门pytest自动化测试教程,全套项目框架实战
简介:
fixture区别于unnitest的传统单元测试(setup/teardown)有显著改进:
1.有独立的命名,并通过声明它们从测试函数、模块、类或整个项目中的使用来激活。
2.按模块化的方式实现,每个fixture都可以互相调用。
3.fixture的范围从简单的单元测试到复杂的功能测试,可以对fixture配置参数,或者跨函数function,类class,模块module或整个测试session范围。
(很重要!!!)(很重要!!!)(很重要!!!)
谨记:当我们使用pytest框架写case的时候,一定要拿它的命令规范去case,这样框架才能识别到哪些case需要执行,哪些不需要执行。
用例设计原则
文件名以test_*.py文件和*_test.py
以test_开头的函数
以Test开头的类
以test_开头的方法
fixture可以当做参数传入
定义fixture跟定义普通函数差不多,唯一区别就是在函数上加个装饰器@pytest.fixture(),fixture命名不要以test开头,跟用例区分开。fixture是有返回值得,没有返回值默认为None。用例调用fixture的返回值,直接就是把fixture的函数名称当做变量名称。
ex:


import pytest@pytest.fixture()
def test1():a = 'leo'return adef test2(test1):assert test1 == 'leo'if __name__ == '__main__':pytest.main('-q test_fixture.py')输出:
============================= test session starts =============================
platform win32 -- Python 3.7.0, pytest-4.0.2, py-1.7.0, pluggy-0.8.0
rootdir: C:\Program Files\PycharmProjects\exercise, inifile:collected 1 itemtest_fixture.py .                                                        [100%]========================== 1 passed in 0.02 seconds ===========================
Process finished with exit code 0


使用多个fixture
如果用例需要用到多个fixture的返回数据,fixture也可以返回一个元祖,list或字典,然后从里面取出对应数据。
ex:


import pytest@pytest.fixture()
def test1():a = 'leo'b = '123456'print('传出a,b')return (a, b)def test2(test1):u = test1[0]p = test1[1]assert u == 'leo'assert p == '123456'print('元祖形式正确')if __name__ == '__main__':pytest.main('-q test_fixture.py')输出结果:
platform win32 -- Python 3.7.0, pytest-4.0.2, py-1.7.0, pluggy-0.8.0
rootdir: C:\Program Files\PycharmProjects\exercise, inifile:collected 1 itemtest_fixture.py 传出a,b
.元祖形式正确[100%]========================== 1 passed in 0.02 seconds ===========================
Process finished with exit code 0


当然也可以分成多个fixture,然后在用例中传多个fixture参数


import pytest@pytest.fixture()
def test1():a = 'leo'print('\n传出a')return a@pytest.fixture()
def test2():b = '123456'print('传出b')return bdef test3(test1, test2):u = test1p = test2assert u == 'leo'assert p == '123456'print('传入多个fixture参数正确')if __name__ == '__main__':pytest.main('-q test_fixture.py')输出结果:
============================= test session starts =============================
platform win32 -- Python 3.7.0, pytest-4.0.2, py-1.7.0, pluggy-0.8.0
rootdir: C:\Program Files\PycharmProjects\exercise, inifile:collected 1 itemtest_fixture.py
传出a
传出b
.传入多个fixture参数正确


fixture互相调用


import pytest@pytest.fixture()
def test1():a = 'leo'print('\n传出a')return adef test2(test1):assert test1 == 'leo'print('fixture传参成功')if __name__ == '__main__':pytest.main('-q test_fixture.py')输出结果:
platform win32 -- Python 3.7.0, pytest-4.0.2, py-1.7.0, pluggy-0.8.0
rootdir: C:\Program Files\PycharmProjects\exercise, inifile:collected 1 itemtest_fixture.py
传出a
.fixture传参成功[100%]========================== 1 passed in 0.03 seconds ===========================
Process finished with exit code 0


介绍完了fixture的使用方式,现在介绍一下fixture的作用范围(scope)
fixture的作用范围
fixture里面有个scope参数可以控制fixture的作用范围:session>module>class>function
-function:每一个函数或方法都会调用
-class:每一个类调用一次,一个类中可以有多个方法
-module:每一个.py文件调用一次,该文件内又有多个function和class
-session:是多个文件调用一次,可以跨.py文件调用,每个.py文件就是module
fixture源码详解
fixture(scope='function',params=None,autouse=False,ids=None,name=None):
scope:有四个级别参数"function"(默认),"class","module","session"
params:一个可选的参数列表,它将导致多个参数调用fixture功能和所有测试使用它。
autouse:如果True,则为所有测试激活fixture func可以看到它。如果为False则显示需要参考来激活fixture
ids:每个字符串id的列表,每个字符串对应于params这样他们就是测试ID的一部分。如果没有提供ID它们将从params自动生成
name:fixture的名称。这默认为装饰函数的名称。如果fixture在定义它的统一模块中使用,夹具的功能名称将被请求夹具的功能arg遮蔽,解决这个问题的一种方法时将装饰函数命令"fixture_<fixturename>"然后使用"@pytest.fixture(name='<fixturename>')"。
具体阐述一下scope四个参数的范围
scope="function"
@pytest.fixture()如果不写参数,参数就是scope="function",它的作用范围是每个测试用例来之前运行一次,销毁代码在测试用例之后运行。


import pytest@pytest.fixture()
def test1():a = 'leo'print('\n传出a')return a@pytest.fixture(scope='function')
def test2():b = '男'print('\n传出b')return bdef test3(test1):name = 'leo'print('找到name')assert test1 == namedef test4(test2):sex = '男'print('找到sex')assert test2 == sexif __name__ == '__main__':pytest.main('-q test_fixture.py')输出结果:platform win32 -- Python 3.7.0, pytest-4.0.2, py-1.7.0, pluggy-0.8.0
rootdir: C:\Program Files\PycharmProjects\exercise, inifile:collected 2 itemstest_fixture.py
传出a
.找到name传出b
.找到sex[100%]========================== 2 passed in 0.04 seconds ===========================


放在类中实现结果也是一样的


import pytest@pytest.fixture()
def test1():a = 'leo'print('\n传出a')return a@pytest.fixture(scope='function')
def test2():b = '男'print('\n传出b')return bclass TestCase:def test3(self, test1):name = 'leo'print('找到name')assert test1 == namedef test4(self, test2):sex = '男'print('找到sex')assert test2 == sexif __name__ == '__main__':pytest.main(['-s', 'test_fixture.py'])输出结果:platform win32 -- Python 3.7.0, pytest-4.0.2, py-1.7.0, pluggy-0.8.0
rootdir: C:\Program Files\PycharmProjects\exercise, inifile:collected 2 itemstest_fixture.py
传出a
.找到name传出b
.找到sex[100%]========================== 2 passed in 0.03 seconds ===========================
Process finished with exit code 0


scope="class"
fixture为class级别的时候,如果一个class里面有多个用例,都调用了次fixture,那么此fixture只在此class里所有用例开始前执行一次。


import pytest@pytest.fixture(scope='class')
def test1():b = '男'print('传出了%s, 且只在class里所有用例开始前执行一次!!!' % b)return bclass TestCase:def test3(self, test1):name = '男'print('找到name')assert test1 == namedef test4(self, test1):sex = '男'print('找到sex')assert test1 == sexif __name__ == '__main__':pytest.main(['-s', 'test_fixture.py'])输出结果:
platform win32 -- Python 3.7.0, pytest-4.0.2, py-1.7.0, pluggy-0.8.0
rootdir: C:\Program Files\PycharmProjects\exercise, inifile:collected 2 itemstest_fixture.py 传出了男, 且只在class里所有用例开始前执行一次!!!
.找到name
.找到sex[100%]========================== 2 passed in 0.05 seconds ===========================
Process finished with exit code 0


scope="module"
fixture为module时,在当前.py脚本里面所有用例开始前只执行一次。


import pytest
##test_fixture.py@pytest.fixture(scope='module')
def test1():b = '男'print('传出了%s, 且在当前py文件下执行一次!!!' % b)return bdef test3(test1):name = '男'print('找到name')assert test1 == nameclass TestCase:def test4(self, test1):sex = '男'print('找到sex')assert test1 == sexif __name__ == '__main__':pytest.main(['-s', 'test_fixture.py'])输出结果:
============================= test session starts =============================
platform win32 -- Python 3.7.0, pytest-4.0.2, py-1.7.0, pluggy-0.8.0
rootdir: C:\Program Files\PycharmProjects\exercise, inifile:collected 2 itemstest_fixture.py 传出了男, 且在当前py文件下执行一次!!!
.找到sex
.找到name[100%]========================== 2 passed in 0.03 seconds ===========================
Process finished with exit code 0


scope="session"
fixture为session级别是可以跨.py模块调用的,也就是当我们有多个.py文件的用例的时候,如果多个用例只需调用一次fixture,那就可以设置为scope="session",并且写到conftest.py文件里。
conftest.py文件名称时固定的,pytest会自动识别该文件。放到项目的根目录下就可以全局调用了,如果放到某个package下,那就在改package内有效。
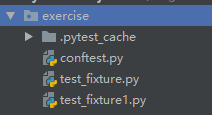
文件目录为


import pytest
# conftest.py@pytest.fixture(scope='session')
def test1():sex = '男'print('获取到%s' % sex)return sex


import pytest
# test_fixture.pydef test3(test1):name = '男'print('找到name')assert test1 == nameif __name__ == '__main__':pytest.main(['-s', 'test_fixture.py'])


import pytest
# test_fixture1.pyclass TestCase:def test4(self, test1):sex = '男'print('找到sex')assert test1 == sexif __name__ == '__main__':pytest.main(['-s', 'test_fixture1.py'])


如果需要同时执行两个py文件,可以在cmd中在文件py文件所在目录下执行命令:pytest -s test_fixture.py test_fixture1.py
执行结果为:


================================================= test session starts =================================================
platform win32 -- Python 3.7.0, pytest-4.0.2, py-1.7.0, pluggy-0.8.0
rootdir: C:\Program Files\PycharmProjects\exercise, inifile:
collected 2 itemstest_fixture.py 获取到男
找到name
.
test_fixture1.py 找到sex
.============================================== 2 passed in 0.05 seconds ===============================================


调用fixture的三种方法
1.函数或类里面方法直接传fixture的函数参数名称


import pytest
# test_fixture1.py@pytest.fixture()
def test1():print('\n开始执行function')def test_a(test1):print('---用例a执行---')class TestCase:def test_b(self, test1):print('---用例b执行')输出结果:
test_fixture1.py
开始执行function
.---用例a执行---开始执行function
.---用例b执行[100%]========================== 2 passed in 0.05 seconds ===========================
Process finished with exit code 0


2.使用装饰器@pytest.mark.usefixtures()修饰需要运行的用例


import pytest
# test_fixture1.py@pytest.fixture()
def test1():print('\n开始执行function')@pytest.mark.usefixtures('test1')
def test_a():print('---用例a执行---')@pytest.mark.usefixtures('test1')
class TestCase:def test_b(self):print('---用例b执行---')def test_c(self):print('---用例c执行---')if __name__ == '__main__':pytest.main(['-s', 'test_fixture1.py'])输出结果:
platform win32 -- Python 3.7.0, pytest-4.0.2, py-1.7.0, pluggy-0.8.0
rootdir: C:\Program Files\PycharmProjects\exercise, inifile:collected 3 itemstest_fixture1.py
开始执行function
.---用例a执行---开始执行function
.---用例b执行---开始执行function
.---用例c执行---[100%]========================== 3 passed in 0.06 seconds ===========================
Process finished with exit code 0


叠加usefixtures
如果一个方法或者一个class用例想要同时调用多个fixture,可以使用@pytest.mark.usefixture()进行叠加。注意叠加顺序,先执行的放底层,后执行的放上层。


import pytest
# test_fixture1.py@pytest.fixture()
def test1():print('\n开始执行function1')@pytest.fixture()
def test2():print('\n开始执行function2')@pytest.mark.usefixtures('test1')
@pytest.mark.usefixtures('test2')
def test_a():print('---用例a执行---')@pytest.mark.usefixtures('test2')
@pytest.mark.usefixtures('test1')
class TestCase:def test_b(self):print('---用例b执行---')def test_c(self):print('---用例c执行---')if __name__ == '__main__':pytest.main(['-s', 'test_fixture1.py'])输出结果:
============================= test session starts =============================
platform win32 -- Python 3.7.0, pytest-4.0.2, py-1.7.0, pluggy-0.8.0
rootdir: C:\Program Files\PycharmProjects\exercise, inifile:collected 3 itemstest_fixture1.py
开始执行function2开始执行function1
.---用例a执行---开始执行function1开始执行function2
.---用例b执行---开始执行function1开始执行function2
.---用例c执行---[100%]========================== 3 passed in 0.03 seconds ===========================
Process finished with exit code 0


usefixtures与传fixture区别
如果fixture有返回值,那么usefixture就无法获取到返回值,这个是装饰器usefixture与用例直接传fixture参数的区别。
当fixture需要用到return出来的参数时,只能讲参数名称直接当参数传入,不需要用到return出来的参数时,两种方式都可以。
fixture自动使用autouse=True
当用例很多的时候,每次都传这个参数,会很麻烦。fixture里面有个参数autouse,默认是False没开启的,可以设置为True开启自动使用fixture功能,这样用例就不用每次都去传参了
autouse设置为True,自动调用fixture功能


import pytest
# test_fixture1.py@pytest.fixture(scope='module', autouse=True)
def test1():print('\n开始执行module')@pytest.fixture(scope='class', autouse=True)
def test2():print('\n开始执行class')@pytest.fixture(scope='function', autouse=True)
def test3():print('\n开始执行function')def test_a():print('---用例a执行---')def test_d():print('---用例d执行---')class TestCase:def test_b(self):print('---用例b执行---')def test_c(self):print('---用例c执行---')if __name__ == '__main__':pytest.main(['-s', 'test_fixture1.py'])输出结果:
============================= test session starts =============================
platform win32 -- Python 3.7.0, pytest-4.0.2, py-1.7.0, pluggy-0.8.0
rootdir: C:\Program Files\PycharmProjects\exercise, inifile:collected 4 itemstest_fixture1.py
开始执行module开始执行class开始执行function
.---用例a执行---开始执行class开始执行function
.---用例d执行---开始执行class开始执行function
.---用例b执行---开始执行function
.---用例c执行---[100%]


conftest.py的作用范围
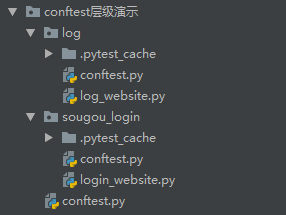
一个工程下可以建多个conftest.py的文件,一般在工程根目录下设置的conftest文件起到全局作用。在不同子目录下也可以放conftest.py的文件,作用范围只能在改层级以及以下目录生效。
项目实例:
目录结构:

1.conftest在不同的层级间的作用域不一样


# conftest层级展示/conftest.pyimport pytest@pytest.fixture(scope='session', autouse=True)
def login():print('----准备登录----')# conftest层级展示/sougou_login/conftest
import pytest@pytest.fixture(scope='session', autouse=True)
def bai_du():print('-----登录百度页面-----')# conftest层级展示/sougou_login/login_website
import pytestclass TestCase:def test_login(self):print('hhh,成功登录百度')if __name__ == '__main__':pytest.main(['-s', 'login_website.py'])输出结果:============================= test session starts =============================
platform win32 -- Python 3.7.0, pytest-4.0.2, py-1.7.0, pluggy-0.8.0
rootdir: C:\Program Files\PycharmProjects\conftest层级演示\sougou_login, inifile:collected 1 itemlogin_website.py ----准备登录----
-----登录百度页面-----
.hhh,成功登录百度[100%]========================== 1 passed in 0.03 seconds ===========================
Process finished with exit code 0


2.conftest是不能跨模块调用的(这里没有使用模块调用)


# conftest层级演示/log/contfest.py
import pytest@pytest.fixture(scope='function', autouse=True)
def log_web():print('打印页面日志成功')# conftest层级演示/log/log_website.py
import pytestdef test_web():print('hhh,成功一次打印日志')def test_web1():print('hhh,成功两次打印日志')if __name__ == '__main__':pytest.main(['-s', 'log_website.py'])输出结果:
============================= test session starts =============================
platform win32 -- Python 3.7.0, pytest-4.0.2, py-1.7.0, pluggy-0.8.0
rootdir: C:\Program Files\PycharmProjects\conftest层级演示\log, inifile:
collected 2 itemslog_website.py ----准备登录----
打印页面日志成功
hhh,成功一次打印日志
.打印页面日志成功
hhh,成功两次打印日志
.========================== 2 passed in 0.02 seconds ===========================


