【减少丢帧卡顿——状态管理】
文章目录
- 状态管理机制
- 状态管理最佳实践
- 合理选择装饰器
- 避免不必要的状态变量的使用
- 删除冗余的状态变量标记
- 建议使用临时变量替换状态变量
- 使用ObjectLink代替@Prop减少不必要的拷贝
- 避免在for、while等循环逻辑中频繁读取状态变量
- 最小化状态共享范围
- 减少不必要的层级传递
- 按照状态复杂度选择装饰器
- 总结
- 使用监听精准控制组件刷新
- 使用@Watch装饰器监听数据源
- 合理使用属性
- 复杂对象引起冗余刷新
- 使用@Observed装饰或被声明为状态变量的类对象绑定数组
- 合理使用ForEach/LazyForEach
- 在ForEach中使用自定义组件搭配对象数组
- 减少使用LazyForEach的重建机制刷新UI
状态管理机制
- ArkUI采用了MVVM模式,ViewModel将数据与视图绑定在一起,更新数据的时候直接更新视图

- 在ArkUI开发过程中,如果没有选择合适的装饰器或合理的控制状态更新范围,可能会导致
- 状态和UI的不一致,如UI界面展示的不是最新的状态
- 非必要的UI视图刷新,如只修改局部组件状态时导致组件所在页面的整体刷新
状态管理最佳实践
合理选择装饰器
避免不必要的状态变量的使用
删除冗余的状态变量标记
反例
- translateObj没有关联任何UI组件,buttonMsg仅有读取操作,没有修改操作。这些情况都不应该使用状态变量标记,否则读变量会影响性能。
@Observed
class Translate {translateX: number = 20;
}
@Entry
@Component
struct MyComponent {@State translateObj: Translate = new Translate();@State buttonMsg: string = 'I am button';build() {Column() {Button(this.buttonMsg) // Here we just read the value of the variable buttonMsg, without any write operation.}}
}
正例
- buttonMsg变量因仅用于读取操作而被定义为普通成员变量,而translateObj变量则因需要根据用户事件改变其x值以驱动动画效果,故被定义为状态变量,并实时更新UI以显示动画。
@Observed
class Translate {translateX: number = 20;
}
@Entry
@Component
struct UnnecessaryState1 {@State translateObj: Translate = new Translate(); // If there are both read and write operations and a Button component is associated with it, it is recommended to use state variables.buttonMsg = 'I am button'; // Only read the value of the variable buttonMsg, without any write operations, just use the general variables directlybuild() {Column() {Button(this.buttonMsg).onClick(() => {this.getUIContext().animateTo({duration: 50}, () => {this.translateObj.translateX = (this.translateObj.translateX + 50) % 150; // Reassign value to variable translateObj when clicked.})})}.translate({x: this.translateObj.translateX // Retrieve the value in translateObj.})}
}
建议使用临时变量替换状态变量
- 状态变量发生变化时,ArkUI会查询依赖该状态变量的组件并执行依赖该状态变量的组件的更新方法,完成组件渲染的行为。可以通过临时变量的计算代替直接操作状态变量,可以使ArkUI仅在最后一次状态变量变更时查询并渲染组件,减少不必要的行为,从而提高应用性能。
反例
@Entry
@Component
struct Index {@State message: string = '';// Define methods for changing state variables (multiple modifications of state variables)appendMsg(newMsg: string) {this.message += newMsg;this.message += ';';this.message += '<br/>';}build() {Column() {Button('Click Print Log').onClick(() => {this.appendMsg('Operational state variables'); // Calling encapsulated methods for changing state variables})}}
}
正例
@Entry
@Component
struct UnnecessaryState2 {@State message: string = '';// Define methods for changing state variables (intermediate variables are manipulated during method execution, state variables are modified only once)appendMsg(newMsg: string) {let message = this.message;message += newMsg;message += ';';message += '<br/>';this.message = message;}build() {Column() {Button('Click Print Log').onClick(() => {this.appendMsg('Manipulating Temporary Variables'); // Calling encapsulated methods for changing state variables})}}
}
使用ObjectLink代替@Prop减少不必要的拷贝
在应用开发中,父组件常向子组件传值。如果子组件不需要修改该状态变量,子组件使用@Prop装饰器会增加组件创建时间并影响性能(因为Prop是深拷贝,会带来额外性能开销),此时建议改用@ObjectLink。
反例
@Observed
class MyClass {public num: number = 0;constructor(num: number) {this.num = num;}
}@Component
struct PropChild {@Prop testClass: MyClass; // @Prop装饰状态变量会深拷贝。build() {Text(`PropChild testNum ${this.testClass.num}`)}
}@Entry
@Component
struct Parent {@State testClass: MyClass[] = [new MyClass(1)];build() {Column() {// PropChild没有改变@Prop testClass: MyClass的值,所以这时最优的选择是使用@ObjectLink。PropChild({ testClass: this.testClass[0] })}}
}
正例
@Observed
class MyClass {public num: number = 0;constructor(num: number) {this.num = num;}
}@Component
struct PropChild {@ObjectLink testClass: MyClass; // @ObjectLink装饰状态变量不会深拷贝。build() {Text(`PropChild testNum ${this.testClass.num}`)}
}@Entry
@Component
struct Parent {@State testClass: MyClass[] = [new MyClass(1)];build() {Column() {// 当子组件不需要本地修改状态时,应优先使用@ObjectLink,因为@Prop会执行深拷贝并带来性能开销,此时@ObjectLink是比@Link和@Prop更优的选择。PropChild({ testClass: this.testClass[0] })}}
}
避免在for、while等循环逻辑中频繁读取状态变量
- 在应用开发中,应避免在循环逻辑中频繁读取状态变量,而是应该放在循环外面读取。
反例
import hilog from '@ohos.hilog';@Entry
@Component
struct Index {@State message: string = '';build() {Column() {Button('点击打印日志').onClick(() => {for (let i = 0; i < 10; i++) {hilog.info(0x0000, 'TAG', '%{public}s', this.message);}})}}
}
正例
import hilog from '@ohos.hilog';@Entry
@Component
struct Index {@State message: string = '';build() {Column() {Button('点击打印日志').onClick(() => {let logMessage: string = this.message;for (let i = 0; i < 10; i++) {hilog.info(0x0000, 'TAG', '%{public}s', logMessage);}})}}
}
最小化状态共享范围
- 组件间需要共享的状态,按照共享范围从小到大依次有三种场景:父子组件间共享状态,不同子树上组件间共享状态和不同组件树间共享状态。


- A方案:@State+@Prop、@State+@Link、@State+@Observed+@ObjectLink:三者的共享范围为从@State所在的组件开始,到@Prop/@Link/@ObjectLink所在组件的整条路径,路径上所有的中间组件通过@Prop/@Link/@ObjectLink都可以共享同一个状态。
- B方案:@Provide+@Consume:状态共享范围是以@Provide所在组件为祖先节点的整棵子树,子树上的任意后代组件通过@Consume都可以共享同一个状态。。
- C方案:LocalStorage:共享范围为UIAbility(即尽在仓库下面的单个模块内不同页面使用)内以页面为单位的不同组件树间的共享。LocalStorage的生命周期由应用程序决定,当应用释放最后一个指向LocalStorage的引用时,LocalStorage被垃圾回收。
- D方案:AppStorage:共享范围是应用全局。AppStorage与应用的进程绑定,由UI框架在应用程序启动时创建,当应用进程终止,AppStorage被回收。适合对于整个应用而言“全局”的变量或应用的主线程内多个UIAbility实例间的状态共享
减少不必要的层级传递
- A方案的实现方式是逐级向下传递状态,当共享状态的组件间层级较多,会出现层层传递的现象。中间会存在许多没有使用该状态的组件,不利于代码维护和扩展。
- 如果MainPage、MineView、DiscoverView、ActionButtonView需要共享appNavigationStack的路由信息状态,使用方案A(左图)就会让中间组件存在不必要的传递,这时候可以使用方案B(右图)


按照状态复杂度选择装饰器
- 方案A种三种装饰器选择的区别
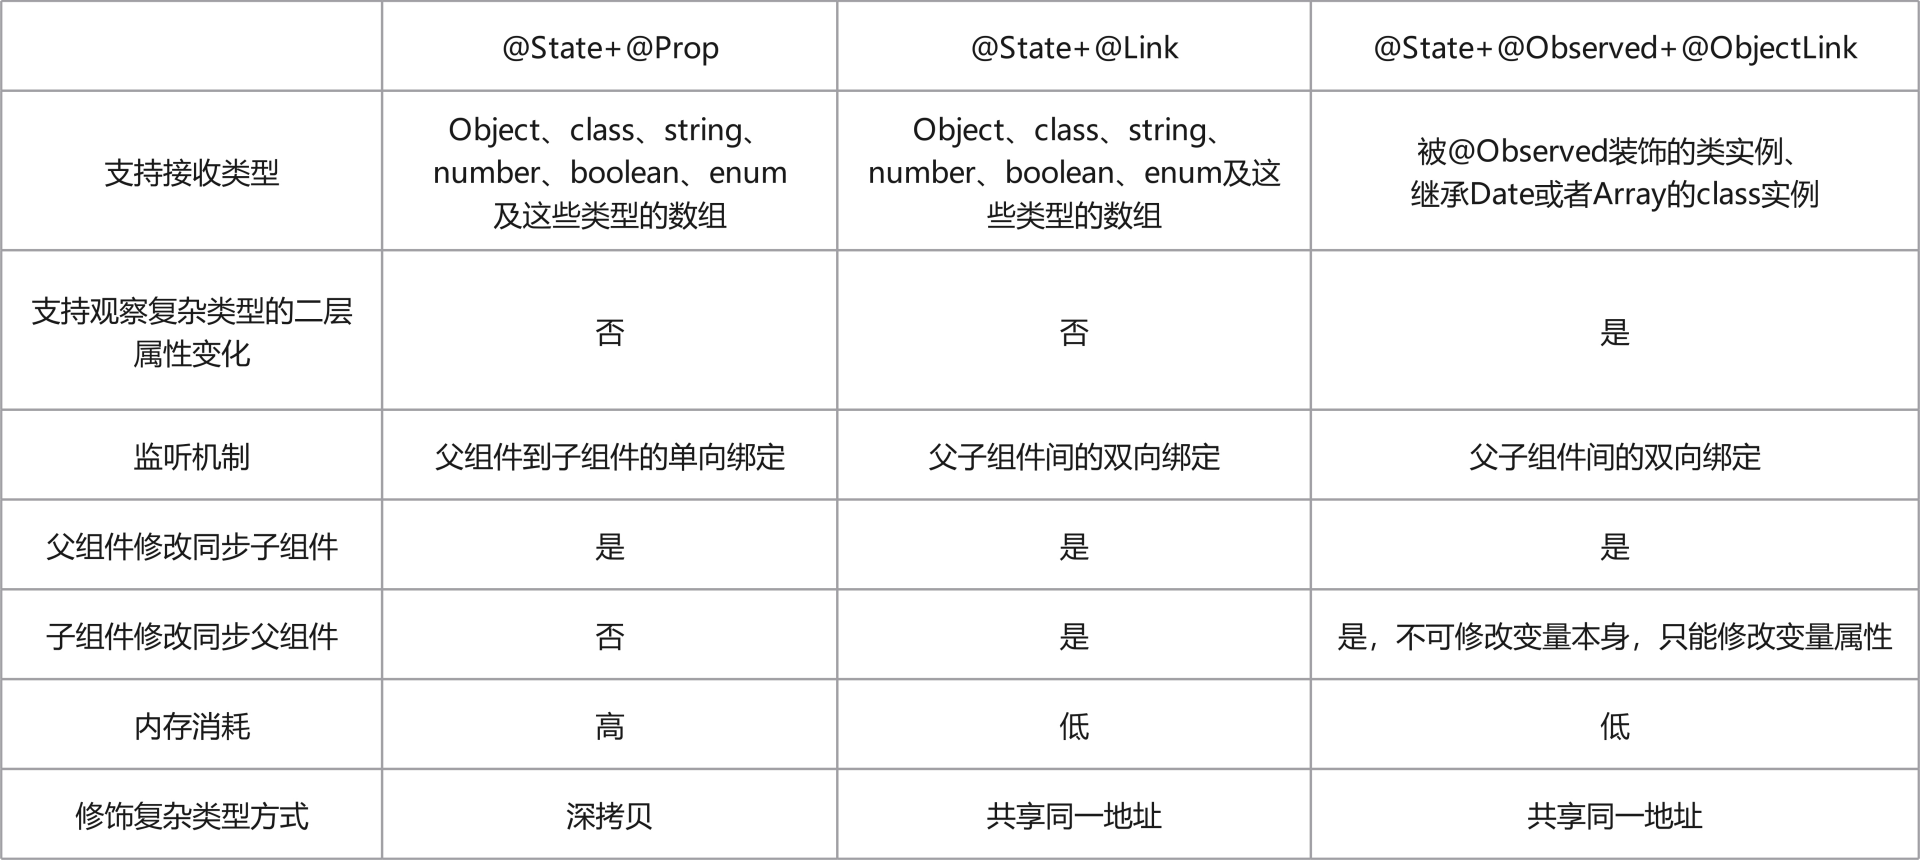
- 选择建议:
- 需要观察嵌套类对象的深层属性变化的场景,选择@State+@Observed+@ObjectLink。
- 状态是复杂对象、类或其类型数组的场景,选择@State+@Link。
- 状态是简单数据类型时,使用@State+@Link和@State+@Prop均可。在功能层面上,依据@Prop单向绑定的特性,@State+@Prop适合用于非实时修改的场景
总结
合理选择装饰器主要包含以下三步:
1.首先根据状态需要共享的范围大小,尽量选择共享能力小的装饰器方案,优先级依次为@State+@Prop、@State+@Link或@State+@Observed+@ObjectLink > @Provide+@Consume > LocalStorage > AppStorage。
2.当共享的状态的组件间层级相差较大时,为避免较差的代码可扩展性和可维护性,@Provide+@Consume的方案要优于层层传递的共享方案。
3.对于具有相同优先级的@State+@Prop、@State+@Link或@State+@Observed+@ObjectLink 三个方案,应结合状态的复杂程度和装饰器各自的特性选择。
使用监听精准控制组件刷新
**在多个组件依赖同一个数据源并根据数据源变化刷新组件的情况下,直接关联数据源会导致每次数据源改变都刷新所有组件。**为精准控制组件刷新,可以采取以下策略。
使用@Watch装饰器监听数据源
在组件中使用@Watch装饰器监听数据源,当数据变化时执行业务逻辑,确保只有满足条件的组件进行刷新。
反例
- 在下面的列表示例代码中,多个组件直接关联同一个数据源,但是未使用@Watch装饰器,导致了冗余的组件刷新。
@Entry
@Component
struct Index {@State currentIndex: number = 0; // The subscript of the currently selected list itemprivate listData: string[] = [];aboutToAppear(): void {for (let i = 0; i < 10; i++) {this.listData.push(`组件 ${i}`);}}build() {Row() {Column() {List() {ForEach(this.listData, (item: string, index: number) => {ListItem() {ListItemComponent({ item: item, index: index, currentIndex: this.currentIndex })}})}.alignListItem(ListItemAlign.Center)}.width('100%')}.height('100%')}
}@Component
struct ListItemComponent {@Prop item: string;@Prop index: number; // The subscript of the list item@Link currentIndex: number;private sizeFont: number = 50;isRender(): number {console.info(`ListItemComponent ${this.index} Text is rendered`);return this.sizeFont;}build() {Column() {Text(this.item).fontSize(this.isRender())// Dynamically set the color of the text according to the difference between the index and currentIndex of the current list item..fontColor(Math.abs(this.index - this.currentIndex) <= 1 ? Color.Red : Color.Blue).onClick(() => {this.currentIndex = this.index;})}}
}
示例中,每个ListItemComponent组件点击Text后会将当前点击的列表项下标index赋值给currentIndex,@Link装饰的状态变量currentIndex变化后,父组件Index和所有ListItemComponent组件中的Index值都会同步发生改变。然后,在所有ListItemComponent组件中,根据列表项下标index与currentIndex的差值的绝对值是否小于等于1来决定Text的颜色,如果满足条件,则文本显示为红色,否则显示为蓝色

- 可以看到每次点击后即使其中部分Text组件的颜色并没有发生改变,所有的Text组件也都会刷新。这是由于ListItemComponent组件中的Text组件直接关联了currentIndex,而不是根据currentIndex计算得到的颜色。
- 针对上述父子组件层级关系的场景,推荐使用状态装饰器@Watch监听数据源。当数据源改变时,在@Watch的监听回调中执行业务逻辑。组件关联回调的处理结果,而不是直接关联数据源。
正例
@Component
struct ListItemComponent {@Prop item: string;@Prop index: number; // The subscript of the list item// 添加@Watch,满足条件才赋值@Link @Watch('onCurrentIndexUpdate') currentIndex: number;@State color: Color = Math.abs(this.index - this.currentIndex) <= 1 ? Color.Red : Color.Blue;isRender(): number {console.info(`ListItemComponent ${this.index} Text is rendered`);return 50;}onCurrentIndexUpdate() {// Dynamically modifies the value of color based on the difference between the index and currentIndex of the current list item.this.color = Math.abs(this.index - this.currentIndex) <= 1 ? Color.Red : Color.Blue;}build() {Column() {Text(this.item).fontSize(this.isRender()).fontColor(this.color).onClick(() => {this.currentIndex = this.index;})}}
}
合理使用属性
着重解决UI不刷新、刷新性能差的情况
复杂对象引起冗余刷新
在开发过程中,我们有时会定义一个大的对象,其中包含了很多样式相关的属性,并且在父子组件间传递这个对象,将其中的属性绑定在组件上。
反例
@Observed
class UiStyle {translateX: number = 0;translateY: number = 0;scaleX: number = 0.3;scaleY: number = 0.3;width: number = 336;height: number = 178;posX: number = 10;posY: number = 50;alpha: number = 0.5;borderRadius: number = 24;imageWidth: number = 78;imageHeight: number = 78;translateImageX: number = 0;translateImageY: number = 0;fontSize: number = 20;
}
@Component
struct SpecialImage {@ObjectLink uiStyle: UiStyle;private isRenderSpecialImage() : number { // 显示组件是否渲染的函数console.info("SpecialImage is rendered");return 1;}build() {Image($r('app.media.icon')) // 此处'app.media.icon'仅作示例,请开发者自行替换,否则imageSource创建失败会导致后续无法正常执行。.width(this.uiStyle.imageWidth).height(this.uiStyle.imageHeight).margin({ top: 20 }).translate({x: this.uiStyle.translateImageX,y: this.uiStyle.translateImageY}).opacity(this.isRenderSpecialImage()) // 如果Image重新渲染,该函数将被调用}
}
@Component
struct PageChild {@ObjectLink uiStyle: UiStyle// 下面的函数用于显示组件是否被渲染private isRenderColumn() : number {console.info("Column is rendered");return 1;}private isRenderStack() : number {console.info("Stack is rendered");return 1;}private isRenderImage() : number {console.info("Image is rendered");return 1;}private isRenderText() : number {console.info("Text is rendered");return 1;}build() {Column() {SpecialImage({uiStyle: this.uiStyle})Stack() {Column() {Image($r('app.media.icon')) // 此处'app.media.icon'仅作示例,请开发者自行替换,否则imageSource创建失败会导致后续无法正常执行。.opacity(this.uiStyle.alpha).scale({x: this.uiStyle.scaleX,y: this.uiStyle.scaleY}).padding(this.isRenderImage()).width(300).height(300)}.width('100%').position({ y: -80 })Stack() {Text("Hello World").fontColor("#182431").fontWeight(FontWeight.Medium).fontSize(this.uiStyle.fontSize).opacity(this.isRenderText()).margin({ top: 12 })}.opacity(this.isRenderStack()).position({x: this.uiStyle.posX,y: this.uiStyle.posY}).width('100%').height('100%')}.margin({ top: 50 }).borderRadius(this.uiStyle.borderRadius).opacity(this.isRenderStack()).backgroundColor("#FFFFFF").width(this.uiStyle.width).height(this.uiStyle.height).translate({x: this.uiStyle.translateX,y: this.uiStyle.translateY})Column() {Button("Move").width(312).fontSize(20).backgroundColor("#FF007DFF").margin({ bottom: 10 }).onClick(() => {this.getUIContext().animateTo({duration: 500},() => {this.uiStyle.translateY = (this.uiStyle.translateY + 180) % 250;})})Button("Scale").borderRadius(20).backgroundColor("#FF007DFF").fontSize(20).width(312).onClick(() => {this.uiStyle.scaleX = (this.uiStyle.scaleX + 0.6) % 0.8;})}.position({y:666}).height('100%').width('100%')}.opacity(this.isRenderColumn()).width('100%').height('100%')}
}
@Entry
@Component
struct Page {@State uiStyle: UiStyle = new UiStyle();build() {Stack() {PageChild({uiStyle: this.uiStyle})}.backgroundColor("#F1F3F5")}
}
在上面的示例中,UiStyle定义了多个属性,并且这些属性分别被多个组件关联。当点击任意一个按钮更改其中的某些属性时,会导致所有这些关联uiStyle的组件进行刷新,虽然它们其实并不需要进行刷新(因为组件的属性都没有改变)。如果关联的属性数量较多,那么每次刷新都会产生许多冗余刷新。
解决方法
- 将大对象拆解为小对象的集合
@Observed
class NeedRenderImage { // 在同一组件中使用的属性可以划分为相同的类public translateImageX: number = 0;public translateImageY: number = 0;public imageWidth:number = 78;public imageHeight:number = 78;
}
@Observed
class NeedRenderScale { // 在一起使用的属性可以划分为相同的类public scaleX: number = 0.3;public scaleY: number = 0.3;
}
@Observed
class NeedRenderAlpha { // 在不同地方使用的属性可以划分为相同的类public alpha: number = 0.5;
}
@Observed
class NeedRenderSize { // 在一起使用的属性可以划分为相同的类public width: number = 336;public height: number = 178;
}
@Observed
class NeedRenderPos { // 在一起使用的属性可以划分为相同的类public posX: number = 10;public posY: number = 50;
}
@Observed
class NeedRenderBorderRadius { // 在不同地方使用的属性可以划分为相同的类public borderRadius: number = 24;
}
@Observed
class NeedRenderFontSize { // 在不同地方使用的属性可以划分为相同的类public fontSize: number = 20;
}
@Observed
class NeedRenderTranslate { // 在一起使用的属性可以划分为相同的类public translateX: number = 0;public translateY: number = 0;
}
@Observed
class UiStyle {// 使用NeedRenderxxx类needRenderTranslate: NeedRenderTranslate = new NeedRenderTranslate();needRenderFontSize: NeedRenderFontSize = new NeedRenderFontSize();needRenderBorderRadius: NeedRenderBorderRadius = new NeedRenderBorderRadius();needRenderPos: NeedRenderPos = new NeedRenderPos();needRenderSize: NeedRenderSize = new NeedRenderSize();needRenderAlpha: NeedRenderAlpha = new NeedRenderAlpha();needRenderScale: NeedRenderScale = new NeedRenderScale();needRenderImage: NeedRenderImage = new NeedRenderImage();
}
- 使用@Track装饰器解决(优先推荐)
- @Track应用于class对象的属性级更新。@Track装饰的属性变化时,只会触发该属性关联的UI更新。
@Observed
class UiStyle {@Track translateX: number = 0;@Track translateY: number = 0;@Track scaleX: number = 0.3;@Track scaleY: number = 0.3;@Track width: number = 336;@Track height: number = 178;@Track posX: number = 10;@Track posY: number = 50;@Track alpha: number = 0.5;@Track borderRadius: number = 24;@Track imageWidth: number = 78;@Track imageHeight: number = 78;@Track translateImageX: number = 0;@Track translateImageY: number = 0;@Track fontSize: number = 20;
}- 注意点:如果class类中使用了@Track装饰器,则未被@Track装饰器装饰的属性不能在UI中使用,如果使用,会发生运行时报错。
class Person {// id被@Track装饰@Track id: number;// age未被@Track装饰age: number;constructor(id: number, age: number) {this.id = id;this.age = age;}
}@Entry
@Component
struct Parent {@State parent: Person = new Person(2, 30);build() {// 没有被@Track装饰的属性不可以在UI中使用,运行时会报错Text(`Parent id is: ${this.parent.id} and Parent age is: ${this.parent.age}`)}
}
使用@Observed装饰或被声明为状态变量的类对象绑定数组
在开发过程中,会有“重置数据”的场景,将一个新创建的对象赋值给原有的状态变量,实现数据的刷新。如果不注意新创建对象的类型,可能会出现UI不刷新的现象。
@Observed
class Child {count: number;constructor(count: number) {this.count = count}
}
@Observed
class ChildList extends Array<Child> {
};
@Observed
class Ancestor {childList: ChildList;constructor(childList: ChildList) {this.childList = childList;}/* 在loadData方法中,创建了一个临时的Child类型的数组tempList,* 并且将Ancestor对象的成员变量的childList指向了tempList。* 但是这里创建的Child[]类型的数组tempList其实并没有能被观测的能力* 重建之后,新数组没有被观测到能力,所以不会引起UI刷新*/public loadData() {let tempList = [new Child(1), new Child(2), new Child(3), new Child(4), new Child(5)];this.childList = tempList;}//修正之后如下,核心的修改点是将原本Child[]类型的tempList修改为具有被观测能力的ChildList类。public loadData() {let tempList = new ChildList();for (let i = 1; i < 6; i ++) {tempList.push(new Child(i));}this.childList = tempList;}public clearData() {this.childList = []}
}
@Entry
@Component
struct Page {@State childList: ChildList = [new Child(1), new Child(2), new Child(3), new Child(4),new Child(5)];@State ancestor: Ancestor = new Ancestor(this.childList)build() {Column() {CompAncestor({ ancestor: this.ancestor})}}
}@Component
struct CompAncestor {@ObjectLink ancestor: Ancestor;build() {Column() {CompList({ childList: this.ancestor.childList })Row() {Button("Clear").onClick(() => {this.ancestor.clearData()}).width(100).margin({right: 50})Button("Recover").onClick(() => {this.ancestor.loadData()}).width(100)}}}
}@Component
struct CompChild {@Link childList: ChildList;@ObjectLink child: Child;build() {Row() {Text(this.child.count+'').height(70).fontSize(20).borderRadius({topLeft: 6,topRight: 6}).margin({left: 50})Button('X').backgroundColor(Color.Red).onClick(()=>{let index = this.childList.findIndex((item) => {return item.count === this.child.count})if (index !== -1) {this.childList.splice(index, 1);}}).margin({left: 200,right:30})}.margin({top:15,left: 15,right:10,bottom:15}).borderRadius(6).backgroundColor(Color.Grey)}
}
@Component
struct CompList {@ObjectLink@Watch('changeChildList') childList: ChildList;changeChildList() {console.info('CompList ChildList change');}isRenderCompChild(index: number) : number {console.info("Comp Child is render" + index);return 1;}build() {Column() {List() {ForEach(this.childList, (item: Child, index) => {ListItem() {CompChild({childList: this.childList,child: item}).opacity(this.isRenderCompChild(index))}})}.height('70%')}}
}
合理使用ForEach/LazyForEach
在ForEach中使用自定义组件搭配对象数组
- 开发中经常会使用对象数组和ForEach结合起来使用,但是写法不当会出现UI不刷新的情况
反例
@Observed
class StyleList extends Array<TextStyles> {
};
@Observed
class TextStyles {fontSize: number;constructor(fontSize: number) {this.fontSize = fontSize;}
}
@Entry
@Component
struct Page {@State styleList: StyleList = new StyleList();aboutToAppear() {for (let i = 15; i < 50; i++)this.styleList.push(new TextStyles(i));}build() {Column() {Text("Font Size List").fontSize(50).onClick(() => {for (let i = 0; i < this.styleList.length; i++) {this.styleList[i].fontSize++;}console.info("change font size");})List() {/** 由于ForEach中生成的item是一个常量,因此当点击改变item中的内容时,没有办法观测到UI刷新,* 尽管日志表面item中的值已经改变了(这体现在打印了“change font size”的日志)。* 因此,需要使用自定义组件,配合@ObjectLink来实现观测的能力。*/ForEach(this.styleList, (item: TextStyles) => {ListItem() {Text("Hello World").fontSize(item.fontSize)}})}}}
}
正例
@Observed
class StyleList extends Array<TextStyles> {
};
@Observed
class TextStyles {fontSize: number;constructor(fontSize: number) {this.fontSize = fontSize;}
}
@Component
struct TextComponent {@ObjectLink textStyle: TextStyles;build() {Text("Hello World").fontSize(this.textStyle.fontSize)}
}
@Entry
@Component
struct Page {@State styleList: StyleList = new StyleList();aboutToAppear() {for (let i = 15; i < 50; i++)this.styleList.push(new TextStyles(i));}build() {Column() {Text("Font Size List").fontSize(50).onClick(() => {for (let i = 0; i < this.styleList.length; i++) {this.styleList[i].fontSize++;}console.info("change font size");})List() {ForEach(this.styleList, (item: TextStyles) => {ListItem() {TextComponent({ textStyle: item})}})}}}
}
减少使用LazyForEach的重建机制刷新UI
class BasicDataSource implements IDataSource {private listeners: DataChangeListener[] = [];private originDataArray: StringData[] = [];//...public reloadData(): void {this.notifyDataReload();}
}class StringData {message: string;imgSrc: Resource;constructor(message: string, imgSrc: Resource) {this.message = message;this.imgSrc = imgSrc;}
}@Entry
@Component
struct MyComponent {private data: MyDataSource = new MyDataSource();aboutToAppear() {for (let i = 0; i <= 9; i++) {this.data.pushData(new StringData(`Click to add ${i}`, $r('app.media.icon')));}}build() {List({ space: 3 }) {LazyForEach(this.data, (item: StringData, index: number) => {ListItem() {Column() {Text(item.message).fontSize(20).onAppear(() => {console.info("text appear:" + item.message);})Image(item.imgSrc).width(100).height(100).onAppear(() => {console.info("image appear");})}.margin({ left: 10, right: 10 })}.onClick(() => {item.message += '0';this.data.reloadData();})}, (item: StringData, index: number) => JSON.stringify(item))}.cachedCount(5)}
}// 替换后的ListItem和自定义组件使用objectLink控制UI更新
ListItem() {ChildComponent({data: item})
}
.onClick(() => {item.message += '0';
})@Component
struct ChildComponent {@ObjectLink data: StringDatabuild() {Column() {Text(this.data.message).fontSize(20).onAppear(() => {console.info("text appear:" + this.data.message);})Image(this.data.imgSrc).width(100).height(100)}.margin({ left: 10, right: 10 })}
}
- 可以观察到在点击更改message之后,图片“闪烁”了一下,同时输出了组件的onAppear日志,这说明组件进行了重建。这是因为在更改message之后,导致LazyForEach中这一项的key值发生了变化,使得LazyForEach在reloadData的时候将这一项ListItem进行了重建。Text组件仅仅更改显示的内容却发生了重建,而不是更新。而尽管Image组件没有需要重新绘制的内容,但是因为触发LazyForEach的重建,会使得同样位于ListItem下的Image组件重新创建。
- 当前LazyForEach与状态变量都能触发UI的刷新,两者的性能开销是不一样的。使用LazyForEach刷新会对组件进行重建,如果包含了多个组件,则会产生比较大的性能开销。使用状态变量刷新会对组件进行刷新,具体到状态变量关联的组件上,相对于LazyForEach的重建来说,范围更小更精确。因此,推荐使用状态变量来触发LazyForEach中的组件刷新,这就需要使用自定义组件。