小白成长之路-centos7部署ceph存储
一、准备
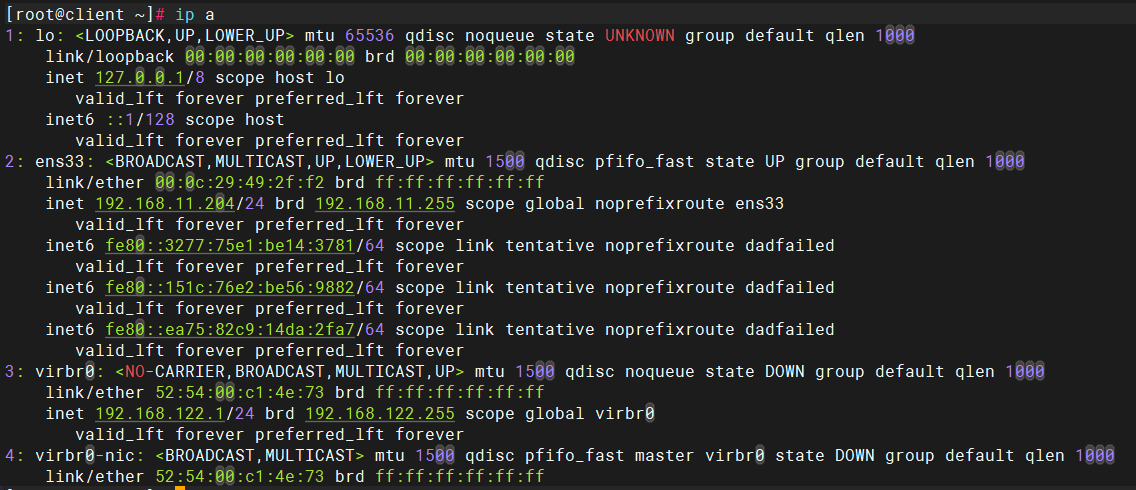
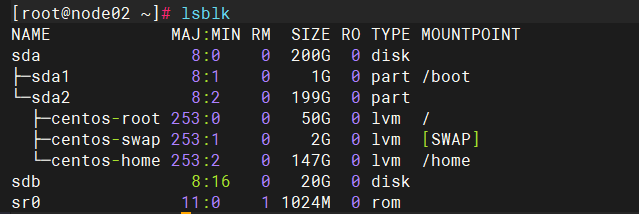
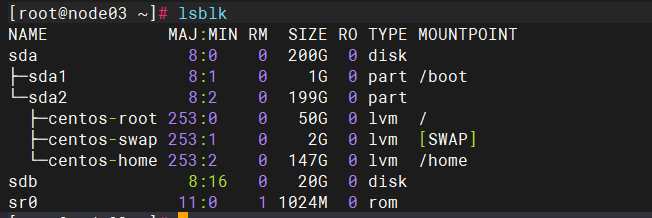
5台centos7主机
node节点双网卡
(1个内部检测,1个外部使用)
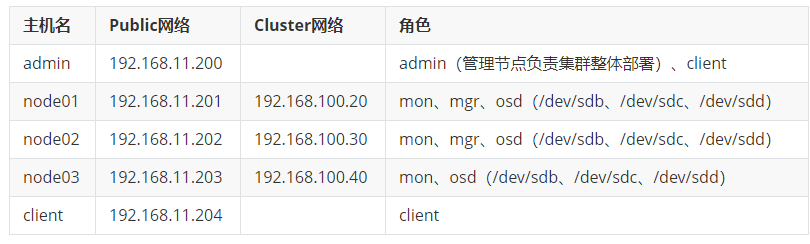
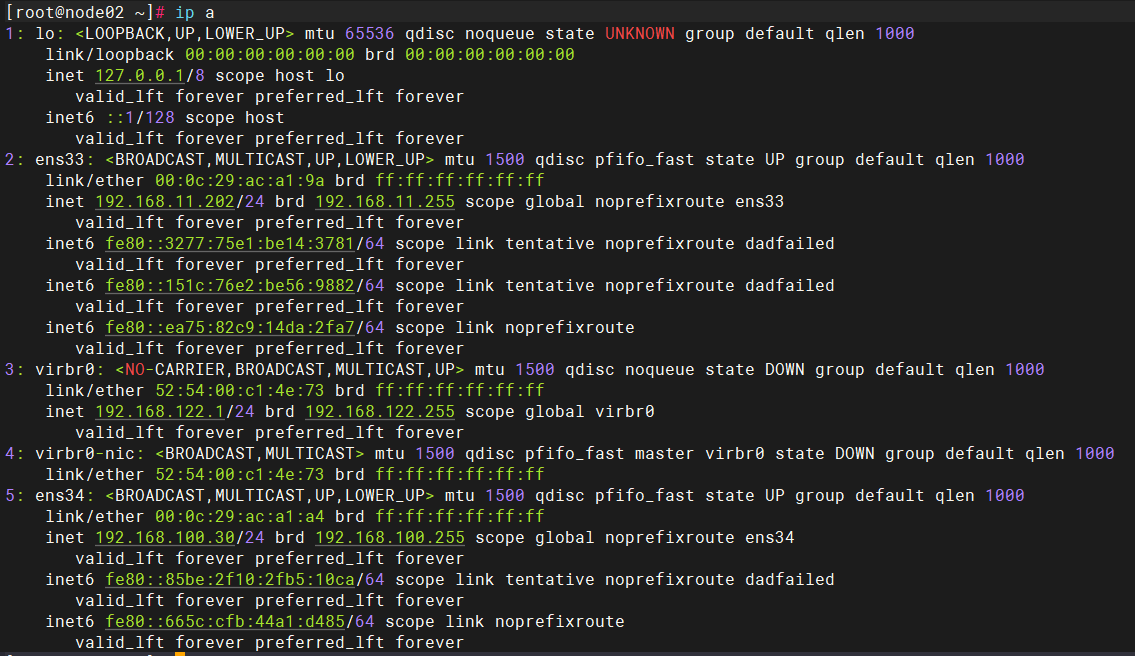
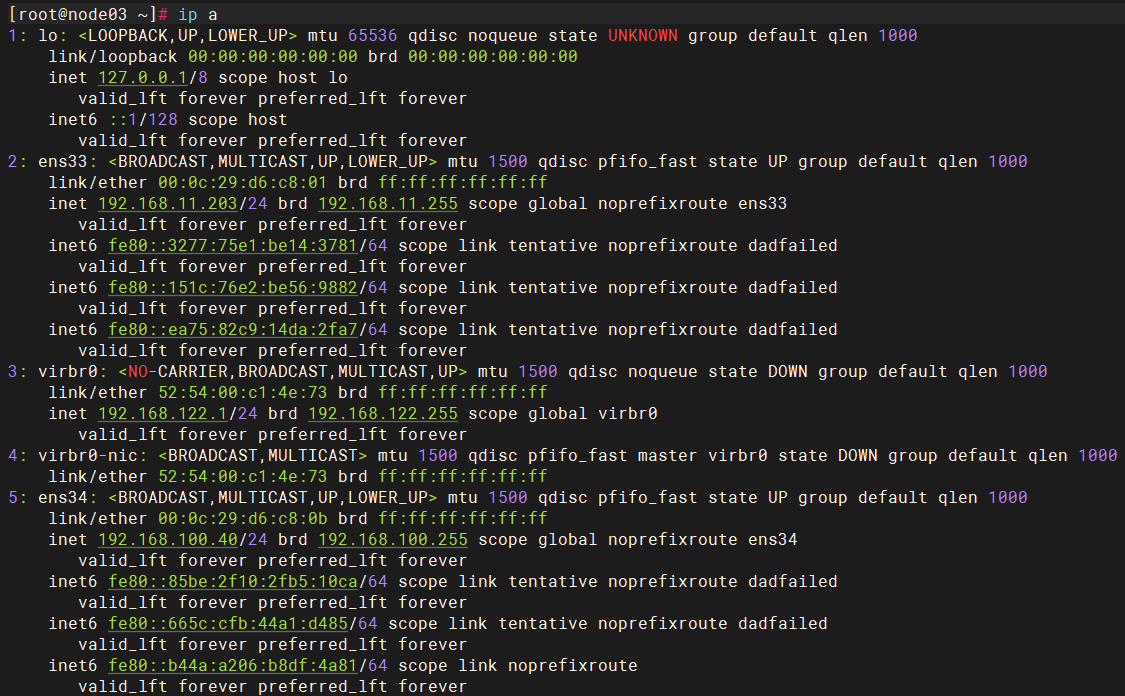
node节点都添加新网卡
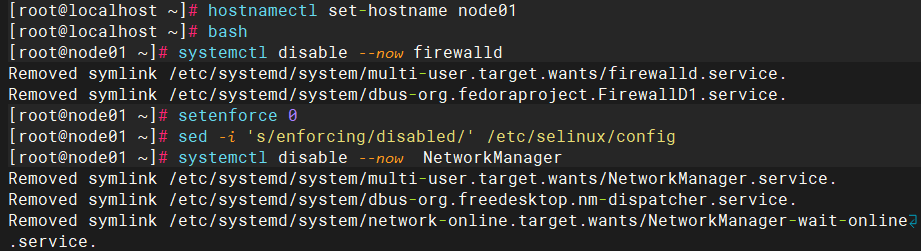
关闭防火墙和上下文
都需要
添加hosts文件
都需要
- cat > /etc/hosts << EOF
- > 127.0.0.1 localhost localhost.localdomain localhost4 localhost4.localdomain4
- > ::1 localhost localhost.localdomain localhost6 localhost6.localdomain6
- > 192.168.11.200 admin
- > 192.168.11.201 node01
- > 192.168.11.202 node02
- > 192.168.11.203 node03
- > 192.168.11.204 client
- > EOF
AI运行代码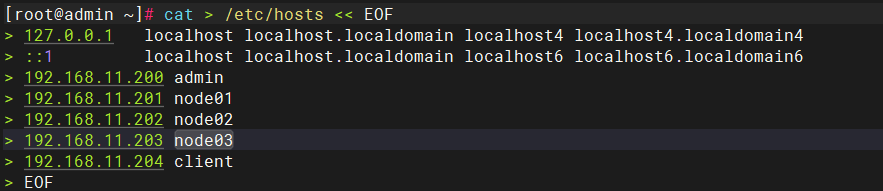
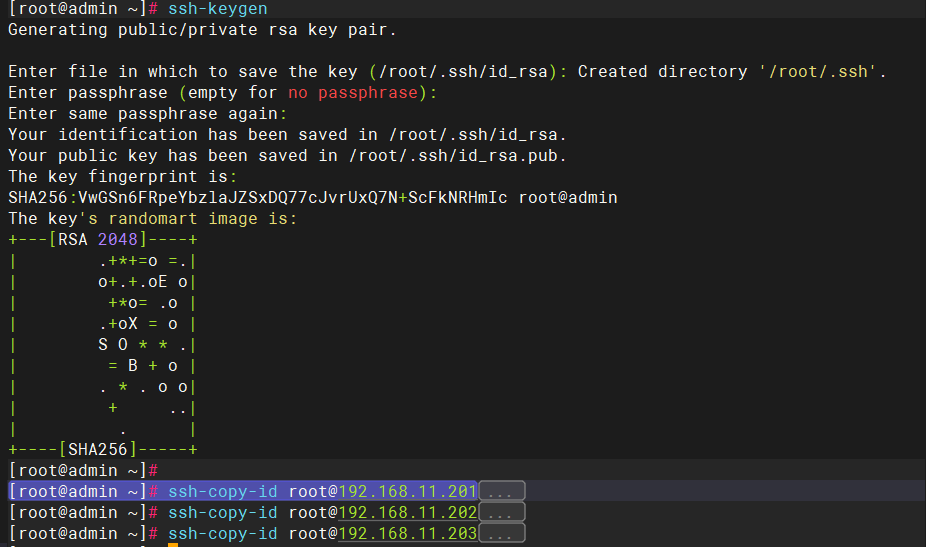
admin对node免密
配时间同步
- timedatectl set-timezone Asia/Shanghai
- timedatectl set-ntp yes
-
- ###
- ntpdate ntp.aliyun.com
AI运行代码
创建工作目录
![]()


配置下载源
- wget https://download.ceph.com/rpm-nautilus/el7/noarch/ceph-release-1-1.el7.noarch.rpm --no-check-certificate
-
- rpm -ivh ceph-release-1-1.el7.noarch.rpm --force
AI运行代码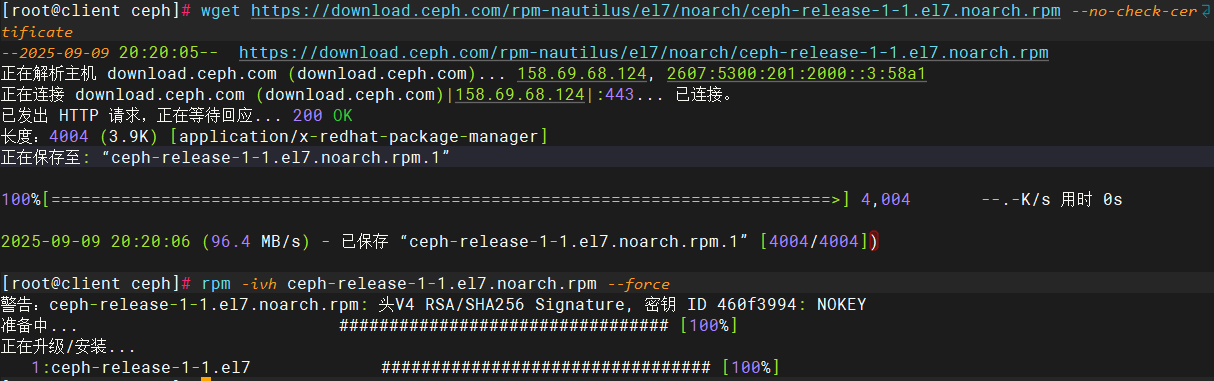
安装软件包及依赖
- curl -o /etc/yum.repos.d/CentOS-Base.repo https://mirrors.aliyun.com/repo/Centos-7.repo
-
- curl -o /etc/yum.repos.d/epel.repo http://mirrors.aliyun.com/repo/epel-7.repo
-
- yum clean all
-
- yum makecache
-
- yum -y install epel-release
-
- yum -y install yum-plugin-priorities yum-utils ntpdate python-setuptools python-pip gcc gcc-c++ autoconf libjpeg libjpeg-devel libpng libpng-devel freetype freetype-devel libxml2 libxml2-devel zlib zlib-devel glibc glibc-devel glib2 glib2-devel bzip2 bzip2-devel zip unzip ncurses ncurses-devel curl curl-devel e2fsprogs e2fsprogs-devel krb5-devel libidn libidn-devel openssl openssh openssl-devel nss_ldap openldap openldap-devel openldap-clients openldap-servers libxslt-devel libevent-devel ntp libtool-ltdl bison libtool vim-enhanced python wget lsof iptraf strace lrzsz kernel-devel kernel-headers pam-devel tcl tk cmake ncurses-devel bison setuptool popt-devel net-snmp screen perl-devel pcre-devel net-snmp screen tcpdump rsync sysstat man iptables sudo libconfig git bind-utils tmux elinks numactl iftop bwm-ng net-tools expect snappy leveldb gdisk python-argparse gperftools-libs conntrack ipset jq libseccomp socat chrony sshpass
AI运行代码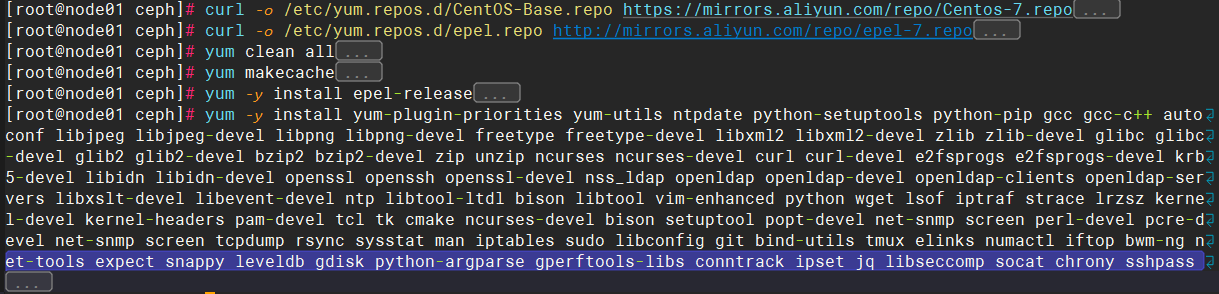
在admin执行


下载失败可手动下载
admin与node
- yum clean all
-
- yum mackcache
-
- yum -y install epel-release
-
- yum -y install yum-plugin-priorities
-
- yum -y install ceph-release ceph ceph-radosgw
AI运行代码
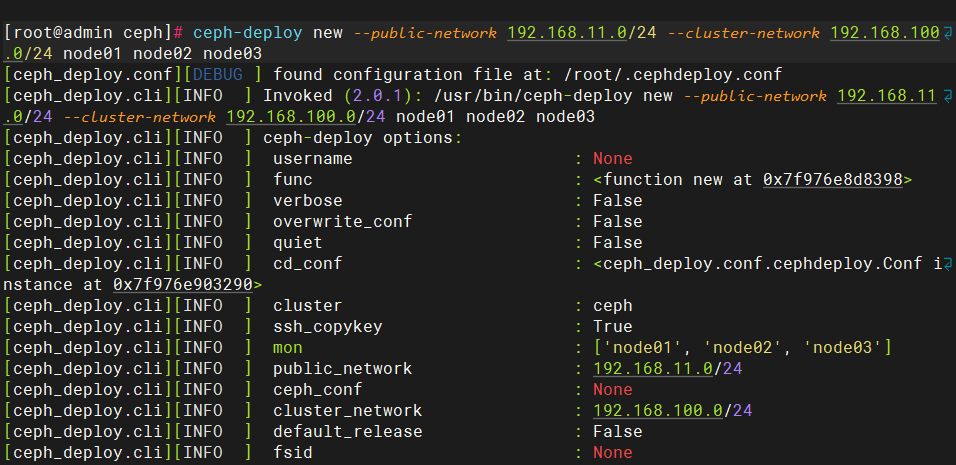
生成初始配置
ceph-deploy new --public-network 192.168.11.0/24 --cluster-network 192.168.100.0/24 node01 node02 node03AI运行代码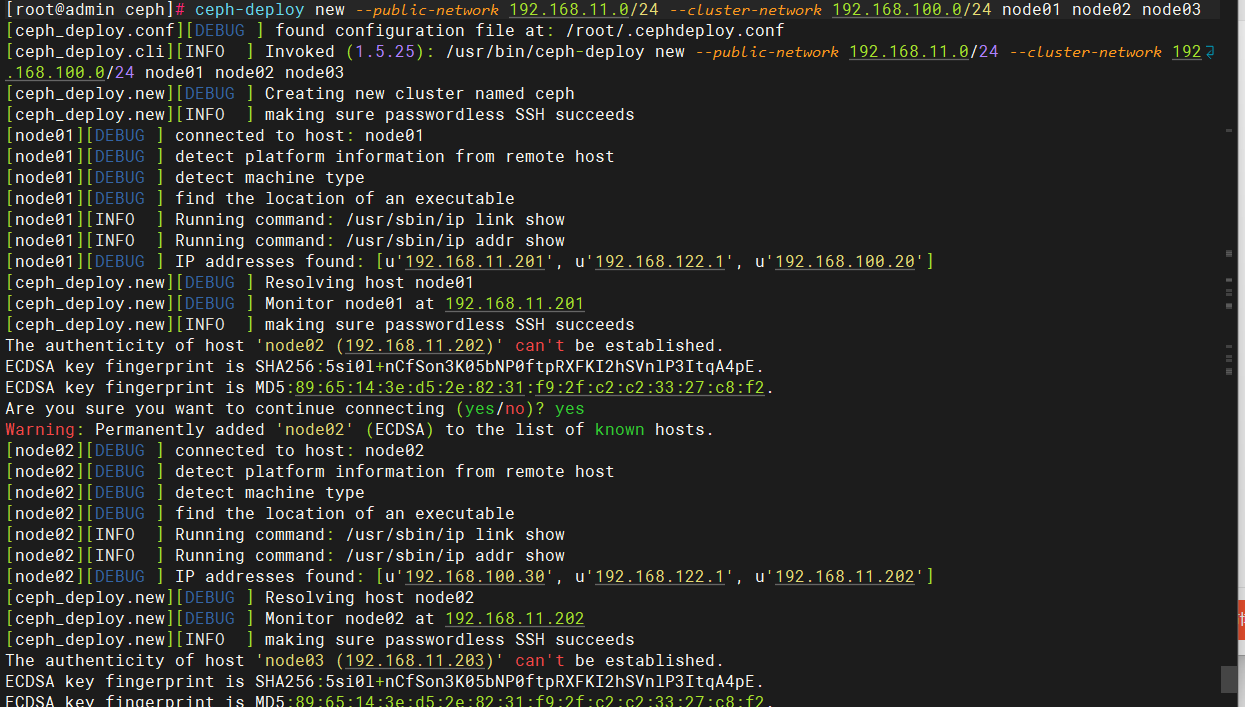
假如出现
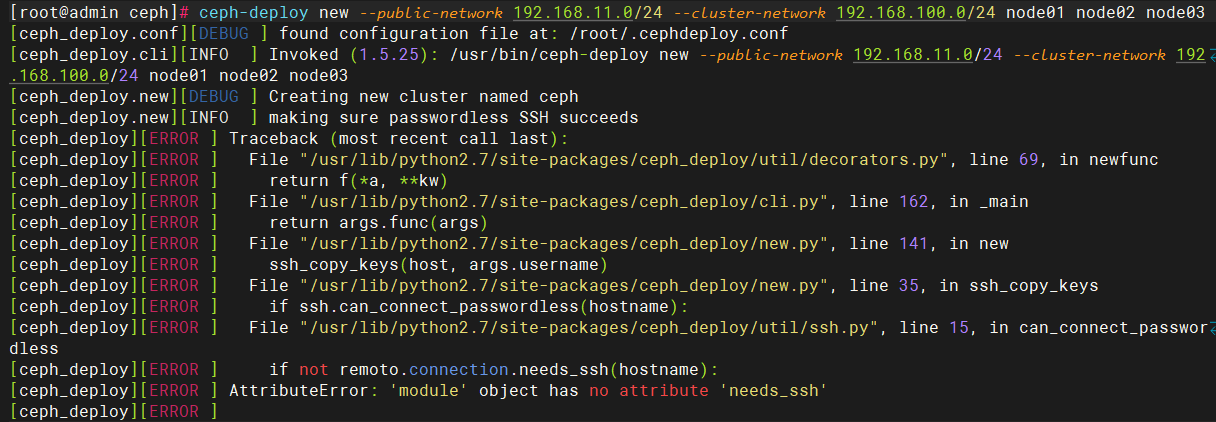
- cat > /usr/lib/python2.7/site-packages/ceph_deploy/util/ssh.py << 'EOF'
- # -*- coding: utf-8 -*-
- import logging
- from ceph_deploy.lib import remoto
- from ceph_deploy.connection import get_local_connection
-
-
- def can_connect_passwordless(hostname):
- """
- Ensure that current host can SSH remotely to the remote
- host using the ``BatchMode`` option to prevent a password prompt.
- That attempt will error with an exit status of 255 and a ``Permission
- denied`` message or a``Host key verification failed`` message.
- """
- # 直接返回True,跳过needs_ssh检查(已确认SSH正常)
- return True
-
- # 以下代码会被上面的return跳过,保留仅作参考
- logger = logging.getLogger(hostname)
- with get_local_connection(logger) as conn:
- # Check to see if we can login, disabling password prompts
- command = ['ssh', '-CT', '-o', 'BatchMode=yes', hostname]
- out, err, retval = remoto.process.check(conn, command, stop_on_error=False)
- permission_denied_error = 'Permission denied '
- host_key_verify_error = 'Host key verification failed.'
- has_key_error = False
- for line in err:
- if permission_denied_error in line or host_key_verify_error in line:
- has_key_error = True
-
- if retval == 255 and has_key_error:
- return False
- return True
- EOF
AI运行代码同步配置
ceph-deploy --overwrite-conf mon create-initialAI运行代码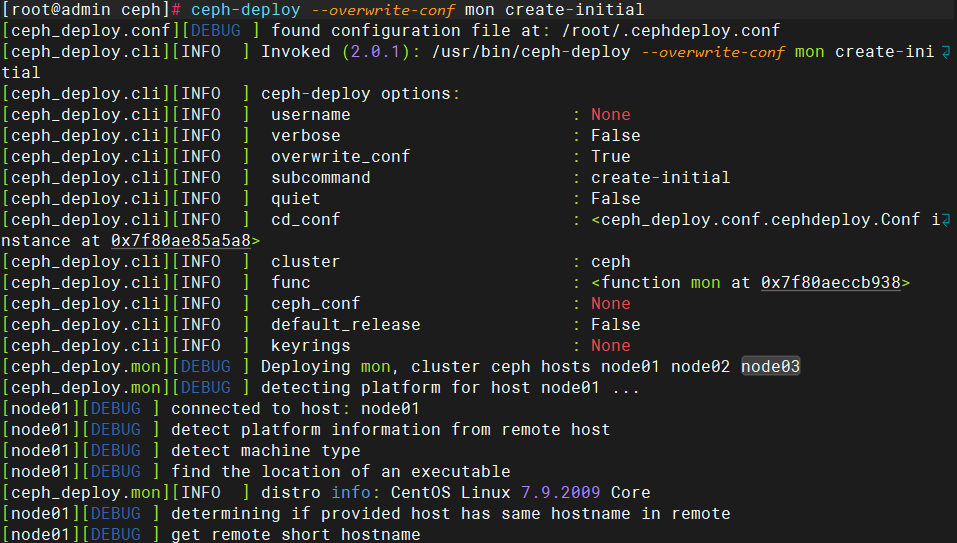
初始化mon节点
ceph-deploy mon create node01 node02 node03AI运行代码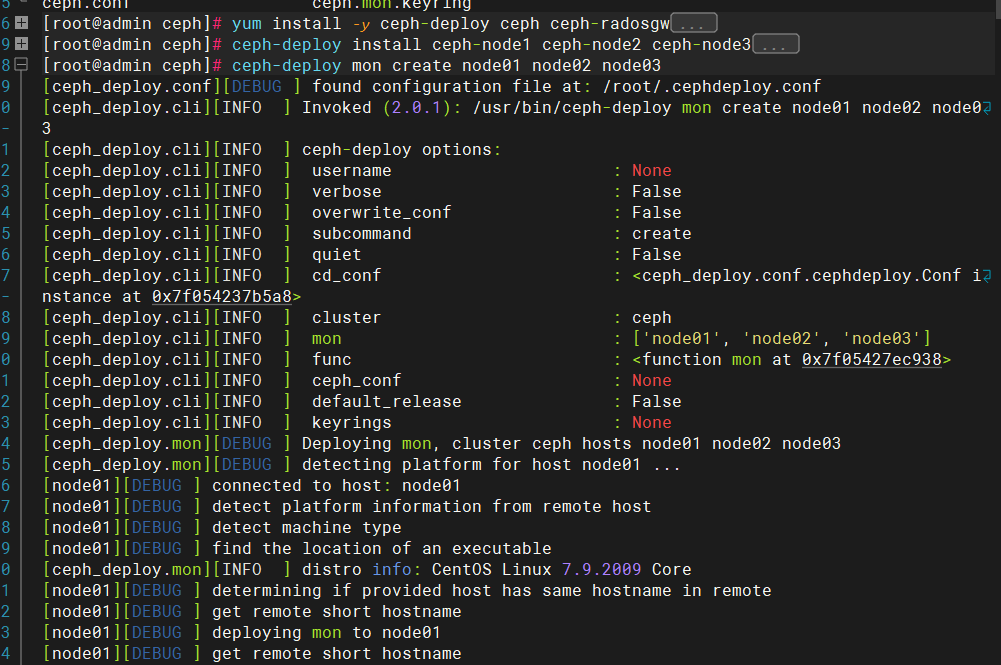

部署mgr
ceph-deploy mgr create node{01..03}AI运行代码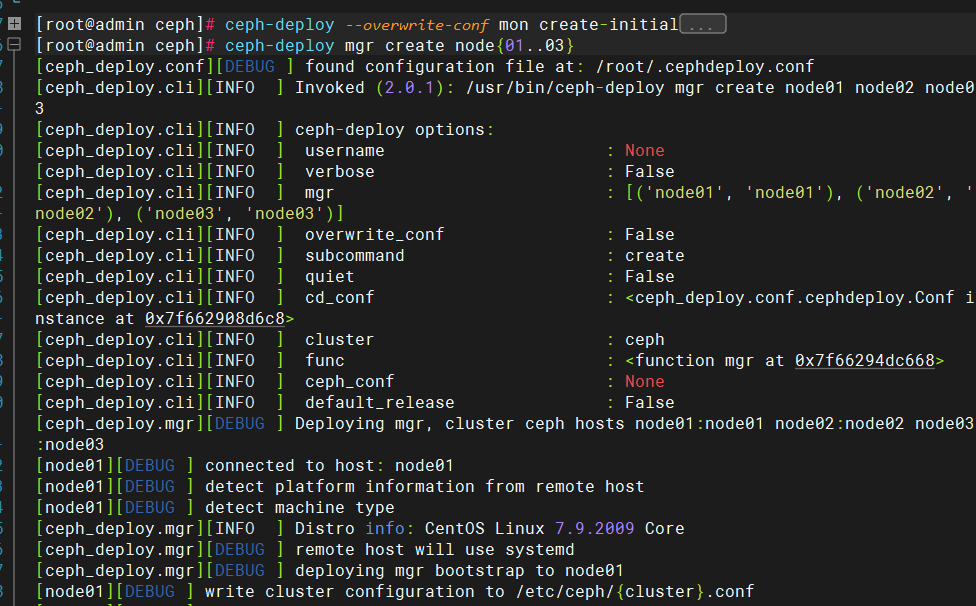

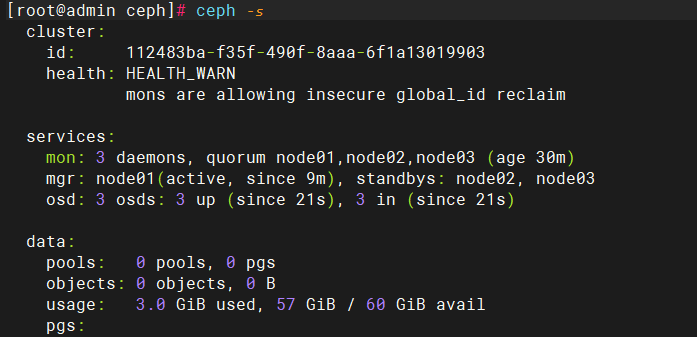
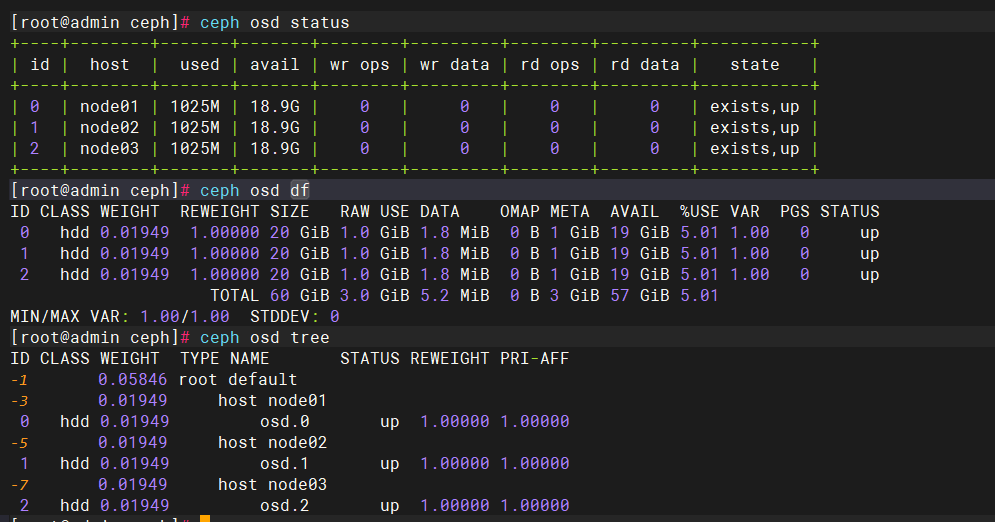
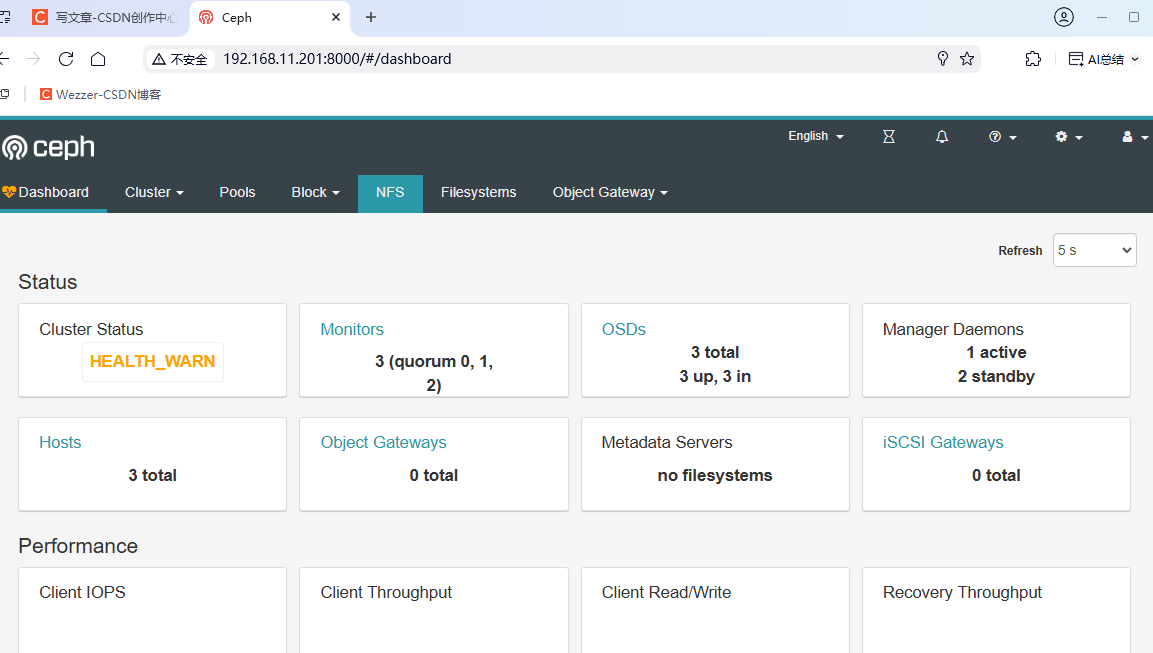
查看ceph集群状态
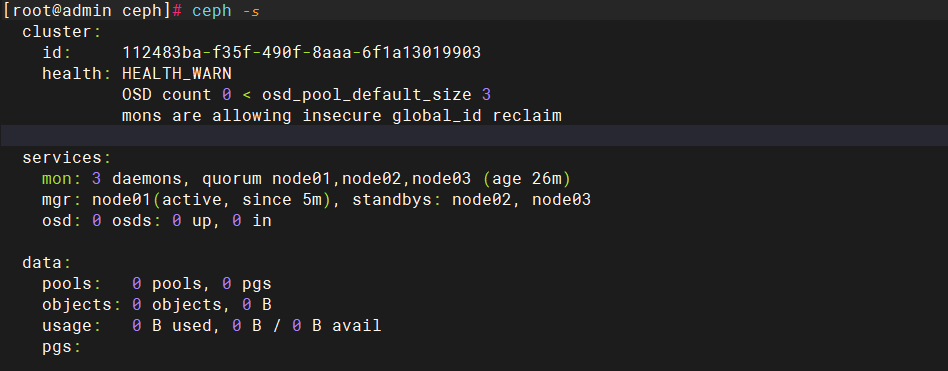
查看 mon 集群选举的情况
ceph quorum_status --format json-pretty | grep leaderAI运行代码
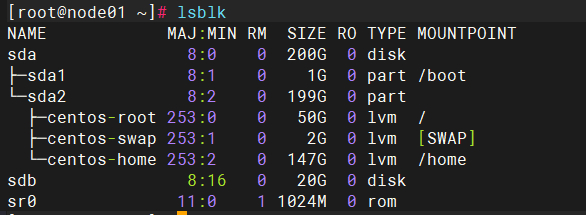
擦净(删除分区表)磁盘
- ceph-deploy disk zap node01 /dev/sdb
- ceph-deploy disk zap node02 /dev/sdb
- ceph-deploy disk zap node03 /dev/sdb
AI运行代码
添加osd节点
- ceph-deploy --overwrite-conf osd create node01 --data /dev/sdb
- ceph-deploy --overwrite-conf osd create node02 --data /dev/sdb
- ceph-deploy --overwrite-conf osd create node03 --data /dev/sdb
AI运行代码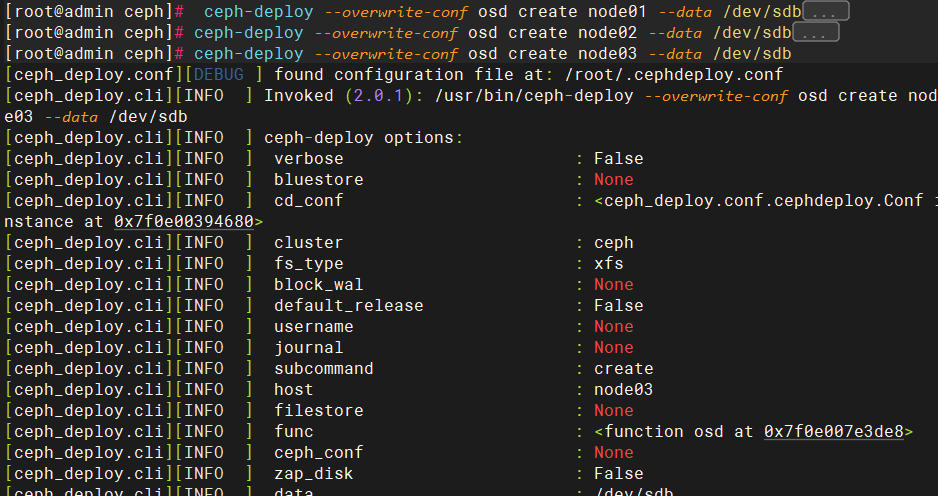
查看状态
开启监控模块
查看主节点
ceph -s | grep mgrAI运行代码![]()
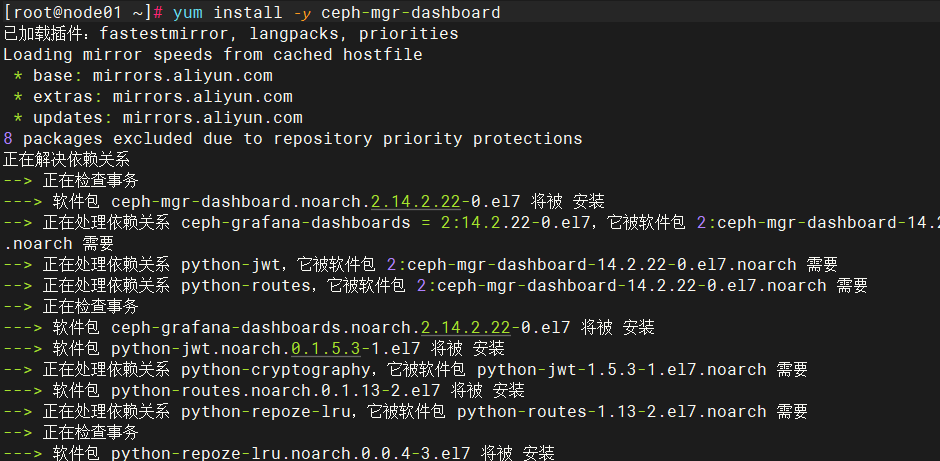
在主节点上执行
yum install -y ceph-mgr-dashboardAI运行代码
- [root@admin ceph]# ceph config set mgr mgr/dashboard/ssl false
- [root@admin ceph]# ceph config set mgr mgr/dashboard/server_addr 0.0.0.0
- [root@admin ceph]# ceph config set mgr mgr/dashboard/server_port 8000
-
- [root@admin ceph]# ceph mgr module disable dashboard
- [root@admin ceph]# ceph mgr module enable dashboard --force
- [root@admin ceph]# ceph mgr services
AI运行代码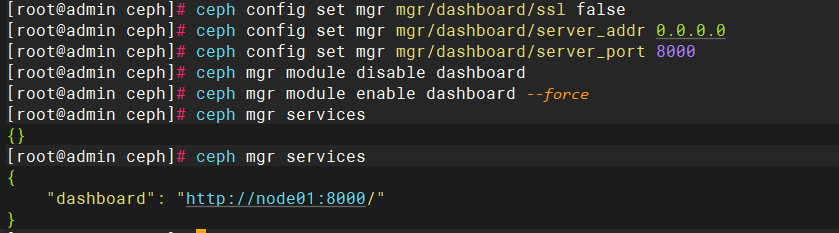
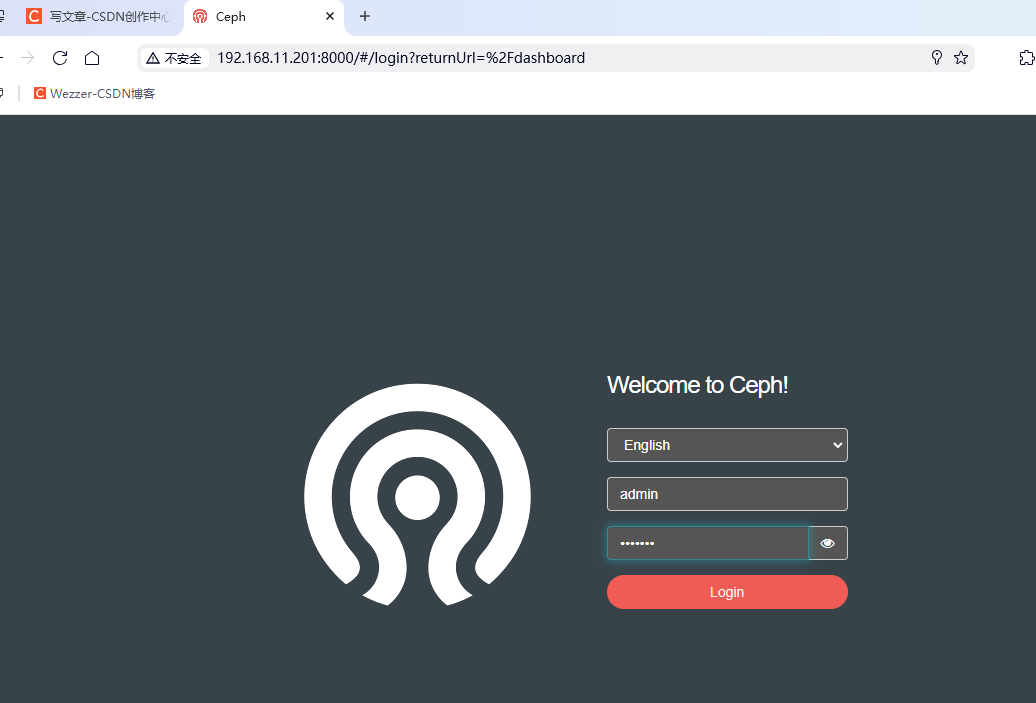
设置密码与用户
- [root@admin ceph]# echo "123.com" > dashboard_passwd.txt
- [root@admin ceph]# ceph dashboard set-login-credentials admin -i dashboard_passwd.txt
AI运行代码
资源池 Pool 管理
创建pool,作为数据池
ceph osd pool create mypool 64 64AI运行代码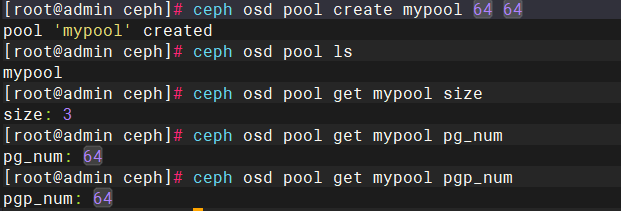
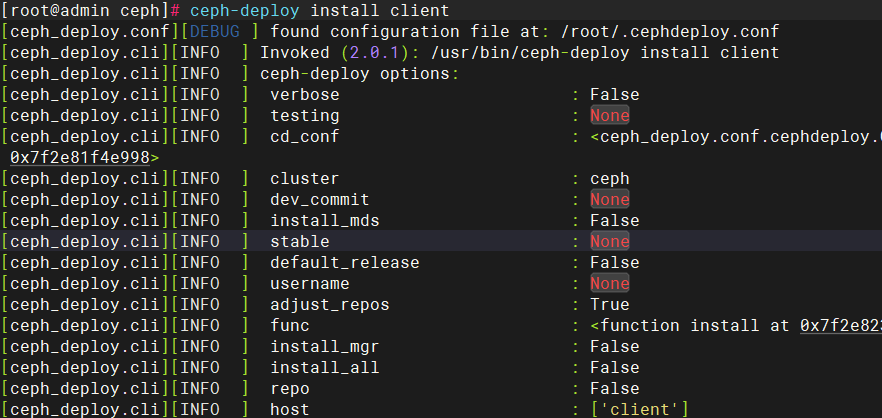
安装客户工具
ceph-deploy install clientAI运行代码
客户端使用ceph
admin节点操作,安装客户端工具
[root@admin ceph]# ceph-deploy install clientAI运行代码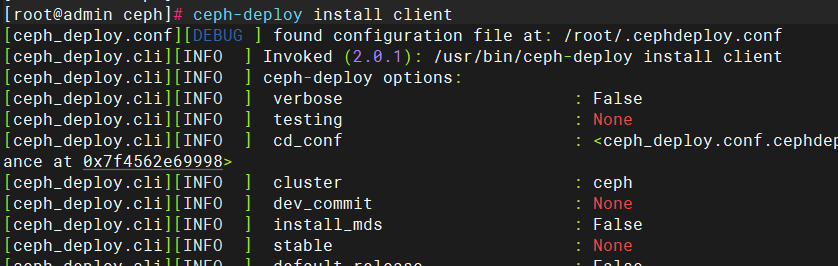
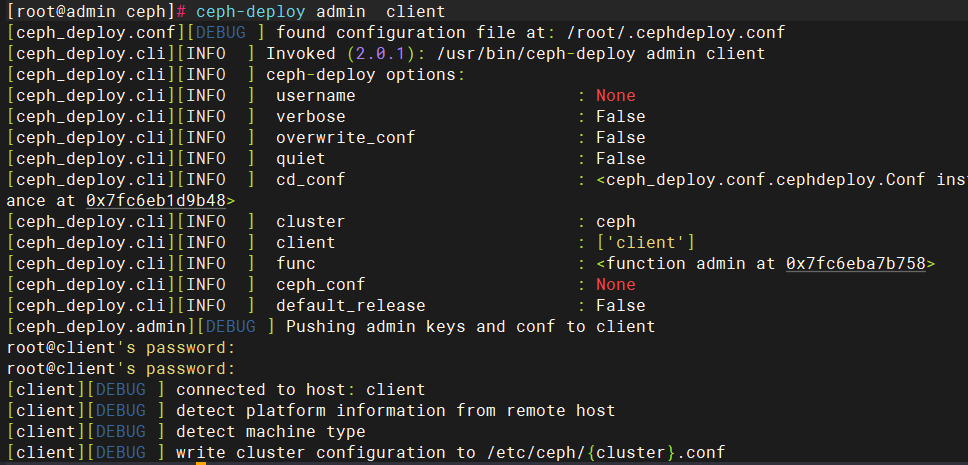
admin节点操作,同步管理信息
ceph-deploy admin clientAI运行代码
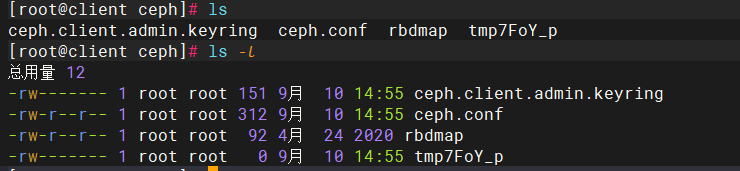
在client节点操作,安装客户端工具
创建 元数据池
- ceph osd pool create cephfs_meta 64
-
- ceph osd pool application enable cephfs_meta cephfs
AI运行代码
使用 资源池与 元资源池 关联 创建 cephfs
使用 2个pool 一个作为资源池 (大容量)一个作为 元资源池 (小容量)
- ceph fs new cephfs cephfs_meta mypool
- ceph fs new <文件系统名称> <元数据池名称> <数据池名称>
AI运行代码
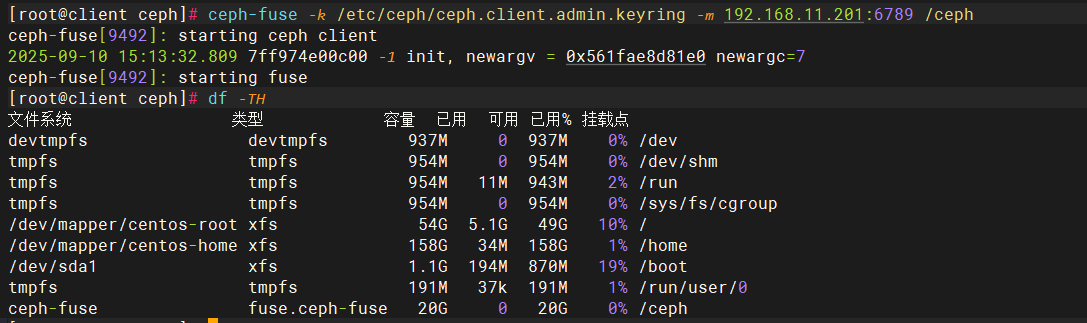
挂载文件
ceph-fuse -k /etc/ceph/ceph.client.admin.keyring -m 192.168.11.201:6789 /cephAI运行代码