PyTorch 零基础入门:从张量到 GPU 加速完全指南
PyTorch 基础教程 - 完整总结
原始来源: https://www.learnpytorch.io/00_pytorch_fundamentals/
GitHub仓库: https://github.com/mrdbourke/pytorch-deep-learning
1. 什么是 PyTorch
PyTorch 是一个开源的机器学习和深度学习框架。
主要特点:
- 允许使用 Python 代码操作和处理数据
- 编写机器学习算法
- 自动处理 GPU 加速(使代码运行更快)
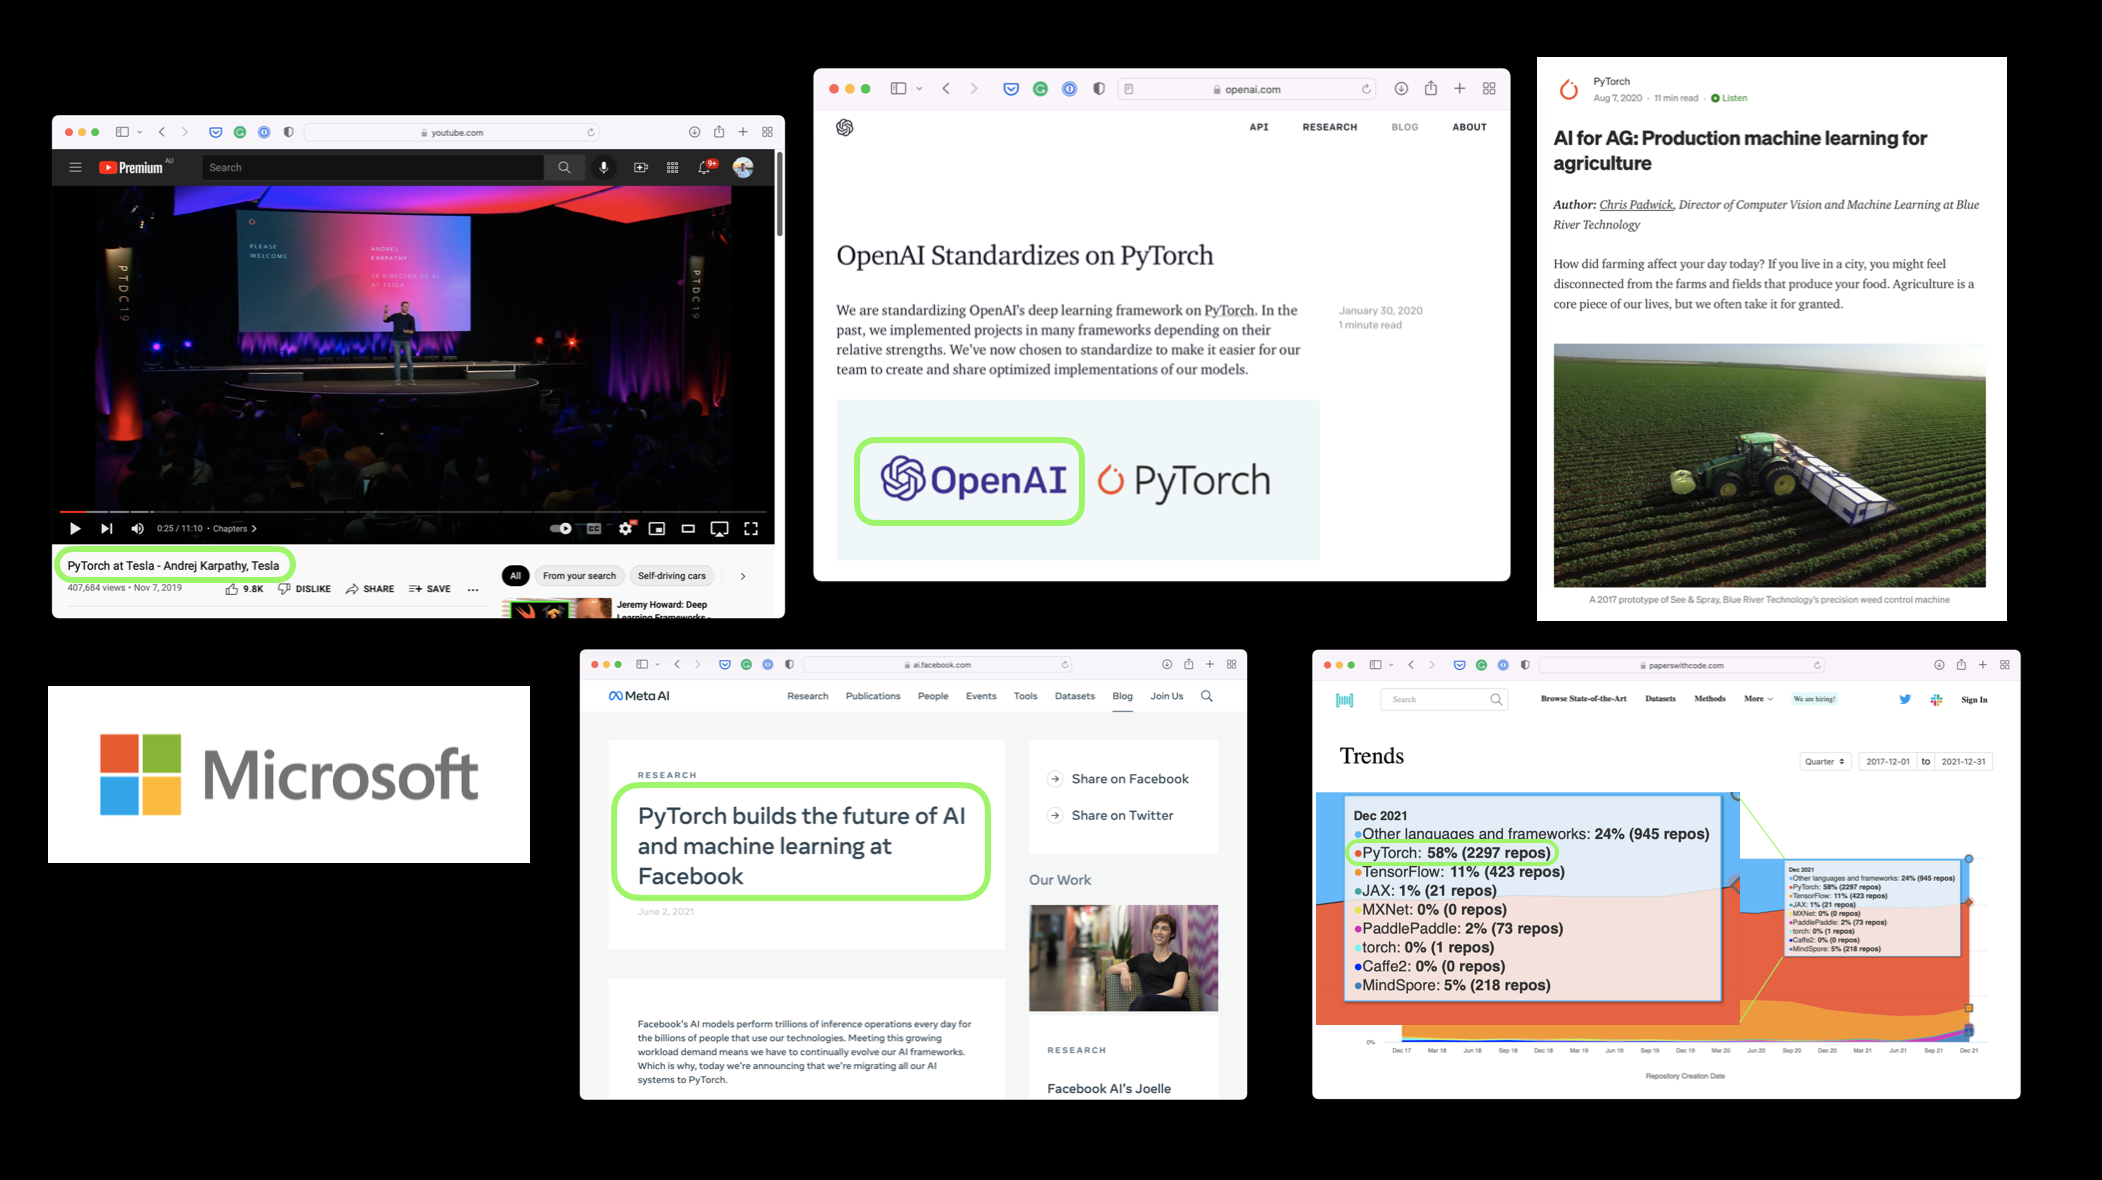
谁在使用 PyTorch:
- 科技巨头: Meta(Facebook)、Tesla、Microsoft
- AI 研究机构: OpenAI
- 工业应用:
- Tesla 使用 PyTorch 驱动自动驾驶计算机视觉模型
- 农业领域使用 PyTorch 为拖拉机提供计算机视觉功能
2. PyTorch 的应用
PyTorch 可以用于:
- 操作和处理数据
- 使用 Python 代码编写机器学习算法
- 构建和训练神经网络
- 图像处理、自然语言处理、语音识别等
3. 为什么使用 PyTorch
主要优势:
-
研究者喜爱: 截至 2022 年 2 月,PyTorch 是 Papers With Code 上使用最多的深度学习框架
-
自动 GPU 加速: PyTorch 在后台自动处理 GPU 加速,让你专注于数据操作和算法编写
-
生产就绪: 被 Tesla、Meta 等公司用于:
- 为数百个应用程序提供支持
- 驾驶数千辆汽车
- 为数十亿人提供内容
-
易于学习: Python 语法,友好的 API
4. 张量(Tensor)简介
什么是张量?
张量是机器学习和深度学习的基本构建块。
张量的作用是以数值方式表示数据。
张量示例:
- 图像: 可以表示为形状为
[3, 224, 224]的张量[colour_channels, height, width]- 3 个颜色通道(红、绿、蓝)
- 高度 224 像素
- 宽度 224 像素

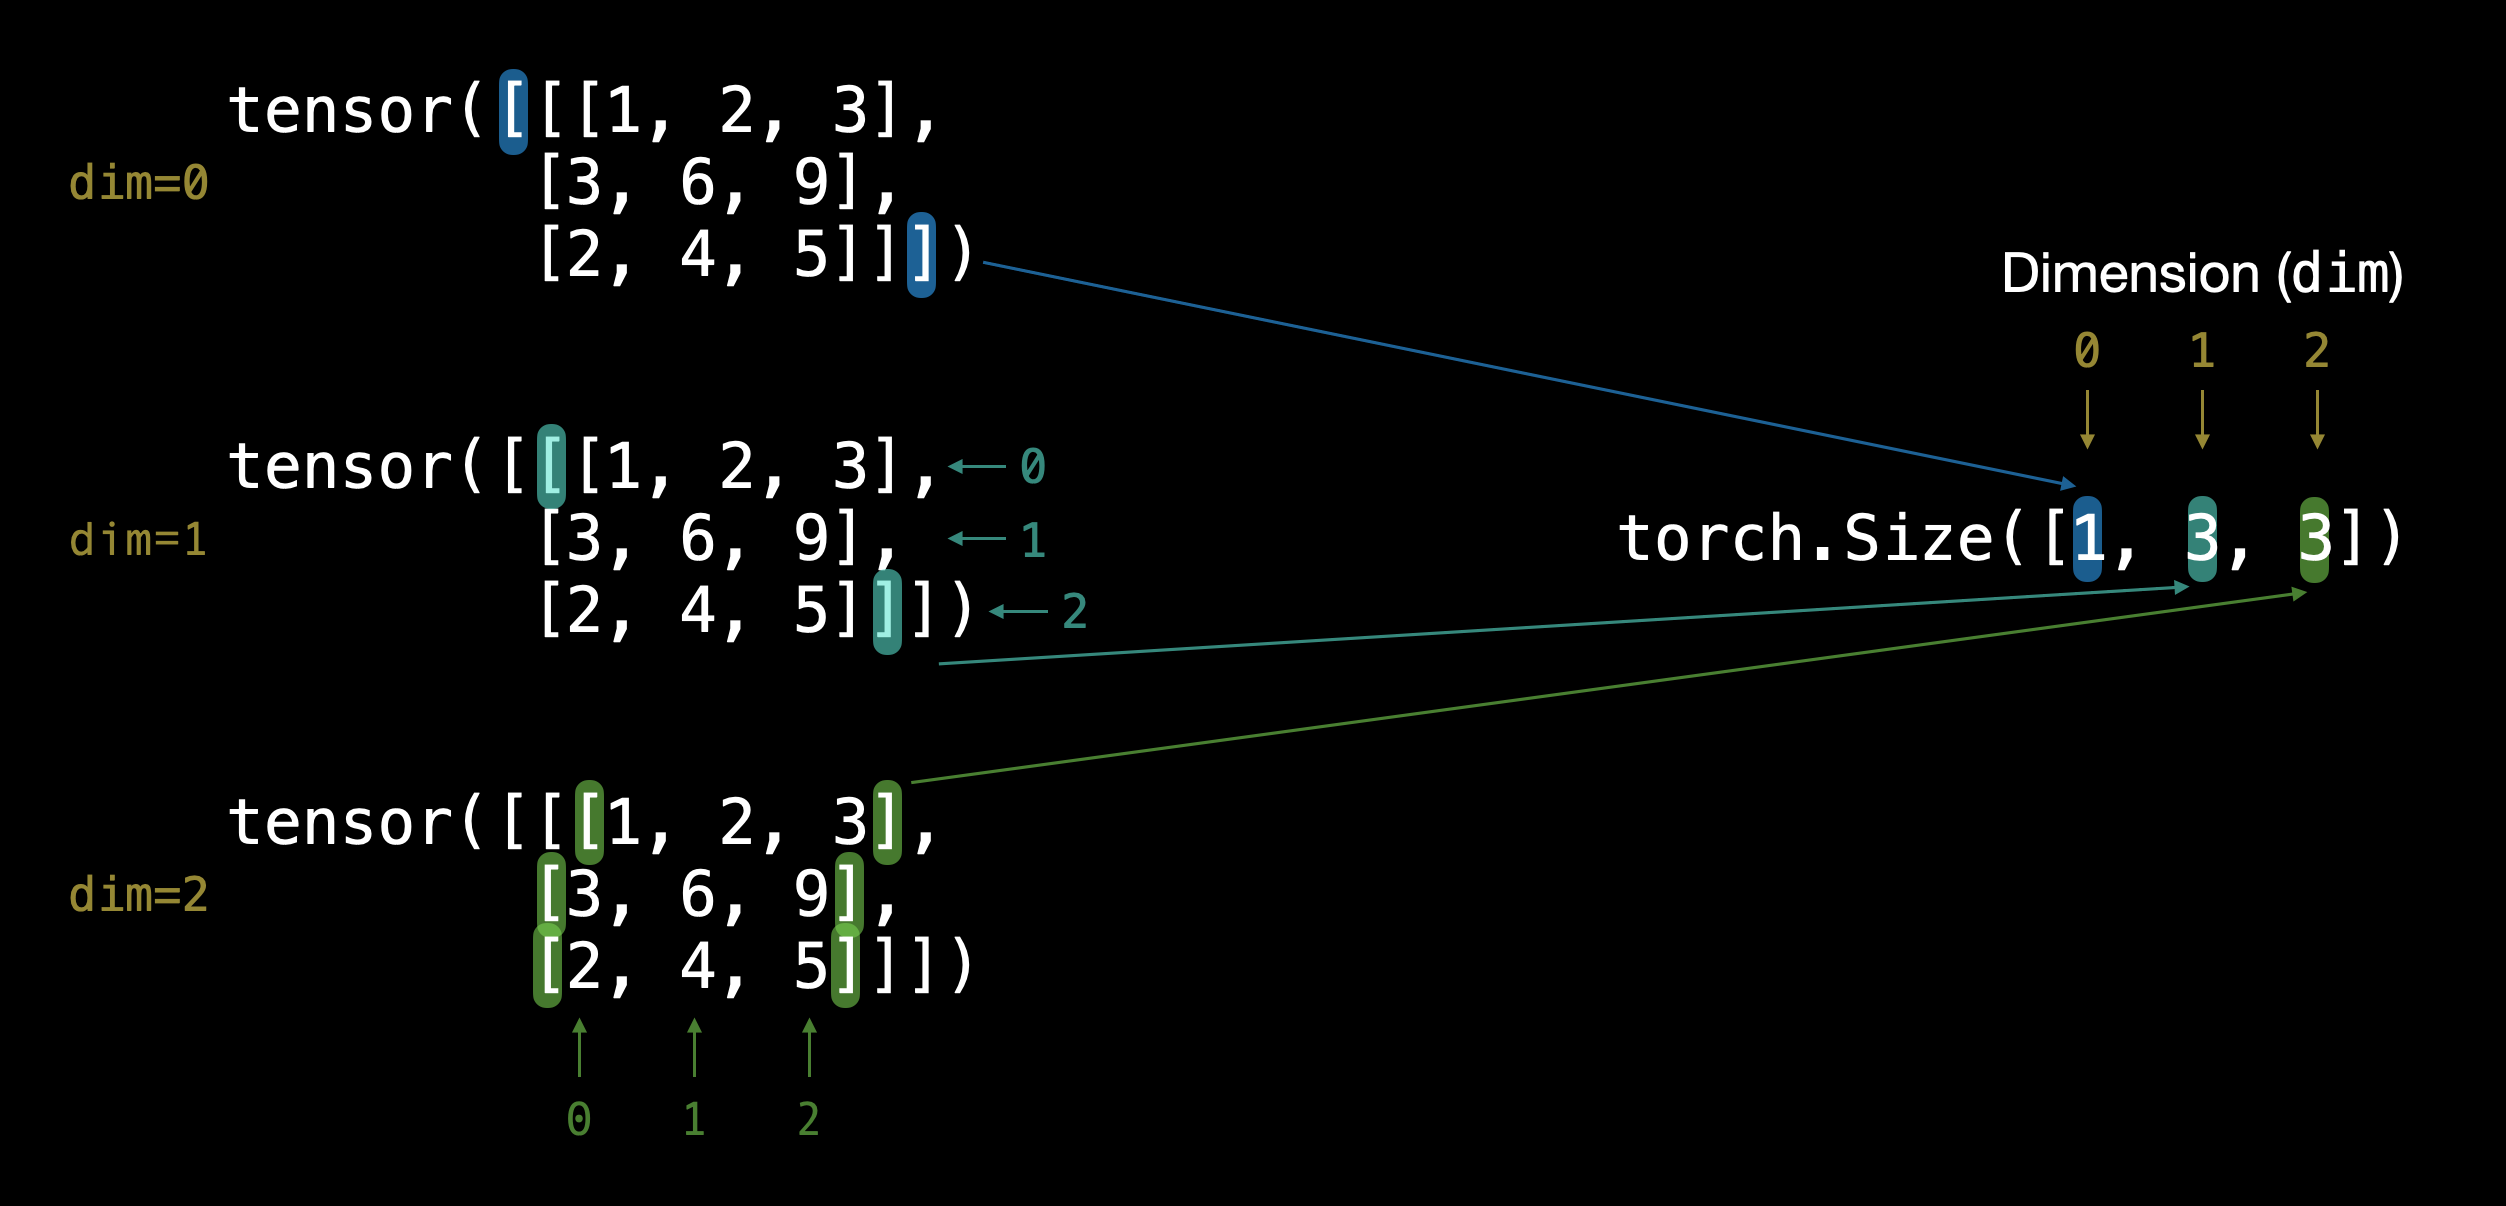
张量维度:
通过外部方括号 [ 的数量可以判断张量的维度(只需数一侧)。
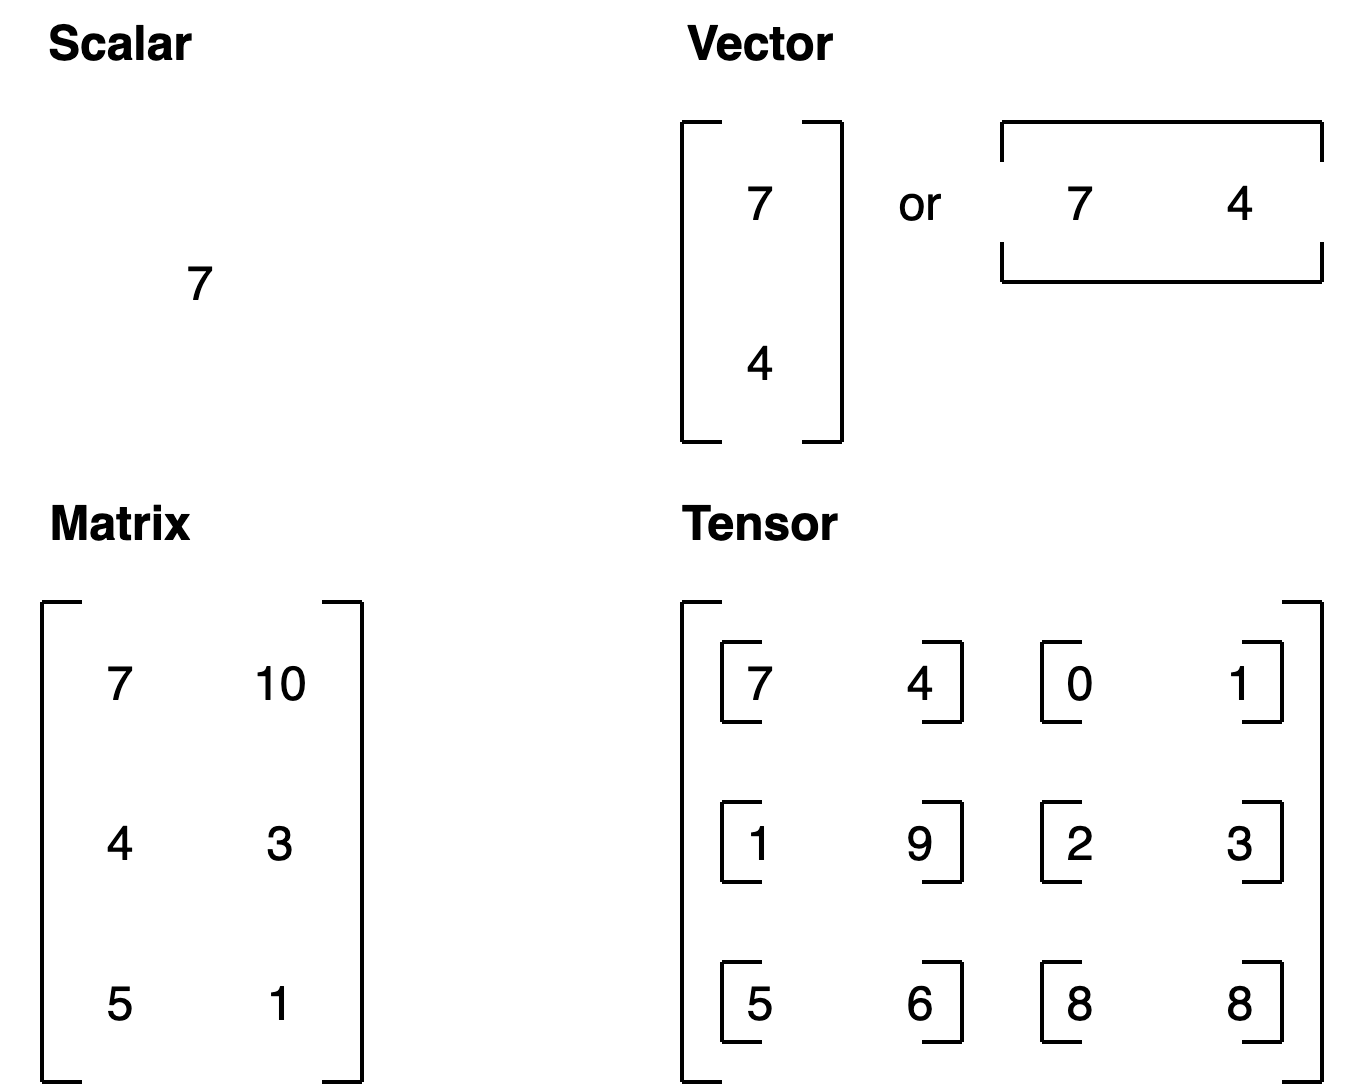
张量类型总结:
| 名称 | 含义 | 维度数 | 命名约定(示例) |
|---|---|---|---|
| scalar(标量) | 单个数字 | 0 | 小写 (a) |
| vector(向量) | 具有方向的数字(如风速)或多个数字 | 1 | 小写 (y) |
| matrix(矩阵) | 二维数字数组 | 2 | 大写 (Q) |
| tensor(张量) | n 维数字数组 | 任意数量 | 大写 (X) |
5. 创建张量
5.1 创建标量(Scalar)
import torch# 标量 - 零维张量
scalar = torch.tensor(7)
print(scalar)  # 输出: tensor(7)
print(scalar.ndim)  # 输出: 0# 从张量中提取 Python 数字
scalar.item()  # 输出: 7
5.2 创建向量(Vector)
# 向量 - 一维张量
vector = torch.tensor([7, 7])
print(vector)  # 输出: tensor([7, 7])
print(vector.ndim)  # 输出: 1
print(vector.shape)  # 输出: torch.Size([2])
5.3 创建矩阵(Matrix)
# 矩阵 - 二维张量
MATRIX = torch.tensor([[7, 8],[9, 10]])
print(MATRIX)
print(MATRIX.ndim)  # 输出: 2
print(MATRIX.shape)  # 输出: torch.Size([2, 2])
5.4 创建张量(Tensor)
# 张量 - n维数组
TENSOR = torch.tensor([[[1, 2, 3],[4, 5, 6],[7, 8, 9]]])
print(TENSOR)
print(TENSOR.ndim)  # 输出: 3
print(TENSOR.shape)  # 输出: torch.Size([1, 3, 3])
5.5 创建随机张量
# 创建随机张量
random_tensor = torch.rand(3, 4)
print(random_tensor)
print(random_tensor.shape)  # 输出: torch.Size([3, 4])# 创建图像形状的随机张量 [height, width, color_channels]
random_image_tensor = torch.rand(224, 224, 3)
print(random_image_tensor.shape)  # 输出: torch.Size([224, 224, 3])
为什么使用随机张量?
- 机器学习模型通常从大型随机张量开始
- 通过处理数据逐步调整这些随机数字
- 过程:
随机数 -> 查看数据 -> 更新随机数 -> 查看数据 -> 更新...
5.6 创建全零和全一张量
# 全零张量
zeros = torch.zeros(3, 4)
print(zeros)# 全一张量
ones = torch.ones(3, 4)
print(ones)
5.7 创建范围张量
# 使用 torch.arange(start, end, step)
range_tensor = torch.arange(0, 10, 1)
print(range_tensor)  # 输出: tensor([0, 1, 2, 3, 4, 5, 6, 7, 8, 9])# 创建类似形状的张量
zeros_like = torch.zeros_like(range_tensor)
print(zeros_like)
5.8 张量数据类型
# 默认数据类型是 float32
float_32_tensor = torch.tensor([3.0, 6.0, 9.0])
print(float_32_tensor.dtype)  # 输出: torch.float32# 创建 float16 张量
float_16_tensor = torch.tensor([3.0, 6.0, 9.0], dtype=torch.float16)
print(float_16_tensor.dtype)  # 输出: torch.float16
重要的数据类型:
torch.float32(默认) - 32位浮点数torch.float16- 16位浮点数(更快但精度较低)torch.int32- 32位整数torch.int8- 8位整数
精度权衡:
- 更高精度 = 更多细节 = 更多计算 = 更慢
- 更低精度 = 更快计算 = 可能牺牲一些准确性
6. 张量操作
6.1 获取张量信息
# 创建张量
some_tensor = torch.rand(3, 4)# 获取重要属性
print(f"Shape: {some_tensor.shape}")        # 形状
print(f"Datatype: {some_tensor.dtype}")     # 数据类型
print(f"Device: {some_tensor.device}")      # 设备(CPU/GPU)
记住 “三个 W” 口诀:
- What shape are my tensors? (什么形状)
- What datatype are they? (什么数据类型)
- Where are they stored? (存储在哪里)
6.2 基本算术操作
tensor = torch.tensor([10, 20, 30])# 加法
result = tensor + 10
print(result)  # tensor([20, 30, 40])# 减法
result = tensor - 10
print(result)  # tensor([0, 10, 20])# 乘法
result = tensor * 10
print(result)  # tensor([100, 200, 300])# 除法
result = tensor / 10
print(result)  # tensor([1., 2., 3.])# PyTorch 内置函数
torch.mul(tensor, 10)  # 等同于 tensor * 10
torch.add(tensor, 10)  # 等同于 tensor + 10
7. 矩阵乘法
7.1 为什么矩阵乘法重要?
矩阵乘法是机器学习和深度学习中最常见的操作之一。
神经网络充满了矩阵乘法和点积。

7.2 矩阵乘法规则
两个主要规则:
-
内部维度必须匹配:
(3, 2) @ (3, 2)❌ 不工作(2, 3) @ (3, 2)✅ 工作(3, 2) @ (2, 3)✅ 工作
-
结果矩阵具有外部维度的形状:
(2, 3) @ (3, 2)->(2, 2)(3, 2) @ (2, 3)->(3, 3)
7.3 元素乘法 vs 矩阵乘法
tensor = torch.tensor([1, 2, 3])# 元素乘法
element_wise = tensor * tensor
print(element_wise)  # tensor([1, 4, 9])# 矩阵乘法(点积)
matrix_mul = torch.matmul(tensor, tensor)
print(matrix_mul)  # tensor(14)  # 1*1 + 2*2 + 3*3 = 14
| 操作 | 计算 | 代码 |
|---|---|---|
| 元素乘法 | [1*1, 2*2, 3*3] = [1, 4, 9] | tensor * tensor |
| 矩阵乘法 | [1*1 + 2*2 + 3*3] = [14] | tensor.matmul(tensor) |
7.4 转置解决形状不匹配
tensor_A = torch.tensor([[1, 2],[3, 4],[5, 6]])  # 形状: (3, 2)tensor_B = torch.tensor([[7, 10],[8, 11],[9, 12]])  # 形状: (3, 2)# 直接相乘会报错
# torch.matmul(tensor_A, tensor_B)  # 错误!# 转置 tensor_B
print(tensor_B.T)  # 形状: (2, 3)# 现在可以相乘
result = torch.matmul(tensor_A, tensor_B.T)
print(result.shape)  # torch.Size([3, 3])
转置方法:
torch.transpose(input, dim0, dim1)- 交换指定维度tensor.T- 转置张量(更简洁)
7.5 神经网络中的线性层
# torch.nn.Linear 实现矩阵乘法
# y = x·A^T + blinear_layer = torch.nn.Linear(in_features=2, out_features=6)
x = torch.tensor([[1., 2.]])output = linear_layer(x)
print(output.shape)  # torch.Size([1, 6])
公式解释:
x: 输入A: 权重矩阵(随机初始化,通过学习调整)b: 偏置项y: 输出
8. 张量聚合操作
8.1 查找最小值、最大值、平均值、总和
# 创建张量
x = torch.arange(0, 100, 10)
print(x)  # tensor([0, 10, 20, 30, 40, 50, 60, 70, 80, 90])# 最小值
print(torch.min(x))    # tensor(0)
print(x.min())         # tensor(0)# 最大值
print(torch.max(x))    # tensor(90)
print(x.max())         # tensor(90)# 平均值 (需要 float 类型)
print(torch.mean(x.type(torch.float32)))  # tensor(45.)# 总和
print(torch.sum(x))    # tensor(450)
print(x.sum())         # tensor(450)
8.2 位置最小值/最大值
# 查找最大值的索引
print(x.argmax())  # tensor(9)  # 索引9的位置# 查找最小值的索引
print(x.argmin())  # tensor(0)  # 索引0的位置
应用场景: 在使用 softmax 激活函数时,只需要知道最大值的位置而非实际值。
9. 张量重塑与变换
9.1 常用重塑方法
| 方法 | 描述 |
|---|---|
torch.reshape(input, shape) | 将输入重塑为指定形状 |
Tensor.view(shape) | 返回原始张量的不同形状视图(共享数据) |
torch.stack(tensors, dim=0) | 沿新维度连接张量序列 |
torch.squeeze(input) | 移除所有值为1的维度 |
torch.unsqueeze(input, dim) | 在指定位置添加维度1 |
torch.permute(input, dims) | 重新排列维度 |
9.2 实际操作示例
# 创建张量
x = torch.arange(1, 10)
print(x.shape)  # torch.Size([9])# 重塑
x_reshaped = x.reshape(3, 3)
print(x_reshaped.shape)  # torch.Size([3, 3])# 视图(view)
x_view = x.view(3, 3)
print(x_view.shape)  # torch.Size([3, 3])# 堆叠(stack)
x_stacked = torch.stack([x, x, x, x], dim=0)
print(x_stacked.shape)  # torch.Size([4, 9])# 压缩(squeeze) - 移除维度1
x_squeezed = torch.squeeze(x_reshaped.unsqueeze(dim=0))
print(x_squeezed.shape)  # torch.Size([3, 3])# 扩展(unsqueeze) - 添加维度1
x_unsqueezed = torch.unsqueeze(x, dim=0)
print(x_unsqueezed.shape)  # torch.Size([1, 9])# 排列(permute)
x_permuted = torch.permute(x_reshaped, (1, 0))
print(x_permuted.shape)  # torch.Size([3, 3])
重要提示: view() 和 permute() 返回的是视图,修改视图会影响原始张量!
9.3 改变张量数据类型
# 创建 float32 张量
tensor = torch.tensor([3.0, 6.0, 9.0])
print(tensor.dtype)  # torch.float32# 转换为 float16
tensor_float16 = tensor.type(torch.float16)
print(tensor_float16.dtype)  # torch.float16# 转换为 int8
tensor_int8 = tensor.type(torch.int8)
print(tensor_int8.dtype)  # torch.int8
10. 索引操作
10.1 选择张量中的数据
# 创建张量
x = torch.arange(1, 10).reshape(1, 3, 3)
print(x)
print(x.shape)  # torch.Size([1, 3, 3])# 索引
print(x[0])        # 第一个维度的所有内容
print(x[0, 0])     # 第一个和第二个维度的第一个元素
print(x[0, 0, 0])  # 单个元素# 使用冒号(:) 选择所有
print(x[:, 0])     # 第二个维度的第一行
print(x[:, :, 0])  # 第三个维度的第一列
索引规则: 从外部维度到内部维度(查看方括号)
提示: 多尝试!索引一开始可能令人困惑,但通过可视化和实践会越来越熟练。
11. PyTorch 与 NumPy
11.1 相互转换
两个主要方法:
torch.from_numpy(ndarray)- NumPy 数组 -> PyTorch 张量torch.Tensor.numpy()- PyTorch 张量 -> NumPy 数组
import numpy as np# NumPy 数组 -> PyTorch 张量
array = np.arange(1.0, 8.0)
tensor = torch.from_numpy(array)
print(tensor)
print(tensor.dtype)  # torch.float64 (NumPy 默认)# 转换为 float32
tensor_float32 = torch.from_numpy(array).type(torch.float32)
print(tensor_float32.dtype)  # torch.float32# PyTorch 张量 -> NumPy 数组
tensor = torch.ones(7)
numpy_array = tensor.numpy()
print(numpy_array)
print(type(numpy_array))  # <class 'numpy.ndarray'>
注意事项:
- NumPy 默认使用
float64 - PyTorch 默认使用
float32 - 转换后的张量与原数组独立(重新赋值后)
12. 可重复性(Reproducibility)
12.1 为什么需要可重复性?
- 神经网络从随机数开始
- 需要能够重现实验结果
- 让他人验证你的结果
12.2 设置随机种子
# 创建两个随机张量
random_tensor_A = torch.rand(3, 4)
random_tensor_B = torch.rand(3, 4)print(random_tensor_A == random_tensor_B)  # 大部分为 False# 使用随机种子
RANDOM_SEED = 42torch.manual_seed(RANDOM_SEED)
random_tensor_C = torch.rand(3, 4)torch.manual_seed(RANDOM_SEED)
random_tensor_D = torch.rand(3, 4)print(random_tensor_C == random_tensor_D)  # 全部为 True!
工作原理: 随机种子为随机性提供"风味",相同的种子产生相同的随机数序列。
12.3 GPU 随机种子
# 为 GPU 设置随机种子
torch.cuda.manual_seed(42)
资源:
- PyTorch 可重复性文档
- 维基百科 - 随机种子
13. 在 GPU 上运行
13.1 为什么使用 GPU?
- 深度学习需要大量数值运算
- GPU 在矩阵乘法等操作上比 CPU 快得多
- 可以显著加快训练时间
13.2 获取 GPU
| 方法 | 难度 | 优点 | 缺点 |
|---|---|---|---|
| Google Colab | 简单 | 免费使用,几乎零设置 | 不保存数据,有限计算,可能超时 |
| 使用自己的 GPU | 中等 | 本地运行 | 需要前期成本 |
| 云计算(AWS/GCP/Azure) | 中等-困难 | 小前期成本,几乎无限计算 | 持续运行可能昂贵 |
13.3 检查 GPU 可用性
import torch# 检查 CUDA (NVIDIA GPU) 是否可用
print(torch.cuda.is_available())  # True 或 False# 设备无关代码
device = "cuda" if torch.cuda.is_available() else "cpu"
print(device)  # "cuda" 或 "cpu"# 计算可用 GPU 数量
print(torch.cuda.device_count())  # 0, 1, 2, ...
13.4 Apple Silicon (M1/M2/M3)
# 检查 Apple Silicon GPU (MPS) 是否可用
print(torch.backends.mps.is_available())  # True 或 False# 设置设备
device = "mps" if torch.backends.mps.is_available() else "cpu"
13.5 将张量放到 GPU 上
# 创建张量并移到 GPU
tensor = torch.tensor([1, 2, 3])
print(tensor, tensor.device)  # tensor([1, 2, 3]) cpu# 移到 GPU
tensor_on_gpu = tensor.to(device)
print(tensor_on_gpu, tensor_on_gpu.device)
# tensor([1, 2, 3], device='cuda:0')# 重新赋值以覆盖
tensor = tensor.to(device)
重要提示: to(device) 返回副本,需要重新赋值来覆盖原张量。
13.6 将张量移回 CPU
# GPU 张量无法直接用于 NumPy
# tensor_on_gpu.numpy()  # 错误!# 先移到 CPU
tensor_on_cpu = tensor_on_gpu.cpu()
numpy_array = tensor_on_cpu.numpy()
print(numpy_array)  # 成功!
为什么需要移回 CPU?
- NumPy 不支持 GPU
- 某些操作只能在 CPU 上执行
14. 练习与资源
14.1 练习题
-
文档阅读 - 花 10 分钟阅读
torch.Tensor和torch.cuda文档 -
创建随机张量 - 创建形状为
(7, 7)的随机张量 -
矩阵乘法 - 对上一步的张量与另一个形状为
(1, 7)的随机张量执行矩阵乘法(提示:可能需要转置) -
设置随机种子 - 将随机种子设置为
0并重做练习 2 和 3 -
GPU 随机种子 - 查找 GPU 等效的随机种子设置方法,并设置为
1234 -
GPU 张量 - 创建两个形状为
(2, 3)的随机张量并发送到 GPU,设置torch.manual_seed(1234) -
GPU 矩阵乘法 - 对练习 6 中创建的张量执行矩阵乘法
-
查找最值 - 找出练习 7 输出的最大值和最小值
-
查找索引 - 找出练习 7 输出的最大值和最小值索引
-
压缩张量 - 创建形状为
(1, 1, 1, 10)的随机张量,然后移除所有值为 1 的维度,得到形状为(10)的张量(种子设为7)
14.2 练习资源
- 练习模板 Notebook
- 示例解答 Notebook (先尝试练习再查看答案!)
14.3 额外学习资源
官方教程:
- PyTorch 基础教程
- 快速入门
- 张量教程
文档:
- torch.Tensor 文档
- PyTorch CUDA 语义
- PyTorch 可重复性
其他资源:
- 计算精度 - 维基百科
- 矩阵乘法可视化工具
- Tim Dettmers GPU 购买指南
核心要点总结
最重要的概念:
- 张量是一切的基础 - 所有数据都表示为张量
- 形状很重要 - 大多数错误都与形状不匹配有关
- 矩阵乘法无处不在 - 神经网络的核心操作
- 设备无关代码 - 让代码在 CPU 和 GPU 上都能运行
- 三个 W 口诀 - What shape? What datatype? Where stored?
常见错误及解决方案:
| 错误类型 | 原因 | 解决方案 |
|---|---|---|
| 形状不匹配 | 张量形状不兼容 | 使用 reshape(), view(), 或转置 |
| 数据类型错误 | 张量数据类型不同 | 使用 .type() 转换 |
| 设备错误 | 张量在不同设备上 | 使用 .to(device) 移动 |
学习建议:
- 多实践 - 亲手编写代码
- 多可视化 - 打印形状和值来理解
- 阅读文档 - PyTorch 文档是最好的资源
- 循序渐进 - 从简单示例开始,逐步增加复杂度
参考链接
- 原始教程: https://www.learnpytorch.io/00_pytorch_fundamentals/
- GitHub 仓库: https://github.com/mrdbourke/pytorch-deep-learning
- Google Colab: 在线运行代码
- 视频讲解: YouTube 视频
- 幻灯片: PDF 幻灯片