Spring AI Alibaba语音合成实战:从零开始实现文本转语音功能
文章目录
- Spring AI Alibaba语音合成实战:从零开始实现文本转语音功能
- 一、什么是文本转语音?
- 二、环境准备
- 1. 环境要求
- 2. 获取API Key
- 三、创建Spring Boot项目
- 1. 初始化项目
- 2. 配置pom.xml
- 四、配置应用参数
- 1. 配置API Key
- 2. 可选模型配置
- 五、实现语音合成接口
- 1. 创建AudioModelController
- 2. 进阶版本:支持在线播放
- 3. 完整AudioController代码
- 六、创建应用启动类
- 七、运行和测试
- 1. 启动应用
- 2. 测试语音合成功能
- 八、常见问题及解决方案
- 1. 依赖解析失败
- 2. API Key错误
- 3. 音频格式问题
- 4. 文本长度限制
- 九、核心原理简介
- 十、总结
Spring AI Alibaba语音合成实战:从零开始实现文本转语音功能
本文面向初学Spring AI Alibaba的开发者,手把手教你实现文本转语音(TTS)功能。
本文将详细介绍如何使用 Spring AI Alibaba 框架快速集成阿里云百炼大模型服务,实现文本转语音(Text-to-Speech)功能。通过本教程,你将学会创建一个简单的Spring Boot应用,只需几行代码就能让AI将文字转换为自然流畅的语音。
一、什么是文本转语音?
文本转语音(Text-to-Speech, TTS)技术能够将文字信息转换为人类可听的语音输出。在没有AI之前,要实现语音合成通常需要专业的录音设备和配音人员。而现在,借助AI大模型,我们可以通过简单的API调用,将任意文本转换为高质量的语音文件,广泛应用于语音助手、有声读物、语音导航等场景。
二、环境准备
1. 环境要求
在开始之前,请确保你的开发环境满足以下要求:
- JDK 17及以上(本文使用JDK 17)
- Spring Boot 3.x及以上(本文使用Spring Boot 3.5.7)
- Maven 3.6及以上
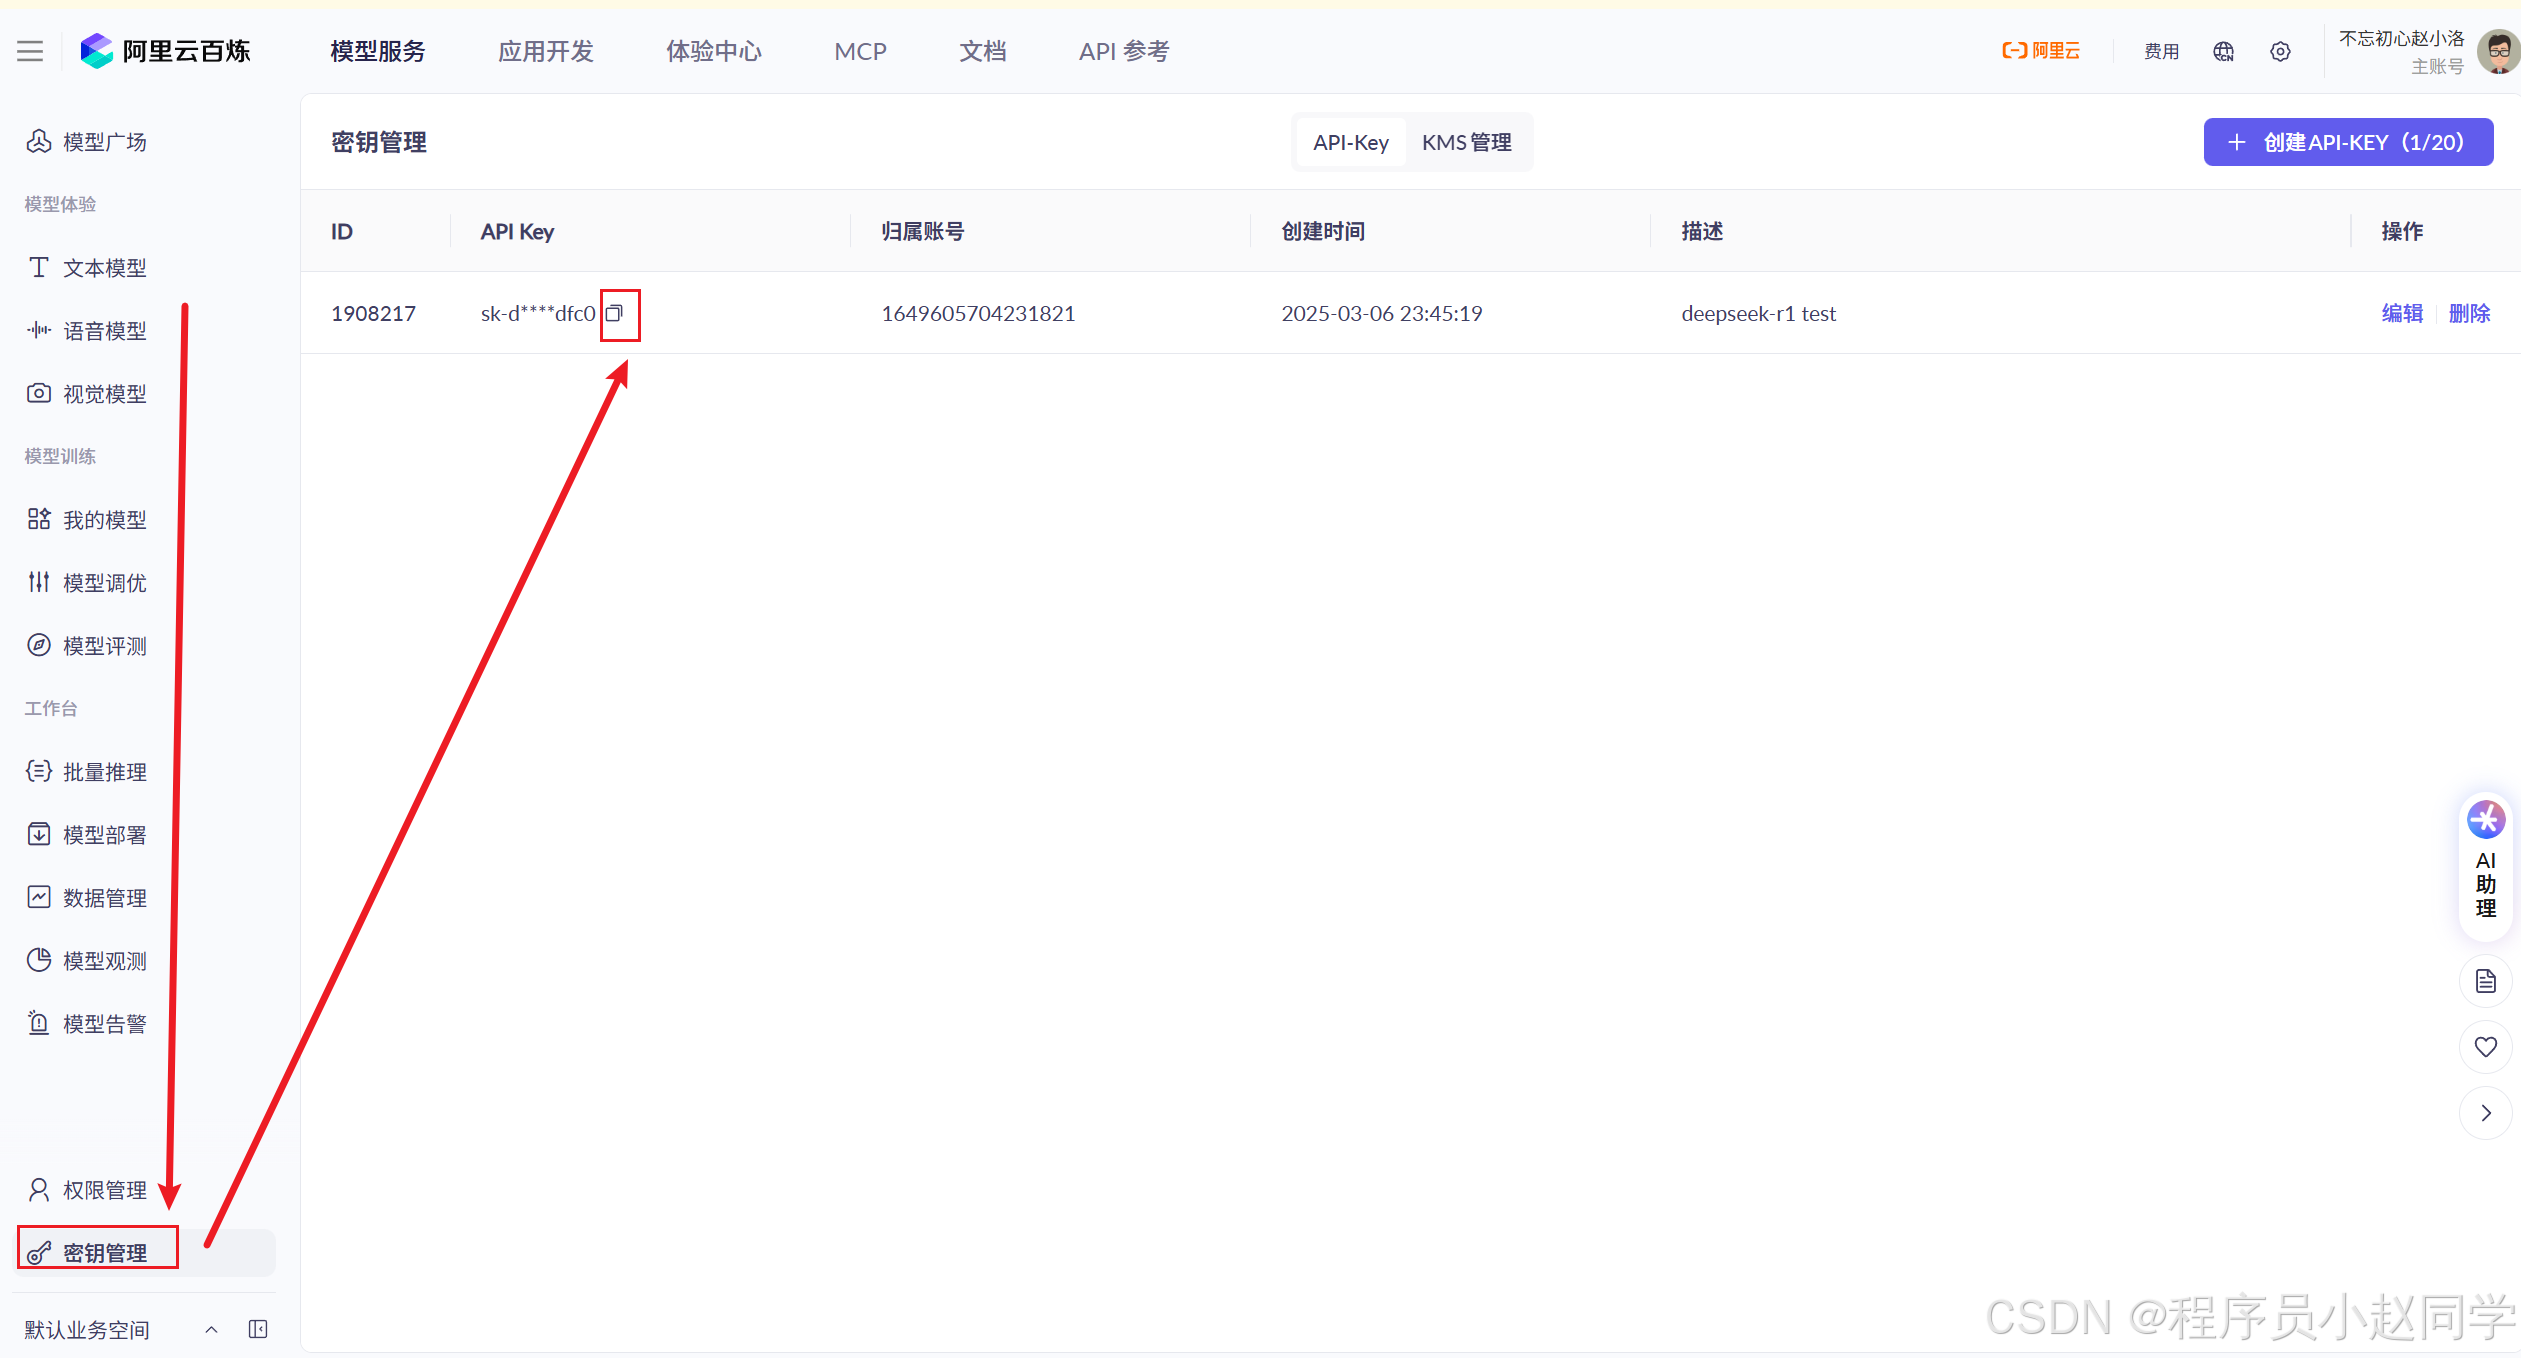
2. 获取API Key
- 访问阿里云百炼平台并登录你的账号
- 开通"百炼大模型"服务(新用户通常有一定免费额度)
- 在控制台中生成API Key并保存
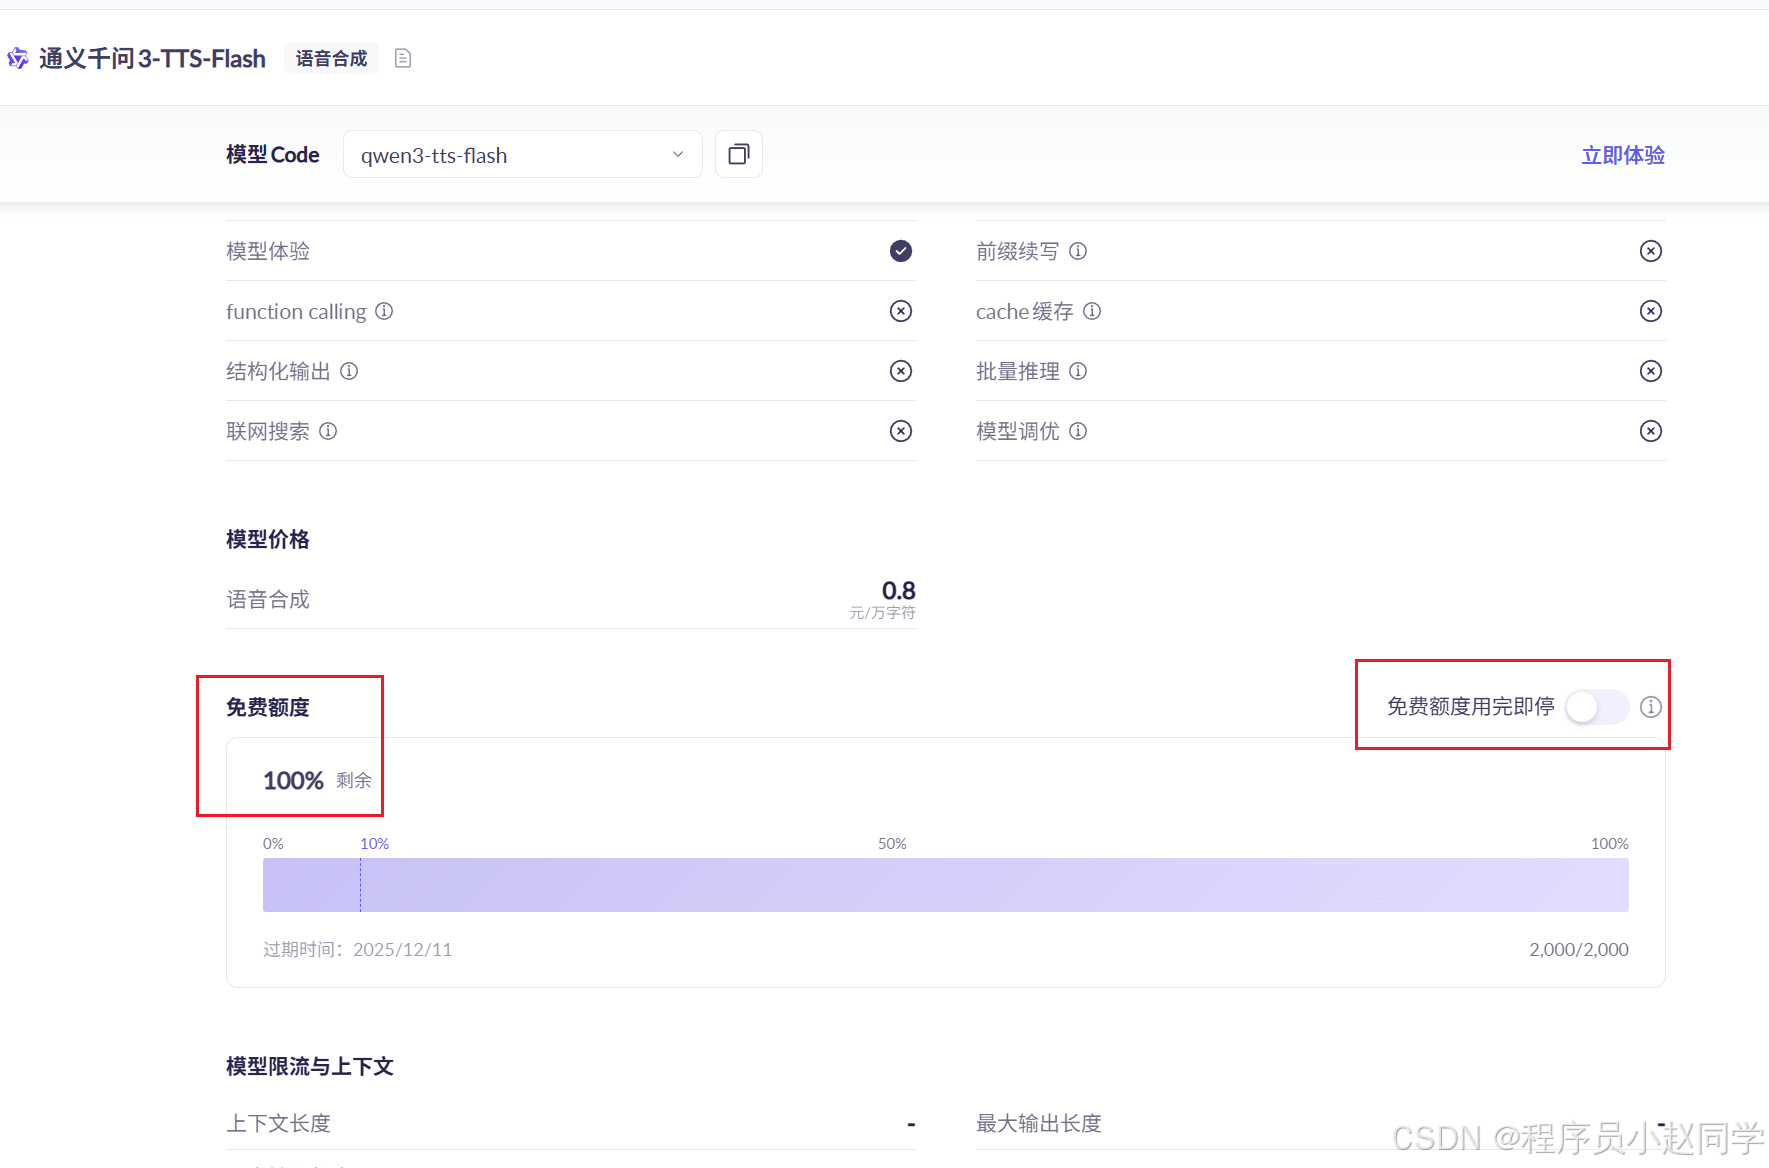
使用某个模型时,建议开启该模型的"免费额度用完即停"功能,防止测试中超额扣费。
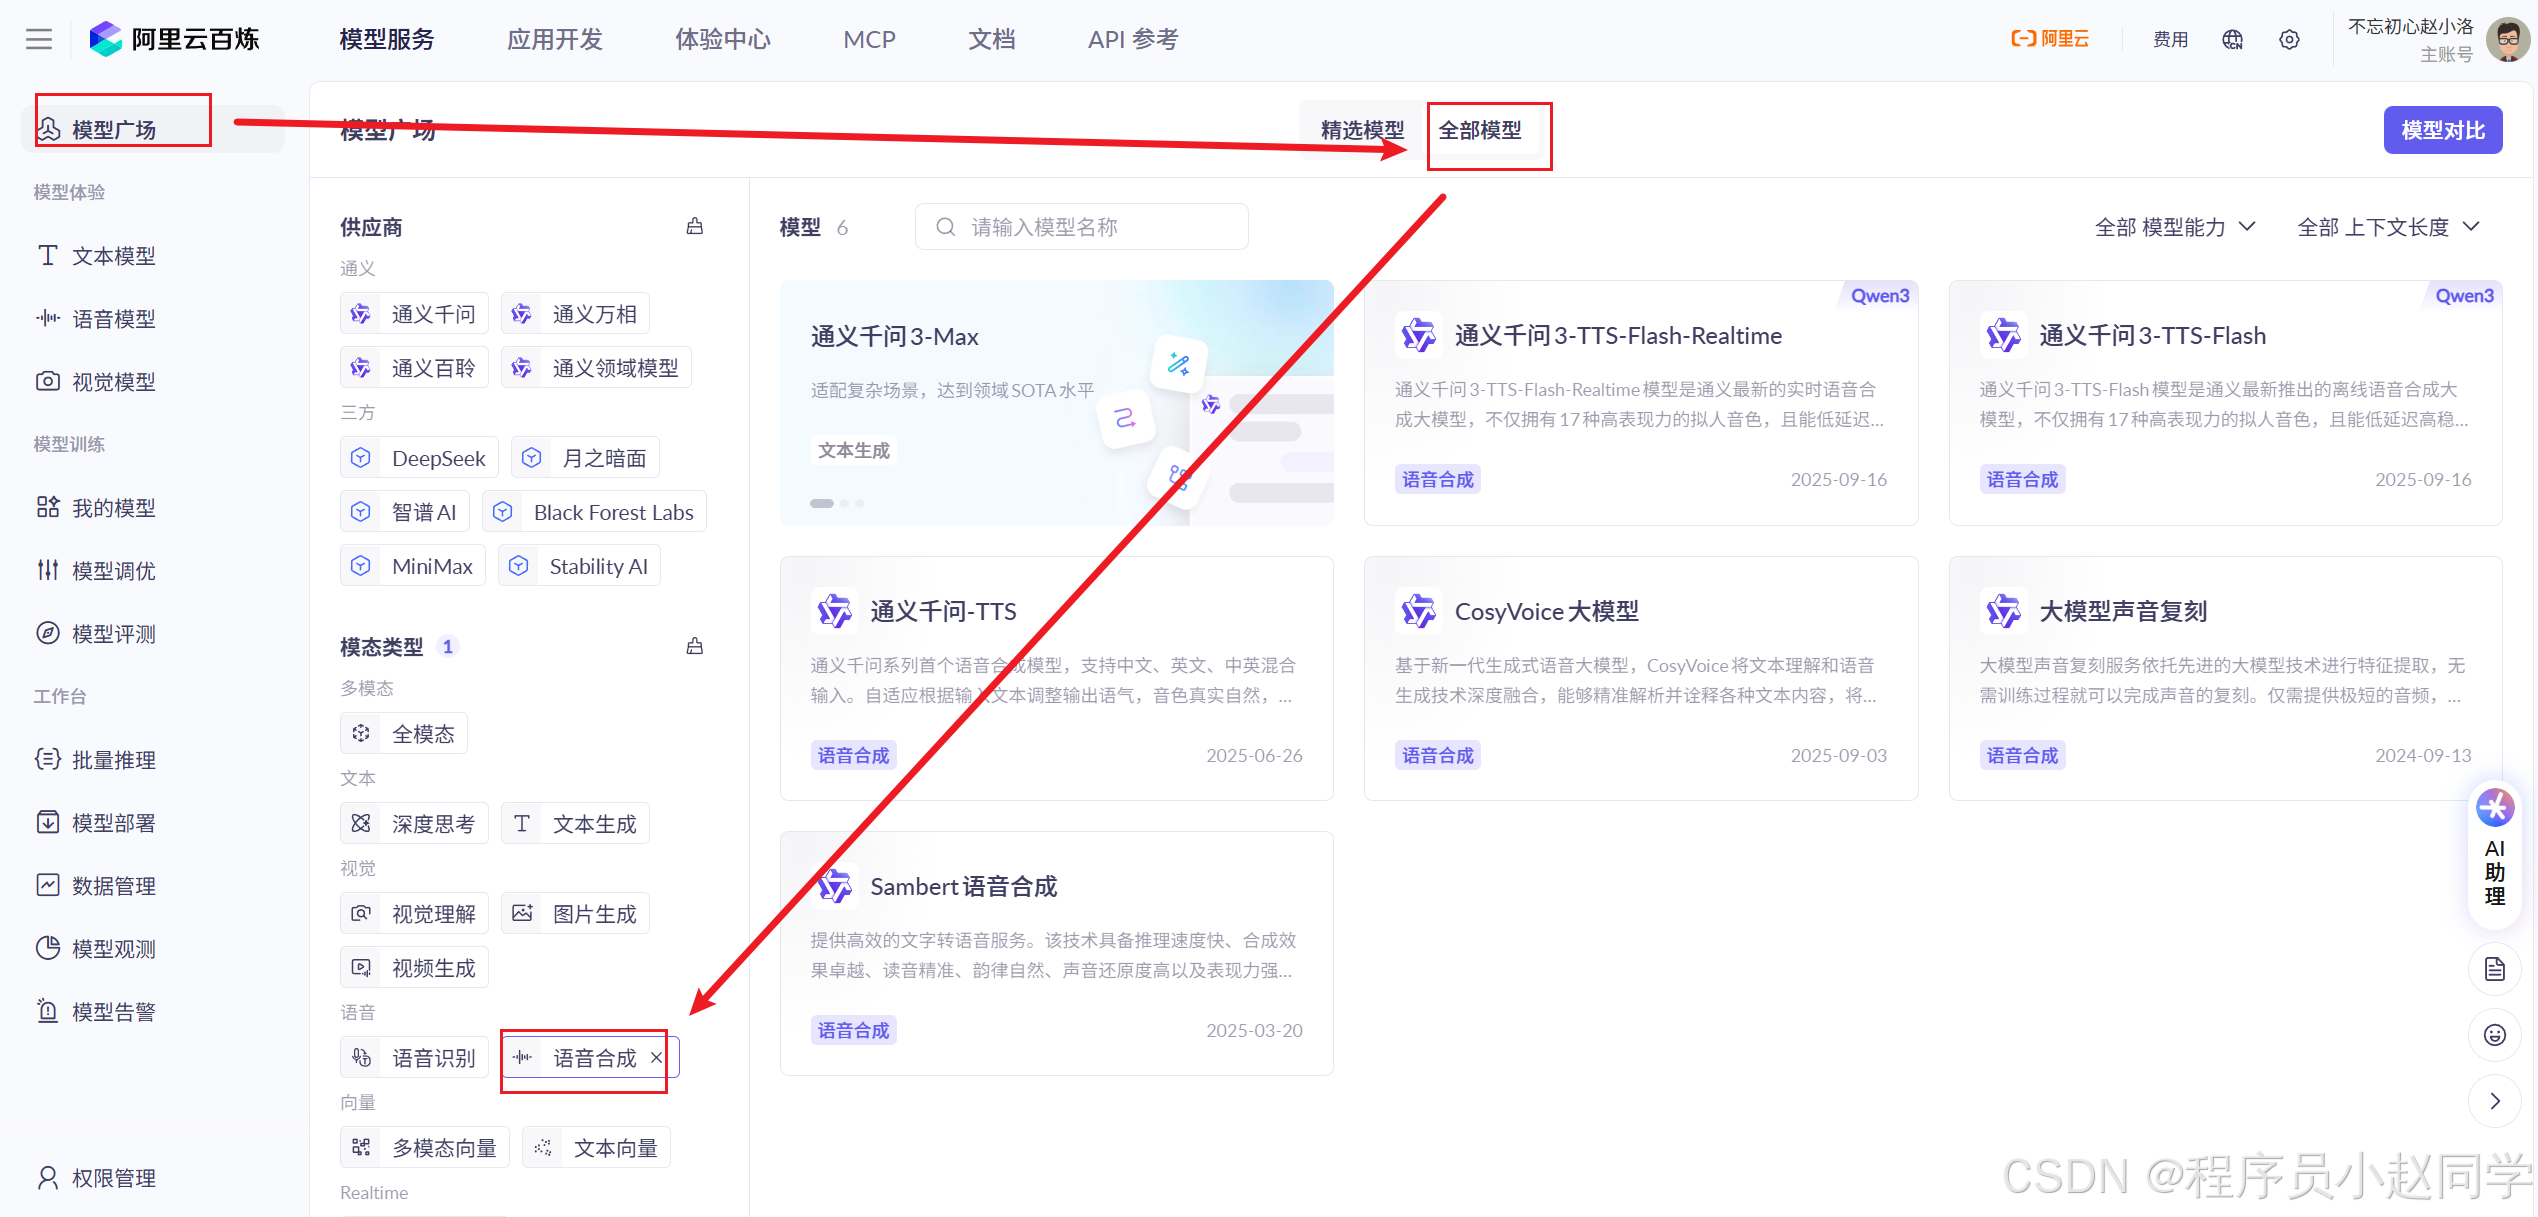
语音合成模型可以在这里找:
三、创建Spring Boot项目
1. 初始化项目
访问 start.spring.io 快速创建项目,配置如下:
- Project: Maven
- Language: Java
- Spring Boot: 3.5.7
- Group: com.example
- Artifact: spring-ai-demo
- Java: 17
- Dependencies: Spring Web
点击"Generate"下载项目压缩包并解压到本地。
2. 配置pom.xml
在pom.xml中添加Spring AI Alibaba依赖和仓库配置:
<?xml version="1.0" encoding="UTF-8"?>
<project xmlns="http://maven.apache.org/POM/4.0.0" xmlns:xsi="http://www.w3.org/2001/XMLSchema-instance"xsi:schemaLocation="http://maven.apache.org/POM/4.0.0 https://maven.apache.org/xsd/maven-4.0.0.xsd"><modelVersion>4.0.0</modelVersion><parent><groupId>org.springframework.boot</groupId><artifactId>spring-boot-starter-parent</artifactId><version>3.5.7</version><relativePath/></parent><groupId>com.example</groupId><artifactId>spring-ai-demo</artifactId><version>0.0.1-SNAPSHOT</version><name>spring-ai-tts-demo</name><properties><java.version>17</java.version></properties><dependencies><dependency><groupId>org.springframework.boot</groupId><artifactId>spring-boot-starter-web</artifactId></dependency><dependency><groupId>com.alibaba.cloud.ai</groupId><artifactId>spring-ai-alibaba-starter</artifactId><version>1.0.0-M5.1</version></dependency><dependency><groupId>org.springframework.boot</groupId><artifactId>spring-boot-starter-test</artifactId><scope>test</scope></dependency></dependencies><!-- 添加Spring Milestones仓库 --><repositories><repository><id>spring-milestones</id><name>Spring Milestones</name><url>https://repo.spring.io/milestone</url><snapshots><enabled>false</enabled></snapshots></repository></repositories>
</project>
由于Spring AI相关依赖尚未发布到中央仓库,所以需要添加Spring Milestones仓库。
四、配置应用参数
1. 配置API Key
在src/main/resources/application.yml中添加配置:
spring:application:name: spring-ai-demoai:dashscope:api-key: ${AI_DASHSCOPE_API_KEY:}chat:options:model: qwen3-max # 设置默认的对话模型image:options:model: qwen-image-edit-plus # 设置默认的文生图模型speech:options:model: qwen3-tts-flash-realtime # 设置默认的语音合成模型
安全提示:不建议将API Key直接写在代码中,可以通过环境变量设置:
Windows系统:
set AI_DASHSCOPE_API_KEY=你的API_KEY
Mac/Linux系统:
export AI_DASHSCOPE_API_KEY=你的API_KEY
2. 可选模型配置
Spring AI Alibaba支持多种语音合成模型,可以在配置文件中指定:
spring:ai:dashscope:api-key: ${AI_DASHSCOPE_API_KEY}speech:options:model: qwen3-tts-flash-realtime # 设置默认的语音合成模型
常用语音合成模型有:
qwen3-tts-flash:通义千问3-TTS-Flashcosyvoice-v3:语音生成CosyVoice-v3大模型
五、实现语音合成接口
1. 创建AudioModelController
创建AudioModelController.java文件,实现语音合成功能:
package com.example.spring_ai_demo.controller;import com.alibaba.cloud.ai.dashscope.audio.synthesis.SpeechSynthesisModel;
import com.alibaba.cloud.ai.dashscope.audio.synthesis.SpeechSynthesisPrompt;
import com.alibaba.cloud.ai.dashscope.audio.synthesis.SpeechSynthesisResponse;
import org.springframework.beans.factory.annotation.Autowired;
import org.springframework.http.MediaType;
import org.springframework.http.ResponseEntity;
import org.springframework.web.bind.annotation.*;import java.nio.ByteBuffer;@RestController
@RequestMapping("/audio")
public class AudioModelController {private final SpeechSynthesisModel speechSynthesisModel;@Autowiredpublic AudioModelController(SpeechSynthesisModel speechSynthesisModel) {this.speechSynthesisModel = speechSynthesisModel;}/*** 基础语音合成接口*/@GetMapping("/synthesize")public ResponseEntity<byte[]> synthesizeSpeech(@RequestParam String text) {//构建语音合成请求SpeechSynthesisPrompt prompt = new SpeechSynthesisPrompt(text);//调用模型生成语音SpeechSynthesisResponse response = speechSynthesisModel.call(prompt);ByteBuffer audioData = response.getResult().getOutput().getAudio();//将ByteBuffer转化为字节数组byte[] audioBytes = new byte[audioData.remaining()];audioData.get(audioBytes);//返回音频流,mp3格式return ResponseEntity.ok().contentType(MediaType.APPLICATION_OCTET_STREAM).header("Content-Disposition", "attachment; filename=output.mp3").body(audioBytes);}}
2. 进阶版本:支持在线播放
/*** 在线播放语音接口*/@GetMapping("/synthesize/play")public ResponseEntity<byte[]> playSpeech(@RequestParam String text) {SpeechSynthesisPrompt prompt = new SpeechSynthesisPrompt(text);SpeechSynthesisResponse response = speechSynthesisModel.call(prompt);ByteBuffer audioData = response.getResult().getOutput().getAudio();byte[] audioBytes = new byte[audioData.remaining()];audioData.get(audioBytes);return ResponseEntity.ok().contentType(MediaType.valueOf("audio/mpeg")).body(audioBytes);}
3. 完整AudioController代码
package com.example.spring_ai_demo.controller;import com.alibaba.cloud.ai.dashscope.audio.synthesis.SpeechSynthesisModel;
import com.alibaba.cloud.ai.dashscope.audio.synthesis.SpeechSynthesisPrompt;
import com.alibaba.cloud.ai.dashscope.audio.synthesis.SpeechSynthesisResponse;
import org.springframework.beans.factory.annotation.Autowired;
import org.springframework.http.MediaType;
import org.springframework.http.ResponseEntity;
import org.springframework.web.bind.annotation.*;import java.nio.ByteBuffer;@RestController
@RequestMapping("/audio")
public class AudioModelController {private final SpeechSynthesisModel speechSynthesisModel;@Autowiredpublic AudioModelController(SpeechSynthesisModel speechSynthesisModel) {this.speechSynthesisModel = speechSynthesisModel;}/*** 基础语音合成接口*/@GetMapping("/synthesize")public ResponseEntity<byte[]> synthesizeSpeech(@RequestParam String text) {//构建语音合成请求SpeechSynthesisPrompt prompt = new SpeechSynthesisPrompt(text);//调用模型生成语音SpeechSynthesisResponse response = speechSynthesisModel.call(prompt);ByteBuffer audioData = response.getResult().getOutput().getAudio();//将ByteBuffer转化为字节数组byte[] audioBytes = new byte[audioData.remaining()];audioData.get(audioBytes);//返回音频流,mp3格式return ResponseEntity.ok().contentType(MediaType.APPLICATION_OCTET_STREAM).header("Content-Disposition", "attachment; filename=output.mp3").body(audioBytes);}/*** 在线播放语音接口*/@GetMapping("/synthesize/play")public ResponseEntity<byte[]> playSpeech(@RequestParam String text) {SpeechSynthesisPrompt prompt = new SpeechSynthesisPrompt(text);SpeechSynthesisResponse response = speechSynthesisModel.call(prompt);ByteBuffer audioData = response.getResult().getOutput().getAudio();byte[] audioBytes = new byte[audioData.remaining()];audioData.get(audioBytes);return ResponseEntity.ok().contentType(MediaType.valueOf("audio/mpeg")).body(audioBytes);}
}
六、创建应用启动类
确保在项目中有Spring Boot启动类:
package com.example.spring_ai_demo;import org.springframework.boot.SpringApplication;
import org.springframework.boot.autoconfigure.SpringBootApplication;@SpringBootApplication
public class SpringAiDemoApplication {public static void main(String[] args) {SpringApplication.run(SpringAiDemoApplication.class, args);}}
七、运行和测试
1. 启动应用
直接在IDE中运行SpringAiTtsDemoApplication类。
2. 测试语音合成功能
打开浏览器或使用Postman测试以下接口:
基础语音合成:
http://localhost:8080/audio/synthesize?text=欢迎使用Spring AI Alibaba语音合成功能,这是一个演示示例。
需要下载后播放

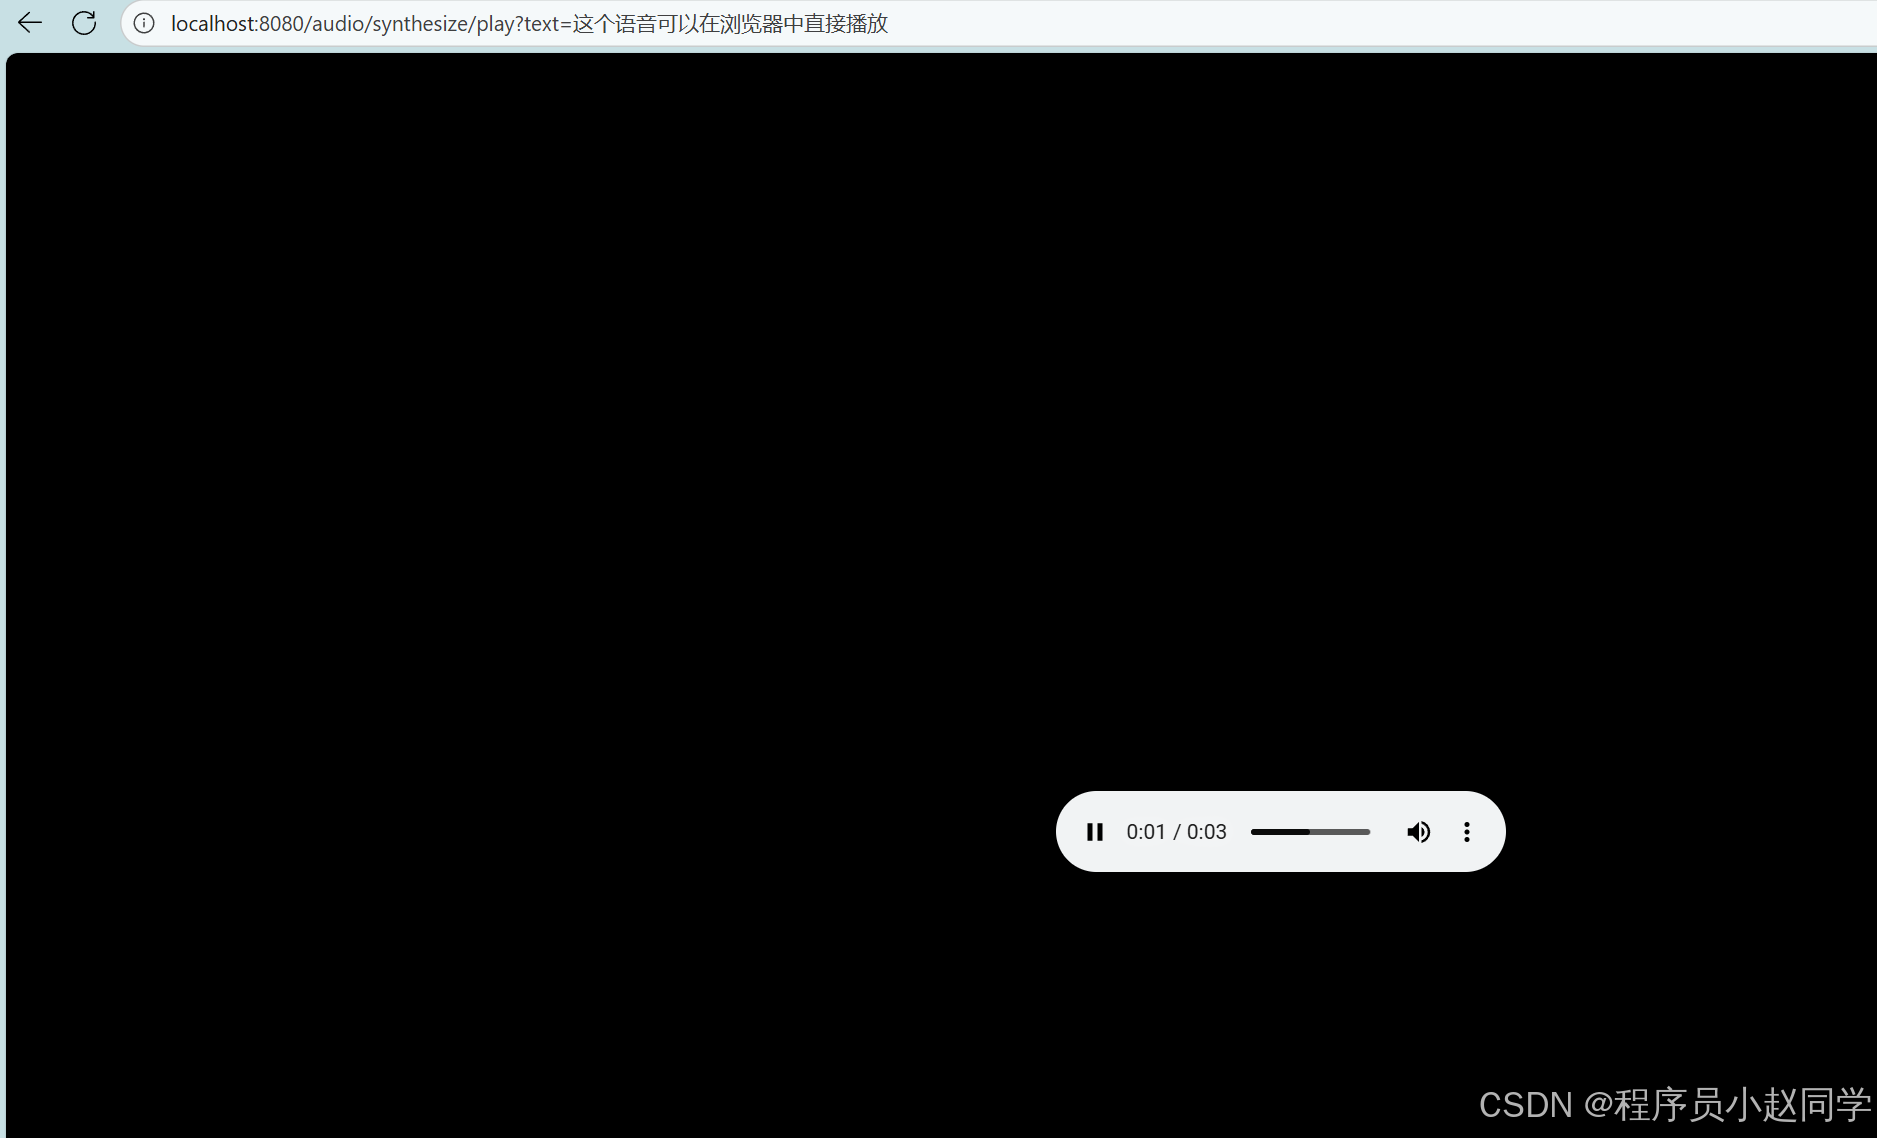
在线播放:
http://localhost:8080/audio/synthesize/play?text=这个语音可以在浏览器中直接播放
八、常见问题及解决方案
1. 依赖解析失败
如果出现依赖解析错误,请确保:
- 已正确配置Spring Milestones仓库
- 使用的是推荐的Spring Boot和JDK版本
2. API Key错误
如果遇到认证错误:
- 检查API Key是否正确设置
- 确认百炼大模型服务已开通
- 验证API Key是否有足够的余额或免费额度
3. 音频格式问题
返回的音频格式为MP3,确保客户端支持MP3播放。
4. 文本长度限制
单次请求的文本长度有限制,建议控制文本在合理范围内。
九、核心原理简介
Spring AI Alibaba通过以下组件实现语音合成功能:
- SpeechSynthesisModel: 抽象的语音合成模型接口
- SpeechSynthesisPrompt: 封装输入文本和合成参数
- SpeechSynthesisResponse: 包含生成音频数据的响应
框架自动装配了与阿里云百炼服务通信的组件,开发者只需关注业务逻辑。
十、总结
通过本教程,你已成功实现了:
- ✅ 创建Spring Boot项目并集成Spring AI Alibaba
- ✅ 配置阿里云百炼大模型服务
- ✅ 实现文本转语音接口
- ✅ 通过HTTP API生成和播放语音
完整项目结构:
spring-ai-tts-demo
├── src/main/java
│   └── com/example/spring_ai_demo
│       ├── controller
│       │   └── AudioController.java
│       └── SpringAiTtsDemoApplication.java
├── src/main/resources
│   └── application.yml
└── pom.xml
现在你可以继续探索Spring AI的更多功能,如图像生成、文本理解等多模态AI能力。尝试不同的音色和文本内容,为你的应用添加语音交互能力!
本项目代码已上传至github《https://github.com/zhaohualuo/spring-ai-demo.git》
参考资源:
- Spring AI Alibaba官方文档
- 阿里云百炼平台
希望本教程对你有所帮助,如有问题欢迎在评论区讨论!