读写分离架构:数据访问层的演进与实践
从单兵作战到分工协作的数据革命
在互联网应用发展的早期阶段,大多数系统都采用单一数据库架构来处理所有的数据读写请求。这种架构简单直接,在业务初期确实能够满足需求。然而,随着业务规模的不断扩大,用户量的持续增长,单一数据库逐渐暴露出性能瓶颈和可用性风险。
想象一下这样一个场景:一个大型电商平台在“双十一”期间,每秒需要处理数十万次的商品查询请求,同时还要处理数万笔订单创建请求。如果所有这些请求都集中在同一个数据库上,就像让一个人同时回答成千上万人的问题还要记录重要的交易信息,结果必然是系统响应缓慢甚至崩溃。
正是这样的挑战催生了读写分离架构的诞生和发展。本文将深入探讨读写分离数据访问层的架构设计,从问题起源到解决方案,从理论原理到实践实现,为读者呈现一幅完整的技术演进图景。
单一数据库架构的困境与挑战
传统架构的技术债务
在深入探讨读写分离之前,我们有必要先了解传统单一数据库架构面临的具体问题。
性能瓶颈的根源
// 传统单一数据库访问示例
public class TraditionalUserDAO {private DataSource dataSource;public User getUserById(Long id) {// 读操作 - 占用数据库连接和CPU资源try (Connection conn = dataSource.getConnection();PreparedStatement stmt = conn.prepareStatement("SELECT * FROM users WHERE id = ?")) {stmt.setLong(1, id);ResultSet rs = stmt.executeQuery();if (rs.next()) {return mapResultSetToUser(rs);}} catch (SQLException e) {throw new RuntimeException("查询用户失败", e);}return null;}public void updateUser(User user) {// 写操作 - 不仅占用资源,还可能锁定数据行try (Connection conn = dataSource.getConnection();PreparedStatement stmt = conn.prepareStatement("UPDATE users SET name=?, email=? WHERE id=?")) {stmt.setString(1, user.getName());stmt.setString(2, user.getEmail());stmt.setLong(3, user.getId());stmt.executeUpdate();} catch (SQLException e) {throw new RuntimeException("更新用户失败", e);}}
}
问题分析:
读写操作竞争相同的数据库资源
复杂的查询可能阻塞关键的事务操作
数据库连接成为稀缺资源
系统扩展性严重受限
真实世界的类比:餐厅的启示
为了更好地理解这个问题,我们可以用一个餐厅的运营模式来类比:
在一家小餐厅里,同一个服务员既负责接待顾客点餐(读操作),又负责到厨房下单和结账(写操作)。当顾客不多时,这种模式运转良好。但随着顾客数量增加,服务员在点餐台和厨房之间疲于奔命,顾客等待时间越来越长。
而现代化的餐厅采用了专业分工:接待员专门负责引导和点餐,服务员专门负责传菜和结账,后厨专门负责烹饪。这种分工协作大大提升了整体效率——这正是读写分离的核心思想。
读写分离架构的理论基础
核心设计理念
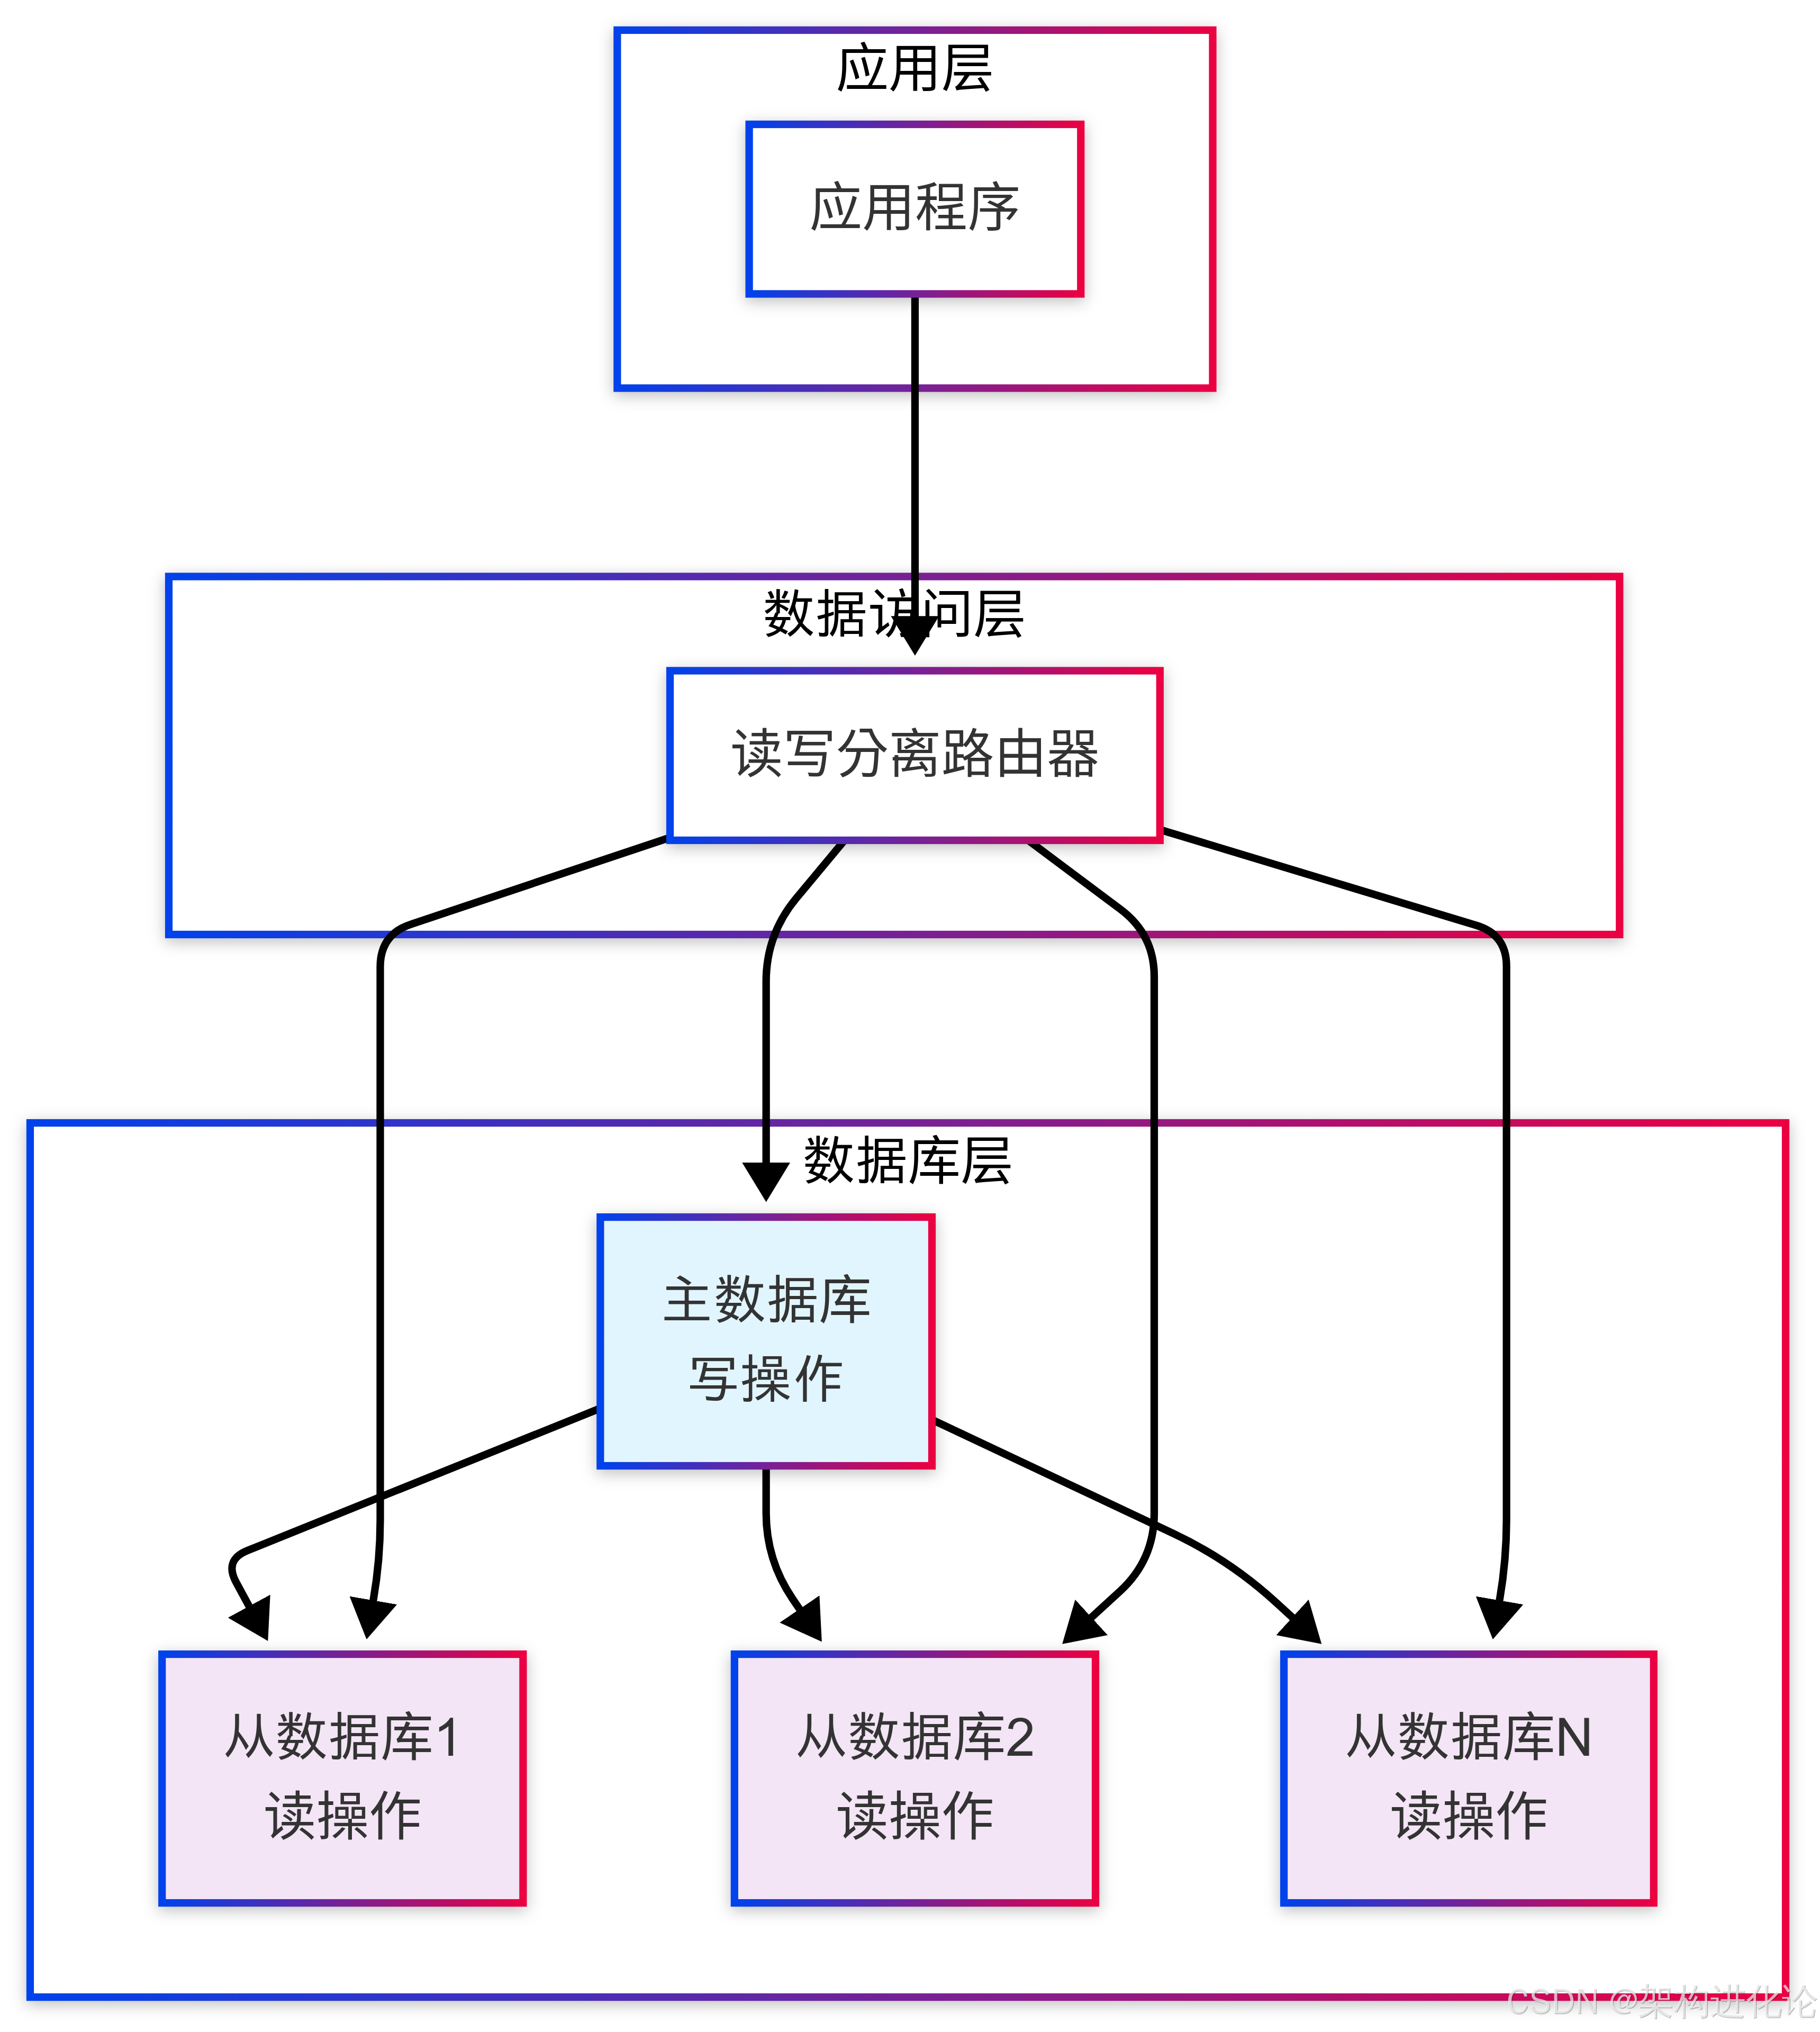
读写分离架构的基本思想是将数据库的读操作和写操作分离到不同的数据库实例上:
主数据库(Master):专门处理写操作(INSERT、UPDATE、DELETE)和实时性要求高的读操作
从数据库(Slave):专门处理读操作(SELECT),可以部署多个实例实现负载均衡
数据同步机制
主从数据库之间的数据同步是读写分离架构的关键技术。主流的数据同步方式包括:
基于二进制日志的复制
// 数据同步过程伪代码表示
public class MySQLReplicationProcess {/*** 主数据库的写操作流程*/public void masterWriteProcess() {// 1. 执行写事务executeWriteTransaction();// 2. 将变更写入二进制日志writeToBinlog();// 3. 通知从库有新的变更notifySlaves();}/*** 从数据库的同步流程*/public void slaveSyncProcess() {// 1. 连接主库并请求二进制日志connectToMaster();requestBinlog();// 2. 接收并解析二进制日志receiveAndParseBinlog();// 3. 在从库上重放SQL语句replaySQLOnSlave();// 4. 更新复制位置updateReplicationPosition();}
}
读写分离数据访问层的详细设计
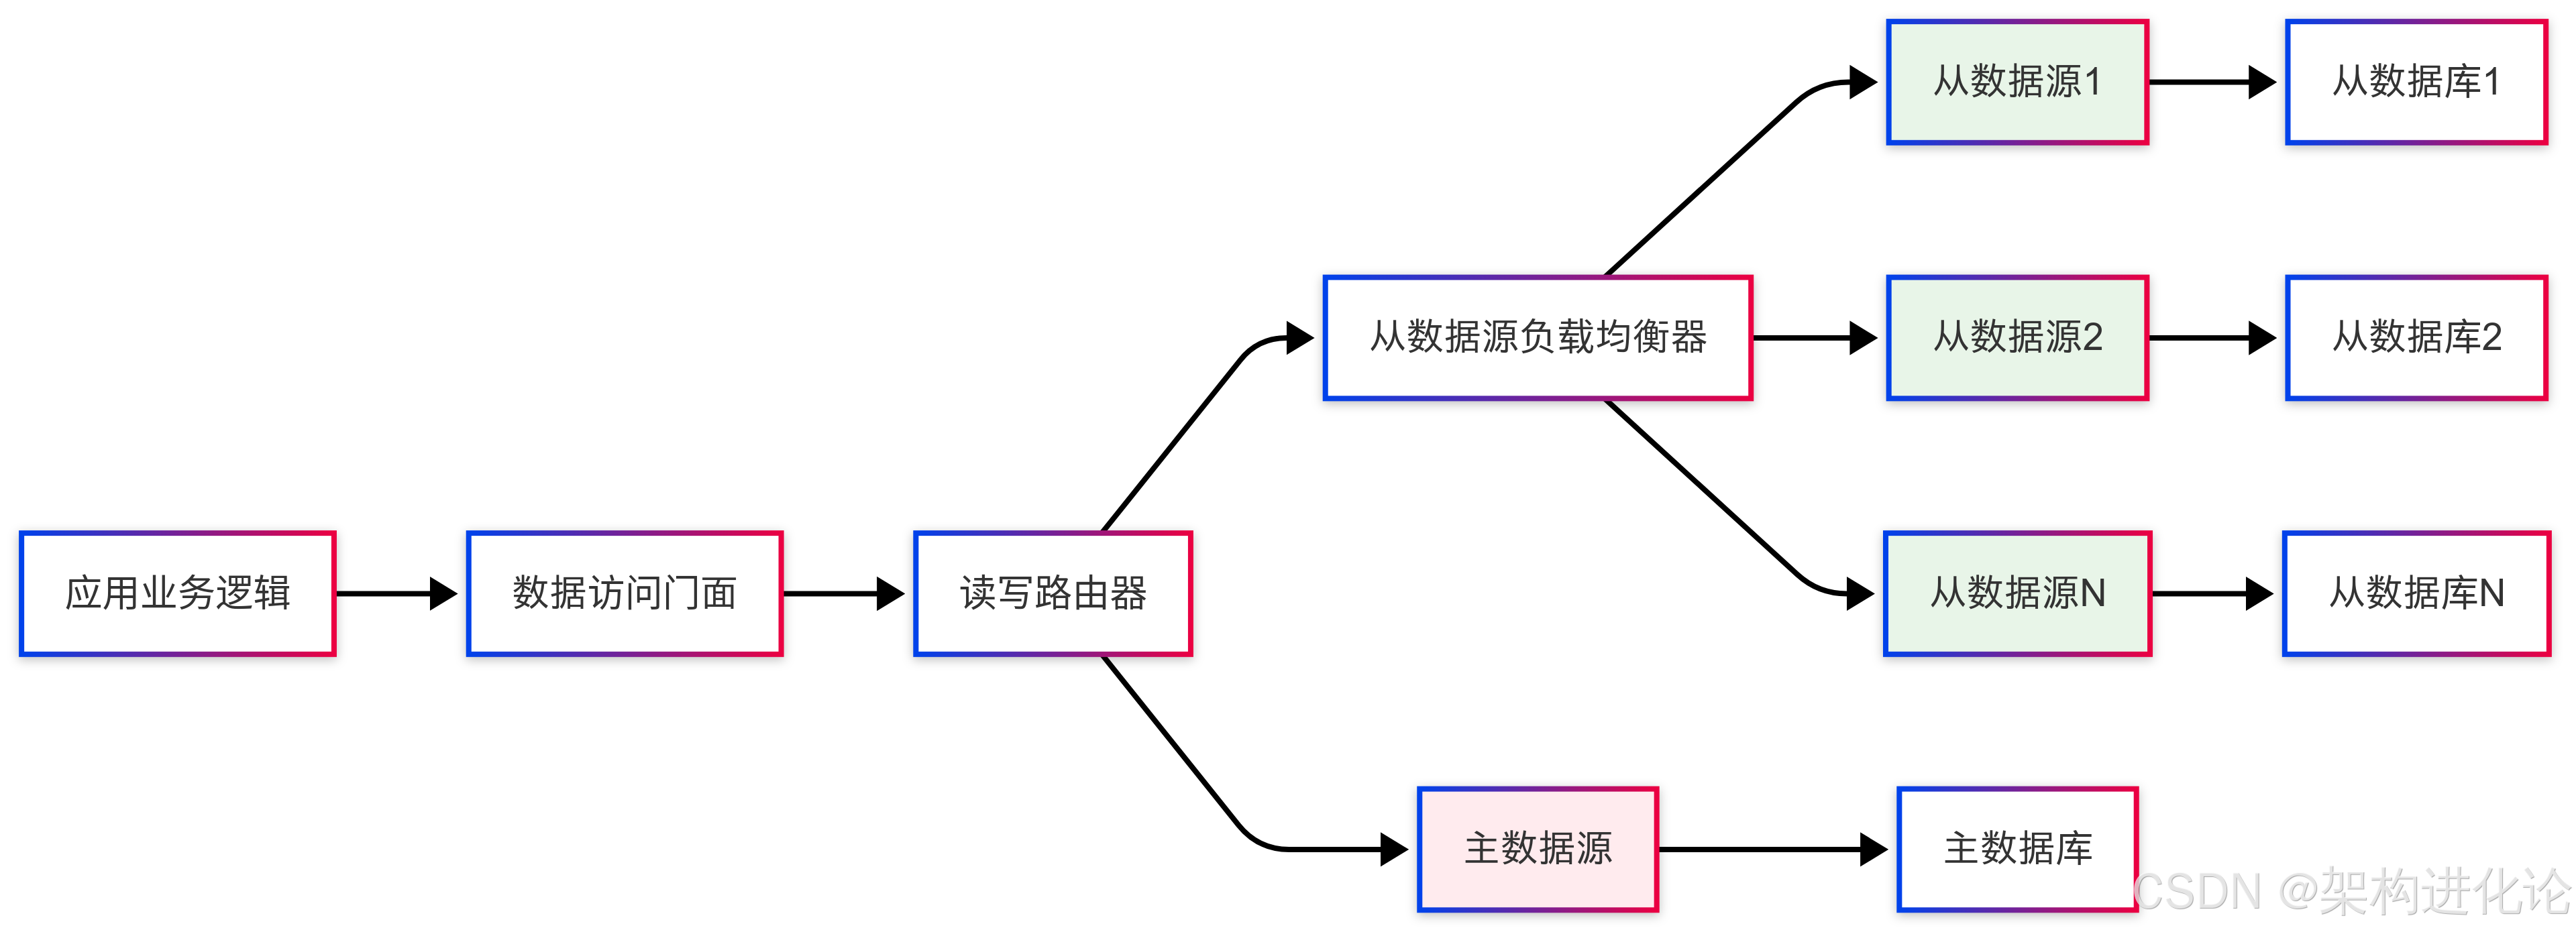
架构组件设计
一个完整的读写分离数据访问层包含多个关键组件:
核心实现代码
下面我们实现一个完整的读写分离数据访问层:
/*** 数据源类型枚举*/
public enum DataSourceType {MASTER, // 主数据源 - 写操作SLAVE   // 从数据源 - 读操作
}/*** 数据源上下文持有者* 用于在运行时动态决定使用主数据源还是从数据源*/
public class DataSourceContextHolder {private static final ThreadLocal<DataSourceType> contextHolder = new ThreadLocal<>();/*** 设置数据源类型*/public static void setDataSourceType(DataSourceType dataSourceType) {if (dataSourceType == null) {throw new NullPointerException("数据源类型不能为空");}contextHolder.set(dataSourceType);}/*** 获取数据源类型*/public static DataSourceType getDataSourceType() {return contextHolder.get();}/*** 清除数据源类型*/public static void clearDataSourceType() {contextHolder.remove();}/*** 切换到主数据源*/public static void useMaster() {setDataSourceType(DataSourceType.MASTER);}/*** 切换到从数据源*/public static void useSlave() {setDataSourceType(DataSourceType.SLAVE);}
}/*** 动态数据源路由器* 根据上下文决定使用主数据源还是从数据源*/
public class DynamicDataSource extends AbstractRoutingDataSource {@Overrideprotected Object determineCurrentLookupKey() {DataSourceType dataSourceType = DataSourceContextHolder.getDataSourceType();// 如果没有显式指定,默认使用从数据源(读操作优先)if (dataSourceType == null) {return DataSourceType.SLAVE;}return dataSourceType;}
}/*** 读写分离数据源配置*/
@Configuration
@EnableTransactionManagement
public class ReadWriteDataSourceConfig {@Bean@ConfigurationProperties(prefix = "spring.datasource.master")public DataSource masterDataSource() {return DataSourceBuilder.create().build();}@Bean@ConfigurationProperties(prefix = "spring.datasource.slave1")public DataSource slave1DataSource() {return DataSourceBuilder.create().build();}@Bean@ConfigurationProperties(prefix = "spring.datasource.slave2")public DataSource slave2DataSource() {return DataSourceBuilder.create().build();}/*** 从数据源负载均衡*/@Beanpublic DataSource slaveLoadBalanceDataSource() {Map<Object, Object> targetDataSources = new HashMap<>();targetDataSources.put("slave1", slave1DataSource());targetDataSources.put("slave2", slave2DataSource());LoadBalanceDataSource loadBalanceDataSource = new LoadBalanceDataSource();loadBalanceDataSource.setDefaultTargetDataSource(slave1DataSource());loadBalanceDataSource.setTargetDataSources(targetDataSources);// 设置负载均衡策略 - 轮询loadBalanceDataSource.setLoadBalanceStrategy(new RoundRobinLoadBalanceStrategy());return loadBalanceDataSource;}/*** 动态数据源配置*/@Beanpublic DataSource dynamicDataSource() {Map<Object, Object> targetDataSources = new HashMap<>();targetDataSources.put(DataSourceType.MASTER, masterDataSource());targetDataSources.put(DataSourceType.SLAVE, slaveLoadBalanceDataSource());DynamicDataSource dynamicDataSource = new DynamicDataSource();dynamicDataSource.setDefaultTargetDataSource(slaveLoadBalanceDataSource());dynamicDataSource.setTargetDataSources(targetDataSources);return dynamicDataSource;}/*** 事务管理器*/@Beanpublic PlatformTransactionManager transactionManager() {return new DataSourceTransactionManager(dynamicDataSource());}
}/*** AOP切面:自动设置数据源类型* 通过分析方法名或注解自动选择主从数据源*/
@Aspect
@Component
public class DataSourceAspect {private static final Logger logger = LoggerFactory.getLogger(DataSourceAspect.class);// 写操作方法前缀private static final String[] WRITE_METHOD_PREFIX = {"insert", "add", "create", "update", "delete", "remove", "save"};/*** 服务层切面 - 根据方法名自动路由*/@Before("execution(* com.example.service.*.*(..))")public void beforeServiceMethod(JoinPoint joinPoint) {String methodName = joinPoint.getSignature().getName().toLowerCase();// 如果方法名以写操作前缀开头,使用主数据源for (String prefix : WRITE_METHOD_PREFIX) {if (methodName.startsWith(prefix)) {DataSourceContextHolder.useMaster();logger.debug("切换到主数据源,方法: {}", methodName);return;}}// 默认使用从数据源DataSourceContextHolder.useSlave();logger.debug("切换到从数据源,方法: {}", methodName);}/*** 确保在方法执行后清理数据源上下文*/@After("execution(* com.example.service.*.*(..))")public void afterServiceMethod(JoinPoint joinPoint) {DataSourceContextHolder.clearDataSourceType();}/*** 处理事务注解 - 有@Transactional注解的方法使用主数据源*/@Before("@annotation(org.springframework.transaction.annotation.Transactional)")public void beforeTransactionalMethod() {DataSourceContextHolder.useMaster();logger.debug("事务方法,切换到主数据源");}
}/*** 手动数据源选择注解* 用于需要强制指定数据源的场景*/
@Target({ElementType.METHOD, ElementType.TYPE})
@Retention(RetentionPolicy.RUNTIME)
public @interface DataSource {DataSourceType value() default DataSourceType.SLAVE;
}/*** 手动数据源选择切面*/
@Aspect
@Component
public class ManualDataSourceAspect {@Before("@annotation(dataSource)")public void beforeMethodWithDataSource(JoinPoint joinPoint, DataSource dataSource) {DataSourceContextHolder.setDataSourceType(dataSource.value());}
}
业务层使用示例
/*** 用户服务 - 展示读写分离的实际使用*/
@Service
public class UserService {private final UserDAO userDAO;public UserService(UserDAO userDAO) {this.userDAO = userDAO;}/*** 查询用户 - 自动路由到从数据库*/public User getUserById(Long userId) {// 由于方法名是get开头,AOP会自动选择从数据源return userDAO.selectById(userId);}/*** 创建用户 - 自动路由到主数据库*/public void createUser(User user) {// 由于方法名是create开头,AOP会自动选择主数据源userDAO.insert(user);}/*** 复杂业务方法:先读后写*/@Transactionalpublic void updateUserEmail(Long userId, String newEmail) {// 在事务中,所有操作都会使用主数据源// 这是为了避免主从延迟导致的数据不一致User user = userDAO.selectById(userId);if (user != null) {user.setEmail(newEmail);userDAO.update(user);// 记录操作日志auditService.logUserUpdate(userId, "email updated");}}/*** 强制使用主数据库查询* 用于需要读取最新数据的场景*/@DataSource(DataSourceType.MASTER)public User getFreshUserData(Long userId) {// 通过注解强制使用主数据源,避免主从延迟return userDAO.selectById(userId);}
}/*** 用户数据访问对象*/
@Repository
public class UserDAO {private final JdbcTemplate jdbcTemplate;public UserDAO(DataSource dataSource) {this.jdbcTemplate = new JdbcTemplate(dataSource);}public User selectById(Long id) {String sql = "SELECT id, name, email, create_time FROM users WHERE id = ?";return jdbcTemplate.queryForObject(sql, new Object[]{id}, (rs, rowNum) -> {User user = new User();user.setId(rs.getLong("id"));user.setName(rs.getString("name"));user.setEmail(rs.getString("email"));user.setCreateTime(rs.getTimestamp("create_time"));return user;});}public void insert(User user) {String sql = "INSERT INTO users (name, email, create_time) VALUES (?, ?, ?)";jdbcTemplate.update(sql, user.getName(), user.getEmail(), new Timestamp(System.currentTimeMillis()));}public void update(User user) {String sql = "UPDATE users SET name = ?, email = ? WHERE id = ?";jdbcTemplate.update(sql, user.getName(), user.getEmail(), user.getId());}
}
高级特性与优化策略
负载均衡策略
在拥有多个从数据库的情况下,合理的负载均衡策略至关重要:
/*** 负载均衡策略接口*/
public interface LoadBalanceStrategy {/*** 选择数据源*/String select(List<String> dataSourceKeys, String originalKey);
}/*** 轮询负载均衡策略*/
public class RoundRobinLoadBalanceStrategy implements LoadBalanceStrategy {private final AtomicInteger counter = new AtomicInteger(0);@Overridepublic String select(List<String> dataSourceKeys, String originalKey) {if (dataSourceKeys.isEmpty()) {return originalKey;}int index = counter.getAndIncrement() % dataSourceKeys.size();if (index < 0) {index += dataSourceKeys.size();counter.set(0);}return dataSourceKeys.get(index);}
}/*** 随机负载均衡策略*/
public class RandomLoadBalanceStrategy implements LoadBalanceStrategy {private final Random random = new Random();@Overridepublic String select(List<String> dataSourceKeys, String originalKey) {if (dataSourceKeys.isEmpty()) {return originalKey;}return dataSourceKeys.get(random.nextInt(dataSourceKeys.size()));}
}/*** 加权负载均衡策略*/
public class WeightedLoadBalanceStrategy implements LoadBalanceStrategy {private final Random random = new Random();@Overridepublic String select(List<String> dataSourceKeys, String originalKey) {// 简化的加权逻辑,实际应用中可以从配置中读取权重Map<String, Integer> weights = new HashMap<>();dataSourceKeys.forEach(key -> weights.put(key, 100)); // 默认权重// 根据服务器性能调整权重weights.put("slave1", 70);  // 性能较差weights.put("slave2", 130); // 性能较好int totalWeight = weights.values().stream().mapToInt(Integer::intValue).sum();int randomWeight = random.nextInt(totalWeight);int current = 0;for (String key : dataSourceKeys) {current += weights.get(key);if (randomWeight < current) {return key;}}return dataSourceKeys.get(0);}
}
故障转移与健康检查
/*** 数据源健康检查器*/
@Component
public class DataSourceHealthChecker {private static final Logger logger = LoggerFactory.getLogger(DataSourceHealthChecker.class);private final Map<String, DataSource> dataSources;private final Map<String, Boolean> healthStatus = new ConcurrentHashMap<>();private final ScheduledExecutorService scheduler = Executors.newScheduledThreadPool(1);public DataSourceHealthChecker(Map<String, DataSource> dataSources) {this.dataSources = dataSources;startHealthCheck();}/*** 启动定时健康检查*/private void startHealthCheck() {scheduler.scheduleAtFixedRate(() -> {for (String dataSourceName : dataSources.keySet()) {boolean isHealthy = checkDataSourceHealth(dataSourceName);healthStatus.put(dataSourceName, isHealthy);if (!isHealthy) {logger.warn("数据源 {} 健康检查失败", dataSourceName);}}}, 0, 30, TimeUnit.SECONDS); // 每30秒检查一次}/*** 检查数据源健康状态*/private boolean checkDataSourceHealth(String dataSourceName) {DataSource dataSource = dataSources.get(dataSourceName);try (Connection conn = dataSource.getConnection();Statement stmt = conn.createStatement()) {stmt.executeQuery("SELECT 1");return true;} catch (SQLException e) {return false;}}/*** 获取健康的数据源列表*/public List<String> getHealthyDataSources(DataSourceType type) {return dataSources.keySet().stream().filter(key -> key.startsWith(type.name().toLowerCase())).filter(key -> healthStatus.getOrDefault(key, false)).collect(Collectors.toList());}/*** 判断数据源是否健康*/public boolean isHealthy(String dataSourceName) {return healthStatus.getOrDefault(dataSourceName, false);}
}
架构演进与最佳实践
从简单到复杂的演进路径
读写分离架构的演进通常遵循以下路径:
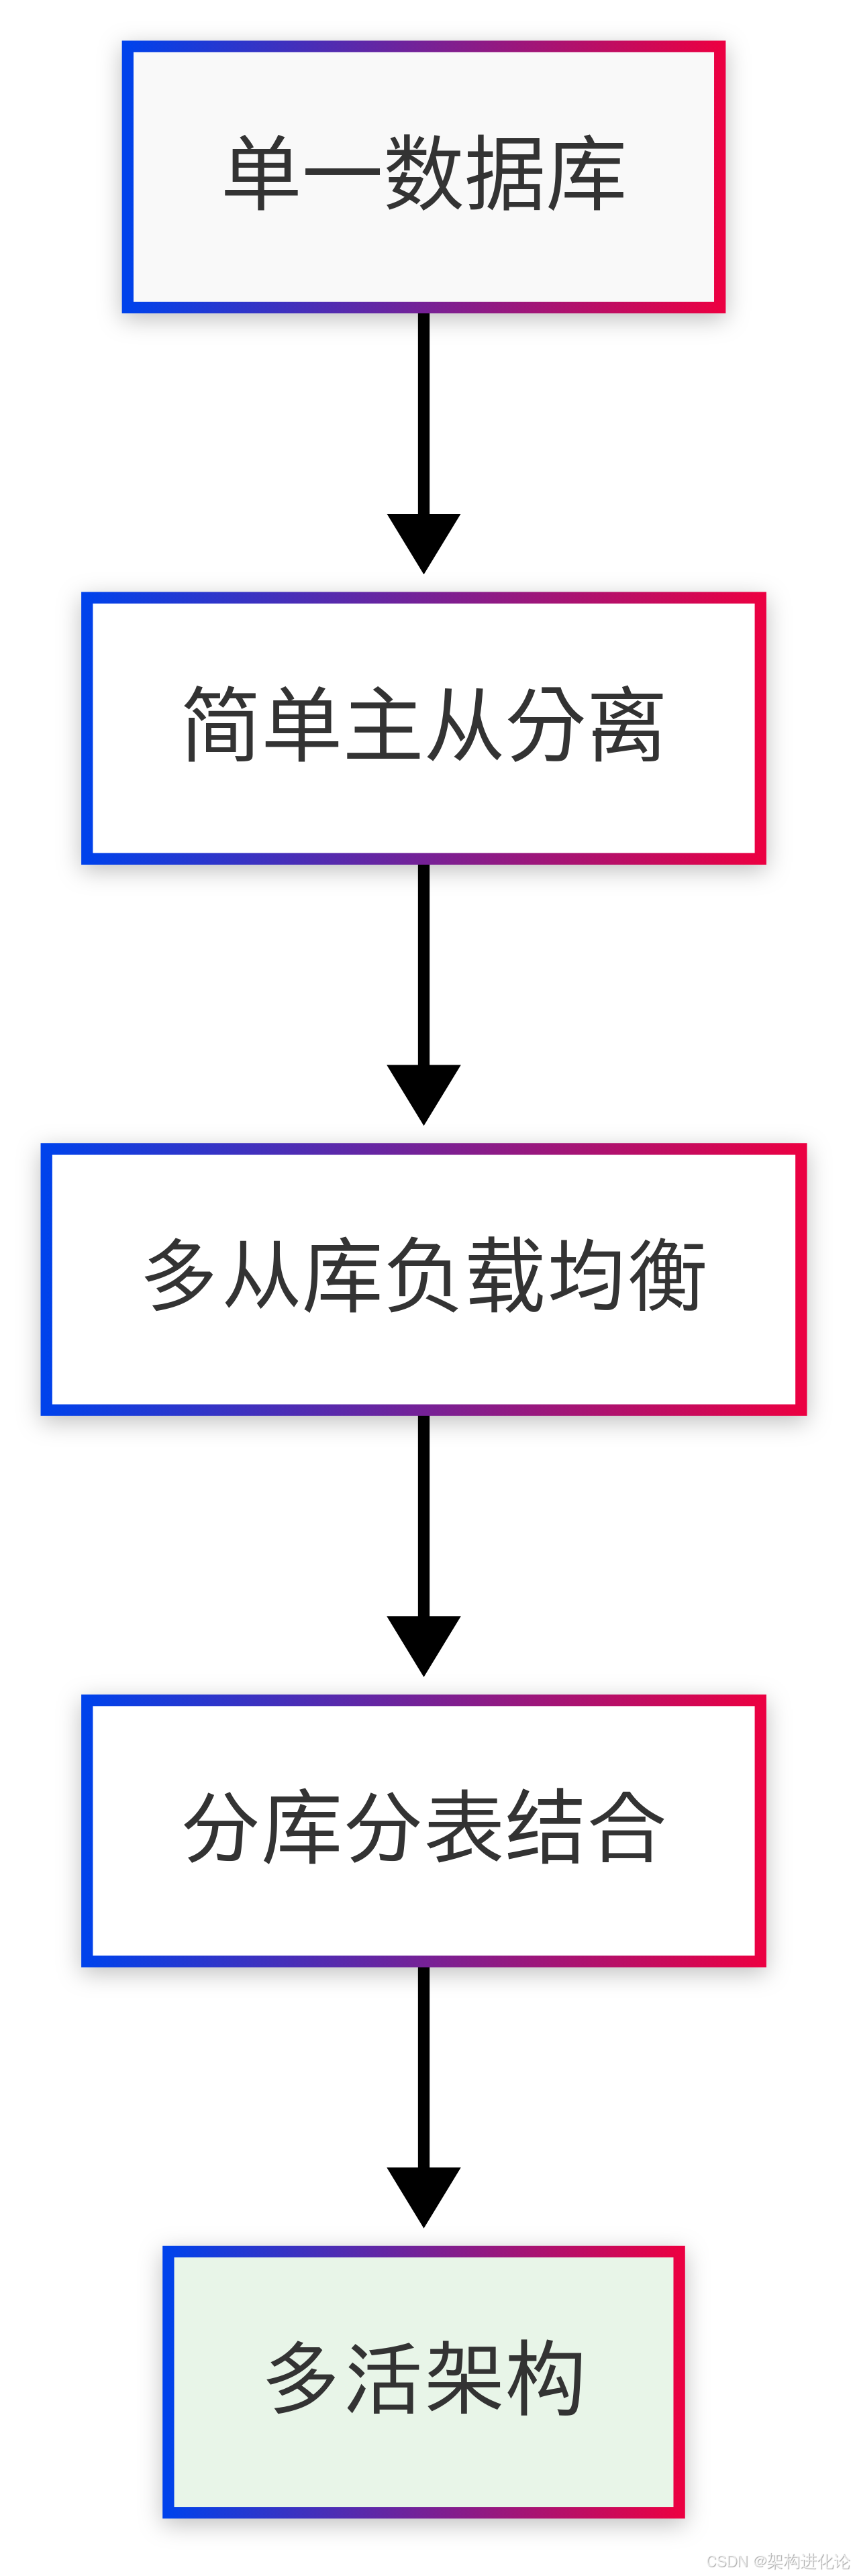
阶段一:简单主从分离
一个主数据库 + 一个从数据库
基础的数据同步
简单的手动数据源切换
阶段二:多从库负载均衡
一个主数据库 + 多个从数据库
自动负载均衡
健康检查与故障转移
阶段三:分库分表结合
水平分片 + 读写分离
更复杂的数据路由
跨库查询处理
阶段四:多活架构
多地部署
双向同步
流量调度
应对典型挑战的解决方案
挑战一:主从延迟问题
/*** 主从延迟解决方案*/
@Service
public class MasterSlaveDelaySolution {/*** 方案1:强制读主库* 适用于对数据实时性要求极高的场景*/@DataSource(DataSourceType.MASTER)public User getRealTimeUser(Long userId) {return userDAO.selectById(userId);}/*** 方案2:写后延迟控制* 在写操作后的一段时间内强制读主库*/public void updateUserWithDelayControl(User user) {userDAO.update(user);// 设置写标记,在接下来的一段时间内读主库DelayControlManager.setReadMaster(user.getId(), 2000); // 2秒内读主库}public User getUserWithDelayControl(Long userId) {if (DelayControlManager.shouldReadMaster(userId)) {return userDAO.selectByIdFromMaster(userId);} else {return userDAO.selectById(userId);}}/*** 方案3:异步重试* 当从库数据不是最新时,异步从主库重新获取*/public CompletableFuture<User> getUserWithRetry(Long userId) {return CompletableFuture.supplyAsync(() -> {User user = userDAO.selectById(userId);// 检查数据是否足够新(根据业务逻辑)if (!isDataFreshEnough(user)) {// 从主库重新获取user = userDAO.selectByIdFromMaster(userId);}return user;});}
}/*** 延迟控制管理器*/
@Component
public class DelayControlManager {private static final ConcurrentHashMap<Object, Long> masterReadRecords = new ConcurrentHashMap<>();/*** 设置需要读主库的记录*/public static void setReadMaster(Object key, long delayMillis) {long expireTime = System.currentTimeMillis() + delayMillis;masterReadRecords.put(key, expireTime);// 定时清理过期记录cleanExpiredRecords();}/*** 判断是否需要读主库*/public static boolean shouldReadMaster(Object key) {Long expireTime = masterReadRecords.get(key);if (expireTime == null) {return false;}if (System.currentTimeMillis() > expireTime) {masterReadRecords.remove(key);return false;}return true;}private static void cleanExpiredRecords() {long currentTime = System.currentTimeMillis();masterReadRecords.entrySet().removeIf(entry -> currentTime > entry.getValue());}
}
挑战二:事务一致性处理
/*** 分布式事务解决方案*/
@Service
public class TransactionSolution {/*** 本地事务处理* 在读写分离架构中,事务内的所有操作都应该路由到主库*/@Transactionalpublic void businessTransaction(Long userId, String newEmail) {// 在事务开始时,数据源已经切换到主库User user = userDAO.selectById(userId);user.setEmail(newEmail);userDAO.update(user);// 记录审计日志auditLogDAO.insert(new AuditLog(userId, "EMAIL_UPDATE"));// 发送事件(在事务提交后)transactionSynchronizationManager.registerSynchronization(new TransactionSynchronizationAdapter() {@Overridepublic void afterCommit() {eventPublisher.publishEvent(new UserEmailUpdatedEvent(userId, newEmail));}});}/*** 最终一致性方案 - 基于消息队列*/public void eventualConsistencyUpdate(User user) {// 1. 更新主库userDAO.update(user);// 2. 发送延迟消息,确保从库同步完成后再执行后续操作messageQueue.sendDelayedMessage(new CacheUpdateMessage(user.getId()), 1000);}
}
实战案例与性能分析
电商平台实战案例
让我们通过一个电商平台的具体场景来展示读写分离的价值:
/*** 电商商品服务*/
@Service
public class ProductService {private final ProductDAO productDAO;private final InventoryDAO inventoryDAO;/*** 商品详情页 - 读多写少*/public ProductDetail getProductDetail(Long productId) {// 读操作:商品信息、库存、评价等都可以从从库读取Product product = productDAO.selectById(productId);Integer inventory = inventoryDAO.selectByProductId(productId);List<ProductReview> reviews = productReviewDAO.selectByProductId(productId);return assembleProductDetail(product, inventory, reviews);}/*** 下单操作 - 写操作集中*/@Transactionalpublic OrderResult placeOrder(OrderRequest request) {// 所有写操作都在主库执行// 1. 检查库存(读主库,避免超卖)Integer inventory = inventoryDAO.selectByProductIdForUpdate(request.getProductId());if (inventory < request.getQuantity()) {throw new InventoryNotEnoughException("库存不足");}// 2. 扣减库存inventoryDAO.decreaseInventory(request.getProductId(), request.getQuantity());// 3. 创建订单Order order = createOrder(request);orderDAO.insert(order);// 4. 更新销量productDAO.increaseSales(request.getProductId(), request.getQuantity());return new OrderResult(order.getId(), "下单成功");}/*** 商品搜索 - 纯读操作*/public PageResult<Product> searchProducts(ProductQuery query) {// 复杂的搜索查询,完全在从库执行// 可以部署多个从库专门处理搜索请求DataSourceContextHolder.useSlave();try {return productDAO.searchByQuery(query);} finally {DataSourceContextHolder.clearDataSourceType();}}
}
性能对比分析
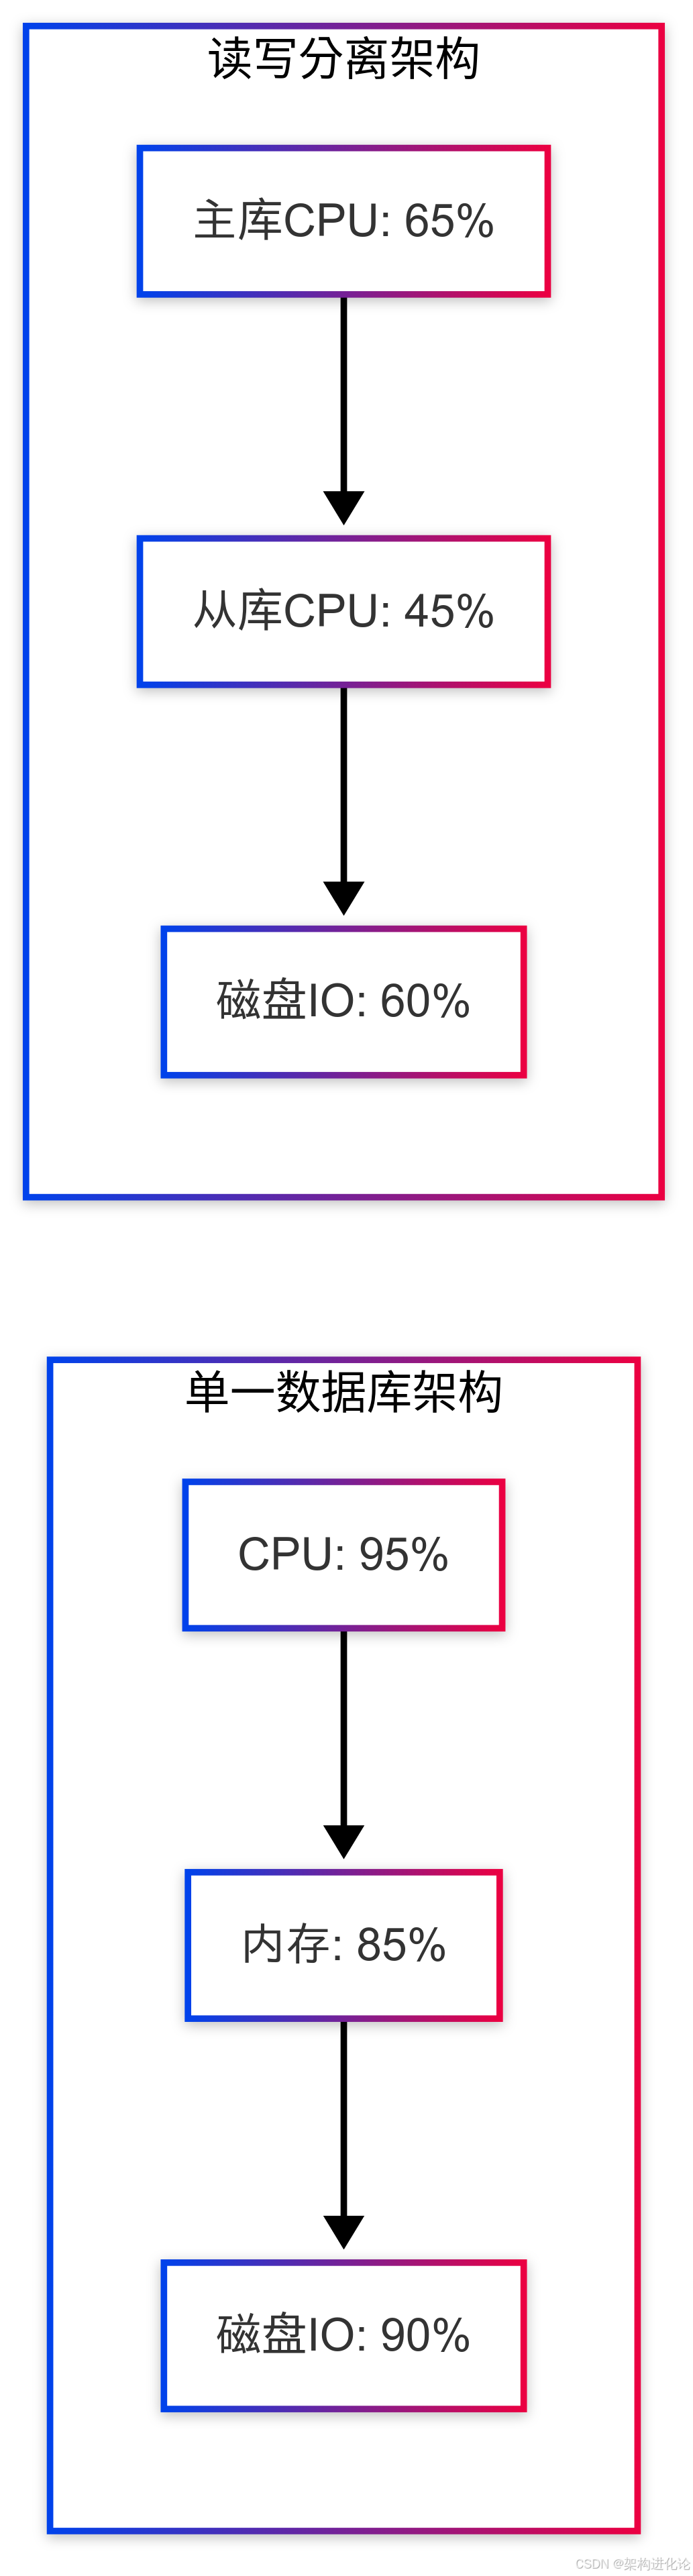
通过实际压力测试,我们可以观察到读写分离带来的性能提升:
测试环境配置:
主数据库:16核CPU,32GB内存,SSD存储
从数据库×3:8核CPU,16GB内存,SSD存储
应用服务器:8核CPU,16GB内存
性能测试结果:
| 场景 | QPS(查询每秒) | TPS(事务每秒) | 平均响应时间 |
|---|---|---|---|
| 单一数据库 | 1,200 | 150 | 85ms |
| 读写分离 | 3,500 | 280 | 32ms |
| 性能提升 | 191% | 87% | 62% |
资源利用率对比:
未来演进与云原生适配
云原生时代的读写分离
随着云原生技术的发展,读写分离架构也在不断演进:
/*** 云原生数据访问层配置*/
@Configuration
public class CloudNativeDataSourceConfig {/*** 基于服务发现的数据源动态配置*/@Bean@RefreshScope // 支持配置动态刷新public DynamicDataSource cloudDynamicDataSource(DiscoveryClient discoveryClient) {Map<Object, Object> targetDataSources = new HashMap<>();// 动态发现数据库实例List<ServiceInstance> masterInstances = discoveryClient.getInstances("database-master");List<ServiceInstance> slaveInstances = discoveryClient.getInstances("database-slave");masterInstances.forEach(instance -> {String dataSourceKey = "master-" + instance.getInstanceId();targetDataSources.put(dataSourceKey, createDataSourceFromInstance(instance));});slaveInstances.forEach(instance -> {String dataSourceKey = "slave-" + instance.getInstanceId();targetDataSources.put(dataSourceKey, createDataSourceFromInstance(instance));});CloudNativeDynamicDataSource dataSource = new CloudNativeDynamicDataSource();dataSource.setTargetDataSources(targetDataSources);dataSource.setDefaultTargetDataSource(targetDataSources.values().iterator().next());return dataSource;}/*** 自适应负载均衡策略*/@Beanpublic AdaptiveLoadBalanceStrategy adaptiveLoadBalanceStrategy() {return new AdaptiveLoadBalanceStrategy();}
}/*** 自适应负载均衡策略* 根据数据库实例的实时指标动态调整路由*/
public class AdaptiveLoadBalanceStrategy implements LoadBalanceStrategy {private final MetricsCollector metricsCollector;@Overridepublic String select(List<String> dataSourceKeys, String originalKey) {if (dataSourceKeys.isEmpty()) {return originalKey;}// 根据实时指标计算权重Map<String, Double> scores = new HashMap<>();for (String dataSourceKey : dataSourceKeys) {double score = calculateDataSourceScore(dataSourceKey);scores.put(dataSourceKey, score);}// 选择分数最高的数据源return scores.entrySet().stream().max(Map.Entry.comparingByValue()).map(Map.Entry::getKey).orElse(dataSourceKeys.get(0));}private double calculateDataSourceScore(String dataSourceKey) {DatabaseMetrics metrics = metricsCollector.getMetrics(dataSourceKey);double score = 100; // 基础分// CPU使用率影响(负向)score -= metrics.getCpuUsage() * 0.5;// 内存使用率影响(负向)score -= metrics.getMemoryUsage() * 0.3;// 连接数影响(负向)score -= metrics.getActiveConnections() * 0.2;// 响应时间影响(负向)score -= Math.min(metrics.getAvgResponseTime() / 10, 20);// 复制延迟影响(负向)if (dataSourceKey.startsWith("slave")) {score -= Math.min(metrics.getReplicationLag() / 100, 30);}return Math.max(score, 10); // 最低10分}
}
智能化与自愈能力
未来的读写分离架构将更加智能化:
/*** 智能数据源管理器*/
@Component
public class IntelligentDataSourceManager {private final DataSourceHealthChecker healthChecker;private final MetricsCollector metricsCollector;private final CircuitBreaker circuitBreaker;/*** 智能路由决策*/public RoutingDecision makeRoutingDecision(RoutingContext context) {RoutingDecision decision = new RoutingDecision();// 1. 基础规则:写操作路由到主库if (context.isWriteOperation()) {decision.setDataSourceType(DataSourceType.MASTER);return decision;}// 2. 一致性要求:强一致性读操作路由到主库if (context.isStrongConsistencyRequired()) {decision.setDataSourceType(DataSourceType.MASTER);return decision;}// 3. 健康状态检查:排除不健康的从库List<String> healthySlaves = healthChecker.getHealthyDataSources(DataSourceType.SLAVE);if (healthySlaves.isEmpty()) {// 所有从库都不健康,降级到主库decision.setDataSourceType(DataSourceType.MASTER);decision.setFallbackReason("NO_HEALTHY_SLAVES");return decision;}// 4. 熔断检查:如果某个从库错误率过高,暂时避开healthySlaves = filterByCircuitBreaker(healthySlaves);// 5. 性能优化:选择性能最好的从库String bestSlave = selectBestSlave(healthySlaves, context);decision.setDataSourceType(DataSourceType.SLAVE);decision.setSelectedDataSource(bestSlave);return decision;}/*** 自适应超时控制*/public Duration determineTimeout(RoutingContext context) {Duration baseTimeout = context.getBaseTimeout();// 根据数据源状态动态调整超时时间if (context.getDataSourceType() == DataSourceType.MASTER) {DatabaseMetrics masterMetrics = metricsCollector.getMetrics("master");if (masterMetrics.getLoadFactor() > 0.8) {// 主库负载高,适当增加超时时间return baseTimeout.plusMillis(500);}}return baseTimeout;}
}
结论:架构的艺术与科学的结合
读写分离数据访问层的设计不仅仅是技术的堆砌,更是架构艺术与工程科学的完美结合。通过本文的详细探讨,我们可以看到:
价值核心:读写分离通过专业分工解决了数据库的性能瓶颈,提升了系统的整体吞吐量。
设计要点:成功的关键在于合理的数据同步、智能的路由决策、完善的故障处理机制。
演进思维:架构需要随着业务发展而演进,从简单的主从分离到复杂的多活架构。
平衡艺术:在一致性、可用性、性能之间找到最佳平衡点是架构师的重要职责。
随着云计算、微服务、人工智能等技术的发展,读写分离架构将继续演进,融入更多的智能化元素,为企业提供更加弹性、可靠、高效的数据访问解决方案。
作为架构师,我们不仅要掌握现有的技术方案,更要具备前瞻性的视野,在业务需求和技术创新之间架起坚实的桥梁,构建能够支撑业务快速发展的稳健架构。读写分离只是这个旅程中的一个重要里程碑,未来的道路依然充满挑战与机遇。