【探寻C++之旅】第十四章:简单实现set和map

请君浏览
- 前言
- 1. 分析源码
- 2.修改红黑树
- 2.1 参数
- 2.2 迭代器
- 2.3 map支持[]
- 2.4 代码实现
- 3. 实现map和set
- 3.1 set
- 3.2 map
- 4. 小结
- 4.1 **深化对数据结构的理解**
- 4.2 **强化 “抽象与复用” 的编程思维**
- 尾声
前言
今天,我们继续踏入追寻C++的冒险历程。上一章我们讲解了红黑树,那么本章我们将通过红黑树去模拟实现一下STL库中的set和map这两类容器,主要的目的是让我们更加的理解红黑树以及set和map的使用原理。下面让我们一起来进入本章的学习。
1. 分析源码
map和set我们在之前已经了解过了,这里不再过多赘述。我们知道map和set在STL库中是由红黑树来实现的,那么我们就自己来使用我们上一章所讲过的红黑树来模拟实现一下“阉割版”的map和set。我们的目的主要是为了加深对红黑树和这些容器的了解,以及提高我们的代码能力。
那么话不多说,接下来让我们先看一下map和set的源码,来分析一下我们该如何开始:
SGI-STL30版本源代码,map和set的源代码在map/set/stl_map.h/stl_set.h/stl_tree.h等⼏个头文件中。
map和set的实现结构框架核⼼部分截取出来如下:
// set
#ifndef __SGI_STL_INTERNAL_TREE_H
#include <stl_tree.h>
#endif
#include <stl_set.h>
#include <stl_multiset.h>// map
#ifndef __SGI_STL_INTERNAL_TREE_H
#include <stl_tree.h>
#endif
#include <stl_map.h>
#include <stl_multimap.h>// stl_set.h
template <class Key, class Compare = less<Key>, class Alloc = alloc>
class set {public:// typedefs:typedef Key key_type;typedef Key value_type;private:typedef rb_tree<key_type, value_type,identity<value_type>, key_compare, Alloc> rep_type;rep_type t; // red-black tree representing set};
// stl_map.h
template <class Key, class T, class Compare = less<Key>, class Alloc = alloc>
class map {public:// typedefs:typedef Key key_type;typedef T mapped_type;typedef pair<const Key, T> value_type;private:typedef rb_tree<key_type, value_type,select1st<value_type>, key_compare, Alloc> rep_type;rep_type t; // red-black tree representing map};
// stl_tree.h
struct __rb_tree_node_base
{typedef __rb_tree_color_type color_type;typedef __rb_tree_node_base* base_ptr;color_type color;base_ptr parent;base_ptr left;base_ptr right;
};
// stl_tree.h
template <class Key, class Value, class KeyOfValue, class Compare, class Alloc= alloc>
class rb_tree {protected:typedef void* void_pointer;typedef __rb_tree_node_base* base_ptr;typedef __rb_tree_node<Value> rb_tree_node;typedef rb_tree_node* link_type;typedef Key key_type;typedef Value value_type;public:// insert⽤的是第⼆个模板参数左形参pair<iterator,bool> insert_unique(const value_type& x);// erase和find⽤第⼀个模板参数做形参size_type erase(const key_type& x);iterator find(const key_type& x);protected:size_type node_count; // keeps track of size of treelink_type header;};
template <class Value>
struct __rb_tree_node : public __rb_tree_node_base
{typedef __rb_tree_node<Value>* link_type;Value value_field;
};
通过对源码的分析,我们发现源码中的rb_tree用了一个巧妙的泛型思想实现,它与我们上一章中红黑树写死的key_value搜索场景不同,源码中的rb_tree的搜索场景是key还是key_value并不是写死的,而是根据第二个模板参数Value决定_rb_tree_node中存储的数据类型。 这样我们就可以通过一棵红黑树去实例化出两棵不同的树作为我们set和map的底层。
- set实例化
rb_tree时第⼆个模板参数给的是key,map实例化rb_tree时第⼆个模板参数给的是pair<const key, T>,这样⼀颗红⿊树既可以实现key搜索场景的set,也可以实现key/value搜索场景的map。
要注意⼀下,源码⾥⾯模板参数是⽤T代表value,⽽内部写的value_type不是我们我们⽇常key/value场景中说的value,源码中的value_type反⽽是红⿊树结点中存储的真实的数据的类型。
那么rb_tree第⼆个模板参数Value已经控制了红⿊树结点中存储的数据类型,为什么还要传第⼀个模板参数Key呢?尤其是set,两个模板参数是⼀样的。要注意的是对于map和set,find/erase时的函数参数都是Key,所以第⼀个模板参数是传给find/erase等函数做形参的类型的。对于set⽽⾔两个参数是⼀样的,但是对于map⽽⾔就完全不⼀样了,map insert的是pair对象,但是find和ease的是Key对象。
2.修改红黑树
2.1 参数
既然我们实现set和map时是使用同一棵红黑树,那么我们就需要对上一章所写的红黑树进行一下更改,因为我们上一章的红黑树只能支持单一的搜索场景,并不能满足我们的需求。
我们这⾥相⽐源码调整⼀下,key参数就⽤K,value参数就⽤V,红⿊树中的数据类型,我们使⽤T。
其次因为RBTree实现了泛型不知道T参数到底是K,还是pair<K, V>,那么insert内部进⾏插⼊逻辑⽐较时,就没办法进⾏⽐较,因为pair的默认⽀持的是key和value⼀起参与⽐较,我们需要是的任何时候只⽐较key,所以我们在map和set层分别实现⼀个MapKeyOfT和SetKeyOfT的仿函数传给RBTree的KeyOfT,然后RBTree中通过KeyOfT仿函数取出T类型对象中的key,再进⾏⽐较,也就是说我们把红黑树中需要对key进行比较的部分通过仿函数把key取出来:
-
对set而言,
SetKeyOfT直接返回keystruct SetKeyOfT {const K& operator()(const K& key){return key;} }; -
对map而言,
MapKeyOfT直接返回pair<key, value>中的keystruct MapKeyOfT {const K& operator()(const pair<K, V>& kv){return kv.first;} };
那么如上所述,我们的红黑树的参数类型就变为:
template<class K, class T, class KeyOfT>
class RBTree
{//...
};
我们只需要将代码中对应的地方进行修改即可。
2.2 迭代器
set和map的迭代器都是双向迭代器,同时他们的迭代器实际上也是通过封装底层红黑树的迭代器来实现的,那么接下来让我们来实现一下红黑树的迭代器。
红黑树的iterator实现的⼤框架跟list的iterator思路是⼀致的,⽤⼀个类型封装结点的指针,再通过重载运算符实现,使迭代器具有像指针⼀样访问的⾏为。
这⾥的最重要的是operator++和operator--的实现。上一章我们分析了map和set的迭代器⾛的是中序遍历(左⼦树->根结点->右⼦树),那么begin()会返回中序第⼀个结点的iterator也就是最左结点的迭代器。
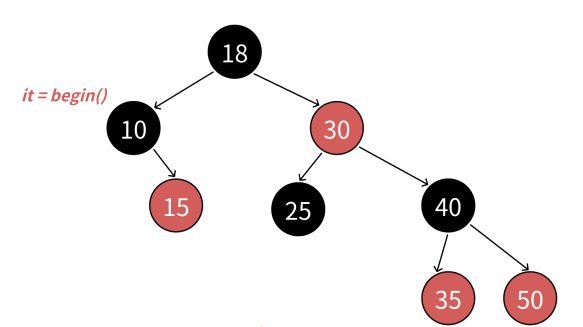
迭代器++/–的核⼼逻辑就是不看全局,只看局部,只考虑当前中序局部要访问的下⼀个结点。
- 迭代器++时,如果
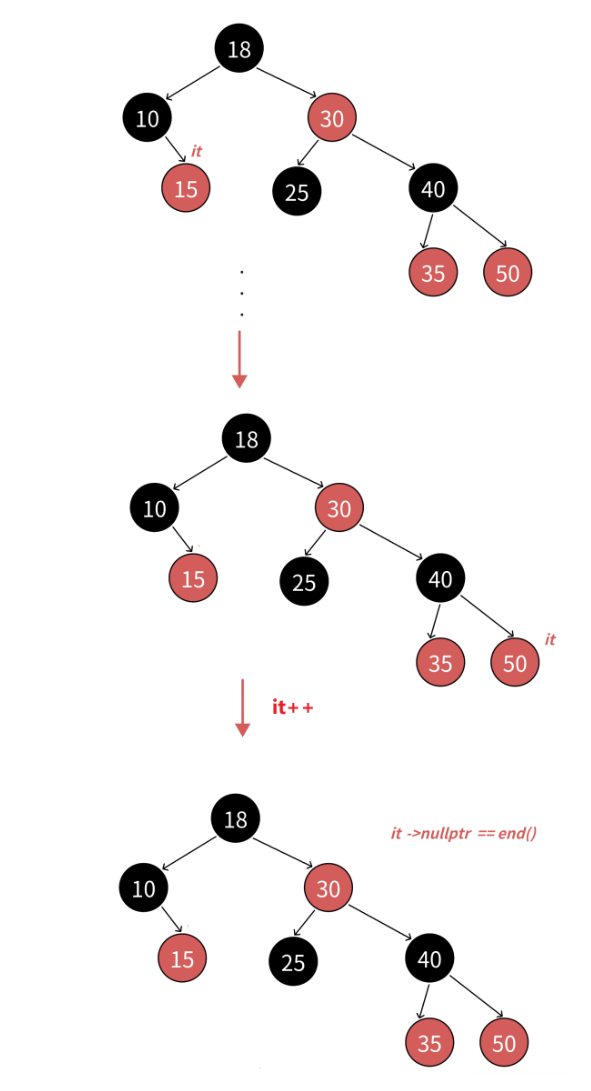
it指向的结点的右⼦树不为空,代表当前结点已经访问完了,要访问下⼀个结点是右⼦树的中序第⼀个,⼀棵树中序第⼀个是最左结点,所以直接找右⼦树的最左结点即可。 - 迭代器++时,如果
it指向的结点的右⼦树为空,代表当前结点已经访问完了且当前结点所在的⼦树也访问完了,要访问的下⼀个结点在当前结点的祖先⾥⾯,所以要沿着当前结点到根的祖先路径向上找。如果当前结点是⽗亲的左,根据中序左⼦树->根结点->右⼦树,那么下⼀个访问的结点就是当前结点的⽗亲;如果当前结点是⽗亲的右,根据中序左⼦树->根结点->右⼦树,当前当前结点所在的⼦树访问完了,当前结点所在⽗亲的⼦树也访问完了,那么下⼀个访问的需要继续往根的祖先中去找,直到找到孩⼦是⽗亲左的那个祖先就是中序要问题的下⼀个结点。
那么end()如何表⽰呢?如果没有找到孩⼦是⽗亲左的那个祖先,这时⽗亲为空了,也就是根节点的父亲,那我们就把it中的结点指针置为nullptr,我们⽤nullptr去充当end()。
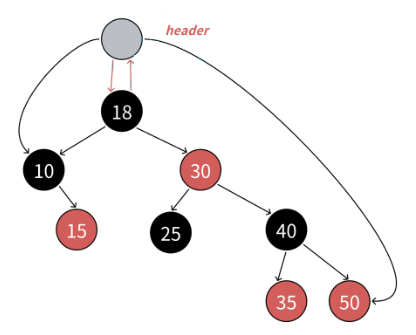
需要注意的是在stl源码中,红⿊树增加了⼀个哨兵位头结点做为end(),哨兵位头结点和根互为⽗亲,左指向最左结点,右指向最右结点。相⽐我们⽤nullptr作为end(),差别不⼤,它能实现的,我们也能实现。只是在--end()判断到结点为空时,需要特殊处理⼀下,让迭代器结点指向最右结点。而有哨兵位则不需要特殊处理,不过当我们每次增加或者删除结点时,哨兵位的左右结点都要需要更新,进行维护,所以会有更大的开销。
迭代器–的实现跟++的思路完全类似,逻辑正好反过来即可,因为他访问顺序是右⼦树->根结点->左⼦树,具体参考下⾯代码实现。
- set的
iterator不⽀持修改,我们把set的第⼆个模板参数改成const K即可RBTree<K,const K, SetKeyOfT> _t - map的
iterator不⽀持修改key但是可以修改value,我们把map的第⼆个模板参数pair的第⼀个参数改成const K即可RBTree<K, pair<const K, V>, MapKeyOfT> _t
至于迭代器中剩下的操作都比较简单,这里不再赘述,下面大家可以直接看代码。
2.3 map支持[]
map要⽀持[]主要需要修改insert返回值⽀持,修改RBtree中的insert返回值为pair<Iterator, bool> Insert(const T& data)
具体原理可以看set和map
2.4 代码实现
下面是修改后的红黑树的代码实现:
#pragma once#include<iostream>
using namespace std;enum Colour
{RED,BLACK
};template<class T>
struct RBTreeNode
{T _data;RBTreeNode<T>* _left;RBTreeNode<T>* _right;RBTreeNode<T>* _parent;Colour _col;RBTreeNode(const T& data): _data(data), _left(nullptr), _right(nullptr), _parent(nullptr){}
};//迭代器
template<class T, class Ref, class Ptr>
struct RBTreeIterator
{typedef RBTreeNode<T> Node;typedef RBTreeIterator<T, Ref, Ptr> Self;Node* _node;Node* _root;RBTreeIterator(Node* node, Node* root):_node(node),_root(root){}Ref operator*(){return _node->_data;}Ptr operator->(){return &_node->_data;}Self& operator++(){if (_node->_right){Node* minleft = _node->_right;while (minleft->_left){minleft = minleft->_left;}_node = minleft;}else{Node* cur = _node;Node* parent = cur->_parent;while (parent && cur == parent->_right){cur = parent;parent = parent->_parent;}_node = parent;}return *this;}Self& operator--(){if (_node == nullptr){Node* minright = _root;while (minright && minright->_right){minright = minright->_right;}_node = minright;}else if (_node->_left){Node* minright = _node->_left;while (minright->_right){minright = minright->_right;}_node = minright;}else{Node* cur = _node;Node* parent = cur->_parent;while (parent && cur == parent->_left){cur = parent;parent = parent->_parent;}_node = parent;}return *this;}bool operator!=(const Self& s){return _node != s._node;}bool operator==(const Self& s){return _node != s._node;}
};template<class K, class T, class KeyOfT>
class RBTree
{typedef RBTreeNode<T> Node;
public:typedef RBTreeIterator<T, T&, T*> Iterator;typedef RBTreeIterator<T, const T&, const T*> Const_Iterator;Iterator begin(){Node* cur = _root;while (cur && cur->_left){cur = cur->_left;}return Iterator(cur, _root);}Iterator end(){return Iterator(nullptr, _root); }Const_Iterator begin() const{Node* cur = _root;while (cur && cur->_left){cur = cur->_left;}return Iterator(cur, _root);}Const_Iterator end() const{return Iterator(nullptr, _root);}pair<Iterator, bool> Insert(const T& data){if (_root == nullptr){_root = new Node(data);_root->_col = BLACK;return { Iterator(_root, _root), true };}KeyOfT kot;Node* cur = _root;Node* parent = nullptr;while (cur){if (kot(cur->_data) < kot(data)){parent = cur;cur = parent->_right;}else if (kot(cur->_data) > kot(data)){parent = cur;cur = parent->_left;}else{return {Iterator(cur, _root), false};}}cur = new Node(data);Node* newnode = cur;// 新增结点。颜⾊给红⾊cur->_col = RED;if (kot(parent->_data) > kot(data)){parent->_left = cur;}else{parent->_right = cur;}cur->_parent = parent;while (parent && parent->_col == RED){Node* grandfather = parent->_parent;if (parent == grandfather->_left){Node* uncle = grandfather->_right;if (uncle && uncle->_col == RED){parent->_col = BLACK;uncle->_col = BLACK;grandfather->_col = RED;cur = grandfather;parent = cur->_parent;}else{//       g//    p     u// cif (cur == parent->_left){RotateR(grandfather);parent->_col = BLACK;grandfather->_col = RED;}//       g//    p     u//      celse{RotateL(parent);RotateR(grandfather);cur->_col = BLACK;grandfather->_col = RED;}break;}}else{Node* uncle = grandfather->_left;if (uncle && uncle->_col == RED){parent->_col = BLACK;uncle->_col = BLACK;grandfather->_col = RED;cur = grandfather;parent = cur->_parent;}else{//       g//    u     p//             cif (cur == parent->_right){RotateL(grandfather);parent->_col = BLACK;grandfather->_col = RED;}//       g//    u     p//        celse{RotateR(parent);RotateL(grandfather);cur->_col = BLACK;grandfather->_col = RED;}break;}}}_root->_col = BLACK;return { Iterator(newnode, _root), true };}Iterator Find(const K& key){Node* cur = _root;while (cur){if (cur->_kv.first < key){cur = cur->_right;}else if (cur->_kv.first > key){cur = cur->_left;}else{return Iterator(cur, _root);}}return end();}bool IsBalance(){if (_root == nullptr)return true;if (_root->_col == RED)return false;// 参考值int refNum = 0;Node* cur = _root;while (cur){if (cur->_col == BLACK){++refNum;}cur = cur->_left;}return Check(_root, 0, refNum);}
private:bool Check(Node* root, int blackNum, const int refNum){if (root == nullptr){// 前序遍历⾛到空时,意味着⼀条路径⾛完了//cout << blackNum << endl;if (refNum != blackNum){cout << "存在黑色结点的数量不相等的路径" << endl;return false;}return true;}// 检查孩⼦不太⽅便,因为孩⼦有两个,且不⼀定存在,反过来检查⽗亲就⽅便多了if (root->_col == RED && root->_parent->_col == RED){cout << root->_kv.first << "存在连续的红色结点" << endl;return false;}if (root->_col == BLACK){blackNum++;}return Check(root->_left, blackNum, refNum)&& Check(root->_right, blackNum, refNum);}void RotateR(Node* parent){Node* subL = parent->_left;Node* subLR = subL->_right;//当旋转的为子树时方便旋转进行链接Node* Pparent = parent->_parent;parent->_left = subLR;//subLR也有可能是一个空树if (subLR)subLR->_parent = parent;subL->_right = parent;parent->_parent = subL;// parent有可能是整棵树的根,也可能是局部的⼦树// 如果是整棵树的根,要修改_root// 如果是局部的指针要跟上⼀层链接if (parent == _root){_root = subL;subL->_parent = nullptr;}else{if (parent = Pparent->_left){Pparent->_left = subL;}else{Pparent->_right = subL;}subL->_parent = Pparent;}}void RotateL(Node* parent){Node* subR = parent->_right;Node* subRL = subR->_left;//当旋转的为子树时方便旋转进行链接Node* Pparent = parent->_parent;parent->_right = subRL;//subRL也有可能是一个空树if (subRL)subRL->_parent = parent;subR->_left = parent;parent->_parent = subR;// parent有可能是整棵树的根,也可能是局部的⼦树// 如果是整棵树的根,要修改_root// 如果是局部的指针要跟上⼀层链接if (parent == _root){_root = subR;subR->_parent = nullptr;}else{if (parent = Pparent->_left){Pparent->_left = subR;}else{Pparent->_right = subR;}subR->_parent = Pparent;}}Node* _root = nullptr;
};
3. 实现map和set
其实当我们修改完红黑树后,实现map和set就非常简单了,我们只需要复用红黑树即可。
3.1 set
代码如下:
#pragma once#include"RBTree.h"namespace hcy
{template<class K>class set{struct SetKeyOfT{const K& operator()(const K& key){return key;}}; public:typedef typename RBTree<K, const K, SetKeyOfT>::Iterator iterator;typedef typename RBTree<K, const K, SetKeyOfT>::Const_Iterator const_iterator;iterator begin(){return _rbtree.begin();}iterator end(){return _rbtree.end();}const_iterator begin() const{return _rbtree.begin();}const_iterator end() const{return _rbtree.end();}pair<iterator, bool> insert(const K& key){return _rbtree.Insert(key);}iterator find(const K& key){return _rbtree.Find(key);}private:RBTree<K, const K, SetKeyOfT> _rbtree;};
}
3.2 map
代码如下:
#pragma once#include"RBTree.h"namespace hcy
{template<class K, class V>class map{struct MapKeyOfT{const K& operator()(const pair<K, V>& kv){return kv.first;}};public:typedef typename RBTree<K, pair<const K, V>, MapKeyOfT>::Iterator iterator;typedef typename RBTree<K, pair<const K, V>, MapKeyOfT>::Const_Iterator const_iterator;iterator begin(){return _rbtree.begin();}iterator end(){return _rbtree.end();}const_iterator begin() const{return _rbtree.begin();}const_iterator end() const{return _rbtree.end();}pair<iterator, bool> insert(const pair<K, V>& kv){return _rbtree.Insert(kv);}V& operator[](const K& key){pair<iterator, bool> ret = _rbtree.Insert({ key, V() });return ret.first->second;}iterator find(const K& key){return _rbtree.Find(key);}private:RBTree<K, pair<const K, V>, MapKeyOfT> _rbtree;};
}
4. 小结
我们通过自己实现红黑树并且复用它来构建简单的map和set可以帮助我们:
4.1 深化对数据结构的理解
红黑树是一种复杂的自平衡二叉搜索树,其核心在于通过颜色规则(红 / 黑)和旋转操作维持平衡性,保证插入、删除、查找的时间复杂度稳定在 O (log n)。我们在实现红黑树的过程中,能深入理解:
- 平衡树的设计思想(如何通过规则避免二叉树退化为链表);
- 旋转操作(左旋、右旋)的具体逻辑和触发场景;
- 颜色调整的规则(如 “红节点的子节点必须为黑节点”“根节点为黑节点” 等)。
而复用红黑树实现 map 和 set 时,能进一步理解这两种容器的底层原理:
- set 本质是 “键即值” 的特殊结构,依赖红黑树的键唯一性;
- map 是 “键值对” 结构,需在红黑树节点中存储键和值,并基于键进行排序和查找。
4.2 强化 “抽象与复用” 的编程思维
红黑树是 map 和 set 的 “底层引擎”—— 两者都依赖红黑树的排序和查找能力,仅在节点存储的数据(set 存键,map 存键值对)和接口设计上有差异。通过复用红黑树实现这两种容器,能直观体会 “抽象复用” 的思想:
- 将红黑树的核心逻辑(平衡维护、节点操作)抽象为独立组件;
- 基于该组件通过 “适配层”(如 map 的键值对封装、set 的去重逻辑)实现不同容器,减少代码冗余。
尾声
若有纰漏或不足之处欢迎大家在评论区留言或者私信,同时也欢迎各位一起探讨学习。感谢您的观看!