Redis集群实验
在分布式系统高速发展的今天,Redis作为高性能的内存数据库,已成为互联网应用中缓存、会话存储、排行榜等场景的“标配”。但随着业务规模的增长,单个Redis实例逐渐暴露出单点故障风险高、存储容量受限、读写压力集中等问题——当主节点宕机时服务不可用,数据量超过单机内存上限时无法扩展,读请求远大于写请求时单节点性能成为瓶颈……如何让Redis既保持高性能,又具备高可用性和可扩展性?这正是Redis群集模式要解决的核心问题。
Redis官方提供了三种主流的群集模式,它们如同技术演进路上的三座里程碑:主从同步/复制是基础,通过数据冗余解决单点故障下的数据恢复问题;哨兵模式是进阶,在主从基础上引入自动故障检测与切换能力,实现“故障自愈”;Cluster模式则是终极方案,通过数据分片+多主多从架构,同时解决高可用、高并发和海量数据存储的需求。
一、主从复制(包括安装)
1.1 redis安装
①关闭防火墙
[root@slave2 utils]# systemctl stop firewalld
[root@slave2 utils]# systemctl stop iptables
[root@slave2 utils]# setenforce 0
setenforce: SELinux is disabled②下载和解压
cd /opt/   #拖动压缩包进去
tar zxvf redis-5.0.7.tar.gz -C /opt/  cd /opt/redis-5.0.7/
yum install -y gcc gcc-c++ makecd /opt/redis-5.0.7/
make && make PREFIX=/usr/local/redis installcd /opt/redis-5.0.7/utils
./install_server.sh
......					#一直回车   ctrl+backspace可删除写错的
(Please select the redis executable path [] /usr/local/redis/bin/redis-server  	#需要手动修改为 /usr/local/redis/bin/redis-server ,注意要一次性正确输入)
------------------------------------------------------------------------------------------
# Selected config:
Port           : 6379								#默认侦听端口为6379
Config file    : /etc/redis/6379.conf				#配置文件路径
Log file       : /var/log/redis_6379.log			#日志文件路径
Data dir       : /var/lib/redis/6379				#数据文件路径
Executable     : /usr/local/redis/bin/redis-server	#可执行文件路径
Cli Executable : /usr/local/bin/redis-cli			#客户端命令工具------------------------------------------------------------------------------------------
③创建软连接
ln -s /usr/local/redis/bin/* /usr/local/bin/  #   netstat -natp | grep redis   可查看进程,现在还没有进程④修改配置文件 /etc/redis/6379.conf 的参数
vim /etc/redis/6379.confbind 127.0.0.1 192.168.10.23				#70行,添加 监听的主机地址
port 6379									#93行,Redis默认的监听端口
daemonize yes								#137行,启用守护进程
pidfile /var/run/redis_6379.pid				#159行,指定 PID 文件
loglevel notice								#167行,日志级别
logfile /var/log/redis_6379.log				#172行,指定日志文件⑤重启
/etc/init.d/redis_6379 restart#   netstat -natp | grep redis   可查看进程,现在有进程和进程号
1.2 主从复制
①修改 Redis 配置文件(Master节点操作)
-----------------------------------------------
vim /etc/redis/6379.confbind 0.0.0.0						#70行,修改监听地址为0.0.0.0
daemonize yes						#137行,开启守护进程
logfile /var/log/redis_6379.log		#172行,指定日志文件目录
dir /var/lib/redis/6379				#264行,指定工作目录
appendonly yes						#700行,开启AOF持久化功能重启:   /etc/init.d/redis_6379 restart②修改 Redis 配置文件(Slave节点操作)
-----------------------------------------------------
vim /etc/redis/6379.confbind 0.0.0.0						#70行,修改监听地址为0.0.0.0
daemonize yes						#137行,开启守护进程
logfile /var/log/redis_6379.log		#172行,指定日志文件目录
dir /var/lib/redis/6379				#264行,指定工作目录   #288行,指定要同步的Master节点IP和端口
replicaof 192.168.10.77 6379
appendonly yes						#700行,开启AOF持久化功能/etc/init.d/redis_6379 restart③验证主从效果
--------------------------------
在Master节点上看日志:
tail -f /var/log/redis_6379.log
Replica 192.168.10.99:6379 asks for synchronization
Replica 192.168.10.112:6379 asks for synchronization在Master节点上验证从节点:
redis-cli info replication# Replication
role:master
connected_slaves:2
slave0:ip=192.168.10.99,port=6379,state=online,offset=154,lag=1
slave1:ip=192.168.10.112,port=6379,state=online,offset=154,lag=1

操作验证:

二、哨兵模式
2.1 搭建哨兵模式
1、搭建Redis 哨兵模式
Master节点:192.168.10.77
Slave1节点:192.168.10.99
Slave2节点:192.168.10.112关防火墙:
systemctl stop firewalld
setenforce 02、修改 Redis 哨兵模式的配置文件(所有节点操作)vim /opt/redis-5.0.7/sentinel.conf
-------------------------------------------------------------------------------
protected-mode no #17行,关闭保护模式
port 26379 #21行,Redis哨兵默认的监听端口
daemonize yes #26行,指定sentinel为后台启动
logfile "/var/log/sentinel.log" #36行,指定日志存放路径
dir "/var/lib/redis/6379" #65行,指定数据库存放路径
sentinel monitor mymaster 192.168.10.77 6379 2 #84行,修改 指定该哨兵节点监控# 192.168.10.77:6379这个主节点,该主节点的名称是mymaster,最后的2的含义与主节点的故障判定有关:至少需要2个哨兵节点同意,才能判定主节点故障并进行故障转移sentinel down-after-milliseconds mymaster 30000 #113行,判定服务器down掉的时间周期,默认30000毫秒(30秒)sentinel failover-timeout mymaster 180000 #146行,故障节点的最大超时时间为180000(180秒)3、启动哨兵模式
先启master,再启slave
cd /opt/redis-5.0.7/
redis-sentinel sentinel.conf &3、查看哨兵信息
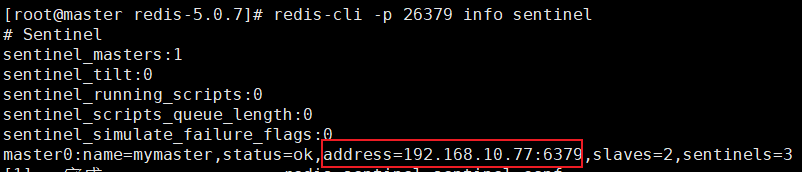
redis-cli -p 26379 info sentinel可以看到master是192.168.10.77,有两个slave:
2.2 模拟故障
# 故障模拟:ps -ef |grep redisroot      30003      1  0 20:24 ?        00:00:12 /usr/local/redis/bin/redis-server 0.0.0.0:6379
root      30427      1  1 20:57 ?        00:00:05 redis-sentinel *:26379 [sentinel]
root      30563  30520  0 21:05 pts/2    00:00:00 grep --color=auto redis# 杀死 Master 节点上redis-server的进程号:
[root@master ~]# kill -9 30003
[root@master ~]# ps -ef |grep redis
root      30427      1  1 20:57 ?        00:00:07 redis-sentinel *:26379 [sentinel]
root      30590  30520  0 21:07 pts/2    00:00:00 grep --color=auto redis# 追踪日志:
[root@master ~]# tail -f /var/log/sentinel.log
30426:X 19 Sep 2025 20:57:09.731 # Configuration loaded
30427:X 19 Sep 2025 20:57:09.734 * Increased maximum number of open files to 10032 (it was originally set to 1024).
30427:X 19 Sep 2025 20:57:09.735 * Running mode=sentinel, port=26379.
30427:X 19 Sep 2025 20:57:09.735 # WARNING: The TCP backlog setting of 511 cannot be enforced because /proc/sys/net/core/somaxconn is set to the lower value of 128.
30427:X 19 Sep 2025 20:57:09.737 # Sentinel ID is 70d5333ea24fa5a8ddfe7ed3305a10768b76ea01
30427:X 19 Sep 2025 20:57:09.737 # +monitor master mymaster 192.168.10.77 6379 quorum 2
30427:X 19 Sep 2025 20:57:09.738 * +slave slave 192.168.10.99:6379 192.168.10.99 6379 @ mymaster 192.168.10.77 6379
30427:X 19 Sep 2025 20:57:09.739 * +slave slave 192.168.10.112:6379 192.168.10.112 6379 @ mymaster 192.168.10.77 6379
30427:X 19 Sep 2025 20:57:55.070 * +sentinel sentinel 20b10539c23e680c3abb866e40fda878bb6c0195 192.168.10.112 26379 @ mymaster 192.168.10.77 6379
30427:X 19 Sep 2025 20:57:55.075 * +sentinel sentinel 98334164c5d251e3016ea264b9eb187eb5fddd1f 192.168.10.99 26379 @ mymaster 192.168.10.77 6379
30427:X 19 Sep 2025 21:08:14.933 # +sdown master mymaster 192.168.10.77 6379
30427:X 19 Sep 2025 21:08:15.034 # +new-epoch 1
30427:X 19 Sep 2025 21:08:15.037 # +vote-for-leader 98334164c5d251e3016ea264b9eb187eb5fddd1f 1
30427:X 19 Sep 2025 21:08:15.362 # +config-update-from sentinel 98334164c5d251e3016ea264b9eb187eb5fddd1f 192.168.10.99 26379 @ mymaster 192.168.10.77 6379
30427:X 19 Sep 2025 21:08:15.363 # +switch-master mymaster 192.168.10.77 6379 192.168.10.99 6379
30427:X 19 Sep 2025 21:08:15.364 * +slave slave 192.168.10.112:6379 192.168.10.112 6379 @ mymaster 192.168.10.99 6379
30427:X 19 Sep 2025 21:08:15.364 * +slave slave 192.168.10.77:6379 192.168.10.77 6379 @ mymaster 192.168.10.99 6379
30427:X 19 Sep 2025 21:08:45.416 # +sdown slave 192.168.10.77:6379 192.168.10.77 6379 @ mymaster 192.168.10.99 6379
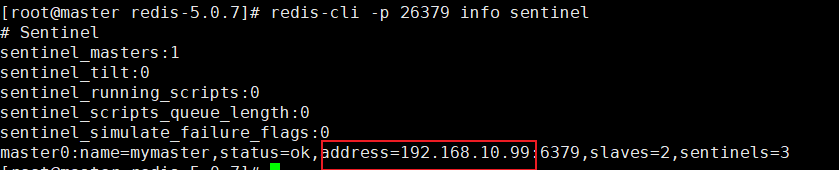
从投票选出:

此时slave192.168.10.99变为master192.68.10.99(主从切换成功):
三、搭建redis群集
1、搭建Redis 群集模式 ----------------------------------------
redis的集群一般需要6个节点,3主3从。方便起见,这里所有节点在同一台服务器上模拟:
以端口号进行区分:3个主节点端口号:6001/6002/6003,对应的从节点端口号:6005/6006/6004。cd /etc/redis/
mkdir -p redis-cluster/redis600{1..6}for i in {1..6}
do
cp /opt/redis-5.0.7/redis.conf /etc/redis/redis-cluster/redis600$i
cp /opt/redis-5.0.7/src/redis-cli /opt/redis-5.0.7/src/redis-server /etc/redis/redis-cluster/redis600$i
done2、#开启群集功能:
#其他5个文件夹的配置文件以此类推修改,注意6个端口都要不一样。
cd /etc/redis/redis-cluster/redis6001
vim redis.conf#bind 127.0.0.1 #69行,注释掉bind 项,默认监听所有网卡
protected-mode no #88行,修改,关闭保护模式
port 6001 #92行,修改,redis监听端口,
daemonize yes #136行,开启守护进程,以独立进程启动
cluster-enabled yes #832行,取消注释,开启群集功能
cluster-config-file nodes-6001.conf #840行,取消注释,群集名称文件设置
cluster-node-timeout 15000 #846行,取消注释群集超时时间设置
appendonly yes #700行,修改,开启AOF持久化3、#启动redis节点
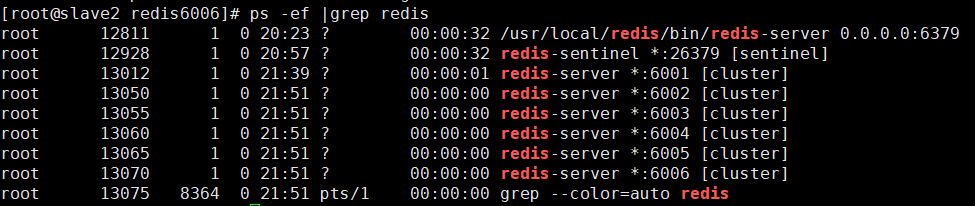
分别进入那六个文件夹,执行命令:redis-server redis.conf ,来启动redis节点
cd /etc/redis/redis-cluster/redis6001#6001~6006每个都要修改(92行、840行)for d in {1..6}
do
cd /etc/redis/redis-cluster/redis600$d
redis-server redis.conf
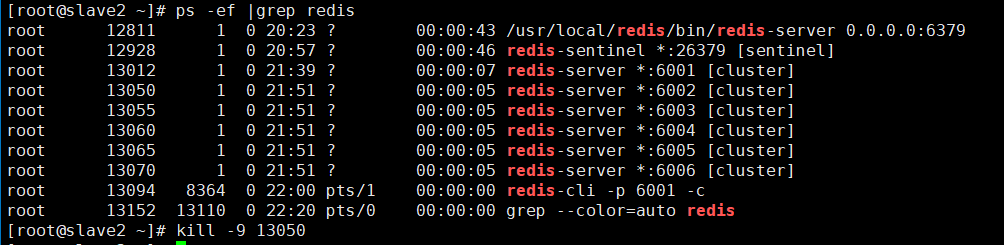
doneps -ef | grep redis4、#启动集群
redis-cli --cluster create 127.0.0.1:6001 127.0.0.1:6002 127.0.0.1:6003 127.0.0.1:6004 127.0.0.1:6005 127.0.0.1:6006 --cluster-replicas 1#六个实例分为三组,每组一主一从,前面的做主节点,后面的做从节点。下面交互的时候 需要输入 yes 才可以创建。
--replicas 1 表示每个主节点有1个从节点。[root@slave2 ~]# redis-cli --cluster create 127.0.0.1:6001 127.0.0.1:6002 127.0.0.1:6003 127.0.0.1:6004 127.0.0.1:6005 127.0.0.1:6006 --cluster-replicas 1
>>> Performing hash slots allocation on 6 nodes...
Master[0] -> Slots 0 - 5460
Master[1] -> Slots 5461 - 10922
Master[2] -> Slots 10923 - 16383
Adding replica 127.0.0.1:6005 to 127.0.0.1:6001
Adding replica 127.0.0.1:6006 to 127.0.0.1:6002
Adding replica 127.0.0.1:6004 to 127.0.0.1:6003
>>> Trying to optimize slaves allocation for anti-affinity
[WARNING] Some slaves are in the same host as their master
M: 589278251a5141fdf378a9b5d372d92bc3799107 127.0.0.1:6001slots:[0-5460] (5461 slots) master
M: 9e15eba9736ffc6e2c47c062d8870d0d409fda25 127.0.0.1:6002slots:[5461-10922] (5462 slots) master
M: b8e8368b0275da94b1e66c1ff804a64700311e06 127.0.0.1:6003slots:[10923-16383] (5461 slots) master
S: 42dbf79a1e3c9e7993f96c6e6995a01e2d00e782 127.0.0.1:6004replicates b8e8368b0275da94b1e66c1ff804a64700311e06
S: 1c39a7b3a46e2423b6d84db60c64a2e89fb6cdda 127.0.0.1:6005replicates 589278251a5141fdf378a9b5d372d92bc3799107
S: 832af6808d5c0b35d53a2d412f2fe8f3087df44a 127.0.0.1:6006replicates 9e15eba9736ffc6e2c47c062d8870d0d409fda25
Can I set the above configuration? (type 'yes' to accept): yes
>>> Nodes configuration updated
>>> Assign a different config epoch to each node
>>> Sending CLUSTER MEET messages to join the cluster
Waiting for the cluster to join
.....
>>> Performing Cluster Check (using node 127.0.0.1:6001)
M: 589278251a5141fdf378a9b5d372d92bc3799107 127.0.0.1:6001slots:[0-5460] (5461 slots) master1 additional replica(s)
S: 1c39a7b3a46e2423b6d84db60c64a2e89fb6cdda 127.0.0.1:6005slots: (0 slots) slavereplicates 589278251a5141fdf378a9b5d372d92bc3799107
S: 832af6808d5c0b35d53a2d412f2fe8f3087df44a 127.0.0.1:6006slots: (0 slots) slavereplicates 9e15eba9736ffc6e2c47c062d8870d0d409fda25
M: 9e15eba9736ffc6e2c47c062d8870d0d409fda25 127.0.0.1:6002slots:[5461-10922] (5462 slots) master1 additional replica(s)
M: b8e8368b0275da94b1e66c1ff804a64700311e06 127.0.0.1:6003slots:[10923-16383] (5461 slots) master1 additional replica(s)
S: 42dbf79a1e3c9e7993f96c6e6995a01e2d00e782 127.0.0.1:6004slots: (0 slots) slavereplicates b8e8368b0275da94b1e66c1ff804a64700311e06
[OK] All nodes agree about slots configuration.
>>> Check for open slots...
>>> Check slots coverage...
[OK] All 16384 slots covered.5、#测试群集
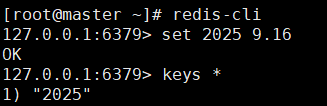
redis-cli -p 6001 -c #加-c参数,节点之间就可以互相跳转# set不同的键值对,根据键在不同的哈希槽,会调到对应的节点
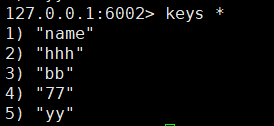
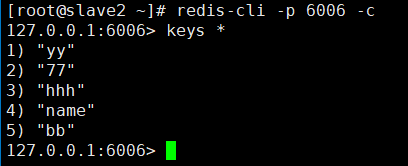
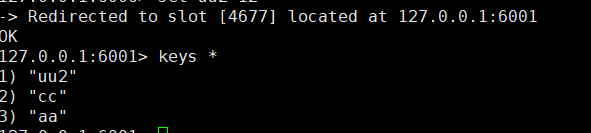
通过主从复制、哨兵模式到集群模式的实践验证,我们清晰看到Redis高可用架构的演进路径:主从解决基础冗余,哨兵实现故障自愈,集群兼顾扩展与容灾。三者层层递进,为不同业务场景提供了灵活可靠的选择,助力系统稳定应对高并发挑战。