项目:仿muduo库的高并发服务器
一.项目简介
该项目是仿制muduo服务器,实现其主要功能,并遵循高并发的特点。
Muduo采用epoll+pthread实现,为用户提供搭建服务器的工具。其中TcpServer供服务端使用,TcpClient供客户端使用。本项目重点是仿制其服务端搭建工具TcpServer,客户端搭建简单不做重点。
本项目采用One Thread One Loop主从Reactor模式搭建。
One Thread One Loop:所有的操作都放到一个线程中完成,同一个线程循环进行事件处理。
主从Reactor模式:主Reactor负责处理新连接请求事件,获取新连接后分发给子Reactor进行监控。当出现监控事件后,子Reactor接收数据并交由Worker线程池进行处理。Worker线程池分配独立线程进行具体的业务处理,业务处理完毕后再交由子Reactor进行事件响应。
需要注意的是,因为并不确定组件使⽤者的使⽤意向,因此本项目并不提供业务层⼯作线程池的实现,只实现主从Reactor,⽽Worker⼯作线程池,可由组件库的使⽤者的需要⾃⾏决定是否使⽤和实现。
本项目除提供TcpServer、TcpConnection(Connection)、EventLoop等muduo接口外,还提供自定义的HttpServer,用于对高并发服务器提供协议支持,基于提供的HTTP协议可以更方便的搭建HTTP服务器。
编译器:g++(C++17)
开发环境:Linux(Ubuntu)
开发平台:VsCode、Xshell
知识架构:C++、Linux、智能指针、Reactor模式、epoll、eventfd、timerfd、无锁编程RunInLoop、时间轮。
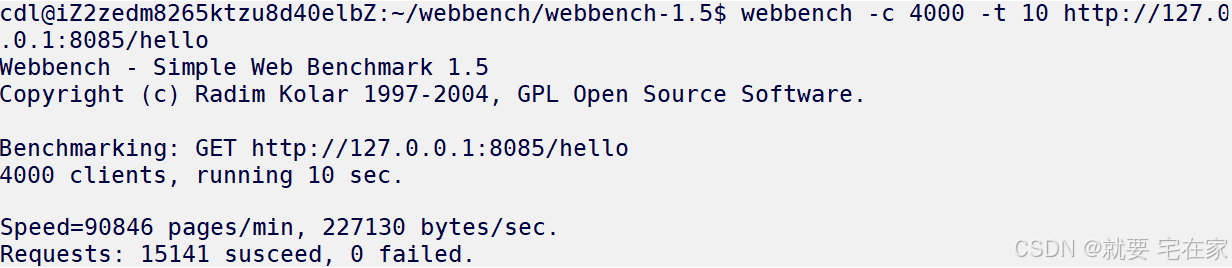
性能测试:由于条件有限,本人采用2核2G带宽3M的轻量级云服务器搭建,故性能测试为本机器极限性能。如果采用本地服务器搭建,可以轻松达到过万并发量。
测试工具为webbench,以4000并发量向服务器发起请求,进行10秒测试,结果近似为1500QPS
大文件传输测试:由于云服务器只有2G内存,所以测试文件大小为1G,测试结果传输正常。
二.流程图
通俗易懂,涵盖主体执行流程。
流程图链接:项目/仿muduo高并发服务器/muduo-就要宅在家.xmind · 纽盖特/git all - 码云 - 开源中国![]() https://gitee.com/newgte/git-all/blob/master/%E9%A1%B9%E7%9B%AE/%E4%BB%BFmuduo%E9%AB%98%E5%B9%B6%E5%8F%91%E6%9C%8D%E5%8A%A1%E5%99%A8/muduo-%E5%B0%B1%E8%A6%81%E5%AE%85%E5%9C%A8%E5%AE%B6.xmind
https://gitee.com/newgte/git-all/blob/master/%E9%A1%B9%E7%9B%AE/%E4%BB%BFmuduo%E9%AB%98%E5%B9%B6%E5%8F%91%E6%9C%8D%E5%8A%A1%E5%99%A8/muduo-%E5%B0%B1%E8%A6%81%E5%AE%85%E5%9C%A8%E5%AE%B6.xmind
三.TcpServer板块
TcpServer模块用于构建主从Reactor、实现数据接收与转发,即muduo的cpServer、TcpConnection(Connection)、EventLoopConnection等服务器模块类。
(1)Any:
此类用于接收任意类型,其实现方式的中心思想是多态。
具体实现上,Any类中定义了一个父类holder和holder的子类placeholder,placeholder是一个模板类。此外,Any中还有一个holder类型的指针_content,由于_content是父类指针,因此根据多态的思想,可以指向不同的特化出来的placeholder子类。我们实际接收的对象是存在于对应特化的placeholder中(placeholder内有一个模板类型的val)。举个例子,当Any需要接收int类型对象时,首先将placeholder中的val特化为int类型,再用父类指针_content指向该placeholder,即可实现用Any接收int。
那如果我想要用该Any对象接收char类型的数据呢?很简单,首先用一个函数接受char对象(例如operator=),在函数内部再创建一个特化char类型的placeholder接收char对象,最后基于多态的思想,父类指针_content丢弃原int的placeholder对象,接收这个char的placeholder对象。
在实际实现中略有不同,无非是多一层封装,但是中心思想一致。
class Any{private://父类,专门让palceholder类来继承class holder{public:virtual ~holder() {}//定义为纯虚函数virtual const std::type_info& type() = 0;virtual holder* clone() = 0;};//模板子类,placeholdertemplate<class T>class placeholder: public holder{public:placeholder(const T& val):_val(val){}virtual const std::type_info& type(){return typeid(T);}virtual holder* clone(){//为什么不是placeholder<T>//在类作用域内,"placeholder" 自动等同于 "placeholder<T>"return new placeholder(_val);}//注意val要设计成公有,使any_cast能接收public:T _val;};holder* _content; //父类指针public:Any():_content(nullptr) {}template<class T>Any(const T& val):_content(new placeholder<T>(val)) //特化+多态接收{}Any(const Any& other):_content(other._content ? other._content->clone() : nullptr){}template<class T>Any& operator=(const T& val){     Any(val).swap(*this);return *this;}Any& operator=(const Any& other){Any(other).swap(*this);return *this;}~Any(){delete _content;}Any& swap(Any& other){std::swap(_content, other._content);return *this;}template<class T>T* any_cast(){assert(typeid(T) == _content->type());return &((placeholder<T>*)_content)->_val;}
};
(2)Socket:
此类是对socket的封装,并非本项目重点,故不再过多介绍。
#define MAX_LISTEN 1024
class Socket{private:int _sockfd;public:        Socket():_sockfd(-1){}Socket(int fd):_sockfd(fd){}~Socket(){ Close(); }int Fd(){ return _sockfd; }bool Creat(){_sockfd = socket(AF_INET, SOCK_STREAM, IPPROTO_TCP);...            }        ssize_t Recv(void* buf, size_t len, bool block = true) {...ssize_t ret = recv(_sockfd, buf, len, flag);...}ssize_t Send(const void* buf, size_t len, bool block = true) {...ssize_t ret = send(_sockfd, buf, len, flag);...}void Close() {...            close(_sockfd);...}        bool Bind(const std::string& ip, uint16_t port){...int ret = bind(_sockfd, (struct sockaddr*)&addr, len);...}bool Listen(int backlog = MAX_LISTEN){int ret = listen(_sockfd, backlog);...}       int Accept() {int newfd = accept(_sockfd, nullptr, nullptr);...}//开启地址端口重用void ReuseAddress() {...setsockopt(_sockfd, SOL_SOCKET, SO_REUSEADDR, (void*)&val, sizeof(int));...setsockopt(_sockfd, SOL_SOCKET, SO_REUSEPORT, (void*)&val, sizeof(int));}//非阻塞void NonBlock() {int flag = fcntl(_sockfd, F_GETFL, 0);fcntl(_sockfd, F_SETFL, flag | O_NONBLOCK);}bool CreatServer(uint16_t port, const std::string& ip = "0.0.0.0", bool block = false);        bool Connect(const std::string& ip, uint16_t port){...int ret = connect(_sockfd, (struct sockaddr*)&addr, len);...}bool CreatClient(uint16_t port, const std::string& ip);
};
(3)Channel:
此类用于设置监控事件(即对监控的事件的封装),开启事件监控以及执行监控事件,Channel与文件描述符是一对一的关系。
其核心是设置两个变量:_events用于记录所监控的事件、_revents用于触发事件时,识别事件类型。
由于Channel会与诸如Poller、EventLoop类进行交互,而这些类将于之后讲解,故在此仅作Channel的事件设置与响应处理流程介绍。
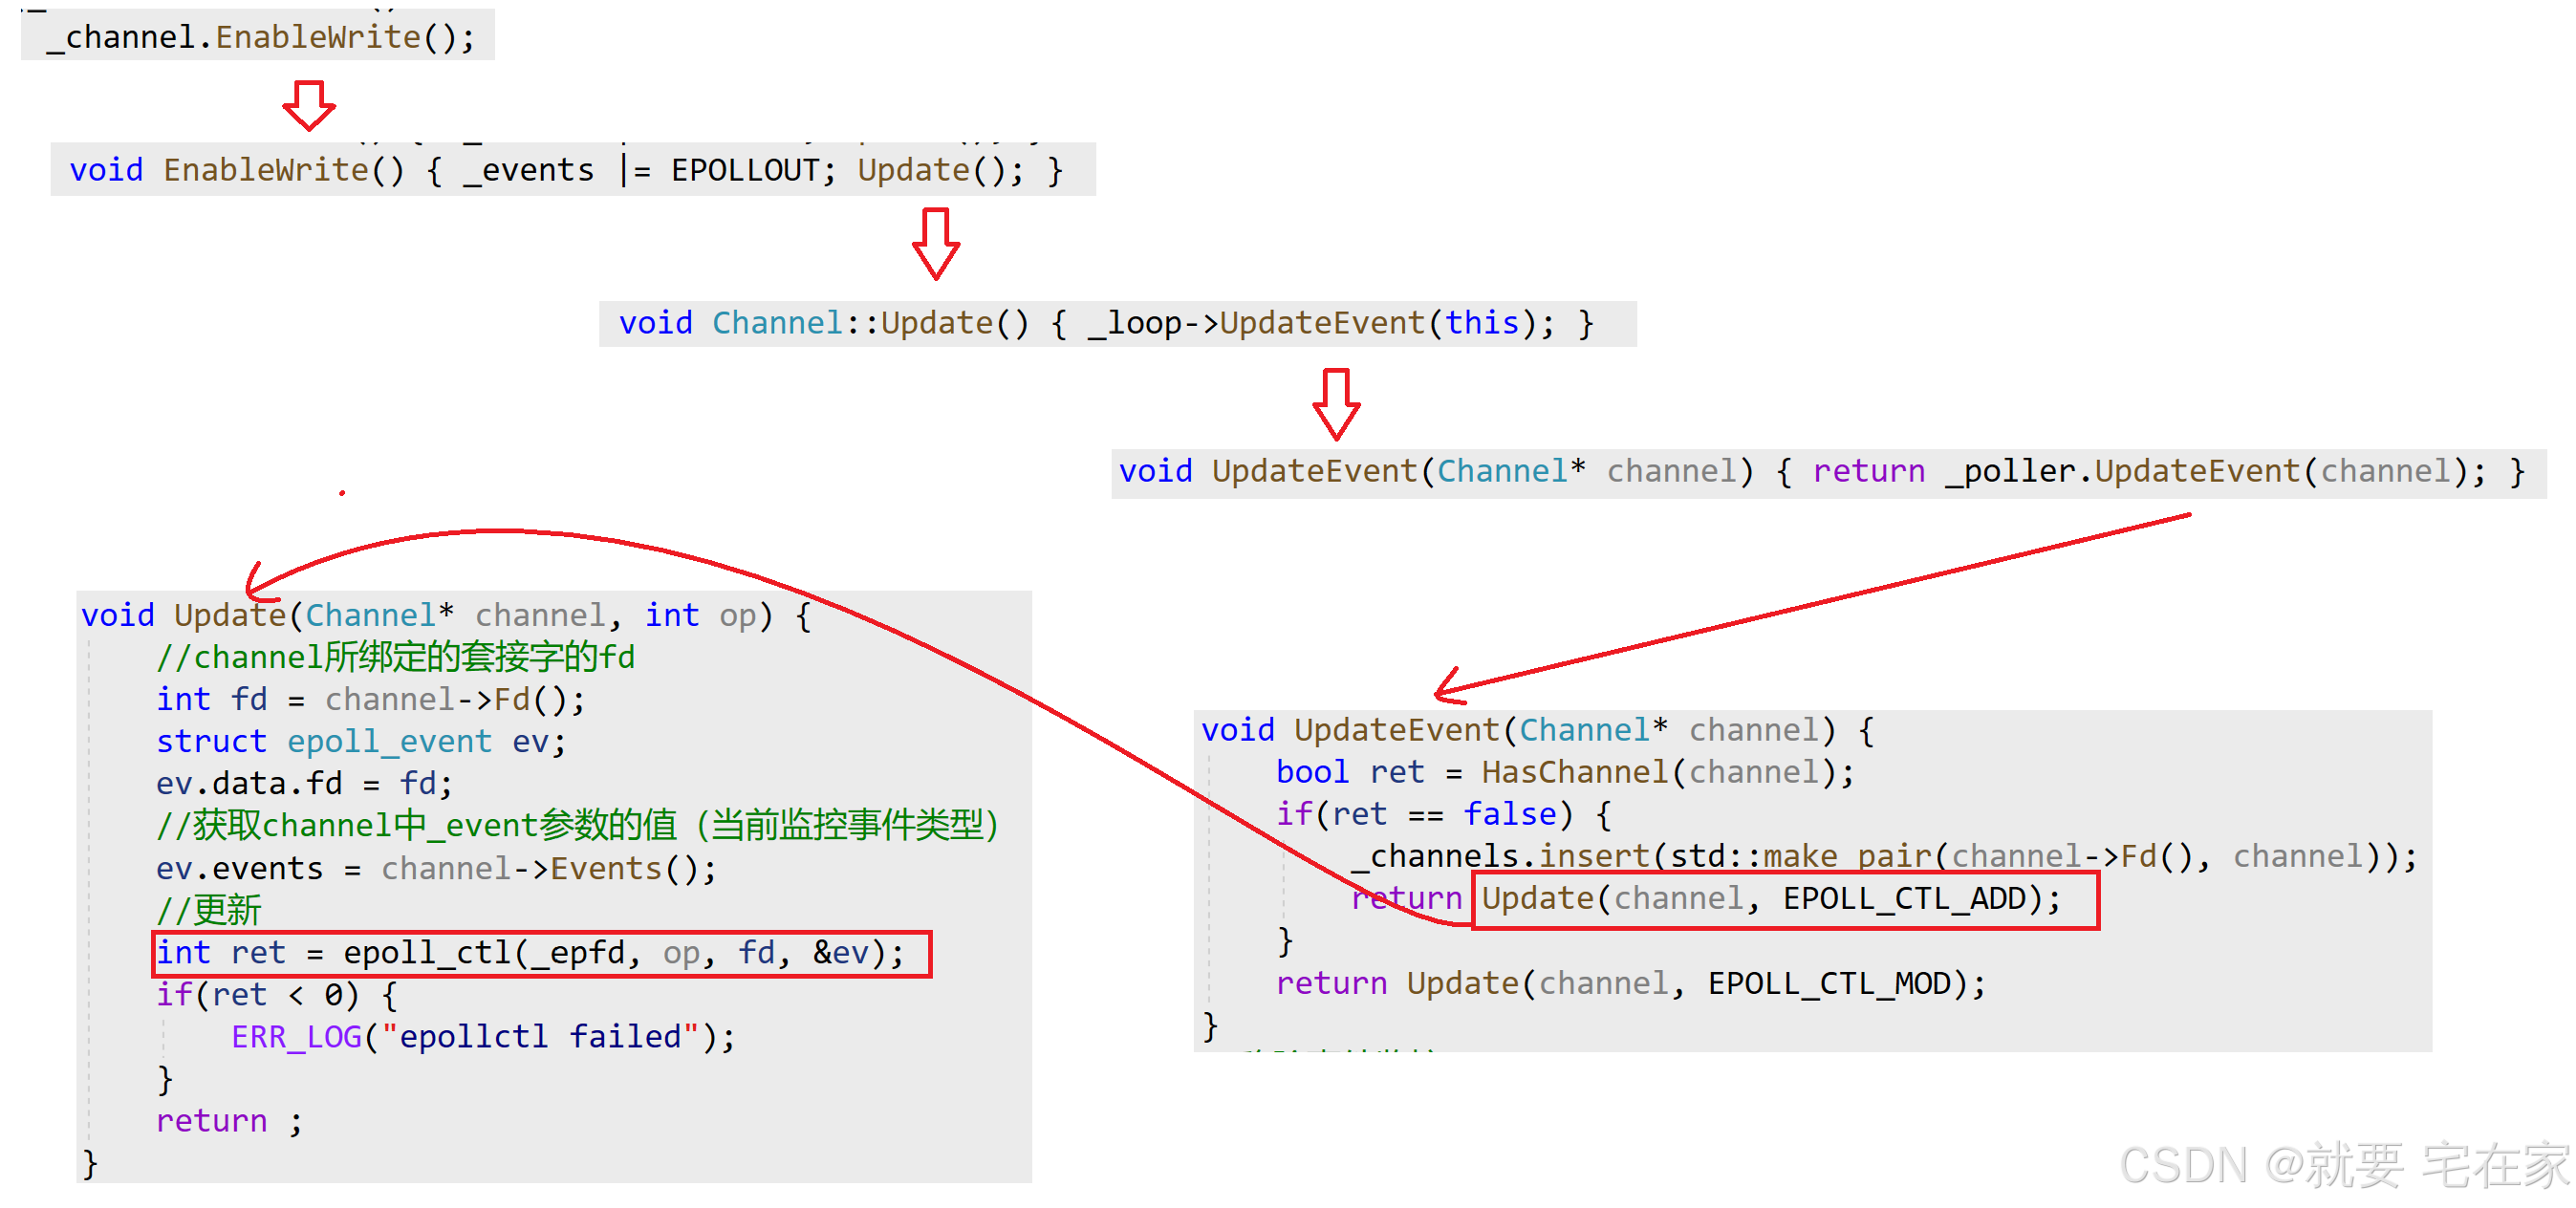
设置事件时,会调用EnableRead/Write()更新_events状态为读/写,调用Update函数开启读/写事件监控。Update函数内部调用Poller等其他类,通过epoll_ctl将_events对应的事件监控设置进epoll_event结构体,再送入epoll中,开启事件监控。流程请见Connection。
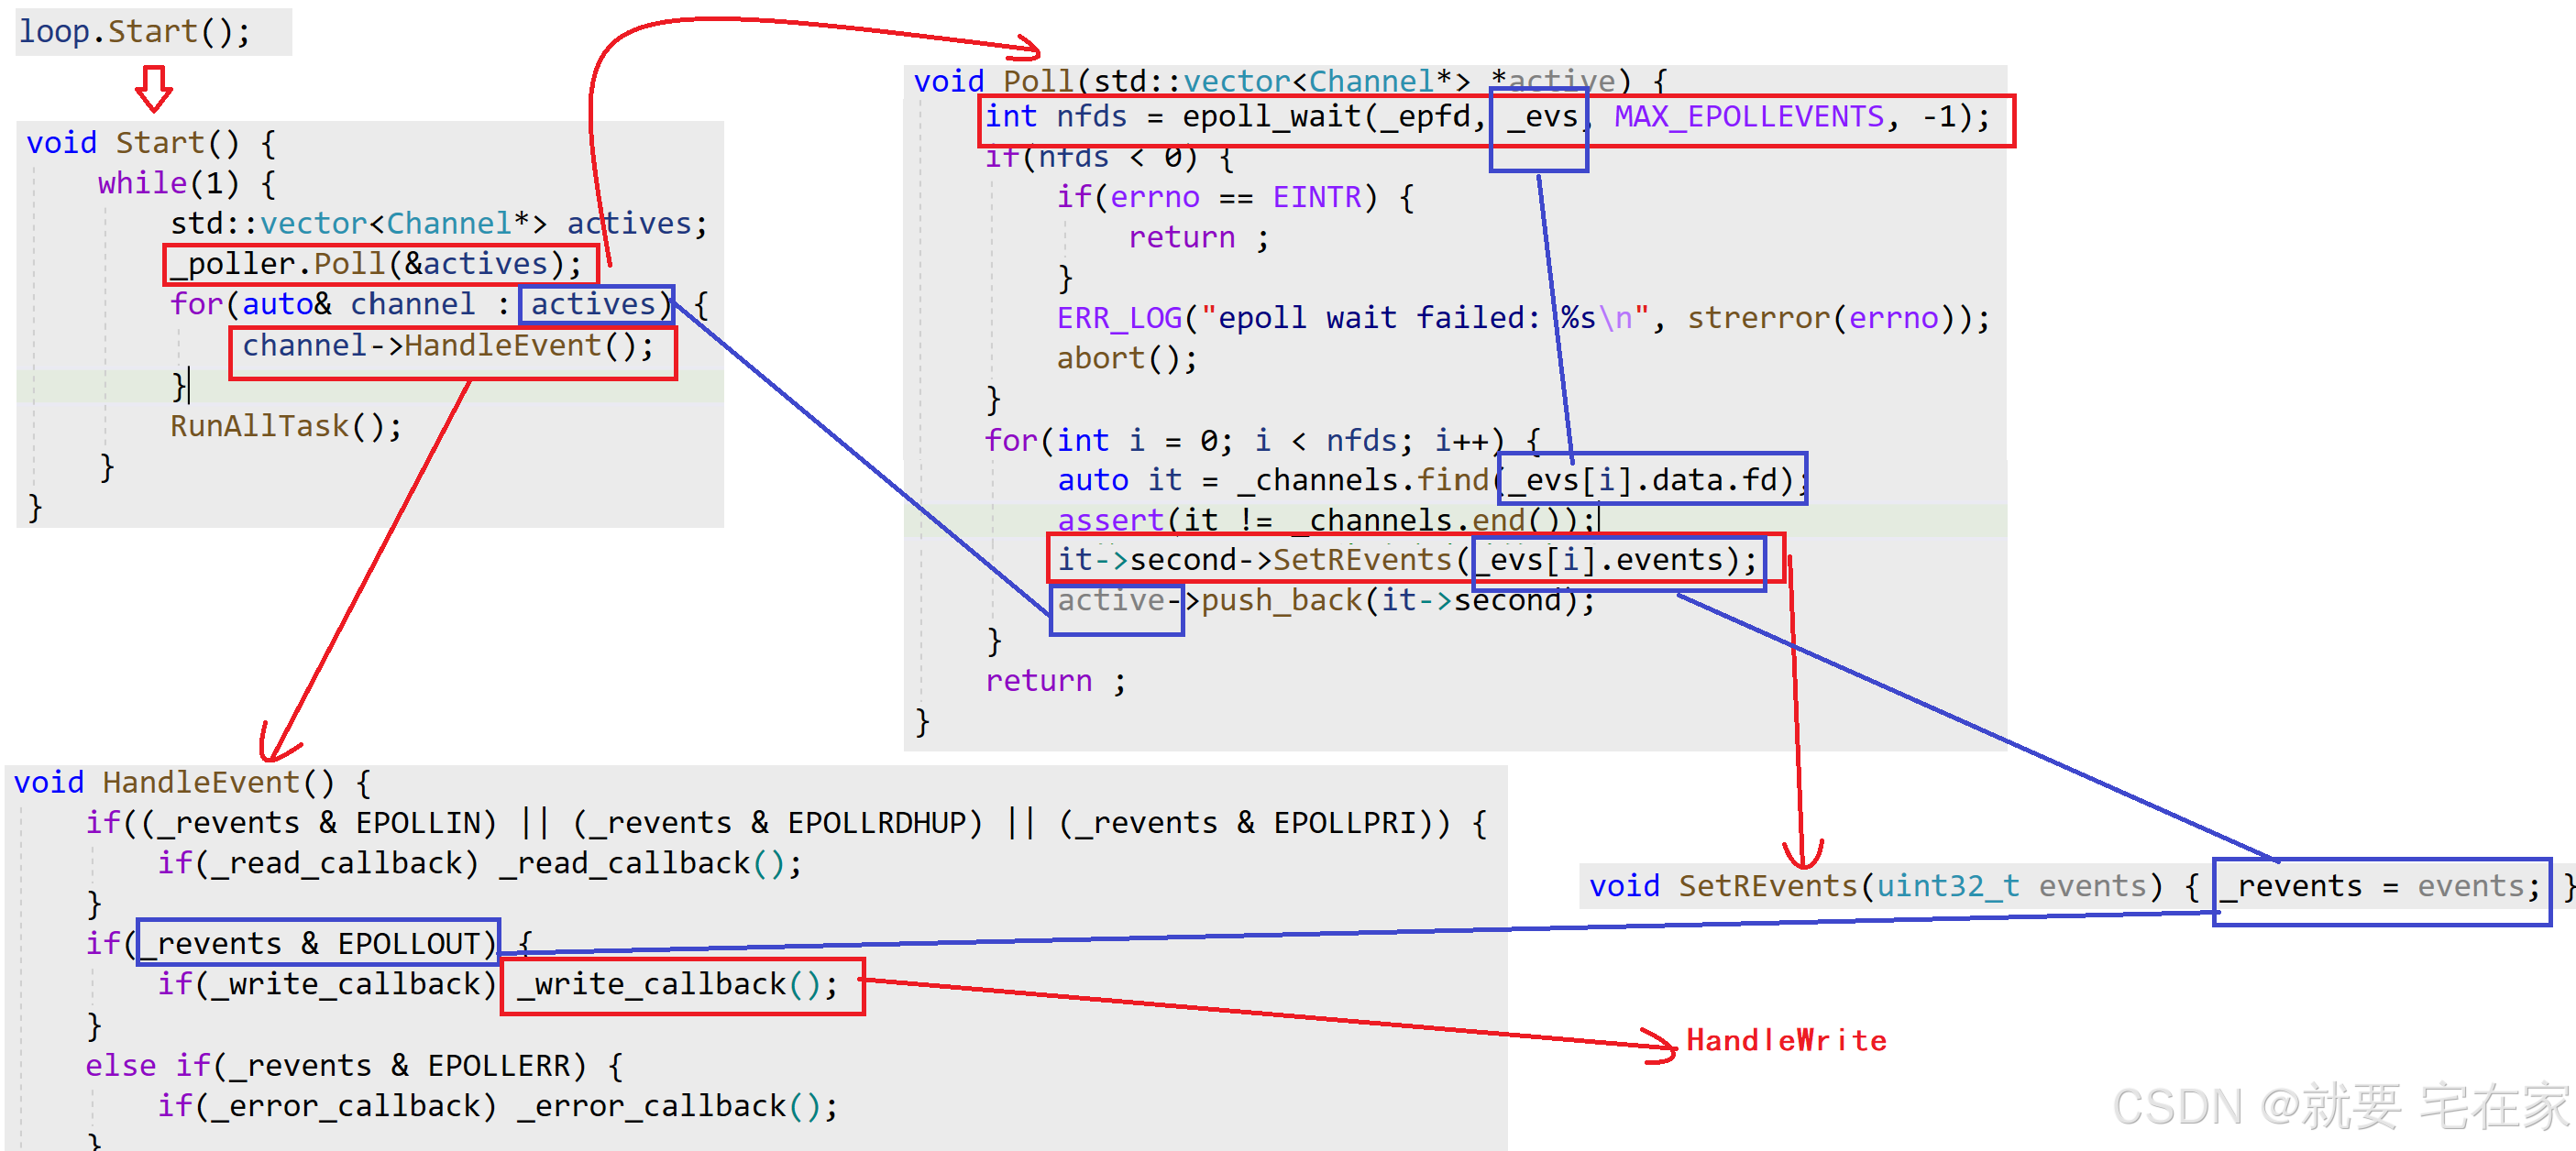
响应时,Poller通过epoll_wait获取响应的事件,将_revents设置为epoll_event中事件类型后,调用执行HandleEvent函数,HandleEvent函数内部会根据当前_revents值来调用对应事件回调函数。Channel暴露5个接口用于用户设置回调函数(读/写/错误/关闭/任意)。流程请见Connection。
注意,可以手动设置给_events的仅有读/写事件监控。对于错误/关闭事件,是系统自动为epoll_event设置,再传给_revents让HandleEvent判断后执行。也就是说,_events仅有读/写两种状态,_revents有读/写/错误/关闭四种状态。HandleEvent执行时,不管当前事件类型是读/写还是其他,“任意”类型事件回调函数只要已设置,就会执行。
设计_event和_revent两个变量,是为了避免当触发一个事件后在处理该事件之前,如果突然改变监控事件类型,从而导致异常的问题。例如,当前监控read事件,当触发read之后,如果仅有_event,那么响应时会将epoll_event中事件状态交给_event(即read),但如果此时改变监控状态为write(_event改为write),那么HandleEvent会执行write回调。所以,设计_event与_revent两个变量,使监控与就绪分离,互不影响。
class Poller;
class EventLoop;
class Channel{private:int _fd;uint32_t _events;//要监控的事件uint32_t _revents;//触发的事件EventLoop* _loop;using EventCallback = std::function<void()>;EventCallback _read_callback;EventCallback _write_callback;EventCallback _error_callback;EventCallback _close_callback;EventCallback _event_callback;//任意事件回调函数public://一定要手动析构,进行防御性编程。在Ubuntu环境中_read_callback等不会自动置空//若无析构,会发生野指针问题~Channel() {_read_callback = nullptr;_write_callback = nullptr;_error_callback = nullptr;_close_callback = nullptr;_event_callback = nullptr;}Channel(EventLoop* loop, int fd):_fd(fd), _events(0), _revents(0), _loop(loop) {}int Fd() { return _fd; }//获取channel监控的事件uint32_t Events() { return _events; }//设置实际要触发的事件void SetREvents(uint32_t events) { _revents = events; }//设置回调函数void SetReadCallback(const EventCallback& cb) { _read_callback = cb; }void SetWriteCallback(const EventCallback& cb) { _write_callback = cb; }void SetErrorCallback(const EventCallback& cb) { _error_callback = cb; }void SetCloseCallback(const EventCallback& cb) { _close_callback = cb; }void SetEventCallback(const EventCallback& cb) { _event_callback = cb; }//判断可读可写性bool ReadAble() { return (_events & EPOLLIN); }bool WriteAble() { return (_events & EPOLLOUT); }//设置读写开关//UPdate()开启相应事件监控,本质是执行epoll_ctl系统调用void EnableRead() {  _events |= EPOLLIN; Update(); }void EnableWrite() { _events |= EPOLLOUT; Update(); }void DisableRead() { _events &= ~EPOLLIN; Update(); }void DisableWrite() { _events &= ~EPOLLOUT; Update(); }void DisableAll() { _events = 0; Update(); }void Remove(); //移除事件监控,也是执行epoll_ctl系统调用void Update(); //更新事件监控//判断事件类型,执行对应回调函数void HandleEvent() {if((_revents & EPOLLIN) || (_revents & EPOLLRDHUP) || (_revents & EPOLLPRI)) {if(_read_callback) _read_callback();}if(_revents & EPOLLOUT) {if(_write_callback) _write_callback();}else if(_revents & EPOLLERR) {if(_error_callback) _error_callback();}else if(_revents & EPOLLHUP) {if(_close_callback) _close_callback();}//任意类型事件回调,只要触发HandleEvent且已设置,就执行if(_event_callback) _event_callback();}
};
(4)Poller:
此类是对epoll的封装。
除封装epoll之外,由于epoll可以记录多个文件描述符fd,且fd与channel一对一,因此Poller内部通过unordered_map记录所有本epoll监控的channel,哈希桶中key为channel对应fd,value为指向channel对象的指针。
设计unordered_map记录fd与channel的映射,是为了能利用epoll_wait返回的epoll_event(中的fd)通过unordered_map找到对应的channel对象,调用channel类内函数以及传参。对应Poll函数代码。
#define MAX_EPOLLEVENTS 1024 //获取就绪队列的最大长度
class Poller{private:int _epfd; //本epollfdstruct epoll_event _evs[MAX_EPOLLEVENTS]; //用于epoll_wait,获取就绪队列std::unordered_map<int, Channel*> _channels;//更新channel中的监控事件,op可以是添加add,调整mod,删除delvoid Update(Channel* channel, int op) {       int fd = channel->Fd();struct epoll_event ev;ev.data.fd = fd;           ev.events = channel->Events(); //获取channel中_event参数的值(当前监控事件类型)            int ret = epoll_ctl(_epfd, op, fd, &ev);//更新if(ret < 0) {ERR_LOG("epollctl failed");}return ;}//判断epoll中是否有添加该channelbool HasChannel(Channel* channel) {auto it = _channels.find(channel->Fd());if(it == _channels.end()) {return false;}return true;}public://内核中创建一个 eventpoll对象Poller() {_epfd = epoll_create(1024);if(_epfd < 0) {ERR_LOG("epoll create failed");abort();}}//添加或修改事件监控内容void UpdateEvent(Channel* channel) {bool ret = HasChannel(channel);if(ret == false) {_channels.insert(std::make_pair(channel->Fd(), channel));return Update(channel, EPOLL_CTL_ADD);}return Update(channel, EPOLL_CTL_MOD);}//移除事件监控void RemoveEvent(Channel* channel) {auto it = _channels.find(channel->Fd());if(it != _channels.end()) {_channels.erase(it);}Update(channel, EPOLL_CTL_DEL);}//获取活跃连接并返回,在EventLoop::Start()中循环使用void Poll(std::vector<Channel*> *active) {                        int nfds = epoll_wait(_epfd, _evs, MAX_EPOLLEVENTS, -1); //-1表示阻塞,0表示不阻塞if(nfds < 0) {if(errno == EINTR) {return ;}ERR_LOG("epoll wait failed: %s\n", strerror(errno));abort();}for(int i = 0; i < nfds; i++) {              auto it = _channels.find(_evs[i].data.fd); assert(it != _channels.end());                it->second->SetREvents(_evs[i].events); //将_revents设置为响应事件的类型active->push_back(it->second);}return ;}
};
(5)TimerTask & TimerWheel
这两个类用于实现定时任务功能模块。
TimerTask用于记录定时任务回调函数及执行,TimerWheel用于装载定时任务和负责整体统筹。
①TimerTask
TimerTask内部通过函数类模板function记录定时任务的回调函数。在析构时执行对应回调函数,也就是说执行回调函数的操作设置在了析构函数内。这是因为定时任务执行是一次性的,所以析构时执行符合逻辑。
当定时任务需要延时,会将对应TimerTask对象copy一份挂到延时后的位置(数据结构在TimerWeel板块介绍),并设置原时间TimerTask对象的_cancel变量状态为“已延时”。当原定时时间到来执行析构函数时,先判断_cancel状态为“已延时”,说明该TimerTask对象已经延时,当前时刻并非真正执行回调函数的时间点,故析构函数内部不执行任务回调函数。当到达延时时间后,再执行copy的TimerTask对象,由于该对象内部_cancel为“未延时”,故调用析构函数可以正常执行任务回调函数。
此外,TimerTask中还有一个函数对象_release,此函数用于消除TimerWheel中对应的TimerTask对象,因此执行时机是超时时间到来,也就是TimerTask析构时,所以_release定义在TimerTask中而非TimerWheel中。
与任务回调函数不同,无论是否延时,_release都会在析构时执行。这一点很好理解,延时是copy一份TimerTask对象到TimerWheel的结构中,所以原先的TimerTask对象在原定时间到来后依旧需要从TimerWheel中消除。
using TaskFunc = std::function<void()>; //回调函数
using ReleaseFunc = std::function<void()>; //_release的函数
class TimerTask{uint64_t _id; //事件触发者的文件描述符uint32_t _timeout; //超时时间bool _cancel; //false即没有额外延时TaskFunc _task_cb; //回调函数ReleaseFunc _release; //删除定时器对象public:TimerTask(uint64_t id, uint32_t delay, const TaskFunc& cb):_id(id), _timeout(delay), _task_cb(cb), _cancel(false){}//析构函数----执行回调~TimerTask(){            if(_cancel == false) _task_cb(); //没有取消(没有进行延时操作),调用回调函数_release();//删除该TimerTask对象}void Cancel(){ _cancel = true; } //进行额外延时void SetRelease(const ReleaseFunc& cb){_release = cb;}uint32_t GetDelayTime() { return _timeout; }
};
②TimerWheel
此类内部定义了一个哈希桶结构的定时器,用于记录定时任务们。
当向TimerWheel中添加一个定时任务时,TimerWheel内部会将该任务用TimerTask封装后放入哈希桶中。根据所设置的定时时间,放入对应的哈希桶,例如以1秒为单位,当设置超时时间为7,就会放入7号桶中;若超时时间超过哈希桶长度,则采用模运算放入对应位置。当然更严谨的做法是对延时时间进行检查,如果超时时间>最大长度,则应报错。
pos = (current time + delay time) % max length
定时任务采用timerfd的方式自动执行,因此TimerWheel内部会封装一个timerfd,哈希桶下标与timerfd所设单位时间一致。将timefd也设置进epoll中进行读事件监控,每次timerfd到时后,就会触发读事件执行timefd对应的回调函数(OnTime),OnTime函数再通过RunTimerTask函数销毁对应哈希桶中TimerTask对象(进而调用TimerTask析构函数)的方式执行定时任务的回调函数(区分timerfd回调OnTime与定时任务回调)。例如,当read到timerfd缓冲区中值为8时,说明距上次读取已过8个单位时间,则销毁8个哈希桶下标中的TimerTask对象。当然正常是每到一个单位时间就会read一次,除非有异常等情况。这里不再对timerfd单独介绍,后续会有博客更新。
由于每个单位时间都可能有多个任务需要执行,因此哈希桶采用二维数组的方式实现。其中第一维代表单位时间,第二维代表该时间到来时需执行的任务。图示如下:
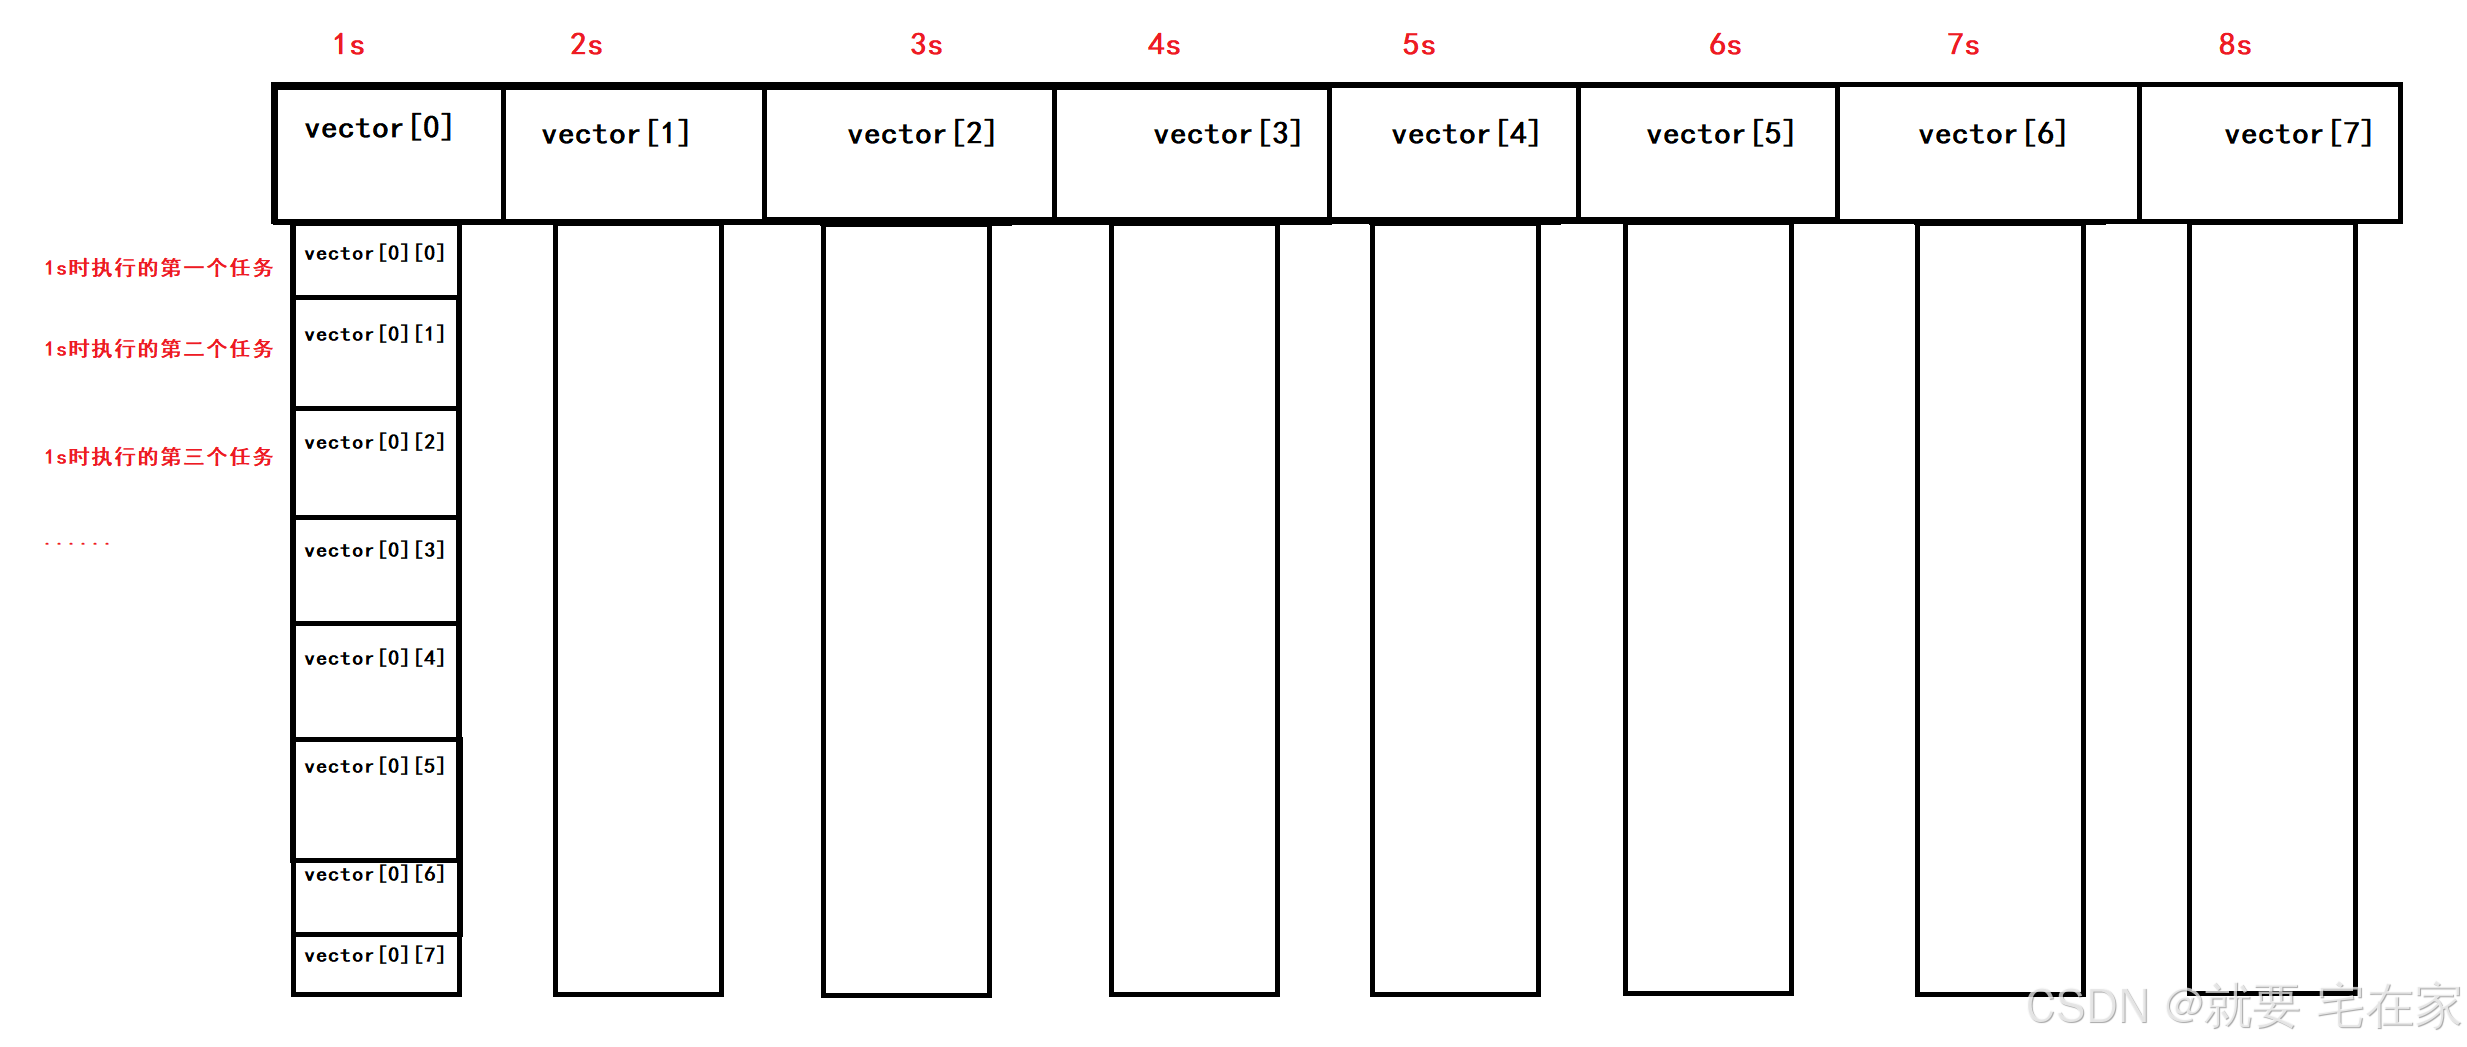
当到达对应时间后,只需要将第二维数组释放即可,也就是timerfd到时触发调用clear函数清除第二维(自动调用数组元素的析构函数)。由于数组元素是TimerTask类,所以执行析构会自动执行定时任务。
还有一点值得注意,在TimerWheel类中除了哈希桶_wheel之外,还有专门用于索引定时任务的_timers。因为定时任务存在延时的可能性,因此采用shared_ptr接收定时任务,这样当出现延时的情况时,可以在最终“真实”的执行时间才调用shared_ptr析构。
但是正因为定时任务采用shared_ptr封装,如果索引依旧采用shared_ptr记录定时任务,那么对应计数值会比哈希桶中该任务的数量+1,进而无法调用shared_ptr析构函数,无法执行任务回调。因此索引中采用weak_ptr。
class TimerWheel{using WeakTask = std::weak_ptr<TimerTask>;using PtrTask = std::shared_ptr<TimerTask>;int _tick; //时间轮当前位置指针int _capacity; //时间轮的max容量std::vector<std::vector<PtrTask>> _wheel; //哈希桶std::unordered_map<uint64_t, WeakTask> _timers;EventLoop* _loop;int _timerfd;std::unique_ptr<Channel> _timer_channel;private:auto GetWeakPtr(uint64_t id){auto it = _timers.find(id);if(it != _timers.end()) return it;ERR_LOG("GetWeakPtr Error");return it;}//移除unordered_map中对应的一个waked_ptrvoid RemoveTimer(uint64_t id){auto it = GetWeakPtr(id);_timers.erase(it);}//初始化timerfd,默认单位时间1秒static int CreateTimerfd() {int timerfd = timerfd_create(CLOCK_MONOTONIC, 0);if(timerfd < 0) {ERR_LOG("timerfd creat error");abort();}struct itimerspec itime; itime.it_value.tv_sec = 1; //第一次的超时时间itime.it_value.tv_nsec = 0; itime.it_interval.tv_sec = 1; //之后的超时时间,均为1秒itime.it_interval.tv_nsec = 0;timerfd_settime(timerfd, 0, &itime, nullptr);return timerfd;}//读操作。int ReadTimerfd() {uint64_t times;int ret = read(_timerfd, ×, 8);if(ret < 0) {ERR_LOG("read timerfd failed");abort();}return times; //返回超时次数}//指针向后走一步,即执行一个单位时间对应的所有定时任务void RunTimerTask(){_tick = (_tick + 1) % _capacity; _wheel[_tick].clear(); //调用析构函数,释放对应的shared_ptr}//timerfd的回调函数void OnTime() {int times = ReadTimerfd(); //返回从上次捕捉信号到现在,一共超时了几次for(int i = 0; i < times; i++) { RunTimerTask(); } }//添加定时任务void TimerAddInLoop(uint64_t id, uint32_t delay, const TaskFunc& cb) {PtrTask pt(new TimerTask(id, delay, cb));pt->SetRelease(std::bind(&TimerWheel::RemoveTimer, this, id));int pos = (_tick + delay) % _capacity;_wheel[pos].push_back(pt);_timers[id] = WeakTask(pt);}//对定时任务进行延时,默认延长单位是原时间void TimerRefreshInLoop(uint64_t id, uint32_t addTime = 0){auto it = GetWeakPtr(id);PtrTask pt = it->second.lock();if (addTime == 0) addTime = pt->GetDelayTime();int pos = (_tick + addTime) % _capacity;_wheel[pos].push_back(pt);}//延时void TimerCancelInLoop(uint64_t id){auto it = GetWeakPtr(id);if(it == _timers.end()) {return ;}//weak_ptr.lock() == 获取w_ptr对应的shared_ptrPtrTask pt = it->second.lock(); if(pt) pt->Cancel();}public:TimerWheel(EventLoop* loop):_capacity(60), _tick(0), _wheel(_capacity), _loop(loop),_timerfd(CreateTimerfd()), _timer_channel(new Channel(_loop, _timerfd)) {//设置timerfd回调函数_timer_channel->SetReadCallback(std::bind(&TimerWheel::OnTime, this));_timer_channel->EnableRead();}//对定时任务进行延时,默认延长单位是原时间void TimerRefresh(uint64_t id, uint32_t addTime = 0);void TimerCancel(uint64_t id);//添加定时任务void TimerAdd(uint64_t id, uint32_t delay, const TaskFunc& cb);bool HasTimer(uint64_t id) {auto it = _timers.find(id);if(it == _timers.end()) {return false;}return true;}
};//声明定义分离是因为TimerWheel中有用到EventLoop,而该类定义在TimerWheel之后。
void TimerWheel::TimerAdd(uint64_t id, uint32_t delay, const TaskFunc& cb) {_loop->RunInLoop(std::bind(&TimerWheel::TimerAddInLoop, this, id, delay, cb));
}
void TimerWheel::TimerRefresh(uint64_t id, uint32_t addTime){_loop->RunInLoop(std::bind(&TimerWheel::TimerRefreshInLoop, this, id, addTime));
}
void TimerWheel::TimerCancel(uint64_t id){_loop->RunInLoop(std::bind(&TimerWheel::TimerCancelInLoop, this, id));
}
(6)EventLoop:
此类是Reactor模式的核心,用于处理Epoll事件回调以及普通事件。注意,EventLoop对象与线程是一对一的关系。每一个EventLoop对象都可以记录处理多个事件及回调函数。
服务器的事件大致可以分成两种类型:Epoll事件回调与普通事件回调。Epoll事件是指装在Epoll中监控的事件,普通事件是指没有在Epoll中的事件。以定时任务为例,定时任务的回调函数需要超时触发后再执行,因此放入epoll中进行监控;而将定时任务装入时间轮的操作是由另一个函数完成的,这个函数需要及时的将定时任务装入时间轮之中,因此该函数应该立即执行,故不用装入epoll进行监控,即是普通事件函数。
private:using Functor = std::function<void()>;std::thread::id _thread_id;//eventfd机制,用于确定当前是否发生了可读事件int _event_fd;std::unique_ptr<Channel> _event_channel;Poller _poller;std::vector<Functor> _tasks;std::mutex _mutex;TimerWheel _timer_wheel;EventLoop内部定义了7个成员变量,其中_event_fd与_event_channel配对使用、_poller即epoll、_tasks数组记录普通函数、mutex确保访问_tasks时的互斥性、_timer_wheel用于设置定时任务。
可以看出,poller(epoll)以及timerwheel(时间轮)是EventLoop对象的组成部分,一对一且生命周期一致。这样设计可以降低EventLoop对象之间的耦合度,提高线程安全防止资源非法访问。并且多个EventLoop对象可以并发处理事件,实现本项目高并发的目的。
class EventLoop {
private:...//成员变量
private:void RunAllTask();static int CreateEventFd();void ReadEventfd();void WeakUpEventFd();public:EventLoop() : _thread_id(std::this_thread::get_id()),_event_fd(CreateEventFd()),_event_channel(new Channel(this, _event_fd)),_timer_wheel(this) {_event_channel->SetReadCallback(std::bind(&EventLoop::ReadEventfd, this));_event_channel->EnableRead();}void Start();bool IsInLoop();void AssertInLoop();void RunInLoop(const Functor& cb);void QueueInLoop(const Functor& cb);void UpdateEvent(Channel* channel) { return _poller.UpdateEvent(channel); }void RemoveEvent(Channel* channel) { return _poller.RemoveEvent(channel); }void TimerAdd(uint64_t id, uint32_t delay, const TaskFunc& cb) {return _timer_wheel.TimerAdd(id, delay, cb);}void TimerRefresh(uint64_t id) {return _timer_wheel.TimerRefresh(id);}void TimerCancel(uint64_t id) { return _timer_wheel.TimerCancel(id); }bool HasTimer(uint64_t id) { return _timer_wheel.HasTimer(id); }
};
其中,Start函数用于获取epoll监控的就绪事件并执行(流程见Connection)以及处理普通事件回调;RunInLoop用于执行普通事件函数;UpdateEvent、RemoveEvent用于更新监控事件;TimerAdd、TimerRefresh、TimerCancel、HasTimer用于处理定时任务。epoll、定时任务、更新监控函数都是对之前讲到的类进一步封装,不再讲解;这里我想重点讲解普通事件函数。
各位读者在阅读代码时可能会困惑RunInLoop中为什么还要调用IsInLoop函数判断当前执行线程是否是EventLoop所对应的线程,即为什么要检查线程一致性。这是因为所有需要由该EventLoop线程执行的普通函数都封装在RunInLoop函数中执行,所以要先检查当前线程是否是EventLoop对应的线程。我们不希望其他线程能直接执行本应由EventLoop对应线程执行的函数。

上图向Timerfd中添加定时任务,因为需要立即添加(即普通事件回调),所以采用RunInLoop“间接”执行TimerAddInLoop函数。
void RunInLoop(const Functor& cb) {if(IsInLoop()) {return cb();}return QueueInLoop(cb);
}
RunInLoop设计思路为:当检查为EventLoop对应线程时,执行普通事件函数;当检查线程不匹配时,调用QueueInLoop“暂存”该普通事件函数,等到线程匹配时再执行。
那么QueueInLoop又是如何实现“暂存”+匹配时再执行的呢,很简单。
实现暂存:用_tasks来保存所有不匹配时的函数。
实现匹配时再执行:EventLoop中采用eventfd机制来及时处理普通事件函数。由于EventLoop在启动后会死循环在start函数中,所以如果没有触发任何事件,那么线程会阻塞在epoll_wait系统调用,这样无法执行后续的RunAllTask函数(RunAllTask用于执行所有放入_task中的普通事件函数)。因此普通事件函数也会由于epoll_wait阻塞而阻塞。所以设计思路是在epoll中装入eventfd监控,当记录一个普通事件函数时,向eventfd中写数据触发事件响应,结束epoll_wait阻塞,从而使EventLoop线程结束阻塞,执行RunAllTask来执行普通事件函数。图示如下:
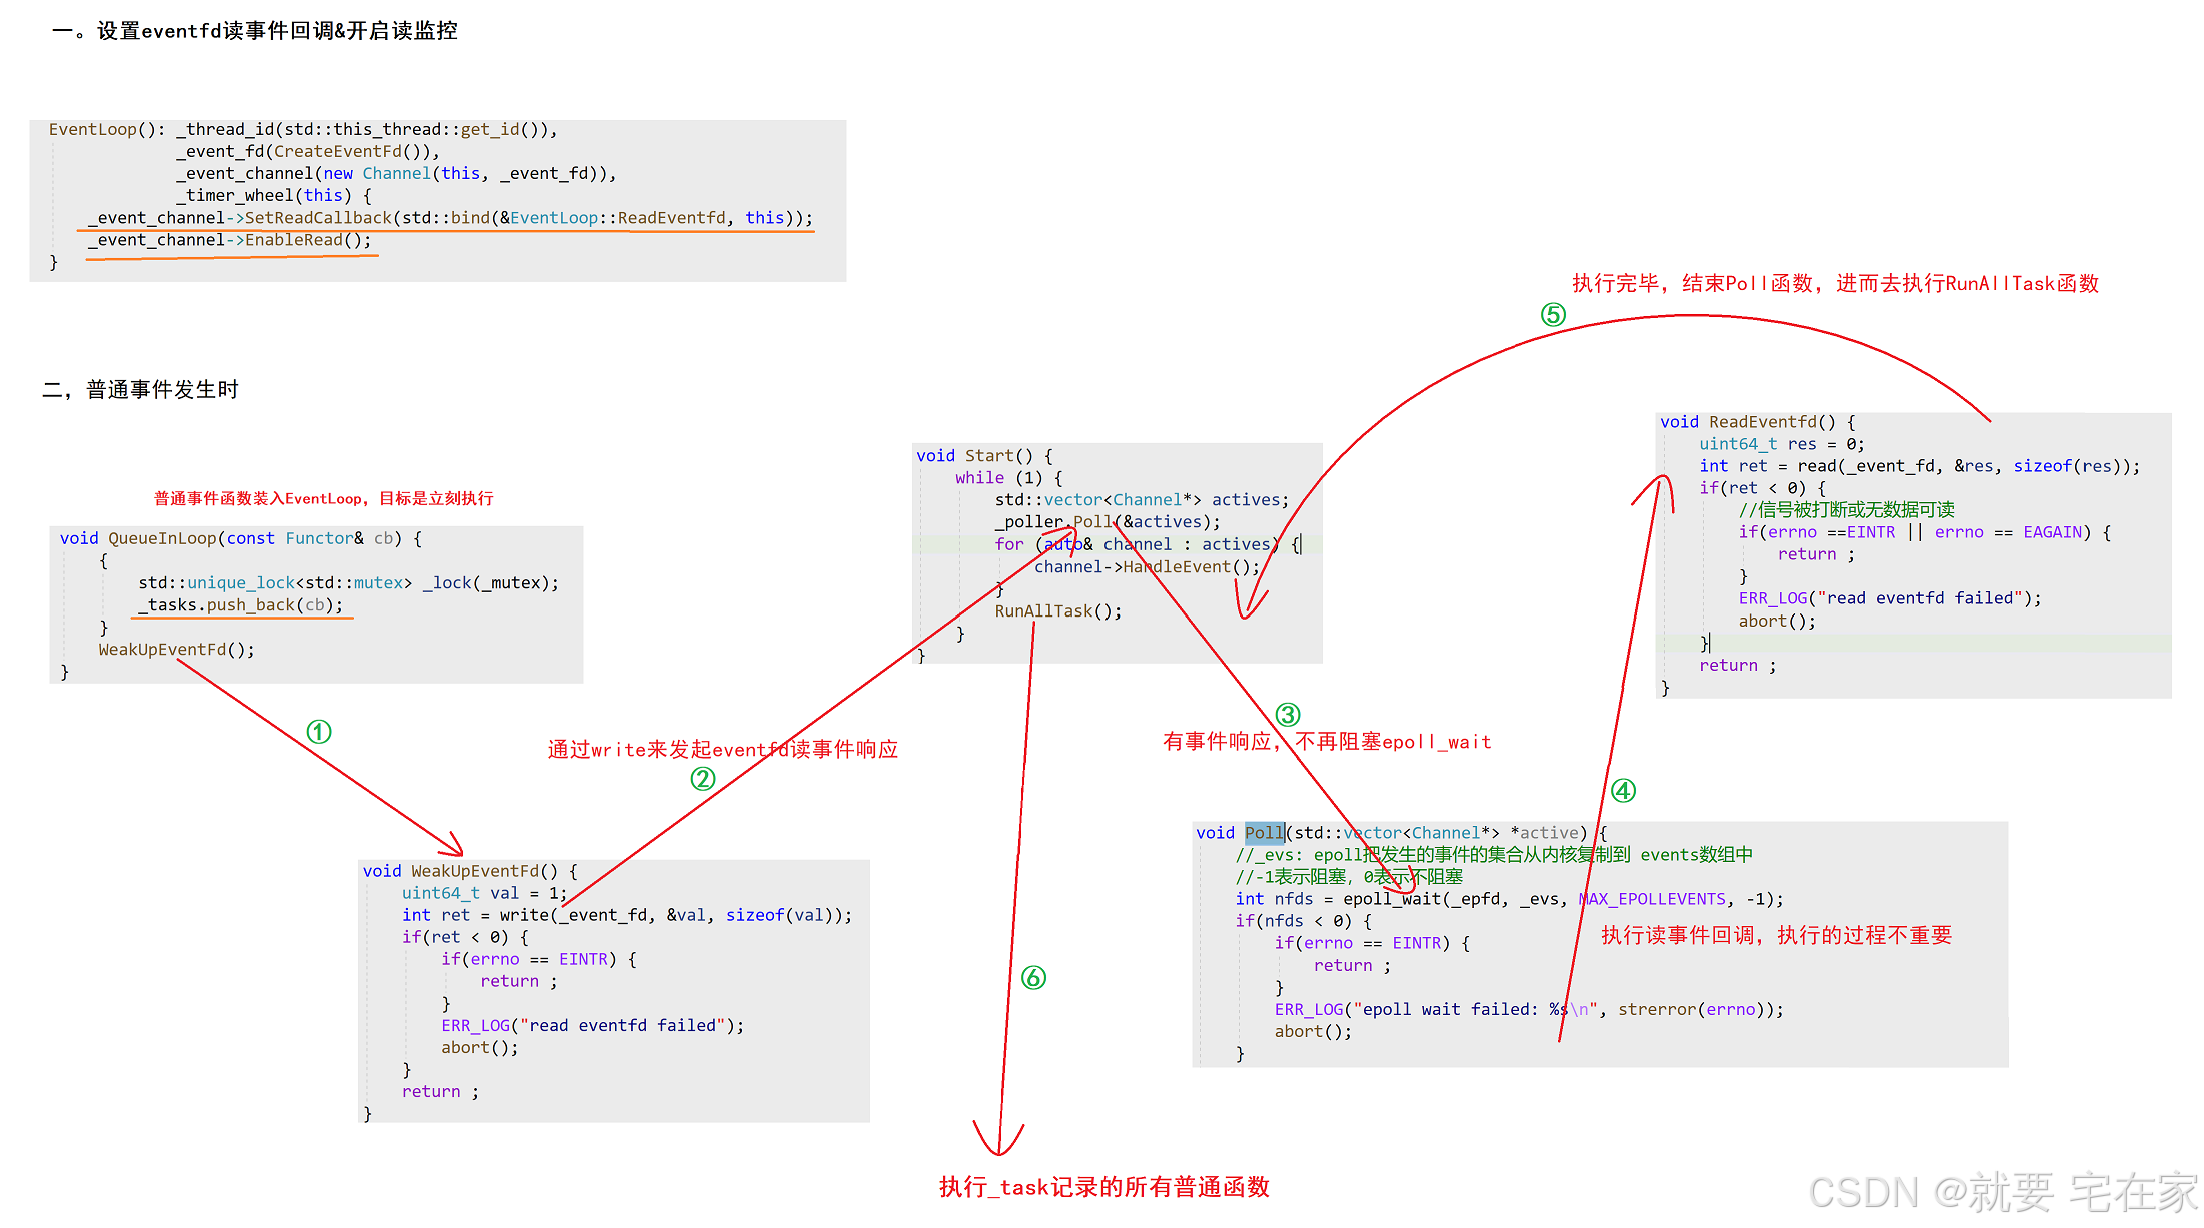
总结:Epoll事件回调函数是通过Poll获取后直接调用HandleEvent执行;普通函数是在处理一遍Epoll事件回调函数之后,调用RunAllTask执行。
(7)Connection:
此类简单讲是对客户端进行封装。但这么说很容易使人糊涂,准确来讲,每当一个新客户端向服务端发起连接请求时,就代表服务端出现了一个新的执行流,而connection是对这个执行流的封装,因为客户端与执行流一对一,所以connection与客户端是一一对应的关系。每一个connection中不仅会记录客户端的socket fd、为该客户端设置编号,而且会为客户端创建私有的输入输出缓冲区。必须要清楚的是,每一个EventLoop会对应多个connection对象。connection本身不占有任何线程,在客户端请求到来之前,系统就已经创建固定多个EventLoop对象组成EventLoop对象池,当客户端发起连接请求创建connection对象时自动分配到某一个EventLoop对象进行管理。因此可以说connection是把客户端的行为进行封装,而执行客户端行为的操作交由对应的EventLoop执行。
执行流程以写事件为例:当需要向客户端中发送数据时,首先调用记录该客户端的connection中的send函数接口,传入需发送的数据。例如:

Send内部先接收数据,再将SendInLoop函数放入EventLoop中让对应的线程执行。

SendInLoop函数用输出缓冲区接收数据,并开启写事件监控。
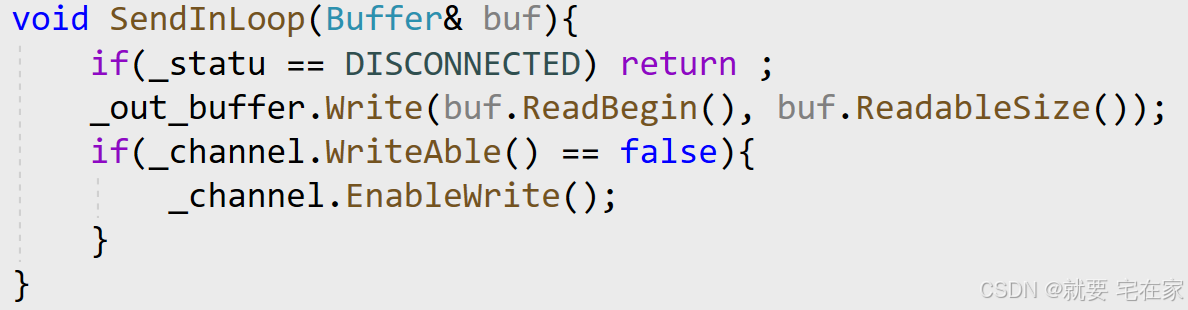
由于在connection初始化的时候就设置了写事件回调为HandleWrite,因此会通过channel-EventLoop-Poller的顺序设置写事件监控;再通过EventLoop-Poller-channel的顺序执行HandleWrite函数。
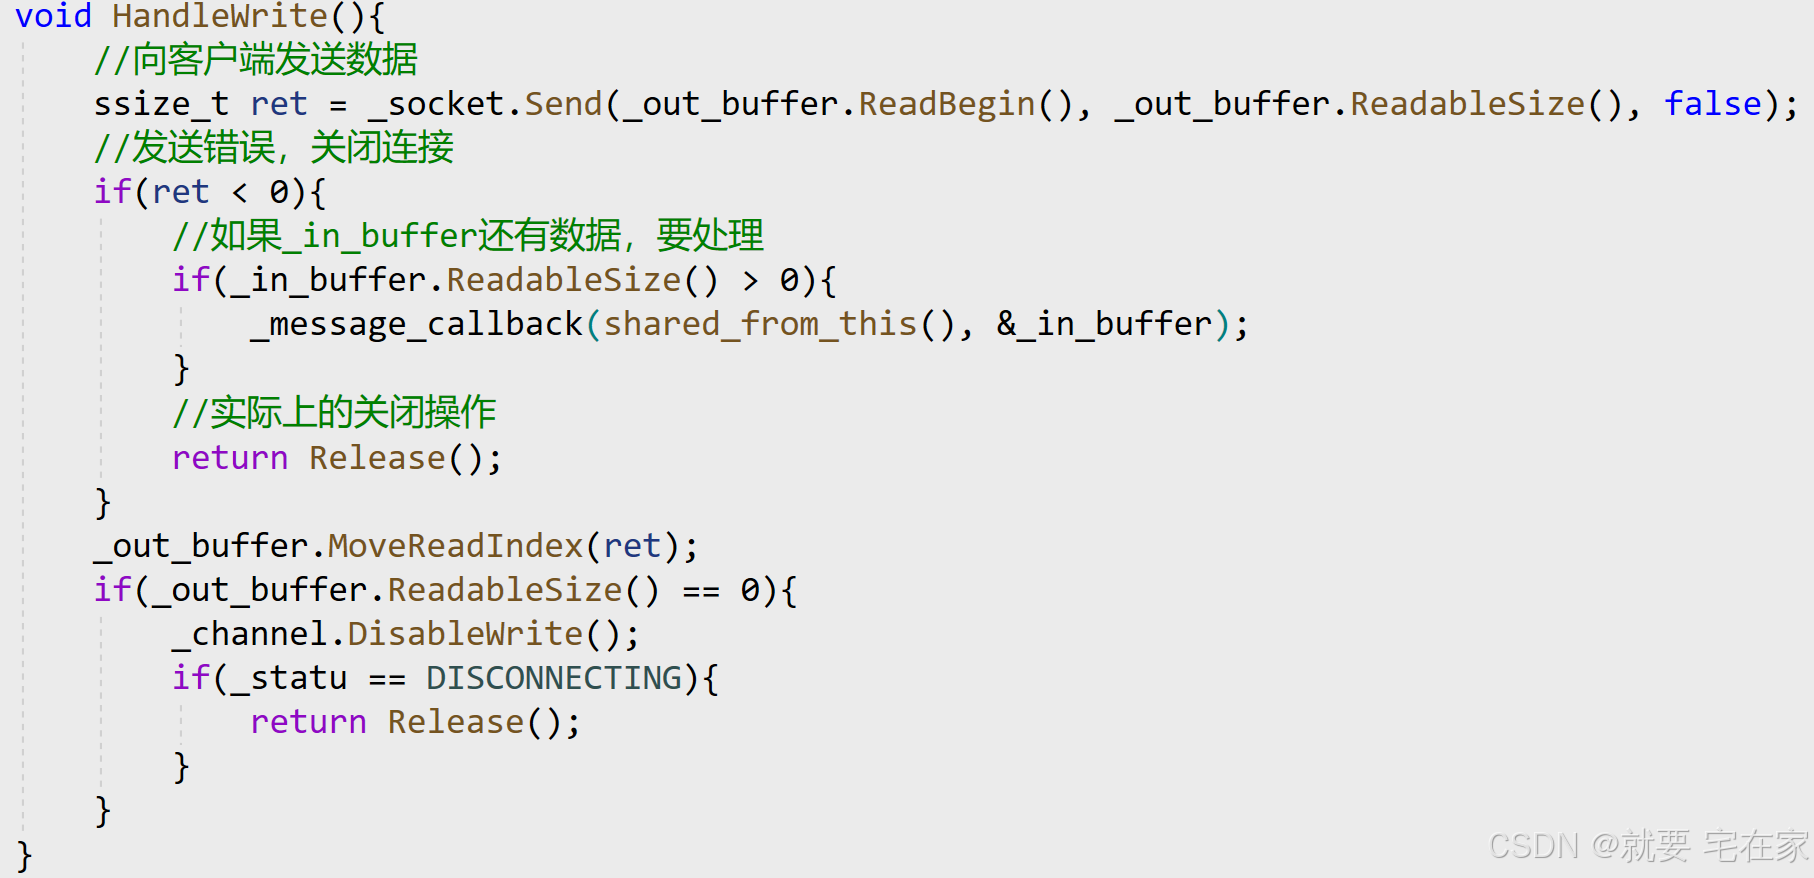
HandleWrite函数内部通过客户端Socket向客户端发数据。如果发送失败,当接收缓冲区中有数据说明还有没有处理的来自客户端的数据,进行处理;如果接收缓冲区中为空,则说明所有来自客户端的数据都已经处理完毕,调用Release关闭连接。当发送成功时,如果缓冲区中还有数据,不用关闭写事件监控,等待下次写即可;如果缓冲区为空,则全部数据已发送,关闭写事件监控;若全部数据发送完毕且当前状态为正在断连,调用Release关闭连接。
在Connection成员变量中,值得注意的是_conn_id与_sockfd。在完整代码中_conn_id用于向TimerWheel提供定时任务对应的索引。那么既然connection的_conn_id是独一无二的,我们为什么不直接用_sockfd作为索引呢,这是为了对变量进行解耦,避免socket fd出现多种含义。
Connection伪代码如下:
class Connection;
#define BUF_MAX 65535
typedef enum { DISCONNECTING, CONNECTING, CONNECTED, DISCONNECTED } ConnStatu;
using PtrConnection = std::shared_ptr<Connection>;//装载connection的智能指针
class Connection : public std::enable_shared_from_this<Connection> {private:uint64_t _conn_id;//客户端编号int _sockfd; //记录连接的客户端的socket fdbool _enable_inactive_release;//是否启动非活跃释放EventLoop* _loop; //指向对应的EventLoopConnStatu _statu; //客户端连接状态Socket _socket; //将客户端fd传入,即封装客户端socket,可以对该fd进行read/writeChannel _channel; //新建立的channelBuffer _in_buffer; //输入缓冲区Buffer _out_buffer; //输出缓冲区Any _context; //接收任意类型的数据using ConnectedCallback = std::function<void(const PtrConnection&)>;using MessageCallback = std::function<void(const PtrConnection&, Buffer*)>;using ClosedCallback = std::function<void(const PtrConnection&)>;using AnyEventCallback = std::function<void(const PtrConnection&)>;ConnectedCallback _connect_callback;MessageCallback _message_callback;ClosedCallback _closed_callback; AnyEventCallback _event_callback;      ClosedCallback _server_closed_callback; private:        void HandleRead(); //客户端读数据  void HandleWrite(); //向客户端发送数据                  void HandleClose();           void HandleError();void HandleEvent(); //任意事件处理           void EstablishedInLoop();                            void ReleaseInLoop();void ShutdownInLoop();                   void EnableInactiveReleaseInLoop(int sec);          void CancelInactiveReleaseInLoop();       void UpgradeInLoop( ... );           public:Connection(EventLoop* loop, uint64_t conn_id, int sockfd):_conn_id(conn_id), _sockfd(sockfd), _enable_inactive_release(false),_loop(loop), _statu(CONNECTING), _socket(_sockfd),_channel(loop, _sockfd){_channel.SetCloseCallback(std::bind(&Connection::HandleClose, this));_channel.SetEventCallback(std::bind(&Connection::HandleEvent, this));_channel.SetReadCallback(std::bind(&Connection::HandleRead, this));_channel.SetWriteCallback(std::bind(&Connection::HandleWrite, this));_channel.SetErrorCallback(std::bind(&Connection::HandleError, this));}~Connection(){ DBG_LOG("realease connection: %p", this); }//socketfdint Fd(){ return _sockfd; }//channel idint Id(){ return _conn_id; }//是否连接bool Connected(){ return _statu == CONNECTED; }//设置上下文void SetContext(const Any& context){ _context = context; }//获取上下文Any* GetContext(){ return &_context; }//设置回调函数(对外接口)void SetConnectedCallback(const ConnectedCallback& cb) { _connect_callback = cb; }void SetMessageCallback(const MessageCallback& cb) { _message_callback = cb; }void SetClosedCallback(const ClosedCallback& cb) { _closed_callback = cb; }void SetAnyEventCallback(const AnyEventCallback& cb) { _event_callback = cb; }void SetSrvClosedCallback(const ClosedCallback& cb) { _server_closed_callback = cb; }void Established(){_loop->RunInLoop(std::bind(&Connection::EstablishedInLoop, this));}void Send(const char* data, size_t len){Buffer buf;buf.Write(data, len);_loop->RunInLoop(std::bind(&Connection::SendInLoop, this, std::move(buf)));}void Shutdown(){_loop->RunInLoop(std::bind(&Connection::ShutdownInLoop, this));}void Release(){_loop->QueueInLoop(std::bind(&Connection::ReleaseInLoop, this));}void EnableInactiveRelease(int sec){_loop->RunInLoop(std::bind(&Connection::EnableInactiveReleaseInLoop, this, sec));}void CancelInactiveRelease(){_loop->RunInLoop(std::bind(&Connection::CancelInactiveReleaseInLoop, this));}void Upgrade(const Any& context,const ConnectedCallback& conn,const MessageCallback& msg,const ClosedCallback& closed,const AnyEventCallback& event){_loop->AssertInLoop();_loop->RunInLoop(std::bind(&Connection::UpgradeInLoop, this, context, conn, msg, closed, event));}
};
(8)Acceptor:
此类是对主线程(专门用于连接客户端的线程)进行封装,也就是说对于主从Reactor服务器,只有唯一的Acceptor类对象(主Reactor对象)。Acceptor在设计上较为简单,仅需设置读事件回调为接收新客户端连接请求即可。Acceptor构造时设置读事件回调HandleRead,HandleRead内再执行真正的客户端连接请求回调_accept_callback。
其余技术支持为epoll、socket,也都是对之前某些类的调用。在此展示全部代码自行参考了解:
class Acceptor {private:Socket _socket;EventLoop* _loop;Channel _channel;using AcceptCallback = std::function<void(int)>;AcceptCallback _accept_callback;private://读事件回调函数void HandleRead() {int newfd = _socket.Accept(); // 获取客户端的fd//获取失败,直接返回if(newfd < 0){return ;}if(_accept_callback) _accept_callback(newfd);}//创建服务端socketint CreateServer(int port) {bool ret = _socket.CreatServer(port);assert(ret == true);return _socket.Fd();}public://初始化Acceptor(EventLoop* loop, int port):_socket(CreateServer(port)),_loop(loop),_channel(loop, _socket.Fd()) {_channel.SetReadCallback(std::bind(&Acceptor::HandleRead, this));}//设置新连接回调函数void SetAcceptCallback(const AcceptCallback& cb) { _accept_callback = cb; }//启动监听,即启动读事件监控,开始接收客户端连接请求void Listen() { _channel.EnableRead(); }
};
(9)LoopThread & LoopThreadPool:
①LoopThread
此类是用于实现EventLoop与线程一对一关联的。
在之前的讲解中,我们一直有一个关键问题没有解决,那就是既然EventLoop与线程一对一,那么该怎么实现这种"绑定"操作呢?答案就是LoopThread类。
那么问题又来了,是先创建线程还是先创建EventLoop对象?答案是先创建线程,因为如果先创建EventLoop对象,那么由于线程并发的特点,可能会出现在绑定线程与EventLoop之前,主线程就调用EventLoop的情况,比如说主线程调用RunInLoop时判断线程一致性,但此时都还没有绑定,何谈一致性,也就出现程序逻辑问题了。
创建线性+绑定的操作都是在LoopThead的构造函数中实现,构造函数内部先创建线程并让线程执行ThreadEntry函数。ThreadEntry内部创建EventLoop对象并调用EventLoop的Start函数死循环等待处理事件。通过死循环的方式将线程固定在ThreadEntry函数内部,就实现了EventLoop与线程的一对一绑定。流程如下图:
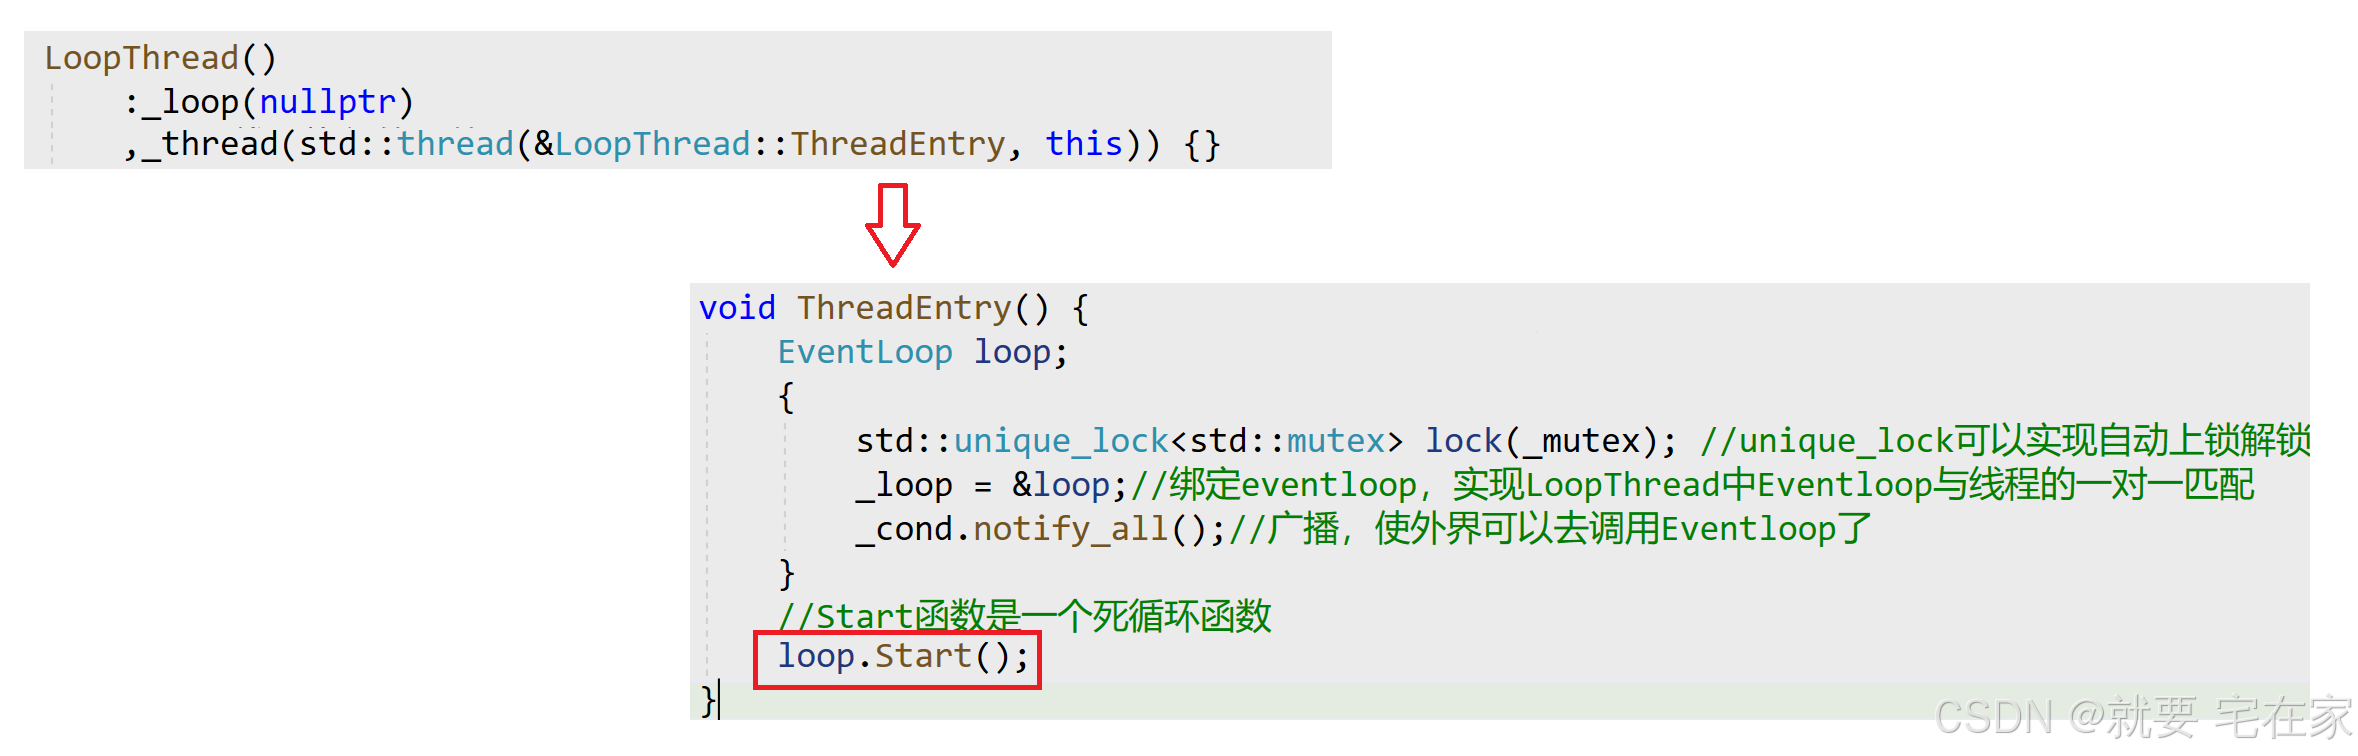
class LoopThread {private:std::mutex _mutex; //避免其他线程抢占对应EventLoop,执行匹配函数时,确保线程的一致性std::condition_variable _cond; //条件变量,只有Eventloop与线程一对一匹配之后,外界才能通过接口调用Eventloop,实现方法是条件变量EventLoop* _loop; //采用指针是因为要先创建线程,原因见笔记std::thread _thread; //创建的线程private:        void ThreadEntry() {            EventLoop loop;{std::unique_lock<std::mutex> lock(_mutex); _loop = &loop;//绑定eventloop,实现LoopThread中Eventloop与线程的一对一匹配_cond.notify_all();//广播,使外界可以去调用Eventloop了}//Start函数是一个死循环函数            loop.Start();}public:LoopThread():_loop(nullptr)          ,_thread(std::thread(&LoopThread::ThreadEntry, this)) {}EventLoop* GetLoop() {  //外界获取EventloopEventLoop* loop = nullptr;{   //GetLoop不会和ThreadEntry发生死锁//只有绑定Eventloop与线程之后调用GetLoop的线程才能获取mutex                std::unique_lock<std::mutex> lock(_mutex);_cond.wait(lock, [&](){ return _loop != nullptr; });loop = _loop;}return loop;}
};
②LoopThreadPool
此类是LoopThread的池化结构。在Connection那里说过,一个EventLoop对应多个Connection,所以设计一个EventLoop池,每当创建新的Connection时就从该池中选出一个EventLoop管理Connection对象。当然由于用LoopThread实现EventLoop与线程的绑定,所以实际上是LoopThread池,分配的是LoopThread。
分配方式上采用RR分配,公式如下:
index = (index + 1) % thread_count
作为一个池,最重要的就是初始化池以及分配池中资源(EventLoop)给外界,那么为什么分配资源时分配的是EventLoop对象而非LoopThread对象呢?这是因为在实际处理各种事件的时候都是调用的EventLoop,比如调用Start/RunInLoop等函数。LoopThread只是将EventLoop与线程绑定,在绑定好后LoopThead实际上就“失去”作用了,剩下的操作都可以由EventLoop独立完成。
LoopThread池在设计上很常规,看代码即可,不多赘述。需要指出的是,在Create创建池之后,池中的每个LoopThread对应线程就已经阻塞在Poller的Poll函数等待epoll_wait条件就绪了,还不太懂可以看看LoopThead章节以及Connection章节中Start流程图。另外,如果没有Create创建池,当需要从LoopThreadPool获取EventLoop,那么返回的应该是系统中唯一的EventLoop——主线程EventLoop。
LoopThreadPool代码如下:
class LoopThreadPool {private:int _thread_count = 0;int _next_idx = 0; //下一个从线程池中取出的线程的数组下标EventLoop* _baseloop; //这里的是主线程EventLoop,        std::vector<LoopThread*> _threads; //池std::vector<EventLoop*> _loops; //_loops用于对外,使外界获取EventLooppublic:        LoopThreadPool(EventLoop* baseloop):_baseloop(baseloop) {}//设置线程总个数void SetThreadCount(int count){if(count < 0){ERR_LOG("Thread Count error");return ;}_thread_count = count;}//创建池void Create() {if(_thread_count > 0) {int prev_count = _threads.size();_threads.resize(_thread_count);_loops.resize(_thread_count);for(int i = prev_count; i < _thread_count; i++) {_threads[i] = new LoopThread(); //建新LoopThread_loops[i] = _threads[i]->GetLoop();}}}//外界获取EventLoop,采用RR方式EventLoop* NextLoop() {if(_thread_count == 0) {return _baseloop; //线程池中无线程,所以返回主Reactor}_next_idx = (_next_idx + 1) % _thread_count;return _loops[_next_idx];}
};
(10)TcpServer:
此类的作用是封装整个服务器程序,使得只对外暴露TcpServer这一个类的接口。
在之前的讲解中我们不难发现,整个程序已经有了主线程Acceptor、服务线程池LoopThreadPool,但是没有将之有效的整合起来。TcpServer对此进一步封装,将两者整合实现真正的高并发服务器组件。
对于TcpServer类,只要有之前知识的积累,其内容很容易理解。因此我想做的是对TcpServer的执行流程进行梳理并解答一些疑问。
首先TcpServer在初始化时要对Acceptor进行构造,设置Acceptor的回调函数NewConnection并开启Acceptor的读事件监控(Listen)。即在TcpServer构造之后,服务器就已经开启对于客户端连接事件的监控,只不过还不能对事件进行收集响应。TcpServer调用Start函数时会启动_baseloop的Start函数,也就是执行epoll_wait系统调用,此时就拥有对客户端连接事件进行响应的能力。
当客户端发起连接请求时,通过epoll触发Acceptor线程的读事件监控,进而执行回调函数NewConnection连接客户端并在线程池中分配线程A。之后所有与该客户端线程进行交互的操作都由线程A完成。换句话说,Acceptor线程负责接收所有客户端的连接请求并将之引导给某一个线程,之后与该客户端的交互都由此线程完成。
class TcpServer {private:uint64_t _next_id; //下一个分配的线程编号int _port; //服务端端口号int _timeout;bool _enable_inactive_release; //是否开启非活跃连接超时释放EventLoop _baseloop; //与主线程绑定Acceptor _acceptor; //Acceptor主线程LoopThreadPool _pool; //执行流线程池std::unordered_map<uint64_t, PtrConnection> _conns;using ConnectedCallback = std::function<void(const PtrConnection&)>;using MessageCallback = std::function<void(const PtrConnection&, Buffer*)>;using ClosedCallback = std::function<void(const PtrConnection&)>;using AnyEventCallback = std::function<void(const PtrConnection&)>;using Functor = std::function<void()>;ConnectedCallback _connect_callback;MessageCallback _message_callback;ClosedCallback _closed_callback;AnyEventCallback _event_callback;ClosedCallback _server_closed_callback;private:void RunAfterInLoop(const Functor& task, int delay){_next_id++;_baseloop.TimerAdd(_next_id, delay, task);} void NewConnection(int fd) {_next_id++;PtrConnection conn(new Connection(_pool.NextLoop(), _next_id, fd));conn->SetMessageCallback(_message_callback);conn->SetClosedCallback(_closed_callback);conn->SetConnectedCallback(_connect_callback);conn->SetAnyEventCallback(_event_callback);conn->SetSrvClosedCallback(std::bind(&TcpServer::RemoveConnection, this, std::placeholders::_1));if(_enable_inactive_release) conn->EnableInactiveRelease(_timeout);conn->Established();_conns.insert(std::make_pair(_next_id, conn));}void RemoveConnectionInLoop(const PtrConnection& conn) {int id = conn->Id();auto it = _conns.find(id);if(it != _conns.end()) {_conns.erase(it);}}void RemoveConnection(const PtrConnection& conn) {_baseloop.RunInLoop(std::bind(&TcpServer::RemoveConnectionInLoop, this, conn));}public:TcpServer(int port):_port(port), _next_id(0), _enable_inactive_release(false) ,_acceptor(&_baseloop, _port), _pool(&_baseloop){_acceptor.SetAcceptCallback(std::bind(&TcpServer::NewConnection, this, std::placeholders::_1));//Listen:开启Acceptor的read,允许调用HandleRead_acceptor.Listen();}void SetConnectedCallback(const ConnectedCallback& cb) { _connect_callback = cb; }void SetMessageCallback(const MessageCallback& cb) { _message_callback = cb; }void SetClosedCallback(const ClosedCallback& cb) { _closed_callback = cb; }void SetAnyEventCallback(const AnyEventCallback& cb) { _event_callback = cb; }void SetThreadCount(int count) { return _pool.SetThreadCount(count); }void EnableInactiveRelease(int timeout) { _timeout = timeout; _enable_inactive_release = true; }//设置定时任务void RunAfter(const Functor& task, int delay){ _baseloop.RunInLoop(std::bind(&TcpServer::RunAfterInLoop, this, task, delay));}void Start(){_pool.Create();_baseloop.Start();}};四.HttpServer
HttpServer是实现前端功能的组件,负责解析Http请求报文、进行请求处理、组织Http响应报文等。与TcpServer的关系是通过TcpServer获取请求报文,并将响应报文交给TcpServer由其完成底层发送操作。
①主流程
建立服务器:创建HttpServer并执行初始化函数,设置TcpServer对象的connect回调(OnConnected)与message回调(OnMessage)。
connect回调:连接客户端后执行的函数。message回调:处理客户端http请求的函数。
建立服务器之后:同时完成TcpServer对象的构造函数,即设置连接客户端的NewConnection函数作为读事件回调+开启主线程的读事件监控。
设置线程池线程数量:调用SetThreadCount函数,执行TcpServer的SetThreadCount函数,内部执行LoopThreadPool类的SetThreadCount函数真正设置待创建线程池的线程总数。
启动服务器:调用Listen函数,执行TcpServer的Start函数,Start内部执行LoopThreadPool类的Create函数创建线程池+执行EventLoop类的Start函数开启事件监控。
客户端发起连接时:
①epoll收到读事件,主线程执行NewConnection函数连接客户端。
②NewConnection函数:创建此客户端的Connection对象+绑定线程池中的一个EventLoop+设置各类回调函数,如将建立服务器时设置的TcpServer中message回调(OnMessage)传入Connection对象,即真正设置客户端的http请求处理函数+通过Connection的Established函数开启读事件监控。
注意:Connection在初始化时设置读事件回调为HandleRead,HandleRead函数执行message回调(OnMessage)。
客户端发起http请求后:
①对应connection收到读事件请求(客户端http请求),执行读事件回调HandleRead。
②执行HandleRead:recv接收客户端发送请求并放入缓冲区,调用message回调(OnMessage)转递Connection & 缓冲区。
③执行OnMessage:解析缓冲区中http请求放入HttpRequest,创建HttpResponse根据HttpRequest请求信息进行处理并发送给客户端。
②缓冲区数据解析:
http请求格式:
| 首行(一行) | 请求方法+URL+协议版本 |
| 请求报头(每对请求一行) | 键值对结构 |
| 空行(一行) | 用于分隔请求报头与正文 |
| 请求正文(若干行,可没有) | GET方法无,POST方法有。格式有很多,如JSON、文本、XML,看场景。 |
http首行&正则化:
正则化有专门的匹配模板,相关博客网上很多,在此不多介绍。我重点说一说如何实现检测首行是否合法。
首行有相对固定的格式,因此采用C++中regex相关函数实现首行的正则化匹配。
bool ParseHttpLine(const std::string& line) {std::smatch matches;std::regex e("(GET|HEAD|POST|PUT|DELETE) ([^?]*)(?:\\?(.*))? (HTTP/1\\.[01])(?:\n|\r\n)?", std::regex::icase);bool ret = std::regex_match(line, matches, e);if(ret == false){...return false;}...//合法,对首行进行解析return true;}这份伪代码中通过设置正则化规则e,采用regex_match函数对首行进行匹配。我们知道http请求首行的格式为:请求方法+空格+URL+空格+协议版本。
(GET|HEAD|POST|PUT|DELETE) ([^?]*)(?:\\?(.*))? (HTTP/1\\.[01])(?:\n|\r\n)?
上述匹配规则即对应http请求首行的格式要求。
(GET|HEAD|POST|PUT|DELETE)即匹配某一个请求方法。
([^?]*)用于匹配URL。[^?]表示匹配任意非?字符,*表示匹配任意多个。
(?:\\?(.*))?用于匹配查询字符串。因为查询字符串可选,因此最后有一个'?'。此外(?: ... )元字符代表进行匹配但不会单独捕捉,又因为匹配规则是C++的字符串,所以转义时要加两个'\'才能表示一个'?',"\\?"中"\\"代表字符串转义出一个'\',所以regex_match匹配时观察到的是"\?",再进行转义,匹配'?'。但注意!之后是一个(),所以仅仅是不捕捉'?' 。(.*)匹配查询字符串。以“?id=1893&name=whu”为例,其捕捉结果是:“id=1893&name=whu”。
(HTTP/1\\.[01])用于匹配协议版本。
(?:\n|\r\n)?用于匹配结尾的换行。防止出现因为换行而导致的匹配失败。
正则化解析合法后,由于regex_match的输出型参数已经获取了各个捕捉组,因此可以直接获取请求方法、URL、查询字符串、协议版本。需要注意的一点是,因为URL中可能存在一些容易产生歧义的参数,因此URL与查询字符串在http传输时要进行编码。所以解析时需要对字符串解码才能获得真正的URL与查询字符串。
网上有许多关于URL编码规则的文章,在此仅简单介绍:大写和小写英文字母、数字、“- _ . ~”4 个特殊字符以及所有保留字符可以不经编码直接使用。其余字符根据ASCII码转为十六进制形式并在前头加上'%',空格除了上述编码外还可以用加号表示。例如
| 字符 | ASCII | 编码后 |
| : | 58 | %3A |
| A | 65 | A |
| 空格 | 32 | %20 或 + |
http请求报头:
请求报头结构为key: value的结构,按照常规字符串匹配的逻辑编写代码即可。\r\n需要单独匹配,同时每行KV键值对结尾的\r与\n要注意去掉,避免影响解析。
http请求正文:
注意http请求在传入的时候是直接放入buf中,因此存在一种情况,请求正文过长,需要分批进行请求。这时报头Content-Length字段减去已经被HttpRequest接收的正文长度就是还有多少正文待接收,进而判断正文是否接收完毕。当待接收长度为0时,说明本次请求已经全部接收,可以开始对报文进行解析。
③信息处理与返回:
请求解析:
首先判断请求的是静态资源还是动态资源。
请求静态资源:需要判断服务器中是否存在静态资源、请求方法是否是GET/HEAD、请求路径是否合法、如果路径是文件根目录(即'\')那么获取的是默认文档。一切就绪后,将文档内容写入HttpResponse的缓冲区中并完善HttpResponse。
请求动态资源:根据请求方法和请求资源,调用对应的请求函数进行处理,完善HttpResponse。
完善HttpResponse:即完善Http响应报头,填充响应行、响应头、响应正文。具体来讲需要留意传来的报文是否是短连接、是否有重定向(设置重定向链接)、注意要设置空格与换行。
创建响应报文:HTTP响应报文所需的响应行、响应头、响应正文都在HttpResponse中以类内成员的形式存放,获取这些成员按照响应格式组成字符串,该字符串就是响应报文。
发送给客户端:
我们采取调用Connection的Send函数发起对客户端的响应。但并非直接相应,Send内部调用SendInLoop并传入响应报文。SendInLoop将响应报文传入输出缓冲区,调用EnableWrite开启写事件监控。我们知道,写事件默认就是就绪的(因为写缓冲区一般都是不满的)。所以会执行直接写事件回调。
写事件回调函数在建立客户端链接时,由Connection的初始化函数完成回调设置,所设回调为Connection的HandleWrite函数,HandleWrite函数内才是真真正正向客户端fd发送数据。
五.项目源码
代码地址:git all: home of head - Gitee.com![]() https://gitee.com/newgte/git-all/tree/master/%E9%A1%B9%E7%9B%AE/%E4%BB%BFmuduo%E9%AB%98%E5%B9%B6%E5%8F%91%E6%9C%8D%E5%8A%A1%E5%99%A8
https://gitee.com/newgte/git-all/tree/master/%E9%A1%B9%E7%9B%AE/%E4%BB%BFmuduo%E9%AB%98%E5%B9%B6%E5%8F%91%E6%9C%8D%E5%8A%A1%E5%99%A8
如有错误,敬请斧正