【OpenGL】openGL常见矩阵
参考博客:https://www.opengl-tutorial.org/cn/beginners-tutorials/tutorial-3-matrices/
一、齐次坐标(Homogeneous coordinates)
目前为止,我们仍然把三维顶点视为三元组(x,y,z)。现在引入一个新的分量w,得到向量(x,y,z,w)。请先记住以下两点(稍后我们会给出解释):
- 若w == 1,则向量(x, y, z, 1)为空间中的点。
- 若w == 0,则向量(x, y, z, 0)为方向。
(请务必将此牢记在心。)
-
二者有什么区别呢?对于旋转,这点区别倒无所谓。当您旋转点和方向时,结果是一样的。但对于平移(将点沿着某个方向移动)情况就不同了。”平移一个方向”是毫无意义的。
-
齐次坐标使得我们可以用同一个公式对点和方向作运算。
二、变换矩阵(Transformation matrices)
2.1 矩阵简介
简而言之,矩阵就是一个行列数固定的、纵横排列的数表。比如,一个2x3矩阵看起来像这样:
[257981]\begin{bmatrix} 2 & 5 & 7 \\ 9 & 8 & 1 \end{bmatrix} [295871]
三维图形学中我们只用到4x4矩阵,它能对顶点(x,y,z,w)作变换。这一变换是用矩阵左乘顶点来实现的:
[abcdefghijklmnop]×[xyzw]=[ax+by+cz+dwex+fy+gz+hwix+jy+kz+lwmx+ny+oz+pw]\begin{bmatrix} a & b & c & d \\ e & f & g & h \\ i & j & k & l \\ m & n & o & p \end{bmatrix} \times \begin{bmatrix} x \\ y \\ z \\ w \end{bmatrix} = \begin{bmatrix} ax + by + cz + dw \\ ex + fy + gz + hw \\ ix + jy + kz + lw \\ mx + ny + oz + pw \end{bmatrix} aeimbfjncgkodhlp×xyzw=ax+by+cz+dwex+fy+gz+hwix+jy+kz+lwmx+ny+oz+pw
矩阵x顶点(记住顺序!!矩阵左乘顶点,顶点用列向量表示)= 变换后的顶点
这看上去复杂,实则不然。左手指着a,右手指着x,得到_ax_。 左手移向右边一个数b,右手移向下一个数y,得到_by_。依次类推,得到_cz_、dw。最后求和ax + by + cz + dw,就得到了新的x!每一行都这么算下去,就得到了新的(x, y, z, w)向量。
这种重复无聊的计算就让计算机代劳吧。
用C++,GLM表示:
glm::mat4 myMatrix;
glm::vec4 myVector;
// fill myMatrix and myVector somehow
glm::vec4 transformedVector = myMatrix * myVector; // Again, in this order ! this is important.
使用QT可以这样做:
QMatrix4x4 myMatrix;
QVector4D myVector;
QVector4D transformVector = myMatrix * myVector;
用GLSL表示:
mat4 myMatrix;
vec4 myVector;
// fill myMatrix and myVector somehow
vec4 transformedVector = myMatrix * myVector; // Yeah, it's pretty much the same than GLM
(还没把这些代码粘贴到程序里调试吗?赶紧试试!)
2.2 平移矩阵(Translation matrices)
平移矩阵是最简单的变换矩阵。平移矩阵是这样的:
[100X010Y001Z0001]\begin{bmatrix} 1 & 0 & 0 & X \\ 0 & 1 & 0 & Y \\ 0 & 0 & 1 & Z \\ 0 & 0 & 0 & 1 \end{bmatrix} 100001000010XYZ1
其中,X、Y、Z是点的位移增量。
例如,若想把向量(\begin{bmatrix}10 \ 10 \ 10 \ 1\end{bmatrix})沿X轴方向平移10个单位,可得:
[10010010000100001]∗[1010101]=[1∗10+0∗10+0∗10+10∗10∗10+1∗10+0∗10+0∗10∗10+0∗10+1∗10+0∗10∗10+0∗10+0∗10+1∗1]=[10+0+0+100+10+0+00+0+10+00+0+0+1]=[2010101]\begin{bmatrix} 1 & 0 & 0 & 10 \\ 0 & 1 & 0 & 0 \\ 0 & 0 & 1 & 0 \\ 0 & 0 & 0 & 1 \end{bmatrix} * \begin{bmatrix} 10 \\ 10 \\ 10 \\ 1 \end{bmatrix}= \begin{bmatrix} 1*10 + 0*10 + 0*10 + 10*1 \\ 0*10 + 1*10 + 0*10 + 0*1 \\ 0*10 + 0*10 + 1*10 + 0*1 \\ 0*10 + 0*10 + 0*10 + 1*1 \end{bmatrix}= \begin{bmatrix} 10 + 0 + 0 + 10 \\ 0 + 10 + 0 + 0 \\ 0 + 0 + 10 + 0 \\ 0 + 0 + 0 + 1 \end{bmatrix}= \begin{bmatrix} 20 \\ 10 \\ 10 \\ 1 \end{bmatrix} 10000100001010001∗1010101=1∗10+0∗10+0∗10+10∗10∗10+1∗10+0∗10+0∗10∗10+0∗10+1∗10+0∗10∗10+0∗10+0∗10+1∗1=10+0+0+100+10+0+00+0+10+00+0+0+1=2010101
(算算看!一定得亲手算!!)
这样就得到了齐次向量[2010101]\begin{bmatrix}20 \\ 10 \\ 10 \\ 1\end{bmatrix}2010101!记住,末尾的1表示这是一个点,而不是方向。经过变换计算后,点仍然是点。
下面来看看,对一个代表Z轴负方向的向量作上述平移变换会得到什么结果:
[10010010000100001]∗[00−10]=[1∗0+0∗0+0∗0+10∗00∗0+1∗0+0∗0+0∗00∗(−1)+0∗(−1)+1∗(−1)+0∗(−1)0∗0+0∗0+0∗0+1∗0]=[0+0+0+00+0+0+00+0+(−1)+00+0+0+0]=[00−10]\begin{bmatrix} 1 & 0 & 0 & 10 \\ 0 & 1 & 0 & 0 \\ 0 & 0 & 1 & 0 \\ 0 & 0 & 0 & 1 \end{bmatrix} * \begin{bmatrix} 0 \\ 0 \\ -1 \\ 0 \end{bmatrix}= \begin{bmatrix} 1*0 + 0*0 + 0*0 + 10*0 \\ 0*0 + 1*0 + 0*0 + 0*0 \\ 0*(-1) + 0*(-1) + 1*(-1) + 0*(-1) \\ 0*0 + 0*0 + 0*0 + 1*0 \end{bmatrix}= \begin{bmatrix} 0 + 0 + 0 + 0 \\ 0 + 0 + 0 + 0 \\ 0 + 0 + (-1) + 0 \\ 0 + 0 + 0 + 0 \end{bmatrix}= \begin{bmatrix} 0 \\ 0 \\ -1 \\ 0 \end{bmatrix} 10000100001010001∗00−10=1∗0+0∗0+0∗0+10∗00∗0+1∗0+0∗0+0∗00∗(−1)+0∗(−1)+1∗(−1)+0∗(−1)0∗0+0∗0+0∗0+1∗0=0+0+0+00+0+0+00+0+(−1)+00+0+0+0=00−10
那怎么用代码表示平移变换呢?
用C++,GLM表示:
#include <glm/gtx/transform.hpp> // after <glm/glm.hpp>glm::mat4 myMatrix = glm::translate(glm::mat4(), glm::vec3(10.0f, 0.0f, 0.0f));
glm::vec4 myVector(10.0f, 10.0f, 10.0f, 0.0f);
glm::vec4 transformedVector = myMatrix * myVector; // guess the result
用QT,QMatrix4x4表示:
//平移x,y,z方向的大小
QMatrix4x4 MyGLWidget::translateMatrix(float x, float y, float z)
{  QMatrix4x4 translate_matrix;  translate_matrix.translate(x,y,z);  return translate_matrix;
}
**用GLSL表示:**呃,实际中我们几乎不用GLSL计算变换矩阵。大多数情况下在C++代码中用glm::translate()算出矩阵,然后把它传给GLSL。在GLSL中只做一次乘法:
vec4 transformedVector = myMatrix * myVector;
2.3、单位矩阵(Identity matrix)
单位矩阵很特殊,它什么也不做。单位矩阵的身份和自然数“1”一样基础而重要,因此在这里要特别提及一下。
[1000010000100001]×[xyzw]=[1∗x+0∗y+0∗z+0∗w0∗x+1∗y+0∗z+0∗w0∗x+0∗y+1∗z+0∗w0∗x+0∗y+0∗z+1∗w]=[x+0+0+00+y+0+00+0+z+00+0+0+w]=[xyzw]\begin{bmatrix} 1 & 0 & 0 & 0 \\ 0 & 1 & 0 & 0 \\ 0 & 0 & 1 & 0 \\ 0 & 0 & 0 & 1 \end{bmatrix} \times \begin{bmatrix} x \\ y \\ z \\ w \end{bmatrix}= \begin{bmatrix} 1*x + 0*y + 0*z + 0*w \\ 0*x + 1*y + 0*z + 0*w \\ 0*x + 0*y + 1*z + 0*w \\ 0*x + 0*y + 0*z + 1*w \end{bmatrix}= \begin{bmatrix} x + 0 + 0 + 0 \\ 0 + y + 0 + 0 \\ 0 + 0 + z + 0 \\ 0 + 0 + 0 + w \end{bmatrix}= \begin{bmatrix} x \\ y \\ z \\ w \end{bmatrix} 1000010000100001×xyzw=1∗x+0∗y+0∗z+0∗w0∗x+1∗y+0∗z+0∗w0∗x+0∗y+1∗z+0∗w0∗x+0∗y+0∗z+1∗w=x+0+0+00+y+0+00+0+z+00+0+0+w=xyzw
用C++表示:
glm::mat4 myIdentityMatrix = glm::mat4(1.0);
用QT表示:
QMatrix4x4 myIdentityMatrix;
myIdentityMatrix.setToIdentity();
2.4 缩放矩阵(Scaling matrices)
缩放矩阵也很简单:
[x0000y0000z00001]\begin{bmatrix} x & 0 & 0 & 0 \\ 0 & y & 0 & 0 \\ 0 & 0 & z & 0 \\ 0 & 0 & 0 & 1 \end{bmatrix} x0000y0000z00001
例如把一个向量(点或方向皆可)沿各方向放大2倍:
[2000020000200001]×[xyzw]=[2∗x+0∗y+0∗z+0∗w0∗x+2∗y+0∗z+0∗w0∗x+0∗y+2∗z+0∗w0∗x+0∗y+0∗z+1∗w]=[2∗x+0+0+00+2∗y+0+00+0+2∗z+00+0+0+1∗w]=[2∗x2∗y2∗zw]\begin{bmatrix} 2 & 0 & 0 & 0 \\ 0 & 2 & 0 & 0 \\ 0 & 0 & 2 & 0 \\ 0 & 0 & 0 & 1 \end{bmatrix} \times \begin{bmatrix} x \\ y \\ z \\ w \end{bmatrix}= \begin{bmatrix} 2*x + 0*y + 0*z + 0*w \\ 0*x + 2*y + 0*z + 0*w \\ 0*x + 0*y + 2*z + 0*w \\ 0*x + 0*y + 0*z + 1*w \end{bmatrix}= \begin{bmatrix} 2*x + 0 + 0 + 0 \\ 0 + 2*y + 0 + 0 \\ 0 + 0 + 2*z + 0 \\ 0 + 0 + 0 + 1*w \end{bmatrix}= \begin{bmatrix} 2*x \\ 2*y \\ 2*z \\ w \end{bmatrix} 2000020000200001×xyzw=2∗x+0∗y+0∗z+0∗w0∗x+2∗y+0∗z+0∗w0∗x+0∗y+2∗z+0∗w0∗x+0∗y+0∗z+1∗w=2∗x+0+0+00+2∗y+0+00+0+2∗z+00+0+0+1∗w=2∗x2∗y2∗zw
w还是没变。您也许会问:”缩放一个向量”有什么用?嗯,大多数情况下是没什么用,所以一般不会去缩放向量;但在某些特殊情况下它就派上用场了。(顺便说一下,单位矩阵只是缩放矩阵的一个特例,其(X, Y, Z) = (1, 1, 1)。单位矩阵同时也是旋转矩阵的一个特例,其(X, Y, Z)=(0, 0, 0))。
用C++表示:
// Use #include <glm/gtc/matrix_transform.hpp> and #include <glm/gtx/transform.hpp>
glm::mat4 myScalingMatrix = glm::scale(2.0f, 2.0f ,2.0f);
用QT表示:
//缩放x,y,z的大小比例
QMatrix4x4 MyGLWidget::scaleMatrix(float x, float y, float z) {  QMatrix4x4 scale_matrix;  scale_matrix.scale(x,y,z);  return scale_matrix;
}
2.5、旋转矩阵(Rotation matrices)
旋转矩阵比较复杂。这里略过细节,因为日常应用中,您并不需要知道矩阵的内部构造。 想了解更多,请看“矩阵和四元组常见问题”(这个资源很热门,应该有中文版吧)。
用C++表示:
// Use #include <glm/gtc/matrix_transform.hpp> and #include <glm/gtx/transform.hpp>
glm::vec3 myRotationAxis( ??, ??, ??);
glm::rotate( angle_in_degrees, myRotationAxis );
用QT表示:
//默认逆时针angle,负数表示顺时针,绕(0,0,0)->(x,y,z)指向的方向旋转
QMatrix4x4 MyGLWidget::rotateMatrix(float angle,float x,float y,float z) {QMatrix4x4 rotate_matrix;rotate_matrix.rotate(angle,x,y,z);return rotate_matrix;
}
2.6 累积变换
前面已经学习了如何旋转、平移和缩放向量。把这些矩阵相乘就能将它们组合起来,例如:
TransformedVector = TranslationMatrix * RotationMatrix * ScaleMatrix * OriginalVector;
!!!注意!!!这行代码首先执行缩放,接着旋转,最后才是平移。这就是矩阵乘法的工作方式。
变换的顺序不同,得出的结果也不同。您不妨亲自尝试一下:
- 向前一步(小心别磕着爱机)然后左转;
- 左转,然后向前一步
实际上,上述顺序正是你在变换游戏角色或者其他物体时所需的:先缩放;再调整方向;最后平移。例如,假设有个船的模型(为简化,略去旋转):
-
错误做法:
- 按(10, 0, 0)平移船体。船体中心目前距离原点10个单位。
- 将船体放大2倍。以原点为参照,每个坐标都变成原来的2倍,就出问题了。最后您得到的是一艘放大的船,但其中心位于2*10=20。这并非您预期的结果。
-
正确做法:
- 将船体放大2倍,得到一艘中心位于原点的大船。
- 平移船体。船大小不变,移动距离也正确。
矩阵-矩阵乘法和矩阵-向量乘法类似,所以这里也会省略一些细节,不清楚的读者请移步矩阵和四元组常见问题 。现在,就让计算机来算:
用C++,GLM表示:
glm::mat4 myModelMatrix = myTranslationMatrix * myRotationMatrix * myScaleMatrix;
glm::vec4 myTransformedVector = myModelMatrix * myOriginalVector;
用QT表示:
QMatrix4x4 scale_matrix = scaleMatrix(1.0,1.0,0.0);
QMatrix4x4 translate_matrix = translateMatrix(0.0,0.0,0.0);  QMatrix4x4 rotate_matrix = rotateMatrix(0.0f,0.0f,0.0f,0.0f);  //叠加操作
QMatrix4x4 transform_matrix = translate_matrix * rotate_matrix * scale_matrix;
用GLSL表示:
mat4 transform = mat2 * mat1;
vec4 out_vec = transform * in_vec;
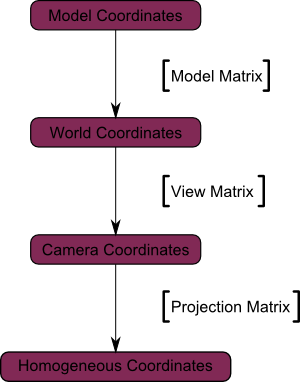
三、模型(Model)、观察(View)和投影(Projection)矩阵
在接下来的课程中,我们假定您已知如何绘制Blender经典模型小猴Suzanne。
利用模型、观察和投影矩阵,可以将变换过程清晰地分解为三个阶段。虽然此法并非必需(前两课我们就没用这个方法嘛),但采用此法较为稳妥。我们将看到,这种公认的方法对变换流程作了清晰的划分。
3.1 模型矩阵
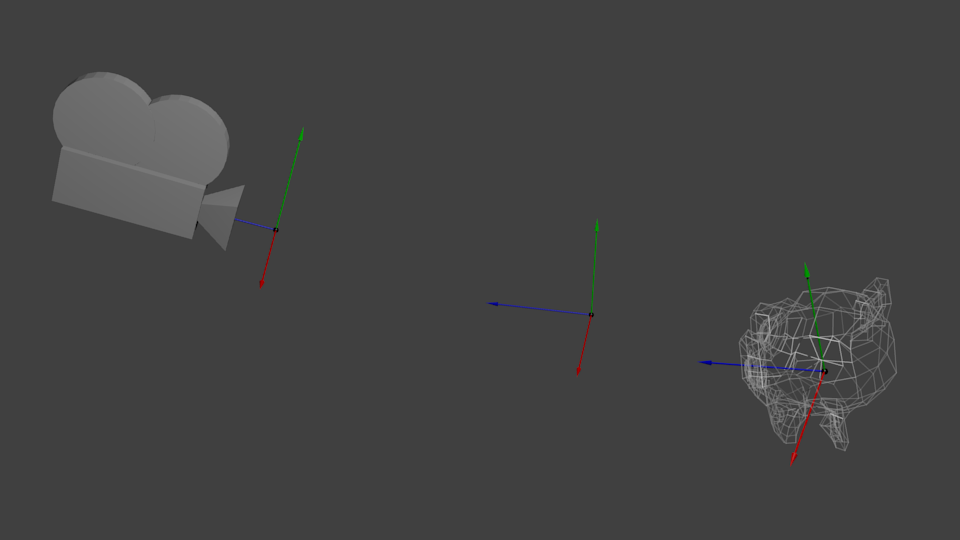
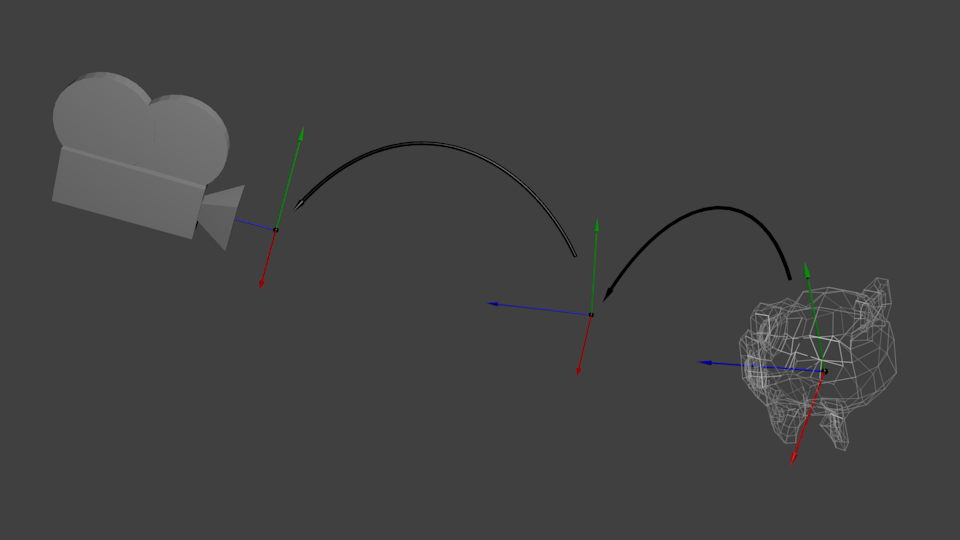
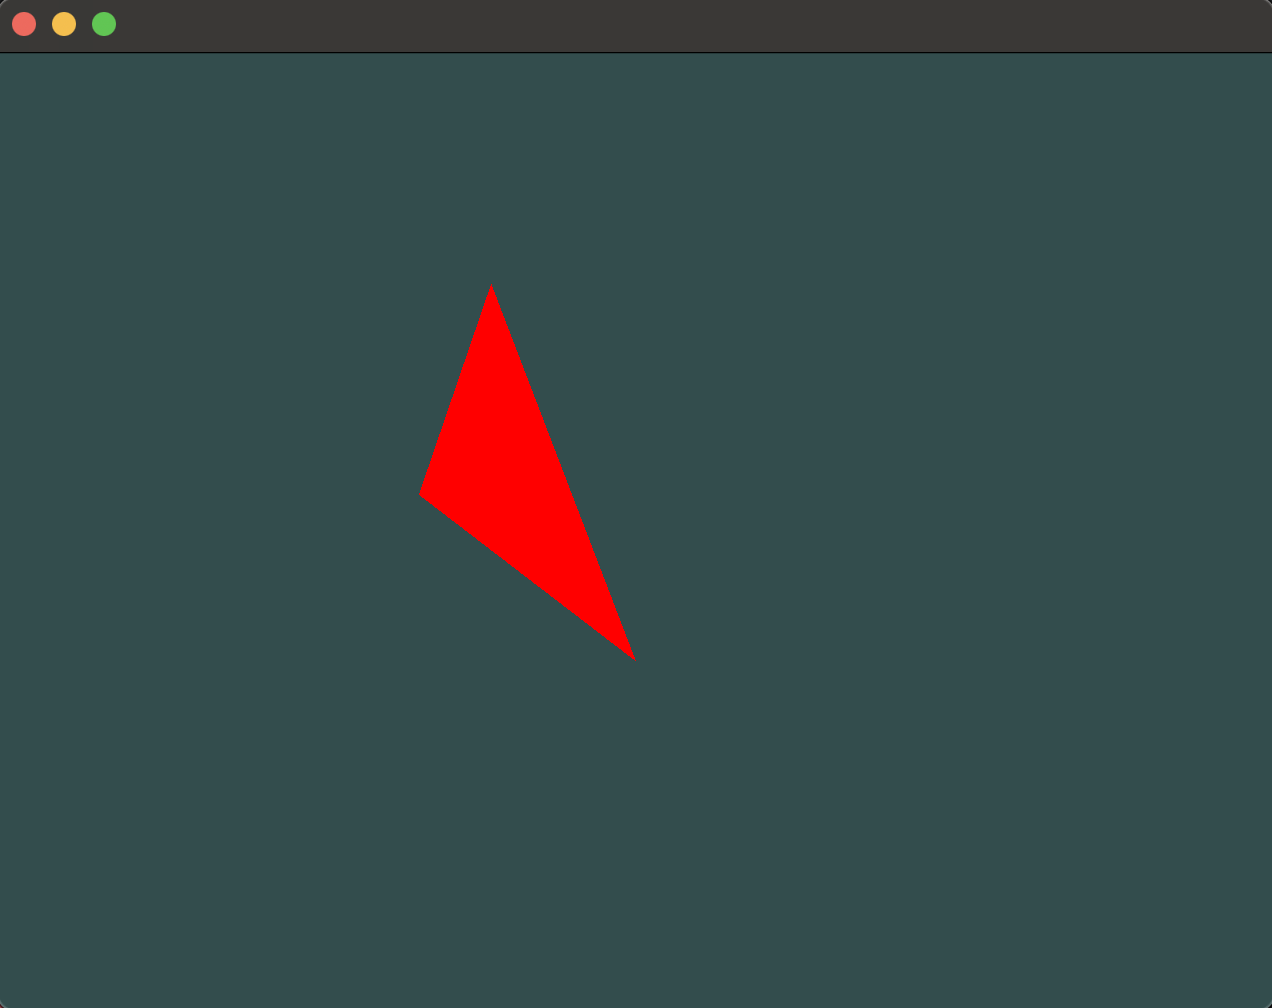
这个三维模型和可爱的红色三角形一样,由一组顶点定义。顶点的XYZ坐标是相对于物体中心定义的:也就是说,若某顶点位于(0,0,0),则其位于物体的中心。
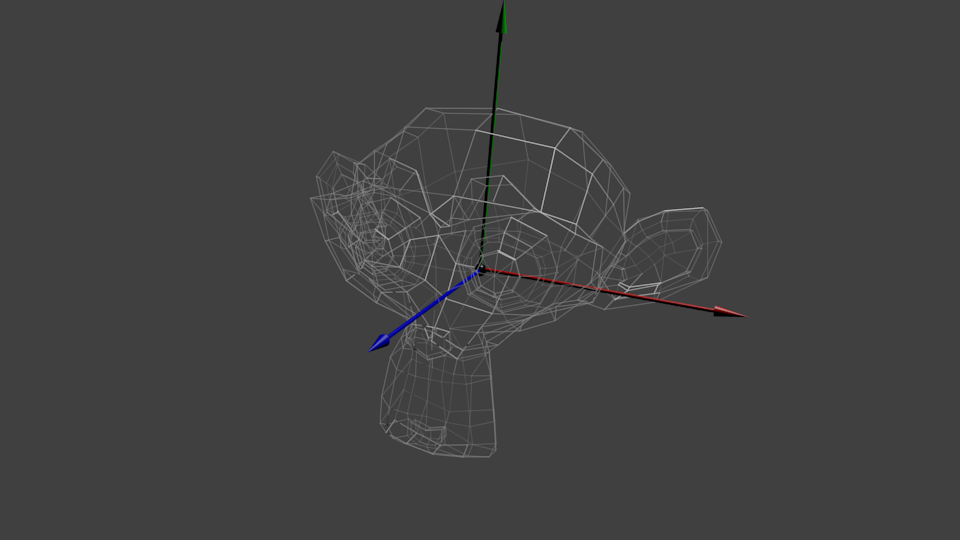
我们希望能够移动它,玩家也需要用键鼠控制这个模型。这很简单,只需记住:缩放_旋转_平移就够了。在每一帧中,用算出的这个矩阵去乘(在GLSL中乘,不是在C++中!)所有的顶点,物体就会移动。唯一不动的是世界空间(World Space)的中心。
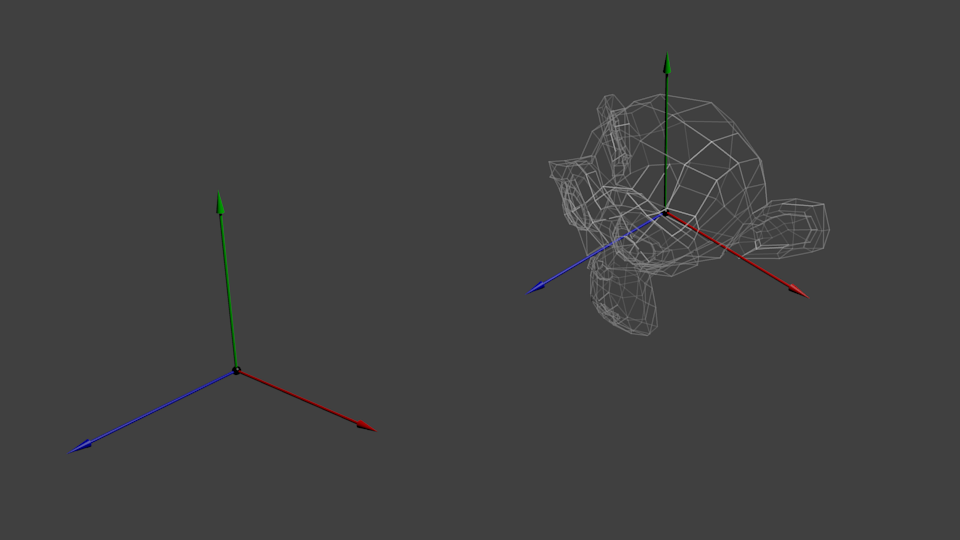
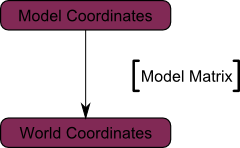
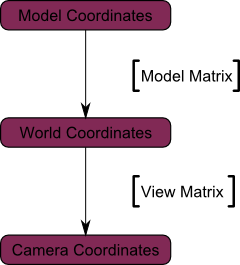
现在,物体所有顶点都位于_世界空间_。下图中黑色箭头的意思是:从模型空间(Model Space)(顶点都相对于模型的中心定义)变换到世界空间(顶点都相对于世界空间中心定义)。
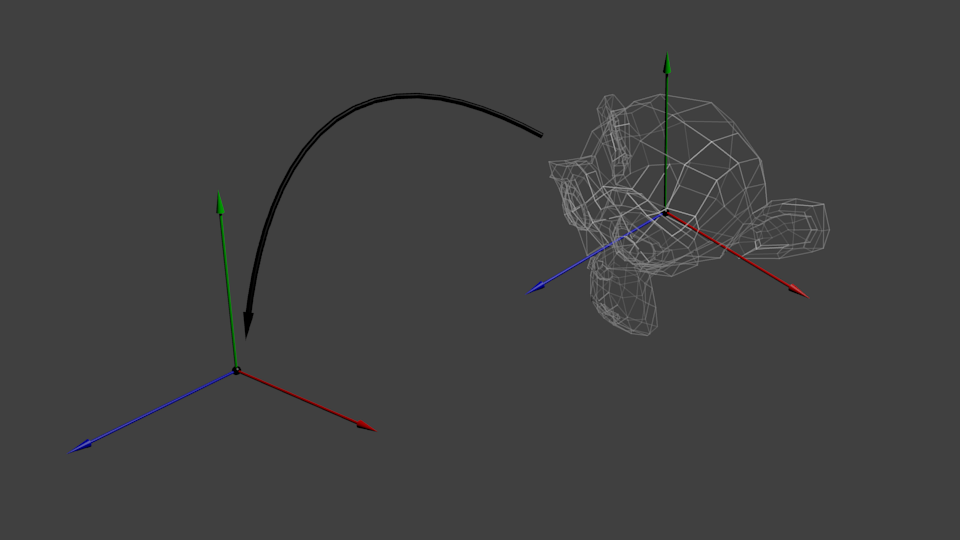
下图概括了这一过程:
3.2 观察矩阵
这里再引用一下《飞出个未来》:
引擎推动的不是飞船而是宇宙。飞船压根就没动过。
仔细想想,摄像机的原理也是相通的。如果想换个角度观察一座山,您可以移动摄像机也可以……移动山。后者在实际中不可行,在计算机图形学中却十分方便。
起初,摄像机位于世界坐标系的原点。移动世界只需乘一个矩阵。假如你想把摄像机向右(X轴正方向)移动3个单位,这和把整个世界(包括网格)向左(X轴负方向)移3个单位是等效的!脑子有点乱?来写代码吧:
// Use #include <glm/gtc/matrix_transform.hpp> and #include <glm/gtx/transform.hpp>
glm::mat4 ViewMatrix = glm::translate(glm::mat4(), glm::vec3(-3.0f, 0.0f, 0.0f));
下图展示了:从世界空间(顶点都相对于世界空间中心定义)到摄像机空间(Camera Space,顶点都相对于摄像机定义)的变换。
趁脑袋还没爆炸,来欣赏一下GLM强大的glm::LookAt函数吧:
glm::mat4 CameraMatrix = glm::LookAt(cameraPosition, // the position of your camera, in world spacecameraTarget,   // where you want to look at, in world spaceupVector        // probably glm::vec3(0,1,0), but (0,-1,0) would make you looking upside-down, which can be great too
);
在QT中是这样的:
//观察矩阵
QVector3D camera_pos = {4,4,3};
QVector3D look_dir = {1,0,0};
QVector3D up_dir = {0,1,0};  //lookAt
QMatrix4x4 view_matrix;
view_matrix.lookAt(camera_pos,look_dir,up_dir);
下图解释了上述变换过程:
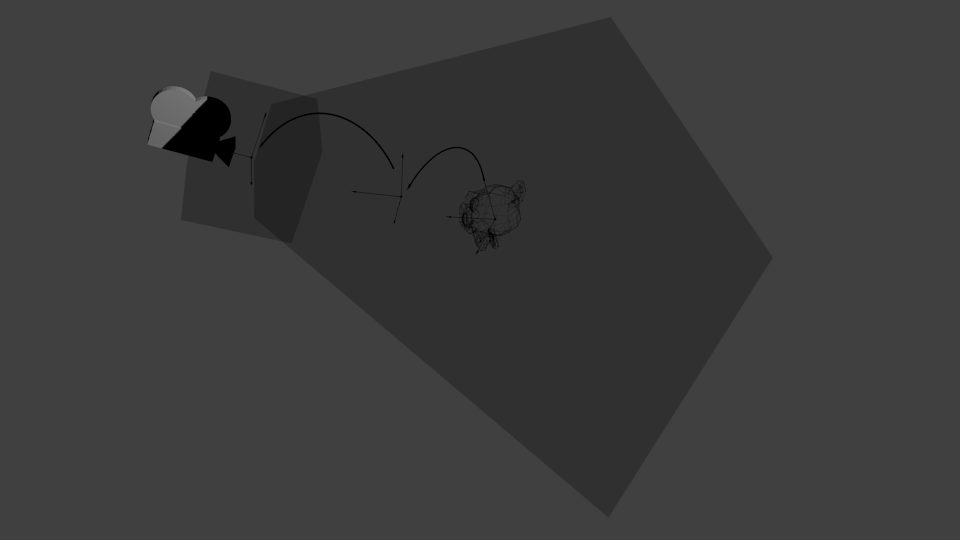
3.3 投影矩阵
现在,我们处于摄像机空间中。这意味着,经历了这么多变换后,现在一个坐标X == 0且Y == 0的顶点,应该被画在屏幕的中心。但仅有x、y坐标还不足以确定物体是否应该画在屏幕上:它到摄像机的距离(z)也很重要!两个x、y坐标相同的顶点,z值较大的一个将会最终显示在屏幕上。
这就是所谓的透视投影(perspective projection):
好在用一个4x4矩阵就能表示这个投影¹ :
// Generates a really hard-to-read matrix, but a normal, standard 4x4 matrix nonetheless
glm::mat4 projectionMatrix = glm::perspective(glm::radians(FoV), // The vertical Field of View, in radians: the amount of "zoom". Think "camera lens". Usually between 90° (extra wide) and 30° (quite zoomed in)4.0f / 3.0f,       // Aspect Ratio. Depends on the size of your window. Notice that 4/3 == 800/600 == 1280/960, sounds familiar ?0.1f,              // Near clipping plane. Keep as big as possible, or you'll get precision issues.100.0f             // Far clipping plane. Keep as little as possible.
);
在QT中可以这样使用:
//投影矩阵
float angle = 45;
float aspect = this->width() * 1.0f / this->height();//距离相机的位置,渲染范围:0.1-100
float near_plane = 0.1f;
float far_plane = 100.f;QMatrix4x4 projection_matrix;
projection_matrix.perspective(angle,aspect,near_plane,far_plane);
最后一个变换:
从摄像机空间(顶点都相对于摄像机定义)到齐次坐空间(Homogeneous Space)(顶点都在一个小立方体中定义。立方体内的物体都会在屏幕上显示)的变换。
最后一幅图示:
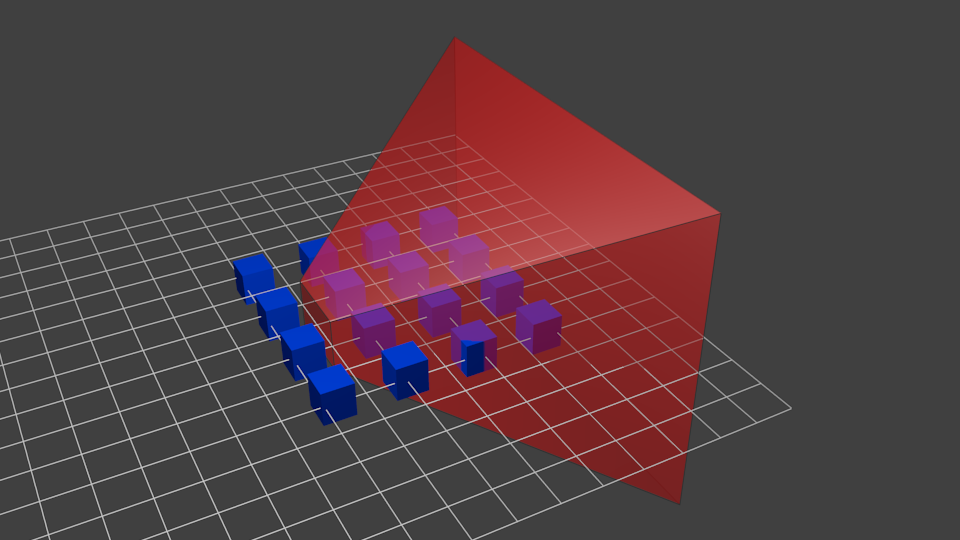
再添几张图,以便大家更好地理解投影变换。投影前,蓝色物体都位于摄像机空间中,红色的东西是摄像机的平截头体(frustum):这是摄像机实际能看见的区域。
用投影矩阵去乘前面的结果,得到如下效果:
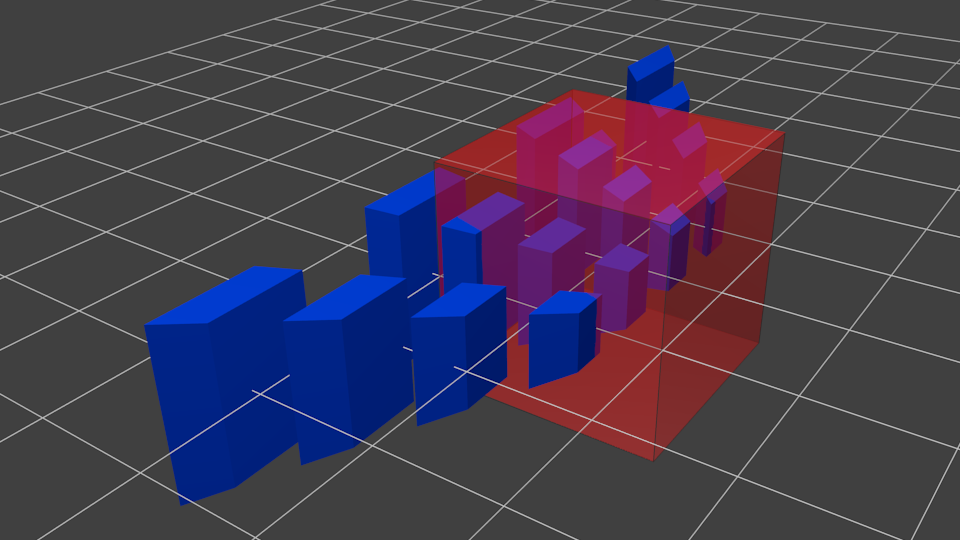
此图中,平截头体变成了一个正方体(每条棱的范围都是-1到1,图不太明显),所有的蓝色物体都经过了相同的变形。因此,离摄像机近的物体就显得大一些,远的显得小一些。这和现实生活一样!
让我们从平截头体的”后面”看看它们的模样:
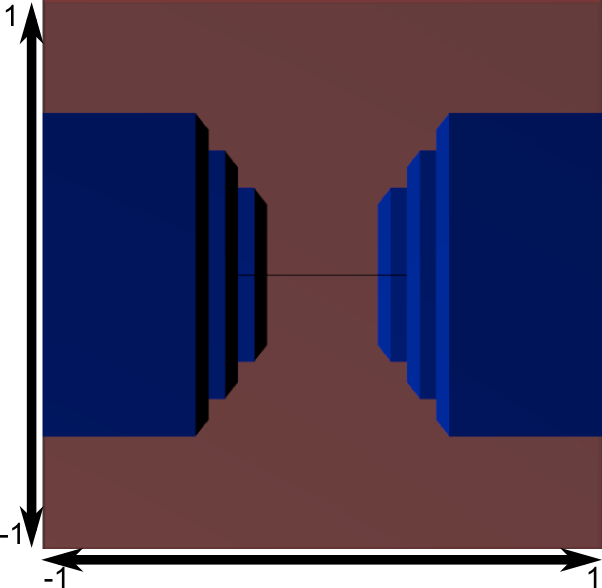
这就是您得到的图像!看上去太方方正正了,因此,还需要做一次数学变换使之适合实际的窗口大小。
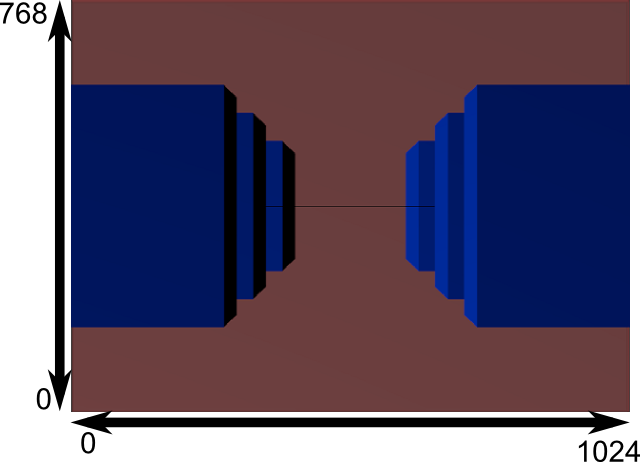
这就是实际渲染的图像啦!
复合变换:模型观察投影矩阵(MVP)
再来一连串深爱已久的标准矩阵乘法:
// C++ : compute the matrix
glm::mat4 MVPmatrix = projection * view * model; // Remember : inverted !
// C++ : compute the matrix
QMatrix4x4 MVPmatrix = projection * view * model; // Remember : inverted !
// GLSL : apply it
transformed_vertex = MVP * in_vertex;
四、使用MVP矩阵
保持上一章节的内容不变,我们添加一个doMVP函数,用于生成一个MVP矩阵,当然也可以独立生成M、V、P三个矩阵,然后传入到vertex shader中再计算出MVP矩阵,这里采用后者
-
这里的参数可以自行修改,以理解不同的参数对渲染结果的影响,也可以去官网查询api参数具体的含义
-
上传到shader需要在shader定义
uniform变量,同时使用glGetUniformLocation获取对应的uniform变量,注意名称要一一对应,然后使用glUniform*函数上传对应类型的参数
void MyGLWidget::doMVP()
{//模型矩阵QMatrix4x4 model_matrix;model_matrix.setToIdentity();//观察矩阵QVector3D camera_pos = {4,4,3};QVector3D look_dir = {1,0,0};QVector3D up_dir = {0,1,0};//lookAtQMatrix4x4 view_matrix;view_matrix.lookAt(camera_pos,look_dir,up_dir);//投影矩阵float angle = 45;float aspect = this->width() * 1.0f / this->height();//距离相机的位置,渲染范围:0.1-100float near_plane = 0.1f;float far_plane = 100.f;QMatrix4x4 projection_matrix;projection_matrix.perspective(angle,aspect,near_plane,far_plane);//获取uniform变量uniform_model_matrix_location = glGetUniformLocation(shader_program_id,"model_matrix");uniform_view_matrix_location = glGetUniformLocation(shader_program_id,"view_matrix");uniform_projection_matrix_location = glGetUniformLocation(shader_program_id,"projection_matrix");//矩阵传入shaderglUniformMatrix4fv(uniform_model_matrix_location,1,GL_FALSE,model_matrix.data());glUniformMatrix4fv(uniform_view_matrix_location,1,GL_FALSE,view_matrix.data());glUniformMatrix4fv(uniform_projection_matrix_location,1,GL_FALSE,projection_matrix.data());}
这里采用的变化函数doTransform生成对应的Model矩阵,也就是对模型空间内的坐标进行变化,比如平移,缩放,旋转
void MyGLWidget::doTransform()
{  QMatrix4x4 scale_matrix = scaleMatrix(1.0,1.0,0.0);  QMatrix4x4 translate_matrix = translateMatrix(0.0,0.0,0.0);  QMatrix4x4 rotate_matrix = rotateMatrix(0.0f,0.0f,0.0f,0.0f);  //叠加操作  QMatrix4x4 transform_matrix = translate_matrix * rotate_matrix * scale_matrix;  //获取uniform变量:transform_matrix,从着色器程序获取  uniform_transform_matrix_location = glGetUniformLocation(shader_program_id,"transform_matrix");  //上传uniform变量的4x4矩阵:transform_matrix,不需要转置,4fv结尾含义是4x4矩阵float类型,向量(vector)形式  glUniformMatrix4fv(uniform_transform_matrix_location,1,GL_FALSE,transform_matrix.data());
}
最后就是,注意在vertex shader中定义对应的uniform变量,这个变量是全局唯一的,类似单例,所以即使重名得到的也是同一个结果:
uniform mat4 transform_matrix;  uniform mat4 model_matrix;
uniform mat4 view_matrix;
uniform mat4 projection_matrix;
上述代码加入后,最后运行的结果如下:
五、完整代码
my_glwidget.h
//
// Created by liuhang on 2025/9/16.
//  #ifndef OPENGL_LEARNING_MY_GLWIDGET_H
#define OPENGL_LEARNING_MY_GLWIDGET_H  #include<QOpenGLWidget>
#include<QOpenGLFunctions>
#include<QMatrix4x4>
#include<QTimer>  class MyGLWidget : public QOpenGLWidget,protected QOpenGLFunctions
{  Q_OBJECT
public:  explicit MyGLWidget(QWidget* parent = nullptr);  ~MyGLWidget() override;  protected:  void initializeGL() override;  void paintGL() override;  void resizeGL(int w,int h) override;  void doTransform();  void doMVP();
private:  void loadShader(std::string const& vertex_shader_path,std::string const& fragment_shader_path);  QMatrix4x4 translateMatrix(float x, float y, float z);  QMatrix4x4 scaleMatrix(float x,float y,float z);  QMatrix4x4 rotateMatrix(float angle,float x,float y,float z);  private:  GLuint vertex_array_id;  GLuint vertex_buffer_id;  GLuint vertex_shader_id;  GLuint fragment_shader_id;  GLuint shader_program_id;  GLint uniform_transform_matrix_location;  GLint uniform_model_matrix_location;  GLint uniform_view_matrix_location;  GLint uniform_projection_matrix_location;  float global_i = 0;  QTimer timer;
};  #endif //OPENGL_LEARNING_MY_GLWIDGET_H
my_glwidget.cpp
//
// Created by liuhang on 2025/9/16.
//  #include "my_glwidget.h"
#include<string>
#include<fstream>
#include<sstream>
#include<iostream>
#include<filesystem>
#include<QThread>
#include<math.h>  static const float vertex_buffer_data[] ={  -1.0f, -1.0f, 0.0f,  1.0f, -1.0f, 0.0f,  0.0f,  1.0f, 0.0f
};  MyGLWidget::MyGLWidget(QWidget *parent): QOpenGLWidget(parent)
{
#if 0  timer.setInterval(1);  connect(&timer,&QTimer::timeout,this,[this](){        static float count = 0;        count+= 0.01f;        global_i = std::fabs(sin(count));  this->update();  timer.setInterval(1);        timer.start();    });
#endif  #if 0  timer.setInterval(1);  connect(&timer,&QTimer::timeout,this,[this](){        global_i+= 1;        if(fabs(global_i - 100) < 0.1f){            global_i = 0;        }        this->update();  timer.setInterval(1);        timer.start();    });  timer.start();#endif  }  MyGLWidget::~MyGLWidget()  {  makeCurrent();  glDeleteVertexArrays(1,&vertex_array_id);  glDeleteBuffers(1,&vertex_buffer_id);  doneCurrent();
}  void MyGLWidget::initializeGL() {  initializeOpenGLFunctions();  glClearColor(0.2f,0.3f,0.3f,1.0f);  glGenVertexArrays(1,&vertex_array_id);  glBindVertexArray(vertex_array_id);  glGenBuffers(1,&vertex_buffer_id);  glBindBuffer(GL_ARRAY_BUFFER,vertex_buffer_id);  glBufferData(GL_ARRAY_BUFFER,sizeof(vertex_buffer_data),vertex_buffer_data,GL_STATIC_DRAW);  //启用layout = 0为当前绑定的VAO  glVertexAttribPointer(0,3,GL_FLOAT,GL_FALSE,0,nullptr);  glEnableVertexAttribArray(0);  //加载着色器  loadShader("/Users/liuhang/CLionProjects/opengl-learning/opengl1-3-matrix/shader/shader.vert",  "/Users/liuhang/CLionProjects/opengl-learning/opengl1-3-matrix/shader/shader.frag");  //    doTransform();  //解绑VAO  glBindVertexArray(0);  }  void MyGLWidget::paintGL() {  glClear(GL_COLOR_BUFFER_BIT);  glBindVertexArray(vertex_array_id);  //使用着色器程序  glUseProgram(shader_program_id);  //缩放  doTransform();  doMVP();
#if 0  QMatrix4x4 scale_matrix = scaleMatrix(global_i,global_i,global_i);  QMatrix4x4 translate_matrix = translateMatrix(0.0,0.0,0.0);  QMatrix4x4 rotate_matrix = rotateMatrix(0.0f,0.0f,0.0f,0.0f);  QMatrix4x4 transform_matrix = translate_matrix * rotate_matrix * scale_matrix;    //获取uniform变量:transform_matrix,从着色器程序获取  uniform_transform_matrix_location = glGetUniformLocation(shader_program_id,"transform_matrix");  //上传uniform变量的4x4矩阵:transform_matrix,不需要转置,4fv结尾含义是4x4矩阵float类型,向量(vector)形式  glUniformMatrix4fv(uniform_transform_matrix_location,1,GL_FALSE,transform_matrix.data());
#endif  glDrawArrays(GL_TRIANGLES,0,3);
}  void MyGLWidget::resizeGL(int w, int h) {  glViewport(0, 0, w, h);
}  void MyGLWidget::loadShader(std::string const& vertex_shader_path,std::string const& fragment_shader_path) {  //创建顶点着色器  vertex_shader_id = glCreateShader(GL_VERTEX_SHADER);  //读取shader.vert  std::string vertex_shader_code;  std::ifstream vertex_shader_stream(vertex_shader_path,std::ios::in);  if(vertex_shader_stream.is_open()){  std::stringstream ss;  ss << vertex_shader_stream.rdbuf();  vertex_shader_code = ss.str();  vertex_shader_stream.close();  }  else{  std::cout << "current path = " << std::filesystem::current_path() << std::endl;  if (!std::filesystem::exists(vertex_shader_path)) {  std::cerr << "File not found: " << vertex_shader_path << std::endl;  }  std::cerr << "read vertex_shader fail!" << std::endl;  return;  }  //加载vertex着色器程序代码  const char* vertex_shader_code_pointer = vertex_shader_code.c_str();  glShaderSource(vertex_shader_id,1,&vertex_shader_code_pointer,nullptr);  //编译vertex shader  glCompileShader(vertex_shader_id);  //查看vertex编译结果  GLint Result = GL_FALSE;  int infoLogLength;  glGetShaderiv(vertex_shader_id,GL_COMPILE_STATUS,&Result);  glGetShaderiv(vertex_shader_id,GL_INFO_LOG_LENGTH,&infoLogLength);  if(infoLogLength > 0){  std::vector<char> vertex_shader_error_message(infoLogLength+1);  glGetShaderInfoLog(vertex_shader_id, infoLogLength, nullptr, &vertex_shader_error_message[0]);  std::cout << "vertex shader:" << &vertex_shader_error_message[0] << std::endl;  }  //创建片段着色器  fragment_shader_id = glCreateShader(GL_FRAGMENT_SHADER);  //读取shader.frag  std::string fragment_shader_code;  std::ifstream fragment_shader_stream(fragment_shader_path,std::ios::in);  if(fragment_shader_stream.is_open()){  std::stringstream ss;  ss << fragment_shader_stream.rdbuf();  fragment_shader_code = ss.str();  fragment_shader_stream.close();  }  else{  std::cout << "current path = " << std::filesystem::current_path() << std::endl;  if (!std::filesystem::exists(vertex_shader_path)) {  std::cerr << "File not found: " << vertex_shader_path << std::endl;  }  std::cerr << "read fragment_shader fail!" << std::endl;  }  //加载fragment着色器程序代码  const char* fragment_shader_code_pointer = fragment_shader_code.c_str();  glShaderSource(fragment_shader_id,1,&fragment_shader_code_pointer,nullptr);  //编译fragment shader  glCompileShader(fragment_shader_id);  //查看fragment编译结果  glGetShaderiv(fragment_shader_id,GL_COMPILE_STATUS,&Result);  glGetShaderiv(fragment_shader_id,GL_INFO_LOG_LENGTH,&infoLogLength);  if(infoLogLength > 0){  std::vector<char> fragment_shader_error_message(infoLogLength+1);  glGetShaderInfoLog(fragment_shader_id, infoLogLength, nullptr, &fragment_shader_error_message[0]);  std::cout << "fragment shader compile error:" << &fragment_shader_error_message[0] << std::endl;  }  //创建着色器程序  shader_program_id = glCreateProgram();  //附加着色器到程序  glAttachShader(shader_program_id,vertex_shader_id);  glAttachShader(shader_program_id,fragment_shader_id);  //链接shader  glLinkProgram(shader_program_id);  //检查程序链接结果  glGetProgramiv(shader_program_id,GL_LINK_STATUS,&Result);  glGetProgramiv(shader_program_id,GL_INFO_LOG_LENGTH,&infoLogLength);  if(infoLogLength > 0){  std::vector<char>program_error_message(infoLogLength + 1);  glGetProgramInfoLog(shader_program_id,infoLogLength,nullptr,&program_error_message[0]);  std::cout << "program link:" << &program_error_message[0] << std::endl;  }  //删除着色器编译结果  glDeleteShader(vertex_shader_id);  glDeleteShader(fragment_shader_id);
}  //平移x,y,z方向的大小
QMatrix4x4 MyGLWidget::translateMatrix(float x, float y, float z)
{  QMatrix4x4 translate_matrix;  translate_matrix.translate(x,y,z);  return translate_matrix;
}  //缩放x,y,z的大小比例
QMatrix4x4 MyGLWidget::scaleMatrix(float x, float y, float z) {  QMatrix4x4 scale_matrix;  scale_matrix.scale(x,y,z);  return scale_matrix;
}  //默认逆时针angle,负数表示顺时针,绕(0,0,0)->(x,y,z)指向的方向旋转
QMatrix4x4 MyGLWidget::rotateMatrix(float angle,float x,float y,float z) {  QMatrix4x4 rotate_matrix;  rotate_matrix.rotate(angle,x,y,z);  return rotate_matrix;
}  void MyGLWidget::doTransform()
{  QMatrix4x4 scale_matrix = scaleMatrix(1.0,1.0,0.0);  QMatrix4x4 translate_matrix = translateMatrix(0.0,0.0,0.0);  QMatrix4x4 rotate_matrix = rotateMatrix(0.0f,0.0f,0.0f,0.0f);  //叠加操作  QMatrix4x4 transform_matrix = translate_matrix * rotate_matrix * scale_matrix;  //获取uniform变量:transform_matrix,从着色器程序获取  uniform_transform_matrix_location = glGetUniformLocation(shader_program_id,"transform_matrix");  //上传uniform变量的4x4矩阵:transform_matrix,不需要转置,4fv结尾含义是4x4矩阵float类型,向量(vector)形式  glUniformMatrix4fv(uniform_transform_matrix_location,1,GL_FALSE,transform_matrix.data());
}  void MyGLWidget::doMVP()
{  //模型矩阵  QMatrix4x4 model_matrix;  model_matrix.setToIdentity();  //观察矩阵  QVector3D camera_pos = {4,4,3};  QVector3D look_dir = {1,0,0};  QVector3D up_dir = {0,1,0};  //lookAt  QMatrix4x4 view_matrix;  view_matrix.lookAt(camera_pos,look_dir,up_dir);  //投影矩阵  float angle = 45;  float aspect = this->width() * 1.0f / this->height();  //距离相机的位置,渲染范围:0.1-100  float near_plane = 0.1f;  float far_plane = 100.f;  QMatrix4x4 projection_matrix;  projection_matrix.perspective(angle,aspect,near_plane,far_plane);  //获取uniform变量  uniform_model_matrix_location = glGetUniformLocation(shader_program_id,"model_matrix");  uniform_view_matrix_location = glGetUniformLocation(shader_program_id,"view_matrix");  uniform_projection_matrix_location = glGetUniformLocation(shader_program_id,"projection_matrix");  //矩阵传入shader  glUniformMatrix4fv(uniform_model_matrix_location,1,GL_FALSE,model_matrix.data());  glUniformMatrix4fv(uniform_view_matrix_location,1,GL_FALSE,view_matrix.data());  glUniformMatrix4fv(uniform_projection_matrix_location,1,GL_FALSE,projection_matrix.data());  }
shader.vert
#version 330 core  layout(location = 0) in vec3 vertexPosion_modelspace;
uniform mat4 transform_matrix;  uniform mat4 model_matrix;
uniform mat4 view_matrix;
uniform mat4 projection_matrix;  void main(){  mat4 MVP_matrix = projection_matrix * view_matrix * model_matrix;  gl_Position = MVP_matrix * transform_matrix * vec4(vertexPosion_modelspace,1.0);
}
shader.frag
#version 330 core  out vec3 fragment_color;  void main(){  fragment_color = vec3(1.0,0.0,0.0);
}