vue3+ts+uniapp H5微信小程序app有截止日期的日期date-pcicker组件
vue3+ts+uniapp H5&微信小程序&app有截止日期的日期date-pcicker组件
因为uniapp官方的picker组件不能限制最大的日期,但业务需要,所以用picker-view改写了一个可以有截止最大日期的组件。
1. 新建一个组件文件 date-pcicker.vue,下面是这个组件的完整代码,复制即用。
<template><view class="date-picker-container"><!-- 触发按钮插槽 --><view @click="showPicker = true"><slot></slot></view><!-- 弹窗遮罩 --><view v-if="showPicker" class="date-picker-overlay" @click="closePicker"><view class="date-picker-popup" :class="{ 'popup-show': showPicker }" @click.stop><!-- 头部 --><view class="picker-header"><view class="header-btn cancel-btn" @click="closePicker">取消</view><view class="header-title">{{ dateTitle }}</view><view class="header-btn confirm-btn" @click="confirmDate">完成</view></view><!-- 日期选择器 --><view class="picker-content"><picker-viewv-if="showPicker":indicator-style="indicatorStyle":value="pickerValue"@change="bindChange"class="picker-view"><picker-view-column><view class="item" v-for="(item, index) in years" :key="index">{{ item }}年</view></picker-view-column><picker-view-column><view class="item" v-for="(item, index) in months" :key="index">{{ item }}月</view></picker-view-column><picker-view-column><view class="item" v-for="(item, index) in days" :key="index">{{ item }}日</view></picker-view-column></picker-view></view></view></view></view>
</template><script setup lang="ts">
import { ref, computed, watch, onMounted } from 'vue'interface Props {// 日期选择器标题dateTitle?: string// 当前选中的日期value?: string// 最小日期minDate?: string// 最大日期maxDate?: string// 占位符文本placeholder?: string// 是否禁用disabled?: boolean
}interface Emits {(e: 'change', value: string): void(e: 'update:value', value: string): void
}const props = withDefaults(defineProps<Props>(), {dateTitle: '选择日期',value: '',minDate: '',maxDate: '',placeholder: '请选择日期',disabled: false
})const emit = defineEmits<Emits>()// 响应式数据
const showPicker = ref(false)
const pickerValue = ref([0, 0, 0])// 实际选中的值(用于确认后更新)
const selectedYear = ref(0)
const selectedMonth = ref(0)
const selectedDay = ref(0)// 临时选中的值(用于选择过程中的显示)
const tempSelectedYear = ref(0)
const tempSelectedMonth = ref(0)
const tempSelectedDay = ref(0)// 获取日期范围
const minDateObj = computed(() => {if (props.minDate) {return new Date(props.minDate)}return new Date(2020, 0, 1) // 默认最小日期
})const maxDateObj = computed(() => {if (props.maxDate) {return new Date(props.maxDate)}return new Date(2030, 11, 31) // 默认最大日期
})// 生成年份列表
const years = computed(() => {const yearList: number[] = []const minYear = minDateObj.value.getFullYear()const maxYear = maxDateObj.value.getFullYear()for (let year = minYear; year <= maxYear; year++) {yearList.push(year)}return yearList
})// 生成月份列表
const months = computed(() => {const monthList: number[] = []const minMonth =tempSelectedYear.value === minDateObj.value.getFullYear()? minDateObj.value.getMonth() + 1: 1const maxMonth =tempSelectedYear.value === maxDateObj.value.getFullYear()? maxDateObj.value.getMonth() + 1: 12for (let month = minMonth; month <= maxMonth; month++) {monthList.push(month)}return monthList
})// 生成日期列表
const days = computed(() => {const dayList: number[] = []const year = tempSelectedYear.valueconst month = tempSelectedMonth.valueif (!year || !month) return dayList// 获取当月天数const daysInMonth = new Date(year, month, 0).getDate()// 计算最小和最大日期let minDay = 1let maxDay = daysInMonthif (year === minDateObj.value.getFullYear() && month === minDateObj.value.getMonth() + 1) {minDay = minDateObj.value.getDate()}if (year === maxDateObj.value.getFullYear() && month === maxDateObj.value.getMonth() + 1) {maxDay = maxDateObj.value.getDate()}for (let day = minDay; day <= maxDay; day++) {dayList.push(day)}return dayList
})// picker-view 指示器样式
const indicatorStyle = ref('height: 60rpx;')// 初始化日期
const initDate = () => {if (!props.maxDate) {// 如果有传入的value,使用valueconst date = new Date()selectedYear.value = date.getFullYear()selectedMonth.value = date.getMonth() + 1selectedDay.value = date.getDate()} else {// 如果没有传入value,使用maxDate作为默认选中日期const maxDate = maxDateObj.valueselectedYear.value = maxDate.getFullYear()selectedMonth.value = maxDate.getMonth() + 1selectedDay.value = maxDate.getDate()}// 同步临时值tempSelectedYear.value = selectedYear.valuetempSelectedMonth.value = selectedMonth.valuetempSelectedDay.value = selectedDay.value// 更新picker-view的值updatePickerValue()
}// 更新picker-view的值
const updatePickerValue = () => {const yearIndex = years.value.indexOf(tempSelectedYear.value)const monthIndex = months.value.indexOf(tempSelectedMonth.value)const dayIndex = days.value.indexOf(tempSelectedDay.value)pickerValue.value = [yearIndex >= 0 ? yearIndex : 0,monthIndex >= 0 ? monthIndex : 0,dayIndex >= 0 ? dayIndex : 0]
}// picker-view 变化事件
const bindChange = (e: any) => {const val = e.detail.valueconst yearIndex = val[0]const monthIndex = val[1]const dayIndex = val[2]// 更新临时选中的值if (years.value[yearIndex]) {tempSelectedYear.value = years.value[yearIndex]}if (months.value[monthIndex]) {tempSelectedMonth.value = months.value[monthIndex]}if (days.value[dayIndex]) {tempSelectedDay.value = days.value[dayIndex]}
}// 确认选择
const confirmDate = () => {// 检查是否有有效的年月日值const hasValidYear = tempSelectedYear.value > 0const hasValidMonth = tempSelectedMonth.value > 0const hasValidDay = tempSelectedDay.value > 0if (hasValidYear && hasValidMonth && hasValidDay) {// 更新实际选中的值selectedYear.value = tempSelectedYear.valueselectedMonth.value = tempSelectedMonth.valueselectedDay.value = tempSelectedDay.valueconst dateStr = `${selectedYear.value}-${selectedMonth.value.toString().padStart(2, '0')}-${selectedDay.value.toString().padStart(2, '0')}`console.log('确认选择日期:', dateStr)emit('change', dateStr)emit('update:value', dateStr)} else {console.log('日期选择不完整:', {year: tempSelectedYear.value,month: tempSelectedMonth.value,day: tempSelectedDay.value})}closePicker()
}// 关闭选择器
const closePicker = () => {// 重置临时值到当前选中值tempSelectedYear.value = selectedYear.valuetempSelectedMonth.value = selectedMonth.valuetempSelectedDay.value = selectedDay.valueupdatePickerValue()showPicker.value = false
}// 监听maxDate变化,重新初始化
watch(() => props.maxDate,() => {initDate()},{immediate: true}
)// 监听临时年份变化,重新计算月份和日期
watch(() => tempSelectedYear.value,() => {// 如果年份变化,重置月份和日期为第一个有效值if (tempSelectedYear.value > 0) {const monthList = months.valueif (monthList.length > 0) {tempSelectedMonth.value = monthList[0]}const dayList = days.valueif (dayList.length > 0) {tempSelectedDay.value = dayList[0]}}updatePickerValue()}
)// 监听临时月份变化,重新计算日期
watch(() => tempSelectedMonth.value,() => {// 如果月份变化,重置日期为第一个有效值if (tempSelectedMonth.value > 0) {const dayList = days.valueif (dayList.length > 0) {tempSelectedDay.value = dayList[0]}}updatePickerValue()}
)onMounted(() => {initDate()
})
</script><style lang="scss" scoped>
.date-picker-container {position: relative;
}.date-picker-overlay {position: fixed;top: 0;left: 0;right: 0;bottom: 0;background: rgba(0, 0, 0, 0.5);z-index: 1000;display: flex;align-items: flex-end;justify-content: center;animation: fadeIn 0.3s ease-out;
}.date-picker-popup {width: 100%;background: #fff;border-radius: 20rpx 20rpx 0 0;overflow: hidden;transform: translateY(100%);// env(safe-area-inset-bottom)padding-bottom: 60rpx;transition: transform 0.3s ease-out;
}.date-picker-popup.popup-show {transform: translateY(0);
}.picker-header {display: flex;align-items: center;justify-content: space-between;padding: 30rpx;background: #fff;border-bottom: 1rpx solid #e0e0e0;position: relative;
}.header-btn {font-size: 28rpx;padding: 10rpx 20rpx;cursor: pointer;transition: all 0.3s;
}.cancel-btn {color: #999;
}.confirm-btn {color: #4a90e2;font-weight: bold;
}.header-title {position: absolute;left: 50%;transform: translateX(-50%);font-size: 32rpx;font-weight: bold;color: #333;
}.picker-content {height: 400rpx;background: #fff;position: relative;
}.picker-view {width: 100%;height: 100%;
}.item {height: 60rpx;line-height: 60rpx;text-align: center;font-size: 28rpx;color: #555;transition: all 0.3s;
}/* 动画效果 */
@keyframes fadeIn {from {opacity: 0;}to {opacity: 1;}
}@keyframes slideUp {from {transform: translateY(100%);}to {transform: translateY(0);}
}
</style>
2. 在父组件中调用,下面是调用步骤
1)在js中引用
import DatePicker from '@/components/date-picker/date-picker.vue'
2)在模板中调用(startMonthDisplay字段也可以startMonthValue,我这个是因为业务需求另外设置的)
<date-pickerv-model="startMonthValue":min-date="minDate":max-date="maxDate"date-title="选择开始日期"@change="onStartDateChange"
><view class="picker-input"><text>{{ startMonthDisplay }}</text></view>
</date-picker>
3)模板中的一些字段定义变量
const startMonthValue = ref<string>('')
// 日期范围限制
const minDate = ref('2020-01-01')
const maxDate = ref('')
const startMonthDisplay = ref('开始时间')// 开始日期变化 里面可以自己再加其他的逻辑判断
const onStartDateChange = (date: string) => {console.log('开始日期变化:', date)startMonthDisplay.value = datestartMonthValue.value = date
}
// 获取昨天日期
const getYesterdayDate = () => {const yesterday = new Date()yesterday.setDate(yesterday.getDate() - 1)return formatDate(yesterday)
}
// 格式化日期
const formatDate = (date: Date): string => {const year = date.getFullYear()const month = String(date.getMonth() + 1).padStart(2, '0')const day = String(date.getDate()).padStart(2, '0')return `${year}-${month}-${day}`
}onLoad(() => {// 设置最大日期为昨天maxDate.value = getYesterdayDate()
})
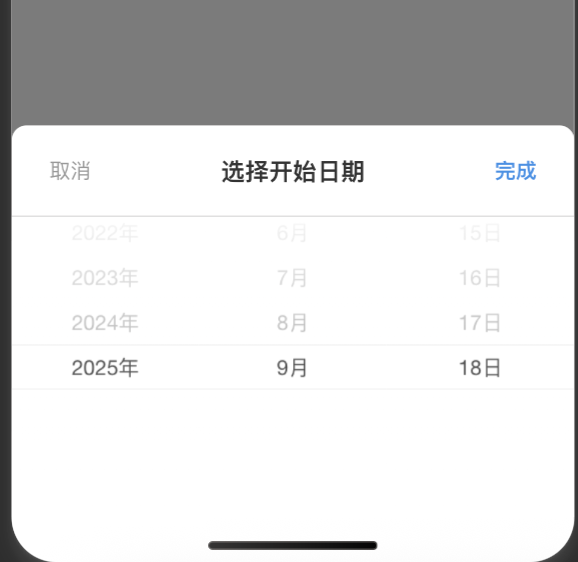
- 效果展示截图