OpenCV:答题卡识别
目录
一、项目原理
二、环境准备
三、核心代码实现
1. 导入必要库
2. 定义关键函数
坐标点排序函数
透视变换函数
轮廓排序函数
图像显示函数
3. 主程序实现
图像预处理
轮廓检测与答题卡定位
透视变换矫正
答案识别与评分
四、实现效果
本文将介绍如何使用 OpenCV 实现一个简单的答题卡识别与评分系统,通过图像处理技术自动识别考生答案并进行评分。
一、项目原理
答题卡识别的核心思路是通过图像处理技术定位答题卡区域,识别考生填涂的答案,再与标准答案对比进行评分。主要步骤包括:图像预处理、轮廓检测、透视变换、答案识别和自动评分。
二、环境准备
pip install numpy opencv-python
三、核心代码实现
1. 导入必要库
import numpy as np
import cv2
2. 定义关键函数
坐标点排序函数
用于对四边形的四个顶点进行排序(左上、右上、右下、左下):
def order_points(pts):# 一共有4个坐标点rect = np.zeros(shape=(4, 2), dtype="float32") # 用来存储排序之后的坐标位置# 按顺序找到对应坐标0123分别是 左上,右上,右下,左下s = pts.sum(axis=1) # 对pts矩阵的每一行进行求和操作,(x+y)rect[0] = pts[np.argmin(s)]rect[2] = pts[np.argmax(s)]diff = np.diff(pts, axis=1) # 对pts矩阵的每一行进行求差操作,(y-x)rect[1] = pts[np.argmin(diff)]rect[3] = pts[np.argmax(diff)]return rect
透视变换函数
将倾斜的答题卡矫正为正视图:
def four_point_transform(image, pts):# 获取输入坐标点rect = order_points(pts)(tl, tr, br, bl) = rect# 计算输入的w和h值widthA = np.sqrt(((br[0] - bl[0]) **2) + ((br[1] - bl[1])** 2))widthB = np.sqrt(((tr[0] - tl[0]) **2) + ((tr[1] - tl[1])** 2))maxWidth = max(int(widthA), int(widthB))heightA = np.sqrt(((tr[0] - br[0]) **2) + ((tr[1] - br[1])** 2))heightB = np.sqrt(((tl[0] - bl[0]) **2) + ((tl[1] - bl[1])** 2))maxHeight = max(int(heightA), int(heightB))# 变换后对应坐标位置dst = np.array([[0, 0], [maxWidth - 1, 0],[maxWidth - 1, maxHeight - 1], [0, maxHeight - 1]], dtype="float32")# 图像透视变换M = cv2.getPerspectiveTransform(rect, dst)warped = cv2.warpPerspective(image, M, (maxWidth, maxHeight))# 返回变换后结果return warped
轮廓排序函数
按照指定方向(左右或上下)对轮廓进行排序:
def sort_contours(cnts, method='left-to-right'):reverse = Falsei = 0if method == 'right-to-left' or method == 'bottom-to-top':reverse = Trueif method == 'top-to-bottom' or method == 'bottom-to-top':i = 1boundingBoxes = [cv2.boundingRect(c) for c in cnts](cnts, boundingBoxes) = zip(*sorted(zip(cnts, boundingBoxes),key=lambda b: b[1][i], reverse=reverse))return cnts, boundingBoxes
图像显示函数
方便调试过程中显示图像:
def cv_show(name, img):cv2.imshow(name, img)cv2.waitKey(0)
3. 主程序实现
图像预处理
# 读取图像
image = cv2.imread(r'./images/test_01.png')
contours_img = image.copy()
# 转为灰度图
gray = cv2.cvtColor(image, cv2.COLOR_BGR2GRAY)
# 高斯模糊去噪
blurred = cv2.GaussianBlur(gray, (5, 5), 0)
# 边缘检测
edged = cv2.Canny(blurred, 75, 200)
轮廓检测与答题卡定位
# 轮廓检测
cnts = cv2.findContours(edged.copy(), cv2.RETR_EXTERNAL, cv2.CHAIN_APPROX_SIMPLE)[-2]
cv2.drawContours(contours_img, cnts, -1, (0, 0, 255), 3)docCnt = None# 根据轮廓大小进行排序,寻找答题卡轮廓(四边形)
cnts = sorted(cnts, key=cv2.contourArea, reverse=True)
for c in cnts:peri = cv2.arcLength(c, True)approx = cv2.approxPolyDP(c, 0.02 * peri, True)  # 轮廓近似if len(approx) == 4:  # 找到四边形轮廓docCnt = approxbreak
透视变换矫正
# 执行透视变换
warped_t = four_point_transform(image, docCnt.reshape(4, 2))
warped_new = warped_t.copy()
warped = cv2.cvtColor(warped_t, cv2.COLOR_BGR2GRAY)# 阈值处理,将答案区域二值化
thresh = cv2.threshold(warped, 0, 255, cv2.THRESH_BINARY_INV | cv2.THRESH_OTSU)[1]
答案识别与评分
# 找到每一个圆圈轮廓
cnts = cv2.findContours(thresh, cv2.RETR_EXTERNAL, cv2.CHAIN_APPROX_SIMPLE)[-2]questionCnts = []
# 筛选出符合条件的答案圆圈轮廓
for c in cnts:(x, y, w, h) = cv2.boundingRect(c)ar = w / float(h)# 根据实际情况指定标准if w >= 20 and h >= 20 and 0.9 <= ar <= 1.1:questionCnts.append(c)# 按照从上到下进行排序
questionCnts = sort_contours(questionCnts, method="top-to-bottom")[0]
correct = 0
ANSWER_KEY = {0: 1, 1: 4, 2: 0, 3: 3, 4: 1} # 正确答案# 每排有5个选项
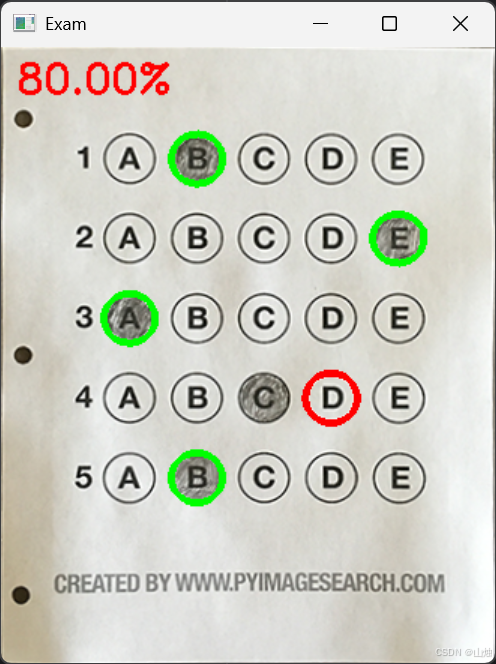
for (q, i) in enumerate(np.arange(0, len(questionCnts), 5)):cnts = sort_contours(questionCnts[i:i + 5])[0] # 排序bubbled = None# 遍历每一个选项for (j, c) in enumerate(cnts):# 使用mask来判断结果mask = np.zeros(thresh.shape, dtype="uint8")cv2.drawContours(mask, [c], -1, 255, -1) # -1表示填充# 通过计算非零点数量来判断是否选择这个答案thresh_mask_and = cv2.bitwise_and(thresh, thresh, mask=mask)total = cv2.countNonZero(thresh_mask_and) # 统计灰度值不为0的像素数if bubbled is None or total > bubbled[0]: # 保存灰度值最大的序号(被填涂的选项)bubbled = (total, j)# 对比正确答案color = (0, 0, 255) # 错误为红色k = ANSWER_KEY[q]if k == bubbled[1]: # 判断正确color = (0, 255, 0) # 正确为绿色correct += 1cv2.drawContours(warped_new, [cnts[k]], -1, color, 3) # 绘制结果# 计算得分
score = (correct / 5.0) * 100
print("[INFO] score: {:.2f}%".format(score))# 显示得分
cv2.putText(warped_new, "{:.2f}%".format(score), (10, 30),cv2.FONT_HERSHEY_SIMPLEX, 0.9, (0, 0, 255), 2)
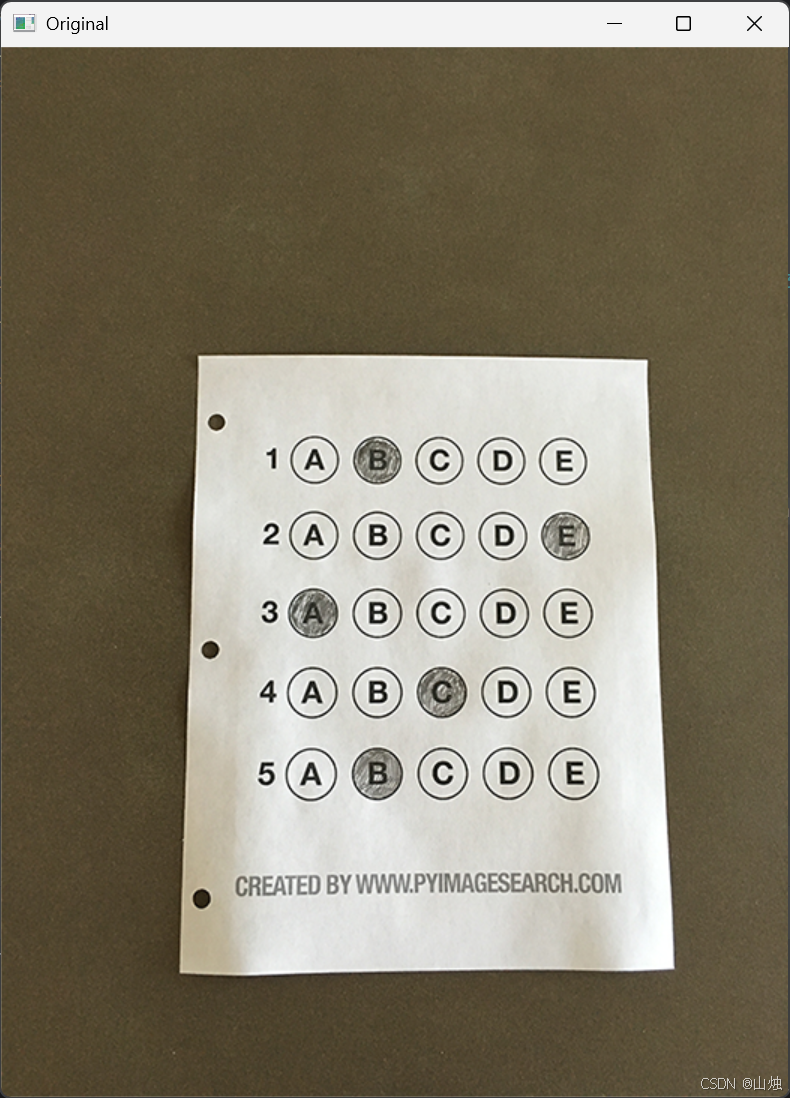
cv2.imshow("Original", image)
cv2.imshow("Exam", warped_new)
cv2.waitKey(0)
四、实现效果
程序会自动识别答题卡中的填涂区域,与标准答案对比后,用绿色标记正确答案,红色标记错误答案,并在图像上显示最终得分。