无人机姿态控制系统详解与实现
无人机姿态控制系统详解与实现
一、引言
无人机姿态控制是飞行控制系统的核心组成部分,它决定了无人机能否稳定飞行。本文将深入讲解四旋翼无人机的姿态控制原理,包括坐标系定义、姿态表示方法、动力学建模以及PID控制器设计,并提供完整的Python仿真代码。
二、基础概念
2.1 坐标系定义
在无人机控制中,我们主要使用两个坐标系:
- 地球坐标系(Earth Frame):固定在地球上的惯性坐标系,通常采用NED(North-East-Down)坐标系
- 机体坐标系(Body Frame):固定在无人机机体上的坐标系,原点在无人机质心
2.2 姿态角定义
无人机的姿态用三个欧拉角表示:
- 横滚角(Roll, φ):绕X轴旋转,范围[-π, π]
- 俯仰角(Pitch, θ):绕Y轴旋转,范围[-π/2, π/2]
- 偏航角(Yaw, ψ):绕Z轴旋转,范围[-π, π]
2.3 四旋翼无人机工作原理
    M1(前)↑|
M4 ←-+-→ M2|↓M3(后)
四个电机的转速控制实现不同的运动:
- 悬停:四个电机转速相同
- 俯仰:M1和M3差速控制
- 横滚:M2和M4差速控制
- 偏航:对角电机组差速控制
三、数学模型
3.1 旋转矩阵
从机体坐标系到地球坐标系的旋转矩阵:
R = Rz(ψ) * Ry(θ) * Rx(φ)
展开形式:
R = [cosψcosθ cosψsinθsinφ-sinψcosφ cosψsinθcosφ+sinψsinφ][sinψcosθ sinψsinθsinφ+cosψcosφ sinψsinθcosφ-cosψsinφ][-sinθ cosθsinφ cosθcosφ ]
3.2 动力学方程
3.2.1 线性运动方程
m * dV/dt = R * F_body - m * g * e_z
其中:
- m:无人机质量
- V:速度向量
- F_body:机体坐标系下的推力
- g:重力加速度
- e_z:z轴单位向量
3.2.2 角运动方程
I * dω/dt = -ω × (I * ω) + τ
其中:
- I:转动惯量矩阵
- ω:角速度向量
- τ:力矩向量
3.3 简化模型
对于姿态控制,我们采用简化的二阶系统模型:
φ̈ = (Iyy - Izz)/Ixx * θ̇ψ̇ + τφ/Ixx
θ̈ = (Izz - Ixx)/Iyy * φ̇ψ̇ + τθ/Iyy
ψ̈ = (Ixx - Iyy)/Izz * φ̇θ̇ + τψ/Izz
四、PID控制器设计
4.1 PID控制原理
PID控制器包含三个部分:
- 比例(P):与误差成正比,提供基本的控制作用
- 积分(I):消除稳态误差
- 微分(D):预测误差趋势,改善动态性能
控制律:
u(t) = Kp*e(t) + Ki*∫e(t)dt + Kd*de(t)/dt
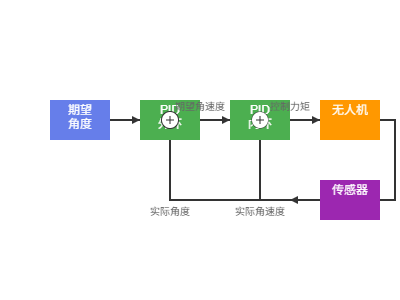
4.2 级联PID控制结构
无人机姿态控制通常采用双环级联PID:
- 外环(角度环):控制姿态角,输出期望角速度
- 内环(角速度环):控制角速度,输出控制力矩
五、完整代码实现
5.1 无人机动力学模型
import numpy as np
import matplotlib.pyplot as plt
from scipy.integrate import odeint
from mpl_toolkits.mplot3d import Axes3D
import matplotlib.animation as animationclass QuadcopterDynamics:"""四旋翼无人机动力学模型"""def __init__(self):# 物理参数self.m = 1.0          # 质量 (kg)self.L = 0.25         # 臂长 (m)self.g = 9.81         # 重力加速度 (m/s^2)# 转动惯量 (kg*m^2)self.Ixx = 0.01self.Iyy = 0.01self.Izz = 0.02# 推力和力矩系数self.k_f = 1.0e-6     # 推力系数self.k_m = 1.0e-7     # 力矩系数# 状态变量 [x, y, z, vx, vy, vz, φ, θ, ψ, p, q, r]self.state = np.zeros(12)def rotation_matrix(self, phi, theta, psi):"""计算旋转矩阵"""R = np.array([[np.cos(psi)*np.cos(theta), np.cos(psi)*np.sin(theta)*np.sin(phi) - np.sin(psi)*np.cos(phi),np.cos(psi)*np.sin(theta)*np.cos(phi) + np.sin(psi)*np.sin(phi)],[np.sin(psi)*np.cos(theta),np.sin(psi)*np.sin(theta)*np.sin(phi) + np.cos(psi)*np.cos(phi),np.sin(psi)*np.sin(theta)*np.cos(phi) - np.cos(psi)*np.sin(phi)],[-np.sin(theta),np.cos(theta)*np.sin(phi),np.cos(theta)*np.cos(phi)]])return Rdef dynamics(self, state, t, u):"""无人机动力学方程state: 状态向量 [x, y, z, vx, vy, vz, φ, θ, ψ, p, q, r]u: 控制输入 [U1, U2, U3, U4] (总推力, 横滚力矩, 俯仰力矩, 偏航力矩)"""# 解析状态变量x, y, z = state[0:3]vx, vy, vz = state[3:6]phi, theta, psi = state[6:9]p, q, r = state[9:12]# 控制输入U1, U2, U3, U4 = u# 旋转矩阵R = self.rotation_matrix(phi, theta, psi)# 线性加速度acc_linear = (1/self.m) * (R @ np.array([0, 0, U1])) - np.array([0, 0, self.g])# 角加速度p_dot = (self.Iyy - self.Izz) / self.Ixx * q * r + U2 / self.Ixxq_dot = (self.Izz - self.Ixx) / self.Iyy * p * r + U3 / self.Iyyr_dot = (self.Ixx - self.Iyy) / self.Izz * p * q + U4 / self.Izz# 欧拉角速率phi_dot = p + q * np.sin(phi) * np.tan(theta) + r * np.cos(phi) * np.tan(theta)theta_dot = q * np.cos(phi) - r * np.sin(phi)psi_dot = q * np.sin(phi) / np.cos(theta) + r * np.cos(phi) / np.cos(theta)# 状态导数state_dot = np.zeros(12)state_dot[0:3] = [vx, vy, vz]state_dot[3:6] = acc_linearstate_dot[6:9] = [phi_dot, theta_dot, psi_dot]state_dot[9:12] = [p_dot, q_dot, r_dot]return state_dot
5.2 PID控制器实现
class PIDController:"""PID控制器"""def __init__(self, kp, ki, kd, dt=0.01, integral_limit=10.0):self.kp = kpself.ki = kiself.kd = kdself.dt = dtself.integral_limit = integral_limitself.integral = 0self.prev_error = 0def reset(self):"""重置控制器状态"""self.integral = 0self.prev_error = 0def update(self, error):"""更新PID控制器"""# 积分项(带抗饱和)self.integral += error * self.dtself.integral = np.clip(self.integral, -self.integral_limit, self.integral_limit)# 微分项derivative = (error - self.prev_error) / self.dt if self.dt > 0 else 0# PID输出output = self.kp * error + self.ki * self.integral + self.kd * derivative# 更新前一次误差self.prev_error = errorreturn outputclass AttitudeController:"""姿态控制器(级联PID)"""def __init__(self, quad_params):self.quad = quad_paramsself.dt = 0.01# 角度环PID参数self.roll_pid = PIDController(kp=4.0, ki=0.05, kd=1.5, dt=self.dt)self.pitch_pid = PIDController(kp=4.0, ki=0.05, kd=1.5, dt=self.dt)self.yaw_pid = PIDController(kp=2.0, ki=0.02, kd=0.5, dt=self.dt)# 角速度环PID参数self.roll_rate_pid = PIDController(kp=0.5, ki=0.01, kd=0.05, dt=self.dt)self.pitch_rate_pid = PIDController(kp=0.5, ki=0.01, kd=0.05, dt=self.dt)self.yaw_rate_pid = PIDController(kp=0.3, ki=0.01, kd=0.02, dt=self.dt)# 高度控制PIDself.altitude_pid = PIDController(kp=10.0, ki=0.5, kd=5.0, dt=self.dt)def compute_control(self, state, setpoint):"""计算控制输入state: 当前状态 [x, y, z, vx, vy, vz, φ, θ, ψ, p, q, r]setpoint: 期望值 [z_des, φ_des, θ_des, ψ_des]"""# 解析状态z = state[2]vz = state[5]phi, theta, psi = state[6:9]p, q, r = state[9:12]# 解析期望值z_des, phi_des, theta_des, psi_des = setpoint# 高度控制z_error = z_des - zU1 = self.altitude_pid.update(z_error) + self.quad.m * self.quad.gU1 = max(0, U1) # 推力不能为负# 角度环(外环)phi_error = phi_des - phitheta_error = theta_des - thetapsi_error = self.normalize_angle(psi_des - psi)p_des = self.roll_pid.update(phi_error)q_des = self.pitch_pid.update(theta_error)r_des = self.yaw_pid.update(psi_error)# 角速度环(内环)p_error = p_des - pq_error = q_des - qr_error = r_des - rU2 = self.roll_rate_pid.update(p_error)U3 = self.pitch_rate_pid.update(q_error)U4 = self.yaw_rate_pid.update(r_error)return np.array([U1, U2, U3, U4])def normalize_angle(self, angle):"""将角度归一化到[-π, π]"""while angle > np.pi:angle -= 2 * np.piwhile angle < -np.pi:angle += 2 * np.pireturn angledef reset(self):"""重置所有PID控制器"""self.roll_pid.reset()self.pitch_pid.reset()self.yaw_pid.reset()self.roll_rate_pid.reset()self.pitch_rate_pid.reset()self.yaw_rate_pid.reset()self.altitude_pid.reset()
5.3 仿真主程序
class QuadcopterSimulation:"""四旋翼无人机仿真"""def __init__(self):self.quad = QuadcopterDynamics()self.controller = AttitudeController(self.quad)self.dt = 0.01self.sim_time = 20.0# 数据记录self.time_history = []self.state_history = []self.control_history = []self.setpoint_history = []def run_simulation(self, initial_state=None, trajectory_type='hover'):"""运行仿真trajectory_type: 'hover', 'step', 'circle', 'spiral'"""if initial_state is not None:self.quad.state = initial_stateelse:# 默认初始状态:悬停在1米高度self.quad.state = np.zeros(12)self.quad.state[2] = 1.0# 重置控制器self.controller.reset()# 清空历史记录self.time_history = []self.state_history = []self.control_history = []self.setpoint_history = []# 仿真主循环t = 0while t < self.sim_time:# 生成轨迹setpoint = self.generate_trajectory(t, trajectory_type)# 计算控制输入control = self.controller.compute_control(self.quad.state, setpoint)# 积分动力学方程time_span = [t, t + self.dt]solution = odeint(self.quad.dynamics, self.quad.state, time_span, args=(control,))self.quad.state = solution[-1]# 记录数据self.time_history.append(t)self.state_history.append(self.quad.state.copy())self.control_history.append(control.copy())self.setpoint_history.append(setpoint.copy())t += self.dt# 转换为numpy数组self.time_history = np.array(self.time_history)self.state_history = np.array(self.state_history)self.control_history = np.array(self.control_history)self.setpoint_history = np.array(self.setpoint_history)def generate_trajectory(self, t, trajectory_type):"""生成参考轨迹"""if trajectory_type == 'hover':# 悬停在2米高度return np.array([2.0, 0.0, 0.0, 0.0])elif trajectory_type == 'step':# 阶跃响应测试z_des = 2.0 if t < 5 else 3.0phi_des = 0.0theta_des = 0.0psi_des = 0.0 if t < 10 else np.pi/4return np.array([z_des, phi_des, theta_des, psi_des])elif trajectory_type == 'circle':# 圆形轨迹radius = 0.2omega = 0.5z_des = 2.0phi_des = radius * np.sin(omega * t)theta_des = radius * np.cos(omega * t)psi_des = 0.0return np.array([z_des, phi_des, theta_des, psi_des])elif trajectory_type == 'spiral':# 螺旋上升z_des = 1.0 + 0.1 * tphi_des = 0.1 * np.sin(0.5 * t)theta_des = 0.1 * np.cos(0.5 * t)psi_des = 0.2 * treturn np.array([z_des, phi_des, theta_des, psi_des])else:return np.array([2.0, 0.0, 0.0, 0.0])def plot_results(self):"""绘制仿真结果"""fig, axes = plt.subplots(4, 3, figsize=(15, 12))# 位置axes[0, 0].plot(self.time_history, self.state_history[:, 0], 'b-', label='x')axes[0, 0].set_ylabel('X Position (m)')axes[0, 0].set_xlabel('Time (s)')axes[0, 0].grid(True)axes[0, 0].legend()axes[0, 1].plot(self.time_history, self.state_history[:, 1], 'g-', label='y')axes[0, 1].set_ylabel('Y Position (m)')axes[0, 1].set_xlabel('Time (s)')axes[0, 1].grid(True)axes[0, 1].legend()axes[0, 2].plot(self.time_history, self.state_history[:, 2], 'r-', label='z (actual)')axes[0, 2].plot(self.time_history, self.setpoint_history[:, 0], 'r--', label='z (desired)')axes[0, 2].set_ylabel('Z Position (m)')axes[0, 2].set_xlabel('Time (s)')axes[0, 2].grid(True)axes[0, 2].legend()# 速度axes[1, 0].plot(self.time_history, self.state_history[:, 3], 'b-')axes[1, 0].set_ylabel('X Velocity (m/s)')axes[1, 0].set_xlabel('Time (s)')axes[1, 0].grid(True)axes[1, 1].plot(self.time_history, self.state_history[:, 4], 'g-')axes[1, 1].set_ylabel('Y Velocity (m/s)')axes[1, 1].set_xlabel('Time (s)')axes[1, 1].grid(True)axes[1, 2].plot(self.time_history, self.state_history[:, 5], 'r-')axes[1, 2].set_ylabel('Z Velocity (m/s)')axes[1, 2].set_xlabel('Time (s)')axes[1, 2].grid(True)# 姿态角axes[2, 0].plot(self.time_history, np.degrees(self.state_history[:, 6]), 'b-', label='φ (actual)')axes[2, 0].plot(self.time_history, np.degrees(self.setpoint_history[:, 1]), 'b--', label='φ (desired)')axes[2, 0].set_ylabel('Roll (deg)')axes[2, 0].set_xlabel('Time (s)')axes[2, 0].grid(True)axes[2, 0].legend()axes[2, 1].plot(self.time_history, np.degrees(self.state_history[:, 7]), 'g-', label='θ (actual)')axes[2, 1].plot(self.time_history, np.degrees(self.setpoint_history[:, 2]), 'g--', label='θ (desired)')axes[2, 1].set_ylabel('Pitch (deg)')axes[2, 1].set_xlabel('Time (s)')axes[2, 1].grid(True)axes[2, 1].legend()axes[2, 2].plot(self.time_history, np.degrees(self.state_history[:, 8]), 'r-', label='ψ (actual)')axes[2, 2].plot(self.time_history, np.degrees(self.setpoint_history[:, 3]), 'r--', label='ψ (desired)')axes[2, 2].set_ylabel('Yaw (deg)')axes[2, 2].set_xlabel('Time (s)')axes[2, 2].grid(True)axes[2, 2].legend()# 控制输入axes[3, 0].plot(self.time_history, self.control_history[:, 0], 'k-')axes[3, 0].set_ylabel('Thrust (N)')axes[3, 0].set_xlabel('Time (s)')axes[3, 0].grid(True)axes[3, 1].plot(self.time_history, self.control_history[:, 1], 'b-', label='Roll')axes[3, 1].plot(self.time_history, self.control_history[:, 2], 'g-', label='Pitch')axes[3, 1].plot(self.time_history, self.control_history[:, 3], 'r-', label='Yaw')axes[3, 1].set_ylabel('Torques (N·m)')axes[3, 1].set_xlabel('Time (s)')axes[3, 1].grid(True)axes[3, 1].legend()# 3D轨迹ax_3d = fig.add_subplot(4, 3, 12, projection='3d')ax_3d.plot(self.state_history[:, 0], self.state_history[:, 1], self.state_history[:, 2])ax_3d.set_xlabel('X (m)')ax_3d.set_ylabel('Y (m)')ax_3d.set_zlabel('Z (m)')ax_3d.set_title('3D Trajectory')plt.tight_layout()plt.show()def animate_3d(self):"""3D动画显示"""fig = plt.figure(figsize=(10, 8))ax = fig.add_subplot(111, projection='3d')# 设置坐标轴max_range = 3.0ax.set_xlim([-max_range, max_range])ax.set_ylim([-max_range, max_range])ax.set_zlim([0, 2*max_range])ax.set_xlabel('X (m)')ax.set_ylabel('Y (m)')ax.set_zlabel('Z (m)')ax.set_title('Quadcopter 3D Animation')# 初始化线条trajectory_line, = ax.plot([], [], [], 'b-', alpha=0.3)quad_lines = []for _ in range(4):line, = ax.plot([], [], [], 'ro-', linewidth=2)quad_lines.append(line)def init():trajectory_line.set_data([], [])trajectory_line.set_3d_properties([])for line in quad_lines:line.set_data([], [])line.set_3d_properties([])return [trajectory_line] + quad_linesdef update(frame):# 更新轨迹trajectory_line.set_data(self.state_history[:frame, 0], self.state_history[:frame, 1])trajectory_line.set_3d_properties(self.state_history[:frame, 2])# 更新四旋翼位置if frame < len(self.state_history):x, y, z = self.state_history[frame, 0:3]phi, theta, psi = self.state_history[frame, 6:9]# 计算四个电机的位置R = self.quad.rotation_matrix(phi, theta, psi)motor_positions = np.array([[self.quad.L, 0, 0],[0, self.quad.L, 0],[-self.quad.L, 0, 0],[0, -self.quad.L, 0]])for i, line in enumerate(quad_lines):motor_pos = R @ motor_positions[i] + np.array([x, y, z])line.set_data([x, motor_pos[0]], [y, motor_pos[1]])line.set_3d_properties([z, motor_pos[2]])return [trajectory_line] + quad_linesani = animation.FuncAnimation(fig, update, frames=len(self.state_history),init_func=init, interval=50, blit=True)plt.show()return ani# 主程序
if __name__ == "__main__":# 创建仿真对象sim = QuadcopterSimulation()# 测试不同的轨迹print("开始仿真...")# 1. 阶跃响应测试print("1. 阶跃响应测试")sim.run_simulation(trajectory_type='step')sim.plot_results()# 2. 圆形轨迹跟踪print("2. 圆形轨迹跟踪")sim.run_simulation(trajectory_type='circle')sim.plot_results()# 3. 螺旋上升print("3. 螺旋上升轨迹")sim.run_simulation(trajectory_type='spiral')sim.plot_results()# 4. 3D动画(可选)print("4. 显示3D动画")sim.animate_3d()print("仿真完成!")
六、控制参数调试指南
6.1 PID参数调试步骤
-
先调内环(角速度环)
- 设置外环增益为0
- 逐步增加P增益直到出现振荡
- 减小P增益至振荡消失的70%
- 逐步增加D增益改善响应速度
- 适当添加I增益消除稳态误差
-
再调外环(角度环)
- 保持内环参数不变
- 重复上述调试过程
- 外环带宽应低于内环的1/5
6.2 常见问题及解决方案
| 问题 | 可能原因 | 解决方案 |
|---|---|---|
| 持续振荡 | P增益过大 | 减小P增益 |
| 响应缓慢 | P增益过小 | 增大P增益或D增益 |
| 超调严重 | D增益不足 | 增大D增益 |
| 稳态误差 | I增益不足 | 适当增加I增益 |
| 积分饱和 | I增益过大 | 减小I增益或添加抗饱和 |
七、扩展功能
7.1 添加扰动和噪声
def add_disturbance(self, state, t):"""添加外部扰动"""# 风扰动模型wind_force = np.array([0.1 * np.sin(0.5 * t),0.1 * np.cos(0.3 * t),0.05 * np.sin(1.0 * t)])# 传感器噪声noise = np.random.normal(0, 0.01, 12)return state + noisedef add_model_uncertainty(self):"""添加模型不确定性"""# 质量不确定性 ±10%self.quad.m *= np.random.uniform(0.9, 1.1)# 转动惯量不确定性 ±15%self.quad.Ixx *= np.random.uniform(0.85, 1.15)self.quad.Iyy *= np.random.uniform(0.85, 1.15)self.quad.Izz *= np.random.uniform(0.85, 1.15)
7.2 自适应控制
class AdaptivePIDController(PIDController):"""自适应PID控制器"""def __init__(self, kp_init, ki_init, kd_init, learning_rate=0.01):super().__init__(kp_init, ki_init, kd_init)self.learning_rate = learning_rateself.performance_history = []def adapt_gains(self, error_history):"""根据误差历史自适应调整增益"""if len(error_history) < 10:return# 计算性能指标mse = np.mean(np.square(error_history[-10:]))overshoot = np.max(np.abs(error_history[-10:])) - np.abs(error_history[-1])# 自适应规则if mse > 0.1: # 误差过大self.kp *= (1 + self.learning_rate)elif overshoot > 0.2: # 超调过大self.kd *= (1 + self.learning_rate)self.kp *= (1 - 0.5 * self.learning_rate)# 限制增益范围self.kp = np.clip(self.kp, 0.1, 10.0)self.ki = np.clip(self.ki, 0.01, 1.0)self.kd = np.clip(self.kd, 0.01, 5.0)
八、性能评估指标
def evaluate_performance(time_history, state_history, setpoint_history):"""评估控制性能"""errors = state_history[:, 6:9] - setpoint_history[:, 1:4]metrics = {'RMSE': np.sqrt(np.mean(errors**2, axis=0)),'MAE': np.mean(np.abs(errors), axis=0),'Max_Error': np.max(np.abs(errors), axis=0),'Settling_Time': calculate_settling_time(time_history, errors),'Overshoot': calculate_overshoot(errors, setpoint_history[:, 1:4])}print("\n=== 性能评估结果 ===")print(f"RMSE (Roll/Pitch/Yaw): {metrics['RMSE']}")print(f"MAE (Roll/Pitch/Yaw): {metrics['MAE']}")print(f"最大误差: {metrics['Max_Error']}")print(f"调节时间: {metrics['Settling_Time']} s")print(f"超调量: {metrics['Overshoot']*100:.2f} %")return metricsdef calculate_settling_time(time, errors, threshold=0.02):"""计算调节时间(误差进入±2%范围)"""settling_times = []for i in range(errors.shape[1]):error_abs = np.abs(errors[:, i])settled_idx = np.where(error_abs < threshold)[0]if len(settled_idx) > 0:settling_times.append(time[settled_idx[0]])else:settling_times.append(time[-1])return settling_timesdef calculate_overshoot(errors, setpoints):"""计算超调量"""overshoots = []for i in range(errors.shape[1]):if setpoints[0, i] != 0:overshoot = np.max(np.abs(errors[:, i])) / np.abs(setpoints[0, i])else:overshoot = 0overshoots.append(overshoot)return np.array(overshoots)
九、总结
本文详细介绍了四旋翼无人机姿态控制系统的设计与实现,包括:
- 理论基础:坐标系定义、姿态表示、动力学建模
- 控制器设计:级联PID控制结构、参数调试方法
- 仿真实现:完整的Python代码,可直接运行
- 性能优化:自适应控制、扰动补偿、性能评估
关键要点
- 姿态控制是无人机飞控的核心,直接影响飞行稳定性
- 级联PID结构简单有效,适合实时控制
- 参数调试需要遵循内环优先、带宽分离的原则
- 仿真验证是控制器设计的重要环节
后续改进方向
- 高级控制算法:LQR、MPC、滑模控制
- 状态估计:卡尔曼滤波、互补滤波
- 轨迹规划:最优轨迹生成、避障算法
- 多机协同:编队控制、任务分配
参考文献
- Beard, R. W., & McLain, T. W. (2012). Small Unmanned Aircraft: Theory and Practice
- Quan, Q. (2017). Introduction to Multicopter Design and Control
- Bouabdallah, S. (2007). Design and Control of Quadrotors with Application to Autonomous Flying
- Mellinger, D., & Kumar, V. (2011). Minimum snap trajectory generation and control for quadrotors
—
作者:
发布时间: 2024年
联系方式: 欢迎在评论区交流讨论
本文代码已在Python 3.8+环境下测试通过,完整代码可从GitHub获取