第十五部分:信号量和读写锁
目录
1、信号量
1.1、信号量接口
1.2、生产消费者模型
1.2.1、单生产消费模型
1.2.2、多生产消费模型
2、线程池
3、线程接口封装
4、容器和智能指针
5、线程安全的单例模式
6、其它的种类的锁
7、读者写者模型
7.1、概念
7.2、读写锁
7.3、饥饿问题
POSIX信号量和SystemV信号量作用相同,都是用于同步操作,达到无冲突的访问共享资源目的。
1.1、信号量接口
初始化信号量:
#include <semaphore.h>int sem_init(sem_t *sem, int pshared, unsigned int value);Link with -pthread.其中,sem需要自己定义;pshared:表示共享,0表示线程间共享,非零表示进程间共享;value:信号量初始值。
销毁信号量:
#include <semaphore.h>int sem_destroy(sem_t *sem);Link with -pthread.等待信号量:
#include <semaphore.h>int sem_wait(sem_t *sem);Link with -pthread.成功时返回 0,失败时返回 -1,并将 errno 设置为相应的错误码。当信号量的值大于 0 时,调用成功,信号量的值减 1,当前线程获得资源访问权,立即返回。当信号量的值为 0 时,调用被阻塞,直到其他线程对该信号量执行 sem_post 使其值变为正数并唤醒等待的线程,线程被唤醒后再执行“减 1”并继续。
发布信号量:发布信号量,表示资源使用完毕,可以归还资源了,将信号量值加1。
#include <semaphore.h>int sem_post(sem_t *sem);Link with -pthread.成功时返回 0,错误时返回 -1,并设置 errno。sem_post 用来“释放”一个信号量,也就是将信号量的值增 1,通知等待的其他线程资源现在可用。
1.2、生产消费者模型
基于环形队列的生产消费模型。
1.2.1、单生产消费模型
例如:
RingQueue.hpp:
#pragma once#include <iostream>
#include <vector>#include <semaphore.h>const static int defaultcap = 5; template <class T>
class RingQueue
{
private:void P(sem_t& sem){sem_wait(&sem);}void V(sem_t& sem){sem_post(&sem);}public:RingQueue(int cap = defaultcap):ringqueue_(cap), cap_(cap), c_step_(0), p_step_(0){sem_init(&cdata_sem_, 0, 0);sem_init(&pspace_sem_, 0, cap);}void Push(const T& in) // 生产{P(pspace_sem_);ringqueue_[p_step_] = in;V(cdata_sem_);p_step_++;p_step_ %= cap_; // 维持环形队列}void Pop(T* out) // 消费{P(cdata_sem_);*out = ringqueue_[c_step_];V(pspace_sem_);c_step_++;c_step_ %= cap_;}~RingQueue(){sem_destroy(&cdata_sem_);sem_destroy(&pspace_sem_);}private:std::vector<T> ringqueue_; // 环形队列int cap_;int c_step_; // 消费者下标int p_step_; // 生产者下标sem_t cdata_sem_; // 消费者信号量sem_t pspace_sem_; // 生产者信号量
};
Main.cpp:
#include <iostream>
#include <ctime>#include "RingQueue.hpp"#include <pthread.h>
#include <unistd.h>using namespace std;void* Productor(void* args)
{RingQueue<int>* rq = static_cast<RingQueue<int>*>(args);while(true){//获取数据int data = rand() % 10 + 1;//生产数据rq->Push(data);cout << "Productor data done: " << data << endl;}return nullptr;
}void* Consumer(void* args)
{RingQueue<int>* rq = static_cast<RingQueue<int>*>(args);while(true){//获取数据int data = 0;rq->Pop(&data);cout << "Consumer get data: " << data << endl;sleep(1);//加工处理//}return nullptr;
}int main()
{srand(time(nullptr)^getpid()); //^getpid()仅仅只是为了更加离散RingQueue<int>* rq = new RingQueue<int>();pthread_t c, p;pthread_create(&c, nullptr, Productor, rq);pthread_create(&p, nullptr, Consumer, rq);pthread_join(c, nullptr);pthread_join(p, nullptr);return 0;
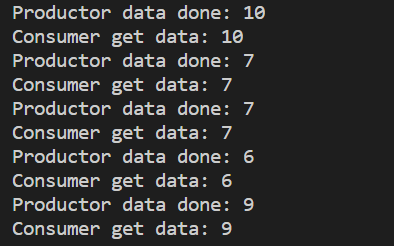
}运行结果为:

把上面的Main.cpp代码稍改为:
#include <iostream>
#include <ctime>#include "RingQueue.hpp"#include <pthread.h>
#include <unistd.h>using namespace std;void* Productor(void* args)
{RingQueue<int>* rq = static_cast<RingQueue<int>*>(args);while(true){//获取数据int data = rand() % 10 + 1;//生产数据rq->Push(data);cout << "Productor data done: " << data << endl;sleep(1);}return nullptr;
}void* Consumer(void* args)
{RingQueue<int>* rq = static_cast<RingQueue<int>*>(args);while(true){//获取数据int data = 0;rq->Pop(&data);cout << "Consumer get data: " << data << endl;//加工处理//}return nullptr;
}int main()
{srand(time(nullptr)^getpid()); //^getpid()仅仅只是为了更加离散RingQueue<int>* rq = new RingQueue<int>();pthread_t c, p;pthread_create(&c, nullptr, Productor, rq);pthread_create(&p, nullptr, Consumer, rq);pthread_join(c, nullptr);pthread_join(p, nullptr);return 0;
}
运行结果为:
1.2.2、多生产消费模型
RingQueue.hpp:
#pragma once
#include <iostream>
#include <vector>#include <semaphore.h>
#include <pthread.h>const static int defaultcap = 5; template <class T>
class RingQueue
{
private:void P(sem_t& sem){sem_wait(&sem);}void V(sem_t& sem){sem_post(&sem);}void Lock(pthread_mutex_t& mutex){pthread_mutex_lock(&mutex);}void Unlock(pthread_mutex_t& mutex){pthread_mutex_unlock(&mutex);}public:RingQueue(int cap = defaultcap):ringqueue_(cap), cap_(cap), c_step_(0), p_step_(0){sem_init(&cdata_sem_, 0, 0);sem_init(&pspace_sem_, 0, cap);pthread_mutex_init(&c_mutex_, nullptr);pthread_mutex_init(&p_mutex_, nullptr);}void Push(const T& in) // 生产{P(pspace_sem_); // PV操作本身就是原子的,不需要被互斥保护,因此放临界区外面Lock(p_mutex_);ringqueue_[p_step_] = in;p_step_++;p_step_ %= cap_; // 维持环形队列Unlock(p_mutex_);V(cdata_sem_);}void Pop(T* out) // 消费{P(cdata_sem_);Lock(c_mutex_);*out = ringqueue_[c_step_];c_step_++;c_step_ %= cap_; Unlock(c_mutex_);V(pspace_sem_);}~RingQueue(){sem_destroy(&cdata_sem_);sem_destroy(&pspace_sem_);pthread_mutex_destroy(&c_mutex_);pthread_mutex_destroy(&p_mutex_);}private:std::vector<T> ringqueue_; // 环形队列int cap_;int c_step_; // 消费者下标int p_step_; // 生产者下标sem_t cdata_sem_; // 消费者信号量sem_t pspace_sem_; // 生产者信号量pthread_mutex_t c_mutex_;pthread_mutex_t p_mutex_;
};
Main.cpp:
#include <iostream>
#include <ctime>#include "RingQueue.hpp"#include <pthread.h>
#include <unistd.h>using namespace std;struct ThreadData
{RingQueue<int>* rq;std::string threadname;
};void* Productor(void* args)
{ThreadData* td = static_cast<ThreadData*>(args);RingQueue<int>* rq = td->rq;std::string name = td->threadname;while(true){//获取数据int data = rand() % 10 + 1;//生产数据rq->Push(data);printf("Productor data done: %d who: %s\n", data, name.c_str());//cout << "Productor data done: " << data << " who: " << name << endl;}return nullptr;
}void* Consumer(void* args)
{ThreadData* td = static_cast<ThreadData*>(args);RingQueue<int>* rq = td->rq;std::string name = td->threadname;while(true){//获取数据int data = 0;rq->Pop(&data);printf("Consumer get data: %d who: %s\n", data, name.c_str());//cout << "Consumer get data: " << data << " who: " << name << endl;sleep(1);//加工处理//}return nullptr;
}int main()
{srand(time(nullptr) ^ getpid()); //^getpid()仅仅只是为了更加离散RingQueue<int>* rq = new RingQueue<int>();pthread_t c[5], p[3];for(int i = 0; i < 3; i++){ThreadData* td = new ThreadData();td->rq = rq;td->threadname = "Productor-" + std::to_string(i);pthread_create(p + i, nullptr, Productor, td);}for(int i = 0; i < 5; i++){ThreadData* td = new ThreadData();td->rq = rq;td->threadname = "Productor-" + std::to_string(i);pthread_create(c + i, nullptr, Consumer, td);}for(int i = 0; i < 3; i++){pthread_join(p[i], nullptr);}for(int i = 0; i < 5; i++){pthread_join(c[i], nullptr);}return 0;
}
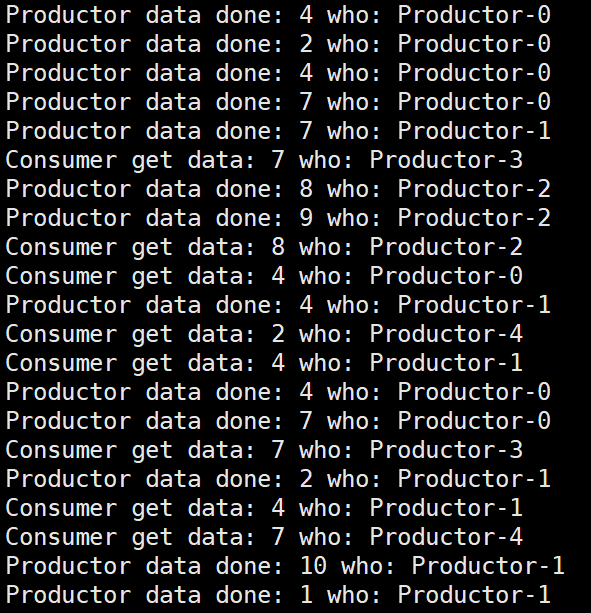
运行结果为:
我们也可以不使用原生的类型,例如:
Task.hpp:
#pragma once
#include <iostream>
#include <string>std::string opers = "+-*/%";enum{DivZero = 1,ModZero,Unknow
};class Task
{
public:Task(){}Task(int x, int y, char op):data1_(x), data2_(y), oper_(op), result_(0), exitcode_(0){}void run(){switch(oper_){case '+':result_ = data1_ + data2_;break;case '-':result_ = data1_ - data2_;break;case '*':result_ = data1_ * data2_;break;case '/':{if(data2_ == 0) exitcode_ = DivZero;else result_ = data1_ / data2_;}break;case '%':{if(data2_ == 0) exitcode_ = ModZero;else result_ = data1_ % data2_;}break;default:exitcode_ = Unknow;break;}}std::string GetResult(){std::string r = std::to_string(data1_);r += oper_;r += std::to_string(data2_);r += '=';r += std::to_string(result_);r += "[code: ";r += std::to_string(exitcode_);r += ']';return r;}std::string GetTask(){std::string r = std::to_string(data1_);r += oper_;r += std::to_string(data2_);r += "= ?";return r;}void operator()(){run();}~Task(){}
private:int data1_;int data2_;char oper_;int result_;int exitcode_;
};
RingQueue.hpp:
#pragma once
#include <iostream>
#include <vector>#include <semaphore.h>
#include <pthread.h>const static int defaultcap = 5; template <class T>
class RingQueue
{
private:void P(sem_t& sem){sem_wait(&sem);}void V(sem_t& sem){sem_post(&sem);}void Lock(pthread_mutex_t& mutex){pthread_mutex_lock(&mutex);}void Unlock(pthread_mutex_t& mutex){pthread_mutex_unlock(&mutex);}public:RingQueue(int cap = defaultcap):ringqueue_(cap), cap_(cap), c_step_(0), p_step_(0){sem_init(&cdata_sem_, 0, 0);sem_init(&pspace_sem_, 0, cap);pthread_mutex_init(&c_mutex_, nullptr);pthread_mutex_init(&p_mutex_, nullptr);}void Push(const T& in) // 生产{P(pspace_sem_); // PV操作本身就是原子的,不需要被互斥保护,因此放临界区外面Lock(p_mutex_);ringqueue_[p_step_] = in;p_step_++;p_step_ %= cap_; // 维持环形队列Unlock(p_mutex_);V(cdata_sem_);}void Pop(T* out) // 消费{P(cdata_sem_);Lock(c_mutex_);*out = ringqueue_[c_step_];c_step_++;c_step_ %= cap_; Unlock(c_mutex_);V(pspace_sem_);}~RingQueue(){sem_destroy(&cdata_sem_);sem_destroy(&pspace_sem_);pthread_mutex_destroy(&c_mutex_);pthread_mutex_destroy(&p_mutex_);}private:std::vector<T> ringqueue_; // 环形队列int cap_;int c_step_; // 消费者下标int p_step_; // 生产者下标sem_t cdata_sem_; // 消费者信号量sem_t pspace_sem_; // 生产者信号量pthread_mutex_t c_mutex_;pthread_mutex_t p_mutex_;
};
Main.cpp:
#include <iostream>
#include <ctime>#include "RingQueue.hpp"
#include "Task.hpp"#include <pthread.h>
#include <unistd.h>using namespace std;struct ThreadData
{RingQueue<Task>* rq;std::string threadname;
};void* Productor(void* args)
{ThreadData* td = static_cast<ThreadData*>(args);RingQueue<Task>* rq = td->rq;std::string name = td->threadname;int len = opers.size();while(true){//获取数据int data1 = rand() % 10 + 1;usleep(10);int data2 = rand() % 10;char op = opers[rand() % len];Task t(data1, data2, op);//生产数据rq->Push(t);cout << "Productor data done: " << t.GetTask() << " who: " << name << endl;}return nullptr;
}void* Consumer(void* args)
{ThreadData* td = static_cast<ThreadData*>(args);RingQueue<Task>* rq = td->rq;std::string name = td->threadname;while(true){//获取数据Task t;rq->Pop(&t);//加工处理t();cout << "Consumer get data: " << t.GetTask() << " who: " << name << " result: " << t.GetResult() << endl;sleep(1);}return nullptr;
}int main()
{srand(time(nullptr) ^ getpid()); //^getpid()仅仅只是为了更加离散RingQueue<Task>* rq = new RingQueue<Task>();pthread_t c[5], p[3];for(int i = 0; i < 3; i++){ThreadData* td = new ThreadData();td->rq = rq;td->threadname = "Productor-" + std::to_string(i);pthread_create(p + i, nullptr, Productor, td);}for(int i = 0; i < 5; i++){ThreadData* td = new ThreadData();td->rq = rq;td->threadname = "Productor-" + std::to_string(i);pthread_create(c + i, nullptr, Consumer, td);}for(int i = 0; i < 3; i++){pthread_join(p[i], nullptr);}for(int i = 0; i < 5; i++){pthread_join(c[i], nullptr);}return 0;
}
2、线程池
池化技术:以空间换时间。线程池是一种线程的使用模式,而线程池维护着多个线程,等待着监督管理者分配可并发执行的任务。这避免了在处理短时间任务时创建与销毁线程的代价。线程池不仅能够保证内核的充分利用,还能防止过分调度。
线程池的应用场景:
1、需要大量的线程来完成任务,且完成任务的时间比较短。
2、对性能要求苛刻的应用,比如要求服务器迅速响应客户请求。
3、接受突发性的大量请求,但不至于使服务器因此产生大量线程。
例如:
Main.cpp:
#include "ThreadPool.hpp"
#include "Task.hpp"#include <iostream>
#include <ctime>int main()
{ThreadPool<Task>* tp = new ThreadPool<Task>(5);tp->Start();srand(time(nullptr) ^ getpid());while(true){//构建任务int x = rand() % 10 + 1;int y = rand() % 5;usleep(10);char op = opers[rand() % opers.size()];Task t(x, y, op);tp->Push(t);//交给线程池处理std::cout << "main thread make task: " << t.GetTask() << std::endl;sleep(1);}return 0;
}
Task.hpp:
#pragma once
#include <iostream>
#include <string>std::string opers = "+-*/%";enum{DivZero = 1,ModZero,Unknow
};class Task
{
public:Task(int x, int y, char op):data1_(x), data2_(y), oper_(op), result_(0), exitcode_(0){}void run(){switch(oper_){case '+':result_ = data1_ + data2_;break;case '-':result_ = data1_ - data2_;break;case '*':result_ = data1_ * data2_;break;case '/':{if(data2_ == 0) exitcode_ = DivZero;else result_ = data1_ + data2_;}break;case '%':{if(data2_ == 0) exitcode_ = ModZero;else result_ = data1_ % data2_;}break;default:exitcode_ = Unknow;break;}}std::string GetResult(){std::string r = std::to_string(data1_);r += oper_;r += std::to_string(data2_);r += '=';r += std::to_string(result_);r += "[code: ";r += std::to_string(exitcode_);r += ']';return r;}std::string GetTask(){std::string r = std::to_string(data1_);r += oper_;r += std::to_string(data2_);r += "= ?";return r;}void operator()(){run();}~Task(){}
private:int data1_;int data2_;char oper_;int result_;int exitcode_;
};
ThreadPool.hpp:
#pragma once#include <iostream>
#include <vector>
#include <string>
#include <queue>#include <pthread.h>
#include <unistd.h>struct ThreadInfo
{pthread_t tid;std::string name;
};static const int defaultnum = 5;template <class T>
class ThreadPool
{
public:void Lock(){pthread_mutex_lock(&mutex_);}void Unlock(){pthread_mutex_unlock(&mutex_);}void Wakeup(){pthread_cond_signal(&cond_);}void ThreadSleep(){pthread_cond_wait(&cond_, &mutex_);}bool IsQueueEmpty(){return tasks_.empty();}std::string GetThreadName(pthread_t tid){for(const auto& ti : threads_){if(ti.tid == tid){return ti.name;}}return "None";}
public:ThreadPool(int num = defaultnum):threads_(num){pthread_mutex_init(&mutex_, nullptr);pthread_cond_init(&cond_, nullptr);}// void* HandlerTask(void* args) // 这样写不行,因为该函数的第一个参数被ThreadPool* this占据了。// {                             // //     ////     while(true)//     {//         sleep(1);//         std::cout << "new thread wait task..." << std::endl;//     }// }static void* HandlerTask(void* args) // 我们也可以把这个函数放在类外{ThreadPool<T>* tp = static_cast<ThreadPool<T>*>(args);std::string name = tp->GetThreadName(pthread_self());while(true){tp->Lock();while(tp->IsQueueEmpty()){tp->ThreadSleep();}T t = tp->Pop();tp->Unlock();t();std::cout << name << " result: " << t.GetResult() << std::endl;}}void Start(){int num = threads_.size();for(int i = 0; i < num; i++){threads_[i].name = "thread-" + std::to_string(i+1);pthread_create(&(threads_[i].tid), nullptr, HandlerTask, this); // 这里传this的原因是使用static修饰的}                                              //HandlerTask没法访问类内的成员,因此传个this指针就可以了}T Pop(){T t = tasks_.front();tasks_.pop();return t;}void Push(const T& t){Lock();tasks_.push(t);Wakeup();Unlock();}~ThreadPool(){pthread_mutex_destroy(&mutex_);pthread_cond_destroy(&cond_);}
private:std::vector<ThreadInfo> threads_;std::queue<T> tasks_;pthread_mutex_t mutex_;pthread_cond_t cond_;
};
3、线程接口封装
如果感觉线程的接口不太好用的话,还可以使用面向对象的方式进行封装。
例如:
Thread.hpp:
#pragma once#include <iostream>
#include <string>
#include <ctime>#include <pthread.h>typedef void (*callback_t)();static int num = 1;class Thread
{
public:static void* Routine(void* args){Thread* thread = static_cast<Thread*>(args);thread->Entry();return nullptr;}
public:Thread(callback_t cb):tid_(0), name_(""), start_timestamp_(0), isrunning_(false), cb_(cb){}void Run(){name_ = "thread-" + std::to_string(num++);start_timestamp_ = time(nullptr);isrunning_ = true;pthread_create(&tid_, nullptr, Routine, this);}void Join(){pthread_join(tid_, nullptr);isrunning_ = false;}std::string Name(){return name_;}uint64_t StartTimestamp(){return start_timestamp_;}bool IsRunning(){return isrunning_;}void Entry(){cb_();}~Thread(){}
private:pthread_t tid_;std::string name_;uint64_t start_timestamp_;bool isrunning_;callback_t cb_;
};
Main.cc:
#include <iostream>
#include <vector>#include <unistd.h>#include "Thread.hpp"void Print()
{while(true){printf("hello\n");sleep(1);}
}int main()
{// Thread t(Print);// t.Run();// std::cout << "是否启动成功: " << t.IsRunning() << std::endl;// std::cout << "启动成功时间戳: " << t.StartTimestamp() << std::endl; // std::cout << "线程的名字: " << t.Name() << std::endl;// t.Join();std::vector<Thread> threads;for(int i = 0; i < 10; i++){threads.push_back(Thread(Print));}for(auto& t : threads){t.Run();}for(auto& t : threads){t.Join();}return 0;
}
4、容器和智能指针
STL中的容器不是线程安全的,原因是STL的设计初衷是将性能挖掘到极致,而一旦涉及到加锁保证线程安全,会对性能造成一定的影响;而且对于不同的容器,加锁方式的不同,性能可能也不同因此STL中的容器默认不是线程安全的,如果需要在多线程环境下使用,往往需要调用者自行保证线程安全。
智能指针一般是线程安全的,对于 unique_ptr,由于只是在当前代码块范围内生效,不会共享访问,因此不涉及线程安全问题,对于 shared_ptr,多个对象需要共用一个引用计数变量,所以会存在线程安全问题, 但是标准库实现的时候考虑到了这个问题。总的来说,大部分智能指针要么与线程安全无关,要么就是考虑了线程安全问题的。
5、线程安全的单例模式
单例模式是一种常见的设计模式,针对一些经典的常见的场景,给定了一些对应的解决方案,这个就是设计模式。
某些类,只应该具有一个对象,就称之为单例。在很多服务器开发场景中,经常需要让服务器加载很多的数据 (上百G) 到内存中,此时往往要用一个单例的类来管理这些数据。
单例模式分为两种,一种是饿汉模式,一种是懒汉模式。饿汉模式和懒汉模式前面在C++中已经讲过了,下面主要讲的是饿汉模式和懒汉模式在多线程的情形下是否是线程安全的。
单例模式本身可能会有线程安全问题,比如:在多线程环境下,创建出多个实例。
饿汉模式:天然线程安全,多线程环境下,不需要保护。
懒汉模式:线程不安全,多线程环境下,需要保护。
例如:下面实现线程安全的懒汉模式的线程池。
ThreadPool.hpp
#pragma once#include <iostream>
#include <vector>
#include <string>
#include <queue>#include <pthread.h>
#include <unistd.h>struct ThreadInfo
{pthread_t tid; std::string name;
};static const int defaultnum = 5;template <class T>
class ThreadPool
{
public:void Lock(){pthread_mutex_lock(&mutex_);}void Unlock(){pthread_mutex_unlock(&mutex_);}void Wakeup(){pthread_cond_signal(&cond_);}void ThreadSleep(){pthread_cond_wait(&cond_, &mutex_);}bool IsQueueEmpty(){return tasks_.empty();}std::string GetThreadName(pthread_t tid){for(const auto& ti : threads_){if(ti.tid == tid){return ti.name;}}return "None";}
public:// void* HandlerTask(void* args) // 这样写不行,因为该函数的第一个参数被ThreadPool* this占据了。// {                             // //     ////     while(true)//     {//         sleep(1);//         std::cout << "new thread wait task..." << std::endl;//     }// }static void* HandlerTask(void* args) // 我们也可以把这个函数放在类外{ThreadPool<T>* tp = static_cast<ThreadPool<T>*>(args);std::string name = tp->GetThreadName(pthread_self());while(true){tp->Lock();while(tp->IsQueueEmpty()){tp->ThreadSleep();}T t = tp->Pop();tp->Unlock();t();std::cout << name << " result: " << t.GetResult() << std::endl;}}void Start(){int num = threads_.size();for(int i = 0; i < num; i++){threads_[i].name = "thread-" + std::to_string(i+1);pthread_create(&(threads_[i].tid), nullptr, HandlerTask, this); // 这里传this的原因是使用static修饰的}                                              //HandlerTask没法访问类内的成员,因此传个this指针就可以了}T Pop(){T t = tasks_.front();tasks_.pop();return t;}void Push(const T& t){Lock();tasks_.push(t);Wakeup();Unlock();}static ThreadPool<T>* GetInstance(){if(nullptr == tp_) // 双重检查加锁{pthread_mutex_lock(&lock_);if(tp_ == nullptr){std::cout << "singleton ThreadPool first create!" << std::endl;tp_ = new ThreadPool<T>();}pthread_mutex_unlock(&lock_);}return tp_;}private:ThreadPool(int num = defaultnum):threads_(num){pthread_mutex_init(&mutex_, nullptr);pthread_cond_init(&cond_, nullptr);}ThreadPool(const ThreadPool<T>&) = delete;ThreadPool<T>& operator=(const ThreadPool<T>&) = delete;~ThreadPool(){pthread_mutex_destroy(&mutex_);pthread_cond_destroy(&cond_);}private:std::vector<ThreadInfo> threads_;std::queue<T> tasks_;pthread_mutex_t mutex_;pthread_cond_t cond_;static ThreadPool<T>* tp_; // 改成懒汉模式static pthread_mutex_t lock_; // 加锁,防止多线程同时创建多个实例
};template <class T>
ThreadPool<T>* ThreadPool<T>::tp_ = nullptr; template <class T>
pthread_mutex_t ThreadPool<T>::lock_ = PTHREAD_MUTEX_INITIALIZER;
Main.cpp
#include "ThreadPool.hpp"
#include "Task.hpp"#include <iostream>
#include <ctime>int main()
{std::cout << "process run" << std::endl;sleep(3);ThreadPool<Task>::GetInstance()->Start();srand(time(nullptr) ^ getpid());while(true){//构建任务int x = rand() % 10 + 1; int y = rand() % 5;usleep(10);char op = opers[rand() % opers.size()];Task t(x, y, op);ThreadPool<Task>::GetInstance()->Push(t);//交给线程池处理std::cout << "main thread make task: " << t.GetTask() << std::endl;sleep(1);}return 0;
}
Task.hpp
#pragma once
#include <iostream>
#include <string>std::string opers = "+-*/%";enum{ DivZero = 1,ModZero,Unknow
};class Task
{
public:Task(int x, int y, char op):data1_(x), data2_(y), oper_(op), result_(0), exitcode_(0){}void run(){switch(oper_){case '+':result_ = data1_ + data2_;break;case '-':result_ = data1_ - data2_;break;case '*':result_ = data1_ * data2_;break;case '/':{if(data2_ == 0) exitcode_ = DivZero;else result_ = data1_ + data2_;}break;case '%':{if(data2_ == 0) exitcode_ = ModZero;else result_ = data1_ % data2_;}break;default:exitcode_ = Unknow;break;}}std::string GetResult(){std::string r = std::to_string(data1_);r += oper_;r += std::to_string(data2_);r += '=';r += std::to_string(result_);r += "[code: ";r += std::to_string(exitcode_);r += ']';return r;}std::string GetTask(){std::string r = std::to_string(data1_);r += oper_;r += std::to_string(data2_);r += "= ?";return r;}void operator()(){run();}~Task(){}
private:int data1_;int data2_;char oper_;int result_;int exitcode_;
};
6、其它的种类的锁
锁是有很多的,下面仅举几个。
悲观锁:在每次取数据时,总是担心数据会被其他线程修改,所以会在取数据前先加锁,当其他线程想要访问数据时,被阻塞挂起(前面线程这一块用的锁全是悲观锁,都是要先申请锁,再进行访问)。
乐观锁:每次取数据时候,总是乐观的认为数据不会被其他线程修改,因此不上锁。但是在更新数据前, 会判断其他数据在更新前有没有对数据进行修改。
自旋锁:不挂起,而是不停的去申请锁,如果成功则进入临界区,如果失败继续申请锁。通常用于短临界区,锁持有时间极短,线程在尝试获取失败时会在用户态不断自旋,避免线程切换开销。
注:之前用的锁都是挂起等待锁。究竟用自旋锁还是挂起等待锁,取决于线程执行临界区的时长,如果执行临界区的时间很短,则使用自旋锁比较好,如果时间很长,则使用挂起等待锁比较好。
可以使用下面的函数实现自旋锁的效果:搞个循环即可。
int pthread_mutex_trylock(pthread_mutex_t *mutex);该函数的作用是尝试获取互斥锁,但不会阻塞当前线程,如果互斥锁当前未被其他线程持有,它会获取锁并立即返回 0;如果互斥锁已经被其他线程获取,它不会等待,而是立即返回一个错误码。
不过,库中已经实现好了自旋锁相关的接口了,例如:初始化与销毁
#include <pthread.h>int pthread_spin_init(pthread_spinlock_t *lock, int pshared);
int pthread_spin_destroy(pthread_spinlock_t *lock);
以及上锁和解锁:
#include <pthread.h>int pthread_spin_lock(pthread_spinlock_t *lock);
int pthread_spin_unlock(pthread_spinlock_t *lock);
其中pthread_spin_lock函数申请锁成功则继续向后执行;如果失败,则在使用感觉上是阻塞住了,但是在底层其实一直在申请锁,而不会阻塞等待,这和pthread_mutex_lock是不一样的。
还有一个下面的函数:
#include <pthread.h>int pthread_spin_trylock(pthread_spinlock_t *lock);上面的函数和pthread_mutex_trylock是类似的。
7、读者写者模型
7.1、概念
读者写者模型是一种在并发控制中用来描述对共享资源进行访问的两类进程或线程角色的模型。
在读者写者模型由以下部分组成:
1、三种关系:读者与读者(共享关系)、读者与写者(互斥与同步关系)、写者与写者(互斥关系)。
2、两种角色:读者(对数据进行读操作)和写者(对数据进行写操作)。
3、一个共享资源:数据。
读者写者模型与生产者消费者模型的最大的区别就是读者与读者之间不是互斥关系,而是可以同时读取的。
7.2、读写锁
例如:初始化与销毁
#include <pthread.h>int pthread_rwlock_destroy(pthread_rwlock_t *rwlock);
int pthread_rwlock_init(pthread_rwlock_t *restrict rwlock, const pthread_rwlockattr_t *restrict attr);
pthread_rwlock_t rwlock = PTHREAD_RWLOCK_INITIALIZER;
例如:读方式加锁
#include <pthread.h>
int pthread_rwlock_rdlock(pthread_rwlock_t *rwlock); // 以读方式加锁
int pthread_rwlock_tryrdlock(pthread_rwlock_t *rwlock);
例如:写方式加锁
#include <pthread.h>
int pthread_rwlock_trywrlock(pthread_rwlock_t *rwlock);
int pthread_rwlock_wrlock(pthread_rwlock_t *rwlock); // 以写方式加锁
例如:解锁
#include <pthread.h>
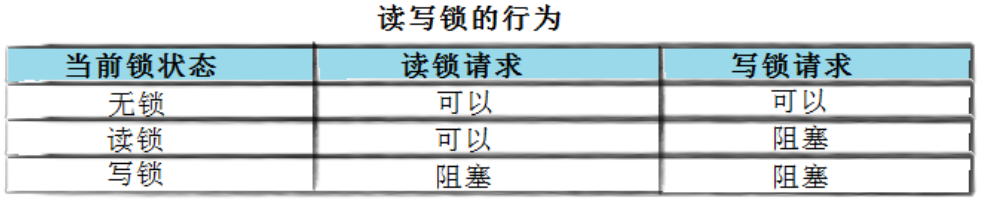
int pthread_rwlock_unlock(pthread_rwlock_t *rwlock);上面的这些函数和之前的互斥锁使用类似,不再赘述。读写锁的功能如下图所示:
7.3、饥饿问题
在读者与写者模型的场景中,一般都是读者多,写者少,这就可能导致写者饥饿问题,不过这现象在读者写者模型中是正常现象,因为读者本来就多而写者本来就少。
如何平衡读者与写者,避免饥饿。有两种常见策略:
1、读者优先:只要有读者正在读取资源,后续的读者可以直接进入,无需等待;写者必须等待所有当前读者读完后才能执行(默认也是读者优先,这种场景最多)。
2、写者优先:当写者请求访问时,会优先获得资源,新的读者必须等待,直到所有等待的写者完成操作;若已有读者在读取,写者需等待当前读者完成,但后续读者会被阻塞,避免写者长期等待。
还有公平版本力求在读者和写者之间实现更公平的轮转,避免饥饿。
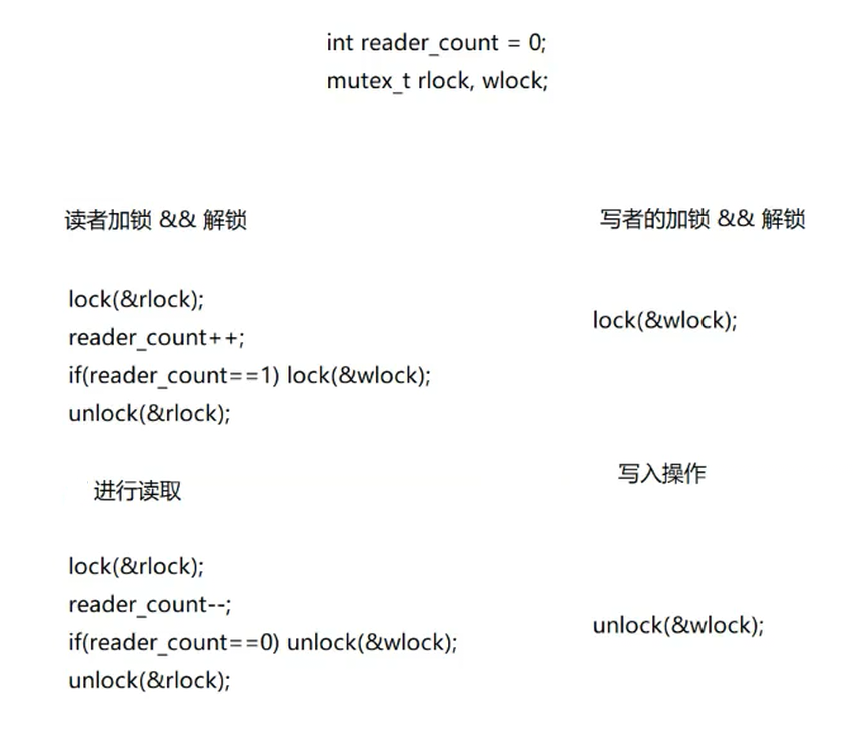
例如:读者优先的伪代码,理解读写锁的实现原理。
还可以使用下面的函数设置读者优先还是写者优先:
#include <pthread.h>int pthread_rwlockattr_setkind_np(pthread_rwlockattr_t *attr, int pref);
int pthread_rwlockattr_getkind_np(const pthread_rwlockattr_t *restrict attr, int *restrict pref);/*pref 共有 3 种选项PTHREAD_RWLOCK_PREFER_READER_NP 读者优先(默认设置)。PTHREAD_RWLOCK_PREFER_WRITER_NP 写者优先。PTHREAD_RWLOCK_PREFER_WRITER_NONRECURSIVE_NP 写者优先,但写者不能递归加锁*/
不过不建议使用上面的函数,使用默认的读者优先就可以了。
例如:
#include <vector>
#include <sstream>
#include <cstdio>
#include <cstdlib>
#include <cstring>#include <unistd.h>
#include <pthread.h>volatile int ticket = 1000;
pthread_rwlock_t rwlock;void *reader(void *arg) // 读者线程函数
{char *id = (char *)arg;while (1){pthread_rwlock_rdlock(&rwlock);if (ticket <= 0){pthread_rwlock_unlock(&rwlock);break;}printf("%s: %d\n", id, ticket);pthread_rwlock_unlock(&rwlock);usleep(1);}return nullptr;
}void *writer(void *arg) // 写者线程函数
{char *id = (char *)arg;while (1){pthread_rwlock_wrlock(&rwlock);if (ticket <= 0){pthread_rwlock_unlock(&rwlock);break;}printf("%s: %d\n", id, --ticket);pthread_rwlock_unlock(&rwlock);usleep(1);}return nullptr;
}struct ThreadAttr
{pthread_t tid;std::string id;
};std::string create_reader_id(std::size_t i)
{// 利用 ostringstream 进行 string 拼接std::ostringstream oss("thread reader ", std::ios_base::ate);oss << i;return oss.str();
}std::string create_writer_id(std::size_t i)
{// 利用 ostringstream 进行 string 拼接std::ostringstream oss("thread writer ", std::ios_base::ate);oss << i;return oss.str();
}void init_readers(std::vector<ThreadAttr> &vec)
{for (std::size_t i = 0; i < vec.size(); ++i){vec[i].id = create_reader_id(i);pthread_create(&vec[i].tid, nullptr, reader, (void *)vec[i].id.c_str());}
}void init_writers(std::vector<ThreadAttr> &vec)
{for (std::size_t i = 0; i < vec.size(); ++i){vec[i].id = create_writer_id(i);pthread_create(&vec[i].tid, nullptr, writer, (void *)vec[i].id.c_str());}
}void join_threads(std::vector<ThreadAttr> const &vec)
{// 我们按创建的逆序来进行线程的回收for (std::vector<ThreadAttr>::const_reverse_iterator it = vec.rbegin(); it != vec.rend(); ++it){pthread_t const &tid = it->tid;pthread_join(tid, nullptr);}
}void init_rwlock()
{
#if 0 // 写者优先pthread_rwlockattr_t attr;pthread_rwlockattr_init(&attr);pthread_rwlockattr_setkind_np(&attr, PTHREAD_RWLOCK_PREFER_WRITER_NONRECURSIVE_NP);pthread_rwlock_init(&rwlock, &attr);pthread_rwlockattr_destroy(&attr);#else // 读者优先pthread_rwlock_init(&rwlock, nullptr);#endif
}int main()
{// 测试效果不明显的情况下,可以加大 reader_nr,但也不能太大。const std::size_t reader_nr = 200; // 读者线程数量const std::size_t writer_nr = 2; // 写者线程数量 std::vector<ThreadAttr> readers(reader_nr);std::vector<ThreadAttr> writers(writer_nr);init_rwlock();init_readers(readers);init_writers(writers);join_threads(writers);join_threads(readers);pthread_rwlock_destroy(&rwlock);return 0;
}