学习:uniapp全栈微信小程序vue3后台(31)
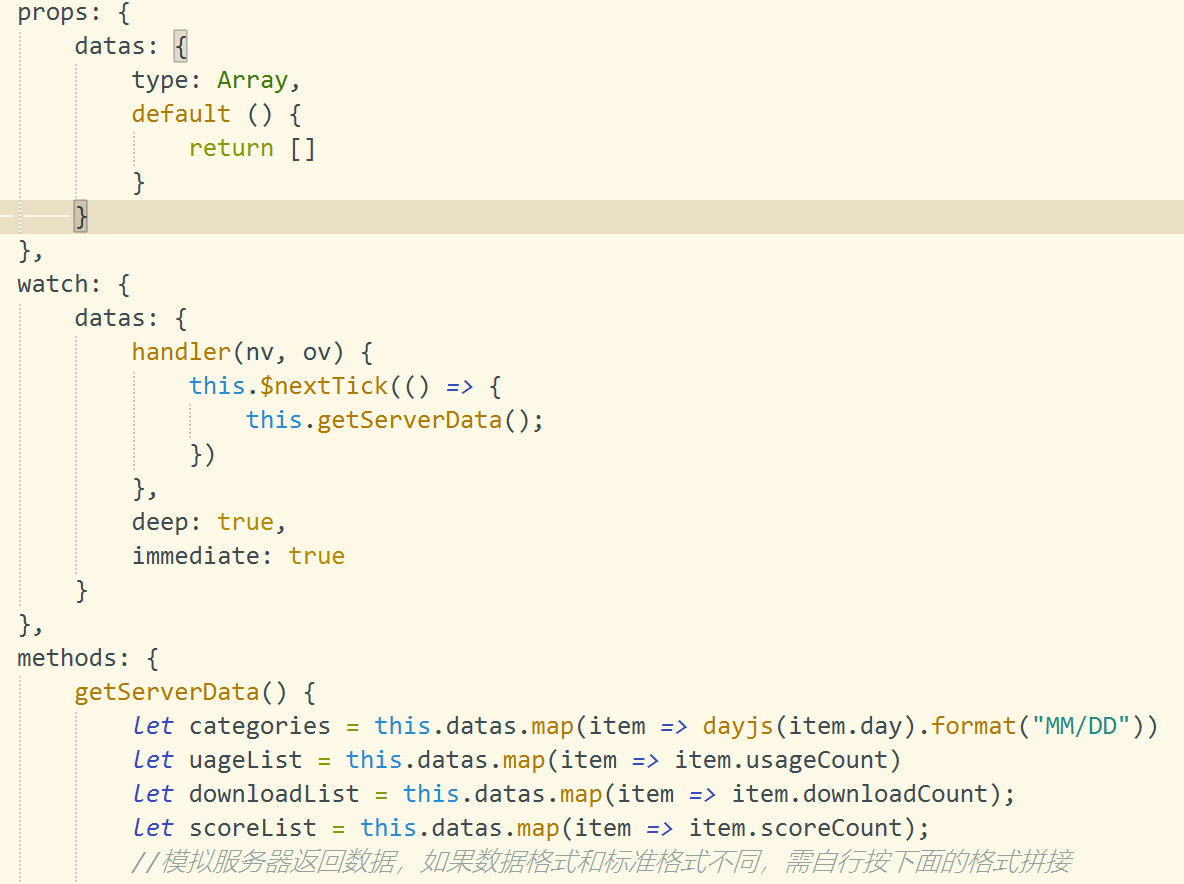
152.完成折线区域图的渲染将数据概率设为后台首页
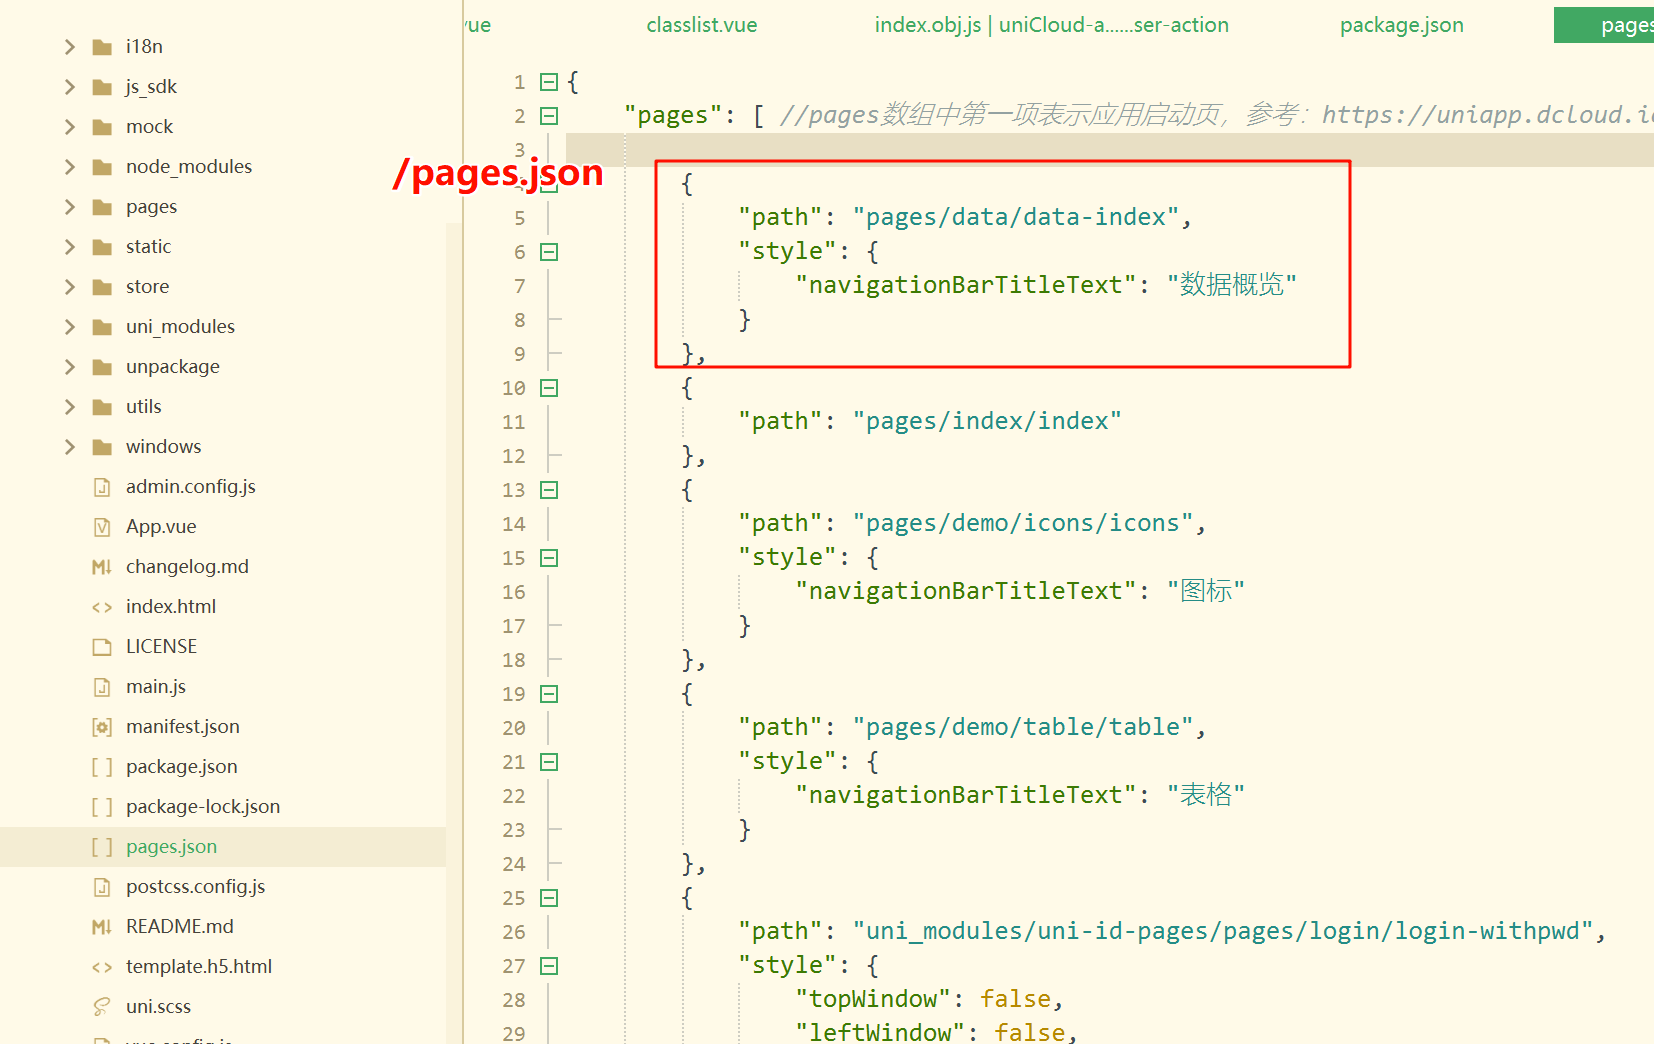
/pages/data/children/data-trend
完整代码
<template><!-- 图表容器 --><view class="charts-box"><!-- 使用qiun-data-charts组件渲染面积图 --><!-- type: 指定图表类型为面积图 --><!-- opts: 图表配置选项 --><!-- chartData: 图表数据 --><!-- ontouch: 启用触摸交互 --><qiun-data-charts type="area" :opts="opts" :chartData="chartData" :ontouch="true" /></view>
</template><script>// 导入dayjs日期处理库,用于日期格式化import dayjs from 'dayjs';export default {data() {return {chartData: {}, // 图表数据对象//您可以通过修改 config-ucharts.js 文件中下标为 ['area'] 的节点来配置全局默认参数,如都是默认参数,此处可以不传 opts 。实际应用过程中 opts 只需传入与全局默认参数中不一致的【某一个属性】即可实现同类型的图表显示不同的样式,达到页面简洁的需求。opts: {color: ["#1890FF", "#91CB74", "#FAC858", "#EE6666", "#73C0DE", "#3CA272", "#FC8452", "#9A60B4","#ea7ccc"],padding: [15, 15, 0, 15],// 是否启用滚动enableScroll: true,// 图例配置legend: {},// X轴配置xAxis: {// 禁用网格线disableGrid: true,// 显示滚动条scrollShow: true,// 显示的数据项数量itemCount: 8},// Y轴配置yAxis: {// 网格线类型为虚线gridType: "dash",// 虚线长度dashLength: 2},// 额外配置项extra: {// 区域图配置area: {// 曲线类型type: "curve",// 透明度opacity: 0.2,// 是否添加辅助线addLine: true,// 线条宽度width: 2,// 是否使用渐变色gradient: true,activeType: "hollow"}}}};},props: {datas: {type: Array,default () {return []}}},watch: {datas: {handler(nv, ov) {this.$nextTick(() => {this.getServerData();})},deep: true,immediate: true}},methods: {getServerData() {let categories = this.datas.map(item => dayjs(item.day).format("MM/DD"))let uageList = this.datas.map(item => item.usageCount)let downloadList = this.datas.map(item => item.downloadCount);let scoreList = this.datas.map(item => item.scoreCount);//模拟服务器返回数据,如果数据格式和标准格式不同,需自行按下面的格式拼接let res = {categories,series: [{name: "使用量",data: uageList},{name: "下载量",data: downloadList},{name: "评分量",data: scoreList}]};this.chartData = JSON.parse(JSON.stringify(res));},}};</script><style scoped>/* 请根据实际需求修改父元素尺寸,组件自动识别宽高 */.charts-box {width: 100%;height: 300px;}</style>
设为后台首页
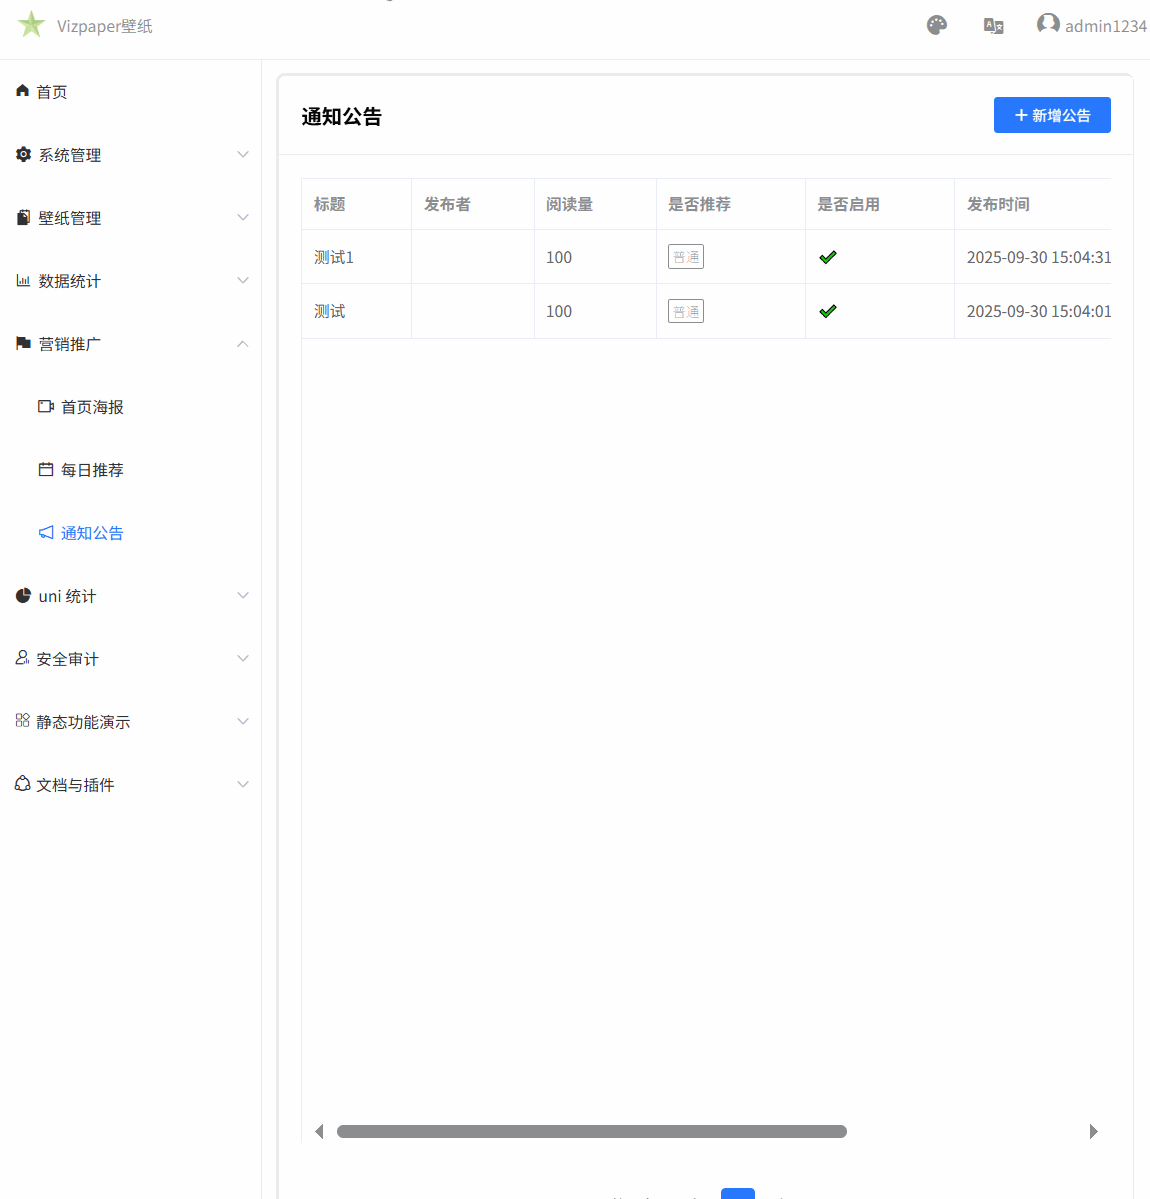
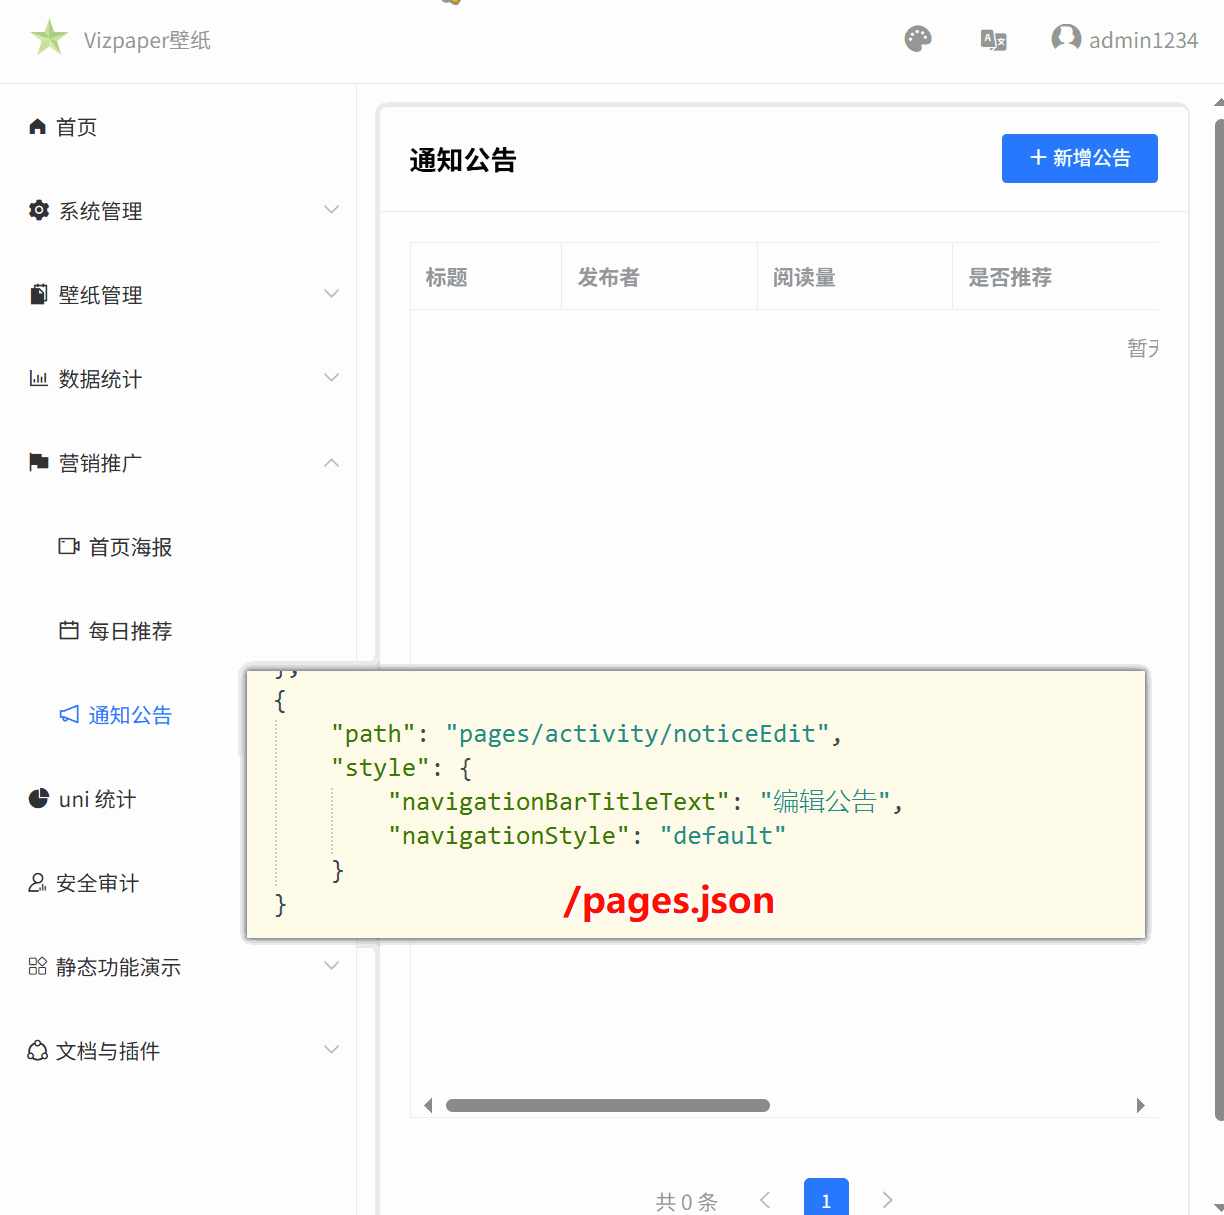
153.在后台管理配置通知公告栏目创建schema表结构
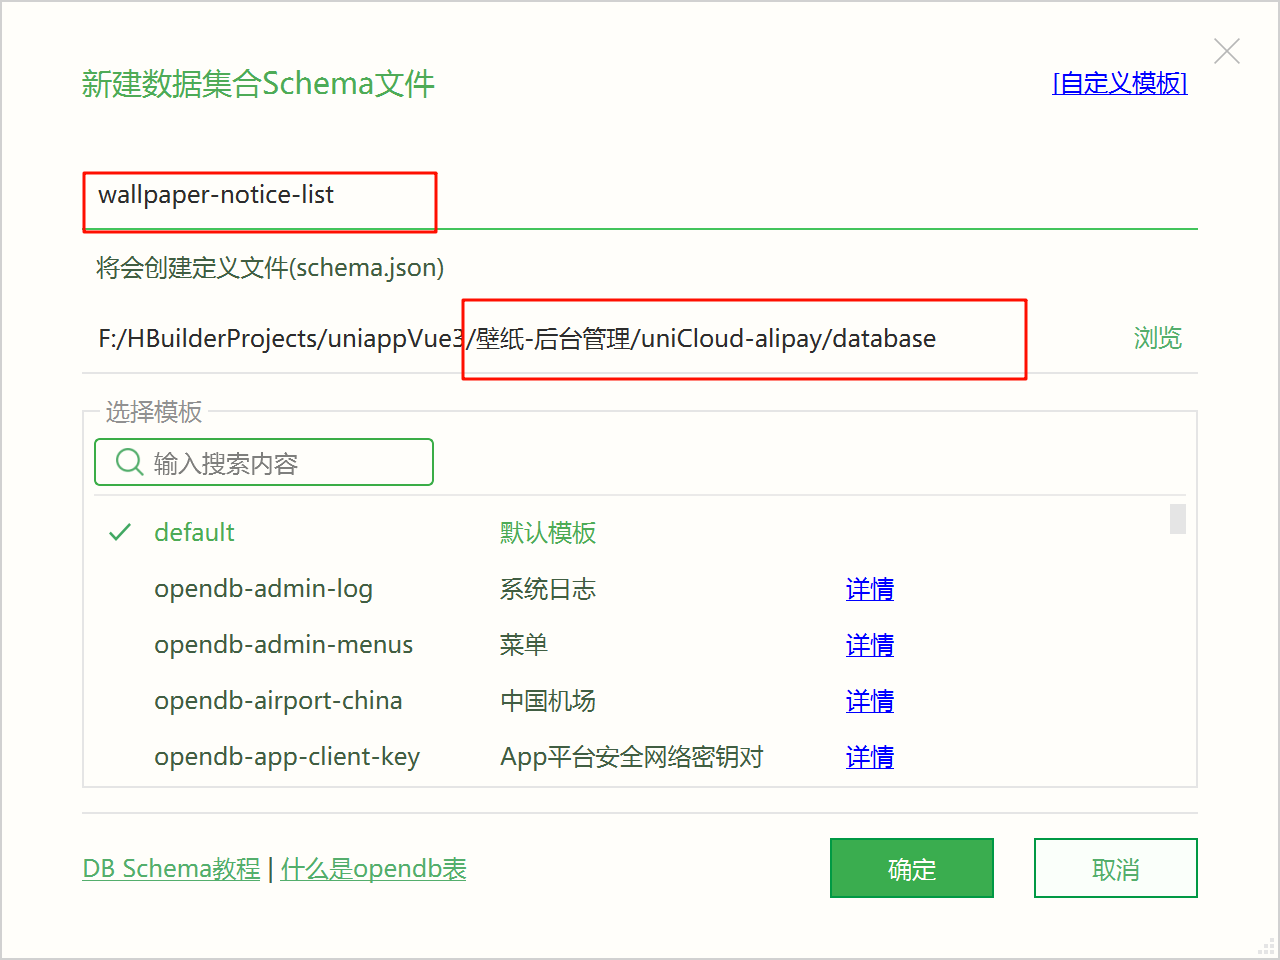
{"bsonType": "object","required": ["title"],"permission": {"read": true,"create": true,"update": true,"delete": true},"properties": {"_id": {"description": "存储文档 ID,系统自动生成"},"title": {"bsonType": "string","description": "公告表态"},"content": {"bsonType": "string","description": "公告详情内容"},"user_id": {"bsonType": "string","description": "作者ID, 参考`uni-id-users` 表","foreignKey": "uni-id-users._id","defaultValue": {"$env": "uid"}},"select": {"bsonType": "bool","description": "是否精选 默认false, true是精选","defaultValue": false},"checked": {"bsonType": "bool","description": "是否启用 默认false, true是启用","defaultValue": true},"view_count": {"bsonType": "int","description": "阅读数","defaultValue": 100},"createTime": {"bsonType": "timestamp","description": "创建时间","forceDefaultValue": {"$env": "now"}}},"version": "0.0.1"
}
创建页面
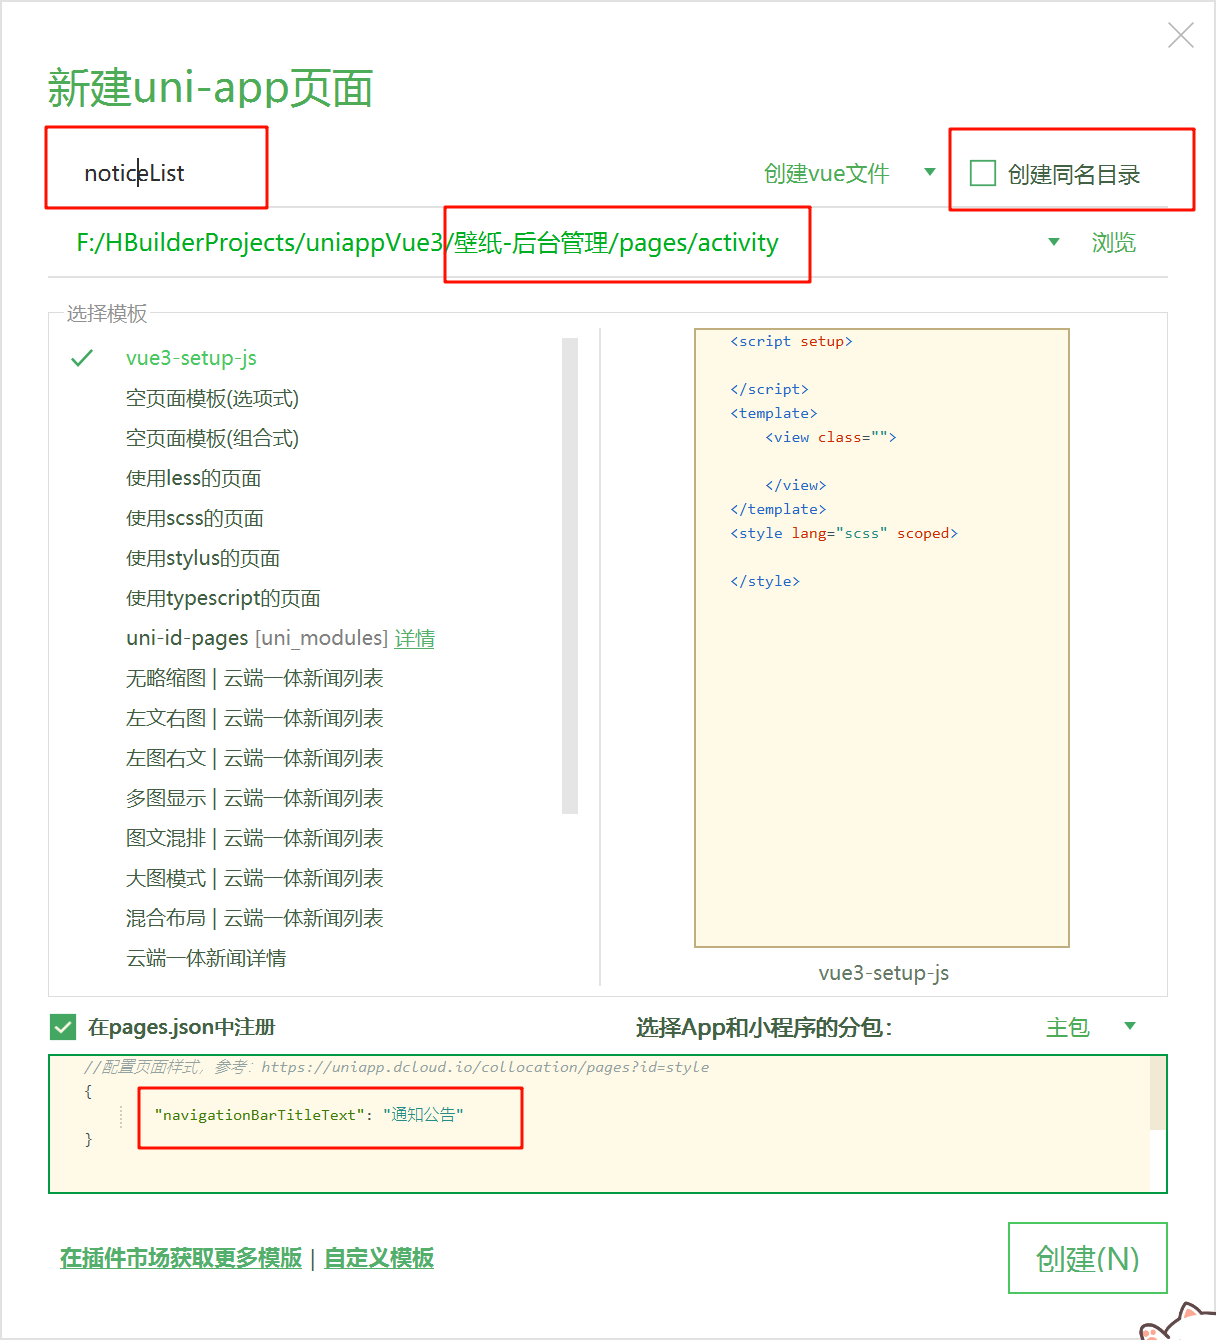
<script setup>import { ref } from "vue";import { routerTo } from "../../utils/common";const listData = ref([]);const params = ref({current: 1,total: 0,size: 15})//新增操作const handleAdd = () => {routerTo("/pages/activity/noticeEdit");}//修改操作const update = () => {routerTo("/pages/activity/noticeEdit");}//删除列表const remove = () => {}//切换分页const pageChange = (e) => {params.value.current = e.current;}</script>
<template><view class="noticeList"><custom-head-top><template #left>通知公告</template><template #right><button type="primary" size="mini" @click="handleAdd"><uni-icons type="plusempty" size="14" color="#fff"></uni-icons>新增公告</button></template></custom-head-top><view class="main"><uni-table ref="tableRef" border stripe emptyText="暂无更多数据"><uni-tr><uni-th align="left">标题</uni-th><uni-th align="left">发布者</uni-th><uni-th align="left">阅读量</uni-th><uni-th align="left">是否推荐</uni-th><uni-th align="left">是否启用</uni-th><uni-th align="left">发布时间</uni-th><uni-th align="right" width="200">操作</uni-th></uni-tr><uni-tr v-for="(item,index) in listData" :key="item._id"><uni-td></uni-td><uni-td></uni-td><uni-td></uni-td><uni-td></uni-td><uni-td></uni-td><uni-td></uni-td><uni-td><view class="operate-btn-group"><button size="mini" type="primary" plain @click="update(item._id)">修改</button><button size="mini" type="warn" plain @click="remove(item._id)">删除</button></view></uni-td></uni-tr></uni-table></view><view class="paging"><uni-pagination :current="params.current" :total="params.total" :page-size="params.size" :show-icon="true"@change="pageChange" /></view></view>
</template>
<style lang="scss" scoped>.main {padding: 20px;}</style>
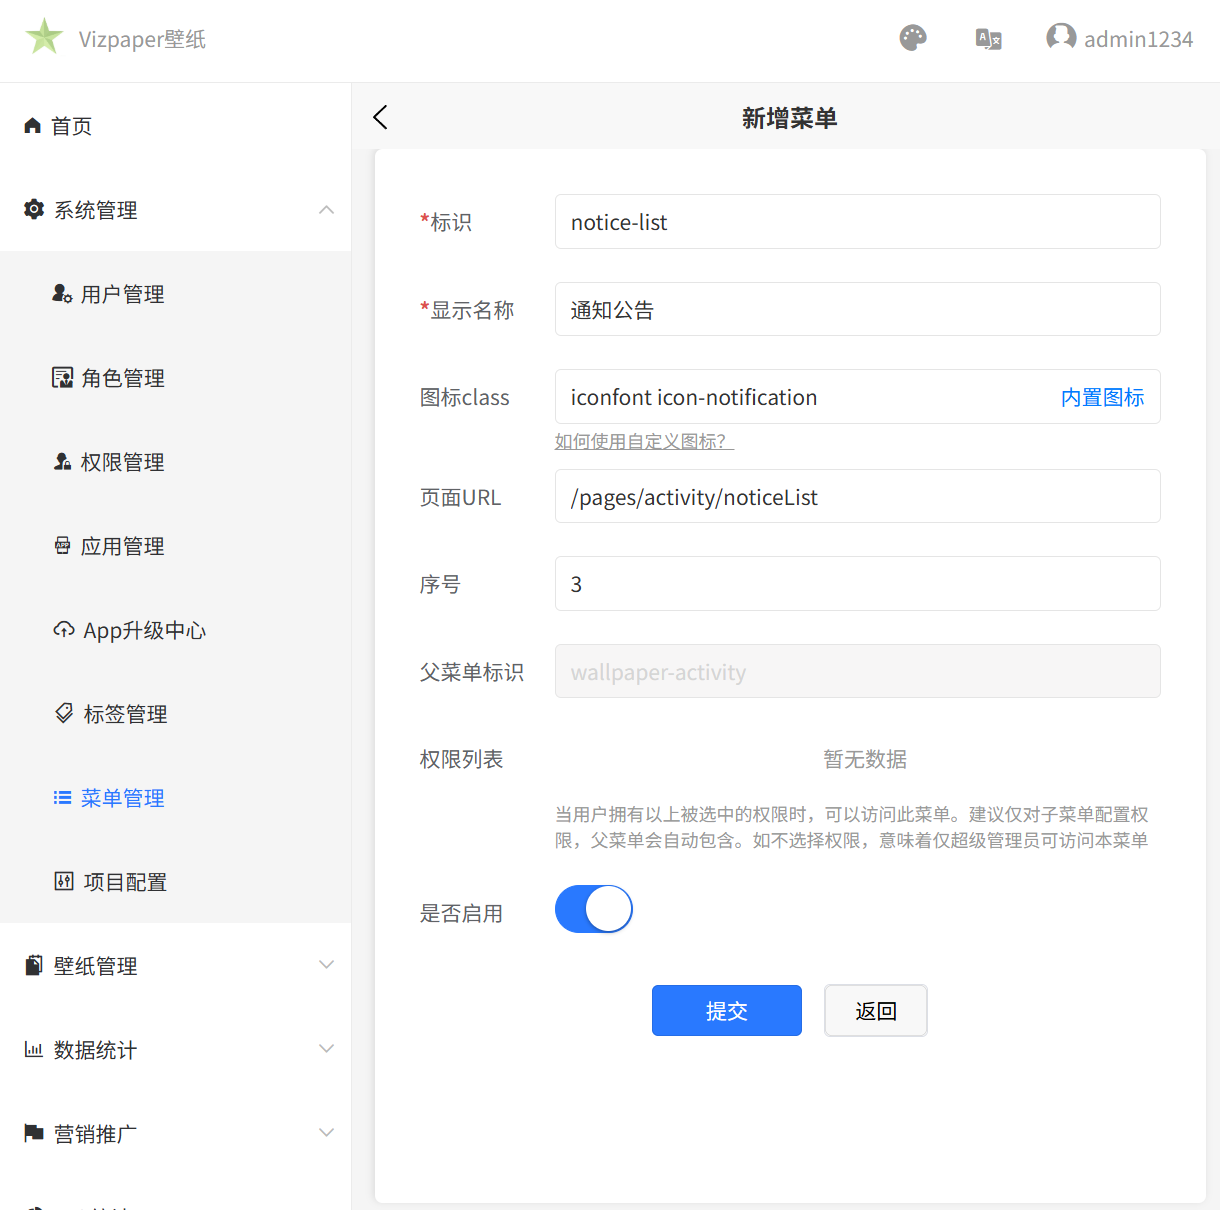
添加子菜单
创建页面
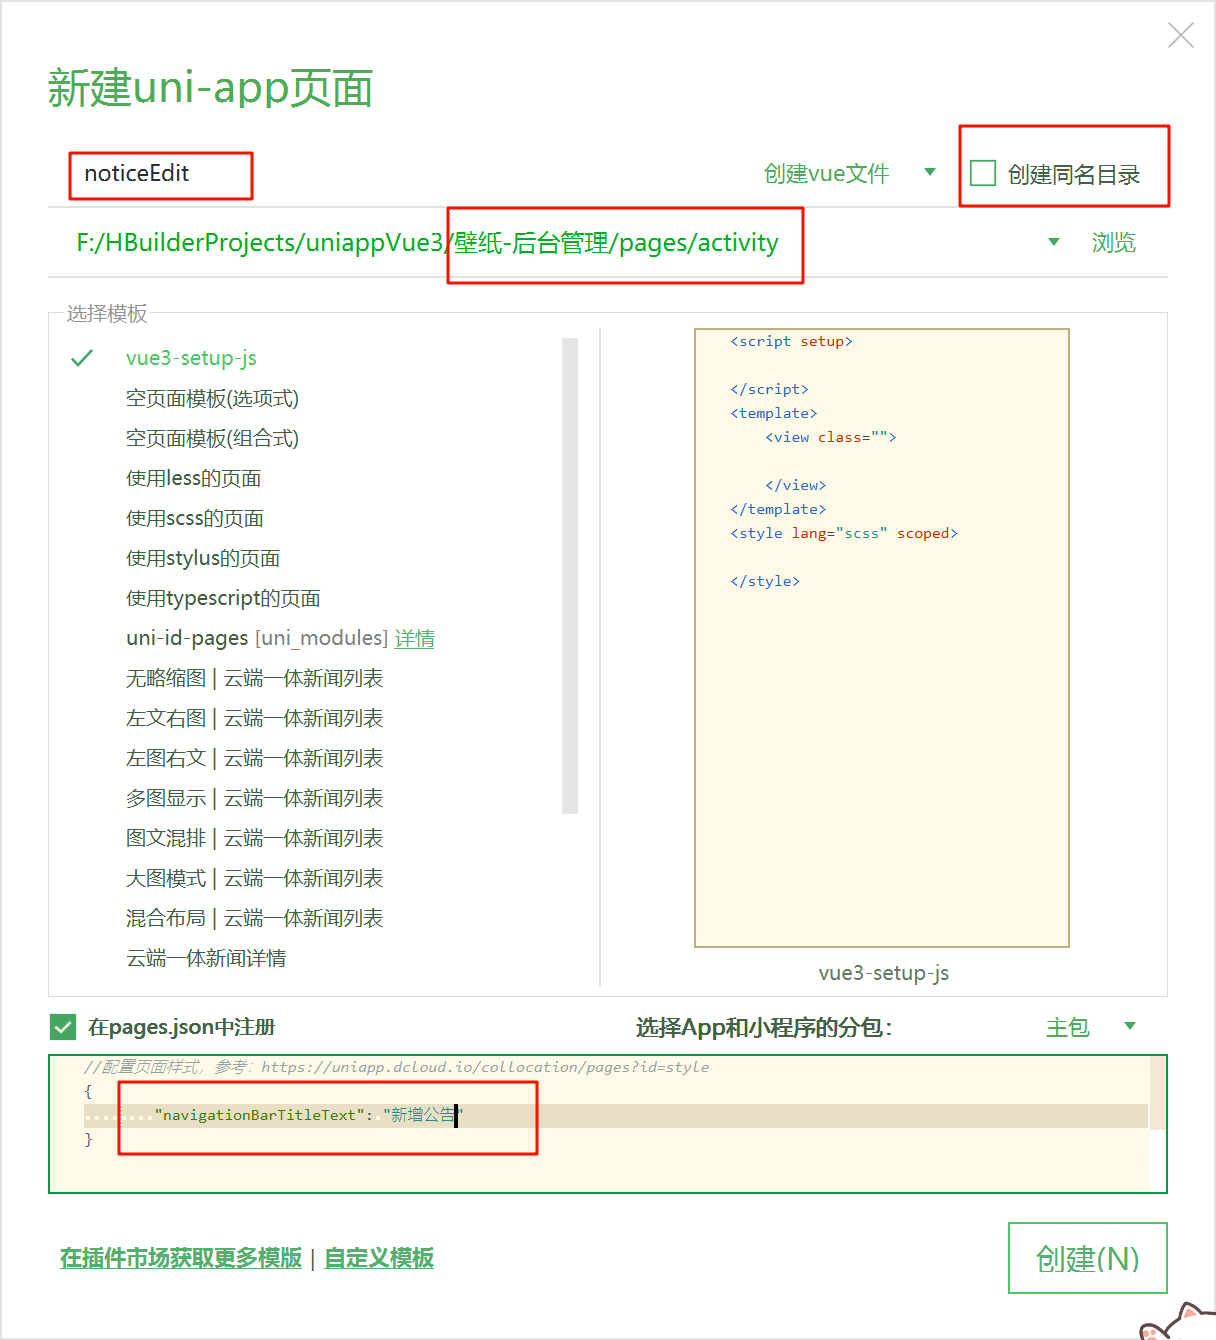
<script setup>import { ref } from 'vue';const formRef = ref(null);const formData = ref({title: "",content: "",checked: true,select: false})const rules = ref({title: {rules: [{required: true,errorMessage: '请输入公告标题',}]}})//是否启动开关const checkedChange = () => {}//是否推荐开关const selectChange = () => {}//提交表单const submit = () => {}//重置表单const reset = () => {}</script>
<template><view class="noticeEdit"><view class="main"><view class="container"><uni-forms ref="formRef" :modelValue="formData" :rules="rules" label-align="left" :label-width="120"><uni-forms-item label="公告标题" name="title" required><uni-easyinput type="text" v-model="formData.title" placeholder="请输入公告标题" /></uni-forms-item><uni-forms-item label="公告内容" name="content"><uni-easyinput type="textarea" v-model="formData.content" placeholder="请输入公告内容" /></uni-forms-item><uni-forms-item label="是否展示" name="checked"><switch :checked="formData.checked" class="switchStyle" @change="checkedChange" /></uni-forms-item><uni-forms-item label="是否推荐" name="select"><switch :checked="formData.select" class="switchStyle" @change="selectChange" /></uni-forms-item><uni-forms-item><view class="popupBtnGroup"><button class="btn" type="primary" @click="submit">提交</button><button class="btn" plain @click="reset">重置</button></view></uni-forms-item></uni-forms></view></view></view>
</template>
<style lang="scss" scoped>.noticeEdit {.main {padding: 40px 20px;.container {margin: 0 auto;min-height: 200px;max-width: 1000px;.uni-forms-item {display: block;margin-bottom: 32px;}:deep(.uni-forms-item__label) {font-size: 16px;font-weight: bolder;color: #888;}:deep(.uni-forms-item__content) {display: flex;align-items: center;}}}}</style>
154.使用wangEditor-next插件创建富文本编辑器,分别认识工具栏配置编辑器配置及相关API
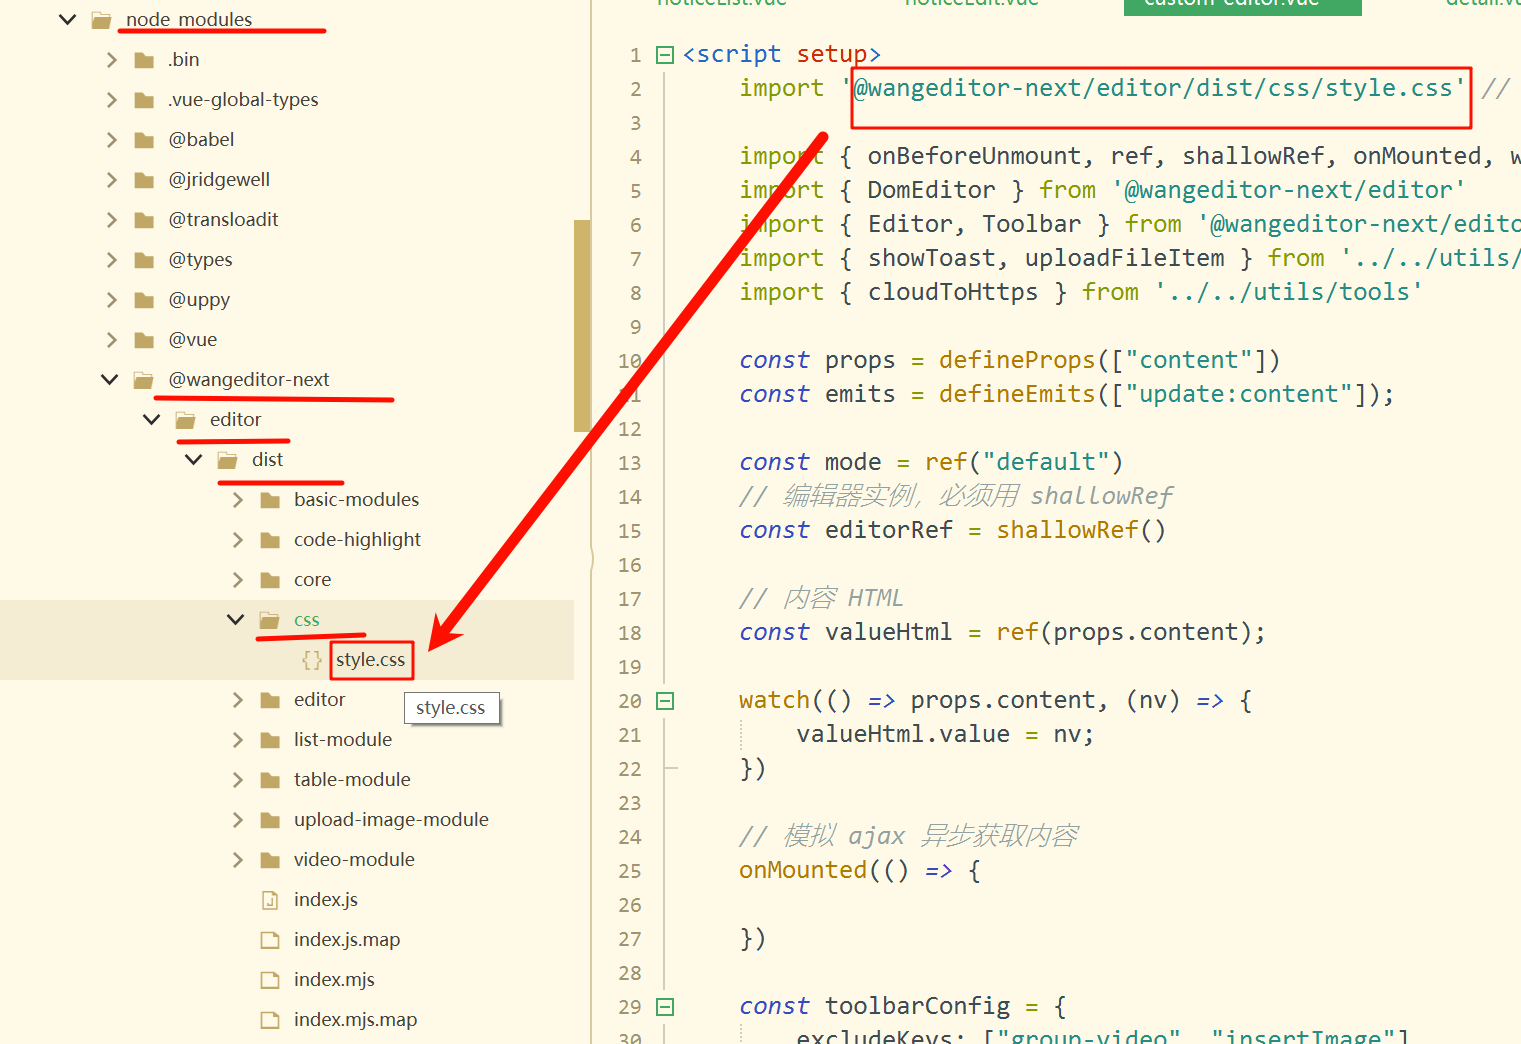
npm install @wangeditor-next/editor --save
npm install @wangeditor-next/editor-for-vue --save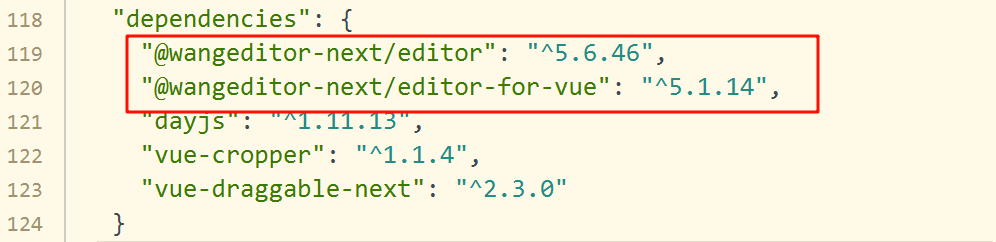
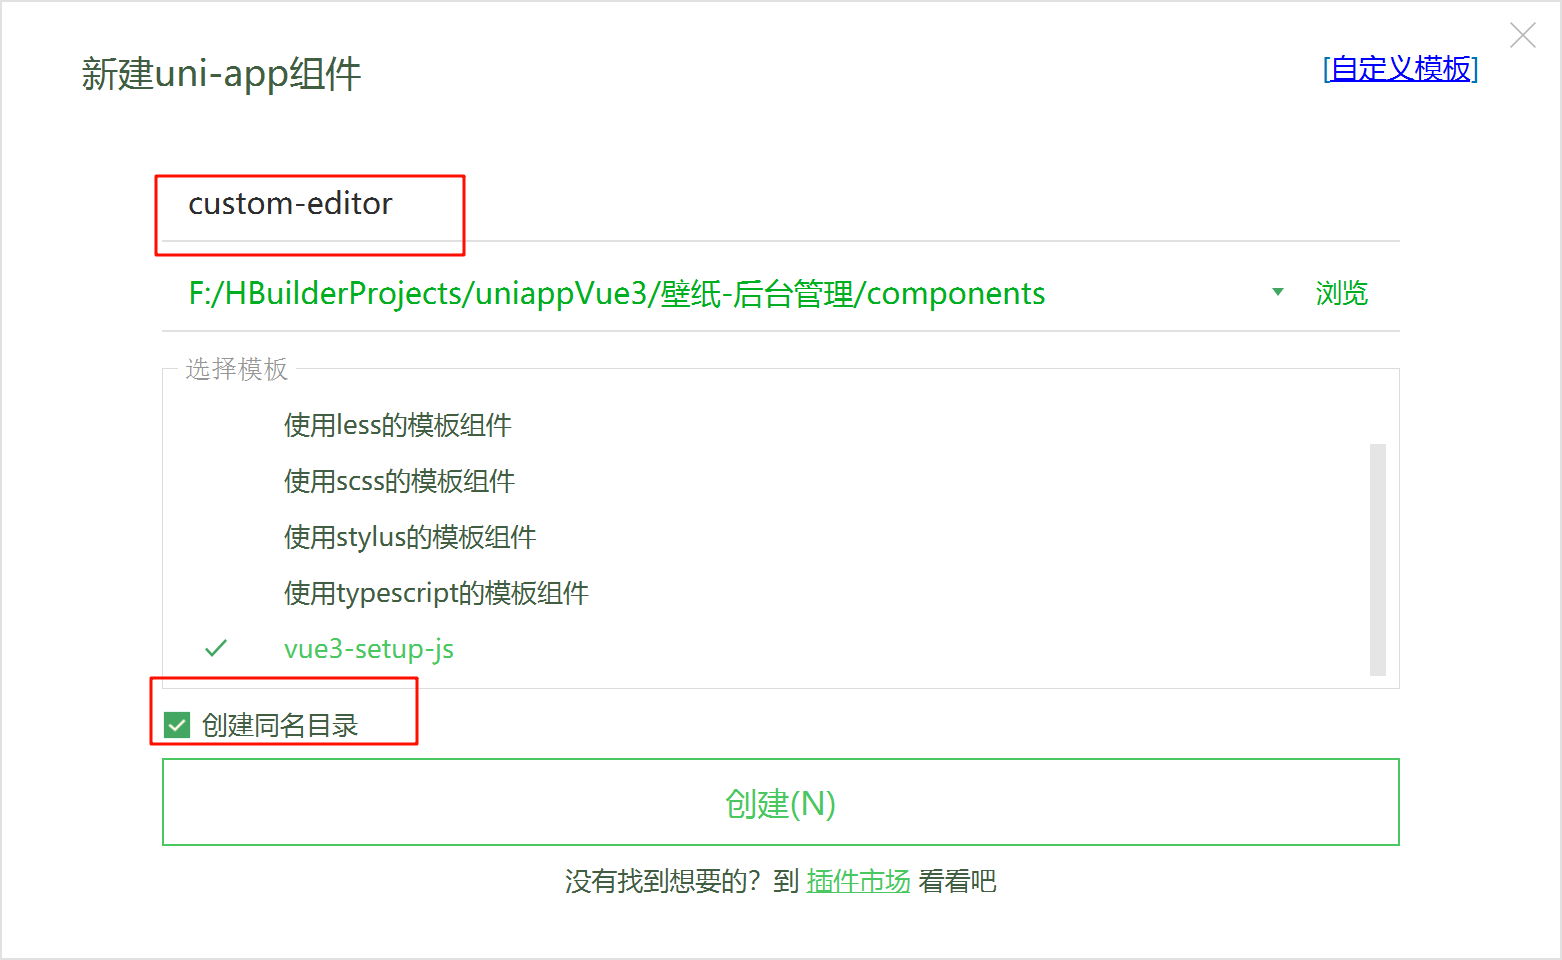
创建组件
完整代码
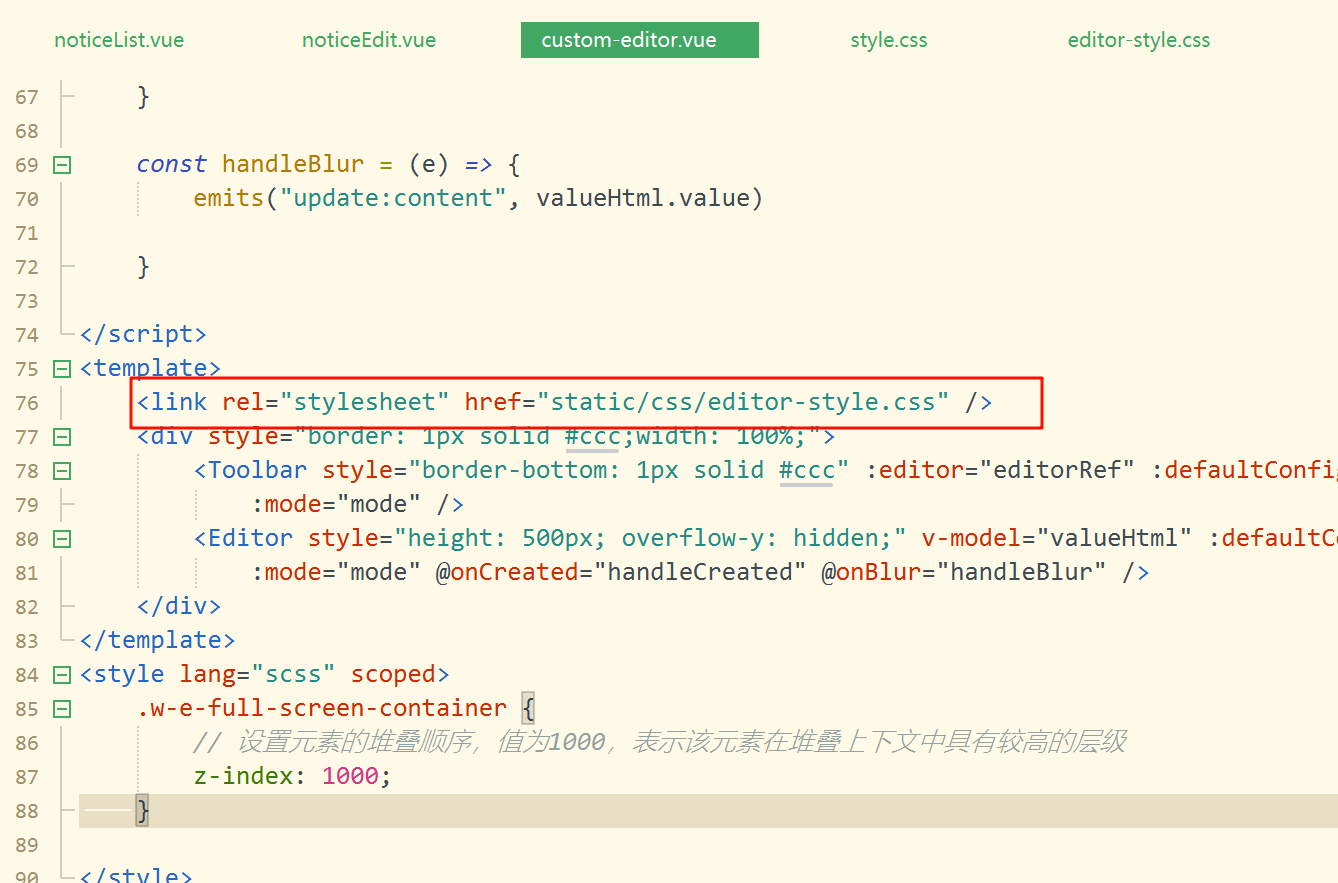
<script setup>// import '@wangeditor-next/editor/dist/css/style.css' // 引入 cssimport { onBeforeUnmount, ref, shallowRef, onMounted, watch } from 'vue'import { DomEditor } from '@wangeditor-next/editor'import { Editor, Toolbar } from '@wangeditor-next/editor-for-vue'import { showToast, uploadFileItem } from '../../utils/common'import { cloudToHttps } from '../../utils/tools'const props = defineProps(["content"])const emits = defineEmits(["update:content"]);const mode = ref("default")// 编辑器实例,必须用 shallowRefconst editorRef = shallowRef()// 内容 HTMLconst valueHtml = ref(props.content);watch(() => props.content, (nv) => {valueHtml.value = nv;})// 模拟 ajax 异步获取内容onMounted(() => {})const toolbarConfig = {excludeKeys: ["group-video", "insertImage"]}const editorConfig = {placeholder: '请输入内容...',autoFocus: false,MENU_CONF: {}}editorConfig.MENU_CONF['uploadImage'] = {// 自定义上传 async customUpload(file, insertFn) {console.log(file);try {uni.showLoading();const blogUrl = URL.createObjectURL(file)let cloudFile = await uploadFileItem(blogUrl, "notice");uni.hideLoading()let fileurl = cloudToHttps(cloudFile.fileID)insertFn(fileurl)} catch (err) {uni.hideLoading()showToast({ title: err })}}}// 组件销毁时,也及时销毁编辑器onBeforeUnmount(() => {const editor = editorRef.valueif (editor == null) returneditor.destroy()})const handleCreated = (editor) => {editorRef.value = editor // 记录 editor 实例,重要!}const handleBlur = (e) => {emits("update:content", valueHtml.value)}</script>
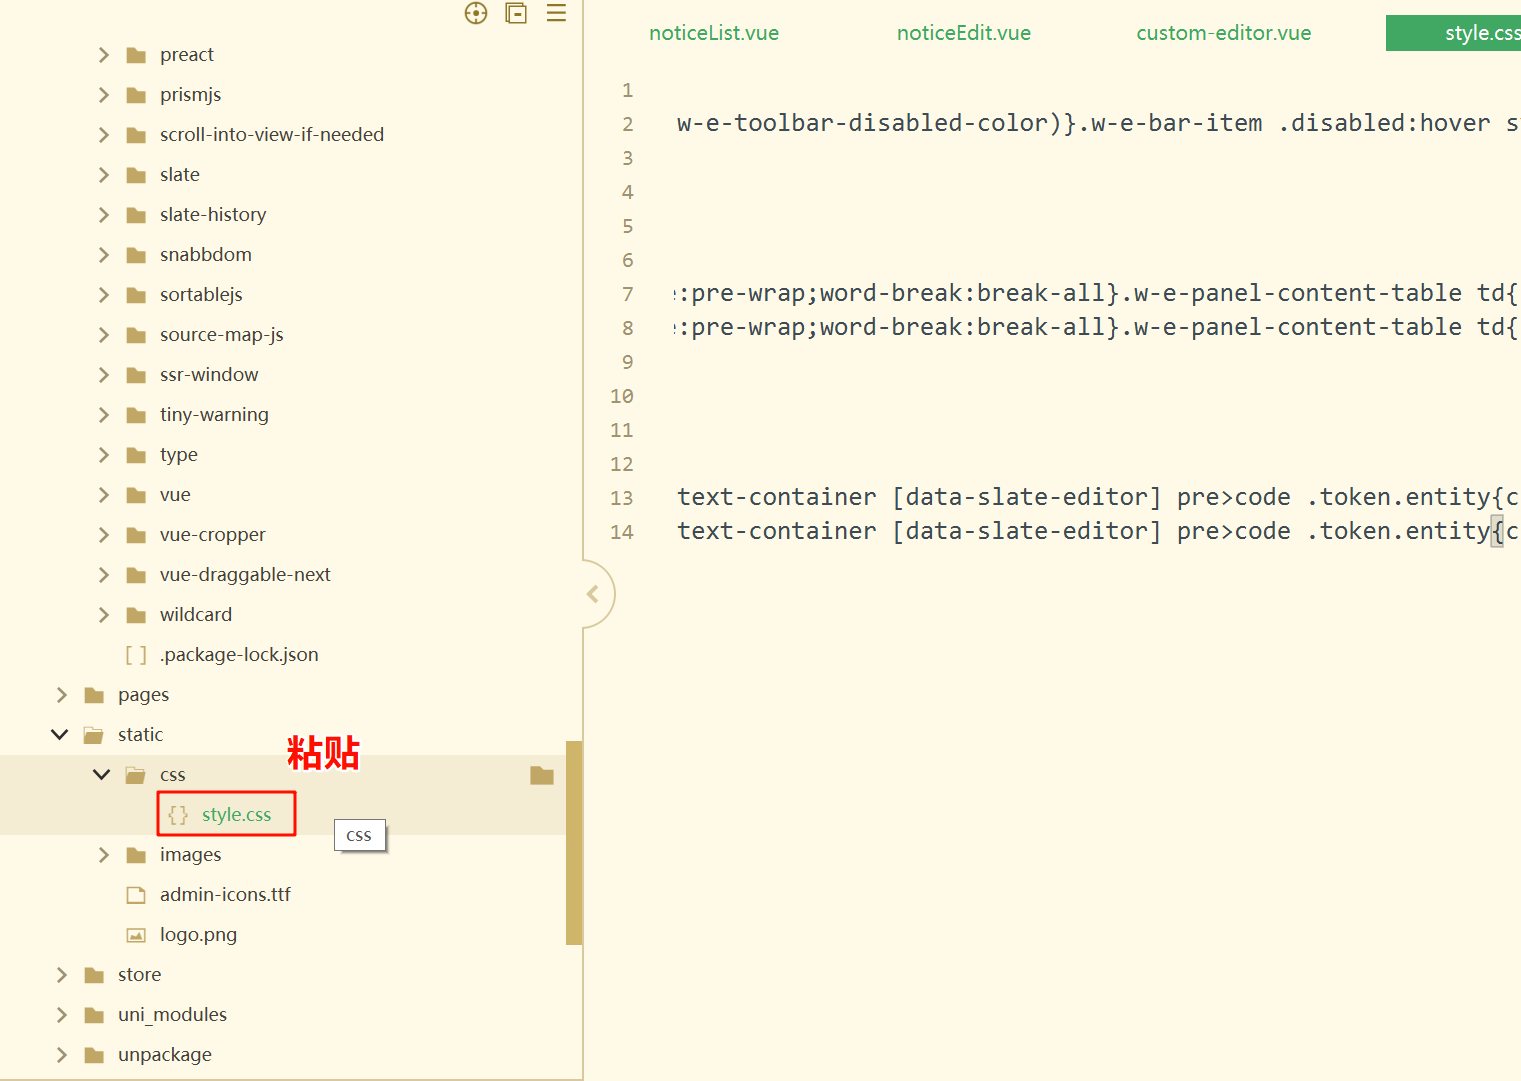
<template><link rel="stylesheet" href="static/css/editor-style.css" /><div style="border: 1px solid #ccc;width: 100%;"><Toolbar style="border-bottom: 1px solid #ccc" :editor="editorRef" :defaultConfig="toolbarConfig":mode="mode" /><Editor style="height: 500px; overflow-y: hidden;" v-model="valueHtml" :defaultConfig="editorConfig":mode="mode" @onCreated="handleCreated" @onBlur="handleBlur" /></div>
</template>
<style lang="scss" scoped>.w-e-full-screen-container {// 设置元素的堆叠顺序,值为1000,表示该元素在堆叠上下文中具有较高的层级z-index: 1000;}</style>
引入组件
/pages/activity/noticeEdit
<uni-forms-item label="公告内容" name="content"><custom-editor ></custom-editor></uni-forms-item>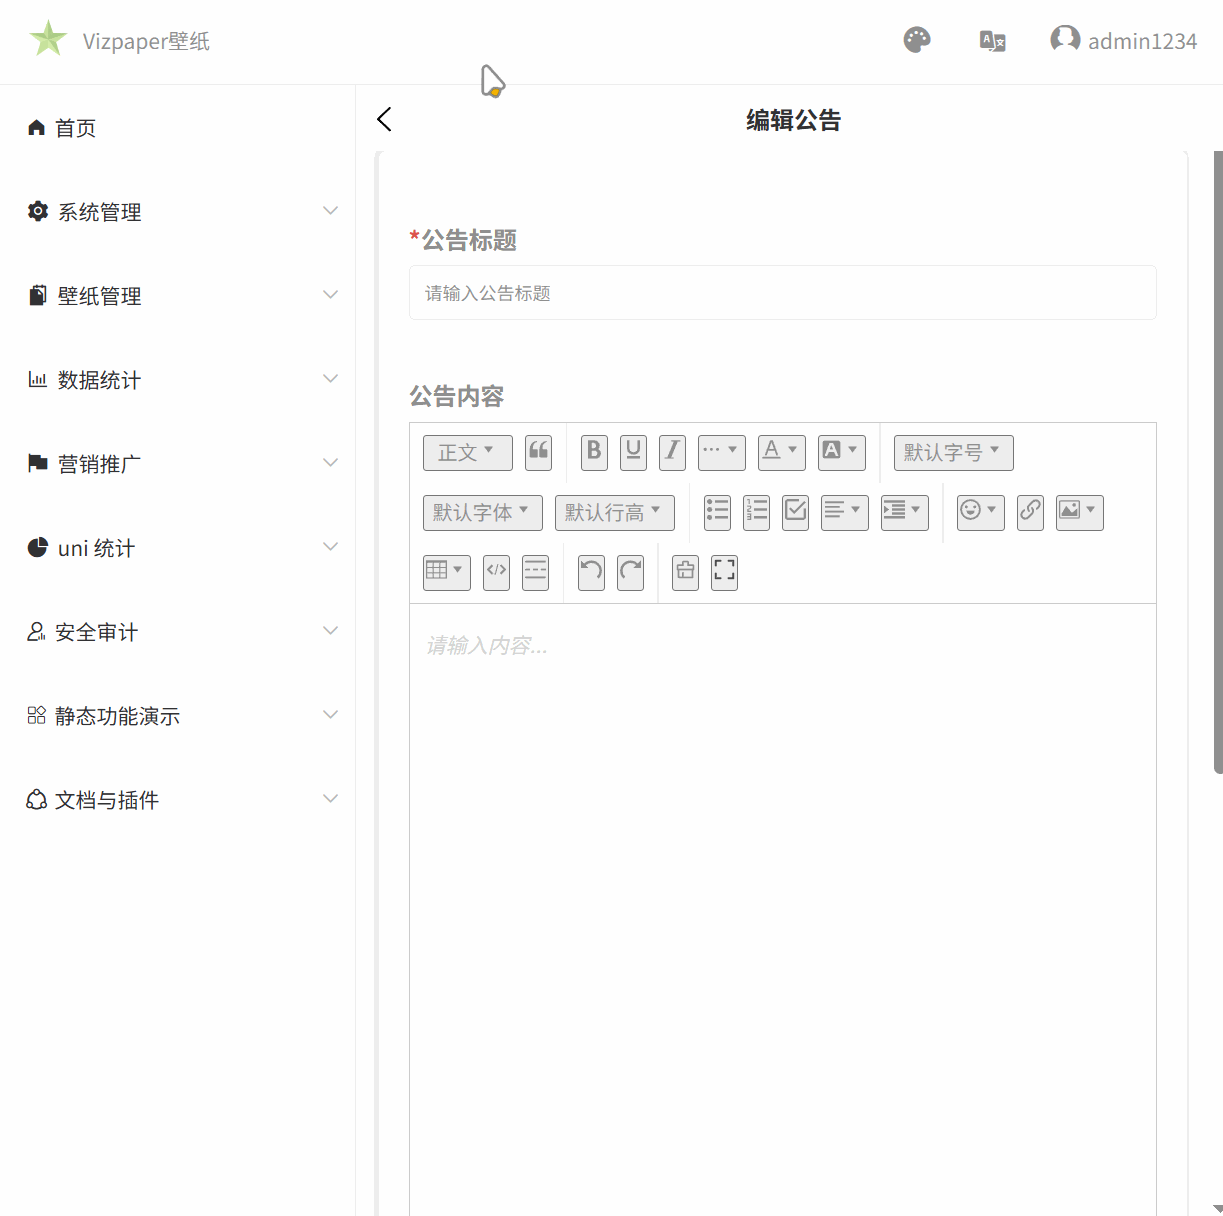
分别认识工具栏配置编辑器配置及相关API
<script setup>// import '@wangeditor-next/editor/dist/css/style.css' // 引入 cssimport { onBeforeUnmount, ref, shallowRef, onMounted, watch } from 'vue'import { DomEditor } from '@wangeditor-next/editor'import { Editor, Toolbar } from '@wangeditor-next/editor-for-vue'import { showToast, uploadFileItem } from '../../utils/common'import { cloudToHttps } from '../../utils/tools'const props = defineProps(["content"])const emits = defineEmits(["update:content"]);const mode = ref("default")// 编辑器实例,必须用 shallowRefconst editorRef = shallowRef()// 内容 HTMLconst valueHtml = ref(props.content);watch(() => props.content, (nv) => {valueHtml.value = nv;})// 模拟 ajax 异步获取内容onMounted(() => {})// 工具栏配置对象, 用于定义工具栏的显示和功能,排除视频,插入图片const toolbarConfig = {excludeKeys: ["group-video", "insertImage"]}// 编辑器配置对象用于定义编辑器的初始化参数和功能选项const editorConfig = {placeholder: '请输入内容...', // 编辑器占位符提示文本autoFocus: false, // 是否自动聚焦到编辑器MENU_CONF: {} // 编辑器菜单配置项,空对象表示使用默认配置}editorConfig.MENU_CONF['uploadImage'] = {// 自定义上传 async customUpload(file, insertFn) {console.log(file);try {uni.showLoading();const blogUrl = URL.createObjectURL(file)let cloudFile = await uploadFileItem(blogUrl, "notice");uni.hideLoading()let fileurl = cloudToHttps(cloudFile.fileID)insertFn(fileurl)} catch (err) {uni.hideLoading()showToast({ title: err })}}}// 组件销毁时,也及时销毁编辑器onBeforeUnmount(() => {const editor = editorRef.valueif (editor == null) returneditor.destroy()})const handleCreated = (editor) => {editorRef.value = editor // 记录 editor 实例,重要!}// *当输入框失去焦点时,触发更新内容的事件const handleBlur = (e) => {// 触发自定义事件,更新内容// 事件名为"update:content",传入的值是valueHtml的当前值emits("update:content", valueHtml.value)}</script>155.组件v-model双向绑定获取数据后提交到数据库中
/pages/activity/noticeEdit
<uni-forms-item label="公告内容" name="content"><custom-editor v-model:content="formData.content"></custom-editor></uni-forms-item>
/components/custom-editor/custom-editor
const props = defineProps(["content"])const emits = defineEmits(["update:content"]);// *当输入框失去焦点时,触发更新内容的事件const handleBlur = (e) => {// 触发自定义事件,更新内容// 事件名为"update:content",传入的值是valueHtml的当前值emits("update:content", valueHtml.value)}点击事件
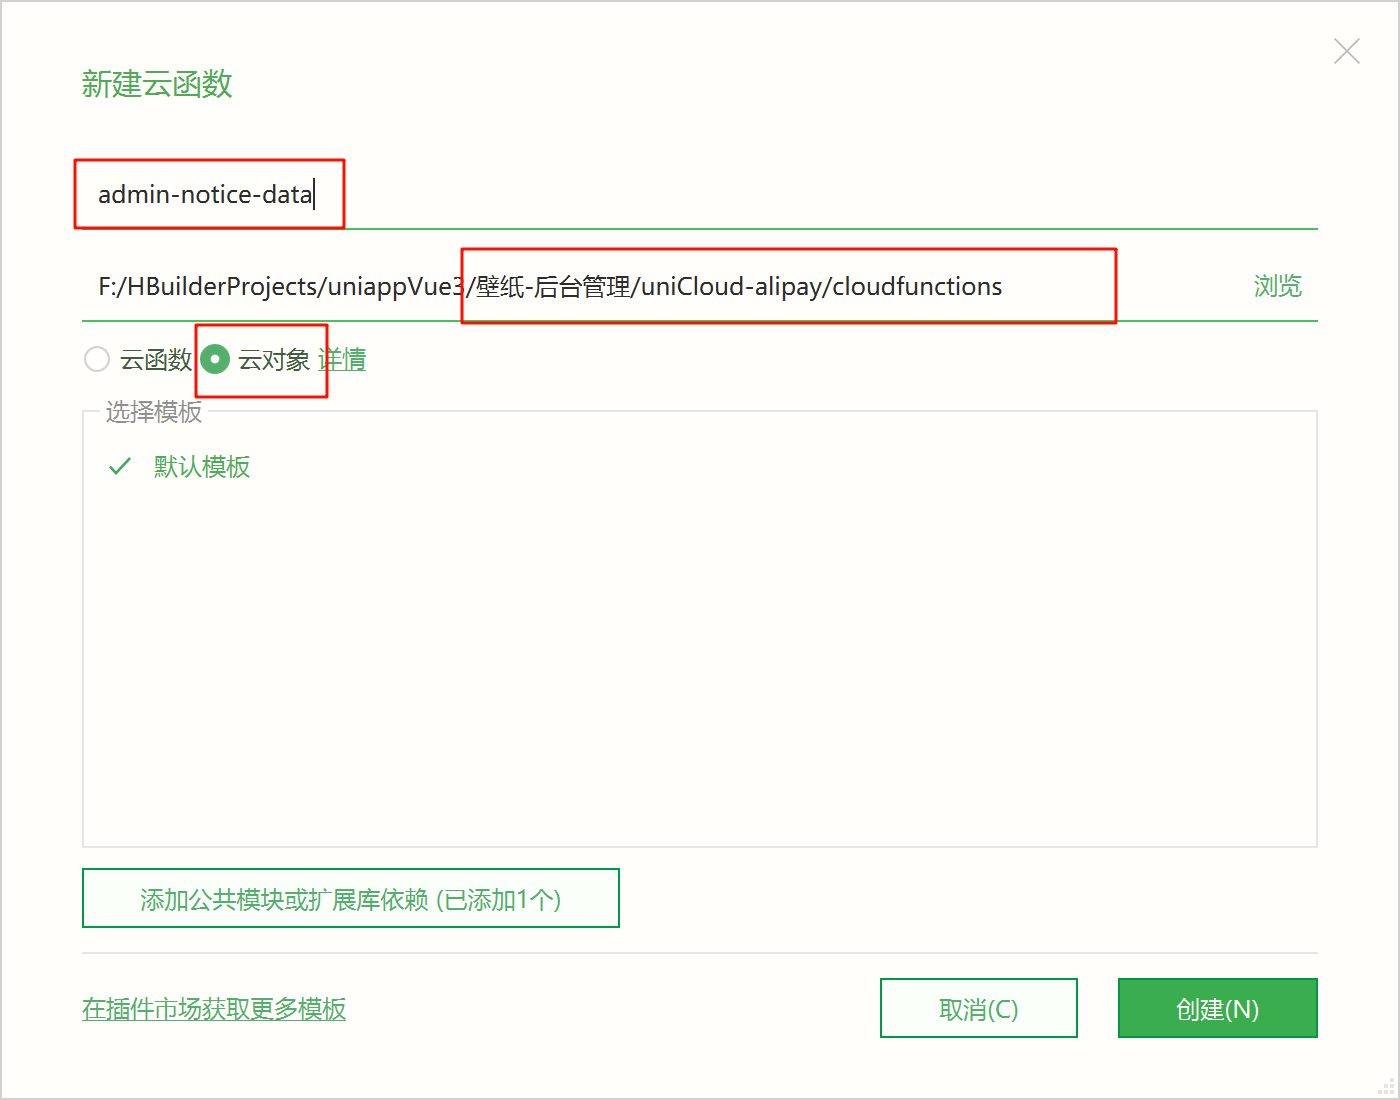
/uniCloud-alipay/cloudfunctions/admin-notice-data/index.obj.js
async add(params = {}) {// 创建JQL数据库操作对象const dbJQL = uniCloud.databaseForJQL({clientInfo: this.getClientInfo()})// 向wallpaper-notice-list集合中添加新记录return await dbJQL.collection("wallpaper-notice-list").add(params); // 执行添加操作并返回结果},
/pages/activity/noticeEdit
const noticeCloudObj = uniCloud.importObject("admin-notice-data", { customUI: true })const submit = () => {try {// 首先验证表单await formRef.value.validate();let { errCode } = await noticeCloudObj.add(formData.value)if (errCode !== 0) return showToast({ title: "请重试" })showToast({ title: "新增成功" })setTimeout(() => { goback() }, 1000)uni.$emit("noticeSuceess")} catch (err) {showToast({ title: JSON.stringify(err) })}}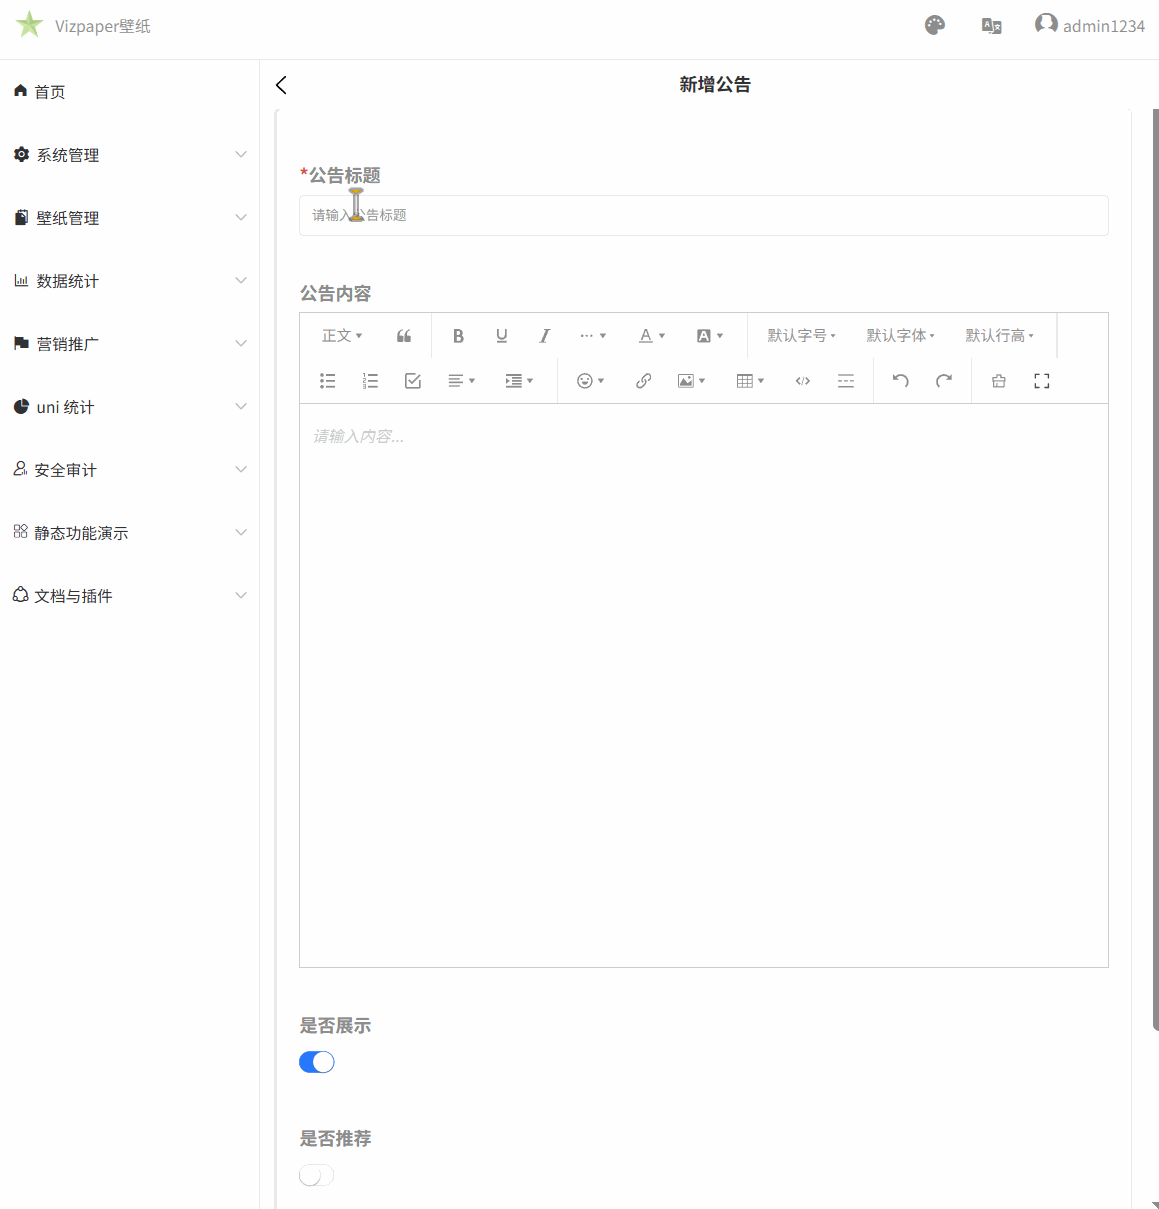
156.发布成功后重新刷新渲染公告列表数据
/uniCloud-alipay/cloudfunctions/admin-notice-data/index.obj.js
async list({ size = 5, current = 1 } = {}) {size = Math.min(30, size);let skip = (current - 1) * sizeconst dbJQL = uniCloud.databaseForJQL({clientInfo: this.getClientInfo()})let noticeTemp = dbJQL.collection("wallpaper-notice-list").orderBy("createTime desc").skip(skip).limit(size).getTemp();let userTemp = dbJQL.collection("uni-id-users").field("_id,nickname").getTemp()return await dbJQL.collection(noticeTemp, userTemp).field("checked,createTime,select,title,view_count,_id,arrayElemAt(user_id.nickname,0) as nickname,arrayElemAt(user_id._id,0) as user_id").get({ getCount: true });},/pages/activity/noticeList
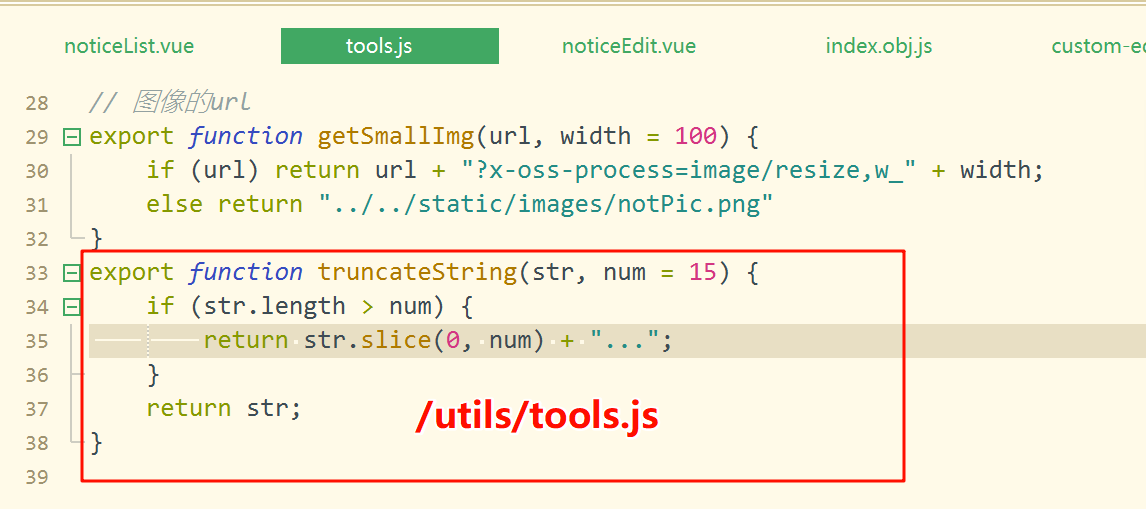
// 异步获取数据函数,用于从noticeCloudObj中获取列表数据并处理结果const getData = async () => {try {// 调用noticeCloudObj的list方法获取数据,解构获取errCode、data和countlet { errCode, data, count } = await noticeCloudObj.list(params.value);// 检查错误码,如果不为0则显示错误提示并返回if (errCode != 0) return showToast({ title: "操作有误" });// 将获取的数据赋值给listDatalistData.value = data;// 将总数赋值给params中的total属性params.value.total = count;// 在控制台打印获取的数据(用于调试)console.log(data);} catch (err) {// 捕获并处理可能发生的错误showToast({ title: err });}}截断字符串方法
/utils/tools.js
两个事件
/pages/activity/noticeEdit
//是否启动开关const checkedChange = (e) => {formData.value.checked = e.detail.value}//是否推荐开关const selectChange = (e) => {formData.value.select = e.detail.value}/pages/activity/noticeList
<uni-tr v-for="(item,index) in listData" :key="item._id"><uni-td>{{truncateString(item.title,15)}}</uni-td><uni-td>{{item.nickname}}</uni-td><uni-td>{{item.view_count}}</uni-td><uni-td><uni-tag v-if="item.select" text="推荐" type="error" size="mini" /><uni-tag v-else text="普通" type="default" size="mini" inverted /></uni-td><uni-td><text v-if="item.checked">✔️</text><text v-else>🚫</text></uni-td><uni-td>{{dayjs(item.createTime).format("YYYY-MM-DD HH:mm:ss")}}</uni-td><uni-td><view class="operate-btn-group"><button size="mini" type="primary" plain @click="update(item._id)">修改</button><button size="mini" type="warn" plain @click="remove(item._id)">删除</button></view></uni-td></uni-tr>
// 监听名为"noticeSuceess"的自定义事件uni.$on("noticeSuceess", () => {// 将params.value.current重置为1,实现分页页码归零params.value.current = 1;// 调用getData函数重新获取数据getData();})