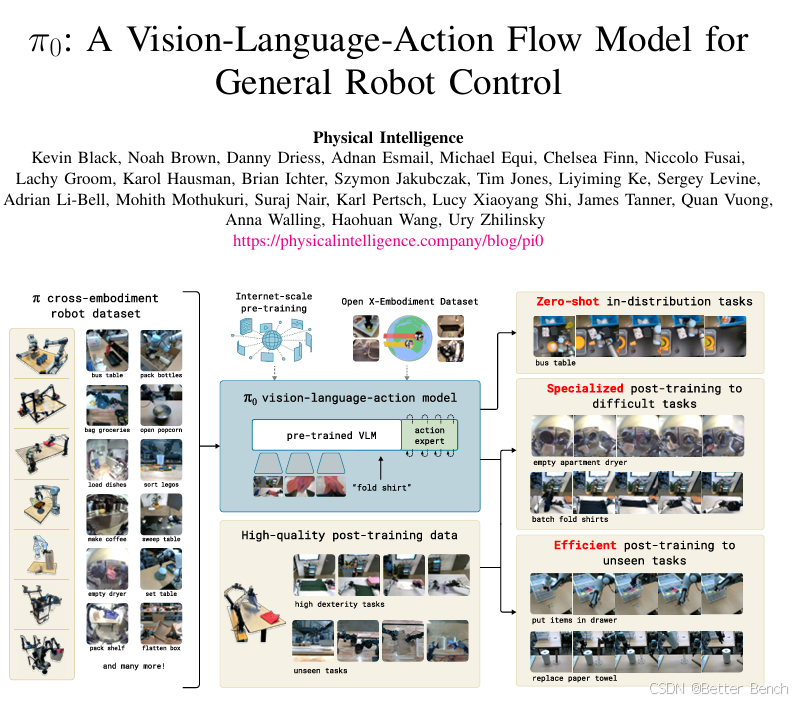
基于Robosuite和Robomimic采集mujoco平台的机械臂数据微调预训练PI0模型,实现快速训练机械臂任务
1 数据采集
(1)步骤一:安装robosuite和robomimic
conda create -n robomimic python=3.10.0 -y
conda activate robomimicgit clone https://github.com/ARISE-Initiative/robosuite.git
cd robosuite
# (可选)切到v1.5.1以获得与robomimic示例最匹配的版本:
git checkout v1.5.1
# 安装依赖
pip install -r requirements.txt
# 安装 robosuite(可选)
pip install -e .git clone https://github.com/ARISE-Initiative/robomimic.git
cd robomimic
pip install -e .
(2)步骤二:从robosuite采集
使用 collect_human_demonstrations.py 脚本来收集人类演示数据并生成 demo.hdf5 文件
python robosuite/scripts/collect_human_demonstrations.py \ --environment PickPlace \ --robots Kinova3 \ --device keyboard \ --directory ./my_demonstrations运行脚本文件,会自动打开mujoco的仿真平台,通过键盘、或游戏手柄操控机械臂,生成演示数据。
手柄操作机械臂教程:在Robosuite中如何使用Xbox游戏手柄操控mujoco仿真中的机械臂?
(3)步骤三: 转换robosuite数据集格式
首先需要将原始的demo.hdf5文件转换为robomimic兼容格式:
python robomimic/scripts/conversion/convert_robosuite.py --dataset /path/to/demo.hdf5
此步骤会就地修改demo.hdf5文件,使其包含robomimic所需的元数据结构 。转换后的文件包含states和actions,但缺少observations、rewards和dones 。
(4)步骤四: 提取观测数据
使用dataset_states_to_obs.py从MuJoCo状态提取观测 ,包含图像观测:
python dataset_states_to_obs.py --dataset /path/to/demo.hdf5 \ --output_name image.hdf5 --done_mode 2 \ --camera_names agentview robot0_eye_in_hand \ --camera_height 84 --camera_width 84
必须要包含图像观测,因为PI0模型是VLA模型,需要图片作为输入。
生成的image.hdf5文件就是完整的数据集。
2 数据转换
要在 PI0上微调自己的数据集,需要以下步骤:
- 转换数据格式: 将 robomimic HDF5 格式转换为 LeRobot 数据集格式
- 安装 π₀ 依赖: 安装必要的依赖包
- 执行微调训练: 使用 LeRobot 训练脚本进行微调
2.1 第一步:安装lerobot
conda create -y -n lerobot python=3.10
conda activate lerobot
conda install ffmpeg -c conda-forge
# 安装 lerobot
git clone https://github.com/huggingface/lerobot.git
cd lerobot
git pull origin main
pip install -e .# 安装 π₀ 的依赖包
pip install -e ".[pi]"pip install --upgrade "huggingface_hub[cli,hf-transfer]>=0.34.2,<0.36.0" "diffusers>=0.27.2,<0.36.0"# 安装 PI0 专用的 transformers 版本
pip install git+https://github.com/huggingface/transformers.git@fix/lerobot_openpi
因为PI0 策略使用了 PaliGemma 和 SigLIP 视觉编码器的特定实现 modeling_pi0.py:31-40 ,这些实现在标准 transformers 库中可能不完全兼容。Physical Intelligence 的 OpenPI 实现需要对 transformers 进行一些修改,因此 LeRobot 维护了一个专门的分支 fix/lerobot_openpi。
其他安装PI0 专用的 transformers 版本的方法,参考文章
https://blog.csdn.net/weixin_43935696/article/details/153326602
2.2 第二步:从hugging face下载三个权重模型
(1)lerobot/pi0_base
huggingface-cli download lerobot/pi0_base --local-dir ./models/pi0_base
(2)fast
huggingface-cli download physical-intelligence/fast --local-dir ./models/fast
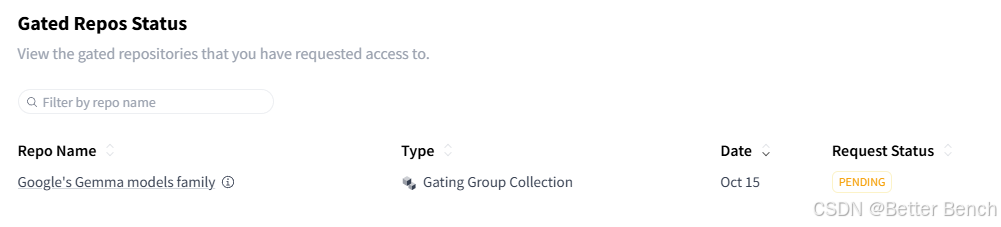
(2)google/paligemma-3b-pt-224
这个是需要登录官网申请授权后才能下载。申请步骤如下:
步骤一:获取huggingface token https://huggingface.co/settings/tokens 生成一个可读token,
步骤二:然后在本地终端,确保能够科学上网,输入刚生成的token后复制,例如hf_***,组合到以下的命令中:
huggingface-cli download --token hf_*** --resume-download google/paligemma-3b-pt-224 --local-dir paligemma-3b-pt-224 --include "tokenizer*" "*.json" "*.txt"
执行命令后,打开官网https://huggingface.co/google/paligemma-3b-pt-224/tree/main,查看申请情况,如果通过了再执行命令下载
(4)执行数据转换脚本脚本
当前的 HDF5 数据是 robomimic 格式,需要转换为 LeRobot 数据集格式。LeRobot 使用特定的数据集结构,包括 observation.images.*、observation.state 和 action 等键。
hdf5的数据结构:
- 图像:
(111367, 84, 84, 6)- 两个相机的图像 - 关节状态:
(111367, 21)- 包含关节位置、速度、末端执行器位姿等 - 动作:
(111367, 7)- 7维关节控制量
# convert_hdf5_to_lerobot.py
import h5py
import numpy as np
from pathlib import Path
from tqdm import tqdm  # 添加进度条库
from lerobot.datasets.lerobot_dataset import LeRobotDataset  def convert_kinova_hdf5_to_lerobot(  hdf5_path: str,  output_dir: str,  fps: int = 30,
):  """  将 Kinova Gen3 HDF5 数据转换为 LeRobot Dataset 格式(纯本地,不与 Hub 交互)  Args:  hdf5_path: HDF5 文件路径  output_dir: 本地输出目录  fps: 帧率  Returns:  LeRobotDataset: 转换后的数据集  """  local_repo_id = "local/kinova_pickplace"  # 1. 定义数据集特征  features = {  "observation.images.agentview": {  "dtype": "video",  "shape": (3, 84, 84),  "names": ["channels", "height", "width"],  },  "observation.images.wrist": {  "dtype": "video",  "shape": (3, 84, 84),  "names": ["channels", "height", "width"],  },  "observation.state": {  "dtype": "float32",  "shape": (21,),  "names": None,  },  "action": {  "dtype": "float32",  "shape": (7,),  "names": None,  },  "reward": {  "dtype": "float32",  "shape": (1,),  "names": None,  },  "done": {  "dtype": "bool",  "shape": (1,),  "names": None,  },  }  # 2. 创建空的 LeRobot 数据集  dataset = LeRobotDataset.create(  repo_id=local_repo_id,  fps=fps,  root=output_dir,  robot_type="kinova_gen3",  features=features,  use_videos=True,  )  # 3. 启动图像写入器  dataset.start_image_writer(num_processes=0, num_threads=3)  # 4. 读取 HDF5 并逐帧添加  with h5py.File(hdf5_path, 'r') as f:  demos = sorted(list(f['data'].keys()),  key=lambda x: int(x.split('_')[1]))  print(f"开始转换 {len(demos)} 个演示...")  # 添加演示级别的进度条  for demo_idx, demo in enumerate(tqdm(demos, desc="转换演示", unit="demo")):  demo_grp = f[f'data/{demo}']  obs_grp = demo_grp['obs']  num_frames = demo_grp['actions'].shape[0]  # 添加帧级别的进度条  for i in tqdm(range(num_frames), desc=f"  {demo}", leave=False, unit="frame"):  # 读取图像并转换为 CHW 格式  agentview_img = obs_grp['agentview_image'][i]  wrist_img = obs_grp['robot0_eye_in_hand_image'][i]  # 转置为 (C, H, W)  agentview_img = np.transpose(agentview_img, (2, 0, 1))  wrist_img = np.transpose(wrist_img, (2, 0, 1))  frame_dict = {  "observation.images.agentview": agentview_img,  "observation.images.wrist": wrist_img,  "observation.state": np.concatenate([  obs_grp['robot0_joint_pos'][i],  obs_grp['robot0_joint_vel'][i],  obs_grp['robot0_eef_pos'][i],  obs_grp['robot0_eef_quat'][i],  ]).astype(np.float32),  "action": demo_grp['actions'][i].astype(np.float32),  "reward": np.array([demo_grp['rewards'][i]], dtype=np.float32),  "done": np.array([demo_grp['dones'][i]], dtype=bool),  "task": "pick_place_milk",  }  dataset.add_frame(frame_dict)  dataset.save_episode()  # 5. 停止图像写入并完成数据集  print("\n正在完成数据集...")  dataset.stop_image_writer()  dataset.finalize()  print(f"✓ 数据集转换完成!")  print(f"  - 总演示数: {dataset.meta.total_episodes}")  print(f"  - 总帧数: {dataset.meta.total_frames}")  print(f"  - 存储路径: {dataset.root}")  return dataset  def main():  """主函数:转换 data/merge_300/image.hdf5 文件"""  hdf5_path = "data/merge_300/image.hdf5"  output_dir = "./kinova_data"  print(f"开始转换 HDF5 数据集...")  print(f"输入文件: {hdf5_path}")  print(f"输出目录: {output_dir}\n")  dataset = convert_kinova_hdf5_to_lerobot(  hdf5_path=hdf5_path,  output_dir=output_dir,  fps=30,  )  print("\n数据集已保存到本地,无需上传到 Hub")  return dataset  if __name__ == "__main__":  main()
3 微调训练
3.1 修改加载本地权重路径
将 HDF5 数据转换为 LeRobot 格式后,在本地使用 GPU 4090 微调 π₀ 模型,不需要与 Hub 交互。
根据以上google/paligemma-3b-pt-224下载到本地后,修改lerobot中的代码,确保使用paligemma-3b-pt-224是从本地加载,而不是从网络下载:
在lerobot/src/lerobot/policies/pi0/processor_pi0.py中,将硬编码的路径改为本地路径 :
# 原代码
tokenizer_name = "google/paligemma-3b-pt-224"  # 修改为本地路径
tokenizer_name= "./models/paligemma-3b-pt-224"
使用以下命令在本地数据集上微调 π₀:
2.2 完全离线训练
下载以上三个预训练模型后,使用本地模型路径训练:
python src/lerobot/scripts/lerobot_train.py \ --dataset.repo_id=local/kinova_pickplace \ --dataset.root=./kinova_data \ --policy.type=pi0 \ --policy.pretrained_path=./models/pi0_base \ --output_dir=./outputs/pi0_kinova_finetune \ --job_name=pi0_kinova_finetune \ --policy.push_to_hub=false \ --policy.compile_model=true \ --policy.gradient_checkpointing=true \ --policy.dtype=bfloat16 \ --policy.device=cuda \ --batch_size=16 \ --steps=10000 \ --eval_freq=2000 \ --save_freq=2000 \ --log_freq=100 \ --wandb.enable=false \ --seed=1000
数据集参数
--dataset.repo_id=local/kinova_pickplace: 使用您转换时设置的本地 repo_id--dataset.root=./kinova_pickplace_dataset: 指定本地数据集路径,这样训练脚本会直接从本地加载数据
π₀ 策略参数
--policy.type=pi0: 指定使用 π₀ 策略架构--policy.pretrained_path=lerobot/pi0_base: 从预训练的 π₀ 基础模型开始微调(这个会从 Hub 下载预训练权重)
训练优化参数
--policy.device=cuda: 使用您的 GPU 4090--policy.compile_model=true: 启用模型编译加速训练--policy.gradient_checkpointing=true: 减少显存占用,对于大模型很重要--policy.dtype=bfloat16: 使用混合精度训练提高效率--batch_size=32: 批次大小,GPU 4090 应该可以支持,如果显存不足可以降低到 16 或 8
输出和日志
--output_dir=./outputs/pi0_kinova_finetuned: 本地输出目录,保存检查点和日志--wandb.enable=false: 禁用 Weights & Biases 日志记录,完全本地运行
训练工作流程
训练脚本会执行以下步骤:
- 加载本地数据集: 从
./kinova_pickplace_dataset加载您转换的数据 - 创建策略: 初始化 π₀ 模型并加载预训练权重
- 训练循环: 进行 3000 步训练,定期保存检查点
- 保存模型: 检查点保存在
./outputs/pi0_kinova_finetuned/checkpoints/
训练输出结构
训练完成后,输出目录包含以下内容:
./outputs/pi0_kinova_finetuned/
├── checkpoints/
│   ├── 001000/
│   │   └── pretrained_model/
│   │       ├── config.json
│   │       ├── model.safetensors
│   │       └── train_config.json
│   ├── 002000/
│   ├── 003000/
│   └── last/  # 指向最新检查点的符号链接
└── logs/└── train.log
注意事项
-
预训练模型下载: 虽然数据集是本地的,但
lerobot/pi0_base预训练模型仍需要从 Hub 下载一次(约 14GB),之后会缓存在本地。也可以提前下载到本地:https://huggingface.co/lerobot/pi0_base/tree/main -
训练日志会保存在
./outputs/pi0_kinova_finetuned/logs/train.log -
如果想监控训练进度,可以启用
--wandb.enable=true并运行wandb login,但这需要网络连接 -
恢复训练: 如果训练中断,可以使用以下命令恢复:
python src/lerobot/scripts/lerobot_train.py \--config_path=./outputs/pi0_kinova_finetuned/checkpoints/last/pretrained_model/train_config.json \--resume=true
错误总结
(1)错误一
RuntimeError: Could not load libtorchcodec. Likely causes:
1. FFmpeg is not properly installed in your environment. We support
versions 4, 5, 6 and 7.
2. The PyTorch version (2.7.1+cu126) is not compatible with
this version of TorchCodec. Refer to the version compatibility
table:
https://github.com/pytorch/torchcodec?tab=readme-ov-file#installing-torchcodec.
3. Another runtime dependency; see exceptions below.
The following exceptions were raised as we tried to load libtorchcodec:
[start of libtorchcodec loading traceback]
FFmpeg version 7: libavutil.so.59: cannot open shared object file: No such file or directory
FFmpeg version 6: libavutil.so.58: cannot open shared object file: No such file or directory
FFmpeg version 5: libavutil.so.57: cannot open shared object file: No such file or directory
FFmpeg version 4: libavutil.so.56: cannot open shared object file: No such file or directory
解决方案:
方法 1: 切换到 PyAV 后端(推荐)
最简单的解决方案是使用 pyav 作为视频解码后端,它不需要额外的系统依赖
lerobot-train \ --dataset.repo_id=local/kinova_pickplace \ --dataset.root=./kinova_data \ --dataset.video_backend=pyav \ --policy.type=pi0 \ --policy.pretrained_path=./huggingface/pi0_base \ --output_dir=./outputs/pi0_kinova_finetune \ --job_name=pi0_kinova_finetune \ --policy.push_to_hub=false \ --policy.compile_model=true \ --policy.gradient_checkpointing=true \ --policy.dtype=bfloat16 \ --policy.device=cuda \ --batch_size=32 \ --steps=10000 \ --wandb.enable=false \ --seed=1000
关键参数是 --dataset.video_backend=pyav,它会强制使用 PyAV 解码器 。
方法 2: 使用 Conda 的 FFmpeg 开发包
在 conda 环境中安装 FFmpeg 开发库:
conda install -c conda-forge ffmpeg=7.1.1 pkg-config
确保安装的是完整版本,包含所有编解码器 。
验证解决方案
使用 PyAV 后端后,您可以验证视频解码是否正常工作:
from lerobot.datasets.video_utils import decode_video_frames  # 测试解码
frames = decode_video_frames(  video_path="path/to/your/video.mp4",  timestamps=[0.0, 0.1, 0.2],  tolerance_s=1e-4,  backend="pyav"
)
print(f"Successfully decoded {len(frames)} frames")