【Linux】手搓日志(附源码)

1.认识日志
计算机中的⽇志是记录系统和软件运⾏中发⽣事件的⽂件,主要作⽤是监控运⾏状态、记录异常信息,帮助快速定位问题并⽀持程序员进⾏问题修复。它是系统维护、故障排查和安全管理的重要⼯具。
日志一般有下面几个必备要素
- 时间戳
- ⽇志内容
- ⽇志等级: DEBUG(测试) INFO(正常) WARNING(有错但不影响) ERROR(有错且会导致结果出错) FATAL(有错且不能再往后运行)
[可读性很好的时间] [⽇志等级] [进程pid] [打印对应⽇志的⽂件名][⾏号] - 消息内容,⽀持可变参数
[2024-08-04 12:27:03] [DEBUG] [202938] [main.cc] [18] - hello world
[2024-08-04 12:27:03] [DEBUG] [202938] [main.cc] [20] - hello world
[2024-08-04 12:27:03] [DEBUG] [202938] [main.cc] [21] - hello world
[2024-08-04 12:27:03] [WARNING] [202938] [main.cc] [23] - hello world
我们实现的日志具备如下功能:
- 形成完整的日志信息
- 能刷新到目标文件(显示器、指定文件),实现这个功能会用到策略模式。
2.日志的实现
2.1 刷新模式
首先要设计刷新策略,是往显示器打印?还是往指定文件里打印?这里要用策略模式,就要用到多态,多态相关知识在:【C++】多态详细讲解 。
#pragma once
#include <iostream>
#include <string>
#include "Mutex.hpp"namespace MyLog
{using namespace MyMutex;// 刷新策略:策略模式class RefreshStrategy // 基类{public:virtual void Refresh(const std::string &message) = 0;virtual ~RefreshStrategy() = default;};class LogToConsole : public RefreshStrategy // 往控制台(显示器)刷新{public:LogToConsole() {}virtual void Refresh(const std::string &message){LockGuard lg(&_mutex); // 打印要加锁std::cout << message << std::endl;}~LogToConsole() {}private:Mutex _mutex;};
}
上面是实现往显示器打印的策略,还要实现一个往指定文件里打印的策略。
#pragma once
#include <iostream>
#include <string>
#include "Mutex.hpp"namespace MyLog
{using namespace MyMutex;// 刷新策略:策略模式class RefreshStrategy // 基类{public:virtual void Refresh(const std::string &message) = 0;virtual ~RefreshStrategy() = default;};class LogToConsole : public RefreshStrategy // 往控制台(显示器)刷新{public:LogToConsole() {}virtual void Refresh(const std::string &message){LockGuard lg(&_mutex); // 打印要加锁std::cout << message << std::endl;}~LogToConsole() {}private:Mutex _mutex;};const std::string default_path = "./log";     // 默认路径const std::string default_file = "mylog.log"; // 默认文件名class LogToFile : public RefreshStrategy // 往指定文件刷新{public:LogToFile(const std::string &path = default_path, const std::string &file = default_file): _path(path),_file(file){}~LogToFile() {}private:std::string _path;std::string _file;};
}
往指定文件里打印就要考虑这个路径是否存在,不存在就要新建,这里用C++17里的文件操作,用到的头文件是#include <filesystem> 。
public:LogToFile(const std::string &path = default_path, const std::string &file = default_file): _path(path),_file(file){if (std::filesystem::exists(_path)) // 判断路径是否存在return;std::filesystem::create_directories(_path); // 创建路径}
存在直接返回,不存在就创建,创建路径也有可能失败,所以用try catch捕捉异常,并且往文件里写也要加锁。
class LogToFile : public RefreshStrategy // 往指定文件刷新
{
public:LogToFile(const std::string &path = default_path, const std::string &file = default_file): _path(path),_file(file){LockGuard lg(&_mutex);              // 加锁if (std::filesystem::exists(_path)) // 判断路径是否存在return;try{std::filesystem::create_directories(_path); // 创建路径}catch (const std::filesystem::filesystem_error &e){std::cerr << e.what() << '\n';}}virtual void Refresh(const std::string &message) override{}~LogToFile() {}private:std::string _path;std::string _file;Mutex _mutex;
};刷新的部分是往文件里刷新,这里用C++的文件操作,需包含头文件#include <fstream>
class LogToFile : public RefreshStrategy // 往指定文件刷新
{
public:LogToFile(const std::string &path = default_path, const std::string &file = default_file): _path(path),_file(file){LockGuard lg(&_mutex);              // 加锁if (std::filesystem::exists(_path)) // 判断路径是否存在return;try{std::filesystem::create_directories(_path); // 创建路径}catch (const std::filesystem::filesystem_error &e){std::cerr << e.what() << '\n';}}virtual void Refresh(const std::string &message) override{LockGuard lg(&_mutex); // 加锁std::string file_name = _path + (_path.back() == '/' ? "" : "/") + _file; // 把路径和文件名拼起来std::ofstream out_file(file_name, std::ios::app);  // 追加写入 的方式打开文件if (!out_file.is_open())  // 打开失败直接返回return;out_file << message << "\r\n"; // 以流形式把message和换行符写到out_file里out_file.close();}~LogToFile() {}private:std::string _path;std::string _file;Mutex _mutex;
};
现在我们就有了两种策略,一种叫LogToConsole往显示器刷新,一种叫LogToFile往指定文件里刷新。
在Main.cc里测试一下。
#include "Log.hpp"
#include <memory>using namespace MyLog;int main()
{// 直接定义基类指针,构建显示器策略std::unique_ptr<RefreshStrategy> strategy = std::make_unique<LogToConsole>();// std::unique_ptr<RefreshStrategy> strategy = std::make_unique<LogToFile>(); // 这是构建文件策略strategy->Refresh("hello mylog!");return 0;
}
make_unique作用是构建对象,返回智能指针。

程序运行之后就会往显示器刷新日志信息。
如果是往指定文件里刷新,程序运行后会新增一个log文件夹,里面有mylog.log文件。
int main()
{// 直接定义基类指针,构建显示器策略//std::unique_ptr<RefreshStrategy> strategy = std::make_unique<LogToConsole>();std::unique_ptr<RefreshStrategy> strategy = std::make_unique<LogToFile>(); // 这是构建文件策略strategy->Refresh("hello mylog!");return 0;
}
打开文件就会发现,日志信息刷新到了mylog.log文件里。
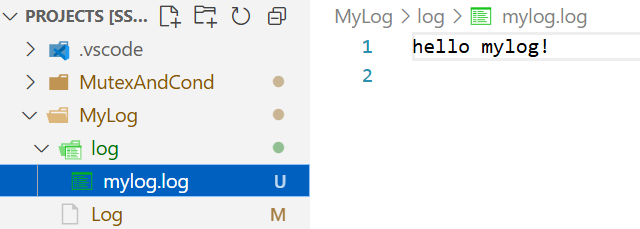
如果我们多执行几次,日志信息就会追加式的写入到文件里了。

2.2 形成完整日志信息
我们要实现的日志样式如下。
[可读性很好的时间] [⽇志等级] [进程pid] [打印对应⽇志的⽂件名][⾏号] - 消息内容,⽀持可变参数
[2024-08-04 12:27:03] [DEBUG] [202938] [main.cc] [18] - hello world
[2024-08-04 12:27:03] [DEBUG] [202938] [main.cc] [20] - hello world
[2024-08-04 12:27:03] [DEBUG] [202938] [main.cc] [21] - hello world
[2024-08-04 12:27:03] [WARNING] [202938] [main.cc] [23] - hello world
首先我们把日志等级定义出来,这里就用enum。
enum class LogLevel
{DEBUG,INFO,WARNING,ERROR,FATAL
};
我们还需要一个类,真正的表示日志的日志类,这个类最主要的作用就是选择刷新策略,类成员用智能指针。
class MyLog
{
public:MyLog(){RefreshLogToConsole(); // 默认往显示器刷新}void RefreshLogToConsole() // 选择刷新到显示器{_refresh_strategy = std::make_unique<LogToConsole>();}void RefreshLogToFile() // 选择刷新到文件{_refresh_strategy = std::make_unique<LogToFile>();}~MyLog() {}private:std::unique_ptr<RefreshStrategy> _refresh_strategy;
};
我们需要设计一个内部类,表示一条日志信息。
class MyLog
{
public:MyLog(){RefreshLogToConsole(); // 默认往显示器刷新}void RefreshLogToConsole() // 选择刷新到显示器{_refresh_strategy = std::make_unique<LogToConsole>();}void RefreshLogToFile() // 选择刷新到文件{_refresh_strategy = std::make_unique<LogToFile>();}class LogMessage //内部类{public:LogMessage(LogLevel log_level, const std::string &filename, int line): _log_level(log_level),_curr_time(), /*获取时间稍后实现*/_pid(getpid()),_filename(filename),_line(line){_log_info = }~LogMessage() {}private:LogLevel _log_level;    // 日志等级std::string _curr_time; // 时间pid_t _pid;             // 进程IDstd::string _filename;  // 文件名int _line;              // 行号std::string _log_info;  // 合并之后的消息};~MyLog() {}private:std::unique_ptr<RefreshStrategy> _refresh_strategy;
};日志等级、文件名和行号是需要我们传进来的,别的不用,在拼成一整条完整信息的时候要用到stringstream,头文件#include <sstream>。
class LogMessage // 内部类{public:LogMessage(LogLevel log_level, const std::string &filename, int line): _log_level(log_level),_curr_time(), /*获取时间稍后实现*/_pid(getpid()),_filename(filename),_line(line){std::stringstream ss; // 定义一个stringstream流// 类型自动转化为string对象然后,把所有内容格式化输入到这个流里,ss << "[" << _curr_time << "]"<< "[" << _log_level << "]" /*这里有问题*/<< "[" << _pid << "]"<< "[" << _filename << "]"<< "[" << _line << "]"<< " - ";}~LogMessage() {}private:LogLevel _log_level; // 日志等级std::string _curr_time; // 时间pid_t _pid; // 进程IDstd::string _filename; // 文件名int _line; // 行号std::string _log_info; // 合并之后的消息};这里需要把enum里的内容转成字符串,我们要多写一个接口。
std::string LevelToStr(LogLevel lev)
{switch (lev){case LogLevel::DEBUG:return "DEBUG";case LogLevel::INFO:return "INFO";case LogLevel::WARNING:return "WARNING";case LogLevel::ERROR:return "ERROR";case LogLevel::FATAL:return "FATAL";default:return "UNKNOWN";}
}
现在就没有错误了,然后我们还要把ss里的内容给_log_info。
public:LogMessage(LogLevel log_level, const std::string &filename, int line): _log_level(log_level),_curr_time(), /*获取时间稍后实现*/_pid(getpid()),_filename(filename),_line(line){std::stringstream ss; // 定义一个stringstream流// 类型自动转化为string对象然后,把所有内容格式化输入到这个流里,ss << "[" << _curr_time << "]"<< "[" << LevelToStr(_log_level) << "]" // 转化<< "[" << _pid << "]"<< "[" << _filename << "]"<< "[" << _line << "]"<< " - ";_log_info = ss.str();}日志的消息后半部分要支持多次<<的输入,也就是消息内容要支持多参数,比如LogMessage<< "1" << "2" << "3" ,我们要对<<进行重载;而且还要支持不同类型的<<,所以实现的时候需要加模板,传的是什么参数类型可以自动推导。
template<typename T> //类型自动推导
/*返回值类型*/ operator<<(const T& info)
{std::stringstream ss; //还是用stringstream流ss << info;_log_info += ss.str(); //消息前后部分拼起来
}
此时就是我们把Log<< "1"拼完成了,还要继续拼 << "2" ,所以这个运算符重载的返回值类型要是当前类的引用,返回值为当前类对象。
class LogMessage // 内部类{public:LogMessage(LogLevel log_level, const std::string &filename, int line): _log_level(log_level),_curr_time("xxxx"), /*获取时间稍后实现*/_pid(getpid()),_filename(filename),_line(line){std::stringstream ss; // 定义一个stringstream流// 类型自动转化为string对象然后,把所有内容格式化输入到这个流里,ss << "[" << _curr_time << "]"<< "[" << LevelToStr(_log_level) << "]" // 转化<< "[" << _pid << "]"<< "[" << _filename << "]"<< "[" << _line << "]"<< " - ";_log_info = ss.str();}template<typename T> //类型自动推导LogMessage &operator<<(const T& info){std::stringstream ss; //还是用stringstream流ss << info;_log_info += ss.str(); //消息前后部分拼起来return *this;}~LogMessage() {}private://...};我们刷新日志信息的时候,不用手动刷新,在LogMessage析构的时候自动刷新就行。刷新策略可以直接获得,因为LogMessage是Log的内部类。
class MyLog
{
public:MyLog(){RefreshLogToConsole(); // 默认往显示器刷新}void RefreshLogToConsole() // 选择刷新到显示器{_refresh_strategy = std::make_unique<LogToConsole>();}void RefreshLogToFile() // 选择刷新到文件{_refresh_strategy = std::make_unique<LogToFile>();}class LogMessage // 内部类{public:LogMessage(LogLevel log_level, const std::string &filename, int line, Log &log): _log_level(log_level),_curr_time("xxxx"), /*获取时间稍后实现*/_pid(getpid()),_filename(filename),_line(line),_log(log){std::stringstream ss; // 定义一个stringstream流// 类型自动转化为string对象然后,把所有内容格式化输入到这个流里,ss << "[" << _curr_time << "]"<< "[" << LevelToStr(_log_level) << "]" // 转化<< "[" << _pid << "]"<< "[" << _filename << "]"<< "[" << _line << "]"<< " - ";_log_info = ss.str();}template <typename T> // 类型自动推导LogMessage &operator<<(const T &info){std::stringstream ss; // 还是用stringstream流ss << info;_log_info += ss.str(); // 消息前后部分拼起来return *this;}~LogMessage() // 析构时自动刷新{if (_log._refresh_strategy){_log._refresh_strategy->Refresh(_log_info); // 刷新日志信息}}private:LogLevel _log_level;    // 日志等级std::string _curr_time; // 时间pid_t _pid;             // 进程IDstd::string _filename;  // 文件名int _line;              // 行号std::string _log_info;  // 合并之后的消息Log &_log;              // 外部类的引用};~MyLog() {}private:std::unique_ptr<RefreshStrategy> _refresh_strategy;
};
在Log类里面我们需要重载(),在外部调用的时候直接()调用,就像仿函数,参数需要传日志等级,文件名和行号,返回值类型就是logMessage
LogMessage operator()(LogLevel level, std::string _filename, int _line){return LogMessage(level, _filename, _line, *this);}这里返回的是临时对象,我们用(),然后会LogMessage() << "1" << "2" << "3",会调用operator<<,虽然是临时对象,只要<<运算符没结束,这个临时对象就会一直存在,<<结束后,LogMessage临时对象就会自动释放,就会自动调LogMessage的析构函数做刷新。
//Main.cc文件
#include "MyLog.hpp"
using namespace MyLog;int main()
{MyLog logger;logger(LogLevel::DEBUG, "Main.cc", 6) << "hello log ";logger(LogLevel::DEBUG, "Main.cc", 7) << "hello log ";logger(LogLevel::DEBUG, "Main.cc", 8) << "hello log ";logger(LogLevel::DEBUG, "Main.cc", 9) << "hello log ";return 0;
}
还可以追加式的打印。
int main()
{MyLog logger;logger(LogLevel::DEBUG, "Main.cc", 6) << "hello log " << 1  << 'c'<< 3.14;logger(LogLevel::DEBUG, "Main.cc", 7) << "hello log " << 2  << 'd'<< 3.14;logger(LogLevel::DEBUG, "Main.cc", 8) << "hello log " << 3  << 'r'<< 3.14;logger(LogLevel::DEBUG, "Main.cc", 9) << "hello log " << 4  << 'g'<< 3.14;return 0;
}
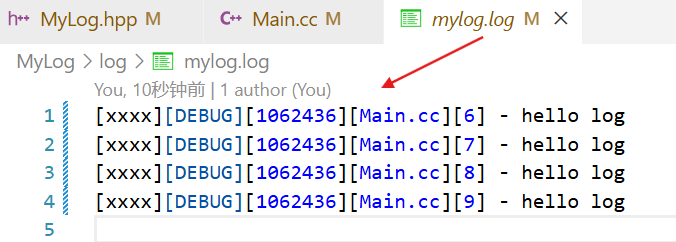
这是往显示器打印,我们也可以选择往文件里打印。
int main()
{MyLog logger;logger.RefreshLogToFile(); //往文件里打印logger(LogLevel::DEBUG, "Main.cc", 6) << "hello log ";logger(LogLevel::DEBUG, "Main.cc", 7) << "hello log ";logger(LogLevel::DEBUG, "Main.cc", 8) << "hello log ";logger(LogLevel::DEBUG, "Main.cc", 9) << "hello log ";return 0;
}
2.3 简化用户操作
定义一个宏,我们只需要传日志的等级就行,还会用到C/C++里的预处理符,叫__FILE__和__LINE__。
//MyLog.hpp文件
MyLog mylog; //定义全局日志对象
#define LOG(level)  mylog(level, __FILE__, __LINE__)
还可以用一个宏选择哪种刷新模式。
MyLog mylog; // 定义全局日志对象
#define LOG(level) mylog(level, __FILE__, __LINE__)
#define Refresh_Log_To_Console() mylog.RefreshLogToConsole() // 显示器
#define Refresh_Log_To_File() mylog.RefreshLogToFile()       // 文件
以后我们在用这个日志的时候,就可以直接用宏定义。
#include "MyLog.hpp"
using namespace MyLog;int main()
{Refresh_Log_To_Console();LOG(LogLevel::DEBUG) << "hello log..." << 123;LOG(LogLevel::DEBUG) << "hello log..." << 456;LOG(LogLevel::DEBUG) << "hello log..." << 789;return 0;
}
此时文件名和行号就不用手动输入了,直接能获取到。

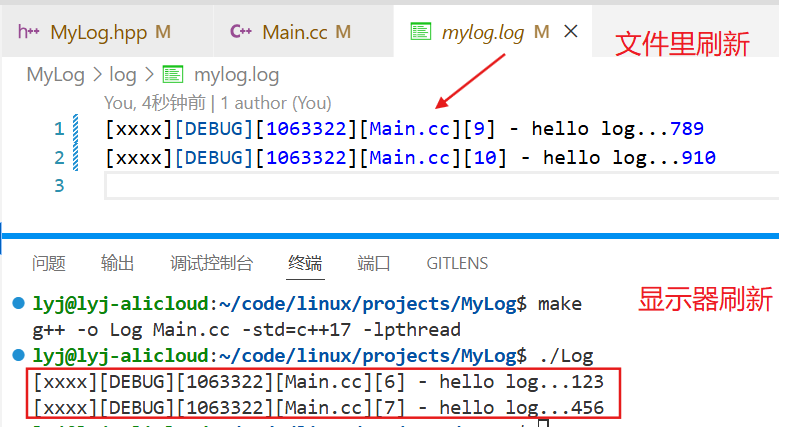
如果要往文件里刷新,就用文件的那个宏。
#include "MyLog.hpp"
using namespace MyLog;int main()
{Refresh_Log_To_Console();LOG(LogLevel::DEBUG) << "hello log..." << 123;LOG(LogLevel::DEBUG) << "hello log..." << 456;Refresh_Log_To_File();LOG(LogLevel::DEBUG) << "hello log..." << 789;LOG(LogLevel::DEBUG) << "hello log..." << 910;return 0;
}
2.4 获取时间
获取时间有很多做法,这里选择用localtime_r函数获取,这个函数是一个可重入的安全的函数,多线程访问时是没有问题的。
#include <time.h>struct tm *localtime_r(const time_t *timep, struct tm *result);
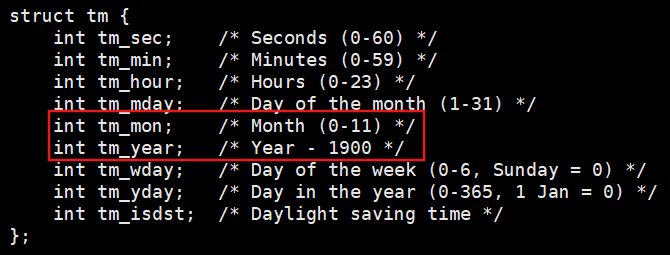
这个函数可以把一个time_t类型转化成一个struct tm的结构,成功就返回这个结构体,失败返回空。
- time_t其实就是一个时间戳,用来获取时间的

- struct tm的结构如下,有年月日、时分秒等

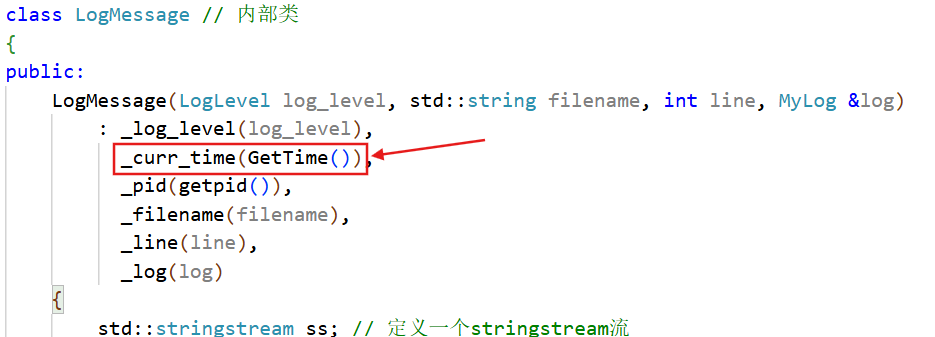
std::string GetTime()
{time_t curr_time = time(nullptr);struct tm stm;localtime_r(&curr_time, &stm);std::stringstream ss;ss << stm.tm_year << "-"<< stm.tm_mon << "-"<< stm.tm_mday << " "<< stm.tm_hour << ":"<< stm.tm_min << ":"<< stm.tm_sec;return ss.str();
}
#include "MyLog.hpp"
using namespace MyLog;int main()
{Refresh_Log_To_Console();LOG(LogLevel::DEBUG) << "hello log..." << 123;LOG(LogLevel::DEBUG) << "hello log..." << 456;LOG(LogLevel::DEBUG) << "hello log..." << 789;return 0;
}
现在的日期是2025年10月10日,运行发现年和月并不对,因为年需要加上1900,月是从0开始的,所以月要加1.
std::string GetTime()
{time_t curr_time = time(nullptr);struct tm stm;localtime_r(&curr_time, &stm);std::stringstream ss;ss << stm.tm_year + 1900 << "-"<< stm.tm_mon + 1 << "-"<< stm.tm_mday << " "<< stm.tm_hour << ":"<< stm.tm_min << ":"<< stm.tm_sec;return ss.str();
}
这个日期的显示还有一种写法,如下。
std::string GetTime()
{time_t curr_time = time(nullptr);struct tm stm;localtime_r(&curr_time, &stm);char timebuffer[124];snprintf(timebuffer, 124, "%4d-%02d-%02d %02d:%02d:%02d",stm.tm_year + 1900,stm.tm_mon + 1,stm.tm_mday,stm.tm_hour,stm.tm_min,stm.tm_sec);return timebuffer;
}
3.源码
//MyLog.hpp文件
#pragma once
#include <iostream>
#include <string>
#include <sstream>
#include <filesystem>
#include <fstream>
#include <memory>
#include <sys/types.h>
#include <unistd.h>
#include <time.h>
#include "Mutex.hpp"namespace MyLog
{using namespace MyMutex;const std::string default_path = "./log";     // 默认路径const std::string default_file = "mylog.log"; // 默认文件名// 刷新策略:策略模式class RefreshStrategy // 基类{public:virtual void Refresh(const std::string &message) = 0;virtual ~RefreshStrategy() = default;};class LogToConsole : public RefreshStrategy // 往控制台(显示器)刷新{public:LogToConsole() {}virtual void Refresh(const std::string &message) override{LockGuard lg(&_mutex); // 打印要加锁std::cout << message << "\r\n";}~LogToConsole() {}private:Mutex _mutex;};class LogToFile : public RefreshStrategy // 往指定文件刷新{public:LogToFile(const std::string &path = default_path, const std::string &file = default_file): _path(path),_file(file){LockGuard lg(&_mutex);              // 加锁if (std::filesystem::exists(_path)) // 判断路径是否存在return;try{std::filesystem::create_directories(_path); // 创建路径}catch (const std::filesystem::filesystem_error &e){std::cerr << e.what() << '\n';}}virtual void Refresh(const std::string &message) override{LockGuard lg(&_mutex);                                                    // 加锁std::string file_name = _path + (_path.back() == '/' ? "" : "/") + _file; // 把路径和文件名拼起来std::ofstream out_file(file_name, std::ios::app);                         // 追加写入 的方式打开文件if (!out_file.is_open())                                                  // 打开失败直接返回return;out_file << message << "\r\n"; // 以流形式把message和换行符写到out_file里out_file.close();}~LogToFile() {}private:std::string _path;std::string _file;Mutex _mutex;};enum class LogLevel{DEBUG,INFO,WARNING,ERROR,FATAL};std::string LevelToStr(LogLevel lev){switch (lev){case LogLevel::DEBUG:return "DEBUG";case LogLevel::INFO:return "INFO";case LogLevel::WARNING:return "WARNING";case LogLevel::ERROR:return "ERROR";case LogLevel::FATAL:return "FATAL";default:return "UNKNOWN";}}// std::string GetTime()// {//     time_t curr_time = time(nullptr);//     struct tm stm;//     localtime_r(&curr_time, &stm);//     std::stringstream ss;//     ss << stm.tm_year + 1900 << "-"//        << stm.tm_mon + 1 << "-"//        << stm.tm_mday << " "//        << stm.tm_hour << ":"//        << stm.tm_min << ":"//        << stm.tm_sec;//     return ss.str();// }std::string GetTime(){time_t curr_time = time(nullptr);struct tm stm;localtime_r(&curr_time, &stm);char timebuffer[124];snprintf(timebuffer, 124, "%4d-%02d-%02d %02d:%02d:%02d",stm.tm_year + 1900,stm.tm_mon + 1,stm.tm_mday,stm.tm_hour,stm.tm_min,stm.tm_sec);return timebuffer;}class MyLog{public:MyLog(){RefreshLogToConsole(); // 默认往显示器刷新}void RefreshLogToConsole() // 选择刷新到显示器{_refresh_strategy = std::make_unique<LogToConsole>();}void RefreshLogToFile() // 选择刷新到文件{_refresh_strategy = std::make_unique<LogToFile>();}class LogMessage // 内部类{public:LogMessage(LogLevel log_level, std::string filename, int line, MyLog &log): _log_level(log_level),_curr_time(GetTime()),_pid(getpid()),_filename(filename),_line(line),_log(log){std::stringstream ss; // 定义一个stringstream流// 类型自动转化为string对象然后,把所有内容格式化输入到这个流里,ss << "[" << _curr_time << "]"<< "[" << LevelToStr(_log_level) << "]" // 转化<< "[" << _pid << "]"<< "[" << _filename << "]"<< "[" << _line << "]"<< " - ";_log_info = ss.str();}template <typename T> // 类型自动推导LogMessage &operator<<(const T &info){std::stringstream ss; // 还是用stringstream流ss << info;_log_info += ss.str(); // 消息前后部分拼起来return *this;}~LogMessage(){if (_log._refresh_strategy){_log._refresh_strategy->Refresh(_log_info); // 刷新日志信息}}private:LogLevel _log_level;    // 日志等级std::string _curr_time; // 时间pid_t _pid;             // 进程IDstd::string _filename;  // 文件名int _line;              // 行号std::string _log_info;  // 合并之后的消息MyLog &_log;            // 外部类的引用};LogMessage operator()(LogLevel level, std::string filename, int line){return LogMessage(level, filename, line, *this);}~MyLog() {}private:std::unique_ptr<RefreshStrategy> _refresh_strategy;};MyLog mylog; // 定义全局日志对象
#define LOG(level) mylog(level, __FILE__, __LINE__)
#define Refresh_Log_To_Console() mylog.RefreshLogToConsole() // 显示器
#define Refresh_Log_To_File() mylog.RefreshLogToFile()       // 文件}
本篇分享就到这里,我们下篇见~

