ELK运维之路(Elasticsearch7集群组建-7.17.24)
最近公司研发需要使用ES来处理一些业务,我就本地做了一个单机版的测试es,正好发现之前公司组建ELKF日志监控时没有留底文档,那我就顺着写一下给自己整理一份,所有内容都为个人留档工作内容,请不要随便搬到你的生产环境。
1、系统参数调整
vim /etc/security/limits.conf
root soft nproc 65536
root hard nproc 65536
* soft nofile 1048576
* hard nofile 1048576
* soft nproc 102400
* hard nproc 102400
* soft memlock unlimited
* hard memlock unlimitedvim /etc/sysctl.conf
vm.max_map_count=655360reboot  # 保存后重启
ulimit -Hn  # 查看当前值
sysctl -p  # 查看当前值
2. 创建需要的文件夹
# kibana相关
mkdir -p /root/elkf/kibana/config
touch /root/elkf/kibana/config/kibana.yml
touch /root/elkf/kibana/config/node.options
# logstash相关
mkdir -p /root/elkf/logstash/config
mkdir -p /root/elkf/logstash/data
mkdir -p /root/elkf/logstash/pipeline
touch /root/elkf/logstash/config/logstash.yml
# ES集群相关
mkdir -p /root/elkf/elasticsearch/certs
mkdir -p /root/elkf/elasticsearch/config
mkdir -p /root/elkf/elasticsearch/plugins/ik
mkdir -p /root/elkf/elasticsearch/node-1/{data,logs}
mkdir -p /root/elkf/elasticsearch/node-2/{data,logs}
mkdir -p /root/elkf/elasticsearch/node-3/{data,logs}
touch  /root/elkf/elasticsearch/config/elasticsearch-1.yml
touch  /root/elkf/elasticsearch/config/elasticsearch-2.yml
touch  /root/elkf/elasticsearch/config/elasticsearch-3.yml
# elasticvue相关
mkdir -p /root/elkf/elasticvue
# 授权
chmod -R 777 /root/elkf/*
3.Elasticsearch准备
3.1 ES配置文件
#------------------------es1配置文件------------------------
#集群名称 所有节点名称一致
cluster.name: es-cluster
#当前该节点的名称,每个节点不能重复scan-es-node-1,scan-es-node-2,scan-es-node-3...
node.name: es-node-1
#当前该节点是不是有资格竞选主节点
node.master: true
#当前该节点是否存储数据
node.data: true
#设置为公开访问
network.host: 0.0.0.0
#设置其它节点和该节点交互的本机器的ip地址
#network.publish_host: 192.168.3.126
# 设置映射端口
http.port: 9200
# 内部节点之间沟通端口
transport.tcp.port: 9300
#支持跨域访问
http.cors.enabled: true
http.cors.allow-origin: "*"
http.cors.allow-headers: X-Requested-With,Content-Type,Content-Length,Authorization#配置集群的主机地址
discovery.seed_hosts: ["es-node-2","es-node-3"]
#初始主节点,使用一组初始的符合主条件的节点引导集群
cluster.initial_master_nodes: ["es-node-1","es-node-2","es-node-3"]
#节点等待响应的时间,默认值是30秒,增加这个值,从一定程度上会减少误判导致脑裂
discovery.zen.ping_timeout: 30s
#配置集群最少主节点数目,通常为 (可成为主节点的主机数目 / 2) + 1
discovery.zen.minimum_master_nodes: 2
#禁用交换内存,提升效率
bootstrap.memory_lock: true
#http传输内容的最大容量
http.max_content_length: 200mbaction.destructive_requires_name: true
cluster.max_shards_per_node: 10000# 因为elasticsearch 7.2默认集成了xpack,而默认的license就只能用30天,所以更改为只使用最基本的功能
xpack.license.self_generated.type: basic
# 开启加密
xpack.security.enabled: true
xpack.security.transport.ssl.enabled: true
# 秘钥配置
xpack.security.transport.ssl.verification_mode: certificate
xpack.security.transport.ssl.keystore.path: /usr/share/elasticsearch/config/elastic-certificates.p12
xpack.security.transport.ssl.truststore.path: /usr/share/elasticsearch/config/elastic-certificates.p12
# ------------------------es2配置文件------------------------
#集群名称 所有节点名称一致
cluster.name: es-cluster
#当前该节点的名称,每个节点不能重复scan-es-node-1,scan-es-node-2,scan-es-node-3...
node.name: es-node-2
#当前该节点是不是有资格竞选主节点
node.master: true
#当前该节点是否存储数据
node.data: true
#设置为公开访问
network.host: 0.0.0.0
#设置其它节点和该节点交互的本机器的ip地址
#network.publish_host: 192.168.3.126
# 设置映射端口
http.port: 9200
# 内部节点之间沟通端口
transport.tcp.port: 9300
#支持跨域访问
http.cors.enabled: true
http.cors.allow-origin: "*"#配置集群的主机地址
discovery.seed_hosts: ["es-node-1","es-node-3"]
#初始主节点,使用一组初始的符合主条件的节点引导集群
cluster.initial_master_nodes: ["es-node-1","es-node-2","es-node-3"]
#节点等待响应的时间,默认值是30秒,增加这个值,从一定程度上会减少误判导致脑裂
discovery.zen.ping_timeout: 30s
#配置集群最少主节点数目,通常为 (可成为主节点的主机数目 / 2) + 1
discovery.zen.minimum_master_nodes: 2
#禁用交换内存,提升效率
bootstrap.memory_lock: true
#http传输内容的最大容量
http.max_content_length: 200mbaction.destructive_requires_name: true
cluster.max_shards_per_node: 10000
http.cors.allow-headers: X-Requested-With,Content-Type,Content-Length,Authorization# 因为elasticsearch 7.2默认集成了xpack,而默认的license就只能用30天,所以更改为只使用最基本的功能
xpack.license.self_generated.type: basic
# 开启加密
xpack.security.enabled: true
xpack.security.transport.ssl.enabled: true
# 秘钥配置
xpack.security.transport.ssl.verification_mode: certificate
xpack.security.transport.ssl.keystore.path: /usr/share/elasticsearch/config/elastic-certificates.p12
xpack.security.transport.ssl.truststore.path: /usr/share/elasticsearch/config/elastic-certificates.p12
#------------------------es3配置文件------------------------
#集群名称 所有节点名称一致
cluster.name: es-cluster
#当前该节点的名称,每个节点不能重复scan-es-node-1,scan-es-node-2,scan-es-node-3...
node.name: es-node-3
#当前该节点是不是有资格竞选主节点
node.master: true
#当前该节点是否存储数据
node.data: true
#设置为公开访问
network.host: 0.0.0.0
#设置其它节点和该节点交互的本机器的ip地址
#network.publish_host: 192.168.3.126
# 设置映射端口
http.port: 9200
# 内部节点之间沟通端口
transport.tcp.port: 9300
#支持跨域访问
http.cors.enabled: true
http.cors.allow-origin: "*"#配置集群的主机地址
discovery.seed_hosts: ["es-node-1","es-node-2"]
#初始主节点,使用一组初始的符合主条件的节点引导集群
cluster.initial_master_nodes: ["es-node-1","es-node-2","es-node-3"]
#节点等待响应的时间,默认值是30秒,增加这个值,从一定程度上会减少误判导致脑裂
discovery.zen.ping_timeout: 30s
#配置集群最少主节点数目,通常为 (可成为主节点的主机数目 / 2) + 1
discovery.zen.minimum_master_nodes: 2
#禁用交换内存,提升效率
bootstrap.memory_lock: true
#http传输内容的最大容量
http.max_content_length: 200mbaction.destructive_requires_name: true
cluster.max_shards_per_node: 10000
http.cors.allow-headers: X-Requested-With,Content-Type,Content-Length,Authorization# 因为elasticsearch 7.2默认集成了xpack,而默认的license就只能用30天,所以更改为只使用最基本的功能
xpack.license.self_generated.type: basic
# 开启加密
xpack.security.enabled: true
xpack.security.transport.ssl.enabled: true
# 秘钥配置
xpack.security.transport.ssl.verification_mode: certificate
xpack.security.transport.ssl.keystore.path: /usr/share/elasticsearch/config/elastic-certificates.p12
xpack.security.transport.ssl.truststore.path: /usr/share/elasticsearch/config/elastic-certificates.p12
3.2 生成Elasticsearch密钥
#  编辑配置文件,用es命令创建证书
vi /root/elkf/certs-create.ymlservices:create_certs:image: elasticsearch:7.17.24container_name: create_certscommand: >bash -c 'bin/elasticsearch-certutil cert -out /certs/elastic-certificates.p12 -pass ""'volumes:- ./elasticsearch/certs:/certs# 启动docker-compose生成证书
docker-compose -f certs-create.yml up -d# 查看证书是否生成
root@ubuntu2204test99:~/elkf# ll elasticsearch/certs/
total 12
drwxrwxrwx 2 root root 4096 Sep 29 06:06 ./
drwxrwxrwx 8 root root 4096 Sep 29 05:37 ../
-rw------- 1 root root 3596 Sep 29 06:06 elastic-certificates.p12
# 授权证书
root@ubuntu2204test99:~/elkf# chmod 644 /root/elkf/elasticsearch/certs/elastic-certificates.p12# 停掉生成证书的容器
docker-compose -f certs-create.yml down
3.3 编辑docker-compose文件
networks:elk_net:driver: bridgeipam:driver: defaultconfig:- subnet: 192.168.177.0/24
services:es-node-1:image: elasticsearch:7.17.24container_name: es-node-1environment:- "ES_JAVA_OPTS=-Xms512m -Xmx512m"ulimits:memlock:soft: -1hard: -1nofile:soft: 65536hard: 65536ports:- "9201:9200"volumes:- /etc/localtime:/etc/localtime- /root/elkf/elasticsearch/certs/elastic-certificates.p12:/usr/share/elasticsearch/config/elastic-certificates.p12- /root/elkf/elasticsearch/config/elasticsearch-1.yml:/usr/share/elasticsearch/config/elasticsearch.yml- /root/elkf/elasticsearch/node-1/data:/usr/share/elasticsearch/data- /root/elkf/elasticsearch/node-1/logs:/usr/share/elasticsearch/logs- /root/elkf/elasticsearch/plugins/ik:/usr/share/elasticsearch/plugins/iknetworks:elk_net:ipv4_address: 192.168.177.100es-node-2:image: elasticsearch:7.17.24container_name: es-node-2environment:- "ES_JAVA_OPTS=-Xms256m -Xmx256m"ulimits:memlock:soft: -1hard: -1nofile:soft: 65536hard: 65536ports:- "9202:9200"volumes:- /etc/localtime:/etc/localtime- /root/elkf/elasticsearch/certs/elastic-certificates.p12:/usr/share/elasticsearch/config/elastic-certificates.p12- /root/elkf/elasticsearch/config/elasticsearch-2.yml:/usr/share/elasticsearch/config/elasticsearch.yml- /root/elkf/elasticsearch/node-2/data:/usr/share/elasticsearch/data- /root/elkf/elasticsearch/node-2/logs:/usr/share/elasticsearch/logs- /root/elkf/elasticsearch/plugins/ik:/usr/share/elasticsearch/plugins/iknetworks:elk_net:ipv4_address: 192.168.177.101es-node-3:image: elasticsearch:7.17.24container_name: es-node-3environment:- "ES_JAVA_OPTS=-Xms256m -Xmx256m"ulimits:memlock:soft: -1hard: -1nofile:soft: 65536hard: 65536ports:- "9203:9200"volumes:- /etc/localtime:/etc/localtime- /root/elkf/elasticsearch/certs/elastic-certificates.p12:/usr/share/elasticsearch/config/elastic-certificates.p12- /root/elkf/elasticsearch/config/elasticsearch-3.yml:/usr/share/elasticsearch/config/elasticsearch.yml- /root/elkf/elasticsearch/node-3/data:/usr/share/elasticsearch/data- /root/elkf/elasticsearch/node-3/logs:/usr/share/elasticsearch/logs- /root/elkf/elasticsearch/plugins/ik:/usr/share/elasticsearch/plugins/iknetworks:elk_net:ipv4_address: 192.168.177.102
3.4 启动后设置elasticsearch密码
# 生成密码(手动输入,可以使用auto自动生成)
root@ubuntu2204test99:~/elkf# docker exec -it es-node-1 /bin/bash -c "./bin/elasticsearch-setup-passwords interactive"
Initiating the setup of passwords for reserved users elastic,apm_system,kibana,kibana_system,logstash_system,beats_system,remote_monitoring_user.
You will be prompted to enter passwords as the process progresses.
Please confirm that you would like to continue [y/N]yEnter password for [elastic]:
Reenter password for [elastic]:
Enter password for [apm_system]:
Reenter password for [apm_system]:
Enter password for [kibana_system]:
Reenter password for [kibana_system]:
Enter password for [logstash_system]:
Reenter password for [logstash_system]:
Enter password for [beats_system]:
Reenter password for [beats_system]:
Enter password for [remote_monitoring_user]:
Reenter password for [remote_monitoring_user]:
Changed password for user [apm_system]
Changed password for user [kibana_system]
Changed password for user [kibana]
Changed password for user [logstash_system]
Changed password for user [beats_system]
Changed password for user [remote_monitoring_user]
Changed password for user [elastic]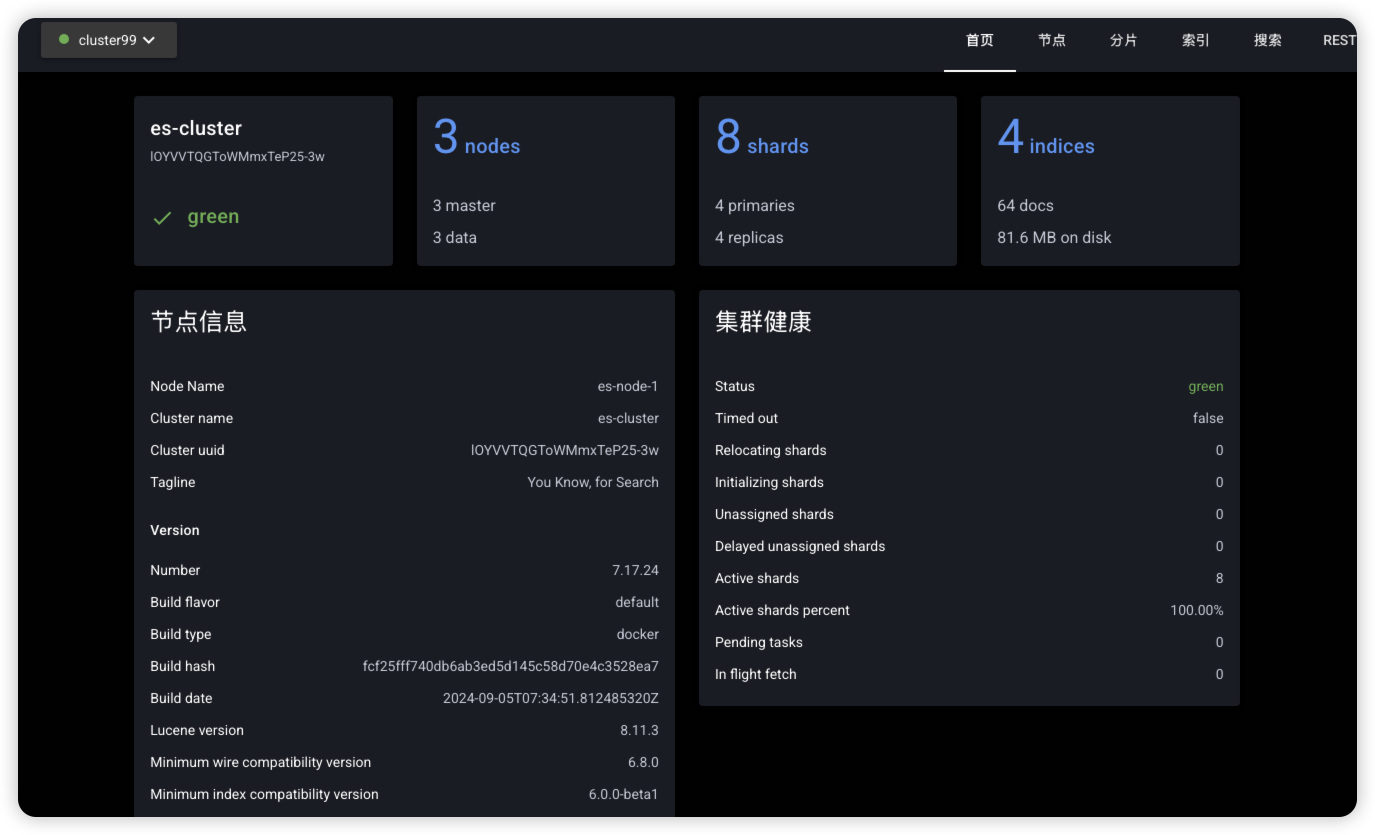
image-20250929163742261