Linux 进程间通信——System V
从这章开始,我们讲一种新的进程间通信方式——System V。System V是一种标准,Linux内核支持了这种标准,专门设计了一个IPC通信模块,这篇文章着重讲解System V中的共享内存。
一.共享内存的原理与接口使用
1、共享内存的原理
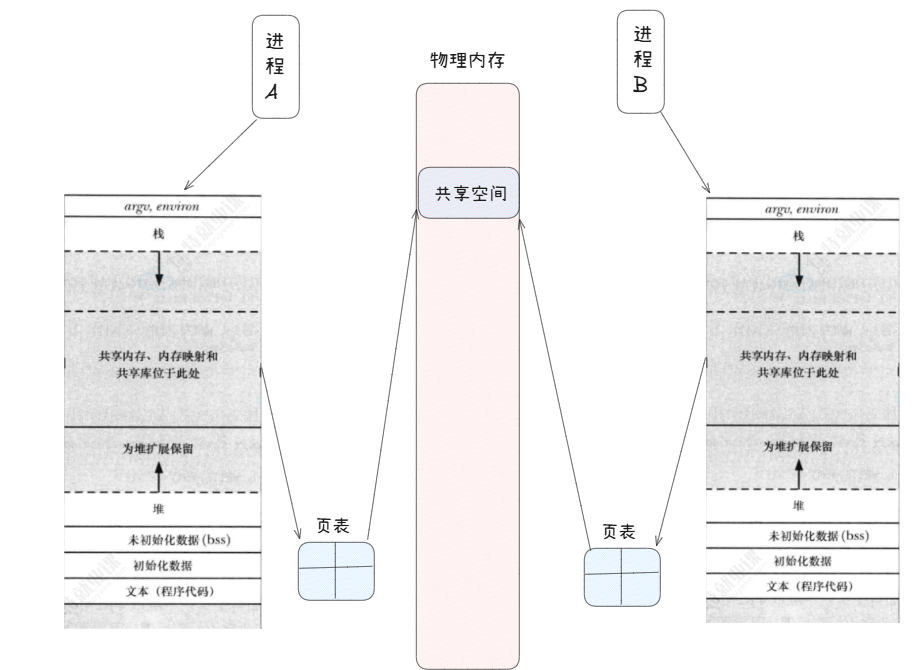
之前我们讲进程地址空间时,提到堆栈中间有一段共享区。我们可以想办法在物理内存中先创建一块区域,然后映射到共享区中。同样地,这块空间可以映射到另一个进程的地址空间中,就类似于动态库的共享原理。
以上工作由操作系统完成,系统调用提供给用户使用。那么到时候如何关闭这个共享内存?free掉进程地址空间,清空页表,物理内存会被自动回收(这个过程也由系统调用完成)。
那么我们在使用malloc时,是直接在物理内存开辟吗?并不是,而是现在进程地址空间上设置指定大小的空间,使用时才在物理内存开辟。
多个共享内存可以同时由多个进程使用来通信,就需要管理:先描述在组织。因此共享内存一定要有对应的描述共享内存的内核结构体对象和物理内存。进程和共享内存的关系,就是内核数据结构之间的关系。
2.与共享内存有关的接口
1.创建共享内存
我们使用系统调用shmget来创建一个共享内存。它的三个参数值得我们详细讲解。
size:指定开辟共享内存的大小(字节为单位)
shmflg:以标志位传参,类似open的打开方式,这里的flag有两个,IPC_CREAT代表创建一个新的共享内存,若存在就返回;IPC_EXCL和IPC_CREAT以按位或方式一起使用,代表如果创建已经存在的共享内存时,就返回异常。
key:不同的进程用shm进行通信,标识共享内存的唯一性。注意,key不是内核直接形成的,而是在用户层,构建并传入OS的。很简单,因为共享内存由其中一个进程开辟,但是这个标识唯一性的key是需要传给另一个进程的,因为我们要保证另一个进程是拿到同一个共享内存,而不是新建。可以类比命名管道的原理:同一路径下的文件有唯一性。
#include <sys/ipc.h>#include <sys/shm.h>int shmget(key_t key, size_t size, int shmflg);//shmflg的选项
IPC_CREATCreate a new segment.  If this flag is not used, then shmget() will find the seg‐ment associated with key and check to see if the user has  permission  to  accessthe segment.IPC_EXCLThis  flag  is  used with IPC_CREAT to ensure that this call creates the segment.If the segment already exists, the call fails.
tips:一般情况下,会使用算法构建一个冲突率较低的key。ftok函数——纯用户级别的算法接口。注意这个函数主要用于用户创建共享内存时唯一标识,真正操作系统内核使用的“标识符”是shmget的返回值,类似于文件描述符fd和struct file*的关系。
2.查看系统共享内存信息
我们使用ipcrm来查看信息,但要注意这里的选项:使用-m是查看。
NAMEipcrm - remove certain IPC resourcesSYNOPSISipcrm [options]ipcrm [shm|msg|sem] ID ...
3.删除指定的共享内存
删除共享内存:ipcrm -m id
如果我们创建了一个共享内存,如果没有进行删除共享内存,共享内存资源会一直存在,其生命周期随内核而不是进程。
注意:删除时使用id,而不能使用key。key未来只给内核来进行区分唯一性,而管理需要用shmid。指令运行在用户空间,因此用户只能使用shmid管理。
4.代码级的共享内存管理
在代码中我们使用shmctl管理共享内存。
NAMEshmctl - System V shared memory controlSYNOPSIS#include <sys/ipc.h>#include <sys/shm.h>int shmctl(int shmid, int cmd, struct shmid_ds *buf);
其中cmd为各种选项,其中包含状态查询,删除,设置权限位等等,详细的使用会在之后的demo中介绍。
IPC_STATCopy information from the kernel data structure associated with shmid into theshmid_ds structure pointed to by buf. The caller must have read permission onthe shared memory segment.IPC_SETWrite the values of some members of the shmid_ds structure pointed to by buf tothe kernel data structure associated with this shared memory segment, updatingalso its shm_ctime member.The following fields are updated: shm_perm.uid, shm_perm.gid, and (the least sig‐nificant 9 bits of) shm_perm.mode.The effective UID of the calling process must match the owner (shm_perm.uid) orcreator (shm_perm.cuid) of the shared memory segment, or the caller must be priv‐ileged.IPC_RMIDMark the segment to be destroyed. The segment will actually be destroyed onlyafter the last process detaches it (i.e., when the shm_nattch member of the asso‐ciated structure shmid_ds is zero). The caller must be the owner or creator ofthe segment, or be privileged. The buf argument is ignored.If a segment has been marked for destruction, then the (nonstandard) SHM_DESTflag of the shm_perm.mode field in the associated data structure retrieved byIPC_STAT will be set.The caller must ensure that a segment is eventually destroyed; otherwise itspages that were faulted in will remain in memory or swap.See also the description of /proc/sys/kernel/shm_rmid_forced in proc(5).IPC_INFO (Linux-specific)Return information about system-wide shared memory limits and parameters in thestructure pointed to by buf. This structure is of type shminfo (thus, a cast isrequired), defined in <sys/shm.h> if the _GNU_SOURCE feature test macro is de‐fined:
5.挂载共享内存
当我们创建好共享内存时,无法直接使用,这里就类似我们之前讲过的系统盘挂载,我们也同样需要对共享内存进行挂载——目的是建立进程和共享内存的映射。
我们使用系统调用shmat进行挂载。同样地,当我们不适用共享内存时,还需要去挂载。
NAMEshmat, shmdt - System V shared memory operationsSYNOPSIS#include <sys/types.h>#include <sys/shm.h>void *shmat(int shmid, const void *shmaddr, int shmflg);int shmdt(const void *shmaddr);
二.共享内存示例
接下来我们使用以上的接口进行进程通信。
为了面向对象的需求,我们首先要封装共享内存的方法。
1.Shm.hpp
我们所有对共享内存的操作都在这个文件中。我们从逻辑上把创建和使用共享内存的过程理一遍。
首先这个demo代码将来肯定要用于客户端client和服务端server。要想使用共享内存,肯定需要创建共享内存——挂载共享内存。这个操作无论客户还是服务端都需要做,所以我们可以把这两个方法直接在构造函数中调用。
包含的头文件和全局变量,以及宏定义
#pragma once#include <iostream>
#include <cstdio>
#include <string>
#include <sys/types.h>
#include <sys/ipc.h>
#include <sys/shm.h>
#include <unistd.h>
#include "Comm.hpp"const int gdefaultid = -1;
const int gsize = 4096;
const std::string pathname = ".";
const int projid = 0x66;
const int gmode = 0666;
#define CREATER "creater"
#define USER "user"
私有成员:
private:int _shmid;key_t _key;int _size;void *_start_mem;std::string _usertype;1.先来看看创建共享内存的逻辑。
这里我们这里分角色调用:如果是服务端,就创建共享内存;如果是客户端,就获取已创建的共享内存。注意这里的创建,共享内存在Linux中也被看作一个文件,我们需要对它设置权限位——否则可能会影响后续的挂载和使用。
void CreateHelper(int flg){printf("key: 0x%x\n", _key);// 共享内存的生命周期,随内核_shmid = shmget(_key, _size, flg);if (_shmid < 0){ERR_EXIT("shmget");}printf("shmid: %d\n", _shmid);}void Create(){CreateHelper(IPC_CREAT | IPC_EXCL | gmode);} void Get(){CreateHelper(IPC_CREAT);}2.接着看挂载的逻辑。这个函数比较简单,基本上就是调用了系统调用shmat,然后输出一些挂载成功的信息即可。
void Attach(){_start_mem = shmat(_shmid, nullptr, 0);if ((long long)_start_mem < 0){ERR_EXIT("shmat");}printf("attach success\n");}void Detach(){int n = shmdt(_start_mem);if (n == 0){printf("detach success\n");}}3.当我们执行完任务后,就需要对共享内存进行删除,很容易想到将来可以把这个方法放在对象的析构中,我们来讲解Destroy的逻辑。删除成功(返回值大于0)就输出正确信息,否则则报错。
void Destroy(){// if (_shmid == gdefaultid)// return;Detach();if (_usertype == CREATER){int n = shmctl(_shmid, IPC_RMID, nullptr);if (n > 0){printf("shmctl delete shm: %d success!\n", _shmid);}else{ERR_EXIT("shmctl");}}}4.然后我们来看public中的构造和析构以及其他获取信息的函数。
最重要的就是构造函数。在创建好对象后,需要做的工作就是创建共享内存空间,为此我们需要一个key——由ftok函数生成,并初始化_key成员。接着就是根据对象角色的不同选择共享内存的操作——创建新的还是使用已有的。然后进行挂载。
然后就是获取虚拟地址方法VirtualAddr,当我们挂载成功时会返回一个参数——指向共享内存段起始地址的指针
public:Shm(const std::string &pathname, int projid, const std::string &usertype): _shmid(gdefaultid),_size(gsize),_start_mem(nullptr),_usertype(usertype){_key = ftok(pathname.c_str(), projid);if (_key < 0){ERR_EXIT("ftok");}if (_usertype == CREATER)Create();else if (_usertype == USER)Get();else{}Attach();}void *VirtualAddr(){printf("VirtualAddr: %p\n", _start_mem);return _start_mem;}int Size(){return _size;}void Attr(){struct shmid_ds ds;int n = shmctl(_shmid, IPC_STAT, &ds); // ds:输出型参数printf("shm_segsz: %ld\n", ds.shm_segsz);printf("key: 0x%x\n", ds.shm_perm.__key);}~Shm(){std::cout << _usertype << std::endl;if(_usertype == CREATER)Destroy();}2.Comm.hpp
这个文件中,我们主要定义了错误信息的输出——尤其用于以上创建共享内存,挂载和去挂载的错误信息。
#pragma once#include <cstdio>
#include <cstdlib>#define ERR_EXIT(m)         \do                      \{                       \perror(m);          \exit(EXIT_FAILURE); \} while (0)
3.server.cc
客户端我们可以看到,在创建对象时以CREATER传参。我们获取到共享内存的起始地址,就可以对它进行读取了。
#include "Shm.hpp"
#include "Fifo.hpp"int main()
{Shm shm(pathname, projid, CREATER);sleep(5);shm.Attr();char *mem = (char *)shm.VirtualAddr();// 我们读写共享内存,有没有使用系统调用??也没有!!while (true){if (1){printf("%s\n", mem);}elsebreak;}std::cout << "server end normal!" << std::endl; // server段的析构函数没有被成功调用!return 0;
}
我们发现一个有趣的现象:
共享内存的读写:没有使用系统调用!
共享内存属于用户空间,可以让用户直接使用。
动态库的映射系统调用,使用mmap方法
4.client.cc
同样地,客户端我们创建对象时就是以USER传参的。可以看到,这里我们向共享内存写入信息时也使用普通库函数,也印证了上面的结论。
#include "Shm.hpp"
#include "Fifo.hpp"int main()
{Shm shm(pathname, projid, USER);char *mem = (char *)shm.VirtualAddr();// 我们读写共享内存,有没有使用系统调用??没有!!int index = 0;for (char c = 'A'; c <= 'B'; c++, index += 2){// 才是向共享内存写入sleep(1);mem[index] = c;mem[index + 1] = c;sleep(1);mem[index+2] = 0;}return 0;
}
5.优缺点与改进
优点:共享内存是进程通信中速度最快的。映射之后,读写,可以直接被对方看到。
缺点:成也萧何,败也萧何。读写可以直接被对方看到是它的优点,但同时也验证了通信双方,没有所谓的同步机制——信息读不完,没有等待阻塞机制,会导致数据不一致等问题。因此需要别的手段如信号量,互锁机制来保护内存。但这些知识我们之后再详细讲解,这里我们用管道文件来模拟这个过程。
例如,这里我们要读取由A-Z的字母两次,并要求每写入一对字母再读出(例如读出AA,AABB,AABBCC)
所以我们引入上节的管道文件头文件,对读写方法做一些修改:
管道文件的读写不再重要,他们的作用只有唤醒共享内存的读写。
void Wakeup(){// 写入操作char c = 'c';int n = write(_fd, &c, 1);printf("尝试唤醒: %d\n", n);}bool Wait(){char c;int number = read(_fd, &c, 1);if(number > 0) {printf("醒来: %d\n", number);return true;}return false;}Fifo.hpp
#pragma once#include <iostream>
#include <cstdio>
#include <string>
#include <iostream>
#include <string>
#include <sys/types.h>
#include <sys/stat.h>
#include <fcntl.h>
#include <unistd.h>
#include "Comm.hpp"#define PATH "."
#define FILENAME "fifo"class NamedFifo
{
public:NamedFifo(const std::string &path, const std::string &name): _path(path), _name(name){_fifoname = _path + "/" + _name;umask(0);// 新建管道int n = mkfifo(_fifoname.c_str(), 0666);if (n < 0){ERR_EXIT("mkfifo");}else{std::cout << "mkfifo success" << std::endl;}}~NamedFifo(){// 删除管道文件int n = unlink(_fifoname.c_str());if (n == 0){ERR_EXIT("unlink");}else{std::cout << "remove fifo failed" << std::endl;}}private:std::string _path;std::string _name;std::string _fifoname;
};class FileOper
{
public:FileOper(const std::string &path, const std::string &name): _path(path), _name(name), _fd(-1){_fifoname = _path + "/" + _name;}void OpenForRead(){// 打开, write 方没有执行open的时候,read方,就要在open内部进行阻塞// 直到有人把管道文件打开了,open才会返回!_fd = open(_fifoname.c_str(), O_RDONLY);if (_fd < 0){ERR_EXIT("open");}std::cout << "open fifo success" << std::endl;}void OpenForWrite(){// write_fd = open(_fifoname.c_str(), O_WRONLY);if (_fd < 0){ERR_EXIT("open");}std::cout << "open fifo success" << std::endl;}void Wakeup(){// 写入操作char c = 'c';int n = write(_fd, &c, 1);printf("尝试唤醒: %d\n", n);}bool Wait(){char c;int number = read(_fd, &c, 1);if(number > 0) {printf("醒来: %d\n", number);return true;}return false;}void Close(){if (_fd > 0)close(_fd);}~FileOper(){}private:std::string _path;std::string _name;std::string _fifoname;int _fd;
};
client修改
#include "Shm.hpp"
#include "Fifo.hpp"int main()
{FileOper writerfile(PATH, FILENAME);writerfile.OpenForWrite();Shm shm(pathname, projid, USER);char *mem = (char *)shm.VirtualAddr();// 我们读写共享内存,有没有使用系统调用??没有!!int index = 0;for (char c = 'A'; c <= 'Z'; c++, index += 2){// 才是向共享内存写入sleep(1);mem[index] = c;mem[index + 1] = c;sleep(1);mem[index+2] = 0;//每当我们写完一对字符时,就唤醒进程writerfile.Wakeup();}writerfile.Close();return 0;
}
server修改
#include "Shm.hpp"
#include "Fifo.hpp"int main()
{Shm shm(pathname, projid, CREATER);sleep(5);shm.Attr();NamedFifo fifo(PATH, FILENAME);// 文件操作FileOper readerfile(PATH, FILENAME);readerfile.OpenForRead();char *mem = (char *)shm.VirtualAddr();while (true){if (readerfile.Wait()){printf("%s\n", mem);}elsebreak;}readerfile.Close();std::cout << "server end normal!" << std::endl; // server段的析构函数没有被成功调用!return 0;
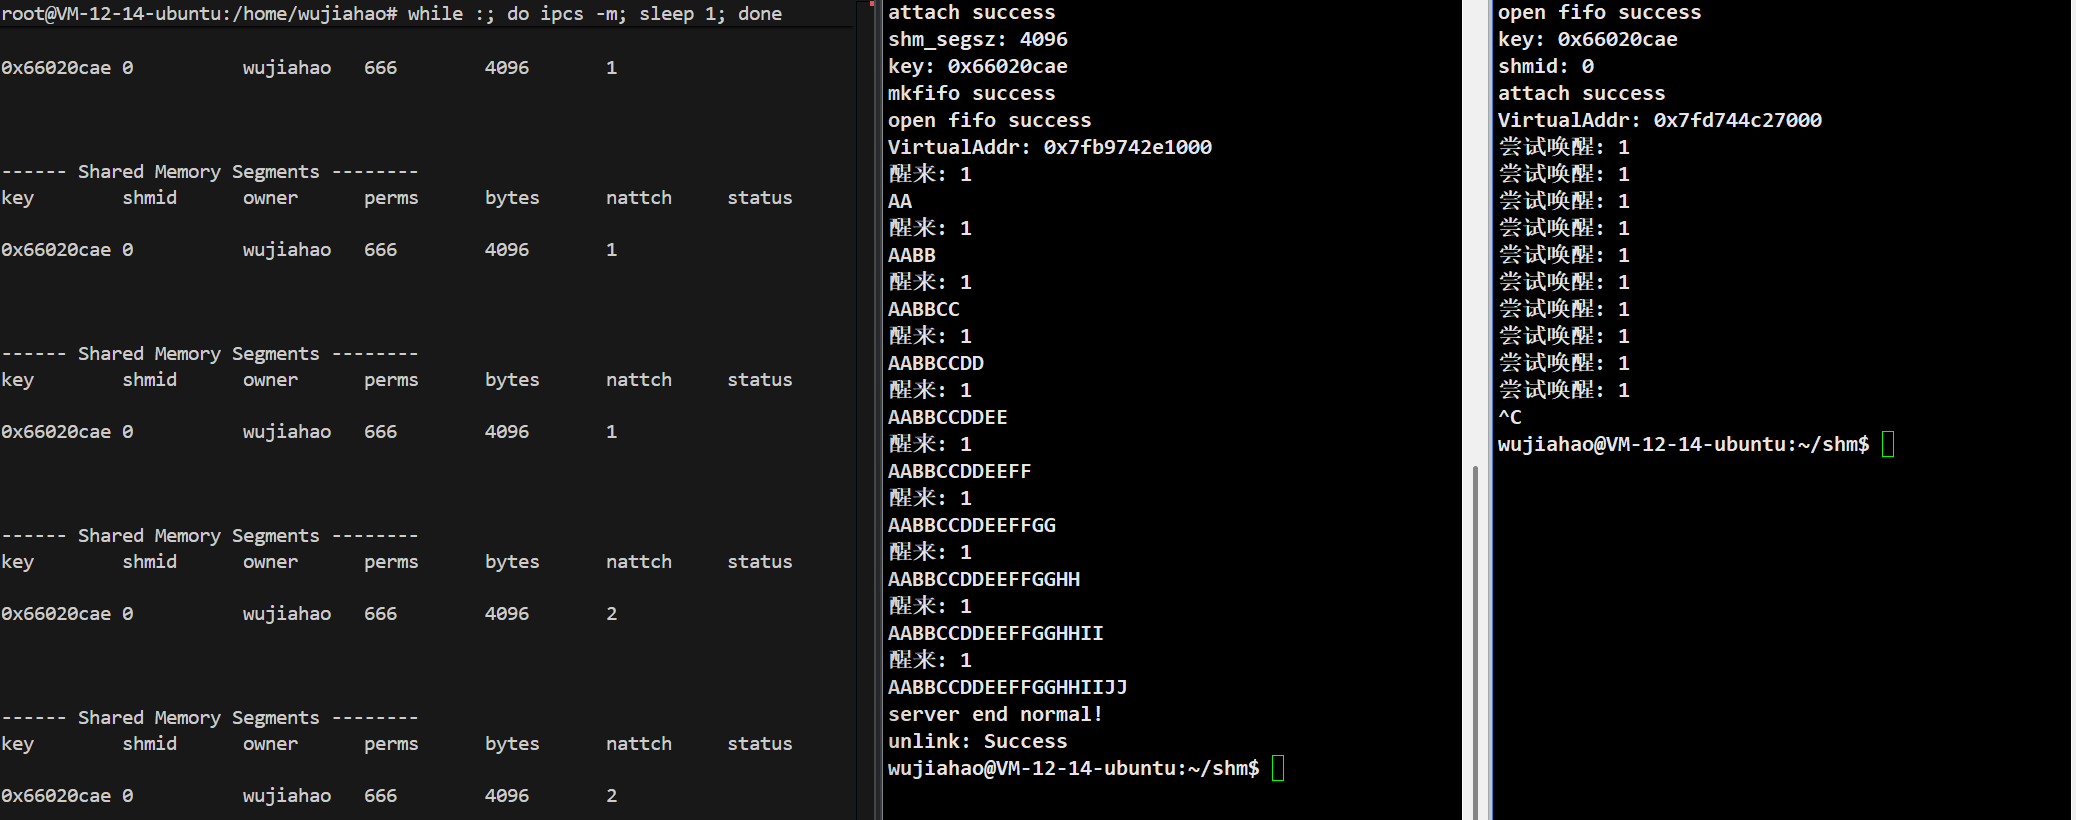
}运行效果
我们使用命令
while :; do ipcs -m; sleep 1; done
查看当前系统中共享内存的信息,只要显示两者是同一个key值,就说明成功关联到同一个共享内存
三.总结
1.在内核中,共享内存在创建时的大小必须是4kb的整数倍。例如我们在创建共享内存时指定大小为4097,操作系统会开辟4096*2,但我们只会使用4097——剩下的空间都会浪费。但是这里不直接使用4096*2也有原因,例如一些因为空间过大而导致的错误——比如越界。
2.现在我们来填上面的一个坑——共享内存必然有一个内核级的数据结构进行管理。我们可以通过查看shmctl的手册来查看这个结构——就是shmid_ds结构体,可以看到这里的主要成员有权限结构体perm,挂载,去挂载,最近一次修改时间以及共享内存关联进程数等等。
struct shmid_ds {struct ipc_perm shm_perm; /* Ownership and permissions */size_t shm_segsz; /* Size of segment (bytes) */time_t shm_atime; /* Last attach time */time_t shm_dtime; /* Last detach time */time_t shm_ctime; /* Creation time/time of lastmodification via shmctl() */pid_t shm_cpid; /* PID of creator */pid_t shm_lpid; /* PID of last shmat(2)/shmdt(2) */shmatt_t shm_nattch; /* No. of current attaches */...};struct ipc_perm {key_t __key; /* Key supplied to shmget(2) */uid_t uid; /* Effective UID of owner */gid_t gid; /* Effective GID of owner */uid_t cuid; /* Effective UID of creator */gid_t cgid; /* Effective GID of creator */unsigned short mode; /* Permissions + SHM_DEST andSHM_LOCKED flags */unsigned short __seq; /* Sequence number */};
同样我们在上面也写了方法来展现这里的重要信息。
void Attr(){struct shmid_ds ds;int n = shmctl(_shmid, IPC_STAT, &ds); // ds:输出型参数printf("shm_segsz: %ld\n", ds.shm_segsz);printf("key: 0x%x\n", ds.shm_perm.__key);}