SpringCloud项目阶段八:利用redis分布式锁解决集群状态下任务抢占以及实现延迟队列异步审核文章
前言:
项目地址:https://gitee.com/whltaoin_admin/hmtt_cloud-project.git
阶段七进度版本号:9b24cde9db94dcec59f1245a38c9408a750120c5
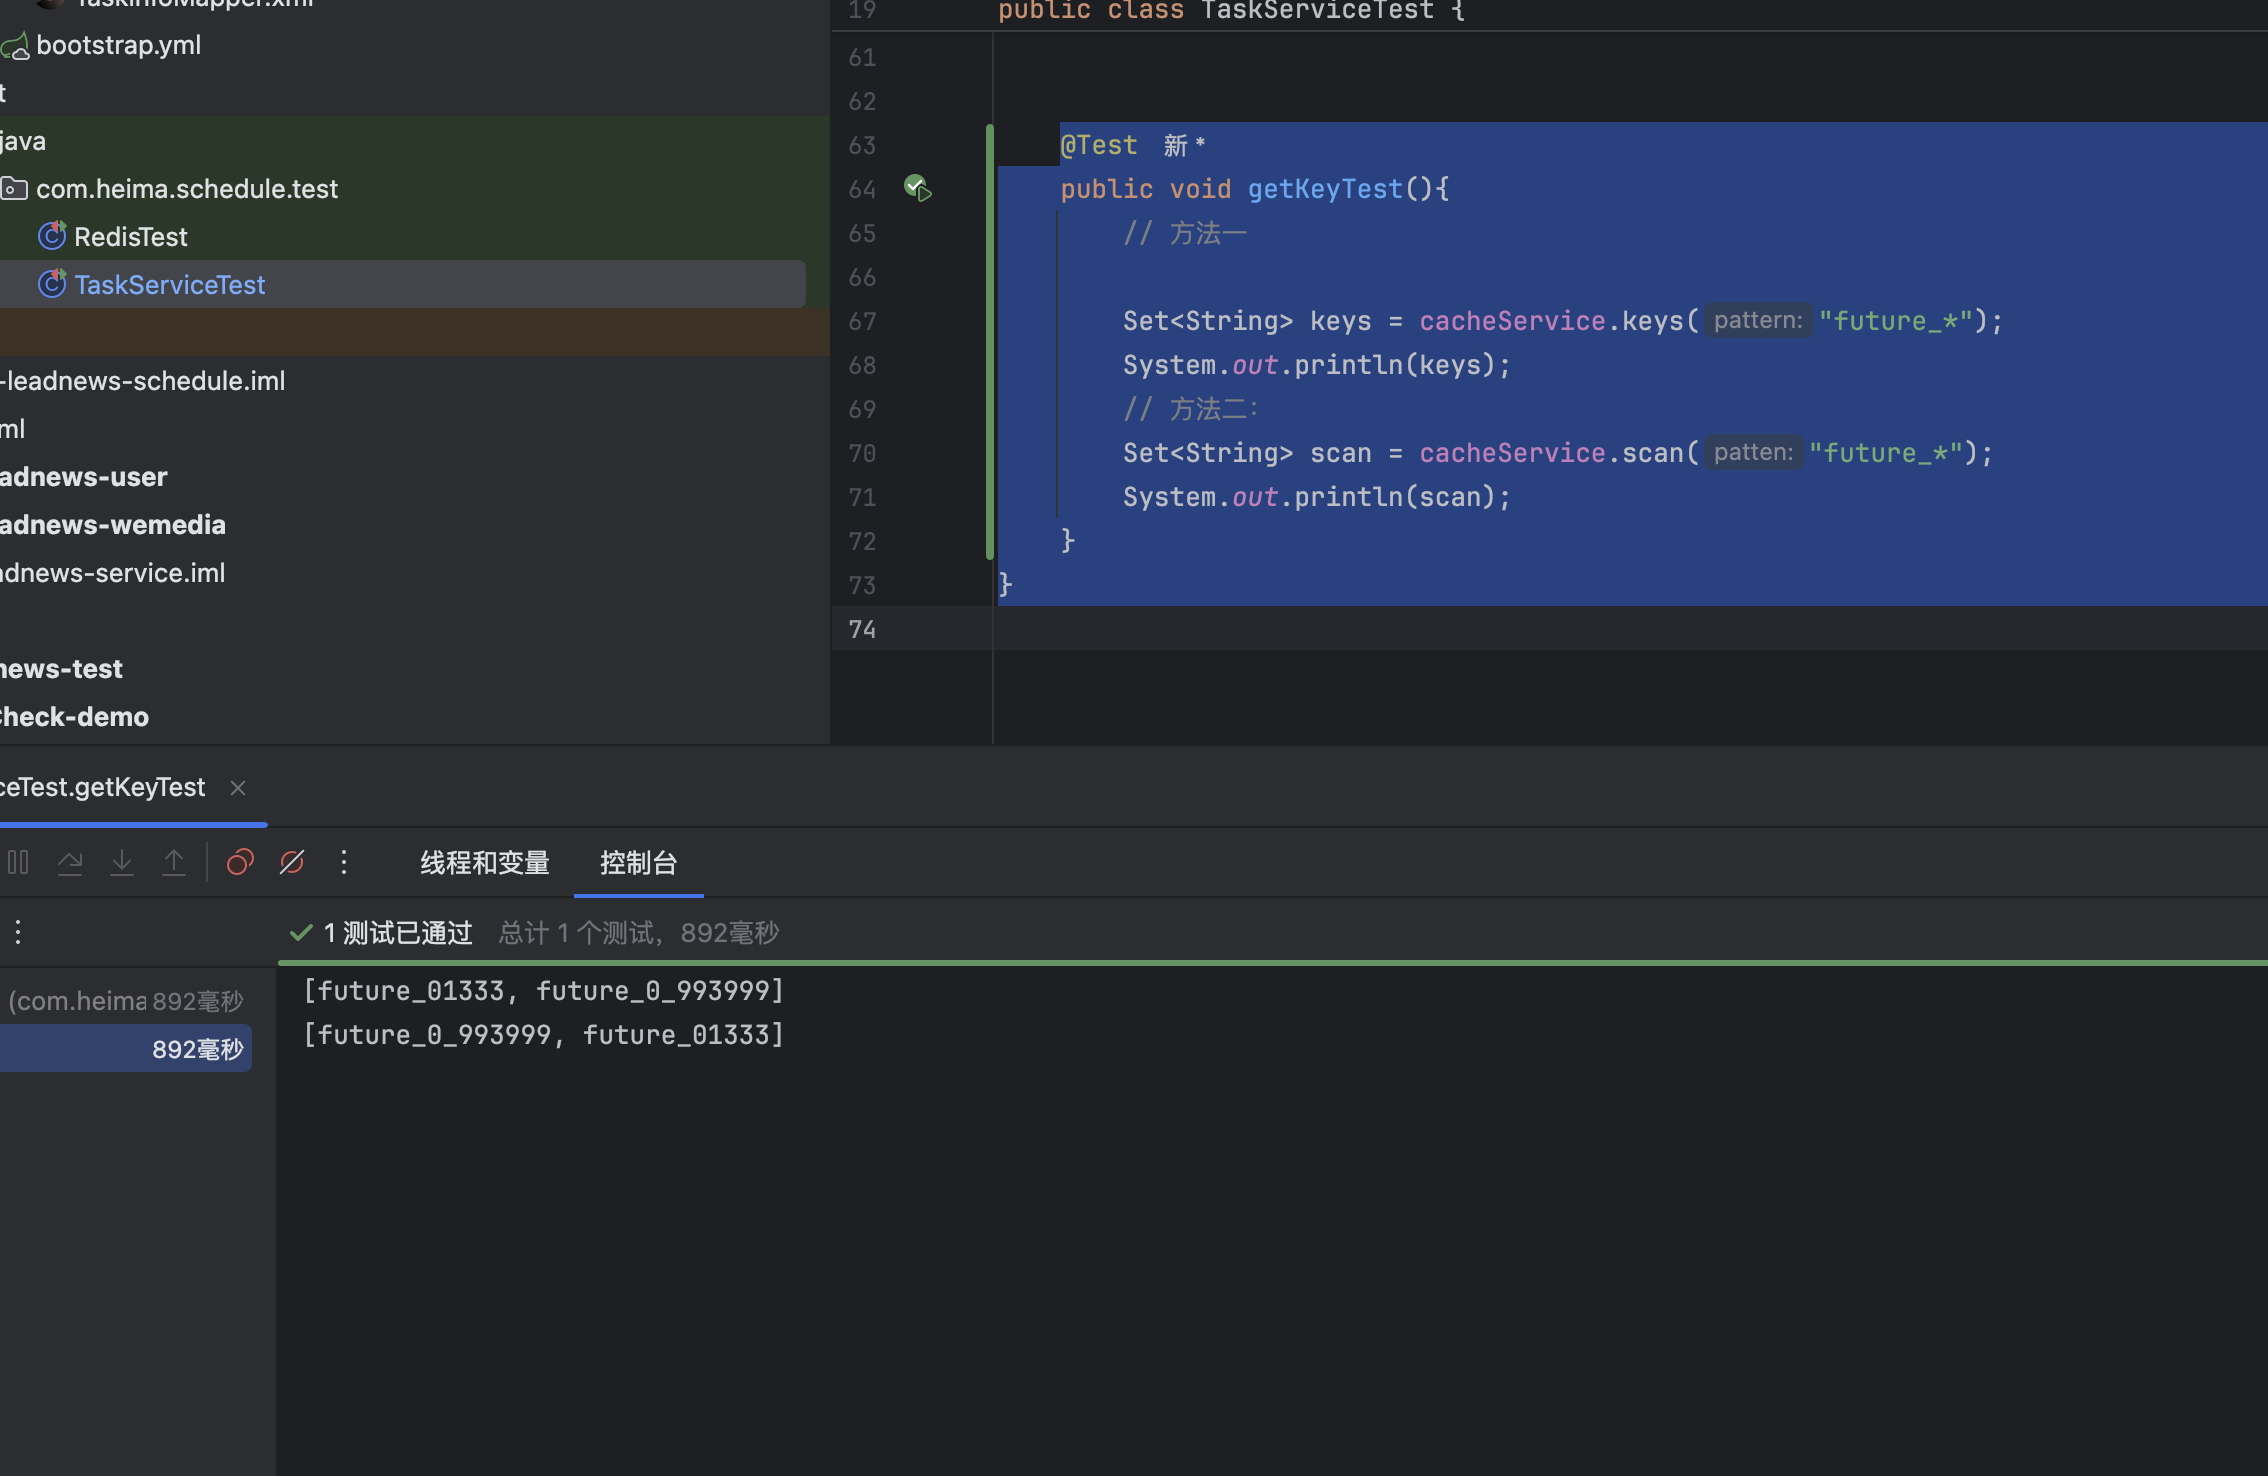
获取redis中的需要的key值
方法一:使用命令:key*
@Test
public void getKeyTest(){// 方法一Set<String> keys = cacheService.keys("future_*");System.out.println(keys);}
}
方法二:使用scan命令
@Test
public void getKeyTest(){// 方法二:Set<String> scan = cacheService.scan("future_*");System.out.println(scan);
}
}
效果
选择
方案一:key
keys的模糊匹配功能很方便,模糊匹配却发现redis的CPU使用率极高,redis是单线程,会被堵塞
方案2:scan
SCAN 命令是一个基于游标的迭代器,SCAN命令每次被调用之后, 都会向用户返回一个新的游标, 用户在下次迭代时需要使用这个新游标作为SCAN命令的游标参数, 以此来延续之前的迭代过程。
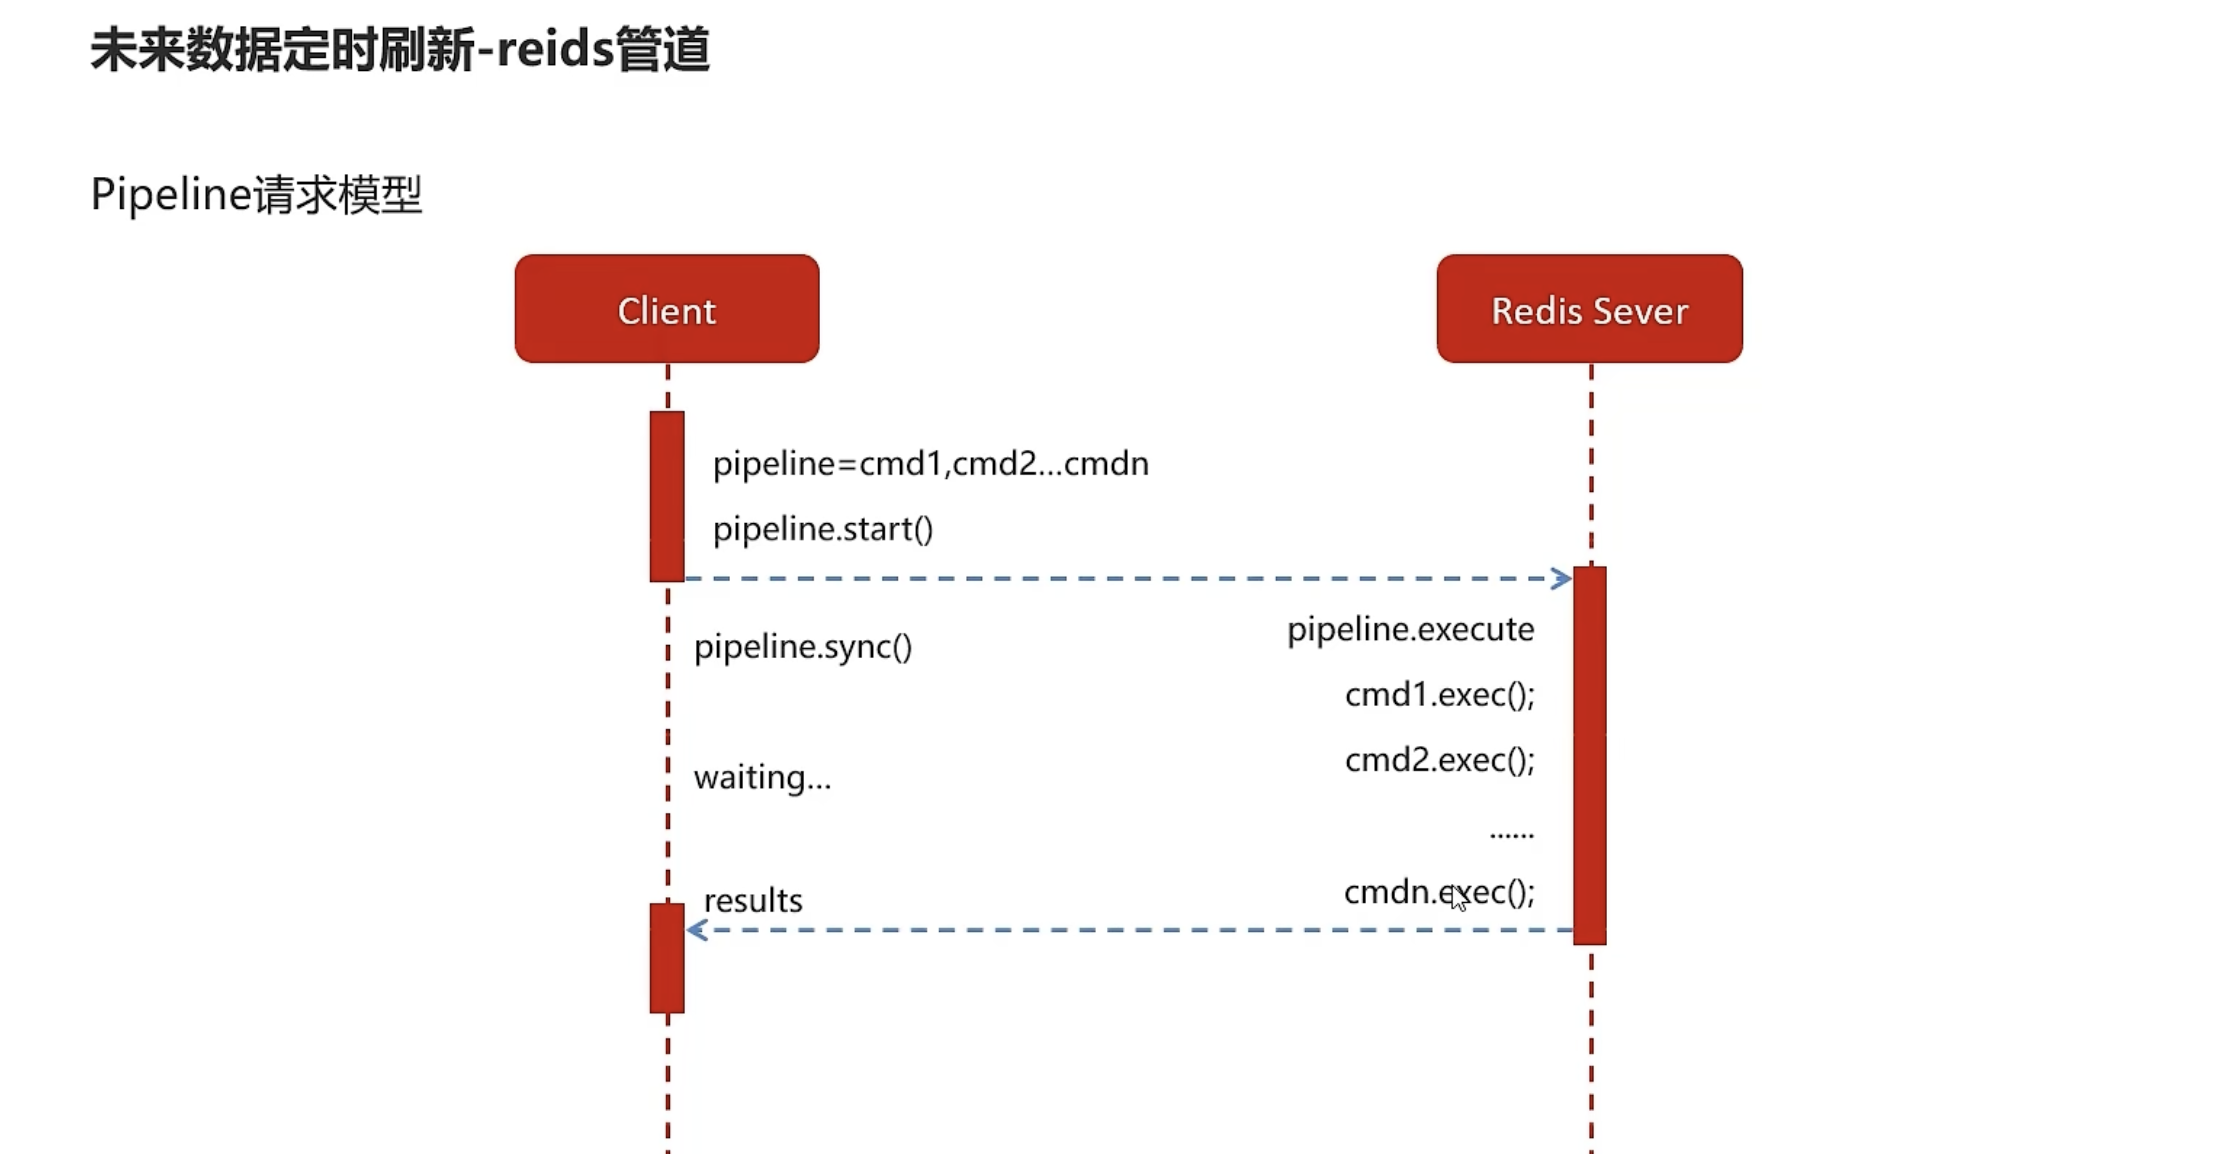
reids管道
对比
- 普通客户端
- 需要来回的发送和接收,耗时长
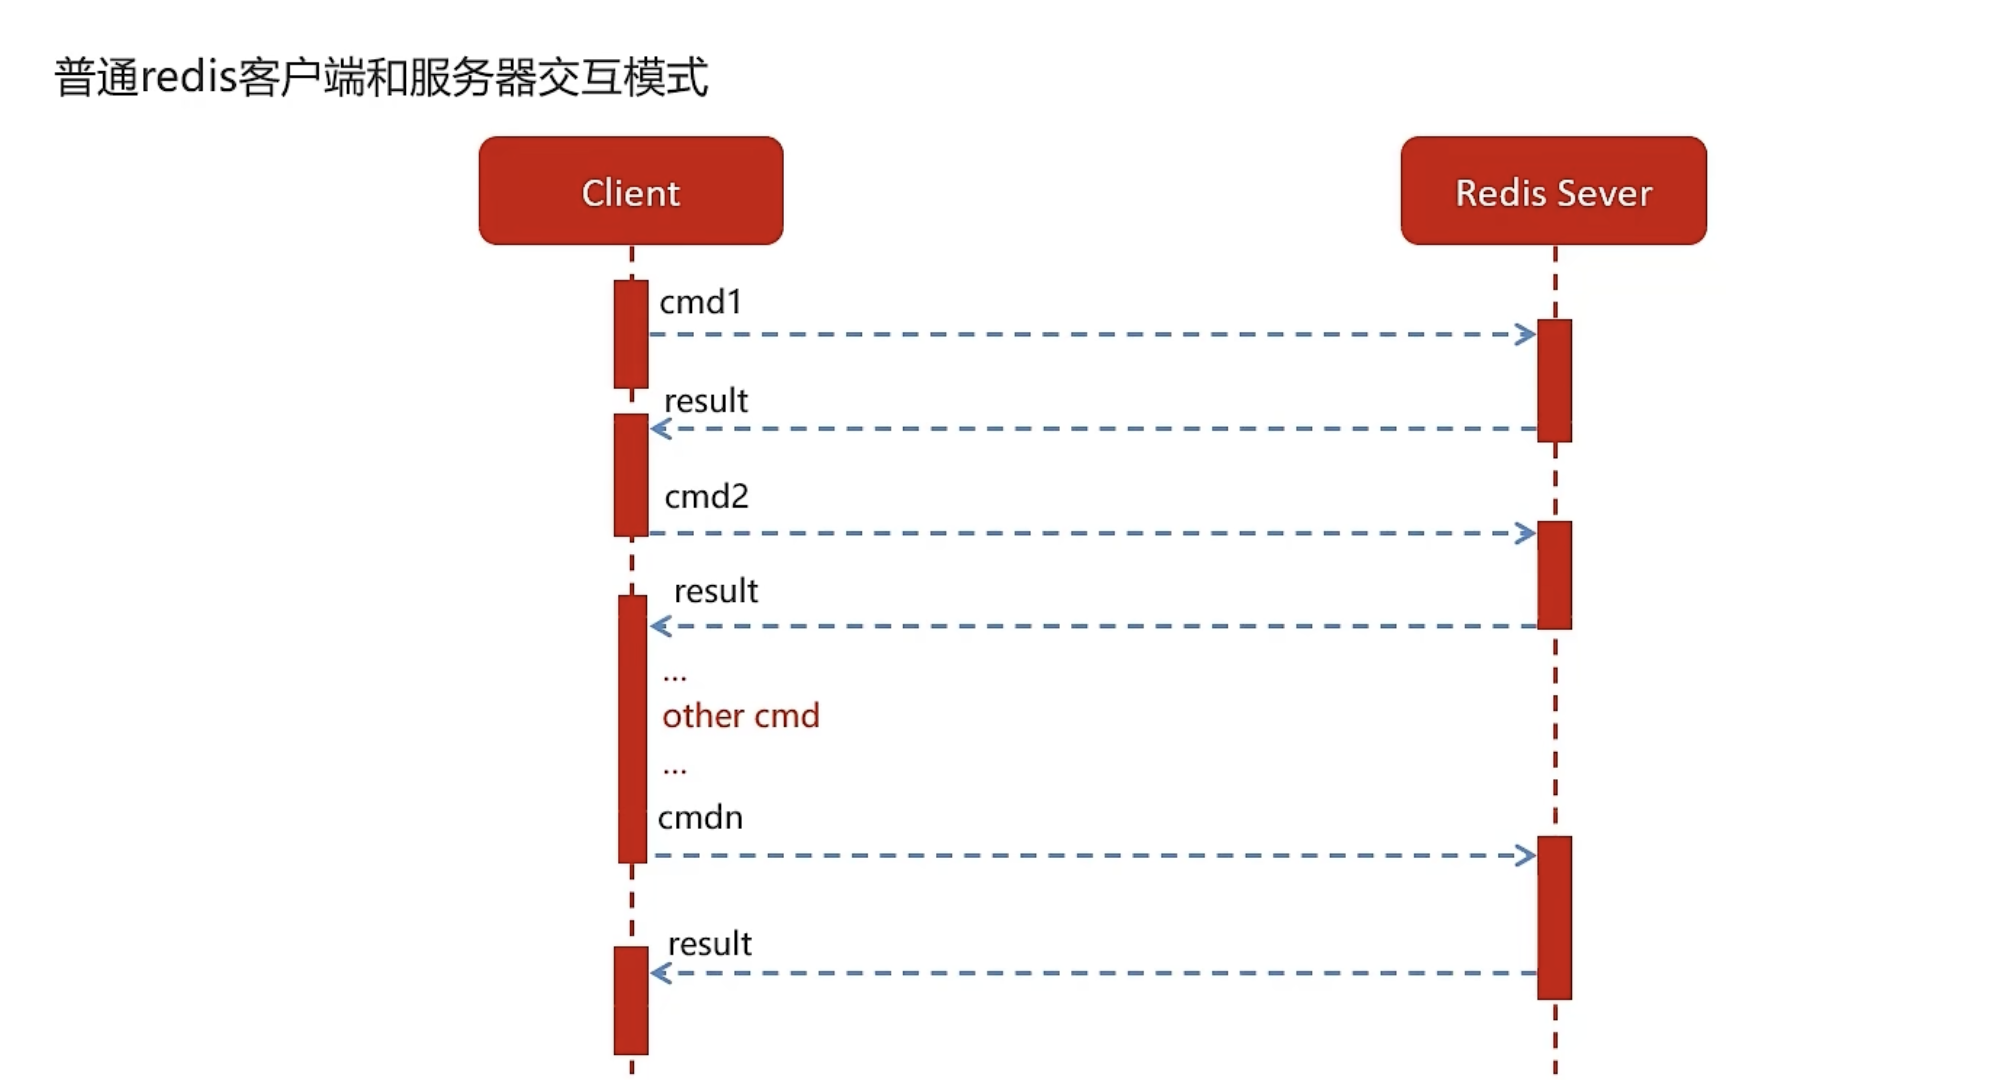
- reids管道
- 将任务都先放入管道中,一起执行完毕后,一起返回。
示例
- 普通
//耗时
@Test
public  void testPiple1(){long start =System.currentTimeMillis();for (int i = 0; i <100 ; i++) {Task task = new Task();task.setTaskType(101);task.setPriority(1);task.setExecuteTime(new Date().getTime());cacheService.lLeftPush("101_1", JSON.toJSONString(task));}System.out.println("耗时"+(System.currentTimeMillis()- start));
}

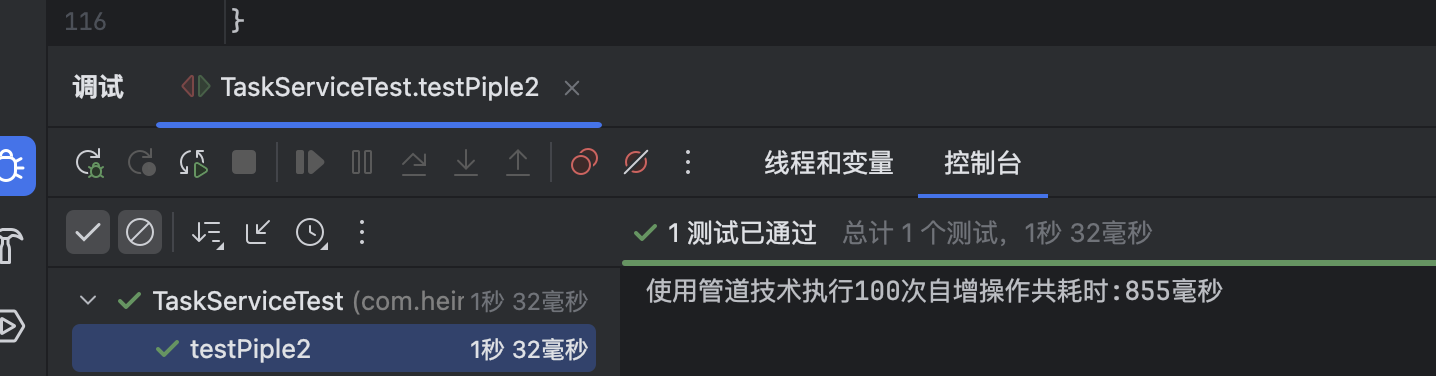
- 管道
@Test
public void testPiple2(){long start  = System.currentTimeMillis();//使用管道技术List<Object> objectList = cacheService.getstringRedisTemplate().executePipelined(new RedisCallback<Object>() {@Nullable@Overridepublic Object doInRedis(RedisConnection redisConnection) throws DataAccessException {for (int i = 0; i <100 ; i++) {Task task = new Task();task.setTaskType(101);task.setPriority(1);task.setExecuteTime(new Date().getTime());redisConnection.lPush("101_1".getBytes(), JSON.toJSONString(task).getBytes());}return null;}});System.out.println("使用管道技术执行100次自增操作共耗时:"+(System.currentTimeMillis()-start)+"毫秒");
}
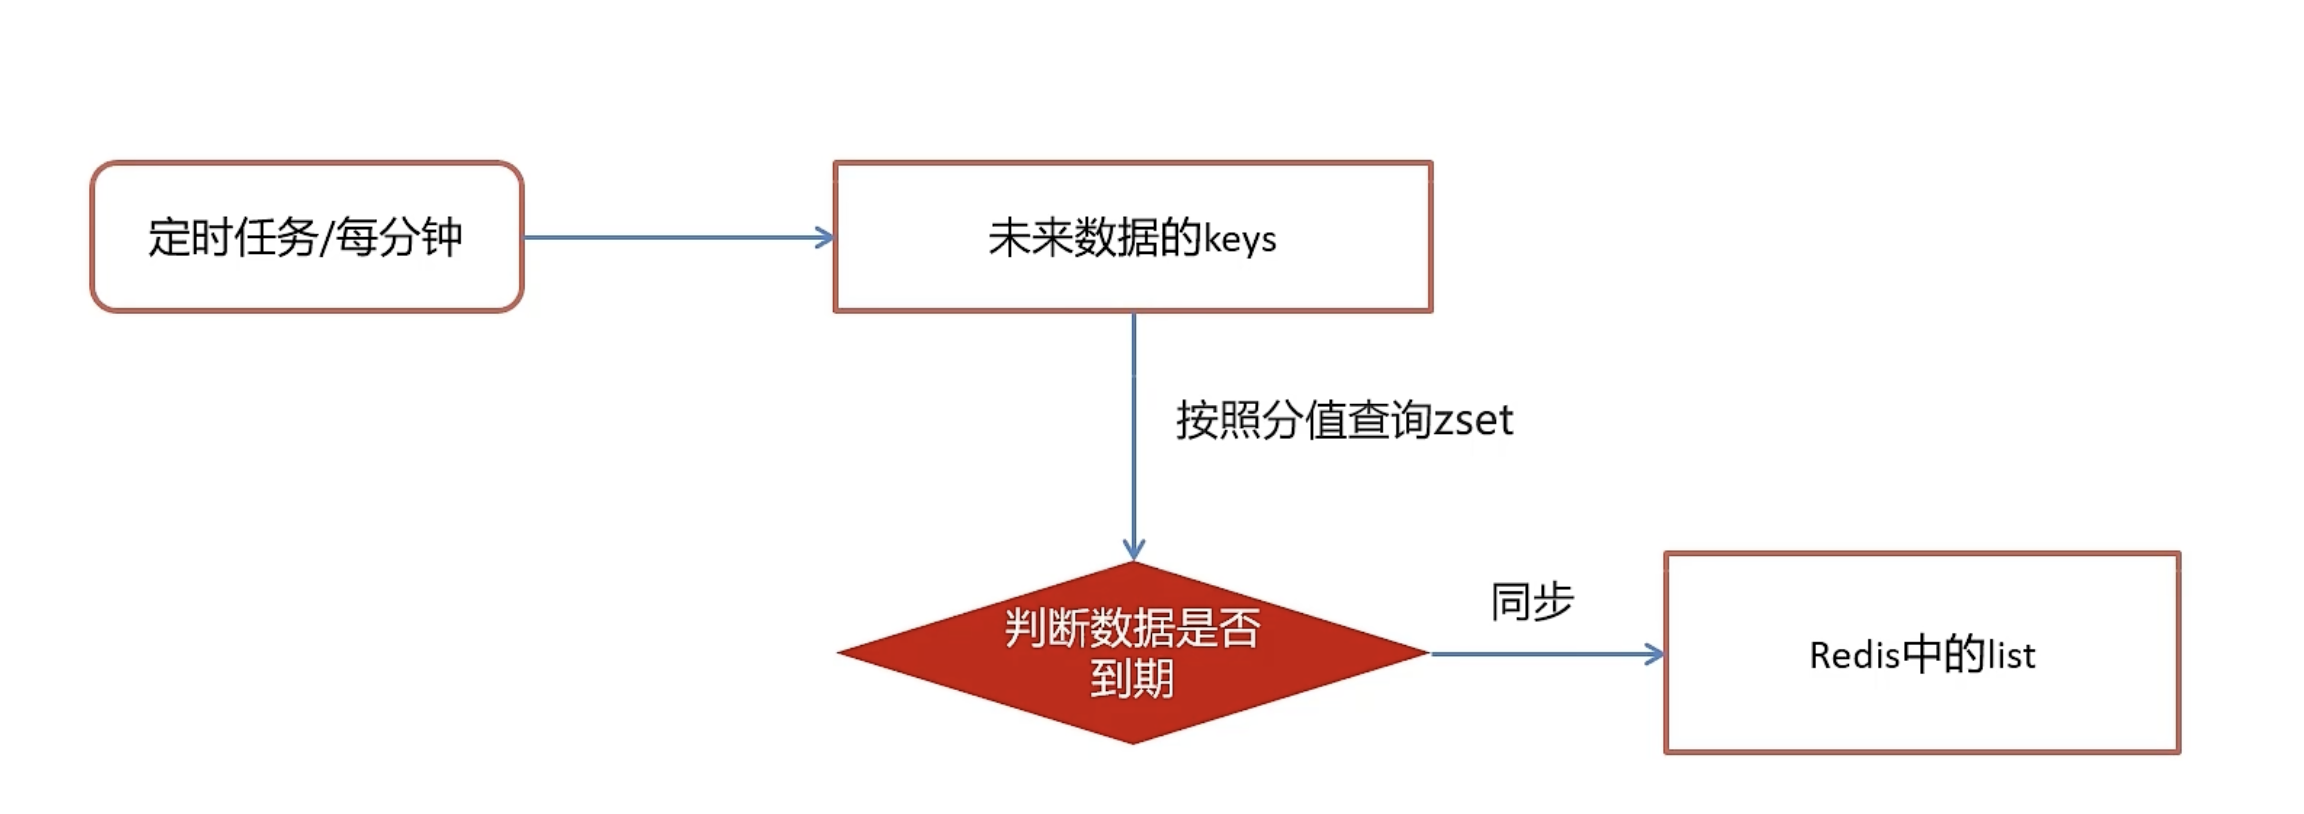
未来数据定时刷新
流程
- 创建一个每分钟刷新一次的方法
- 使用scan方法查询到未来数据所有的key
- 通过优先级和执行时间判断出,当前需要执行的数据
- 放入到list中并删除zset中的数据
实现
1. 方法/*** 未来任务定时刷新*/
@Scheduled(cron = "0 */1 * * * ?")public void futureTaskRefresh(){System.out.println(System.currentTimeMillis() / 1000 + "执行了定时任务");// 2. 使用scan方法查询到未来数据所有的keySet<String> scan = cacheService.scan(ScheduleConstants.FUTURE + "*");scan.forEach(s->{String topicKey = ScheduleConstants.TOPIC + s.split(ScheduleConstants.FUTURE)[1];// 3. 通过优先级和执行时间判断出,当前需要执行的数据Set<String> tasks = cacheService.zRangeByScore(s, 0, System.currentTimeMillis());if (!tasks.isEmpty()) {// 4. 放入到list中并删除zset中的数据cacheService.refreshWithPipeline(s,topicKey,tasks);System.out.println("成功的将" + topicKey + "下的当前需要执行的任务数据刷新到" + topicKey + "下");}});}
- 在启动类上添加Scheduling注解
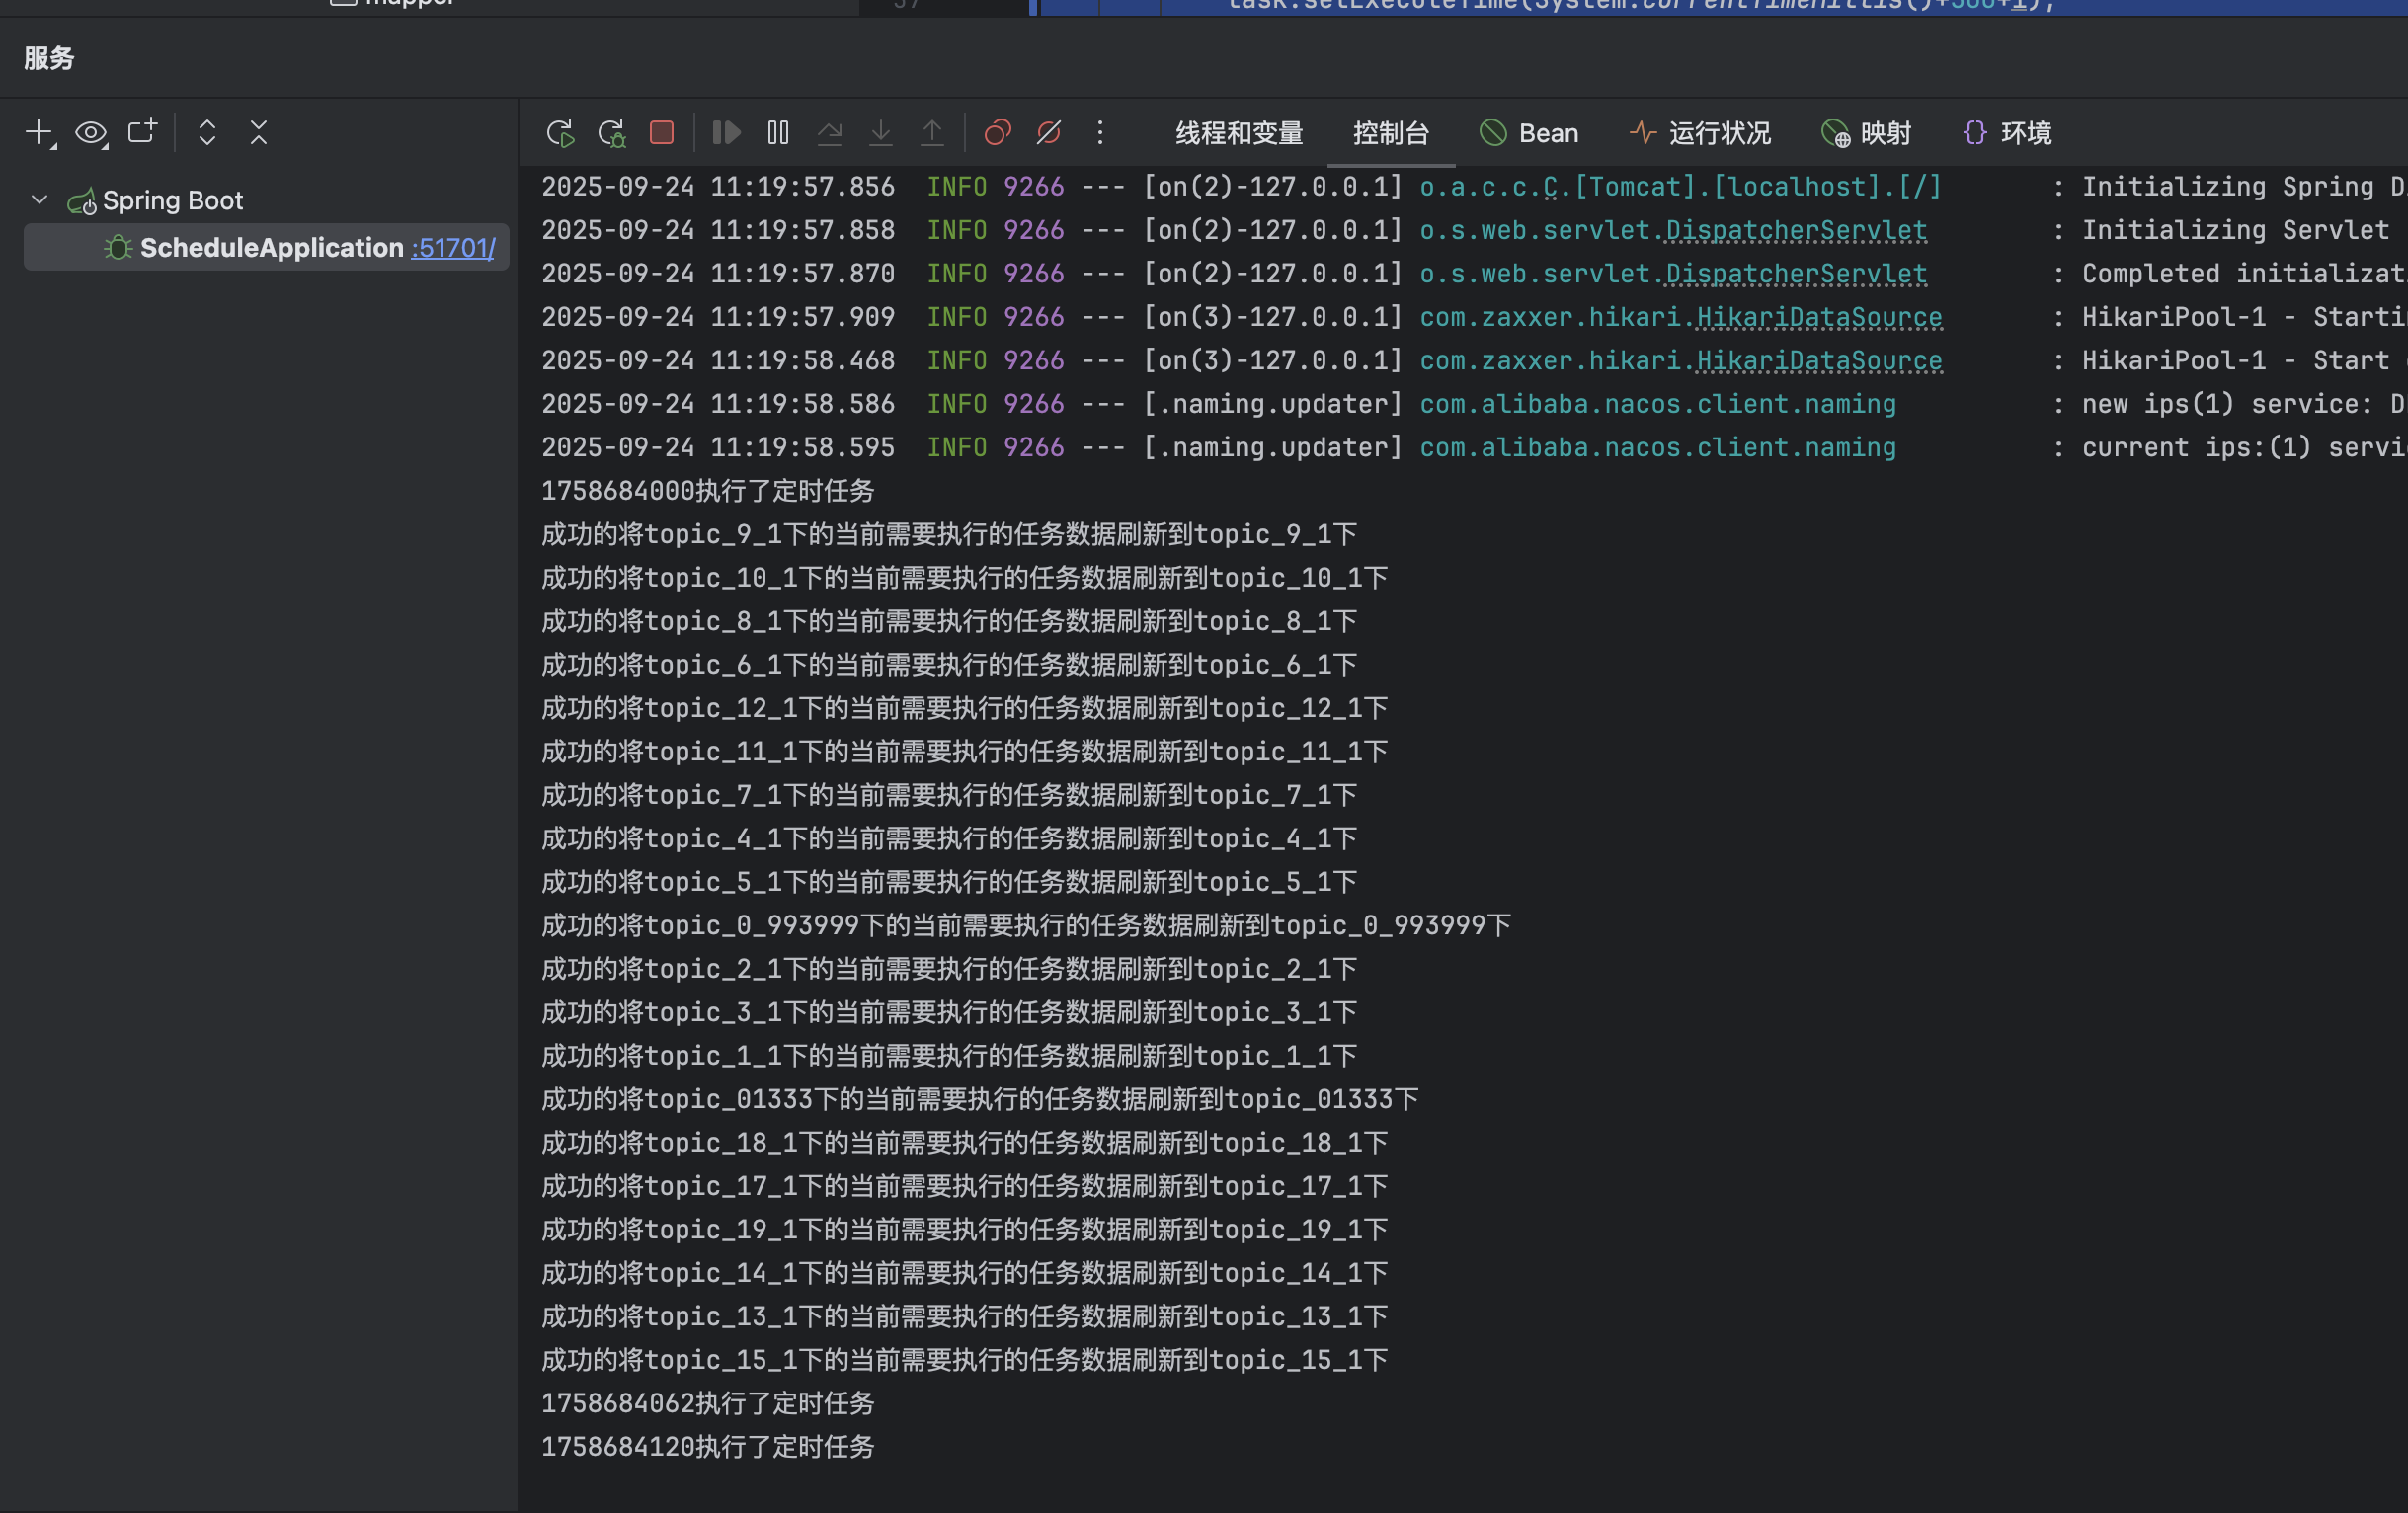
测试
- 执行测试方法
@Test
public void addFutureTask(){for (int i = 0; i < 20; i++) {Task task = new Task();task.setParameters("varin varin varintest".getBytes());task.setTaskType(i);//        Calendar calendar = Calendar.getInstance();//        calendar.add(Calendar.MINUTE,3);task.setExecuteTime(System.currentTimeMillis()+500+i);task.setPriority(1);taskService.addTask(task);}
}
- 启动模块
- 效果
分布式锁解决集群下的定时任务抢占执行
分析需求
当同时启动存在定时任务的服务时,两个服务都会执行定时任务,可能会出现系统异常的情况
技术选择
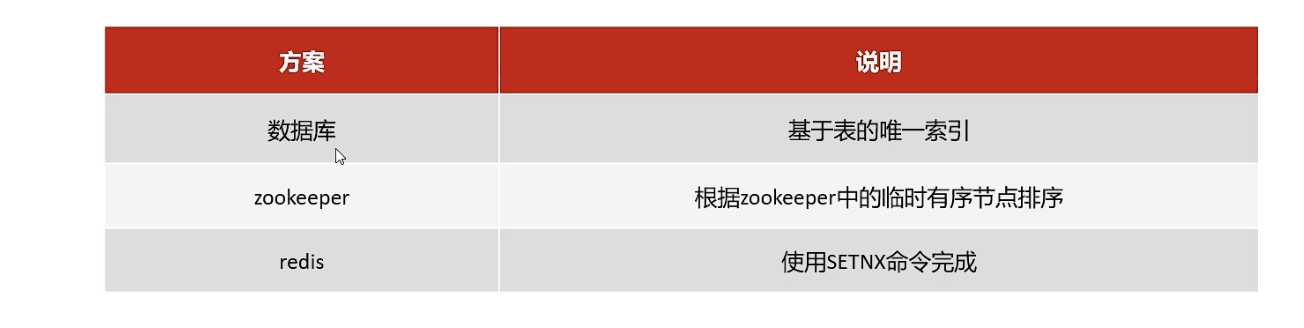
使用redis中的setnx实现分布式锁
sexnx (SET if Not eXists) 命令在指定的 key 不存在时,为 key 设置指定的值。
这种加锁的思路是,如果 key 不存在则为 key 设置 value,如果 key 已存在则 SETNX 命令不做任何操作
- 客户端A请求服务器设置key的值,如果设置成功就表示加锁成功
- 客户端B也去请求服务器设置key的值,如果返回失败,那么就代表加锁失败
- 客户端A执行代码完成,删除锁
- 客户端B在等待一段时间后再去请求设置key的值,设置成功
- 客户端B执行代码完成,删除锁
- 实现方法
/*** 加锁** @param name* @param expire* @return*/
public String tryLock(String name, long expire) {name = name + "_lock";String token = UUID.randomUUID().toString();RedisConnectionFactory factory = stringRedisTemplate.getConnectionFactory();RedisConnection conn = factory.getConnection();try {//参考redis命令://set key value [EX seconds] [PX milliseconds] [NX|XX]Boolean result = conn.set(name.getBytes(),token.getBytes(),Expiration.from(expire, TimeUnit.MILLISECONDS),RedisStringCommands.SetOption.SET_IF_ABSENT //NX);if (result != null && result)return token;} finally {RedisConnectionUtils.releaseConnection(conn, factory,false);}return null;
}
- 定时任务加锁
/*** 未来任务定时刷新*/
@Scheduled(cron = "0 */1 * * * ?")public void futureTaskRefresh(){String token = cacheService.tryLock("FUTURE_TASK_SYNC", 1000 * 30);if (!StringUtils.isNotBlank(token)) {return;}Date now = new Date(System.currentTimeMillis());System.out.println(now.toString() + "执行了定时任务");//        2. 使用scan方法查询到未来数据所有的keySet<String> scan = cacheService.scan(ScheduleConstants.FUTURE + "*");scan.forEach(s->{String topicKey = ScheduleConstants.TOPIC + s.split(ScheduleConstants.FUTURE)[1];//  3. 通过优先级和执行时间判断出,当前需要执行的数据Set<String> tasks = cacheService.zRangeByScore(s, 0, System.currentTimeMillis());if (!tasks.isEmpty()) {//        4. 放入到list中并删除zset中的数据cacheService.refreshWithPipeline(s,topicKey,tasks);System.out.println("成功的将" + topicKey + "下的当前需要执行的任务数据刷新到" + topicKey + "下");}});}
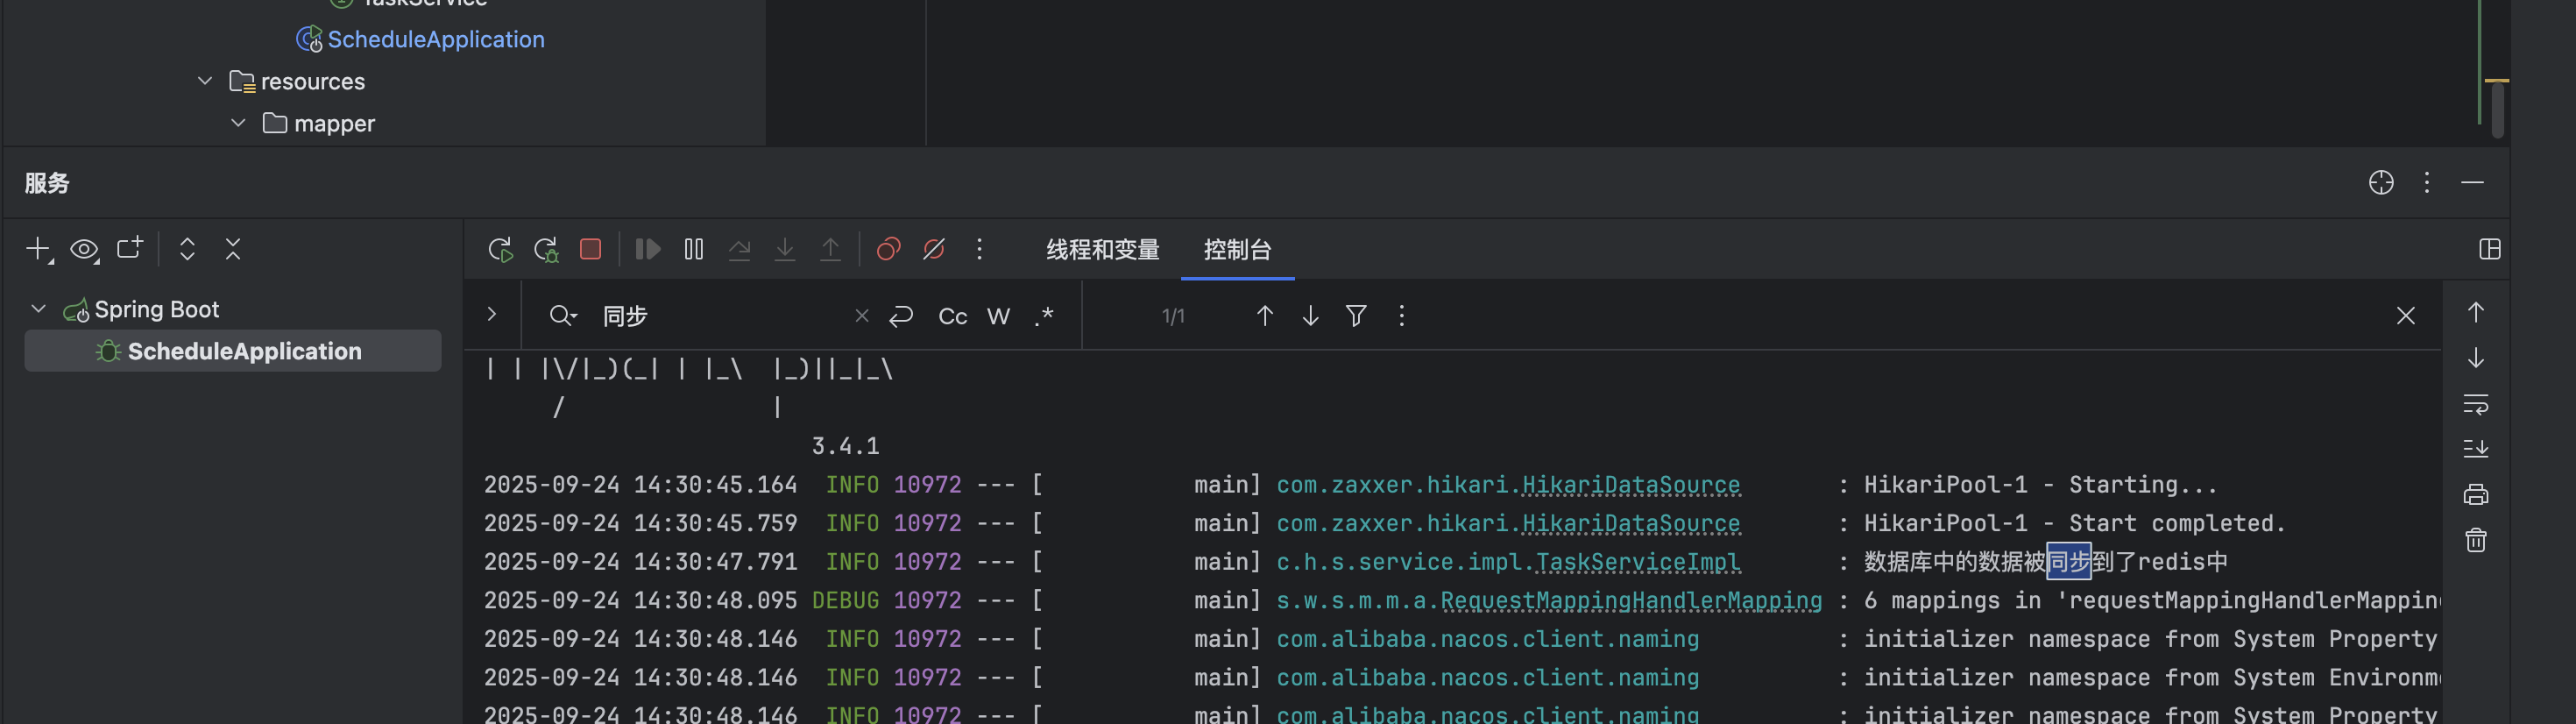
将数据库中的任务同步到redis中
流程
删除redis中两个主题的任务
重新判断符合条件的数据到redis中
设置服务启动的时候,立即执行,之后5分钟执行一次
实现
/*** 数据库任务同步到redis**/
@PostConstruct
@Scheduled(cron = "0 */5 * * * *")
public void reloadData(){// 1. 删除redis中两个主题的任务clearRedis();// 2. 重新判断符合条件的数据到redis中Calendar calendar = Calendar.getInstance();calendar.add(Calendar.MINUTE,5);List<Taskinfo> taskinfos = taskinfoMapper.selectList(Wrappers.<Taskinfo>lambdaQuery().le(Taskinfo::getExecuteTime, calendar.getTime()));// 判断是否有数据if (taskinfos!=null && taskinfos.size()>0) {taskinfos.forEach(taskinfo->{Task task = new Task();BeanUtils.copyProperties(taskinfo,task);task.setExecuteTime(taskinfo.getExecuteTime().getTime());addTasktoCache(task);});}log.info("数据库中的数据被同步到了redis中");}
// 清除reids中的数据
public void clearRedis(){Set<String> topicKeys = cacheService.scan(ScheduleConstants.TOPIC + "*");Set<String> futureKeys = cacheService.scan(ScheduleConstants.FUTURE + "*");cacheService.delete(topicKeys);cacheService.delete(futureKeys);
}
Feign服务实现schedule客户端
- 在feign创建IScheduleClient类
package cn.varin.apis.article.cn.varin.apis.schedule;import com.heima.model.common.dtos.ResponseResult;
import com.heima.model.schedule.dtos.Task;
import org.springframework.cloud.openfeign.FeignClient;
import org.springframework.web.bind.annotation.GetMapping;
import org.springframework.web.bind.annotation.PathVariable;
import org.springframework.web.bind.annotation.PostMapping;
import org.springframework.web.bind.annotation.RequestBody;@FeignClient(value = "leadnews-schedule")
public interface IScheduleClient {/**** @param task* @return*/@PostMapping("/api/v1/task/add")ResponseResult addTask( @RequestBody Task task);@GetMapping("/api/v1/task/{taskId}")ResponseResult cancelTask(@PathVariable("taskId") Long taskId);@GetMapping("/api/v1/task/{taskType}/{priority}")ResponseResult pull(@PathVariable("taskType")Integer taskType,@PathVariable("priority")Integer priority);
}
- 在schedule模块中创建ScheduleClient实现IScheduleClient
package com.heima.schedule.feign;import cn.varin.apis.article.cn.varin.apis.schedule.IScheduleClient;
import com.heima.model.common.dtos.ResponseResult;
import com.heima.model.schedule.dtos.Task;
import com.heima.schedule.service.TaskService;
import org.springframework.beans.factory.annotation.Autowired;
import org.springframework.web.bind.annotation.*;@RestController
public class ScheduleClient  implements IScheduleClient {@Autowiredprivate TaskService taskService;@PostMapping("/api/v1/task/add")public   ResponseResult addTask( @RequestBody Task task){return ResponseResult.okResult(taskService.addTask(task));}@GetMapping("/api/v1/task/{taskId}")public ResponseResult cancelTask(@PathVariable("taskId") Long taskId) {return ResponseResult.okResult(taskService.cancelTask(taskId));}@GetMapping("/api/v1/task/{taskType}/{priority}")public ResponseResult pull(@PathVariable("taskType")Integer taskType,@PathVariable("priority")Integer priority){return ResponseResult.okResult(taskService.pull(taskType,priority));}
}
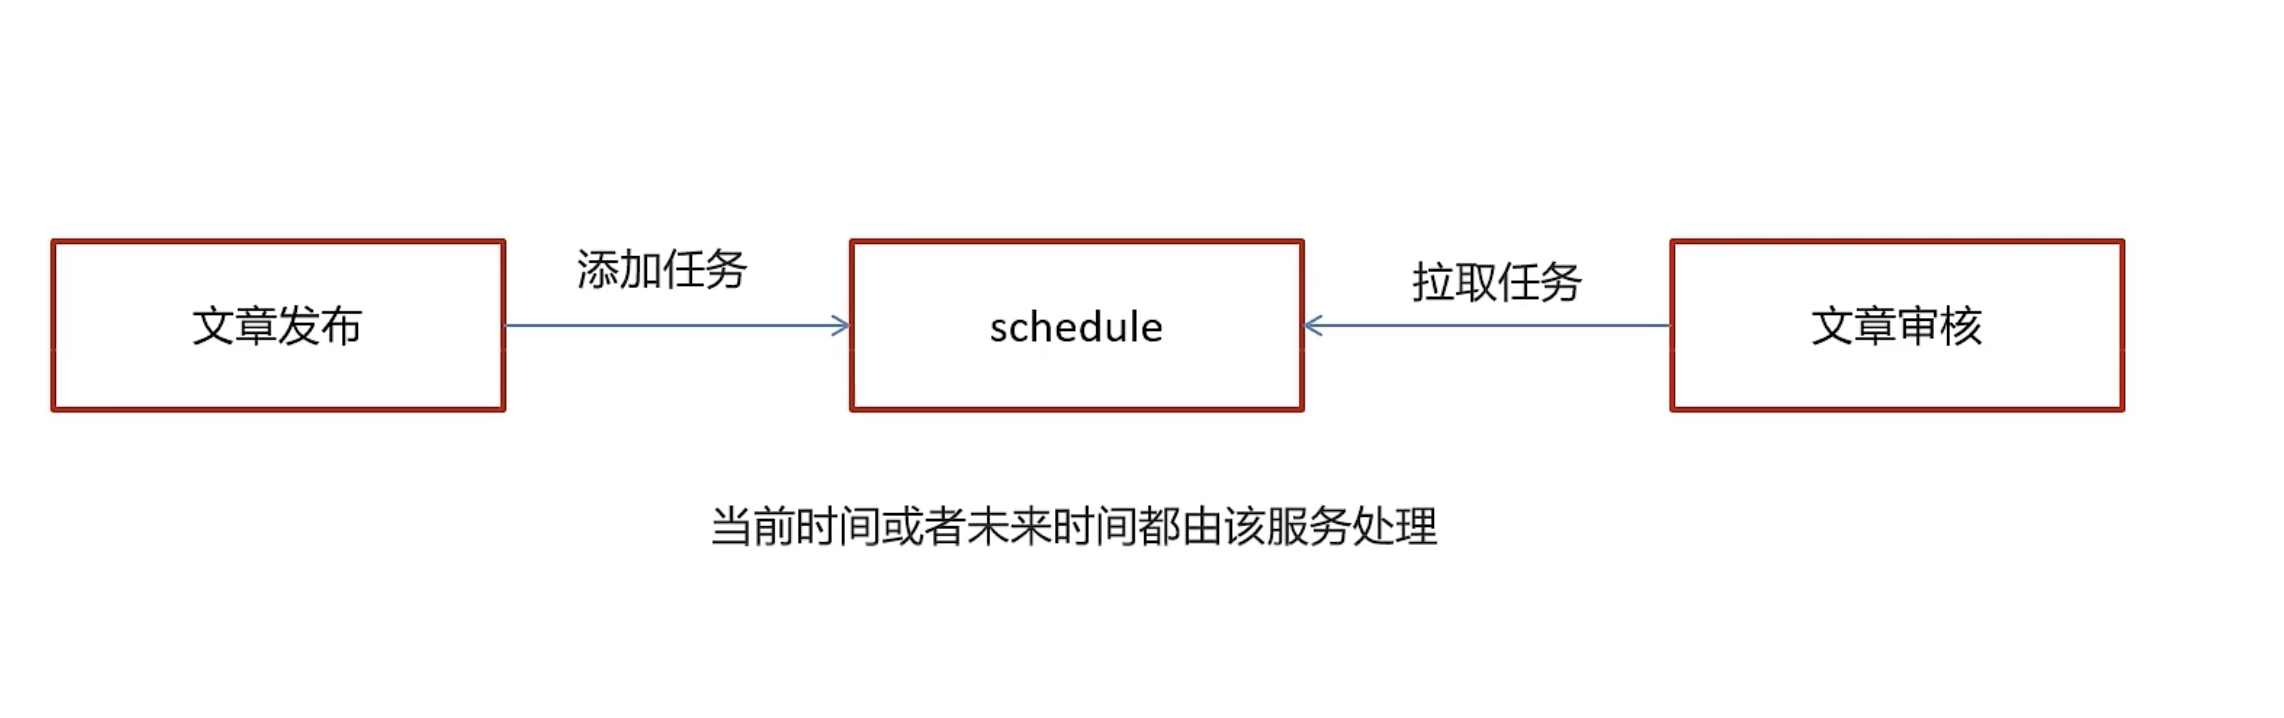
文章发布后将其添加到延迟队列中
流程:
- 在自媒体端,添加文章点击发布后,调用添加延迟队列方法,
- 根据不同的发布时间,存储成为不同的任务类型
实现
- 在自媒体端的service模块中加入新的接口:WmNewsTaskService
package com.heima.wemedia.service;import java.util.Date;public interface WmNewsTaskService {/*** 添加任务到队列中*/void addNewsToTask(Integer id, Date publishTime);
}
- 实现接口:
package com.heima.wemedia.service.impl;import cn.varin.apis.article.cn.varin.apis.schedule.IScheduleClient;
import com.heima.model.common.enums.TaskTypeEnum;
import com.heima.model.schedule.dtos.Task;
import com.heima.model.wemedia.pojos.WmNews;
import com.heima.utils.common.ProtostuffUtil;
import com.heima.wemedia.service.WmNewsTaskService;
import lombok.extern.slf4j.Slf4j;
import org.checkerframework.checker.index.qual.SameLen;
import org.springframework.beans.factory.annotation.Autowired;
import org.springframework.scheduling.annotation.Async;
import org.springframework.stereotype.Service;
import org.springframework.transaction.annotation.Transactional;import java.util.Date;@Service
@Slf4j
public class WmNewsTaskServiceImpl implements WmNewsTaskService {@Autowiredprivate IScheduleClient scheduleClient;@Override@Asyncpublic void addNewsToTask(Integer id, Date publishTime) {log.info("添加任务到延迟服务中----begin");System.out.println(publishTime);Task task = new Task();task.setExecuteTime(publishTime.getTime());task.setTaskType(TaskTypeEnum.NEWS_SCAN_TIME.getTaskType());task.setPriority(TaskTypeEnum.NEWS_SCAN_TIME.getPriority());WmNews wmNews = new WmNews();wmNews.setId(id);task.setParameters(ProtostuffUtil.serialize(wmNews));scheduleClient.addTask(task);log.info("添加任务到延迟服务中----end");}
}
- 添加序列化工具类
- 依赖
<dependency><groupId>io.protostuff</groupId><artifactId>protostuff-core</artifactId><version>1.6.0</version></dependency><dependency><groupId>io.protostuff</groupId><artifactId>protostuff-runtime</artifactId><version>1.6.0</version></dependency>2. 工具类1:JdkSerializeUtil
package com.heima.utils.common;import java.io.ByteArrayInputStream;
import java.io.ByteArrayOutputStream;
import java.io.ObjectInputStream;
import java.io.ObjectOutputStream;/*** jdk序列化*/
public class JdkSerializeUtil {/*** 序列化* @param obj* @param <T>* @return*/public static <T> byte[] serialize(T obj) {if (obj  == null){throw new NullPointerException();}ByteArrayOutputStream bos = new ByteArrayOutputStream();try {ObjectOutputStream oos = new ObjectOutputStream(bos);oos.writeObject(obj);return bos.toByteArray();} catch (Exception ex) {ex.printStackTrace();}return new byte[0];}/*** 反序列化* @param data* @param clazz* @param <T>* @return*/public static <T> T deserialize(byte[] data, Class<T> clazz) {ByteArrayInputStream bis = new ByteArrayInputStream(data);try {ObjectInputStream ois = new ObjectInputStream(bis);T obj = (T)ois.readObject();return obj;} catch (Exception ex) {ex.printStackTrace();}return  null;}}
3. 工具类2:ProtostuffUtil
package com.heima.utils.common;import com.heima.model.wemedia.pojos.WmNews;
import io.protostuff.LinkedBuffer;
import io.protostuff.ProtostuffIOUtil;
import io.protostuff.Schema;
import io.protostuff.runtime.RuntimeSchema;public class ProtostuffUtil {/*** 序列化* @param t* @param <T>* @return*/public static <T> byte[] serialize(T t){Schema schema = RuntimeSchema.getSchema(t.getClass());return ProtostuffIOUtil.toByteArray(t,schema,LinkedBuffer.allocate(LinkedBuffer.DEFAULT_BUFFER_SIZE));}/*** 反序列化* @param bytes* @param c* @param <T>* @return*/public static <T> T deserialize(byte []bytes,Class<T> c) {T t = null;try {t = c.newInstance();Schema schema = RuntimeSchema.getSchema(t.getClass());ProtostuffIOUtil.mergeFrom(bytes,t,schema);} catch (InstantiationException e) {e.printStackTrace();} catch (IllegalAccessException e) {e.printStackTrace();}return t;}/*** jdk序列化与protostuff序列化对比* @param args*/public static void main(String[] args) {long start =System.currentTimeMillis();for (int i = 0; i <1000000 ; i++) {WmNews wmNews =new WmNews();JdkSerializeUtil.serialize(wmNews);}System.out.println(" jdk 花费 "+(System.currentTimeMillis()-start));start =System.currentTimeMillis();for (int i = 0; i <1000000 ; i++) {WmNews wmNews =new WmNews();ProtostuffUtil.serialize(wmNews);}System.out.println(" protostuff 花费 "+(System.currentTimeMillis()-start));}}
- 调用方法
public ResponseResult submit(WmNewsDto dto) {// // 条件判断dot是否为null或者dto中的内容是否为nullif (dto==null || dto.getContent()==null) {// 返回提示无效参数return ResponseResult.errorResult(AppHttpCodeEnum.PARAM_INVALID);}// 1保存或修改文章WmNews wmNews = new WmNews();BeanUtils.copyProperties(dto,wmNews);// 判断是否存储图片if (dto.getImages()!=null && dto.getImages().size()>0) {String join = StringUtils.join(",", dto.getImages());wmNews.setImages(join);}if (dto.getType().equals(WemediaConstants.WM_NEWS_TYPE_AUTO)) {wmNews.setType(null);}saveOrUpdateWmNews(wmNews);// 2 判断是否为草稿,如果是草稿结束方法if (dto.getStatus().equals(WmNews.Status.NORMAL.getCode())) {// 成功返回return ResponseResult.okResult(AppHttpCodeEnum.SUCCESS);}// 3 不是草稿,保存文章内容图片和素材的关系// 从json中取出图片列表List<String> imageList= getContentImage(dto.getContent());// 保存文件和图片的关系saveContentImage(imageList,wmNews.getId());// 4 不是草稿,保存嗯栈封面图片和素材的关系saveMaterialForCover(dto,wmNews,imageList);// 发布后开始审核// wmNewAutoScanService.AutoScanWmNews(wmNews.getId());// 发布的任务添加到队列wmNewsTaskService.addNewsToTask(wmNews.getId(),wmNews.getPublishTime());return ResponseResult.okResult(AppHttpCodeEnum.SUCCESS);}
定时拉取任务并进行审核
- 思路:
- 通过之前定义的pull方法,会将redis中时间到了的任务拉取下来
- 拉取的data中存储task类型的json字符串
- 先将其转为task对象
- 在从task的属性:getParameters
- 反序列化出WmNews
最后将其传递给自动审核的方法
- 实现:
@Scheduled(fixedRate = 1000)//一秒一次
@Override
public void scanNewsToTask() {ResponseResult result = scheduleClient.pull(TaskTypeEnum.NEWS_SCAN_TIME.getTaskType(), TaskTypeEnum.NEWS_SCAN_TIME.getPriority());log.info("文章审核---消费任务执行---start---");if (result.getCode().equals(200) && result.getData()!=null) {// 解析JSON为Task对象String jsonString = JSON.toJSONString(result.getData());Task task = JSON.parseObject(jsonString, Task.class);// 反序列化WmNews nwe   = ProtostuffUtil.deserialize(task.getParameters(), WmNews.class);// 自动审核wmNewAutoScanService.AutoScanWmNews(nwe.getId());}log.info("文章审核---消费任务执行---end---");}
加油呀!