05 初始化
前言
在前面几个章节的内容中,在做所有操作前,我们要获取一个 ProcessEngine 实例,就必须先调用 ProcessEngines.getDefaultProcessEngine() 初始化一个 ProcessEngine。通过这个 ProcessEngine 提供的各个 Service 的 API,我们才顺利部署流程模型、启动流程实例、完成审批任务等。那Activiti框架是怎么初始化的?ProcessEngines.getDefaultProcessEngine() 内部做了哪些初始化工作,使得我们可以简单通过 ProcessEngine 来达成我们的目的。
配置文件
本次初始化是用的 activiti.cfg.xml 配置文件如下:
<?xml version="1.0" encoding="UTF-8"?>
<beans xmlns="http://www.springframework.org/schema/beans"xmlns:xsi="http://www.w3.org/2001/XMLSchema-instance"xsi:schemaLocation="http://www.springframework.org/schema/beans http://www.springframework.org/schema/beans/spring-beans.xsd"><bean id="processEngineConfiguration" class="org.activiti.engine.impl.cfg.StandaloneProcessEngineConfiguration"><!-- databaseSchemaUpdate 通常用于框架或工具(如 Hibernate、Activiti 等)中,用于控制数据库模式的更新行为该属性决定应用程序启动时如何处理数据库模式,value="true": 表示启用数据库模式的自动更。生产环境慎用!!!可能的行为:1.自动更新模式:如果数据库表或结构与应用程序的实体类不匹配,系统会自动更新数据库模式以匹配实体类。2.创建缺失的表:如果表不存在,系统会自动创建。3.更新现有表:如果表已存在但结构不匹配,系统会尝试更新表结构--><property name="databaseSchemaUpdate" value="true" /><property name="jdbcUrl" value="jdbc:mysql://localhost:3306/activiti7?createDatabaseIfNotExist=true&useSSL=false" /><property name="jdbcUsername" value="root" /><property name="jdbcPassword" value="123456" /><property name="jdbcDriver" value="com.mysql.cj.jdbc.Driver" /><!--异步执行--><property name="asyncExecutorActivate" value="true" /></bean></beans>前期初始化
初始化入口
以 ProcessEngines 的 getDefaultProcessEngine() 为入口,研究 Activiti 如何初始化 。
ProcessEngine processEngine = ProcessEngines.getDefaultProcessEngine();ProcessEngines中的初始化
ProcessEngines 源码如下,已省去部分代码。
public abstract class ProcessEngines {private static Logger log = LoggerFactory.getLogger(ProcessEngines.class);public static final String NAME_DEFAULT = "default";protected static boolean isInitialized;protected static Map<String, ProcessEngine> processEngines = new HashMap<String, ProcessEngine>();protected static Map<String, ProcessEngineInfo> processEngineInfosByName = new HashMap<String, ProcessEngineInfo>();protected static Map<String, ProcessEngineInfo> processEngineInfosByResourceUrl = new HashMap<String, ProcessEngineInfo>();protected static List<ProcessEngineInfo> processEngineInfos = new ArrayList<ProcessEngineInfo>();/*** 根据 activiti.cfg.xml 配置,获取默认的 ProcessEngine* @return ProcessEngine 实例*/public static ProcessEngine getDefaultProcessEngine() {return getProcessEngine(NAME_DEFAULT);}/*** obtain a process engine by name.* * @param processEngineName* is the name of the process engine or null for the default process engine.*/public static ProcessEngine getProcessEngine(String processEngineName) {// 如果没有初始化,就进行初始化。第一次进来,这个 isInitialized 是 false,再做非运算,最终结果是 true,进入 if 语句内部 if (!isInitialized()) {// 开始初始化init();}// 等初始化完成后,从 processEngines 这个 Map 缓存中取出 ProcessEngine 实例return processEngines.get(processEngineName);}public static boolean isInitialized() {return isInitialized;}public synchronized static void init() {// 再一次确定,没有初始化过if (!isInitialized()) {if (processEngines == null) {// Create new map to store process-engines if current map is// null// 实例化一个新的 processEngines 缓存,用来存储 processEngineprocessEngines = new HashMap<String, ProcessEngine>();}// 通过反射工具 ReflectUtil 获取类加载器ClassLoader classLoader = ReflectUtil.getClassLoader();Enumeration<URL> resources = null;try {// 加载我们配置的 activiti.cfg.xml 文件resources = classLoader.getResources("activiti.cfg.xml");} catch (IOException e) {throw new ActivitiIllegalArgumentException("problem retrieving activiti.cfg.xml resources on the classpath: " + System.getProperty("java.class.path"), e);}// Remove duplicated configuration URL's using set. Some// classloaders may return identical URL's twice, causing duplicate// startupsSet<URL> configUrls = new HashSet<URL>();while (resources.hasMoreElements()) {configUrls.add(resources.nextElement());}// 遍历配置for (Iterator<URL> iterator = configUrls.iterator(); iterator.hasNext();) {URL resource = iterator.next();log.info("Initializing process engine using configuration '{}'", resource.toString());// 用配置文件的信息初始化 processEnginesinitProcessEngineFromResource(resource);}// 加载来自 Spring 的 activiti-context.xml 配置文件try {resources = classLoader.getResources("activiti-context.xml");} catch (IOException e) {throw new ActivitiIllegalArgumentException("problem retrieving activiti-context.xml resources on the classpath: " + System.getProperty("java.class.path"), e);}while (resources.hasMoreElements()) {URL resource = resources.nextElement();log.info("Initializing process engine using Spring configuration '{}'", resource.toString());initProcessEngineFromSpringResource(resource);}// 初始化完成,设置 isInitialized 为 truesetInitialized(true);} else {log.info("Process engines already initialized");}}private static ProcessEngineInfo initProcessEngineFromResource(URL resourceUrl) {ProcessEngineInfo processEngineInfo = processEngineInfosByResourceUrl.get(resourceUrl.toString());// if there is an existing process engine info// 第一次进入这个方法时,肯定为 null,所以不进入这个 if 里面if (processEngineInfo != null) {// remove that process engine from the member fieldsprocessEngineInfos.remove(processEngineInfo);if (processEngineInfo.getException() == null) {String processEngineName = processEngineInfo.getName();processEngines.remove(processEngineName);processEngineInfosByName.remove(processEngineName);}processEngineInfosByResourceUrl.remove(processEngineInfo.getResourceUrl());}String resourceUrlString = resourceUrl.toString();try {log.info("initializing process engine for resource {}", resourceUrl);// 创建 processEngine 实例,非常重要的一个方法ProcessEngine processEngine = buildProcessEngine(resourceUrl);// 得到 processEngine 实例,获取名称,将存储于 processEngines 缓存中String processEngineName = processEngine.getName();log.info("initialised process engine {}", processEngineName);processEngineInfo = new ProcessEngineInfoImpl(processEngineName, resourceUrlString, null);// 把创建好的 processEngine 放入到前面创建的 processEngines 缓存中processEngines.put(processEngineName, processEngine);processEngineInfosByName.put(processEngineName, processEngineInfo);} catch (Throwable e) {log.error("Exception while initializing process engine: {}", e.getMessage(), e);processEngineInfo = new ProcessEngineInfoImpl(null, resourceUrlString, getExceptionString(e));}processEngineInfosByResourceUrl.put(resourceUrlString, processEngineInfo);processEngineInfos.add(processEngineInfo);return processEngineInfo;}/*** 创建 processEngine 实例** @param resource* @return*/private static ProcessEngine buildProcessEngine(URL resource) {InputStream inputStream = null;try {inputStream = resource.openStream();// 用 Spring 的 DefaultListableBeanFactory 和 XmlBeanDefinitionReader 读取 activiti.cfg.xml 中定义// 的 processEngineConfiguration bean 信息,创建出 ProcessEngineConfiguration 实例// processEngineConfiguration 这个 bean 中配置了数据库的连接信息ProcessEngineConfiguration processEngineConfiguration = ProcessEngineConfiguration.createProcessEngineConfigurationFromInputStream(inputStream);// 开始构建 ProcessEngine,大部分初始化都在这个 buildProcessEngine() 方法里return processEngineConfiguration.buildProcessEngine();} catch (IOException e) {throw new ActivitiIllegalArgumentException("couldn't open resource stream: " + e.getMessage(), e);} finally {IoUtil.closeSilently(inputStream);}}}- 校验是否初始化过 ProcessEngine,没有初始化过,就进行初始化;
- 用 Spring 的 XmlBeanDefinitionReader 加载 activiti.cfg.xml 配置文件;
- 用 Spring 的 DefaultListableBeanFactory 创建 activiti.cfg.xml 中定义的 processEngineConfiguration 这个 Bean 实例 ;
- 调用 processEngineConfiguration 这个 Bean 的 buildProcessEngine() 方法(真正初始化的地方),开始构建 ProcessEngine 实例。
ProcessEngineConfiguration中的初始化
上面代码,最后进入了 processEngineConfiguration.buildProcessEngine() 方法中,来到了 ProcessEngineConfiguration 这个类中的初始化逻辑。
ProcessEngineConfiguration 中的 buildProcessEngine 是一个抽象方法,该抽象方法由 ProcessEngineConfiguration 的子类 ProcessEngineConfigurationImpl 实现。但ProcessEngineConfigurationImpl 同样也是一个抽象类,抽象类是不能初始化的,所以在上面的 步骤3中,实际创建出来的是 StandaloneProcessEngineConfiguration 这个 Bean,然后把这个 Bean 先赋值给了 ProcessEngineConfigurationImpl,再由 ProcessEngineConfigurationImpl 赋值给 ProcessEngineConfiguration,示意图如下:

public abstract class ProcessEngineConfiguration {public abstract ProcessEngine buildProcessEngine();}StandaloneProcessEngineConfiguration 这个类本身没有任何实现,仅仅是继承了 ProcessEngineConfigurationImpl。
public class StandaloneProcessEngineConfiguration extends ProcessEngineConfigurationImpl {@Overridepublic CommandInterceptor createTransactionInterceptor() {return null;}}ProcessEngineConfigurationImpl 对 buildProcessEngine() 抽象方法的实现如下。
public abstract class ProcessEngineConfigurationImpl extends ProcessEngineConfiguration {@Overridepublic ProcessEngine buildProcessEngine() {// init 方法是真正初始化的地方init();// 创建出 ProcessEngine 实例ProcessEngineImpl processEngine = new ProcessEngineImpl(this);postProcessEngineInitialisation();return processEngine;}
}
init() 方法作为核心初始化模块,初始化了非常多且重要的子模块,在下面的 核心初始化 进一步详解。
核心初始化
核心初始化入口
在 org/activiti/engine/impl/cfg/ProcessEngineConfigurationImpl 中的 init() 方法内部,有一些非常核心的初始化逻辑,见下面代码:
public void init() {initConfigurators();configuratorsBeforeInit();initHistoryLevel();initExpressionManager();if (usingRelationalDatabase) {// 初始化数据库initDataSource();}// 初始化 AgendaFactory,它是前面例子中常见的 Context.getAgenda() 的初始化initAgendaFactory();// 初始化 ProcessInstanceHelper(发起流程时用到)、ListenerNotificationHelperinitHelpers();// 初始化变量类型,有String、Long、Date、Boolean等数据类型,数据入库和查询时用到initVariableTypes();initBeans();initScriptingEngines();initClock();initBusinessCalendarManager();// 初始化 CommandContextFactory 上下文initCommandContextFactory();// 初始化 TransactionContextFactory 上下文initTransactionContextFactory();// 初始化 CommandExecutors 上下文initCommandExecutors();// 初始化 常用的服务,包括 runtimeService、repositoryService、historyService、taskServiceinitServices();// 初始化 id 生成器initIdGenerator();initBehaviorFactory();// 初始化监听器工厂initListenerFactory();// 初始化Bpmn解析器initBpmnParser();// 初始化流程定义缓存initProcessDefinitionCache();// 初始化流程定义信息缓存initProcessDefinitionInfoCache();initKnowledgeBaseCache();// 初始化 作业处理程序initJobHandlers();// 初始化 作业管理器initJobManager();initAsyncExecutor();initTransactionFactory();if (usingRelationalDatabase) {initSqlSessionFactory();}initSessionFactories();// 初始化 DataManager,用于管理数据库中的数据initDataManagers();// 初始化各种实体管理者,以及 table 与 entity 的映射关系initEntityManagers();initHistoryManager();initJpa();initDeployers();initDelegateInterceptor();// 初始化 事件处理程序,包括信号事件、补偿事件、消息事件initEventHandlers();initFailedJobCommandFactory();initEventDispatcher();initProcessValidator();initDatabaseEventLogging();configuratorsAfterInit();
}
初始化CommandExecutor
在启动流程实例、完成审批任务等功能中,都有看到 CommandExecutor 的身影,它是如何初始化的?initCommandExecutors() 方法中有具体实现。
public void initCommandExecutors() {initDefaultCommandConfig();initSchemaCommandConfig();initCommandInvoker();initCommandInterceptors();initCommandExecutor();
}
initCommandExecutors()方法中调用了 initCommandExecutor() 方法,这个方法实现如下:
在 CommandExecutorImpl 的构造函数中,传入了 CommandConfig 和 CommandInterceptor,然后new 一个 CommandExecutorImpl,赋值给了 CommandExecutor。CommandInterceptor 是一个非常重要的拦截器链,几乎所有的 Command 都会被传入到这个链中,最终在这个链的末尾 CommandInvoker 中真正执行 Command 命令。
public void initCommandExecutor() {if (commandExecutor == null) {CommandInterceptor first = initInterceptorChain(commandInterceptors);commandExecutor = new CommandExecutorImpl(getDefaultCommandConfig(), first);}
}
初始化CommandInteceptor
CommandInteceptor 是怎么初始化的?在 CommandInteceptor 命令拦截器链中,各个拦截器的顺序是怎样的?
通 过源码可知,CommandInteceptor 也是在 initCommandExecutors() 方法中初始化的,在这个方法中,initCommandInterceptors() 就是用来初始化 CommandInteceptor 的,initCommandInterceptors() 实现如下:
public void initCommandInterceptors() {// 判断 commandInterceptors 是否为为 nullif (commandInterceptors == null) {// 是 null 直接 new 一个 ArrayListcommandInterceptors = new ArrayList<CommandInterceptor>();// 自定义'前置拦截器链',如果不是 null,全部添加到 commandInterceptors 中if (customPreCommandInterceptors != null) {commandInterceptors.addAll(customPreCommandInterceptors);}// 添加内置默认的 CommandInterceptor 到 commandInterceptors 中commandInterceptors.addAll(getDefaultCommandInterceptors());// 自定义'后置拦截器链',如果不是 null,全部添加到 commandInterceptors 中if (customPostCommandInterceptors != null) {commandInterceptors.addAll(customPostCommandInterceptors);}// 添加最后一个 CommandInterceptor,它是 commandInvokercommandInterceptors.add(commandInvoker);}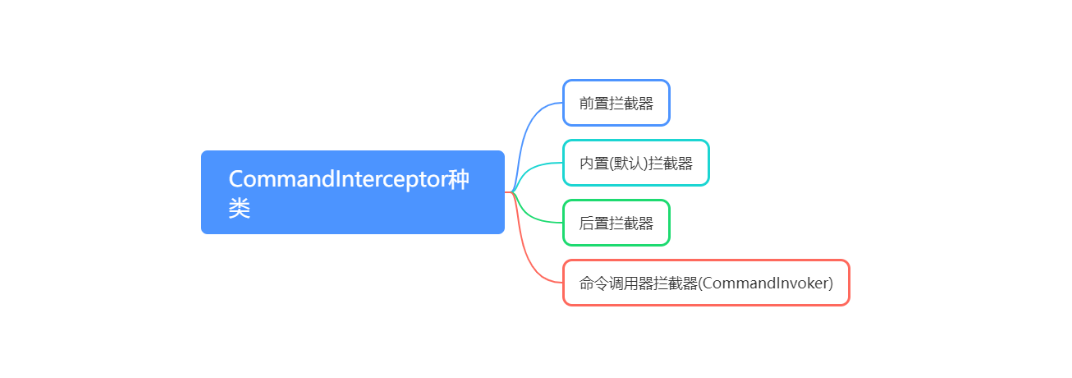
}从实现逻辑看,拦截器链分为四种,如下图,其中的前置拦截器和后置拦截器,可以由用户自定义实现,剩余两种,由Activiti框架提供。另外Activiti还提供了一个前置拦截器 TotalExecutionTimeCommandInterceptor,它用于统计 Execution(一条流程从开始到结束)的总执行时间。
备注:前置拦截器和后置拦截器,如何添加?
CommandInteceptor 命令拦截器链中,各个拦截器的顺序在内置默认拦截器中定义,该定义由 getDefaultCommandInterceptors() 方法实现,具体如下:
public Collection<? extends CommandInterceptor> getDefaultCommandInterceptors() {List<CommandInterceptor> interceptors = new ArrayList<CommandInterceptor>();// 第一个是日志拦截器 LogInterceptorinterceptors.add(new LogInterceptor());// 第二个是事务拦截器 transactionInterceptorCommandInterceptor transactionInterceptor = createTransactionInterceptor();if (transactionInterceptor != null) {interceptors.add(transactionInterceptor);}// 第三个是命令上下文工厂拦截器 commandContextFactoryif (commandContextFactory != null) {interceptors.add(new CommandContextInterceptor(commandContextFactory, this));}// 第四个是事务上下文工厂拦截器 transactionContextFactoryif (transactionContextFactory != null) {interceptors.add(new TransactionContextInterceptor(transactionContextFactory));}return interceptors;
}
初始化Service
在这个初始逻辑中,如何初始化像 runtimeService、taskService 这种常用的服务类,是直接new一个实例吗?还是通过Spring框架注入?通过initServices()方法一探究竟。
initServices() 方法实现如下,内部调用了 initService(Object service) 方法,并传入runtimeService 等服务类。
public void initServices() {initService(repositoryService);initService(runtimeService);initService(historyService);initService(taskService);initService(managementService);initService(dynamicBpmnService);
}
initService(Object service)c方法实现如下,从中并没有看到我所期待的如何实例化runtimeService,而是仅仅给传入的cservicec设置cCommandExecutorc命令执行器。
public void initService(Object service) {if (service instanceof ServiceImpl) {((ServiceImpl) service).setCommandExecutor(commandExecutor);}
}
那么在哪里能看到实例化 runtimeService 呐?直接找到 runtimeService 变量的声明出,在这里,看到 runtimeService 是通过代码中手动 new 一个实例出来的,而不是通过 Spring 注入。
protected RepositoryService repositoryService = new RepositoryServiceImpl();
protected RuntimeService runtimeService = new RuntimeServiceImpl();
protected HistoryService historyService = new HistoryServiceImpl(this);
protected TaskService taskService = new TaskServiceImpl(this);
protected ManagementService managementService = new ManagementServiceImpl();
protected DynamicBpmnService dynamicBpmnService = new DynamicBpmnServiceImpl(this);
初始化表创建
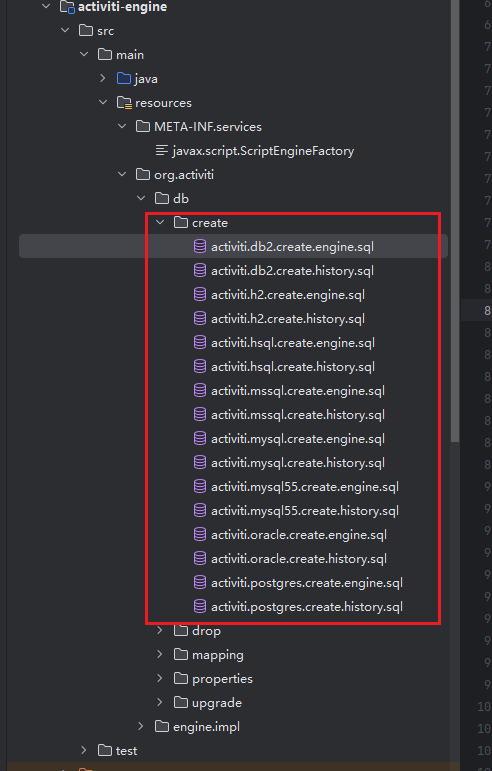
建表SQL
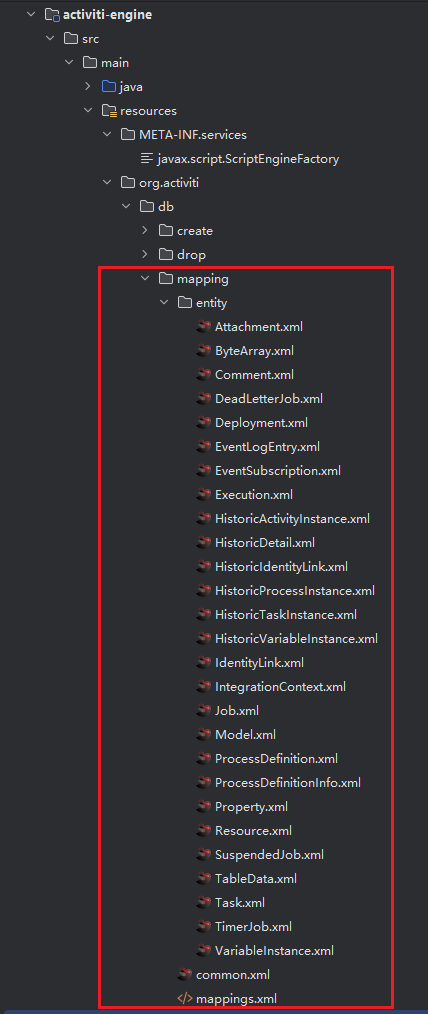
mapping映射
初始化表与实体映射
在这个类中 org/activiti/engine/impl/persistence/entity/TableDataManagerImpl,有个 static 代码块,负责初始化表与实体的映射关系。
从这个初始代码中发现像 ACT_RU_EVENT_SUBSCR 这个表,它对应多个 Entity,属于一对多的关系
static {// runtimeentityToTableNameMap.put(TaskEntity.class, "ACT_RU_TASK");entityToTableNameMap.put(ExecutionEntity.class, "ACT_RU_EXECUTION");entityToTableNameMap.put(IdentityLinkEntity.class, "ACT_RU_IDENTITYLINK");entityToTableNameMap.put(VariableInstanceEntity.class, "ACT_RU_VARIABLE");entityToTableNameMap.put(JobEntity.class, "ACT_RU_JOB");entityToTableNameMap.put(TimerJobEntity.class, "ACT_RU_TIMER_JOB");entityToTableNameMap.put(SuspendedJobEntity.class, "ACT_RU_SUSPENDED_JOB");entityToTableNameMap.put(DeadLetterJobEntity.class, "ACT_RU_DEADLETTER_JOB");entityToTableNameMap.put(EventSubscriptionEntity.class, "ACT_RU_EVENT_SUBSCR");entityToTableNameMap.put(CompensateEventSubscriptionEntity.class, "ACT_RU_EVENT_SUBSCR");entityToTableNameMap.put(MessageEventSubscriptionEntity.class, "ACT_RU_EVENT_SUBSCR");entityToTableNameMap.put(SignalEventSubscriptionEntity.class, "ACT_RU_EVENT_SUBSCR");// repositoryentityToTableNameMap.put(DeploymentEntity.class, "ACT_RE_DEPLOYMENT");entityToTableNameMap.put(ProcessDefinitionEntity.class, "ACT_RE_PROCDEF");entityToTableNameMap.put(ModelEntity.class, "ACT_RE_MODEL");entityToTableNameMap.put(ProcessDefinitionInfoEntity.class, "ACT_PROCDEF_INFO");// historyentityToTableNameMap.put(CommentEntity.class, "ACT_HI_COMMENT");entityToTableNameMap.put(HistoricActivityInstanceEntity.class, "ACT_HI_ACTINST");entityToTableNameMap.put(AttachmentEntity.class, "ACT_HI_ATTACHMENT");entityToTableNameMap.put(HistoricProcessInstanceEntity.class, "ACT_HI_PROCINST");entityToTableNameMap.put(HistoricVariableInstanceEntity.class, "ACT_HI_VARINST");entityToTableNameMap.put(HistoricTaskInstanceEntity.class, "ACT_HI_TASKINST");entityToTableNameMap.put(HistoricIdentityLinkEntity.class, "ACT_HI_IDENTITYLINK");// a couple of stuff goes to the same tableentityToTableNameMap.put(HistoricDetailAssignmentEntity.class, "ACT_HI_DETAIL");entityToTableNameMap.put(HistoricDetailTransitionInstanceEntity.class, "ACT_HI_DETAIL");entityToTableNameMap.put(HistoricDetailVariableInstanceUpdateEntity.class, "ACT_HI_DETAIL");entityToTableNameMap.put(HistoricDetailEntity.class, "ACT_HI_DETAIL");// generalentityToTableNameMap.put(PropertyEntity.class, "ACT_GE_PROPERTY");entityToTableNameMap.put(ByteArrayEntity.class, "ACT_GE_BYTEARRAY");entityToTableNameMap.put(ResourceEntity.class, "ACT_GE_BYTEARRAY");entityToTableNameMap.put(EventLogEntryEntity.class, "ACT_EVT_LOG");// and now the map for the API types (does not cover all cases)apiTypeToTableNameMap.put(Task.class, "ACT_RU_TASK");apiTypeToTableNameMap.put(Execution.class, "ACT_RU_EXECUTION");apiTypeToTableNameMap.put(ProcessInstance.class, "ACT_RU_EXECUTION");apiTypeToTableNameMap.put(ProcessDefinition.class, "ACT_RE_PROCDEF");apiTypeToTableNameMap.put(Deployment.class, "ACT_RE_DEPLOYMENT");apiTypeToTableNameMap.put(Job.class, "ACT_RU_JOB");apiTypeToTableNameMap.put(Model.class, "ACT_RE_MODEL");// historyapiTypeToTableNameMap.put(HistoricProcessInstance.class, "ACT_HI_PROCINST");apiTypeToTableNameMap.put(HistoricActivityInstance.class, "ACT_HI_ACTINST");apiTypeToTableNameMap.put(HistoricDetail.class, "ACT_HI_DETAIL");apiTypeToTableNameMap.put(HistoricVariableUpdate.class, "ACT_HI_DETAIL");apiTypeToTableNameMap.put(HistoricTaskInstance.class, "ACT_HI_TASKINST");apiTypeToTableNameMap.put(HistoricVariableInstance.class, "ACT_HI_VARINST");// TODO: Identity skipped for the moment as no SQL injection is provided// here
}
总结
- VariableTypes:数据映射类型
- PreCommandInterceptors:前置命令拦截器
- PostCommandInterceptors:后置命令拦截器
- IdGenerator:Id生成器
- BpmnParseHandlers:Bpmn解析处理程序,如果 自定义解析处理程序 和 内置解析处理程序 处理的是同一个类,则会把内置的替换成自定义的
- JobHandler:作业处理器
- EventHandler:事件处理器