在 Windows GPU 机器上运行 Linux CUDA
目录
文章目录
- 目录
- Linux CUDA over Windows GPU Machine
- 环境信息
- Win11 安装 GPU Driver
- Ubuntu 安装 CUDA lib
- 验证 CUDA 程序运行环境
- CUDA 程序压测示例程序
- 参考文档
Linux CUDA over Windows GPU Machine
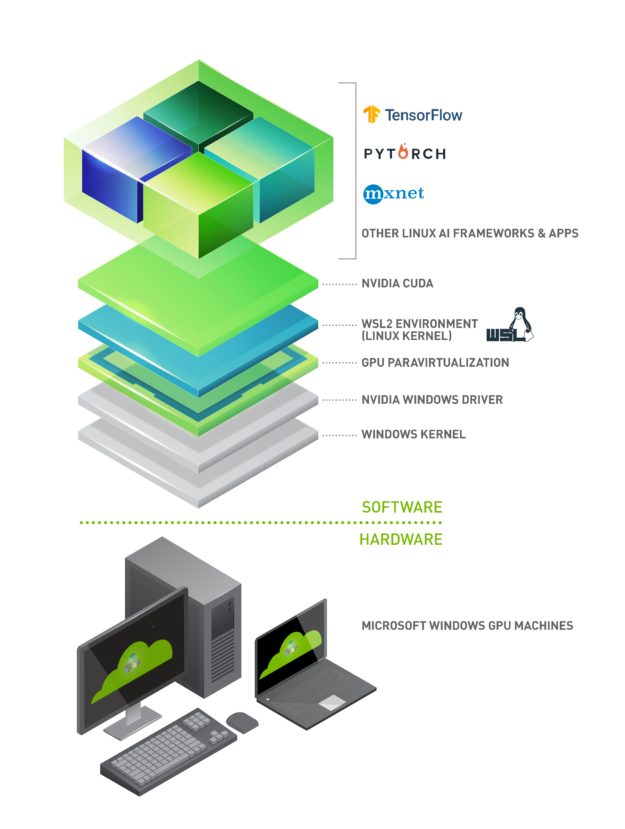
2020 年 5 月,微软为开发者推出了 GPU WSL2 加速功能。通过 WSL2 和 GPU 半虚拟化( GPU -PV )技术,使得 GPU 开发者可以轻松地在 Windows GPU 机器上运行和调试 Linux CUDA 程序。其技术堆栈如下图所示。
- 官方文档:https://docs.nvidia.com/cuda/wsl-user-guide/index.html
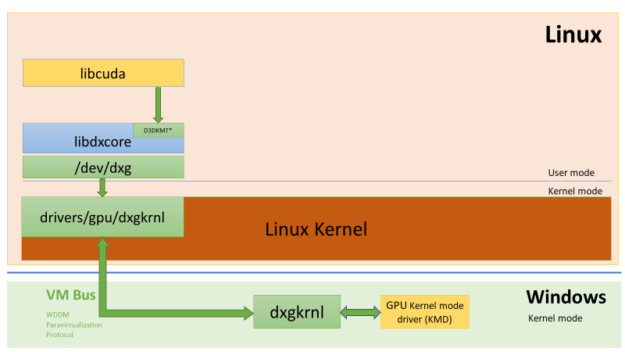
在 GPU WLS2 技术中,GPU Driver 被安装在 Windows 上,而 CUDA lib 则被安装在 Linux 上。如下图所示 Linux 中的 CUDA lib 通过 dxgkrnl(操作系统图形内核)来集成到 Win VDDM(图形驱动程序模型)中的 GPU Driver。
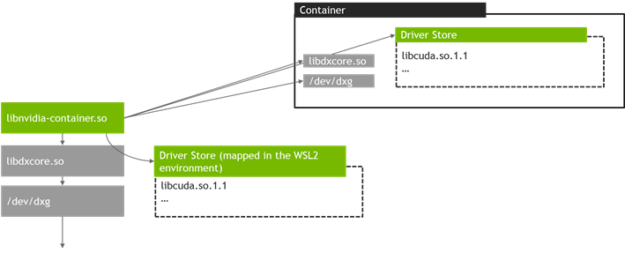
NVIDIA 还为 GPU WLS2 技术开发了 NVIDIA 容器工具包。Linux 中的 libNVIDIA-container 运行时库启动时,会自动检测到 libdxcore,以此来识别 GPU WLS2 运行环境。
环境信息
- Win11(推荐)
- WSL2
- GeForce RTX 4060 GPU
- Ubuntu 22.04 LTS
Win11 安装 GPU Driver
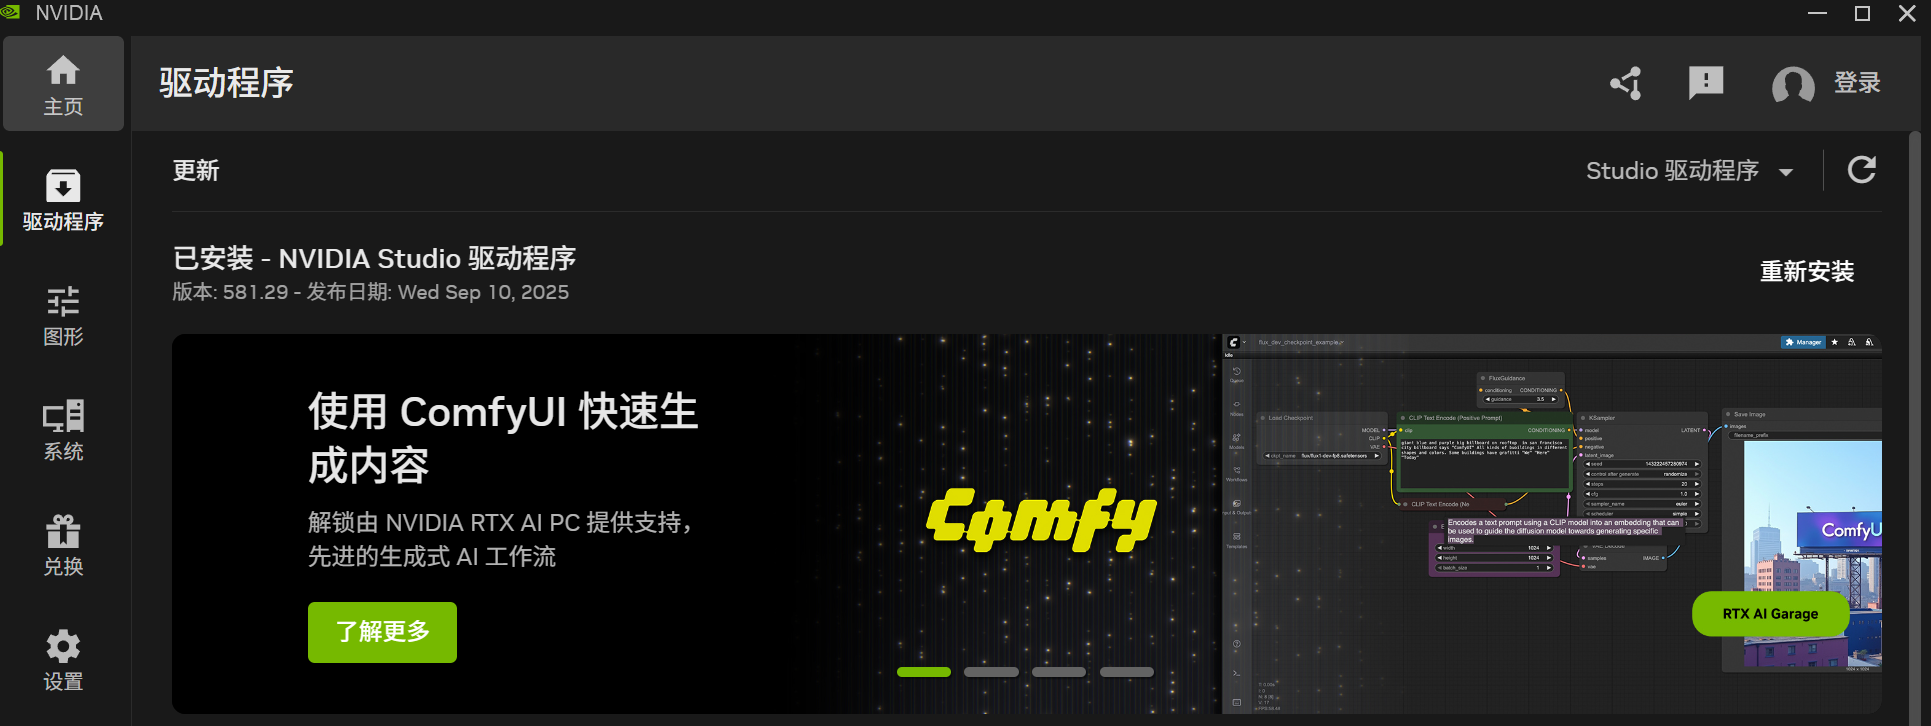
- 安装 NVIDIA App,https://www.nvidia.com/en-us/software/nvidia-app/

- 选择 Game Ready 或 Studio 版本,安装或更新 GPU Driver。WSL 会自动将 Driver 以 libcuda.so 的形式集成到 Linux 中,因此不需要在 Linux 中重复安装 Driver。NOTE:最新版本的驱动程序已经内置了 WSL 集成,不再需要勾选 “WSL”。
Ubuntu 安装 CUDA lib
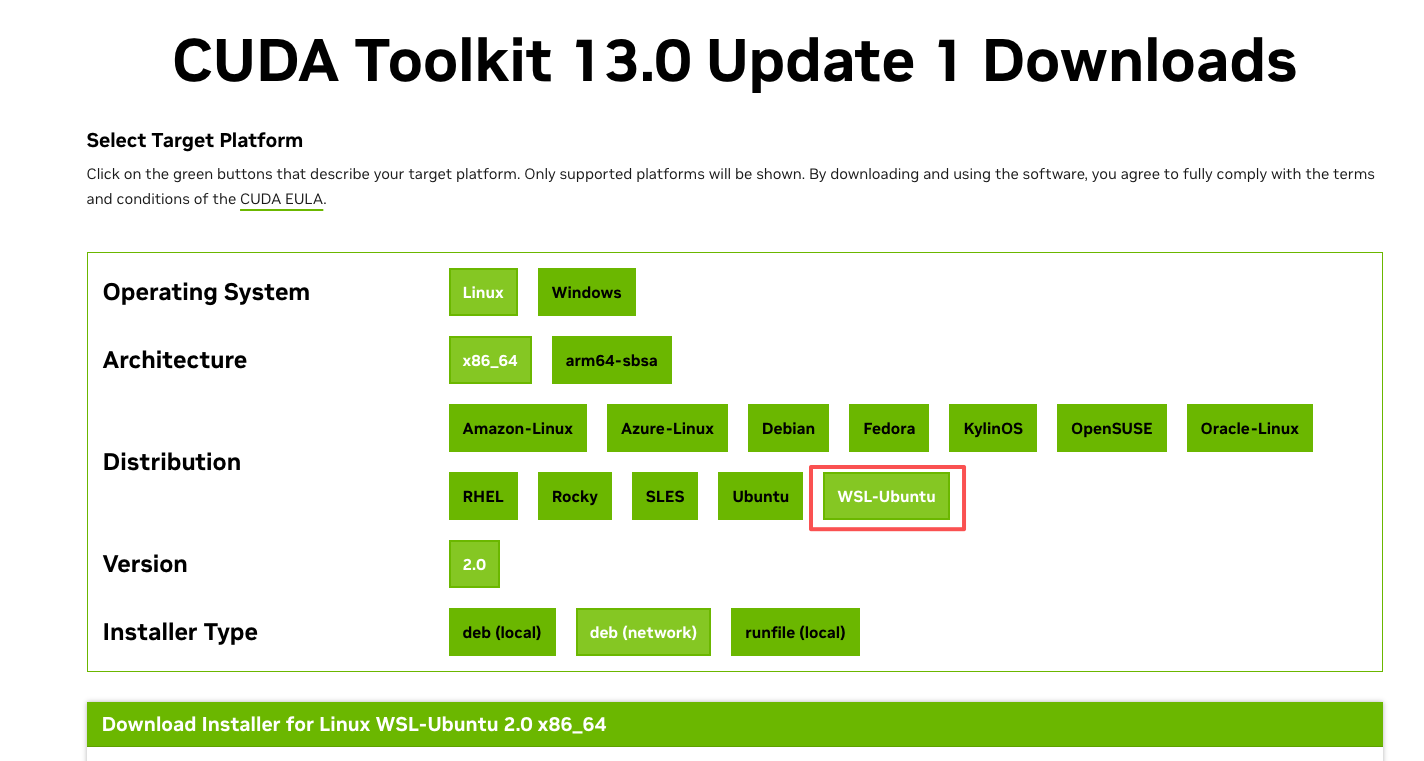
- 安装 CUDA lib。NOTE:WSL 有专门的 CUDA lib 版本,不能安装常规版本。根据官方文档提供的指令进行安装。https://developer.nvidia.com/cuda-downloads?target_os=Linux&target_arch=x86_64&Distribution=WSL-Ubuntu&target_version=2.0&target_type=deb_network
# 添加 NVIDIA 仓库文件
wget https://developer.download.nvidia.com/compute/cuda/repos/wsl-ubuntu/x86_64/cuda-wsl-ubuntu.pin
sudo mv cuda-wsl-ubuntu.pin /etc/apt/preferences.d/cuda-repository-pin-600
# 添加密钥
sudo apt-key adv --fetch-keys https://developer.download.nvidia.com/compute/cuda/repos/wsl-ubuntu/x86_64/3bf863cc.pub
# 添加 NIVIDA 仓库
sudo add-apt-repository "deb https://developer.download.nvidia.com/compute/cuda/repos/wsl-ubuntu/x86_64/ /"
# 安装 CUDA
sudo apt update
sudo apt install -y cuda
sudo dpkg -l | grep cuda
- 添加 CUDA bin 环境变量。
$ vim ~/.bashrc
export CUDA_HOME=/usr/local/cuda-13.0
export PATH=$PATH:$CUDA_HOME/bin
export LD_LIBRARY_PATH=$LD_LIBRARY_PATH:$CUDA_HOME/lib64$ source ~/.bashrc
- 添加 WSL GPU 环境变量。NOTE:WSL 虽然提供了完整的 Linux 环境,但其启动机制与原生 Linux 有所不同。所以当我们 SSH 到 WSL 时,它启动的 Bash env 是一个纯净的、未继承 Windows 变量的 Linux 环境。所以你无法看见 WSL 启动时添加的 env 变量,需要手动添加。
$ vim ~/.bashrc
export PATH="$PATH:/usr/lib/wsl/lib"$ source ~/.bashrc
- 验证 GPU Driver 安装。NOTE:Linux 输出应该和 Win PowerShell 输出一致,确保 Win 和 Linux 的兼容性。
$ nvidia-smi
Tue Sep 23 22:33:01 2025
+-----------------------------------------------------------------------------------------+
| NVIDIA-SMI 580.82.10              Driver Version: 581.29         CUDA Version: 13.0     |
+-----------------------------------------+------------------------+----------------------+
| GPU  Name                 Persistence-M | Bus-Id          Disp.A | Volatile Uncorr. ECC |
| Fan  Temp   Perf          Pwr:Usage/Cap |           Memory-Usage | GPU-Util  Compute M. |
|                                         |                        |               MIG M. |
|=========================================+========================+======================|
|   0  NVIDIA GeForce RTX 4060 ...    On  |   00000000:01:00.0 Off |                  N/A |
| N/A   40C    P3             11W /   50W |       0MiB /   8188MiB |      0%      Default |
|                                         |                        |                  N/A |
+-----------------------------------------+------------------------+----------------------++-----------------------------------------------------------------------------------------+
| Processes:                                                                              |
|  GPU   GI   CI              PID   Type   Process name                        GPU Memory |
|        ID   ID                                                               Usage      |
|=========================================================================================|
|  No running processes found                                                             |
+-----------------------------------------------------------------------------------------+- 验证 CUDA lib 安装
$ nvcc --version
nvcc: NVIDIA (R) Cuda compiler driver
Copyright (c) 2005-2025 NVIDIA Corporation
Built on Wed_Aug_20_01:58:59_PM_PDT_2025
Cuda compilation tools, release 13.0, V13.0.88
Build cuda_13.0.r13.0/compiler.36424714_0
验证 CUDA 程序运行环境
- 下载对应 CUDA 版本:https://github.com/NVIDIA/cuda-samples/tree/v13.0
- deviceQuery,若输出 Result = PASS,说明 GPU 可用。
# 进入示例目录
cd cuda-samples-13.0/Samples/1_Utilities/deviceQuery# 编译(需安装 cmake 和 make)
sudo cmake CMakeLists.txt
sudo make# 运行测试
./deviceQuery
- deviceQueryDrv,若输出 Result = PASS,说明 GPU 可被 CUDA 调用。
cd cuda-samples-13.0/Samples/1_Utilities/deviceQueryDrv# 编译(需安装 cmake 和 make)
sudo cmake CMakeLists.txt -DCMAKE_CUDA_COMPILER=/usr/local/cuda-13.0/bin/nvcc
sudo make# 运行测试
./deviceQueryDrv
- topologyQuery,若输出 Atomic Supported: no,表示 GPU 和 CPU 之间不支持原子内存操作,因为 GeForce RTX 消费级 GPU 是通过 PCIe 连接到 CPU 的。传统的 PCIe 连接不支持 GPU-CPU 之间的原子操作,需要 NVLink 连接;若输出 Atomic Supported: yes,则说明是 Multiple GPU 环境。
cd cuda-samples-13.0/Samples/1_Utilities/topologyQuery# 编译(需安装 cmake 和 make)
sudo cmake CMakeLists.txt -DCMAKE_CUDA_COMPILER=/usr/local/cuda-13.0/bin/nvcc
sudo make# 运行测试
./topologyQuery
CUDA 程序压测示例程序
- cuda_stress_test.cu
#include <stdio.h>
#include <stdlib.h>
#include <cuda_runtime.h>
#include <device_launch_parameters.h>
#include <chrono>
#include <thread>// 定义矩阵大小
#define MATRIX_SIZE 1024
#define BLOCK_SIZE 16// CUDA 矩阵乘法核函数
__global__ void matrixMultiply(float* A, float* B, float* C, int size) {int row = blockIdx.y * blockDim.y + threadIdx.y;int col = blockIdx.x * blockDim.x + threadIdx.x;if (row < size && col < size) {float sum = 0.0f;for (int k = 0; k < size; k++) {sum += A[row * size + k] * B[k * size + col];}C[row * size + col] = sum;}
}// CUDA 向量加法核函数(另一种计算模式)
__global__ void vectorAdd(float* A, float* B, float* C, int size) {int idx = blockIdx.x * blockDim.x + threadIdx.x;if (idx < size) {C[idx] = A[idx] + B[idx];}
}// CUDA 归约求和核函数
__global__ void reduceSum(float* input, float* output, int size) {extern __shared__ float sdata[];unsigned int tid = threadIdx.x;unsigned int i = blockIdx.x * blockDim.x + threadIdx.x;sdata[tid] = (i < size) ? input[i] : 0.0f;__syncthreads();for (unsigned int s = blockDim.x / 2; s > 0; s >>= 1) {if (tid < s) {sdata[tid] += sdata[tid + s];}__syncthreads();}if (tid == 0) {output[blockIdx.x] = sdata[0];}
}// 检查 CUDA 错误
#define CHECK_CUDA_ERROR(err) \if (err != cudaSuccess) { \printf("CUDA Error: %s\n", cudaGetErrorString(err)); \exit(EXIT_FAILURE); \}// 显示 GPU 信息
void printGPUInfo() {int deviceCount;cudaGetDeviceCount(&deviceCount);printf("Number of CUDA devices: %d\n", deviceCount);for (int i = 0; i < deviceCount; i++) {cudaDeviceProp prop;cudaGetDeviceProperties(&prop, i);printf("\nDevice %d: %s\n", i, prop.name);printf("  Compute capability: %d.%d\n", prop.major, prop.minor);printf("  Total global memory: %.2f GB\n", prop.totalGlobalMem / 1024.0 / 1024.0 / 1024.0);printf("  Multiprocessors: %d\n", prop.multiProcessorCount);printf("  Max threads per block: %d\n", prop.maxThreadsPerBlock);printf("  Max threads per multiprocessor: %d\n", prop.maxThreadsPerMultiProcessor);}printf("\n");
}int main() {printf("Starting CUDA Stress Test for 2 minutes...\n");printGPUInfo();// 设置设备int device = 0;cudaError_t err = cudaSetDevice(device);CHECK_CUDA_ERROR(err);// 分配主机内存size_t matrixSize = MATRIX_SIZE * MATRIX_SIZE * sizeof(float);size_t vectorSize = MATRIX_SIZE * MATRIX_SIZE * sizeof(float);float *h_A = (float*)malloc(matrixSize);float *h_B = (float*)malloc(matrixSize);float *h_C = (float*)malloc(matrixSize);// 初始化主机数据for (int i = 0; i < MATRIX_SIZE * MATRIX_SIZE; i++) {h_A[i] = rand() / (float)RAND_MAX;h_B[i] = rand() / (float)RAND_MAX;}// 分配设备内存float *d_A, *d_B, *d_C;err = cudaMalloc(&d_A, matrixSize);CHECK_CUDA_ERROR(err);err = cudaMalloc(&d_B, matrixSize);CHECK_CUDA_ERROR(err);err = cudaMalloc(&d_C, matrixSize);CHECK_CUDA_ERROR(err);// 复制数据到设备err = cudaMemcpy(d_A, h_A, matrixSize, cudaMemcpyHostToDevice);CHECK_CUDA_ERROR(err);err = cudaMemcpy(d_B, h_B, matrixSize, cudaMemcpyHostToDevice);CHECK_CUDA_ERROR(err);// 设置网格和块大小dim3 threadsPerBlock(BLOCK_SIZE, BLOCK_SIZE);dim3 blocksPerGrid((MATRIX_SIZE + BLOCK_SIZE - 1) / BLOCK_SIZE, (MATRIX_SIZE + BLOCK_SIZE - 1) / BLOCK_SIZE);// 创建 CUDA 事件用于计时cudaEvent_t start, stop;cudaEventCreate(&start);cudaEventCreate(&stop);auto startTime = std::chrono::high_resolution_clock::now();auto endTime = startTime + std::chrono::minutes(2);int iteration = 0;float totalGFlops = 0.0f;printf("Running stress test for 2 minutes...\n");printf("Iteration | Time (ms) | GFLOP/s\n");printf("----------|-----------|---------\n");// 主循环:运行 2 分钟while (std::chrono::high_resolution_clock::now() < endTime) {iteration++;cudaEventRecord(start);// 执行矩阵乘法matrixMultiply<<<blocksPerGrid, threadsPerBlock>>>(d_A, d_B, d_C, MATRIX_SIZE);cudaEventRecord(stop);cudaEventSynchronize(stop);// 计算性能float milliseconds = 0;cudaEventElapsedTime(&milliseconds, start, stop);// 矩阵乘法计算量:2 * N^3 次浮点运算float flops = 2.0f * MATRIX_SIZE * MATRIX_SIZE * MATRIX_SIZE;float gflops = (flops / milliseconds) / 1e6;totalGFlops += gflops;if (iteration % 10 == 0) {printf("%9d | %9.3f | %7.2f\n", iteration, milliseconds, gflops);}// 每隔一段时间同步并检查错误if (iteration % 50 == 0) {err = cudaDeviceSynchronize();CHECK_CUDA_ERROR(err);// 重新初始化数据以避免数值问题for (int i = 0; i < MATRIX_SIZE * MATRIX_SIZE; i++) {h_A[i] = rand() / (float)RAND_MAX;h_B[i] = rand() / (float)RAND_MAX;}cudaMemcpy(d_A, h_A, matrixSize, cudaMemcpyHostToDevice);cudaMemcpy(d_B, h_B, matrixSize, cudaMemcpyHostToDevice);}}// 计算平均性能float avgGFlops = totalGFlops / iteration;auto totalDuration = std::chrono::duration_cast<std::chrono::milliseconds>(std::chrono::high_resolution_clock::now() - startTime);printf("\nTest completed successfully!\n");printf("Total iterations: %d\n", iteration);printf("Total time: %.2f seconds\n", totalDuration.count() / 1000.0);printf("Average performance: %.2f GFLOP/s\n", avgGFlops);// 清理free(h_A);free(h_B);free(h_C);cudaFree(d_A);cudaFree(d_B);cudaFree(d_C);cudaEventDestroy(start);cudaEventDestroy(stop);// 重置设备cudaDeviceReset();printf("CUDA stress test completed successfully!\n");return 0;
}
- compile.sh
#!/bin/bash# CUDA 13 编译脚本
echo "Compiling CUDA stress test..."# 设置 CUDA 路径(根据你的实际路径调整)
export CUDA_HOME=/usr/local/cuda-13.0
export PATH=$PATH:$CUDA_HOME/bin
export LD_LIBRARY_PATH=$LD_LIBRARY_PATH:$CUDA_HOME/lib64# 编译命令
nvcc -o cuda_stress_test cuda_stress_test.cu \-O3 -arch=native \-Xcompiler -fopenmp -lgomp \-DMATRIX_SIZE=1024 \-std=c++17# 检查编译是否成功
if [ $? -eq 0 ]; thenecho "Compilation successful!"echo "Run the test with: ./cuda_stress_test"
elseecho "Compilation failed!"exit 1
fi
- run_test.sh
#!/bin/bash# 运行 CUDA 压力测试
echo "Starting CUDA stress test for 2 minutes..."# 设置 CUDA 设备(如果需要)
export CUDA_VISIBLE_DEVICES=0# 运行测试程序
./cuda_stress_test# 检查运行结果
if [ $? -eq 0 ]; thenecho "Test completed successfully!"
elseecho "Test failed!"exit 1
fi
- 测试
# 给脚本执行权限
chmod +x compile.sh run_test.sh# 编译程序
./compile.sh# 运行测试
./run_test.sh
- 输出
$ ./run_test.sh
Starting CUDA stress test for 2 minutes...
Starting CUDA Stress Test for 2 minutes...
Number of CUDA devices: 1Device 0: NVIDIA GeForce RTX 4060 Laptop GPUCompute capability: 8.9Total global memory: 8.00 GBMultiprocessors: 24Max threads per block: 1024Max threads per multiprocessor: 1536Running stress test for 2 minutes...
Iteration | Time (ms) | GFLOP/s
----------|-----------|---------10 |     3.017 |  711.8620 |     3.077 |  697.8930 |     3.011 |  713.3240 |     3.011 |  713.3250 |     3.020 |  711.2060 |     3.032 |  708.2670 |     3.030 |  708.7480 |     2.535 |  847.0890 |     2.532 |  848.02100 |     2.527 |  849.74
...44310 |     2.185 |  982.92Test completed successfully!
Total iterations: 44310
Total time: 120.00 seconds
Average performance: 978.27 GFLOP/s
CUDA stress test completed successfully!
Test completed successfully!
参考文档
https://developer.nvidia.com/zh-cn/blog/announcing-cuda-on-windows-subsystem-for-linux-2/
https://blog.csdn.net/asialee_bird/article/details/150015080