Spring MVC 常用注解及代码示例
Spring MVC 常用注解及代码示例
- @Controller 与RestController
- 结论:
- 对比表格
- 代码示例深度解析
- 示例 1:使用 `@Controller`(返回视图)
- 示例 2:使用 `@Controller` + `@ResponseBody`(返回数据)
- 示例 3:使用 `@RestController`(返回数据,推荐方式)
- @ResponseBody注解
- 核心功能
- @RequestMapping - 定义请求的入口
- 注解可用在哪些位置?
- 如何设置your-app?
- 核心属性
- 属性示例代码:
- 构造请求
- 返回结果
- 参数路径通配符
- 代码示例
- 重要注意事项和最佳实践
- @RequestMapping:处理参数的相关注解 - 获取请求中的数据
- 1. `@RequestParam` - 获取查询参数或表单数据
- 示例一:GET请求URL中携带参数
- 示例二:POST请求参数在请求体
- 2. `@PathVariable` - 获取 URL 路径中的变量
- 高级通配:使用正则表达式进行约束和匹配
- 代码示例与讲解
- 正则表达式部分说明:
- 通配符 (`*`, `**`) 结合使用
- 重要注意事项
- 3. `@RequestBody` - 获取请求体(如 JSON)
- @JsonAlias:若传递的JSON 字段名与 Java 字段名不一致
- @JsonProperty:谨慎使用与存在的问题
- @JsonAlias 与 @JsonProperty 的序列化差异
- 4. `@ModelAttribute` - 获取模型数据(常用于表单对象)
- 示例一:GET请求URL携带参数
- 示例二:POST请求body携带参数
- 示例三:省略@ModelAttribute注解
- 简写方式与加`@ModelAttribute`注解方式有什么区别?
- 显式添加 @ModelAttribute 的理由是什么
- 5. @RequestHeader - 获取HTTP请求头的值
- 用法示例
- 6. @CookieValue - 获取Cookie的值
- 示例一: 获取cookie中的属性值
- 示例二:获取cookie对象
- 7. @RequestPart - 获取文件上传部分信息
- 示例一:多文件上传与form表单提交
- 示例二:多文件上传与JSON传输
- 8. HttpEntity封装请求原始数据
- 如何使用 HttpEntity
- 什么时候使用 HttpEntity?
- HttpEntity 的特殊化子类
- 实际应用示例
- 示例 1:处理文件上传并返回元数据
- 示例 2:代理请求到另一个服务
- 示例3:文件下载示例
- 示例4:文件下载标准格式示例(推荐)
- 总结
- 9. 原生API
- 总结与最佳实践
- @RequestParam、@RequestBody以及@ModelAttribute的区别和异同?
- 核心区别对比表
- 详细解释与示例
- 1. @RequestParam:获取单个参数
- 2. @ModelAttribute:绑定到对象(表单处理)
- 3. @RequestBody:解析请求体(API开发)
- 关键异同总结
- 如何选择?
- @RequestHeader, @CookieValue, @RequestPart对比总结
@Controller 与RestController
@Controller 和 @RestController 是 Spring MVC 中用于定义控制器的两个核心注解。
- 随着前后端分离架构的普及,
@RestController的使用频率远远超过了传统的@Controller。大部分新一代的 Java Web 项目都是后端只提供 API 接口,因此@RestController成为了事实上的标准选择。 - 要页面,用
@Controller;要数据,用@RestController。
结论:
如果开发...
- 传统多页面网站(MPA):使用
@Controller。你需要视图解析器来渲染 HTML 页面,并与模型(Model)交互。 - RESTful API / 前后端分离项目(SPA):使用
@RestController。你只负责提供数据(JSON/XML),前端框架(如 React, Vue, Angular)负责渲染页面。
@RestController 是一个组合注解,它等同于 @Controller + @ResponseBody。 它们的根本区别在于如何处置方法的返回值。
@Controller:适用于传统 Web 应用,方法返回值通常代表一个视图名(View Name),由视图解析器渲染后返回 HTML 页面。@RestController:专为 RESTful Web 服务设计,方法的返回值会直接写入 HTTP 响应体(Response Body),通常转换为 JSON/XML 数据。
下面我们通过一个对比表格和代码示例来详细解析。
对比表格
| 特性 | @Controller | @RestController |
|---|---|---|
| 本质 | 一个标准的 Spring MVC 控制器注解 | 一个组合注解,包含 @Controller 和 @ResponseBody |
| 返回值处理 | 返回值通常被解析为视图名(View Name) | 返回值直接写入 HTTP 响应体 |
| 用途 | 构建传统的、服务端渲染的 Web 应用(返回 HTML、JSP、Thymeleaf 模板等) | 构建 RESTful API,提供 JSON/XML 数据(前后端分离架构) |
| 视图技术 | 需要配合视图解析器(ViewResolver)如 Thymeleaf、FreeMarker、JSP | 不需要视图解析器 |
| 注解要求 | 如果需要返回数据而非视图,方法上需额外添加 @ResponseBody | 无需额外添加 @ResponseBody,类级别已默认拥有 |
| HTTP 响应头 | Content-Type 通常为 text/html | Content-Type 通常为 application/json |
代码示例深度解析
示例 1:使用 @Controller(返回视图)
@Controller // 表明这是一个传统的MVC控制器
@RequestMapping("/traditional")
public class TraditionalController {@GetMapping("/user")public String getUserPage(Model model) {// 1. 业务逻辑:向模型中添加数据model.addAttribute("user", new User("Alice", 25));// 2. 返回一个字符串,这个字符串会被视图解析器解析为具体的页面return "user-detail"; // 视图解析器会查找 'user-detail.html' 或 'user-detail.jsp' 模板}
}
工作流程:
- 浏览器访问
GET /traditional/user。 - 方法执行,将
User对象放入Model。 - 返回字符串
"user-detail"。 DispatcherServlet将此字符串交给ViewResolver(视图解析器)。ViewResolver根据前缀后缀配置(例如:前缀classpath:/templates/,后缀.html)找到物理视图:classpath:/templates/user-detail.html。(resources/static/index.html)- 视图模板(如 Thymeleaf)引擎接管,将模型数据与 HTML 模板合并渲染。
- 最终生成一个完整的 HTML 页面返回给浏览器。
结果: 浏览器收到并显示一个渲染好的 HTML 页面。
示例 2:使用 @Controller + @ResponseBody(返回数据)
@Controller // 仍然是传统控制器
@RequestMapping("/hybrid")
public class HybridController {@GetMapping("/user")@ResponseBody // 关键注解:告诉Spring,返回值直接写入响应体,不要找视图public User getUserData() {// 直接返回一个对象return new User("Alice", 25);}
}
工作流程:
- 浏览器或客户端访问
GET /hybrid/user。 - 方法执行,返回
User对象。 - 因为方法上有
@ResponseBody,DispatcherServlet会跳过视图解析。 - 根据请求的
Accept头,选择合适的HttpMessageConverter(如MappingJackson2HttpMessageConverter)。 - 转换器将
User对象序列化为 JSON 字符串。 - JSON 数据被直接写入 HTTP 响应体。
结果: 客户端收到一段 JSON 数据:{"name": "Alice", "age": 25}。
示例 3:使用 @RestController(返回数据,推荐方式)
@RestController // 等价于 @Controller + @ResponseBody
@RequestMapping("/api")
public class RestApiController {@GetMapping("/user")// 不需要再写 @ResponseBody!public User getUser() {return new User("Alice", 25);}@PostMapping("/user")public User createUser(@RequestBody User user) {// ... 保存用户的逻辑return savedUser;}
}
工作流程:
与示例 2 完全相同。因为 @RestController 已经在类级别隐式地为所有方法添加了 @ResponseBody 语义。
结果: 客户端访问 GET /api/user 会收到 JSON 数据:{"name": "Alice", "age": 25}。
@ResponseBody注解
-
@ResponseBody注解的核心作用是指定一个控制器方法的返回值应当直接写入 HTTP 响应体(Response Body)中,而不是被当作一个视图名称(View Name)由视图解析器(View Resolver)去查找并渲染一个页面。 -
它的主要用途是实现 RESTful Web 服务 或 前后端分离架构,在这种架构下,后端通常返回的是数据(如 JSON、XML),而不是一个完整的 HTML 页面。
-
返回
JSON、XML或其他数据格式而非 HTML 页面
核心功能
- 直接写入响应体:将方法返回值直接写入 HTTP 响应流中
- 绕过视图解析:不经过视图解析器(ViewResolver)处理
- 自动内容协商:根据客户端请求的 Accept 头自动选择适当的消息转换器
@RequestMapping - 定义请求的入口
@RequestMapping 是 Spring MVC 中最基本的注解,用于将 Web 请求映射到特定的控制器类或方法上。它定义了“哪个请求”应该由“哪个方法”来处理。
注解可用在哪些位置?
类级别:提供初步的请求映射,通常表示共享的路径(模块路径)。方法级别:进一步细化映射,与类级别注解组合形成完整的 URL 映射。
示例:
@RestController
@RequestMapping("/user")
public class UserController {@RequestMapping("/profile") // 方法级别:组合成 /users/profilepublic String showProfile() {return "profile";}
}
访问 http://localhost:8080/your-app/users/profile 会触发 showProfile() 方法。
如何设置your-app?
your-app是一个占位符,它代表你的 Web 应用程序的上下文根(Context Root)。它不是由 Spring MVC 的@RequestMapping注解直接设置的,而是在部署应用时由 Servlet 容器(如 Tomcat、Jetty)或通过 Spring Boot 的配置来决定的。
简单来说,访问的完整 URL 结构是:
http://<server>:<port>/<context-path>/<spring-mvc-mapping>
- Spring Boot 内嵌了 Servlet 容器(默认是 Tomcat),设置
Context Path非常简单,只需要在配置文件application.properties或application.yml中修改一个属性即可。
server.servlet.context-path=/mvc
-
效果:配置完成后,重启应用。你之前定义的
@RequestMapping("/users/profile")的完整访问路径就变成了:
http://localhost:8080/mvc/users/profile -
如果你不进行任何配置,Spring Boot 默认的 context-path 是 /(空根路径)。这意味着你的访问路径直接就是:
http://localhost:8080/users/profile
核心属性
@RequestMapping 是一个多功能注解,通过指定其属性可以精确匹配请求。
@Target({ElementType.TYPE, ElementType.METHOD})
@Retention(RetentionPolicy.RUNTIME)
@Documented
@Mapping
@Reflective({ControllerMappingReflectiveProcessor.class})
public @interface RequestMapping {String name() default "";// 访问路径,别名为path@AliasFor("path")String[] value() default {};// 访问路径,别名为value@AliasFor("value")String[] path() default {};// 指定请求方式为:get、post等,才会响应RequestMethod[] method() default {};// 必须携带指定的参数,才能响应。例:?username=zhangsanString[] params() default {};// 必须携带指定的http请求头信息,才能响应。String[] headers() default {};// 必须携带指定的媒体类型Context-Type,才会响应。String[] consumes() default {};// 告诉前端,我返回的媒体类型是json还是其他。String[] produces() default {};
}
| 属性 | 说明 | 示例 |
|---|---|---|
value / path | 指定请求的 URL 路径(最主要的属性)。支持 Ant 风格(如 ?, *, **)。 | @RequestMapping("/user/list") @RequestMapping("/view/*.html") |
method | 指定请求的 HTTP 方法(GET, POST, PUT, DELETE 等)。 | @RequestMapping(path = "/save", method = RequestMethod.POST) |
params | 要求请求必须包含某些参数,或参数值必须等于特定值。 | @RequestMapping(path = "/get", params = "type=admin") (只匹配 /get?type=admin) |
headers | 要求请求必须包含某些 HTTP 头。 | @RequestMapping(path = "/data", headers = "content-type=application/json") |
consumes | 指定处理请求的媒体类型(Content-Type)。请求头 Content-Type 必须匹配。 | @RequestMapping(consumes = "application/json") (只处理请求体为 JSON 的请求) |
produces | 指定响应的媒体类型。告诉客户端我将返回什么类型的数据,并设置 Content-Type 响应头。 | @RequestMapping(produces = "application/json") (我返回 JSON,并设置响应头) |
属性示例代码:
package com.ssg.web.controller;@RestController
@RequestMapping("/user")
public class UserController {/*** 请求路径:/userinfo/{id}* 请求方式(必须为):GET OR POST* 参数信息(必须携带):username=man* 媒体类型(只处理):application/* [json也包括在内]* 请求头信息(必须携带):web-header=hahaha* 响应的媒体信息(返回给前端):application/json* @param id 用户id* @return User对象*/@RequestMapping(path = "/userinfo/{id}", method = {RequestMethod.GET, RequestMethod.POST}, params = {"username=man"},consumes = {"application/json"}, headers = {"web-header=hahaha"}, produces = {MediaType.APPLICATION_JSON_VALUE})public User userInfo(@PathVariable Integer id){return new User(id,"张三","123","admin@web.com","123");}
}
构造请求
GET http://localhost:8080/mvc/user/userinfo/1?username=man
web-header: hahaha
Accept: application/json
Content-Type: application/json
-
服务器看到
Content-Type: application/json:Spring MVC 会使用 HttpMessageConverter 中配置的 JSON 转换器(如 Jackson)来解析(反序列化) 请求体,并将其转换为一个 Java 对象(如 User 对象),方便你在 @RequestBody User user 参数中使用。 -
服务器看到
Accept: application/json:Spring MVC 会决定使用能够输出 JSON 的 HttpMessageConverter 来序列化方法的返回值,并设置响应头的 Content-Type。 -
Accept: application/json:这表示您的控制器方法只会生成 application/json 类型的响应。因此,只有当客户端在 Accept 头中明确表示它可以接受 JSON 响应时,Spring 才会调用这个方法。
返回结果
HTTP/1.1 200
Content-Type: application/json
Date: Mon, 08 Sep 2025 05:28:07 GMT
Connection: close
Content-Length: 79{"id": 1,"name": "张三","password": "123","email": "admin@web.com","phone": "123"
}
参数路径通配符
| 通配符 | 说明 | 示例 | 匹配的示例 | 不匹配的示例 |
|---|---|---|---|---|
? | 匹配单个任意字符 | /user? | /user1, /userA | /user, /user12 |
* | 匹配任意数量的任意字符,但在单级路径中 | /user/* | /user/, /user/1, /user/abc | /user/1/profile |
** | 匹配任意数量的任意字符,可以跨越多级路径 | /user/** | /user/, /user/1, /user/1/profile/pic | (无,全部匹配) |
{name} | 路径变量(Path Variable),匹配一个路径段并将其捕获为变量 | /user/{userId} | /user/123 -> userId=123 | /user/ |
代码示例
@RestController
@RequestMapping("/api")
public class MyController {// 匹配 /api/file1, /api/fileA,但不匹配 /api/file, /api/file123@GetMapping("/file?")public String getSingleFile() {return "Match a single character";}// 匹配 /api/category/books, /api/category/123// 但不匹配 /api/category/books/author (因为 * 是单级的)@GetMapping("/category/*")public String getByCategory() {return "Match one path segment";}// 匹配 /api/search/xxx, /api/search/xxx/yyy/zzz, /api/search/// ** 可以匹配零到多级路径@GetMapping("/search/**")public String searchEverything() {return "Match all paths under search";}// 组合使用:匹配 /api/users/123, /api/users/john.doe 等// 并使用 @PathVariable 注解获取值@GetMapping("/users/{userId}")public String getUserById(@PathVariable String userId) {return "User ID: " + userId;}// 更复杂的组合:匹配 /api/products/clothing/shirts/123// category = "clothing", type = "shirts", id = "123"@GetMapping("/products/{category}/{type}/{id}")public String getProduct(@PathVariable String category,@PathVariable String type,@PathVariable Long id) {return String.format("Category: %s, Type: %s, ID: %d", category, type, id);}// 使用通配符和路径变量混合匹配// 匹配 /api/download/user/avatar/somefile.txt// fileId 将会是 "somefile.txt"@GetMapping("/download/**/{fileId}")public String downloadFile(@PathVariable String fileId) {// 可以通过其他方式解析 ** 匹配的完整路径return "Downloading file: " + fileId;}
}
重要注意事项和最佳实践
-
匹配优先级:Spring 会优先匹配最具体的模式。
- 一个固定的模式(如
/users/active)比一个通配符模式(如/users/*)更具体。 - 当多个模式都可能匹配同一个请求时,最具体的模式会被选中。
- 一个固定的模式(如
-
/**与/**:/通常用作默认映射或捕获所有请求,但要谨慎使用,因为它可能会匹配到你意想不到的请求(如静态资源、Spring Boot 的 actuator 端点等)。 -
路径变量 vs 请求参数:
- 路径变量 (
{id}):用于标识资源本身(如/users/1)。 - 请求参数 (
?key=value):用于过滤、排序、分页等(如/users?role=admin)。通过@RequestParam获取。
- 路径变量 (
-
**的用法:**非常强大,常用于实现静态资源映射、统一的异常处理或者某些需要捕获“所有剩余路径”的场景。
| 场景 | 推荐方式 |
|---|---|
| 简单、清晰的层级式路由(RESTful 风格) | 路径变量 (如 /users/{id}) |
| 匹配单级目录下的任意资源 | * (如 /images/*) |
| 匹配多级嵌套目录下的任意资源 | ** (如 /resources/**) |
| 对路径变量的格式有严格要求(如必须是数字) | 正则表达式 (如 {id:\\d+}) |
希望这个详细的解释和示例能帮助你更好地理解和使用 @RequestMapping 中的参数通配符!
@RequestMapping:处理参数的相关注解 - 获取请求中的数据
在控制器方法中,我们需要方便地获取 HTTP 请求中携带的各种数据。Spring MVC 提供了一系列强大的注解来实现自动的参数绑定。
1. @RequestParam - 获取查询参数或表单数据
用于获取 URL 查询字符串(Query String) 或 POST 表单提交的数据。
- 格式:URL中
?key=9QB9IDyj&value=qxfWeCjG或 请求体中application/x-www-form-urlencoded表单。- 无论请求参数带到了请求体中或者url
?后面,他们都是请求参数,都能进行解析。
- 无论请求参数带到了请求体中或者url
- 默认要求:参数默认是必需的。如果请求中没有该参数,会抛出异常。
- 注解常用属性:
value/name: 指定参数名。required: 是否为必选参数,默认为true。设为false时,如果请求中没有此参数,参数值会被设为null。defaultValue: 默认值。如果提供了默认值,required会自动被设置为false。
示例一:GET请求URL中携带参数
- 请求url:
http://localhost:8080/mvc/user/requestParam?key=9QB9IDyj&value=qxfWeCjG - HTTP请求报文:
GET /mvc/user/requestParam2?username=11111&password=2222 HTTP/1.1
Host: localhost:8080
Upgrade-Insecure-Requests: 1
User-Agent: Mozilla/5.0 (Windows NT 10.0; Win64; x64) AppleWebKit/537.36 (KHTML, like Gecko) Chrome/112.0.5615.50 Safari/537.36
Accept: text/html,application/xhtml+xml,application/xml;q=0.9,image/avif,image/webp,image/apng,*/*;q=0.8,application/signed-exchange;v=b3;q=0.7
Connection: close
- 示例代码:
/*** GET请求,将字段key/value用RequestParam进行映射为:username/password* {@code http://localhost:8080/mvc/user/requestParam?key=9QB9IDyj&value=qxfWeCjG}* @return User*/@RequestMapping(value = "/requestParam", method = RequestMethod.GET)public User requestParam(@RequestParam("key") String username, @RequestParam("value")String password ){return new User(1,username,password,"admin@web.com","123");}
- HTTP响应报文
HTTP/1.1 200
Content-Type: application/json
Date: Sun, 14 Sep 2025 07:49:19 GMT
Connection: close
Content-Length: 107{"id":1,"name":"11111","password":"2222","email":"admin@web.com","phone":"123","country-address":"address"}
简写形式:如果方法参数名与请求参数名相同,可以省略 @RequestParam("name") 中的值。
- @RequestParam 会自动绑定参数:?
username=7ZyJwVYe&password=oLDeqerM
/*** GET请求,将key字段用RequestParam进行映射为:k.* {@code http://localhost:8080/mvc/user/requestParam2?username=7ZyJwVYe&password=oLDeqerM}* @return User*/@RequestMapping(value = "/requestParam2", method = RequestMethod.GET)public User requestParam2(@RequestParam String username, @RequestParam String password ){return new User(1,username,password,"admin@web.com","123");}
示例二:POST请求参数在请求体
- HTTP请求报文
POST /mvc/user/requestParam3 HTTP/1.1
Host: localhost:8080
User-Agent: Mozilla/5.0 (Windows NT 10.0; Win64; x64) AppleWebKit/537.36 (KHTML, like Gecko) Chrome/112.0.5615.50 Safari/537.36
Connection: close
Content-Type: application/x-www-form-urlencoded
Content-Length: 35username=7ZyJwVYe&password=oLDeqerM
- 示例代码:
在@RequestMapping注解中,我规定必须使用表单提交,否则无法请求该控制方法。这是因为若要@RequestParam接受POST请求,必须使用from表达提交的方式。
/*** POST请求,请求体中携带参数信息* {@code http://localhost:8080/mvc/user/requestParam2}* {@code 请求体中:?username=7ZyJwVYe&password=oLDeqerM}* 要求:POST请求,必须为form表单提交* @return User*/@RequestMapping(value = "/requestParam3", method = RequestMethod.POST,consumes = APPLICATION_FORM_URLENCODED_VALUE)public User requestParam3(@RequestParam String username, @RequestParam String password) {return new User(1, username, password, "admin@web.com", "123","address");}
- HTTP响应报文
HTTP/1.1 200
Content-Type: application/json
Date: Sun, 14 Sep 2025 07:04:11 GMT
Connection: close
Content-Length: 114{"id":1,"name":"7ZyJwVYe","password":"oLDeqerM","email":"admin@web.com","phone":"123","country-address":"address"}
2. @PathVariable - 获取 URL 路径中的变量
用于从 RESTful 风格的 URL 路径中获取变量值。
- 来源:URL 模板变量,如
/user/{id}中的{id}。 - 属性:
value/name(指定路径变量名,如果方法参数名一致可省略)。 - 要求:默认是必需的。
示例:
/*** {@code http://localhost:8080/mvc/user/path-variable/username-111/get/password-222}* @param username username-111* @param password password-222* @return*/@RequestMapping(value = "/path-variable/{username}/get/{password}", method = RequestMethod.GET)public User pathVariable(@PathVariable("username") String username, @PathVariable("password") String password){return new User(1,username,password,"admin@web.com","123");}
其他写法:
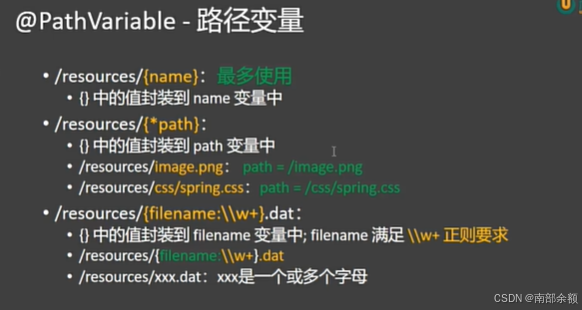
高级通配:使用正则表达式进行约束和匹配
这是 @PathVariable 真正强大之处。你可以在变量名后使用冒号 : 添加一个正则表达式来精确控制变量的匹配模式。
语法: {variableName:regex}
代码示例与讲解
a) 确保参数格式正确(数据验证)
// 匹配 /products/123, 但不匹配 /products/abc
// 使用 \\d+ 确保 id 必须是一个或多个数字
@GetMapping("/products/{id:\\d+}")
public String getProductById(@PathVariable Long id) {return "Product ID (numeric only): " + id;
}// 匹配 /articles/2024-05-27, 但不匹配 /articles/20240527
// 使用正则表达式确保 date 格式为 YYYY-MM-DD
@GetMapping("/articles/{date:\\d{4}-\\d{2}-\\d{2}}")
public String getArticleByDate(@PathVariable String date) {return "Article date: " + date;
}
b) 匹配复杂模式和多个片段
// 匹配 /files/2024/document_123.pdf
// 使用正则表达式分别定义 year 和 filename 的格式
// filename 的正则 [a-zA-Z0-9._-]+ 允许字母、数字、点、下划线、短横线
@GetMapping("/files/{year:\\d{4}}/{filename:[a-zA-Z0-9._-]+}")
public String getFile(@PathVariable int year, @PathVariable String filename) {return "Year: " + year + ", File: " + filename;
}// 一个路径变量捕获多个路径段 (使用 ** 通配符后再捕获)
// 匹配 /download/user/profile/picture.jpg
// filePath 变量将捕获 "user/profile/picture.jpg"
@GetMapping("/download/{filePath:.+}")
public String downloadFile(@PathVariable String filePath) {return "Downloading file from path: " + filePath;
}// 更复杂的例子:匹配语义化版本号
// 匹配 /api/version/v1.2.3-beta
@GetMapping("/api/version/v{major:\\d+}\\.{minor:\\d+}\\.{patch:\\d+}(-{qualifier:.*})?")
public String getVersion(@PathVariable String major,@PathVariable String minor,@PathVariable String patch,@PathVariable(required = false) String qualifier) { // qualifier 是可选的String version = major + "." + minor + "." + patch;if (qualifier != null) {version += "-" + qualifier;}return "Version: " + version;
}
正则表达式部分说明:
\\d+:一个或多个数字。\\d{4}:正好 4 位数字。[a-zA-Z0-9._-]+:一个或多个字母、数字、点、下划线或短横线。.+:一个或多个任意字符(包括斜杠,但需要注意转义和匹配规则)。(-{qualifier:.*})?:(-开始一个分组,匹配短横线。{qualifier:.*})捕获名为qualifier的变量,其值为任何字符(零个或多个)。最后的)?使整个分组可选。
通配符 (*, **) 结合使用
@PathVariable 常与 Ant 风格通配符一起使用,以实现更灵活的路径匹配,尤其是在你不知道后面有多少级路径时。
// 使用 ** 匹配多级路径,然后通过 @PathVariable 捕获最后一部分
// 匹配 /api/static/images/users/avatar.jpg
// fileId 将是 "avatar.jpg"
@GetMapping("/api/static/**/{fileId}")
public String serveStaticFile(@PathVariable String fileId) {// 如果需要,可以通过 HttpServletRequest 获取完整的请求路径来解析 ** 部分return "Serving file: " + fileId;
}// 匹配所有以 /admin/ 开头的路径,并捕获剩余部分
// 例如 /admin/user/create, /admin/settings/general
// 然后根据 capturedPath 进行路由分发或处理
@GetMapping("/admin/{capturedPath:**}")
public String adminRouter(@PathVariable String capturedPath) {return "Admin path: " + capturedPath;
}
重要注意事项
-
冲突与优先级:当多个
@RequestMapping模式都可以匹配同一个请求时,Spring 会选择最具体的那个。一个没有通配符的路径比一个有通配符的路径更具体。例如,/users/active会优先于/users/{id}匹配/users/active这个请求。 -
.(点号)的特殊处理:默认情况下,Spring 会将路径变量中的点号 (.) 后面的内容截断。例如,对于路径/files/my.file.txt和模式/files/{name},name变量得到的值默认是my.file。要获取完整值,有两种方式:- 在模式中使用正则表达式:
/files/{name:.+} - 在配置中修改:
spring.mvc.pathmatch.use-suffix-pattern=false(在 Spring Boot 新版本中默认已是false)。
- 在模式中使用正则表达式:
-
可选路径变量:Spring MVC 本身不支持直接在 URI 模板中声明可选路径变量(如
/api/{optionalVar?})。实现可选功能通常有两种方法:- 提供多个映射方法:为有该变量和没有该变量的情况分别编写方法。
- 将
@PathVariable的required属性设为false,但这要求你同时修改模式,使其能够匹配两种情况(通常很难用一条正则实现)。更常见的做法是使用请求参数 (@RequestParam(required = false)) 来实现可选功能。
@PathVariable 的强大通配能力主要来自于与其结合使用的 URI 模式表达式:
| 需求场景 | 推荐方式 | 示例 |
|---|---|---|
| 基本捕获 | {variableName} | /users/{id} |
| 格式验证 (数字、日期等) | {variableName:regex} | /products/{id:\\d+} |
| 捕获包含特殊字符(如点号)的值 | {variableName:.+} | /files/{name:.+} |
| 捕获未知的多级路径 | 结合 ** 通配符 | /api/**/{finalSegment} |
| 实现近似“可选”变量 | 提供多个 @RequestMapping 或使用请求参数 | /api/books 和 /api/books/{category} |
掌握这些组合用法,你可以设计出非常灵活且强大的 RESTful API 端点。
3. @RequestBody - 获取请求体(如 JSON)
用于将 HTTP 请求体(如 JSON、XML 数据)自动转换并绑定到 Java 对象上。
- 来源:请求体(Request Body),通常是
application/json或application/xml。 - 工作原理:依靠
HttpMessageConverter(如 Jackson 的MappingJackson2HttpMessageConverter)来完成反序列化。 - 常见用法:接收前端通过 AJAX 发送的 JSON 数据。
- 其他:如果用POJO对象的方式接受参数,可以不写
@RequestBody
示例:
- post请求传递json数据
{"id": 12,"name": "cDyIr0ca","password": "V0h3cU8r","email": "admin@web.com","phone": "123","country-address": "china"
}
- 示例代码
/*** 测试@RequestBody,将json字符串转为对象* @param user { "id": 12, "name": "cDyIr0ca", "password": "V0h3cU8r", "email": "admin@web.com", "phone": "123"}* @return User对象*/@RequestMapping(value = "/request-body", method = RequestMethod.POST)public User requestBody(@RequestBody User user) {User u = new User();BeanUtils.copyProperties(user, u);System.out.println("u = " + u);return u;}
@JsonAlias:若传递的JSON 字段名与 Java 字段名不一致
- 可以使用
@JsonAlias注解
@Data
@AllArgsConstructor
@NoArgsConstructor
public class User {private Integer id;private String name;private String password;private String email;private String phone;
//    @JsonProperty("country-address")@JsonAlias("country-address")private String address;
}
这样配置后:
- 请求中的 country-address 字段会被正确映射到 address 属性
- 响应中的 address 属性会被序列化为 address 字段
@JsonProperty:谨慎使用与存在的问题
- 若使用
@JsonProperty注解,则会出现修改Bean属性的名称。
@Data
@AllArgsConstructor
@NoArgsConstructor
public class User {private Integer id;private String name;private String password;private String email;private String phone;@JsonProperty("country-address")private String address;
}
- 返回的Json字符串为:
address字段被country-address替代。
{"id": 12,"name": "cDyIr0ca","password": "V0h3cU8r","email": "admin@web.com","phone": "123","country-address": "china"
}
问题原因@JsonProperty注解在 Jackson 中有双重作用:
- 反序列化(JSON → Java 对象):将 JSON 中的字段名映射到 Java 属性
- 序列化(Java 对象 → JSON):将 Java 属性映射到 JSON 中的字段名
当您在字段上使用 @JsonProperty("country-address") 时,您告诉 Jackson:
-
在反序列化时,将 JSON 中的 country-address 字段映射到 Java 的 address 属性
-
在序列化时,将 Java 的 address 属性序列化为 JSON 中的 country-address 字段
这就是为什么返回的 JSON 中包含 country-address 而不是 address。
@JsonAlias 与 @JsonProperty 的序列化差异
@JsonAlias 仅影响反序列化(JSON → Java对象),而 @JsonProperty 同时影响序列化和反序列化。如果你在字段上同时使用了 @JsonProperty 和 @JsonAlias,例如:
@JsonProperty("serializedName") // 序列化时会使用 "serializedName"
@JsonAlias({"alias1", "alias2"}) // 反序列化时接受 "alias1" 或 "alias2"
private String myField;
那么:
- 序列化(Java对象 → JSON):该字段会使用
@JsonProperty指定的名称(例如 “serializedName”)。 - 反序列化(JSON → Java对象):JSON 数据中的 “alias1”、“alias2” 或 “serializedName” 都会被映射到 myField 上。
4. @ModelAttribute - 获取模型数据(常用于表单对象)
介绍:当一个控制器方法的参数是一个 POJO(如您的 User 类),并且没有使用任何特定注解(如 @RequestBody)时,Spring 默认会使用 @ModelAttribute 的逻辑来处理它。
限制条件:
- 它不会去主动解析请求体(
Body),而是从URL查询参数(Query String) 和 表单数据(Form Data,application/x-www-form-urlencoded) 中获取数据。- Post请求也可以,但是传递参数需要拼接在URL中或请求体中。
功能强大,可用于:
- 方法参数绑定:将请求参数绑定到一个复合对象(如表单对象、DTO)。
- 方法级别注解:在方法调用前,自动将对象加入模型(Model)。
作为参数注解(常用):
- 它会把请求参数按名称匹配的方式绑定到对象的属性中。
- 非常适合处理表单提交,可以一次性获取所有相关字段。
示例一:GET请求URL携带参数
- HTTP请求报文
GET /mvc/user/model?id=1&name=222&password=333 HTTP/1.1
User-Agent: PostmanRuntime/7.46.0
Accept: */*
Postman-Token: 07ef9d02-dc20-450e-9915-547e0d85fa4c
Host: localhost:8080
Accept-Encoding: gzip, deflate
Connection: close
- 示例代码:
/*** GET请求,URL携带请求参数* @param user ?id=1&name=222&password=333* @return user*/@RequestMapping(value = "/model", method = RequestMethod.GET)public User model(@ModelAttribute User user) {User u = new User();BeanUtils.copyProperties(user, u);System.out.println("u = " + u);return u;}
- HTTP响应报文
HTTP/1.1 200
Content-Type: application/json
Date: Sun, 14 Sep 2025 08:17:58 GMT
Connection: close
Content-Length: 79{"id":1,"name":"222","password":"333","email":null,"phone":null,"address":null}
示例二:POST请求body携带参数
- POST请求体中携带报文。
- POST url连接中携带报文
- HTTP请求报文
POST /mvc/user/model2 HTTP/1.1
User-Agent: PostmanRuntime/7.46.0
Accept: */*
Host: localhost:8080
Accept-Encoding: gzip, deflate
Connection: close
Content-Length: 26
Content-Type: application/x-www-form-urlencodedid=1&name=222&password=333
- 示例代码
@RequestMapping(value = "/model2", method = RequestMethod.POST)public User model2(@ModelAttribute User user) {User u = new User();BeanUtils.copyProperties(user, u);System.out.println("u = " + u);return u;}
- HTTP响应报文
HTTP/1.1 200
Content-Type: application/json
Date: Sun, 14 Sep 2025 08:25:37 GMT
Connection: close
Content-Length: 79{"id":1,"name":"222","password":"333","email":null,"phone":null,"address":null}
示例三:省略@ModelAttribute注解
- HTTP请求报文
POST /mvc/user/model3?id=1&name=222&password=333 HTTP/1.1
User-Agent: PostmanRuntime/7.46.0
Accept: */*
Postman-Token: 4fc46231-1874-4597-97f5-8148c440e45f
Host: localhost:8080
Accept-Encoding: gzip, deflate
Connection: close
Content-Length: 0
- 示例代码
@RequestMapping(value = "/model3", method = RequestMethod.POST)public User model3(User user) {User u = new User();BeanUtils.copyProperties(user, u);System.out.println("u = " + u);return u;}
- HTTP响应报文
HTTP/1.1 200
Content-Type: application/json
Date: Sun, 14 Sep 2025 08:30:40 GMT
Connection: close
Content-Length: 79{"id":1,"name":"222","password":"333","email":null,"phone":null,"address":null}
简写方式与加@ModelAttribute注解方式有什么区别?
这是一个很好的问题,它触及了Spring MVC的一个核心便利特性:隐式规则。
简单直接的回答是:在这个特定场景下,不加 @ModelAttribute 注解与加上该注解,效果是完全一样的。
原因解析:Spring MVC的默认规则
- Spring MVC的设计哲学之一是“约定优于配置”(Convention over Configuration)。为了简化开发,它设定了一系列默认规则:
- 简单类型参数(如
String,int,Integer):默认使用@RequestParam来解析。 - 复杂对象参数(如
User,Order等自定义POJO):默认使用@ModelAttribute来解析。
所以,当你写 public User model3(User user) 时,Spring看到 User 是一个复杂类型,它会自动地、隐式地为其应用@ModelAttribute的绑定逻辑。这个过程对你来说是透明的。
- 调用 User 类的默认无参构造函数来创建对象实例。
- 遍历请求中的所有参数(如 username, password, email)。
- 查找 User 类中是否有与之匹配的setter方法(如 setUsername(String name))。
- 找到后,进行类型转换(如果需要)并调用setter方法将请求参数的值注入到对象中。
所以,public User model3(User user) 和 public User model3(@ModelAttribute User user) 在功能上是完全等效的。
显式添加 @ModelAttribute 的理由是什么
既然效果一样,为什么我们有时还会看到代码中显式地写上 @ModelAttribute 呢?
代码清晰性与可读性(最主要的原因):
- 显式注解:明确地告诉了代码的阅读者(包括未来的你自己或其他开发者),这个参数是通过模型属性绑定的,其数据来自HTTP请求并会被填充到一个对象中。这是一种“自文档化”的代码实践。
- 隐式规则:依赖框架的默认行为。对于不熟悉Spring MVC默认约定的开发者来说,可能需要停下来思考一下 User user 这个参数是怎么被注入的。
显式地加上 @ModelAttribute 通常是更推荐的做法。它使代码的意图更加清晰,减少了误解的可能性,遵循了“明确优于隐晦”的编程原则。这对于团队协作和长期代码维护非常有益。
5. @RequestHeader - 获取HTTP请求头的值
作用:@RequestHeader 注解用于将控制器方法参数绑定到HTTP请求头的值。
使用场景
当需要获取请求中的特定头部信息时使用,例如:
- 获取客户端信息(User-Agent)
- 获取认证令牌(Authorization)
- 获取内容类型(Content-Type)
- 获取语言偏好(Accept-Language)
用法示例
/*** 获取HTTP 请求头信息* @param user POJO 对象* @param userAgent 浏览器信息* @param host 地址,如果不存在设置默认值* @param headers Map对象* @param authorization 令牌,不需要必填* @return user*/@RequestMapping(value = "/request-header", method = RequestMethod.GET)public User requestHeader(User user,@RequestHeader("User-Agent") String userAgent,@RequestHeader(value = "host", defaultValue = "127.0.0.1") String host,@RequestHeader Map<String, String> headers,@RequestHeader(value = "Authorization", required = false) String authorization) {User u = new User();BeanUtils.copyProperties(user, u);System.out.println("u = " + u);System.out.println("userAgent = " + userAgent);System.out.println("host = " + host);headers.forEach((k, v) -> System.out.println(k + " = " + v));System.out.println("令牌 = " + authorization);return u;}
属性说明
value/name: 要获取的请求头名称required: 是否必须存在该请求头(默认为true)defaultValue: 当请求头不存在时的默认值
6. @CookieValue - 获取Cookie的值
作用:@CookieValue 注解用于将控制器方法参数绑定到HTTP请求中的Cookie值。
使用场景
当需要获取客户端发送的特定Cookie时使用,例如:
- 获取会话ID(JSESSIONID)
- 获取用户偏好设置
- 获取跟踪标识
示例一: 获取cookie中的属性值
@RequestMapping(value = "/get-cookie", method = RequestMethod.GET)public String getCookie(@CookieValue(name = "ry-cookie") String cookieValue,@CookieValue(name = "cookie") String cookie) {return cookieValue +" "+cookie;}
属性说明:
value/name: 要获取的Cookie名称required: 是否必须存在该Cookie(默认为true)defaultValue: 当Cookie不存在时的默认值
示例二:获取cookie对象
/*** 获取指定名称的整个 Cookie 对象,并返回其详细信息* 通过 Cookie 对象可以访问 Cookie 的所有属性,如域名、路径、安全标志等* @param cookie 通过 @CookieValue 注解自动注入的名称为 "cookie" 的 Cookie 对象* 如果请求中没有此 Cookie,将抛出异常(可通过 required=false 避免)* @return 包含 Cookie 所有属性的格式化字符串,格式为:domain=值;path=值;name=值;secure=值;value=值;maxAge=值* 可用于调试或显示 Cookie 的完整信息*/@RequestMapping(value = "/get-cookie2", method = RequestMethod.GET)public String getCookie2(@CookieValue("cookie") Cookie cookie) {// 获取 Cookie 的域名属性(设置此 Cookie 的域名)String domain = cookie.getDomain();// 获取 Cookie 的值(实际存储的数据)String value = cookie.getValue();// 获取 Cookie 的路径属性(指定此 Cookie 在哪个路径下有效)String path = cookie.getPath();// 获取 Cookie 的名称(键)String name = cookie.getName();// 获取 Cookie 的安全标志(是否仅通过 HTTPS 传输)boolean secure = cookie.getSecure();// 获取 Cookie 的最大存活时间(秒),-1 表示浏览器关闭后过期,0 表示立即过期int maxAge = cookie.getMaxAge();// 将所有 Cookie 属性拼接成字符串返回return "domain=" + domain + ";path=" + path + ";name=" + name +";secure=" + secure + ";value=" + value + ";maxAge=" + maxAge;}
7. @RequestPart - 获取文件上传部分信息
作用:@RequestPart 注解用于处理 multipart/form-data 请求,通常用于文件上传。它可以绑定到方法参数,处理上传的文件或表单字段。
- 并且可以处理json数据绑定,直接将json解析到类对象中。前提条件是在前端JavaScript中封装为blob类型方能接收。
使用场景
主要用于文件上传场景,例如:
- 用户头像上传
- 文档上传
- 多文件批量上传
示例一:多文件上传与form表单提交
- 代码示例:
    /*** 文件上传:前提条件:Post请求,请求类型(Content-type)为multipart/form-data** @param user  form表单提交* @param file  单文件* @param files 多文件*/@RequestMapping(value = "/file-upload2", method = RequestMethod.POST, consumes = MediaType.MULTIPART_FORM_DATA_VALUE)public String fileUpload2(@ModelAttribute User user,@RequestPart("file") MultipartFile file,@RequestPart("files") MultipartFile[] files) throws IOException {// user中接受三个字段
//        private Integer id;
//        private String name;
//        private String password;// 1. 文件名称String name = file.getOriginalFilename();// 2. 文件大小long size = file.getSize();// 3. 文件流InputStream inputStream = file.getInputStream();// 4. 保存文件file.transferTo(new File("D://IMAGE//" + Math.random() + name));// 5. 多文件个个数int length = files.length;for (MultipartFile multipartFile : files) {// 6. 统一的文件保存multipartFile.transferTo(new File("D://IMAGE//" + multipartFile.getOriginalFilename()));}return "参数信息为:" + user + ";单文件上传名称为:" + name + "; 多文件上传共上传了:" + length + "个文件";}
- 前端代码示例:
要求:form 表单提交用户ID、用户名、密码
<body>
<div class="container"><h2>文件上传示例</h2><form action="http://localhost:8080/mvc/user/file-upload2" method="post" enctype="multipart/form-data"><label>用户ID:</label><input type="text" name="id" placeholder="请输入用户ID" required/><label>用户名:</label><input type="text" name="name" placeholder="请输入用户名" required/><label>密码:</label><input type="password" name="password" placeholder="请输入密码" required/><label>单文件上传:</label><input type="file" name="file" required/><label>多文件上传:</label><input type="file" name="files" multiple="multiple" required/><div class="hint">按住 Ctrl 或 Cmd 键可选择多个文件</div><button type="submit">上传文件</button></form>
</div>
</body>
- HTTP请求报文:
参考:理解 multipart/form-data 中的 boundary:文件上传的关键
POST http://localhost:8080/mvc/user/file-upload2 HTTP/1.1
Host: localhost:8080
Connection: keep-alive
Content-Length: 668
Cache-Control: max-age=0
sec-ch-ua: "Chromium";v="140", "Not=A?Brand";v="24", "Microsoft Edge";v="140"
sec-ch-ua-mobile: ?0
sec-ch-ua-platform: "Windows"
Origin: null
Content-Type: multipart/form-data; boundary=----WebKitFormBoundary9SoBhjF6rKJ4xNgh
Upgrade-Insecure-Requests: 1
User-Agent: Mozilla/5.0 (Windows NT 10.0; Win64; x64) AppleWebKit/537.36 (KHTML, like Gecko) Chrome/140.0.0.0 Safari/537.36 Edg/140.0.0.0
Accept: text/html,application/xhtml+xml,application/xml;q=0.9,image/avif,image/webp,image/apng,*/*;q=0.8,application/signed-exchange;v=b3;q=0.7
Sec-Fetch-Site: cross-site
Sec-Fetch-Mode: navigate
Sec-Fetch-User: ?1
Sec-Fetch-Dest: document
Accept-Encoding: gzip, deflate, br, zstd
Accept-Language: zh-CN,zh;q=0.9,en;q=0.8,en-GB;q=0.7,en-US;q=0.6------WebKitFormBoundary9SoBhjF6rKJ4xNgh
Content-Disposition: form-data; name="id"12
------WebKitFormBoundary9SoBhjF6rKJ4xNgh
Content-Disposition: form-data; name="name"12
------WebKitFormBoundary9SoBhjF6rKJ4xNgh
Content-Disposition: form-data; name="password"13
------WebKitFormBoundary9SoBhjF6rKJ4xNgh
Content-Disposition: form-data; name="file"; filename="文件1.txt"
Content-Type: text/plain文件内容:第一个文件
------WebKitFormBoundary9SoBhjF6rKJ4xNgh
Content-Disposition: form-data; name="files"; filename="文件2.txt"
Content-Type: text/plain文件内容:第二个文件
------WebKitFormBoundary9SoBhjF6rKJ4xNgh--
示例二:多文件上传与JSON传输
若想使用@RequestPart来处理json数据,则前端代码必须使用:Blob或File类型
- 如果我们想在后端使用
@RequestPart注解传输文件的同时来接收JSON数据,并且希望Spring MVC能够自动将JSON字符串转换为Java对象,那么前端必须将JSON数据作为Blob(或File)类型附加到FormData中,并设置正确的Content-Type(即application/json)
- 代码示例:
    @RequestMapping(value = "/file-upload3", method = RequestMethod.POST, consumes = MediaType.MULTIPART_FORM_DATA_VALUE)public String fileUpload3(@RequestPart("user") User user,@RequestPart("file") MultipartFile file,@RequestPart("files") MultipartFile[] files) throws IOException {// user中接受三个字段
//        private Integer id;
//        private String name;
//        private String password;System.out.println("user = " + user);// 1. 文件名称String name = file.getOriginalFilename();// 2. 文件大小long size = file.getSize();// 3. 文件流InputStream inputStream = file.getInputStream();// 4. 保存文件file.transferTo(new File("D://IMAGE//" + Math.random() + name));// 5. 多文件个个数int length = files.length;for (MultipartFile multipartFile : files) {// 6. 统一的文件保存multipartFile.transferTo(new File("D://IMAGE//" + multipartFile.getOriginalFilename()));}return "参数信息为:" + user + ";单文件上传名称为:" + name + "; 多文件上传共上传了:" + length + "个文件";}
- 前端代码示例:
<script>document.addEventListener('DOMContentLoaded', function () {const form = document.getElementById('uploadForm');const previewBtn = document.getElementById('previewBtn');const jsonPreview = document.getElementById('jsonPreview');const statusMessage = document.getElementById('statusMessage');function showStatus(message, isSuccess) {statusMessage.textContent = message;statusMessage.className = isSuccess ? 'status-message success' : 'status-message error';statusMessage.style.display = 'block';setTimeout(() => {statusMessage.style.display = 'none';}, 5000);}previewBtn.addEventListener('click', function () {const user = {id: document.getElementById('id').value,name: document.getElementById('name').value,password: document.getElementById('password').value};jsonPreview.textContent = JSON.stringify(user, null, 2);jsonPreview.style.display = 'block';});form.addEventListener('submit', function (e) {e.preventDefault();// 创建FormData对象const formData = new FormData();const userData = {id: document.getElementById('id').value,name: document.getElementById('name').value,password: document.getElementById('password').value};formData.append('user', new Blob([JSON.stringify(userData)], {type: "application/json"}));const singleFile = document.querySelector('input[name="file"]').files[0];if (singleFile) {formData.append('file', singleFile);}const multiFiles = document.querySelector('input[name="files"]').files;for (let i = 0; i < multiFiles.length; i++) {formData.append('files', multiFiles[i]);}showStatus('正在上传文件,请稍候...', true);// 详细的fetch请求fetch(form.action, {method: 'POST',body: formData,// 添加mode选项mode: 'cors',// 添加credentials选项credentials: 'omit'}).then(response => {console.log('响应收到,状态码:', response.status);console.log('响应URL:', response.url);console.log('响应类型:', response.type);// 检查响应类型const contentType = response.headers.get('content-type');console.log('Content-Type:', contentType);if (contentType && contentType.includes('application/json')) {return response.json().then(data => {console.log('JSON响应数据:', data);return {success: true, data: data, type: 'json'};});} else {return response.text().then(text => {console.log('文本响应数据:', text);return {success: true, data: text, type: 'text'};});}}).then(result => {if (result.success) {if (result.type === 'json') {showStatus('上传成功!JSON响应: ' + JSON.stringify(result.data, null, 2), true);} else {showStatus('上传成功!响应: ' + result.data, true);}}}).catch(error => {console.error('完整错误信息:', error);console.error('错误名称:', error.name);console.error('错误消息:', error.message);// 更详细的错误分析if (error.name === 'TypeError') {console.error('可能是网络错误、CORS问题或响应解析错误');}showStatus('上传失败: ' + error.message, false);});});});
</script>
- HTTP请求报文:
POST http://localhost:8080/mvc/user/file-upload3 HTTP/1.1
Host: localhost:8080
Connection: keep-alive
Content-Length: 566
User-Agent: Mozilla/5.0 (Windows NT 10.0; Win64; x64) AppleWebKit/537.36 (KHTML, like Gecko) Chrome/140.0.0.0 Safari/537.36 Edg/140.0.0.0
Content-Type: multipart/form-data; boundary=----WebKitFormBoundaryhMTAuUnQkQoA82lA
Accept: */*
Origin: null
Accept-Encoding: gzip, deflate, br, zstd
Accept-Language: zh-CN,zh;q=0.9,en;q=0.8,en-GB;q=0.7,en-US;q=0.6------WebKitFormBoundaryhMTAuUnQkQoA82lA
Content-Disposition: form-data; name="user"; filename="blob"
Content-Type: application/json{"id":"11","name":"22","password":"33"}
------WebKitFormBoundaryhMTAuUnQkQoA82lA
Content-Disposition: form-data; name="file"; filename="文件1.txt"
Content-Type: text/plain文件内容:第一个文件
------WebKitFormBoundaryhMTAuUnQkQoA82lA
Content-Disposition: form-data; name="files"; filename="文件2.txt"
Content-Type: text/plain文件内容:第二个文件
------WebKitFormBoundaryhMTAuUnQkQoA82lA--
8. HttpEntity封装请求原始数据
HttpEntity 是 Spring Framework 中的一个核心类,用于表示 HTTP 请求或响应的完整内容,包括头信息(headers) 和 主体内容(body)。它是 Spring 的 HTTP 消息抽象的核心组成部分。
核心特征:
- 封装了 HTTP 消息的头信息和主体
- 既可以用于请求,也可以用于响应
- 提供了访问和操作 HTTP 消息的便捷方法
- 是
RequestEntity和ResponseEntity的基类
如何使用 HttpEntity
1. 作为控制器方法参数(接收请求)
当 HttpEntity 用作控制器方法的参数时,Spring 会自动将传入的 HTTP 请求解析并注入:
@PostMapping("/process")
public ResponseEntity<String> processRequest(HttpEntity<String> httpEntity) {// 获取请求头HttpHeaders headers = httpEntity.getHeaders();String contentType = headers.getContentType().toString();String authToken = headers.getFirst("Authorization");// 获取请求体String requestBody = httpEntity.getBody();// 处理逻辑...System.out.println("收到请求,内容类型: " + contentType);System.out.println("认证令牌: " + authToken);System.out.println("请求体: " + requestBody);// 返回响应return ResponseEntity.ok("处理成功");
}
2. 作为返回值(返回自定义响应)
@GetMapping("/custom-response")
public HttpEntity<String> createCustomResponse() {// 创建自定义头HttpHeaders headers = new HttpHeaders();headers.setContentType(MediaType.APPLICATION_JSON);headers.set("X-Custom-Header", "custom-value");headers.setCacheControl("no-cache");// 创建响应体String responseBody = "{\"status\":\"success\", \"message\":\"Hello World\"}";// 返回 HttpEntityreturn new HttpEntity<>(responseBody, headers);
}
什么时候使用 HttpEntity?
1. 需要完全控制 HTTP 请求/响应时
- 当你需要精确设置或读取 HTTP 头信息时并且一次性夺取多个:
- 使用@RequestHeader读取多个不太方便时
// 需要设置特定的认证头
@PostMapping("/secure-data")
public ResponseEntity<String> getSecureData() {HttpHeaders headers = new HttpHeaders();headers.setBearerAuth("your-token-here");headers.set("X-API-Version", "2.0");HttpEntity<Void> request = new HttpEntity<>(headers);RestTemplate restTemplate = new RestTemplate();return restTemplate.exchange("https://api.secure.com/data",HttpMethod.GET,request,String.class);
}
2. 处理非标准 HTTP 消息时
当需要处理特殊的 Content-Type 或自定义头时:
@PostMapping(value = "/xml-data", consumes = "application/xml")
public ResponseEntity<String> processXmlData(HttpEntity<String> xmlEntity) {// 验证内容类型if (!MediaType.APPLICATION_XML.includes(xmlEntity.getHeaders().getContentType())) {return ResponseEntity.badRequest().body("期望 XML 内容");}// 处理 XML 数据String xmlData = xmlEntity.getBody();// XML 解析和处理逻辑...return ResponseEntity.ok("XML 处理成功");
}
3. 需要访问请求的完整信息时
当方法需要同时访问头信息和主体时:
@PostMapping("/log-request")
public ResponseEntity<Void> logIncomingRequest(HttpEntity<byte[]> requestEntity) {// 记录所有头信息requestEntity.getHeaders().forEach((name, values) -> {System.out.println(name + ": " + values);});// 记录主体大小byte[] body = requestEntity.getBody();System.out.println("请求体大小: " + (body != null ? body.length : 0) + " 字节");return ResponseEntity.ok().build();
}
4. 构建自定义响应时
当需要返回具有特定头的响应时:
@GetMapping("/download")
public HttpEntity<byte[]> downloadFile() {// 读取文件内容byte[] fileContent = readFileContent("report.pdf");// 设置下载头HttpHeaders headers = new HttpHeaders();headers.setContentType(MediaType.APPLICATION_PDF);headers.setContentDispositionFormData("attachment", "report.pdf");headers.setContentLength(fileContent.length);return new HttpEntity<>(fileContent, headers);
}
HttpEntity 的特殊化子类
Spring 提供了两个更专用的 HttpEntity 子类:
RequestEntity:专门用于表示 HTTP 请求,包含 HTTP 方法信息:
// 创建 RequestEntity
RequestEntity<String> request = RequestEntity.post(URI.create("https://api.example.com/data")).header("Authorization", "Bearer token123").contentType(MediaType.APPLICATION_JSON).body("{\"key\":\"value\"}");// 发送请求
RestTemplate restTemplate = new RestTemplate();
ResponseEntity<String> response = restTemplate.exchange(request, String.class);
ResponseEntity:专门用于表示 HTTP 响应,包含状态码信息:
// 创建各种响应
@GetMapping("/data")
public ResponseEntity<String> getData() {try {String data = fetchDataFromDatabase();// 返回成功响应return ResponseEntity.ok().header("Cache-Control", "max-age=3600").body(data);} catch (DataNotFoundException e) {// 返回 404 响应return ResponseEntity.notFound().build();} catch (Exception e) {// 返回 500 响应return ResponseEntity.status(HttpStatus.INTERNAL_SERVER_ERROR).body("服务器错误: " + e.getMessage());}
}
实际应用示例
示例 1:处理文件上传并返回元数据
@PostMapping(value = "/upload", consumes = MediaType.MULTIPART_FORM_DATA_VALUE)
public ResponseEntity<Map<String, Object>> handleFileUpload(HttpEntity<MultipartHttpServletRequest> httpEntity) {MultipartHttpServletRequest request = httpEntity.getBody();HttpHeaders headers = httpEntity.getHeaders();// 获取上传的文件MultipartFile file = request.getFile("file");String originalFilename = file.getOriginalFilename();long fileSize = file.getSize();// 获取其他表单数据String description = request.getParameter("description");// 处理文件(保存到存储等)String fileId = saveFile(file);// 构建响应Map<String, Object> response = new HashMap<>();response.put("fileId", fileId);response.put("originalName", originalFilename);response.put("size", fileSize);response.put("description", description);response.put("uploadedAt", new Date());// 返回 JSON 响应HttpHeaders responseHeaders = new HttpHeaders();responseHeaders.setContentType(MediaType.APPLICATION_JSON);return new ResponseEntity<>(response, responseHeaders, HttpStatus.CREATED);
}
示例 2:代理请求到另一个服务
@PostMapping("/proxy")
public ResponseEntity<String> proxyRequest(HttpEntity<String> incomingRequest) {// 复制原始请求的头和体HttpHeaders outgoingHeaders = new HttpHeaders();outgoingHeaders.putAll(incomingRequest.getHeaders());// 添加或修改头outgoingHeaders.set("X-Forwarded-For", "proxy-server");// 创建转发请求HttpEntity<String> outgoingRequest = new HttpEntity<>(incomingRequest.getBody(), outgoingHeaders);// 转发到目标服务RestTemplate restTemplate = new RestTemplate();return restTemplate.exchange("https://target-service.com/api/endpoint",HttpMethod.POST,outgoingRequest,String.class);
}
示例3:文件下载示例
/*** 文件下载* @param file 文件名称* @return ResponseEntity*/@RequestMapping("/download/{file}")public ResponseEntity<byte[]> download(@PathVariable String file) throws IOException {// 文件流InputStream inputStream = new FileInputStream("C:\\Users\\Administrator\\Pictures\\wifi\\ipv4.png");// 问题:1. 这种方式下载文件,中文名称无法识别// 问题:2. 文件太大,会oom内存溢出// 转为byte类型byte[] readAllBytes = inputStream.readAllBytes();return ResponseEntity.ok()// 内容类型:application/octet-stream.contentType(MediaType.APPLICATION_OCTET_STREAM)// 内容大小.contentLength(readAllBytes.length)// Content-Disposition 内容处理方式.header("Content-Disposition", "attachment; filename=" +file ).body(readAllBytes);}
示例4:文件下载标准格式示例(推荐)
/*** 极简文件下载* @param file 文件名称* @return ResponseEntity*/@RequestMapping("/download2/{file}")public ResponseEntity<InputStreamResource> download2(@PathVariable String file) throws IOException {// 文件流InputStream inputStream = new FileInputStream("C:\\Users\\Administrator\\Pictures\\wifi\\ipv4.png");// 问题:1. 这种方式下载文件,中文名称无法识别,使用URLEncoder解决解决乱码问题,对中文进行url编码。String file_encode = URLEncoder.encode(file, StandardCharsets.UTF_8);// 问题:2. 文件太大下载时,会oom内存溢出,InputStreamResource resource = new InputStreamResource(inputStream);return ResponseEntity.ok()// 内容类型:application/octet-stream.contentType(MediaType.APPLICATION_OCTET_STREAM)// 内容大小.contentLength(inputStream.available())// Content-Disposition 内容处理方式.header("Content-Disposition", "attachment; filename=" +file_encode ).body(resource);}
最佳实践
-
优先使用 ResponseEntity 和 RequestEntity:它们提供了更丰富的API和更好的类型安全性。
-
适当处理空体:对于没有主体的请求或响应,可以使用
HttpEntity<Void>。 -
注意内存使用:对于大文件或大量数据,考虑使用流式处理而不是一次性加载到内存。
-
合理使用头信息:遵循 HTTP 标准,正确设置 Content-Type、Cache-Control 等头信息。
-
异常处理:始终处理可能出现的异常,并提供适当的错误响应。
总结
HttpEntity 是 Spring 中处理 HTTP 消息的核心抽象,它提供了对 HTTP 请求和响应的完整控制。通过 HttpEntity 及其子类(RequestEntity 和 ResponseEntity),开发者可以:
- 精确控制 HTTP 头信息
- 处理各种内容类型的数据
- 构建符合标准的 HTTP 响应
- 实现高级功能如请求代理、文件处理等
在需要完全控制 HTTP 消息的各个方面时,HttpEntity 是一个强大而灵活的工具。
简单代码
@RequestMapping(value = "/http-entity")public String httpEntity(HttpEntity<String> httpEntity) {// 获取http请求报文头HttpHeaders headers = httpEntity.getHeaders();System.out.println("headers = " + headers);// 获取context-type 类型MediaType contentType = headers.getContentType();System.out.println("contentType = = " + contentType);// 获取请求体String body = httpEntity.getBody();System.out.println("body = " + body);return headers + body;}
HTTP请求报文
POST http://localhost:8080/mvc/user/http-entity HTTP/1.1
User-Agent: PostmanRuntime/7.46.1
Accept: */*
Postman-Token: 8b8203b7-af8f-473e-8e28-0a7ef53ca36c
Host: localhost:8080
Accept-Encoding: gzip, deflate, br
Connection: keep-alive
Content-Type: application/x-www-form-urlencoded
Content-Length: 25username=111&password=222
结果输出:
headers = [user-agent:"PostmanRuntime/7.46.1", accept:"*/*", postman-token:"8b8203b7-af8f-473e-8e28-0a7ef53ca36c", host:"localhost:8080", accept-encoding:"gzip, deflate, br", connection:"keep-alive", content-length:"25", Content-Type:"application/x-www-form-urlencoded;charset=UTF-8"]
contentType = application/x-www-form-urlencoded;charset=UTF-8
body = username=111&password=222
9. 原生API
代码示例:
@RequestMapping(value = "servlet")public void servlet(HttpServletRequest request, HttpServletResponse response) throws IOException {String username = request.getParameter("username");String password = request.getParameter("password");// 自定义请求头response.setHeader("TEST-SERVLET", username+":"+password);response.getWriter().write("ok"+username+":"+password);}
HTTP请求报文
POST http://localhost:8080/mvc/user/servlet?username=111&password=200 HTTP/1.1
User-Agent: PostmanRuntime/7.46.1
Accept: */*
Postman-Token: feb64c8b-b9e0-4305-b159-8709d859b6f5
Host: localhost:8080
Accept-Encoding: gzip, deflate, br
Connection: keep-alive
Content-Type: application/x-www-form-urlencoded
Content-Length: 25
HTTP响应报文
- 我们自定义的header头返回了
HTTP/1.1 200
Vary: Origin
Vary: Access-Control-Request-Method
Vary: Access-Control-Request-Headers
Access-Control-Allow-Origin: *
TEST-SERVLET: 111:200
Content-Length: 0
Date: Thu, 18 Sep 2025 09:58:43 GMT
Keep-Alive: timeout=60
Connection: keep-alive
总结与最佳实践
| 场景 | 推荐注解 | 说明 |
|---|---|---|
| 定义请求入口 | @GetMapping, @PostMapping 等 | 优先使用组合注解,意图更清晰。 |
| 获取单个URL参数 | @RequestParam | 用于查询字符串和表单字段。 |
| 获取RESTful路径变量 | @PathVariable | 用于从 URL 路径中获取值。 |
| 获取JSON请求体 | @RequestBody | 构建 RESTful API 时常用。 |
| 获取表单对象 | @ModelAttribute | 处理传统表单提交,可自动绑定到对象。 |
| 获取请求头/Cookie | @RequestHeader, @CookieValue | 用于需要这些信息的特定场景。 |
@RequestParam、@RequestBody以及@ModelAttribute的区别和异同?
@RequestParam、@RequestBody 和 @ModelAttribute 都用于从HTTP请求中提取数据,但它们的工作方式、用途和场景有根本性的区别。
下面我将通过一个对比表格和详细解释来阐明三者的区别和异同。
核心区别对比表
| 特性 | @RequestParam | @ModelAttribute | @RequestBody |
|---|---|---|---|
| 核心用途 | 获取单个请求参数 | 将多个参数绑定到对象 | 将请求体绑定到对象 |
| 数据来源 | URL 查询字符串 或 表单数据 | URL查询字符串、表单数据、路径变量等 | 请求体 (Body) |
| HTTP方法 | 主要用于 GET,也可用于 POST | 主要用于 GET/POST (表单) | 主要用于 POST, PUT, PATCH |
| 数据格式 | key1=value1&key2=value2 | key1=value1&key2=value2 | JSON、XML 等 (由Content-Type指定) |
Content-Type | application/x-www-form-urlencoded | application/x-www-form-urlencoded | application/json, application/xml |
| 处理过程 | 简单类型转换 | 数据绑定 (Data Binding) | HttpMessageConverter 进行反序列化 |
| 返回值 | 一个简单类型的值 | 一个复杂对象 | 一个复杂对象 |
| 典型场景 | 分页(page)、搜索(keyword)、ID(id) | 表单提交(用户注册、编辑) | RESTful API,接收前端发送的JSON数据 |
详细解释与示例
为了更好地理解,我们假设有一个 User 类:
public class User {private String username;private String password;private Integer age;
}
1. @RequestParam:获取单个参数
- 作用:用于从请求URL的查询字符串(Query String) 或 表单数据(Form Data) 中提取单个值。
- 来源:URL中
?后面的部分,例如?name=John&age=30。 - 处理:Spring进行简单的类型转换(如 String -> Integer)。
示例场景:通过URL参数获取用户信息。
// 请求:GET /user?name=John&age=30@GetMapping("/user")
public String getUser(@RequestParam String name, @RequestParam Integer age) {// 使用 name 和 agereturn "user-page";
}
2. @ModelAttribute:绑定到对象(表单处理)
- 作用:将请求中的多个参数(通常是表单字段)智能地绑定到一个复合对象上。
- 来源:主要来自表单提交的字段。Spring会自动将参数名与对象属性名匹配。
- 处理:数据绑定(Data Binding) + 可选的验证(Validation)。
示例场景:传统的HTML表单提交。
// 请求:POST /register (Body: username=John&password=123&age=30)@PostMapping("/register")
public String register(@ModelAttribute User user) { // Spring 自动创建User对象并调用setter方法:// user.setUsername("John");// user.setPassword("123");// user.setAge(30);userService.save(user);return "success";
}
3. @RequestBody:解析请求体(API开发)
- 作用:将整个请求体(Request Body) 的内容(通常是JSON)解析并转换(反序列化)为一个Java对象。
- 来源:请求体(Body),不是URL参数。
- 处理:使用配置的
HttpMessageConverter(如MappingJackson2HttpMessageConverter)来解析JSON等格式。
示例场景:开发RESTful API,接收前端发送的JSON数据。
// 请求:POST /api/users
// Headers: Content-Type: application/json
// Body: {"username": "John", "password": "123", "age": 30}@PostMapping("/api/users")
public ResponseEntity<User> createUser(@RequestBody User user) {// Spring 使用Jackson库将JSON字符串反序列化成User对象User savedUser = userService.save(user);return ResponseEntity.ok(savedUser);
}
关键异同总结
-
@RequestParamvs@ModelAttribute:- 相同点:都主要用于处理
application/x-www-form-urlencoded格式的数据(即URL查询参数或表单提交)。 - 不同点:
@RequestParam是“零售”,一个一个地拿参数;@ModelAttribute是“批发”,一次性把一个表单的所有字段组装成一个对象。在简单场景下,@ModelAttribute可以省略不写,Spring会默认应用此规则。
- 相同点:都主要用于处理
-
@ModelAttributevs@RequestBody:- 根本区别:它们处理的数据格式和
Content-Type完全不同。@ModelAttribute:期望Content-Type: application/x-www-form-urlencoded。数据是扁平化的键值对。@RequestBody:期望Content-Type: application/json。数据是结构化的JSON(或XML)。
- 这是导致你之前遇到 415 Unsupported Media Type 错误的核心原因。如果你用
@RequestBody去接收一个表单提交,或者用@ModelAttribute去接收一个JSON请求体,都会报错。
- 根本区别:它们处理的数据格式和
-
@RequestParamvs@RequestBody:- 它们处在完全不同的“维度”。
@RequestParam处理的是URL的一部分,而@RequestBody处理的是HTTP请求的消息体。
- 它们处在完全不同的“维度”。
如何选择?
- 开发传统的网页应用(多页面应用,MPA),使用表单提交:主要使用
@ModelAttribute(或省略)。 - 开发现代的前后端分离应用(如React/Vue + Spring Boot API):主要使用
@RequestBody来接收JSON数据。 - 在任何场景下,只需要获取一两个简单的查询参数(如ID、搜索词、分页参数):使用
@RequestParam。
简单记忆:表单用@ModelAttribute,JSON用@RequestBody,小参数用@RequestParam。
@RequestHeader, @CookieValue, @RequestPart对比总结
| 注解 | 作用 | 数据来源 | 常用场景 |
|---|---|---|---|
@RequestHeader | 获取HTTP请求头 | 请求头部 | 获取客户端信息、认证令牌等 |
@CookieValue | 获取Cookie值 | 请求Cookie | 获取会话ID、用户偏好等 |
@RequestPart | 获取multipart请求部分 | 请求体(multipart) | 文件上传、复杂表单提交 |