基于Qt Creator的Serial Port串口调试助手项目(代码开源)
前言:本文为手把手教学的基于 Qt Creator 的 Serial Port 串口调试助手项目教程,项目使用 Qt 版本为 Qt 5.9.0,整体上实现了 Serial Port 串口助手所有的功能。本项目的 Serial Port 串口助手除了设计出常规的 Serial Port 串口打印功能外,还额外模仿了著名软件 VOFA+ 的上位机波形实时输出功能。本项目代码实现偏简单可行,可能存在很多可以优化性能的地方,亦或可能存在功能性上的 BUG ,欢迎各位读者朋友们使用该代码或在此代码框架上进行二次开发。当然,也欢迎各位读者朋友们提出珍贵的改进建议(篇末代码开源)!
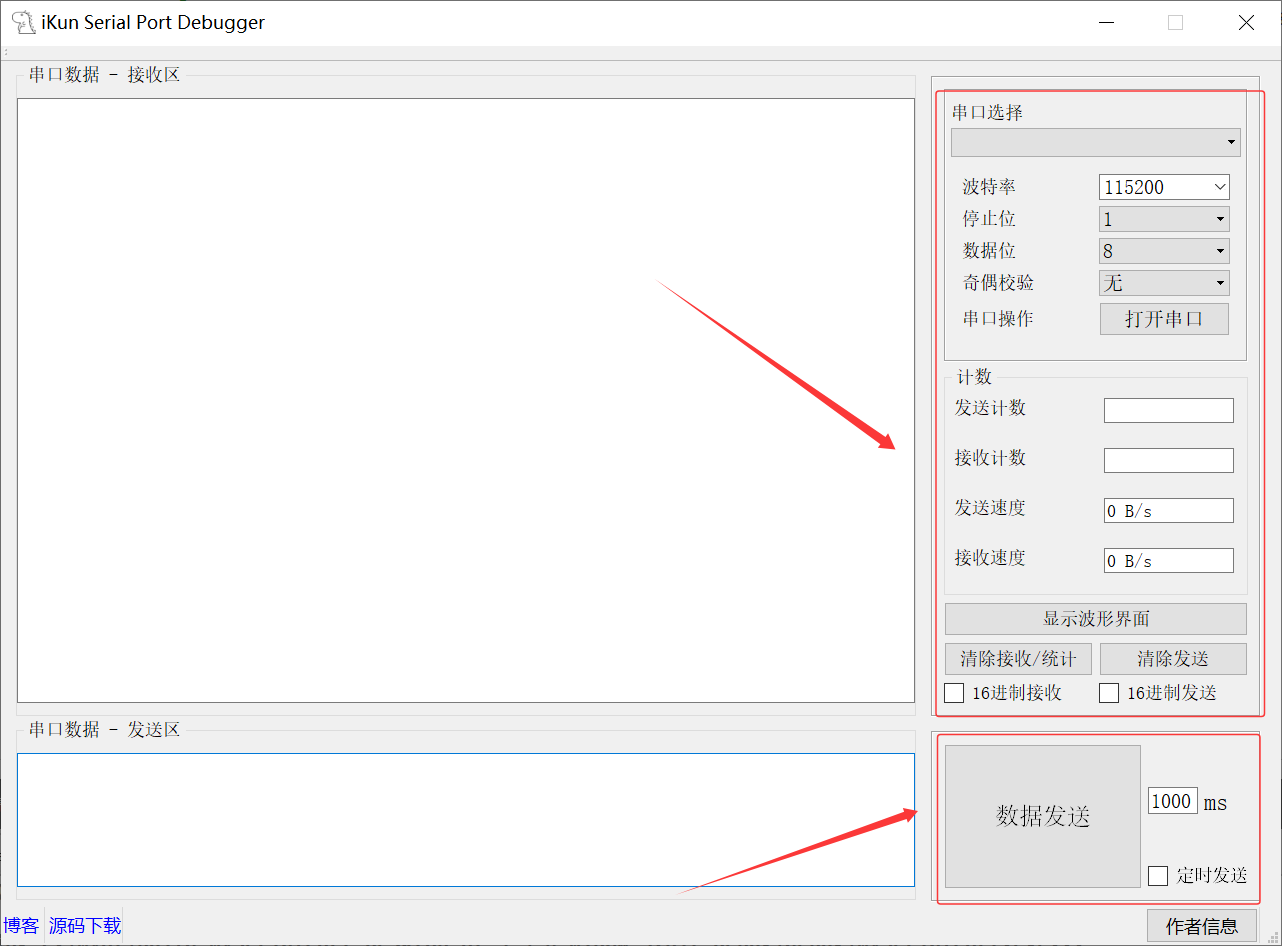
软件界面:
所需环境和软件工具:
1. Qt Creator 4.3.0
2. Qt 5.9.0
3. Window10
一、Serial Port串口助手
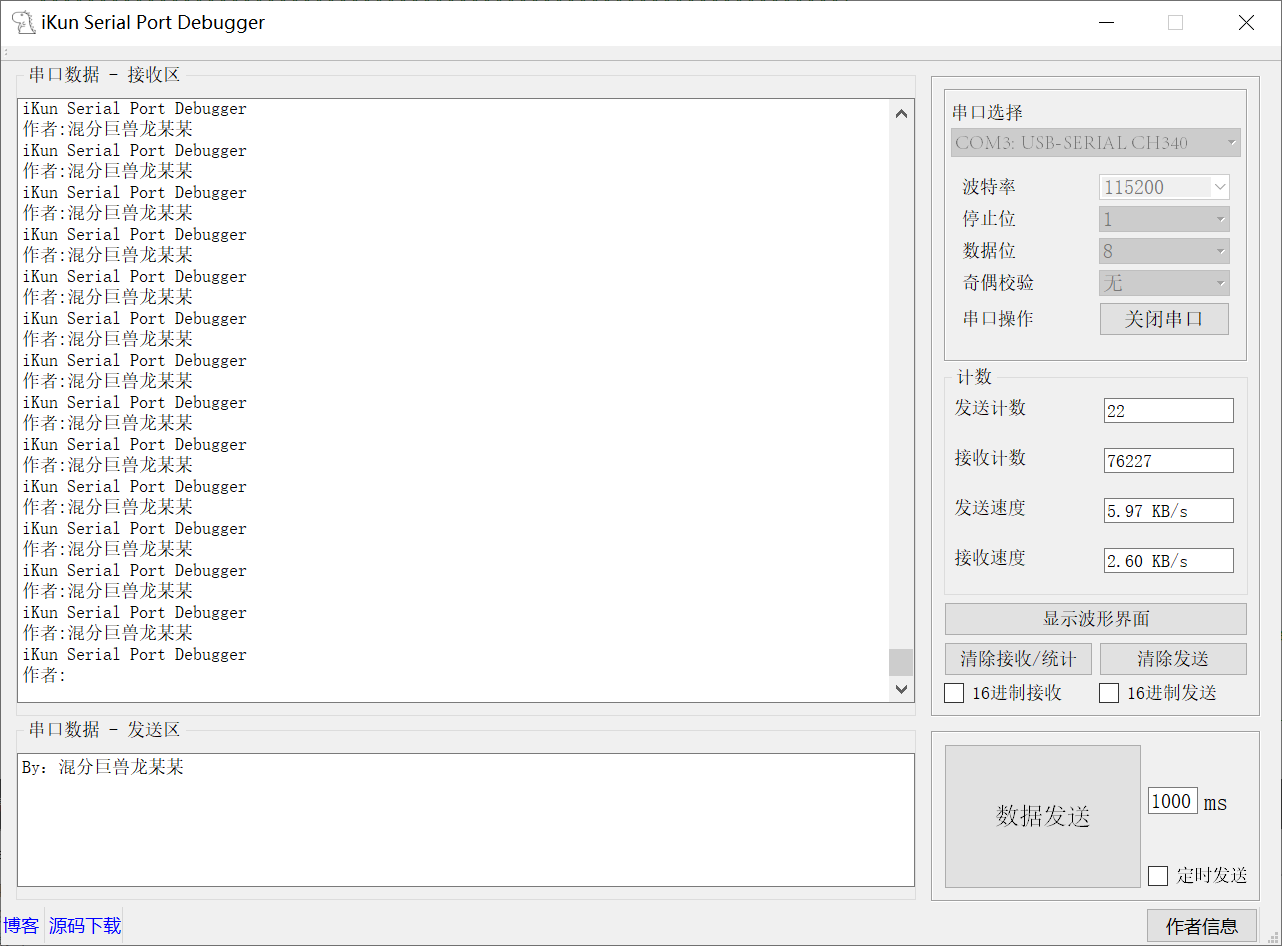
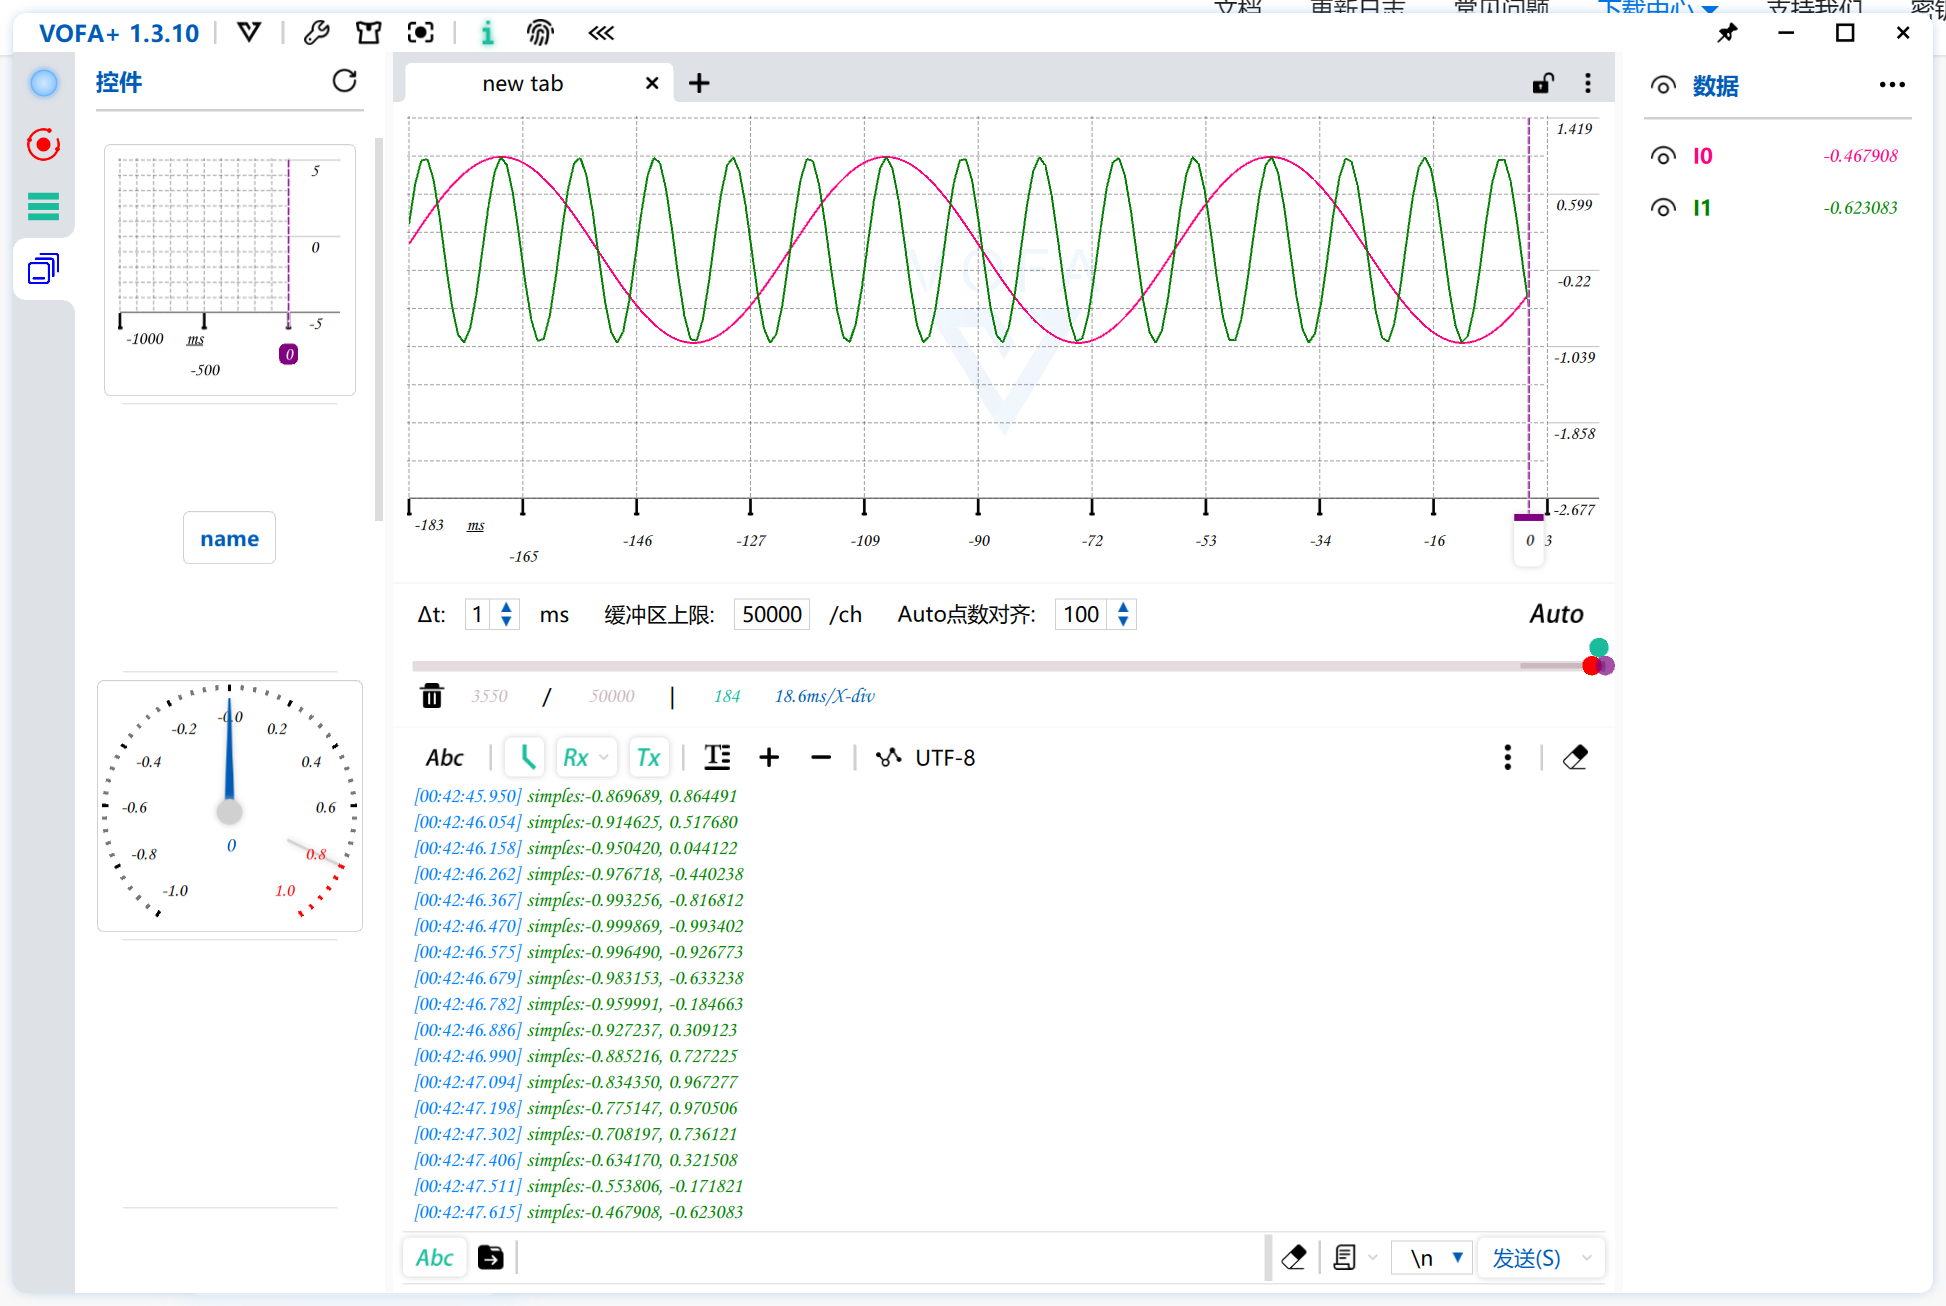
串口助手(Serial Port Debugger)是一款运行在计算机(PC)上的软件工具,其核心功能是通过计算机的物理串行通信接口(如 COM 口、USB 转串口适配器)或虚拟串口,与外部具备串行通信能力的硬件设备进行双向数据交互。它是嵌入式系统开发、工业控制、仪器仪表调试、物联网设备通信等领域的基础且至关重要的工具。本项目在传统的 Serial Port 助手的功能上还提供了 Plot 绘制的功能,该功能模仿了超级优秀的串口上位机 VOFA+ 进行设计,如下为 VOFA+ 这款非常优秀的串口调试助手界面:
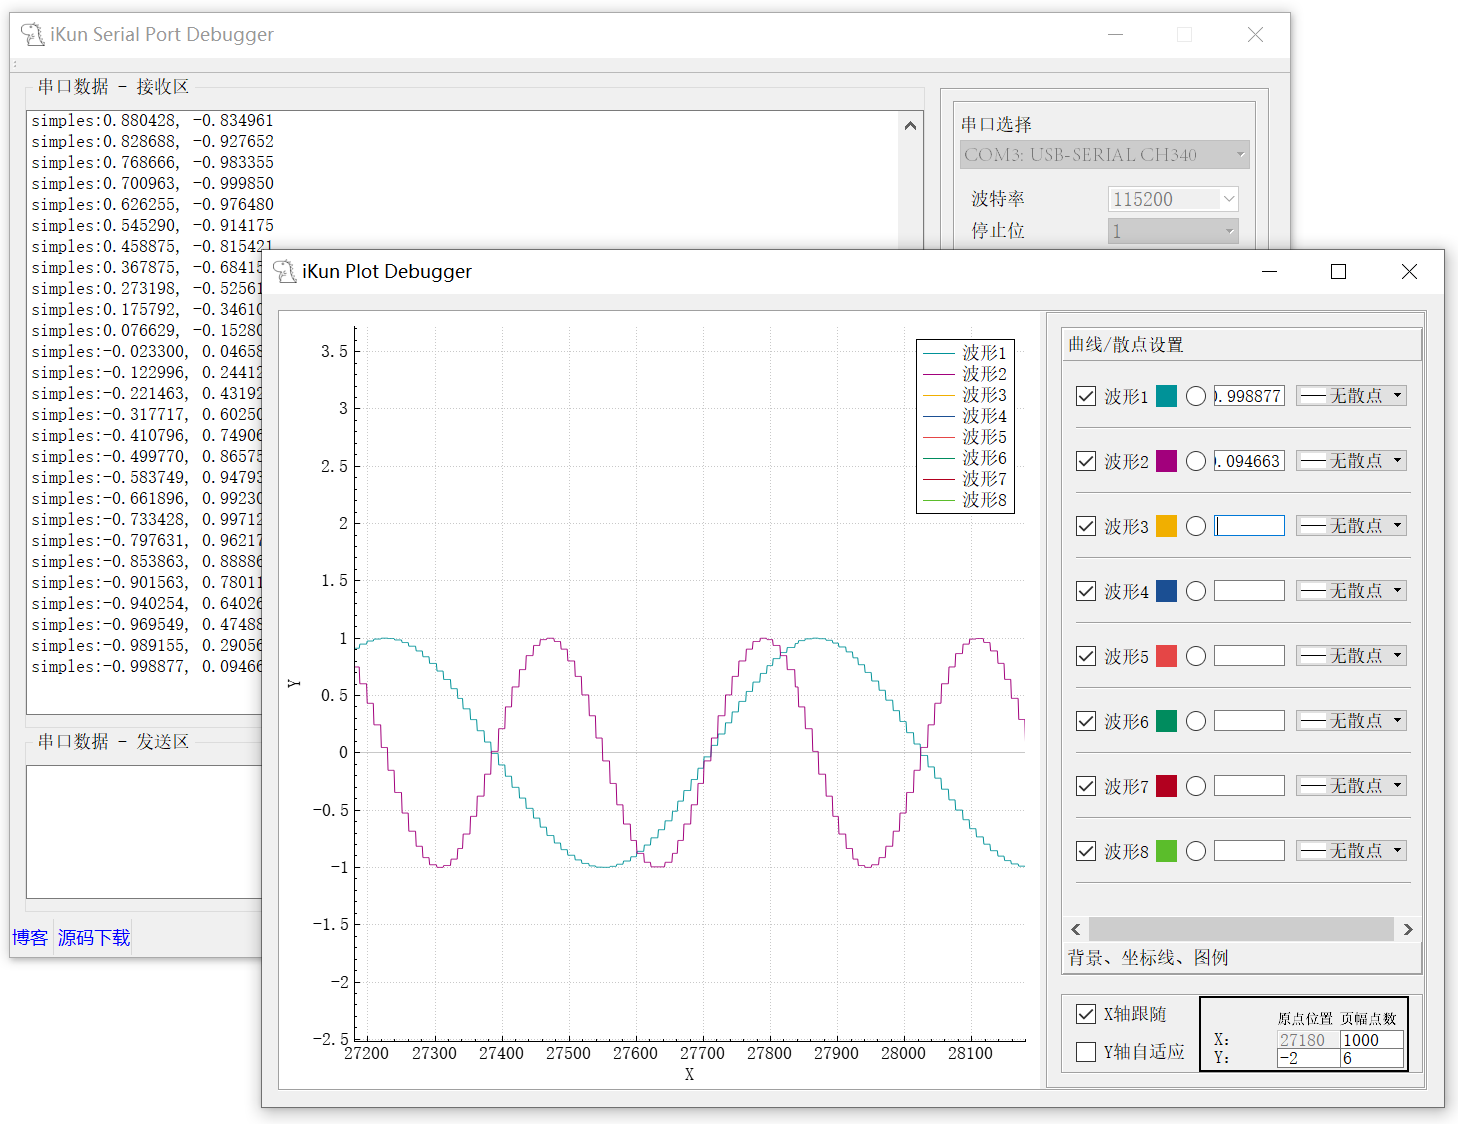
本篇博客的 Serial Port 串口调试助手是模仿 VOFA+ 这款优秀上位机进行制作的,使用的开发软件为 Qt Creator 4.3.0,Qt 的版本为Qt 5.9.0。考虑到需要实现 Plot 波形数据绘制,还引入了 QCustomPlot 这个图形库,利用 QCustomPlot 提供的 API 函数实现 Plot 的绘制。本项目的 Serial Port 串口助手的 Plot 波形绘制功能如下:
二、Serial Port布局 ui 画面
2.1 Serial Port整体布局
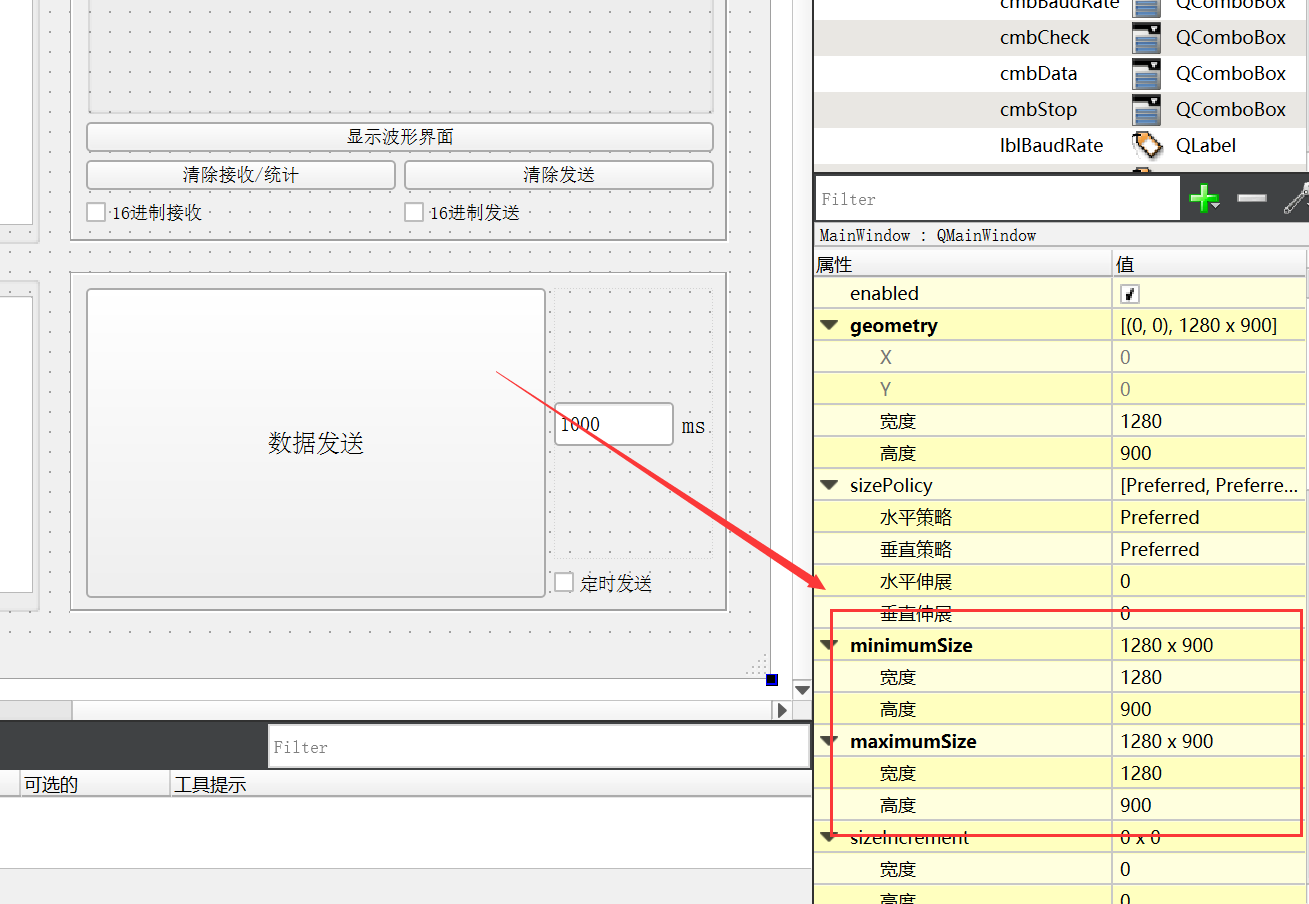
一般情况下,为了保证设计的 Serial Port 助手的布局合理性,可能会固定窗口大小,共有 2 种方法;
方案 1:使用代码 this->setFixedSize(this->size());其中这里的this表示所需要固定的窗口。
方案 2:调整 ui 窗口的最大值与最小值,即使得二者相等,如下图所示:
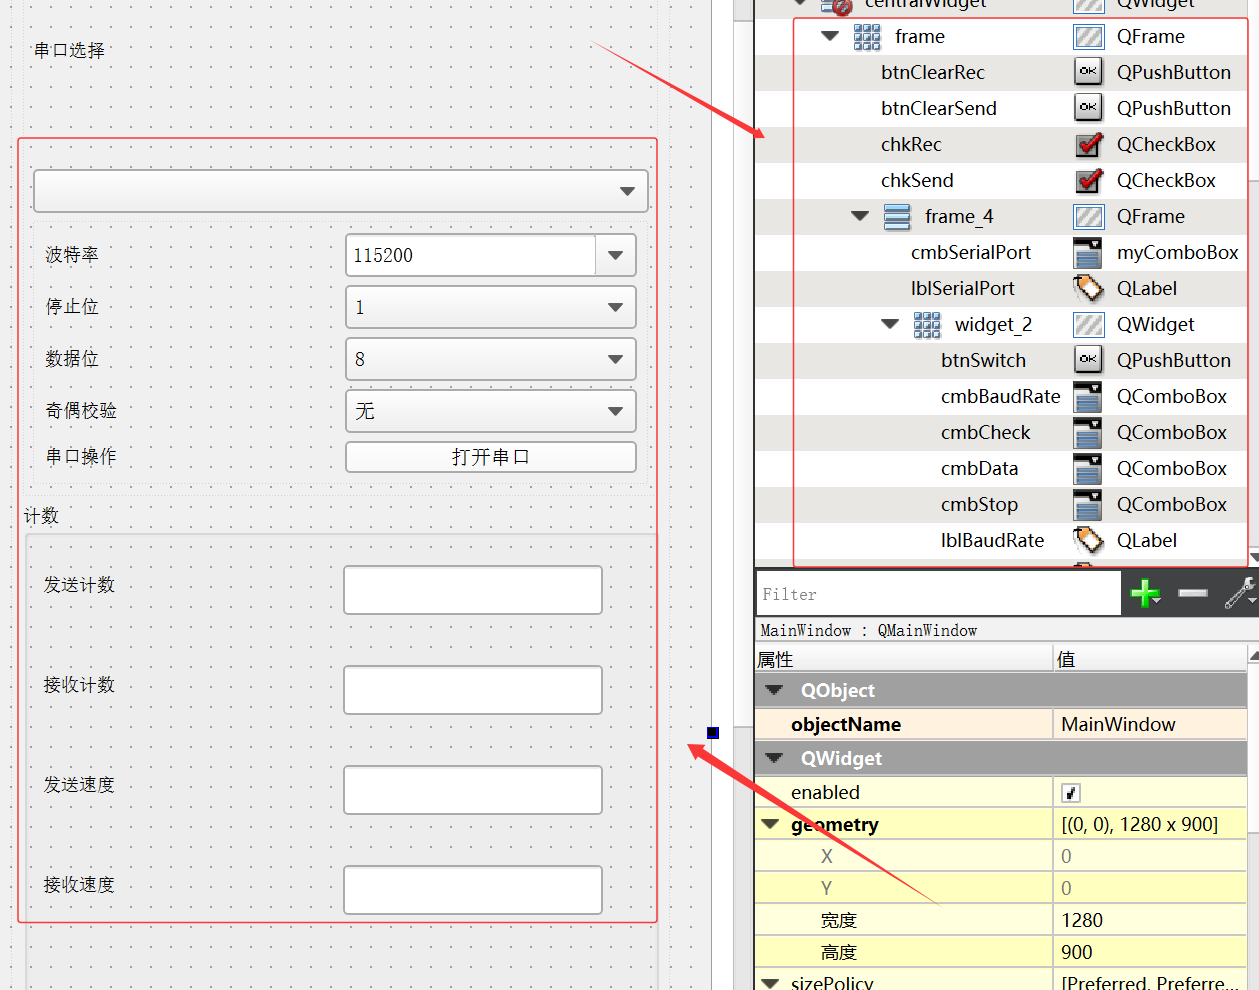
2.2 功能性按键布局
Serial Port 串口助手的功能布局:
1、串口选择:USB_CH340_COM;myComboBox
2、波特率:1200~1382400;QComboBox
3、停止位:1、1.5、2;QComboBox
4、数据位:5、6、7、8;QComboBox
5、奇偶校验:无、奇校验、偶校验;QComboBox
6、串口操作:控制串口的打开;QPushButton
Serial Port 计数的功能布局:
1、发送计数:发送的字节数量;QLineEdit
2、接收计数:接收的字节数量;QLineEdit
3、发送速度:发送的字节速度;QLineEdit
4、接收速度:接收的字节速度;QLineEdit
5、清除接收/统计:清除接收内容与接收计数;QPushButton
6、清除发送:清除发送内容与发送计数;QPushButton
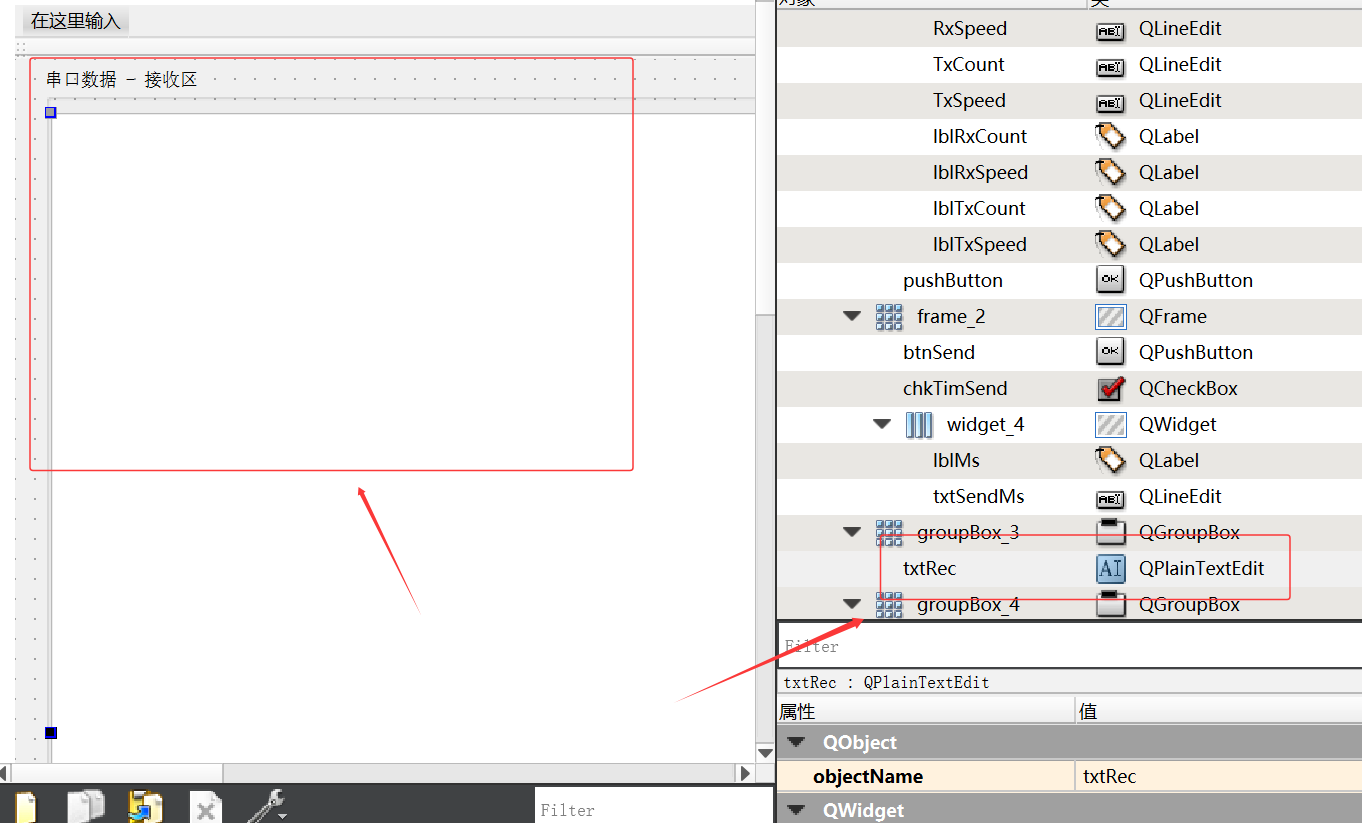
2.3 数据接收与发送布局
Serial Port 串口数据接收:
打开串口助手后,默认串口数据-接收区将会一直接收下位机发送过来的数据。该数据接收区的 Qt 部件为 QPlainTextEdit,读者朋友们可以自行设计其 Size() 大小、Font 字符内容和 Format 格式等
Serial Port 串口数据发送:
打开串口助手后,可以在串口数据发送区输入文本内容,点击发送按钮 PushButton 即可;亦或是使用定时器发送数据内容。补充说明:数据接收与数据发送区都可以使用 16 进制数据进行处理。
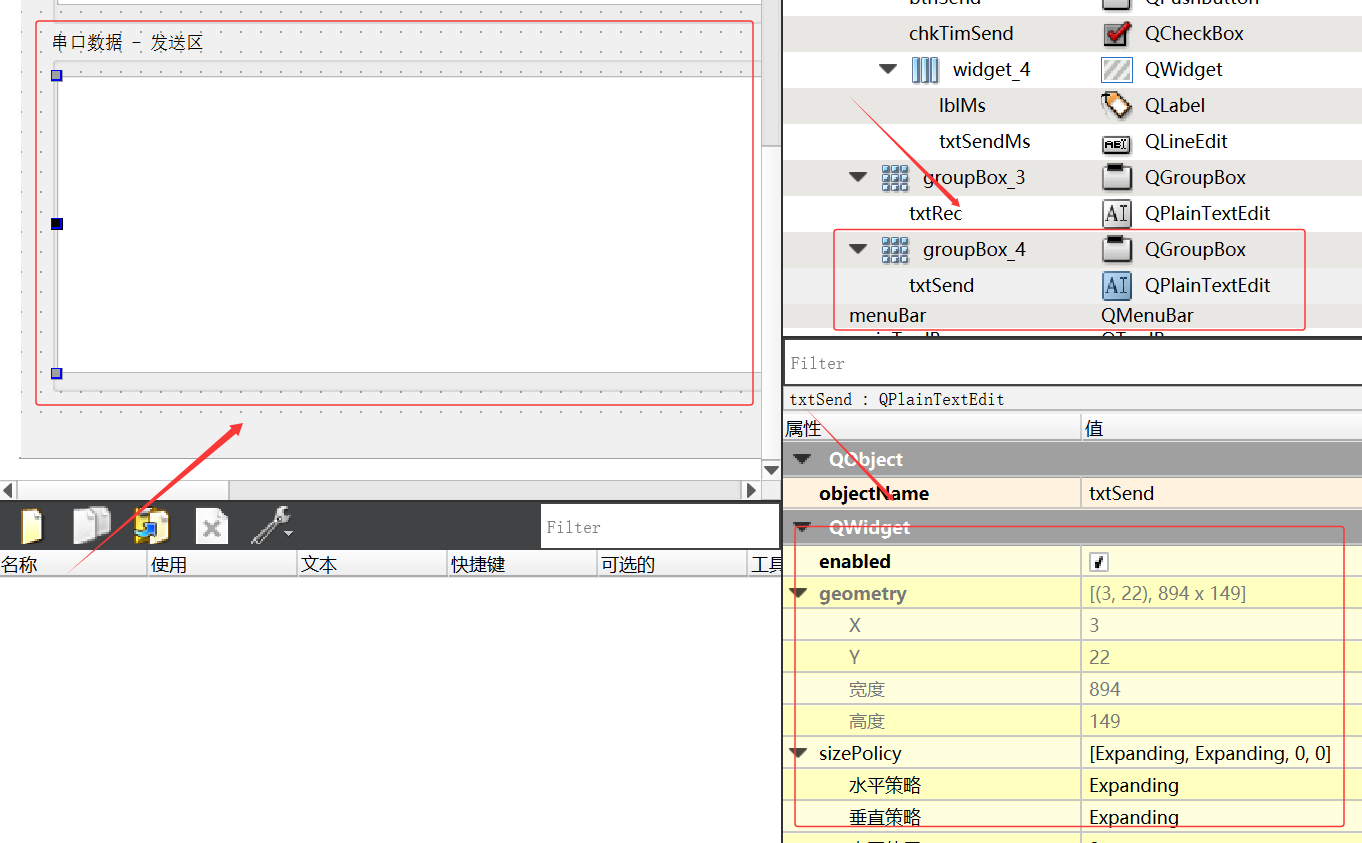
Serial Port 的串口数据接收区和发送区都属于 Qt 中的 QPlainTextEdit;
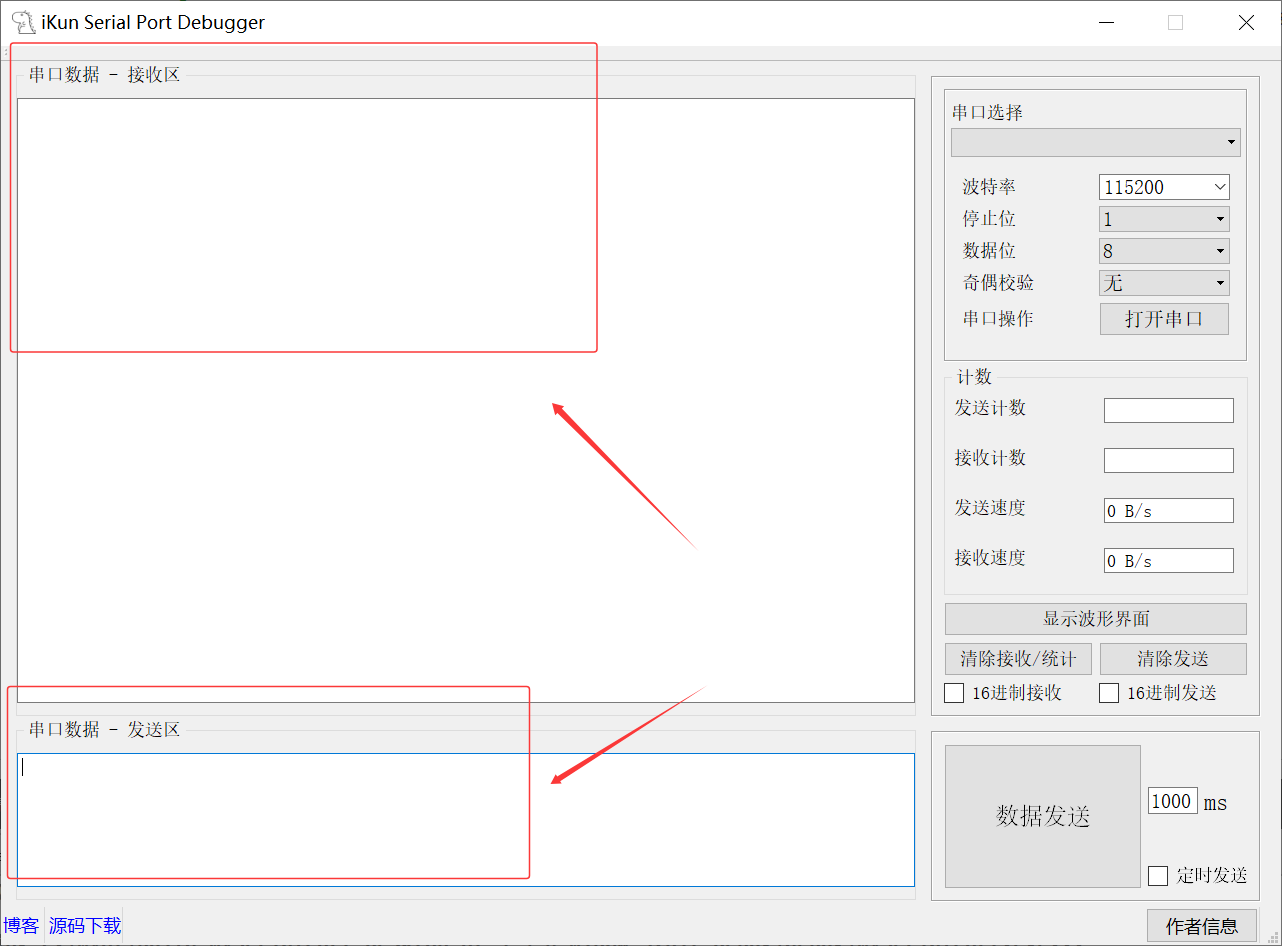
Serial Port 最终布局:
三、Serial Port 串口功能实现
3.1 Serial Port 初始化与接收
Serial Port 初始化需要选择 PC端现在存在的 COM 端口,之后需要设置 Serial Port 波特率、数据的停止位、数据位和奇偶校验。然后,点击串口操作按钮 PushButton 打开串口,作者这里使用了 Qt 槽函数进行连接;
补充说明:Qt 提供了一系列特别方便的 Serial Port 串口助手库函数,我们可以直接使用 mySerialPort->readAll() 和 mySerialPort->writeAll() 针对串口提供的数据进行操作;

// Serial Port串口设置初始化
void MainWindow::on_btnSwitch_clicked()
{QSerialPort::BaudRate baudRate;QSerialPort::DataBits dataBits;QSerialPort::StopBits stopBits;QSerialPort::Parity   checkBits;// 获取串口波特率baudRate = (QSerialPort::BaudRate)ui->cmbBaudRate->currentText().toUInt();// 获取串口数据位dataBits = (QSerialPort::DataBits)ui->cmbData->currentText().toUInt();// 获取串口停止位if(ui->cmbStop->currentText() == "1"){stopBits = QSerialPort::OneStop;}else if(ui->cmbStop->currentText() == "1.5"){stopBits = QSerialPort::OneAndHalfStop;}else if(ui->cmbStop->currentText() == "2"){stopBits = QSerialPort::TwoStop;}else{stopBits = QSerialPort::OneStop;}// 获取串口奇偶校验位if(ui->cmbCheck->currentText() == "无"){checkBits = QSerialPort::NoParity;}else if(ui->cmbCheck->currentText() == "奇校验"){checkBits = QSerialPort::OddParity;}else if(ui->cmbCheck->currentText() == "偶校验"){checkBits = QSerialPort::EvenParity;}else{checkBits = QSerialPort::NoParity;}// 想想用 substr strchr怎么从带有信息的字符串中提前串口号字符串// 初始化串口属性,设置 端口号、波特率、数据位、停止位、奇偶校验位数mySerialPort->setBaudRate(baudRate);mySerialPort->setDataBits(dataBits);mySerialPort->setStopBits(stopBits);mySerialPort->setParity(checkBits);//mySerialPort->setPortName(ui->cmbSerialPort->currentText());// 不匹配带有串口设备信息的文本// 匹配带有串口设备信息的文本QString spTxt = ui->cmbSerialPort->currentText();spTxt = spTxt.section(':', 0, 0);//spTxt.mid(0, spTxt.indexOf(":"));//qDebug() << spTxt;mySerialPort->setPortName(spTxt);// 根据初始化好的串口属性,打开串口// 如果打开成功,反转打开按钮显示和功能。打开失败,无变化,并且弹出错误对话框。if(ui->btnSwitch->text() == "打开串口"){if(mySerialPort->open(QIODevice::ReadWrite) == true){ui->btnSwitch->setText("关闭串口");// 让端口号下拉框不可选,避免误操作(选择功能不可用,控件背景为灰色)ui->cmbSerialPort->setEnabled(false);ui->cmbBaudRate->setEnabled(false);ui->cmbStop->setEnabled(false);ui->cmbData->setEnabled(false);ui->cmbCheck->setEnabled(false);}else{QMessageBox::critical(this, "错误提示", "串口打开失败!!!\r\n\r\n该串口可能被占用,请选择正确的串口\r\n或者波特率过高,超出硬件支持范围");}}else{mySerialPort->close();ui->btnSwitch->setText("打开串口");// 端口号下拉框恢复可选,避免误操作ui->cmbSerialPort->setEnabled(true);ui->cmbBaudRate->setEnabled(true);ui->cmbStop->setEnabled(true);ui->cmbData->setEnabled(true);ui->cmbCheck->setEnabled(true);}
}
// 串口接收显示,槽函数
void MainWindow::serialPortRead_Slot()
{/* 利用QtSerial库接收数据 */QByteArray recBuf = mySerialPort->readAll();Plot_Num = recBuf;// 判断是否为16进制接收,将以后接收的数据全部转换为16进制显示(先前接收的部分在多选框槽函数中进行转换。最好多选框和接收区组成一个自定义控件,方便以后调用)if(ui->chkRec->checkState() == false){// GB2312编码输入QString strb = QString::fromLocal8Bit(recBuf);//QString::fromUtf8(recBuf);//QString::fromLatin1(recBuf);// 在当前位置插入文本,不会发生换行。如果没有移动光标到文件结尾,会导致文件超出当前界面显示范围,界面也不会向下滚动。ui->txtRec->insertPlainText(strb);}else{// 16进制显示,并转换为大写QString str1 = recBuf.toHex().toUpper();//.data();// 添加空格QString str2;for(int i = 0; i<str1.length (); i+=2){str2 += str1.mid (i,2);str2 += " ";}ui->txtRec->insertPlainText(str2);}/* 1.计算接收到的字节数 */RecvNum += recBuf.size();/* 2.格式化并显示总字节数 */ui->RxCount->setText(QString::number(RecvNum));/* 3.计算并显示接收速度 */QString speedText = calculateSpeed(RecvNum);ui->RxSpeed->setText(speedText);/* 4.更新上一次记录(用于下次计算速度)*/lastRecvNum = RecvNum;lastUpdateTime = QDateTime::currentMSecsSinceEpoch();/* 5.移动光标到文本结尾 */ui->txtRec->moveCursor(QTextCursor::End);
}
3.2 Serial Port 串口数据发送
Serial Port 串口助手通常拥有定时发送功能,例如:1000ms 进行一次数据发送。当然,还拥有 16 进制数转换的功能进行 Data 数据接收和发送。作者这边提供详细的代码,读者朋友可以直接参考作者提供的开源代码。
// 串口发送数据
void MainWindow::on_btnSend_clicked()
{QByteArray sendData;// 判断是否为16进制发送,将发送区全部的asc2转换为16进制字符串显示,发送的时候转换为16进制发送if(ui->chkSend->checkState() == false){// 字符串形式发送,GB2312编码用以兼容大多数单片机sendData = ui->txtSend->toPlainText().toLocal8Bit();// GB2312编码输出}else{// 16进制发送,不要用.data(),.data()返回的是字符数组,0x00在ASC2中的意义为NUL,也就是'\0'结束符,所以遇到0x00就会终止sendData = QByteArray::fromHex(ui->txtSend->toPlainText().toLocal8Bit());// GB2312编码输出}// 记录发送前的时间戳qint64 sendStartTime = QDateTime::currentMSecsSinceEpoch();// 发送数据int bytesSent = mySerialPort->write(sendData);// 发送字节计数并显示if(bytesSent > 0) {// 更新总发送字节数SendNum += bytesSent;ui->TxCount->setText(QString::number(SendNum));// 记录发送结束时间qint64 sendEndTime = QDateTime::currentMSecsSinceEpoch();qint64 sendDuration = sendEndTime - sendStartTime;// 计算并显示发送速度calculateSendSpeed(bytesSent, sendDuration);}
}// 16进制发送触发按键
void MainWindow::on_chkSend_stateChanged(int arg1)
{// 获取文本字符串QString txtBuf = ui->txtSend->toPlainText();// 获取多选框状态,未选为0,选中为2// 为0时,多选框未被勾选,将先前的发送区的16进制字符串转换为asc2字符串if(arg1 == 0){//QByteArray str1 = QByteArray::fromHex(txtBuf.toUtf8());//仅能处理Unicode编码,因为QString就是Unicode//QString str1 = QString::fromLocal8Bit(txtBuf.toUtf8());//仅能处理GB2312编码,Unicode的数据无论如何都会乱码//把gb2312编码转换成unicodeQString str1 = QTextCodec::codecForName("GB2312")->toUnicode(QByteArray::fromHex(txtBuf.toLocal8Bit()));// 文本控件清屏,显示新文本ui->txtSend->clear();ui->txtSend->insertPlainText(str1);// 移动光标到文本结尾ui->txtSend->moveCursor(QTextCursor::End);}else{// 多选框被勾选,将先前的发送区的asc2字符串转换为16进制字符串//QByteArray str1 = txtBuf.toUtf8().toHex().toUpper();// Unicode编码输出QString str1 = txtBuf.toLocal8Bit().toHex().toUpper();// GB2312编码输出// 添加空格QString str2;for(int i = 0; i<str1.length (); i+=2){str2 += str1.mid (i,2);str2 += " ";}// 文本控件清屏,显示新文本ui->txtSend->clear();ui->txtSend->insertPlainText(str2);// 移动光标到文本结尾ui->txtSend->moveCursor(QTextCursor::End);}
}
3.3 Serial Port 计数功能
Serial Port 的发送速度:
// 计算发送速度(字节/秒)
void MainWindow::calculateSendSpeed(qint64 bytesSent, qint64 durationMs)
{// 处理零时间间隔(理论不可能,但安全处理)if (durationMs == 0) durationMs = 1;// 计算瞬时速度(字节/秒)double instantSpeed = (bytesSent * 1000.0) / durationMs;// 应用指数平滑滤波(减少数值跳动)const double smoothingFactor = 0.3;smoothedSendSpeed = smoothingFactor * instantSpeed + (1 - smoothingFactor) * smoothedSendSpeed;// 单位转换与显示QString speedText;if (smoothedSendSpeed >= 1024 * 1024 * 1024) { // GB/sspeedText = QString("%1 GB/s").arg(smoothedSendSpeed / (1024 * 1024 * 1024), 0, 'f', 2);} else if (smoothedSendSpeed >= 1024 * 1024) { // MB/sspeedText = QString("%1 MB/s").arg(smoothedSendSpeed / (1024 * 1024), 0, 'f', 2);} else if (smoothedSendSpeed >= 1024) { // KB/sspeedText = QString("%1 KB/s").arg(smoothedSendSpeed / 1024, 0, 'f', 2);} else { // B/sspeedText = QString("%1 B/s").arg(smoothedSendSpeed, 0, 'f', 2);}// 更新UI显示ui->TxSpeed->setText(speedText);// 更新最后发送状态lastSendTime = QDateTime::currentMSecsSinceEpoch();lastSendNum = SendNum;
}
Serial Port 的接收速度:
// 计算接收速度(字节/秒)
QString MainWindow::calculateSpeed(qint64 currentNum)
{qint64 currentTime = QDateTime::currentMSecsSinceEpoch();qint64 deltaTime = currentTime - lastUpdateTime;if (deltaTime == 0 || lastRecvNum == 0) {// 首次计算或时间未变化时返回0lastRecvNum = currentNum;lastUpdateTime = currentTime;return "0 B/s";}// 计算每秒接收字节数double deltaBytes = currentNum - lastRecvNum;double speed = deltaBytes / deltaTime * 1000; // 转换为秒// 速度单位转换if (speed >= 1024 * 1024 * 1024) { // GB/sreturn QString("%1 GB/s").arg(speed / (1024 * 1024 * 1024), 0, 'f', 2);} else if (speed >= 1024 * 1024) { // MB/sreturn QString("%1 MB/s").arg(speed / (1024 * 1024), 0, 'f', 2);} else if (speed >= 1024) { // KB/sreturn QString("%1 KB/s").arg(speed / 1024, 0, 'f', 2);} else { // B/sreturn QString("%1 B/s").arg(speed, 0, 'f', 2);}
}
四、Waveform 波形功能实现
4.1 引入 QCustomPlot
QCustomPlot 是一个超强超小巧的 Qt 绘图类,非常漂亮,非常易用,只需要加入一个 qcustomplot.h 和 qcustomplot.cpp 文件即可使用,远比 qwt 方便和漂亮,可以自己使用两个源文件也可以自己编译成库文件,非常方便。
官方网站:http://www.qcustomplot.com/
进入 QCustomPlot 下载页,下载最新的完整包(包含:源码、文档、示例)!
将下载好的安装包进行解压缩,里面包含文档、示例、更改日志、GPL 授权、以及最重要的两个文件 qcustomplot.h 与 qcustomplot.cpp。
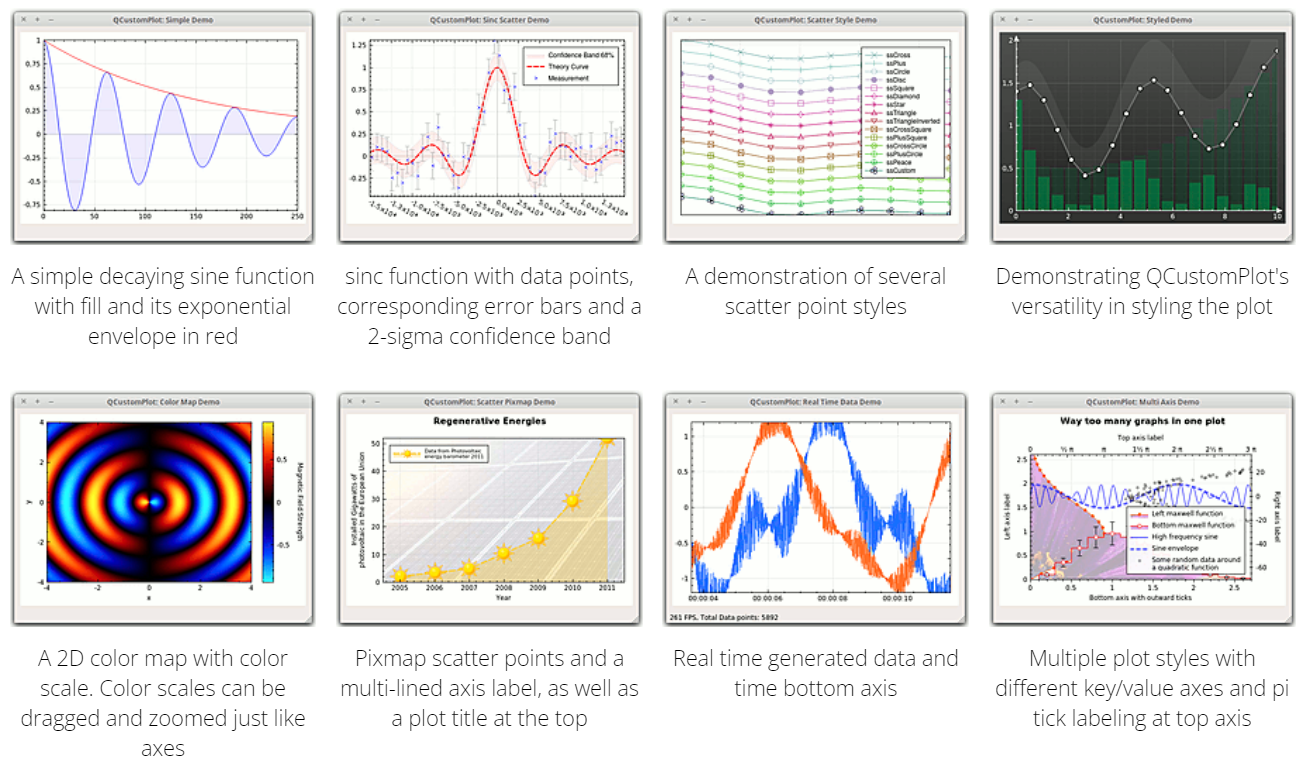
在 Examples 中我们会看到一些自带的示例,可以运行看一下效果。
如果在自己的项目中使用,需要进行以下配置:
首先,在 pro 中需要添加(由于 QCustomPlot 中存在导出功能,使用了 printsupport 模块):
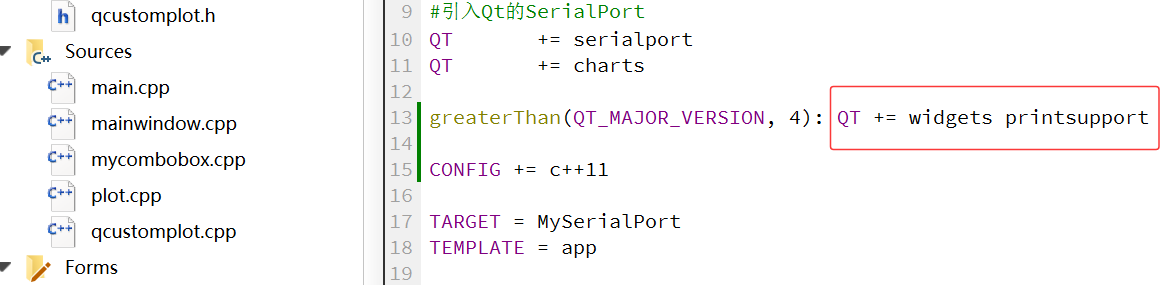
QT += printsupport然后,将 qcustomplot.h 与 qcustomplot.cpp 拷贝到工程目录下,右键 -> 添加现有文件…,将这两个文件添加至工程。在调用 qcustomplot 的地方,需要引入,才可成功创建一个 qcustomplot 对象:
#include "qcustomplot.h"
/* 创建qcustomplot */
QCustomPlot *pCustomPlot = new QCustomPlot(this);
4.2 Plot ui 格局设计

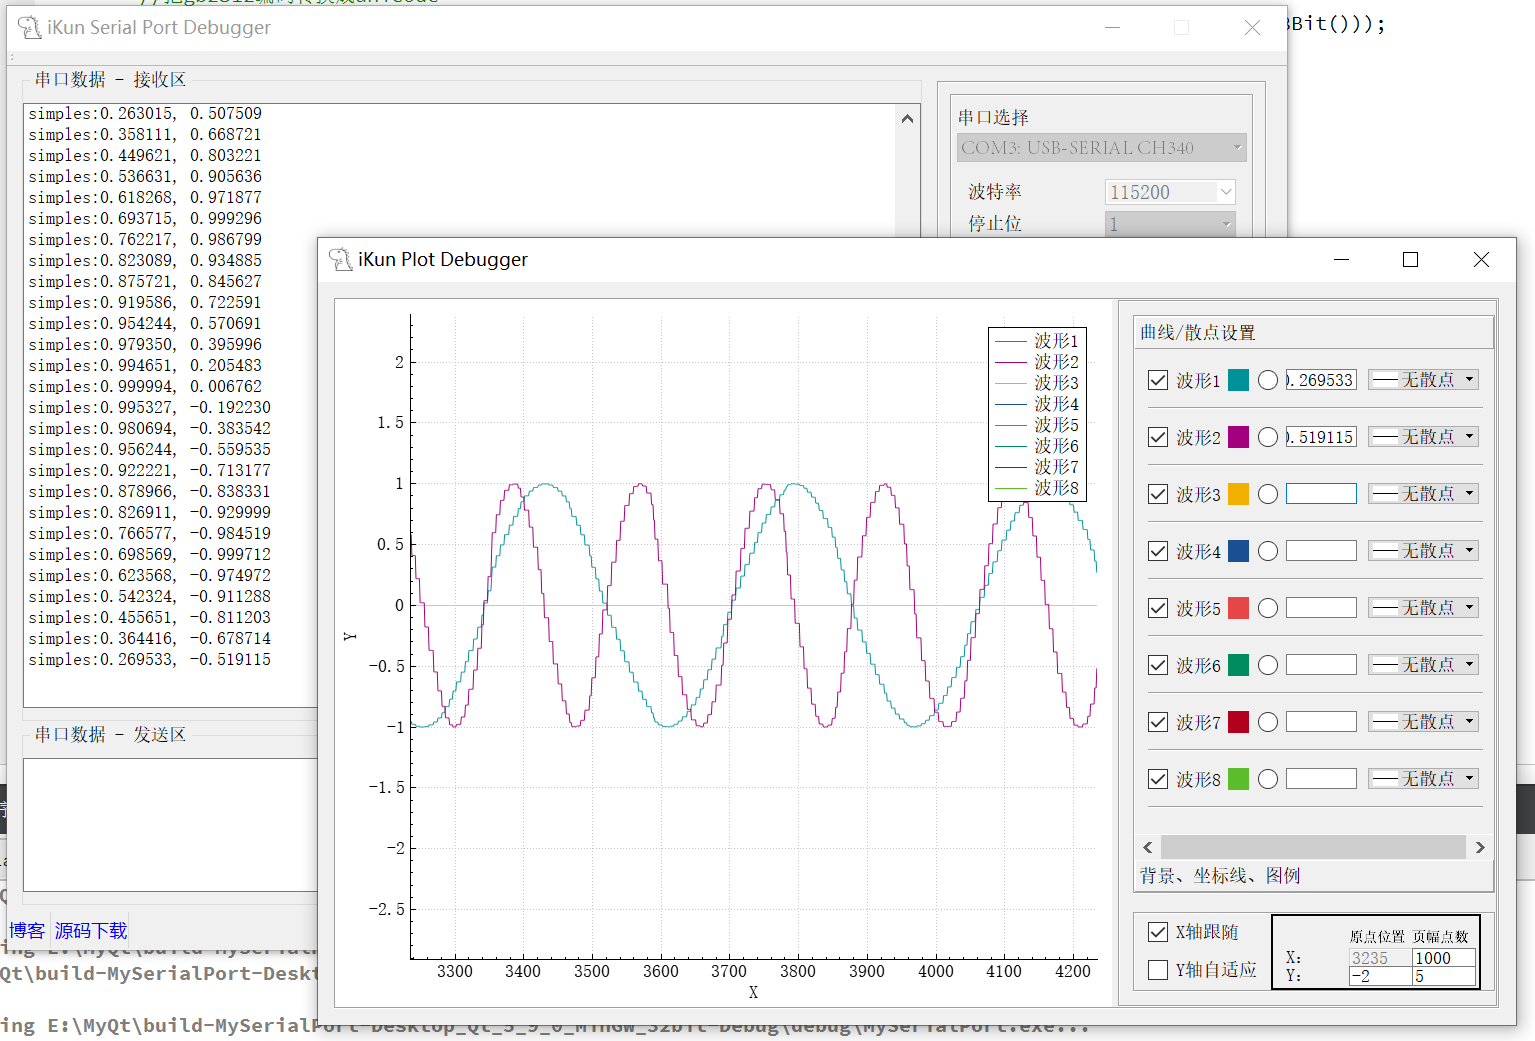
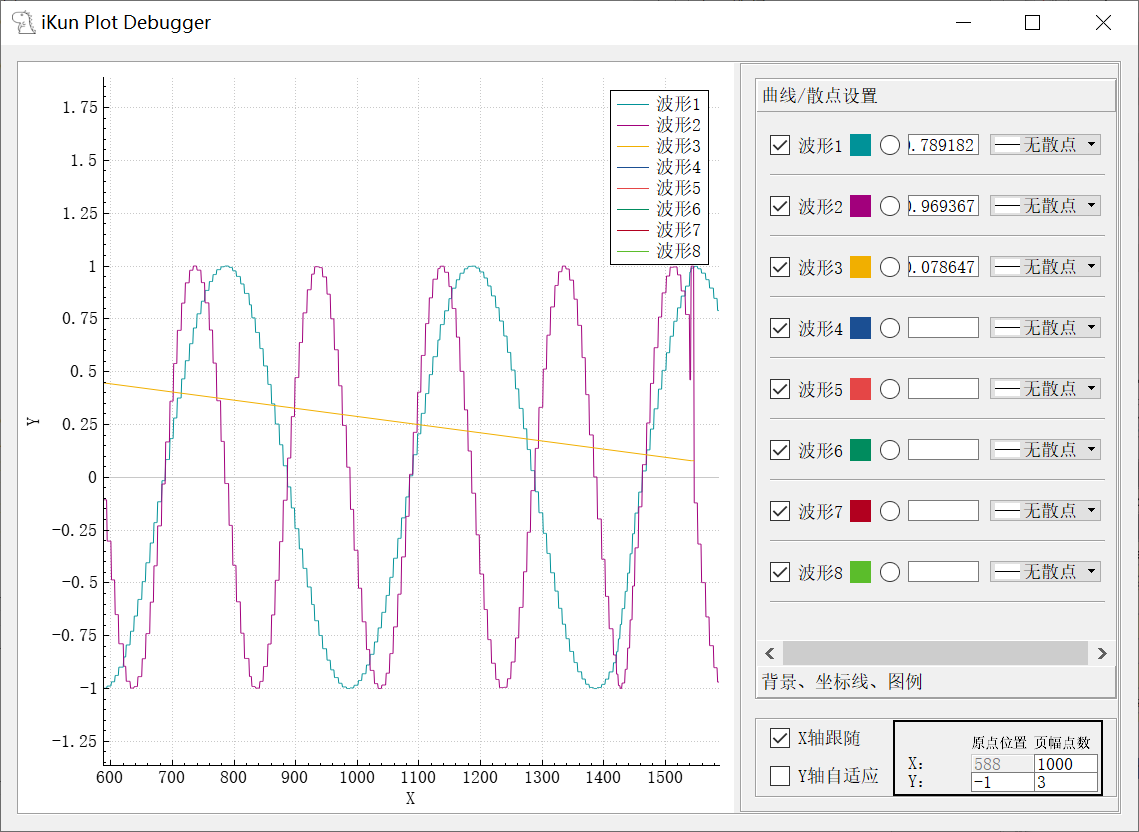
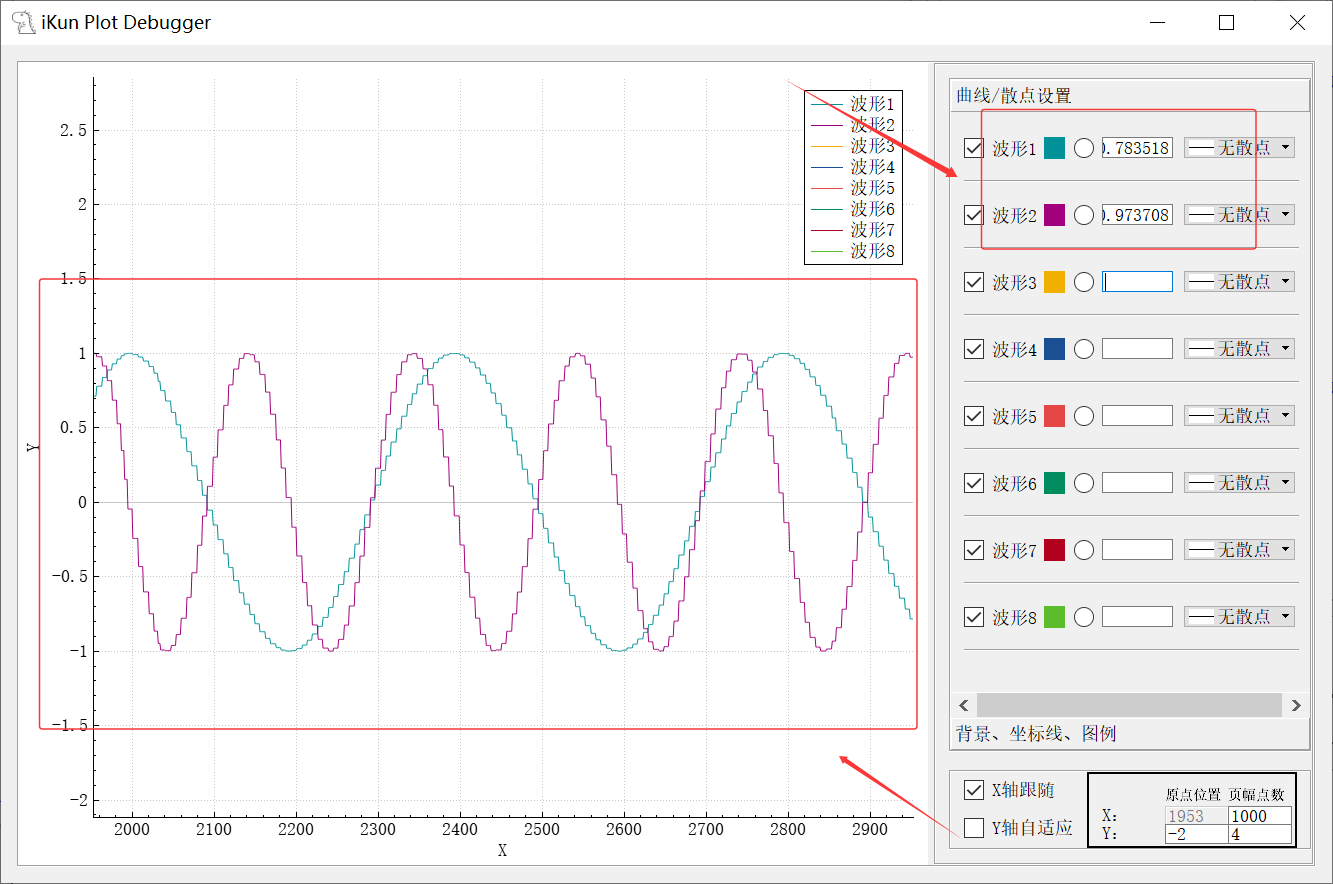
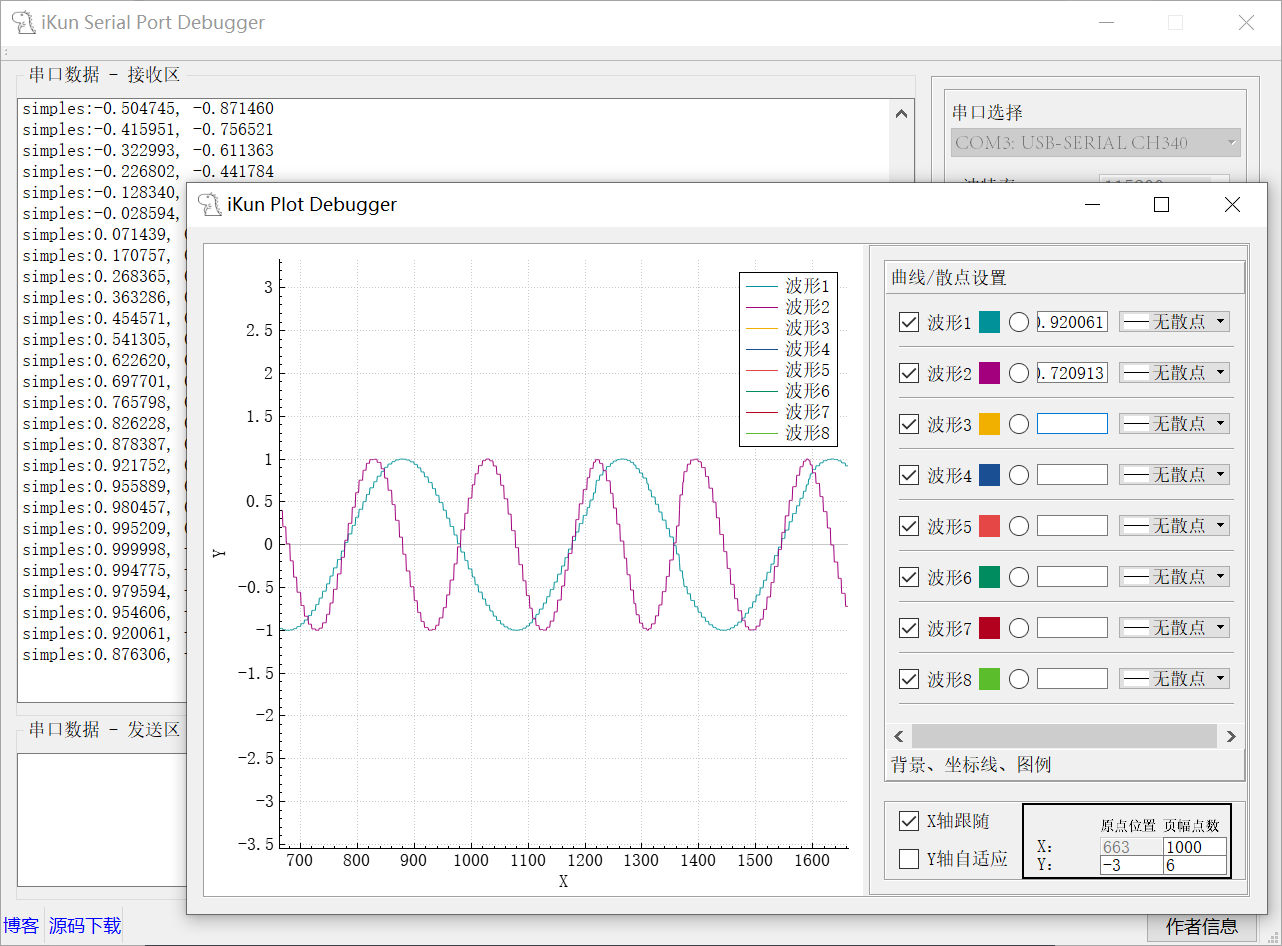
Plot 波形绘制的区域使用了 QCustomPlot 库中的 QCustomPlot 的类,曲线/散点设置则是一系列 Qt 自带的类进行设计的。最终的 Plot 绘制的情况如下图:
4.3 Plot data 数据筛选
作者设计的 Plot 绘制波形的数据筛选使用了如下格式,且最高支持8个波形的同时绘制:
printf("simples:%f, %f\n", sin(t1), sin(t2)); Plot data 数据的筛选部分代码如下:
// 数据清洗与转换
QString str = QString::fromUtf8(Plot_Num).remove(" ").replace(":", ",").replace(":",  ",").replace(",", ",");// 拆分字符串
QStringList parts = str.split(",",  QString::SkipEmptyParts );// 提取数字
QVector<double> numbers;
for (const QString& part : parts) {bool ok;double num = part.toDouble(&ok);if (ok) numbers.append(num);
}
巧妙的使用了 Qt 和 C++ 库函数进行操作,替换原数据文本中不符合要求的内容,在 QVector 容器的基础上进行有效数据的提取!
4.4 Plot 波形图绘制
作者使用的方式是定时器每 10ms 将串口接收到的数据进去筛选提取,并利用 QCustomPlot 库进行 Plot 的绘制(由于很多情况下,串口接收速率是比 Plot 绘制提取的速率快的,这将不可避免地导致数据缺失,读者朋友可以根据直接实际情况使用一个环形缓存区进行缓存处理)
Plot 波形绘图定时器设计:
// 创建定时器,用于定时生成曲线坐标点数据
timer = new QTimer(this);
timer->setInterval(10);
connect(timer,SIGNAL(timeout()),this,SLOT(TimeData_Update()));
timer->start(10);
// 定时器溢出处理槽函数。用来生成曲线的坐标数据。
void plot::TimeData_Update(void)
{// 数据清洗与转换QString str = QString::fromUtf8(Plot_Num).remove(" ").replace(":", ",").replace(":",  ",").replace(",", ",");// 拆分字符串QStringList parts = str.split(",",  QString::SkipEmptyParts );// 提取数字QVector<double> numbers;for (const QString& part : parts) {bool ok;double num = part.toDouble(&ok);if (ok) numbers.append(num);}// 计算需要绘制几个波形,移动x轴的数据int n = numbers.size();cnt++;// 给曲线添加数据for(int i=0; i<n; i++){pTxtValueCurve[i]->setText(QString::number(numbers[i],'g',8));// 显示曲线当前值pCurve[i]->addData(cnt, numbers[i]);}// 设置x坐标轴显示范围,使其自适应缩放x轴,x轴最大显示pointCountX个点。与chkTrackX复选框有关if(ui->chkTrackX->checkState()){//customPlot->xAxis->setRange((pCurve[0]->dataCount()>pointCountX)?(pCurve[0]->dataCount()-pointCountX):0, pCurve[0]->dataCount());setAutoTrackX(pPlot1);}// 设置y坐标轴显示范围,使其自适应曲线缩放if(ui->chkAdjustY->checkState()){setAutoTrackY(pPlot1);}// 更新绘图,这种方式在高填充下太浪费资源。有另一种方式rpQueuedReplot,可避免重复绘图。// 最好的方法还是将数据填充、和更新绘图分隔开。将更新绘图单独用定时器更新。例程数据量较少没用单独定时器更新,实际工程中建议大家加上。pPlot1->replot(QCustomPlot::rpQueuedReplot);
}
五、代码解析与各项功能
5.1 mainwindow.cpp
本代码为 iKun Serial Port Debugger 串口调试助手的主界面代码功能,作者在上方拆解了部分 Serial Port 功能代码的实现原理与代码。本项目更多的细节点读者朋友可以参考下发的代码内容,其中包括 SendSpeed 和 RecvSpeed 速度的实时更新等。一个优秀的 APP 项目肯定是需要不断打磨的,后期作者会把本项目已知的不足与打算改进的地方就行更新!
/******************************************************************
* @projectName   iKun Serial Port Debugger
* @brief         mainwindow.cpp
* @author        混分巨兽龙某某
* @email         1178305328@qq.com
*******************************************************************/
#include "mainwindow.h"
#include "ui_mainwindow.h"
#include "plot.h"MainWindow::MainWindow(QWidget *parent) :QMainWindow(parent),ui(new Ui::MainWindow)
{ui->setupUi(this);setWindowTitle("iKun Serial Port Debugger");        /* 修改APP标题 */// 状态栏QStatusBar *sBar = statusBar();/* 实例化两个按钮对象,并设置其显示文本为窗口皮肤1和窗口皮肤2 */pushButton1 = new QPushButton("作者信息", this);/* 设定两个QPushButton对象的位置 */sBar->addPermanentWidget(pushButton1);// 状态栏添加超链接QLabel *lblLinkBlog = new QLabel(this);lblLinkBlog->setOpenExternalLinks(true);lblLinkBlog->setText("<style> a {text-decoration: none} </style> <a href=\"https://blog.csdn.net/black_sneak?type=blog\">博客");// 无下划线QLabel *lblLinkSource = new QLabel(this);lblLinkSource->setOpenExternalLinks(true);lblLinkSource->setText("<style> a {text-decoration: none} </style> <a href=\"https://blog.csdn.net/black_sneak/article/details/151232098\">源码下载");// 无下划线lblLinkBlog->setMinimumSize(40, 20);lblLinkSource->setMinimumSize(60, 20);// 从左往右依次添加sBar->addWidget(lblLinkBlog);sBar->addWidget(lblLinkSource);// 定时发送-定时器timSend = new QTimer;timSend->setInterval(1000);// 设置默认定时时长1000msconnect(timSend, &QTimer::timeout, this, [=](){on_btnSend_clicked();});// 初始化清零定时器(每500ms检查一次)speedClearTimer = new QTimer(this);connect(speedClearTimer, &QTimer::timeout, this, &MainWindow::checkSpeedClear);speedClearTimer->start(500);// 新建一串口对象mySerialPort = new QSerialPort(this);// 串口接收,信号槽关联connect(mySerialPort, SIGNAL(readyRead()), this, SLOT(serialPortRead_Slot()));// 信号槽连接,打开作者信息的按钮connect(pushButton1, SIGNAL(clicked()), this, SLOT(pushButton1_Clicked()));
}MainWindow::~MainWindow()
{delete ui;
}// 作者信息的信号槽函数
void MainWindow::pushButton1_Clicked()
{QMessageBox::information(NULL, "作者信息","作者:混粉巨兽龙某某\n联系方式:1178305328\n版本信息:V1.0");
}// 调用Plot界面操作
void MainWindow::on_pushButton_clicked()
{plot *ConfigWindow = new plot;ConfigWindow->show();
}// Serial Port串口设置初始化
void MainWindow::on_btnSwitch_clicked()
{QSerialPort::BaudRate baudRate;QSerialPort::DataBits dataBits;QSerialPort::StopBits stopBits;QSerialPort::Parity   checkBits;// 获取串口波特率baudRate = (QSerialPort::BaudRate)ui->cmbBaudRate->currentText().toUInt();// 获取串口数据位dataBits = (QSerialPort::DataBits)ui->cmbData->currentText().toUInt();// 获取串口停止位if(ui->cmbStop->currentText() == "1"){stopBits = QSerialPort::OneStop;}else if(ui->cmbStop->currentText() == "1.5"){stopBits = QSerialPort::OneAndHalfStop;}else if(ui->cmbStop->currentText() == "2"){stopBits = QSerialPort::TwoStop;}else{stopBits = QSerialPort::OneStop;}// 获取串口奇偶校验位if(ui->cmbCheck->currentText() == "无"){checkBits = QSerialPort::NoParity;}else if(ui->cmbCheck->currentText() == "奇校验"){checkBits = QSerialPort::OddParity;}else if(ui->cmbCheck->currentText() == "偶校验"){checkBits = QSerialPort::EvenParity;}else{checkBits = QSerialPort::NoParity;}// 想想用 substr strchr怎么从带有信息的字符串中提前串口号字符串// 初始化串口属性,设置 端口号、波特率、数据位、停止位、奇偶校验位数mySerialPort->setBaudRate(baudRate);mySerialPort->setDataBits(dataBits);mySerialPort->setStopBits(stopBits);mySerialPort->setParity(checkBits);//mySerialPort->setPortName(ui->cmbSerialPort->currentText());// 不匹配带有串口设备信息的文本// 匹配带有串口设备信息的文本QString spTxt = ui->cmbSerialPort->currentText();spTxt = spTxt.section(':', 0, 0);//spTxt.mid(0, spTxt.indexOf(":"));//qDebug() << spTxt;mySerialPort->setPortName(spTxt);// 根据初始化好的串口属性,打开串口// 如果打开成功,反转打开按钮显示和功能。打开失败,无变化,并且弹出错误对话框。if(ui->btnSwitch->text() == "打开串口"){if(mySerialPort->open(QIODevice::ReadWrite) == true){ui->btnSwitch->setText("关闭串口");// 让端口号下拉框不可选,避免误操作(选择功能不可用,控件背景为灰色)ui->cmbSerialPort->setEnabled(false);ui->cmbBaudRate->setEnabled(false);ui->cmbStop->setEnabled(false);ui->cmbData->setEnabled(false);ui->cmbCheck->setEnabled(false);}else{QMessageBox::critical(this, "错误提示", "串口打开失败!!!\r\n\r\n该串口可能被占用,请选择正确的串口\r\n或者波特率过高,超出硬件支持范围");}}else{mySerialPort->close();ui->btnSwitch->setText("打开串口");// 端口号下拉框恢复可选,避免误操作ui->cmbSerialPort->setEnabled(true);ui->cmbBaudRate->setEnabled(true);ui->cmbStop->setEnabled(true);ui->cmbData->setEnabled(true);ui->cmbCheck->setEnabled(true);}
}// 串口接收显示,槽函数
void MainWindow::serialPortRead_Slot()
{/* 利用QtSerial库接收数据 */QByteArray recBuf = mySerialPort->readAll();Plot_Num = recBuf;// 判断是否为16进制接收,将以后接收的数据全部转换为16进制显示(先前接收的部分在多选框槽函数中进行转换。最好多选框和接收区组成一个自定义控件,方便以后调用)if(ui->chkRec->checkState() == false){// GB2312编码输入QString strb = QString::fromLocal8Bit(recBuf);//QString::fromUtf8(recBuf);//QString::fromLatin1(recBuf);// 在当前位置插入文本,不会发生换行。如果没有移动光标到文件结尾,会导致文件超出当前界面显示范围,界面也不会向下滚动。ui->txtRec->insertPlainText(strb);}else{// 16进制显示,并转换为大写QString str1 = recBuf.toHex().toUpper();//.data();// 添加空格QString str2;for(int i = 0; i<str1.length (); i+=2){str2 += str1.mid (i,2);str2 += " ";}ui->txtRec->insertPlainText(str2);}/* 1.计算接收到的字节数 */RecvNum += recBuf.size();/* 2.格式化并显示总字节数 */ui->RxCount->setText(QString::number(RecvNum));/* 3.计算并显示接收速度 */QString speedText = calculateSpeed(RecvNum);ui->RxSpeed->setText(speedText);/* 4.更新上一次记录(用于下次计算速度)*/lastRecvNum = RecvNum;lastUpdateTime = QDateTime::currentMSecsSinceEpoch();/* 5.移动光标到文本结尾 */ui->txtRec->moveCursor(QTextCursor::End);
}// 计算接收速度(字节/秒)
QString MainWindow::calculateSpeed(qint64 currentNum)
{qint64 currentTime = QDateTime::currentMSecsSinceEpoch();qint64 deltaTime = currentTime - lastUpdateTime;if (deltaTime == 0 || lastRecvNum == 0) {// 首次计算或时间未变化时返回0lastRecvNum = currentNum;lastUpdateTime = currentTime;return "0 B/s";}// 计算每秒接收字节数double deltaBytes = currentNum - lastRecvNum;double speed = deltaBytes / deltaTime * 1000; // 转换为秒// 速度单位转换if (speed >= 1024 * 1024 * 1024) { // GB/sreturn QString("%1 GB/s").arg(speed / (1024 * 1024 * 1024), 0, 'f', 2);} else if (speed >= 1024 * 1024) { // MB/sreturn QString("%1 MB/s").arg(speed / (1024 * 1024), 0, 'f', 2);} else if (speed >= 1024) { // KB/sreturn QString("%1 KB/s").arg(speed / 1024, 0, 'f', 2);} else { // B/sreturn QString("%1 B/s").arg(speed, 0, 'f', 2);}
}// 计算发送速度(字节/秒)
void MainWindow::calculateSendSpeed(qint64 bytesSent, qint64 durationMs)
{// 处理零时间间隔(理论不可能,但安全处理)if (durationMs == 0) durationMs = 1;// 计算瞬时速度(字节/秒)double instantSpeed = (bytesSent * 1000.0) / durationMs;// 应用指数平滑滤波(减少数值跳动)const double smoothingFactor = 0.3;smoothedSendSpeed = smoothingFactor * instantSpeed + (1 - smoothingFactor) * smoothedSendSpeed;// 单位转换与显示QString speedText;if (smoothedSendSpeed >= 1024 * 1024 * 1024) { // GB/sspeedText = QString("%1 GB/s").arg(smoothedSendSpeed / (1024 * 1024 * 1024), 0, 'f', 2);} else if (smoothedSendSpeed >= 1024 * 1024) { // MB/sspeedText = QString("%1 MB/s").arg(smoothedSendSpeed / (1024 * 1024), 0, 'f', 2);} else if (smoothedSendSpeed >= 1024) { // KB/sspeedText = QString("%1 KB/s").arg(smoothedSendSpeed / 1024, 0, 'f', 2);} else { // B/sspeedText = QString("%1 B/s").arg(smoothedSendSpeed, 0, 'f', 2);}// 更新UI显示ui->TxSpeed->setText(speedText);// 更新最后发送状态lastSendTime = QDateTime::currentMSecsSinceEpoch();lastSendNum = SendNum;
}// 新增:速度清零检查函数
void MainWindow::checkSpeedClear()
{qint64 currentTime = QDateTime::currentMSecsSinceEpoch();// 超过1秒无数据时清零显示if (currentTime - lastUpdateTime > 1000) {ui->RxSpeed->setText("0 B/s");ui->TxSpeed->setText("0 B/s");}
}// 串口发送数据
void MainWindow::on_btnSend_clicked()
{QByteArray sendData;// 判断是否为16进制发送,将发送区全部的asc2转换为16进制字符串显示,发送的时候转换为16进制发送if(ui->chkSend->checkState() == false){// 字符串形式发送,GB2312编码用以兼容大多数单片机sendData = ui->txtSend->toPlainText().toLocal8Bit();// GB2312编码输出}else{// 16进制发送,不要用.data(),.data()返回的是字符数组,0x00在ASC2中的意义为NUL,也就是'\0'结束符,所以遇到0x00就会终止sendData = QByteArray::fromHex(ui->txtSend->toPlainText().toLocal8Bit());// GB2312编码输出}// 记录发送前的时间戳qint64 sendStartTime = QDateTime::currentMSecsSinceEpoch();// 发送数据int bytesSent = mySerialPort->write(sendData);// 发送字节计数并显示if(bytesSent > 0) {// 更新总发送字节数SendNum += bytesSent;ui->TxCount->setText(QString::number(SendNum));// 记录发送结束时间qint64 sendEndTime = QDateTime::currentMSecsSinceEpoch();qint64 sendDuration = sendEndTime - sendStartTime;// 计算并显示发送速度calculateSendSpeed(bytesSent, sendDuration);}
}// 16进制发送触发按键
void MainWindow::on_chkSend_stateChanged(int arg1)
{// 获取文本字符串QString txtBuf = ui->txtSend->toPlainText();// 获取多选框状态,未选为0,选中为2// 为0时,多选框未被勾选,将先前的发送区的16进制字符串转换为asc2字符串if(arg1 == 0){//QByteArray str1 = QByteArray::fromHex(txtBuf.toUtf8());//仅能处理Unicode编码,因为QString就是Unicode//QString str1 = QString::fromLocal8Bit(txtBuf.toUtf8());//仅能处理GB2312编码,Unicode的数据无论如何都会乱码//把gb2312编码转换成unicodeQString str1 = QTextCodec::codecForName("GB2312")->toUnicode(QByteArray::fromHex(txtBuf.toLocal8Bit()));// 文本控件清屏,显示新文本ui->txtSend->clear();ui->txtSend->insertPlainText(str1);// 移动光标到文本结尾ui->txtSend->moveCursor(QTextCursor::End);}else{// 多选框被勾选,将先前的发送区的asc2字符串转换为16进制字符串//QByteArray str1 = txtBuf.toUtf8().toHex().toUpper();// Unicode编码输出QString str1 = txtBuf.toLocal8Bit().toHex().toUpper();// GB2312编码输出// 添加空格QString str2;for(int i = 0; i<str1.length (); i+=2){str2 += str1.mid (i,2);str2 += " ";}// 文本控件清屏,显示新文本ui->txtSend->clear();ui->txtSend->insertPlainText(str2);// 移动光标到文本结尾ui->txtSend->moveCursor(QTextCursor::End);}
}// 定时器发送触发按键操作
void MainWindow::on_chkTimSend_stateChanged(int arg1)
{// 获取复选框状态,未选为0,选中为2if(arg1 == 0){timSend->stop();// 时间输入框恢复可选ui->txtSendMs->setEnabled(true);}else{// 对输入的值做限幅,小于20ms会弹出对话框提示if(ui->txtSendMs->text().toInt() >= 20){timSend->start(ui->txtSendMs->text().toInt());// 设置定时时长,重新计数// 让时间输入框不可选,避免误操作(输入功能不可用,控件背景为灰色)ui->txtSendMs->setEnabled(false);}else{ui->chkTimSend->setCheckState(Qt::Unchecked);QMessageBox::critical(this, "错误提示", "定时发送的最小间隔为 20ms\r\n请确保输入的值 >=20");}}
}//
void MainWindow::on_btnClearRec_clicked()
{ui->txtRec->clear();// 清除接收字节计数RecvNum = 0;ui->RxCount->setText(QString::number(RecvNum));
}void MainWindow::on_btnClearSend_clicked()
{ui->txtSend->clear();// 清除发送字节计数SendNum = 0;ui->TxCount->setText(QString::number(SendNum));
}// 16进制的串口数据接收
void MainWindow::on_chkRec_stateChanged(int arg1)
{// 获取文本字符串QString txtBuf = ui->txtRec->toPlainText();// 获取多选框状态,未选为0,选中为2// 为0时,多选框未被勾选,接收区先前接收的16进制数据转换为asc2字符串格式if(arg1 == 0){//QString str1 = QByteArray::fromHex(txtBuf.toUtf8());//QString str1 = QByteArray::fromHex(txtBuf.toLocal8Bit());//把gb2312编码转换成unicodeQString str1 = QTextCodec::codecForName("GB2312")->toUnicode(QByteArray::fromHex(txtBuf.toLocal8Bit()));// 文本控件清屏,显示新文本ui->txtRec->clear();ui->txtRec->insertPlainText(str1);// 移动光标到文本结尾ui->txtRec->moveCursor(QTextCursor::End);}else{// 不为0时,多选框被勾选,接收区先前接收asc2字符串转换为16进制显示//QString str1 = txtBuf.toUtf8().toHex().toUpper();// Unicode编码输出QString str1 = txtBuf.toLocal8Bit().toHex().toUpper();// GB2312编码输出// 添加空格QByteArray str2;for(int i = 0; i<str1.length (); i+=2){str2 += str1.mid (i,2);str2 += " ";}// 文本控件清屏,显示新文本ui->txtRec->clear();ui->txtRec->insertPlainText(str2);// 移动光标到文本结尾ui->txtRec->moveCursor(QTextCursor::End);}
}
5.2 mycombobox.cpp
/******************************************************************
* @projectName   Serial Port Scanning Function
* @brief         mycombobox.cpp
* @author        混分巨兽龙某某
* @email         1178305328@qq.com
*******************************************************************/
#include "mycombobox.h"myComboBox::myComboBox(QWidget *parent) : QComboBox(parent)
{// 扫描可用串口scanActivePort();
}// 扫描可用串口
void myComboBox::scanActivePort()
{// 先清空列表项,防止多次刷新后重叠clear();// 串口端口号列表QStringList serialPortName;// 自动扫描当前可用串口,返回值追加到字符数组中foreach(const QSerialPortInfo &info, QSerialPortInfo::availablePorts()){// 携带有串口设备信息的文本QString serialPortInfo = info.portName() + ": " + info.description();               // 串口设备信息,芯片/驱动名称//QString serialPortInfo = info.portName() + ": " + info.manufacturer();            // 串口设备制造商//QString serialPortInfo = info.portName() + ": " + info.serialNumber();            // 串口设备的序列号//QString serialPortInfo = info.portName() + ": " + info.systemLocation();          // 串口设备的系统位置serialPortName << serialPortInfo;}/* 可用串口号,显示到串口选择下拉框中 */this->addItems(serialPortName);
}// 重写鼠标点击事件
void myComboBox::mousePressEvent(QMouseEvent *event)
{if(event->button() == Qt::LeftButton){// 扫描可用串口scanActivePort();// 弹出下拉框showPopup();}
}
5.3 plot.cpp
引入 QCustomPlot 之后实现的 Plot 绘制动态波形是比较简单的,核心的部分的代码为串口接收数据的提取,这部分代码作者在上述已经拆解说明了。其余部分代码功能的时候,读者朋友们可以借鉴一下作者提供的开源代码。当然,Plot 波形绘制过程中的 x 和 y轴自适应也挺重要的,读者朋友们也可以学习一下!
/******************************************************************
* @projectName   Serial Port Plot Function
* @brief         plot.cpp
* @author        混分巨兽龙某某
* @email         1178305328@qq.com
*******************************************************************/
#include "plot.h"
#include "ui_plot.h"
#include <stdio.h>
#include "mainwindow.h"QByteArray Plot_Num;plot::plot(QWidget *parent) :QWidget(parent),ui(new Ui::plot)
{ui->setupUi(this);setWindowTitle("iKun Plot Debugger");// 给widget绘图控件,设置个别名,方便书写pPlot1 = ui->winPlot;// 初始化图表1QPlot_init(pPlot1);// 绘图图表的设置控件初始化,主要用于关联控件的信号槽QPlot_widget_init();// 创建定时器,用于定时生成曲线坐标点数据timer = new QTimer(this);timer->setInterval(10);connect(timer,SIGNAL(timeout()),this,SLOT(TimeData_Update()));timer->start(10);// 关联控件初始化ui->txtPointOriginX->setEnabled(false);// 图表重绘后,刷新原点坐标和范围connect(pPlot1,SIGNAL(afterReplot()),this,SLOT(repPlotCoordinate()));
}plot::~plot()
{delete ui;
}// 定时器溢出处理槽函数。用来生成曲线的坐标数据。
void plot::TimeData_Update(void)
{// 数据清洗与转换QString str = QString::fromUtf8(Plot_Num).remove(" ").replace(":", ",").replace(":",  ",").replace(",", ",");// 拆分字符串QStringList parts = str.split(",",  QString::SkipEmptyParts );// 提取数字QVector<double> numbers;for (const QString& part : parts) {bool ok;double num = part.toDouble(&ok);if (ok) numbers.append(num);}// 计算需要绘制几个波形,移动x轴的数据int n = numbers.size();cnt++;// 给曲线添加数据for(int i=0; i<n; i++){pTxtValueCurve[i]->setText(QString::number(numbers[i],'g',8));// 显示曲线当前值pCurve[i]->addData(cnt, numbers[i]);}// 设置x坐标轴显示范围,使其自适应缩放x轴,x轴最大显示pointCountX个点。与chkTrackX复选框有关if(ui->chkTrackX->checkState()){//customPlot->xAxis->setRange((pCurve[0]->dataCount()>pointCountX)?(pCurve[0]->dataCount()-pointCountX):0, pCurve[0]->dataCount());setAutoTrackX(pPlot1);}// 设置y坐标轴显示范围,使其自适应曲线缩放if(ui->chkAdjustY->checkState()){setAutoTrackY(pPlot1);}// 更新绘图,这种方式在高填充下太浪费资源。有另一种方式rpQueuedReplot,可避免重复绘图。// 最好的方法还是将数据填充、和更新绘图分隔开。将更新绘图单独用定时器更新。例程数据量较少没用单独定时器更新,实际工程中建议大家加上。pPlot1->replot(QCustomPlot::rpQueuedReplot);
}// 绘图图表初始化
void plot::QPlot_init(QCustomPlot *customPlot)
{// 添加曲线名称QStringList lineNames;//设置图例的文本lineNames << "波形1" << "波形2" << "波形3" << "波形4" << "波形5" << "波形6" << "波形7" << "波形8";// 曲线初始颜色QColor initColor[8] = {QColor(0,146,152), QColor(162,0,124), QColor(241,175,0), QColor(27,79,147), QColor(229,70,70),\QColor(0,140,94), QColor(178,0,31), QColor(91,189,43)};//QColor(255,255,255)};//白色// 图表添加20条曲线,并设置初始颜色,和图例名称for(int i=0; i<8; i++){pCurve[i] = customPlot->addGraph();pCurve[i]->setPen(QPen(QColor(initColor[i])));pCurve[i]->setName(lineNames.at(i));}// 设置背景颜色customPlot->setBackground(QColor(255,255,255));// 设置背景选择框颜色ui->btnColourBack->setStyleSheet(QString("border:0px solid;background-color: %1;").arg(QColor(255,255,255).name()));// 曲线选择框颜色,与曲线同步颜色。这样写太复杂了,用控件指针数组在下面写过了,记得要在addGraph()之后才有效。//ui->btnColourCurve1->setStyleSheet("border:0px solid;background-color:rgb(0,146,152)");//ui->btnColourCurve1->setStyleSheet(QString("border:0px solid;background-color: %1;").arg(initColor[0].name()));//ui->btnColourCurve20->setStyleSheet(QString("border:0px solid;background-color: %1;").arg(pCurve[]->pen().color().name()));// 设置坐标轴名称customPlot->xAxis->setLabel("X");customPlot->yAxis->setLabel("Y");// 设置x,y坐标轴显示范围pointCountX = ui->txtPointCountX->text().toUInt();pointCountY = ui->txtPointCountY->text().toUInt();customPlot->xAxis->setRange(0,pointCountX);customPlot->yAxis->setRange(pointCountY/2*-1,pointCountY/2);//customPlot->axisRect()->setupFullAxesBox();//四边安装轴并显示//customPlot->xAxis->ticker()->setTickOrigin(1);//改变刻度原点为1//customPlot->xAxis->setNumberFormat("gbc");//g灵活的格式,b漂亮的指数形式,c乘号改成×//customPlot->xAxis->setNumberPrecision(1);//精度1customPlot->xAxis->ticker()->setTickCount(ui->txtMainScaleNumX->text().toUInt());//11个主刻度customPlot->yAxis->ticker()->setTickCount(ui->txtMainScaleNumY->text().toUInt());//11个主刻度customPlot->xAxis->ticker()->setTickStepStrategy(QCPAxisTicker::tssReadability);//可读性优于设置customPlot->yAxis->ticker()->setTickStepStrategy(QCPAxisTicker::tssReadability);//可读性优于设置// 显示图表的图例customPlot->legend->setVisible(true);// 设置波形曲线的复选框字体颜色//ui->chkVisibleCurve1->setStyleSheet("QCheckBox{color:rgb(255,0,0)}");//设定前景颜色,就是字体颜色// 允许用户用鼠标拖动轴范围,以鼠标为中心滚轮缩放,点击选择图形:customPlot->setInteractions(QCP::iRangeDrag | QCP::iRangeZoom | QCP::iSelectPlottables);// 设置鼠标滚轮的缩放倍率,如果不设置默认为0.85,大于1反方向缩放//customPlot->axisRect()->setRangeZoomFactor(0.5);// 设置鼠标滚轮缩放的轴方向,仅设置垂直轴。垂直轴和水平轴全选使用:Qt::Vertical | Qt::HorizontalcustomPlot->axisRect()->setRangeZoom(Qt::Vertical);
}// 绘图图表的设置控件初始化,主要用于关联控件的信号槽
void plot::QPlot_widget_init(void)
{// 获取控件指针数组,方便设置时编码书写pChkVisibleCurve[0] = ui->chkVisibleCurve1; pBtnColourCurve[0] = ui->btnColourCurve1; pTxtValueCurve[0] = ui->txtValueCurve1; pRdoBoldCurve[0] = ui->rdoBoldCurve1;pChkVisibleCurve[1] = ui->chkVisibleCurve2; pBtnColourCurve[1] = ui->btnColourCurve2; pTxtValueCurve[1] = ui->txtValueCurve2; pRdoBoldCurve[1] = ui->rdoBoldCurve2;pChkVisibleCurve[2] = ui->chkVisibleCurve3; pBtnColourCurve[2] = ui->btnColourCurve3; pTxtValueCurve[2] = ui->txtValueCurve3; pRdoBoldCurve[2] = ui->rdoBoldCurve3;pChkVisibleCurve[3] = ui->chkVisibleCurve4; pBtnColourCurve[3] = ui->btnColourCurve4; pTxtValueCurve[3] = ui->txtValueCurve4; pRdoBoldCurve[3] = ui->rdoBoldCurve4;pChkVisibleCurve[4] = ui->chkVisibleCurve5; pBtnColourCurve[4] = ui->btnColourCurve5; pTxtValueCurve[4] = ui->txtValueCurve5; pRdoBoldCurve[4] = ui->rdoBoldCurve5;pChkVisibleCurve[5] = ui->chkVisibleCurve6; pBtnColourCurve[5] = ui->btnColourCurve6; pTxtValueCurve[5] = ui->txtValueCurve6; pRdoBoldCurve[5] = ui->rdoBoldCurve6;pChkVisibleCurve[6] = ui->chkVisibleCurve7; pBtnColourCurve[6] = ui->btnColourCurve7; pTxtValueCurve[6] = ui->txtValueCurve7; pRdoBoldCurve[6] = ui->rdoBoldCurve7;pChkVisibleCurve[7] = ui->chkVisibleCurve8; pBtnColourCurve[7] = ui->btnColourCurve8; pTxtValueCurve[7] = ui->txtValueCurve8; pRdoBoldCurve[7] = ui->rdoBoldCurve8;pCmbScatterStyle[0] = ui->cmbScatterStyle1;pCmbScatterStyle[1] = ui->cmbScatterStyle2;pCmbScatterStyle[2] = ui->cmbScatterStyle3;pCmbScatterStyle[3] = ui->cmbScatterStyle4;pCmbScatterStyle[4] = ui->cmbScatterStyle5;pCmbScatterStyle[5] = ui->cmbScatterStyle6;pCmbScatterStyle[6] = ui->cmbScatterStyle7;pCmbScatterStyle[7] = ui->cmbScatterStyle8;// 设置颜色选择框的初始背景颜色,与曲线同步颜色for(int i=0; i<8; i++){pBtnColourCurve[i]->setStyleSheet(QString("border:0px solid;background-color: %1;").arg(QColor(pCurve[i]->pen().color()).name()));}// 可见性选择框关联for(int i=0; i<8; i++){connect(pChkVisibleCurve[i], &QCheckBox::clicked, [=](){curveSetVisible(pPlot1, pCurve[i], pChkVisibleCurve[i]->checkState());});}// 颜色选择框关联for(int i=0; i<8; i++){connect(pBtnColourCurve[i], &QPushButton::clicked, [=](){curveSetColor(pPlot1, pCurve[i], pBtnColourCurve[i]);});}// 加粗显示多选框关联。尽量别用,会导致CPU使用率升高for(int i=0; i<8; i++){connect(pRdoBoldCurve[i], &QRadioButton::clicked, [=](){curveSetBold(pPlot1, pCurve[i], pRdoBoldCurve[i]->isChecked());});}// 散点样式选择关联for(int i=0; i<8; i++){connect(pCmbScatterStyle[i], &QComboBox::currentTextChanged, [=](){curveSetScatterStyle(pPlot1, pCurve[i], pCmbScatterStyle[i]->currentIndex()+1);});}//QIcon ssCircleIcon (":/pic/ssCircle.png");//ui->cmbScatterStyle1->addItem(ssCircleIcon,"空心圆");for(int i=0; i<8; i++){pCmbScatterStyle[i]->setIconSize(QSize(25,17)); // 设置图片显示像素大小,不然会默认大小显示会模糊}}/* 功能:隐藏/显示曲线n* QCustomPlot *pPlot:父控件,绘图图表* QCPGraph *pCurve:图表的曲线* int arg1:曲线的可见性,>0可见,0不可见* */
void plot::curveSetVisible(QCustomPlot *pPlot, QCPGraph *pCurve, int arg1)
{if(arg1){pCurve->setVisible(true);}else{pCurve->setVisible(false);}pPlot->replot(QCustomPlot::rpQueuedReplot);
}/* 功能:弹出颜色对话框,设置曲线n的颜色* QCustomPlot *pPlot:父控件,绘图图表* QCPGraph *pCurve:图表的曲线* QPushButton *btn:曲线颜色选择框的按键,与曲线的颜色同步* */
void plot::curveSetColor(QCustomPlot *pPlot, QCPGraph *pCurve, QPushButton *btn)
{// 获取当前颜色QColor bgColor(0,0,0);//bgColor = btn->palette().color(QPalette::Background);// 由pushButton的背景色获得颜色bgColor = pCurve->pen().color();// 由curve曲线获得颜色// 以当前颜色打开调色板,父对象,标题,颜色对话框设置项(显示Alpha透明度通道)//QColor color = QColorDialog::getColor(bgColor);QColor color = QColorDialog::getColor(bgColor, this,tr("颜色对话框"),QColorDialog::ShowAlphaChannel);// 判断返回的颜色是否合法。若点击x关闭颜色对话框,会返回QColor(Invalid)无效值,直接使用会导致变为黑色。if(color.isValid()){// 设置选择框颜色btn->setStyleSheet(QString("border:0px solid;background-color: %1;").arg(color.name()));// 设置曲线颜色QPen pen = pCurve->pen();pen.setBrush(color);pCurve->setPen(pen);}// 更新绘图pPlot->replot(QCustomPlot::rpQueuedReplot);
}/* 功能:加粗显示曲线n* QCustomPlot *pPlot:父控件,绘图图表* QCPGraph *pCurve:图表的曲线* int arg1:曲线的粗细,>0粗,0细* */
void plot::curveSetBold(QCustomPlot *pPlot, QCPGraph *pCurve, int arg1)
{// 预先读取曲线的颜色QPen pen = pCurve->pen();//pen.setBrush(pCurve->pen().color());// 由curve曲线获得颜色if(arg1){pen.setWidth(3);pCurve->setPen(pen);}else{pen.setWidth(1);pCurve->setPen(pen);}pPlot->replot(QCustomPlot::rpQueuedReplot);
}/* 功能:选择曲线样式(线,点,积)* QCustomPlot *pPlot:父控件,绘图图表* QCPGraph *pCurve:图表的曲线* int arg1:曲线样式(线,点,积)* */
void plot::curveSetLineStyle(QCustomPlot *pPlot, QCPGraph *pCurve, int arg1)
{// 设置曲线样式//customPlot->graph(19)->setLineStyle(QCPGraph::lsLine); // 数据点通过直线连接//customPlot->graph(19)->setLineStyle((QCPGraph::LineStyle)i);//设置线性//pCurve->setLineStyle(QCPGraph::LineStyle(arg1));pCurve->setLineStyle((QCPGraph::LineStyle)arg1);pPlot->replot(QCustomPlot::rpQueuedReplot);
}/* 功能:选择散点样式(空心圆、实心圆、正三角、倒三角)* QCustomPlot *pPlot:父控件,绘图图表* QCPGraph *pCurve:图表的曲线* int arg1:散点样式(空心圆、实心圆、正三角、倒三角)* */
void plot::curveSetScatterStyle(QCustomPlot *pPlot, QCPGraph *pCurve, int arg1)
{// 设置散点样式//customPlot->graph(19)->setScatterStyle(QCPScatterStyle(QCPScatterStyle::ssCircle, 5)); // 空心圆//pCurve->setScatterStyle(QCPScatterStyle::ScatterShape(arg1)); // 散点样式//pCurve->setScatterStyle((QCPScatterStyle::ScatterShape)arg1); // 散点样式if(arg1 <= 10){pCurve->setScatterStyle(QCPScatterStyle((QCPScatterStyle::ScatterShape)arg1, 5)); // 散点样式}else{ // 后面的散点图形略复杂,太小会看不清pCurve->setScatterStyle(QCPScatterStyle((QCPScatterStyle::ScatterShape)arg1, 8)); // 散点样式}pPlot->replot(QCustomPlot::rpQueuedReplot);
}// 图例显示与否
void plot::on_chkShowLegend_stateChanged(int arg1)
{if(arg1){// 显示图表的图例pPlot1->legend->setVisible(true);}else{// 不显示图表的图例pPlot1->legend->setVisible(false);}pPlot1->replot(QCustomPlot::rpQueuedReplot);
}// 绘图演示-曲线
void plot::on_chkDrawDemo_stateChanged(int arg1)
{if(arg1){timer->start(10);}else{timer->stop();}
}// 设置曲线x轴自动跟随
void plot::setAutoTrackX(QCustomPlot *pPlot)
{pointCountX = ui->txtPointCountX->text().toUInt();if(pCurve[0]->dataCount() < pointCountX){pPlot->xAxis->setRange(0,pointCountX);}else{pPlot->xAxis->setRange((pCurve[0]->dataCount()>pointCountX)?(pCurve[0]->dataCount()-pointCountX):0, pCurve[0]->dataCount());}
}// 设置曲线x轴手动设置范围(依照右下角输入框)
void plot::setManualSettingX(QCustomPlot *pPlot)
{pointOriginX = ui->txtPointOriginX->text().toInt();pointCountX = ui->txtPointCountX->text().toUInt();pPlot->xAxis->setRange(pointOriginX, pointOriginX+pointCountX);
}// 设置Y轴自适应
void plot::setAutoTrackY(QCustomPlot *pPlot)
{pPlot->graph(0)->rescaleValueAxis();// y轴自适应,可放大可缩小for(int i=0; i<8; i++){pPlot->graph(i)->rescaleValueAxis(true);// y轴自适应,只能放大}
}// 重新设置X轴显示的点数
void plot::on_txtPointCountX_returnPressed()
{if(ui->chkTrackX->checkState()){setAutoTrackX(pPlot1);}else{setManualSettingX(pPlot1);}pPlot1->replot(QCustomPlot::rpQueuedReplot);
}void plot::on_txtPointCountY_returnPressed()
{pointCountY = ui->txtPointCountY->text().toUInt();pPlot1->yAxis->setRange(pointCountY/2*-1,pointCountY/2);ui->txtPointOriginY->setText(QString::number(pointCountY/2*-1));pPlot1->replot(QCustomPlot::rpQueuedReplot);
}void plot::on_btnColourBack_clicked()
{// 获取当前颜色QColor bgColor(0,0,0);bgColor = ui->btnColourBack->palette().color(QPalette::Background);// 由pushButton的背景色获得颜色// 以当前颜色打开调色板,父对象,标题,颜色对话框设置项(显示Alpha透明度通道)//QColor color = QColorDialog::getColor(bgColor);QColor color = QColorDialog::getColor(bgColor, this,tr("颜色对话框"),QColorDialog::ShowAlphaChannel);// 判断返回的颜色是否合法。若点击x关闭颜色对话框,会返回QColor(Invalid)无效值,直接使用会导致变为黑色。if(color.isValid()){// 设置背景颜色pPlot1->setBackground(color);// 设置背景选择框颜色ui->btnColourBack->setStyleSheet(QString("border:0px solid;background-color: %1;").arg(color.name()));}// 更新绘图pPlot1->replot(QCustomPlot::rpQueuedReplot);
}void plot::on_txtPointOriginX_returnPressed()
{setManualSettingX(pPlot1);pPlot1->replot(QCustomPlot::rpQueuedReplot);
}void plot::on_chkTrackX_stateChanged(int arg1)
{if(arg1){ui->txtPointOriginX->setEnabled(false);setAutoTrackX(pPlot1);pPlot1->replot(QCustomPlot::rpQueuedReplot);}else{ui->txtPointOriginX->setEnabled(true);}
}void plot::on_chkAdjustY_stateChanged(int arg1)
{if(arg1){ui->txtPointOriginY->setEnabled(false);ui->txtPointCountY->setEnabled(false);setAutoTrackY(pPlot1);pPlot1->replot(QCustomPlot::rpQueuedReplot);}else{ui->txtPointOriginY->setEnabled(true);ui->txtPointCountY->setEnabled(true);}
}void plot::on_txtPointOriginY_returnPressed()
{pointOriginY = ui->txtPointOriginY->text().toInt();pointCountY = ui->txtPointCountY->text().toUInt();pPlot1->yAxis->setRange(pointOriginY, pointOriginY+pointCountY);qDebug() << pointOriginY << pointCountY;pPlot1->replot(QCustomPlot::rpQueuedReplot);
}// 每次图表重绘后,都会更新当前显示的原点坐标与范围。与上次不同时才会更新显示,解决有曲线数据时无法输入y的参数的问题
void plot::repPlotCoordinate()
{static int xOrigin, yOrigin, yCount;static int xOriginLast, yOriginLast, yCountLast;xOrigin = pPlot1->xAxis->range().lower;yOrigin = pPlot1->yAxis->range().lower;yCount = pPlot1->yAxis->range().size();// 与上次不同时才会更新显示,解决有曲线数据时无法输入y的参数的问题if(xOriginLast != xOrigin){ui->txtPointOriginX->setText(QString::number(xOrigin));}if(yOriginLast != yOrigin){ui->txtPointOriginY->setText(QString::number(yOrigin));}if(yCountLast != yCount){ui->txtPointCountY->setText(QString::number(yCount));}// 记录历史值xOriginLast = xOrigin;yOriginLast = yOrigin;yCountLast = yCount;
}// 清空绘图
void plot::on_btnClearGraphs_clicked()
{//pPlot1->clearGraphs(); // 清除图表的所有数据和设置,需要重新设置才能重新绘图//pPlot1->clearPlottables(); // 清除图表中所有曲线,需要重新添加曲线才能绘图for(int i=0; i<8; i++){pPlot1->graph(i)->data().data()->clear(); // 仅仅清除曲线的数据}cnt = 0;pPlot1->replot(QCustomPlot::rpQueuedReplot);
}// 设置X轴主刻度个数
void plot::on_txtMainScaleNumX_returnPressed()
{pPlot1->xAxis->ticker()->setTickCount(ui->txtMainScaleNumX->text().toUInt());pPlot1->replot(QCustomPlot::rpQueuedReplot);
}// 设置Y轴主刻度个数
void plot::on_txtMainScaleNumY_returnPressed()
{pPlot1->yAxis->ticker()->setTickCount(ui->txtMainScaleNumY->text().toUInt());pPlot1->replot(QCustomPlot::rpQueuedReplot);
}
5.4 APP 功能使用
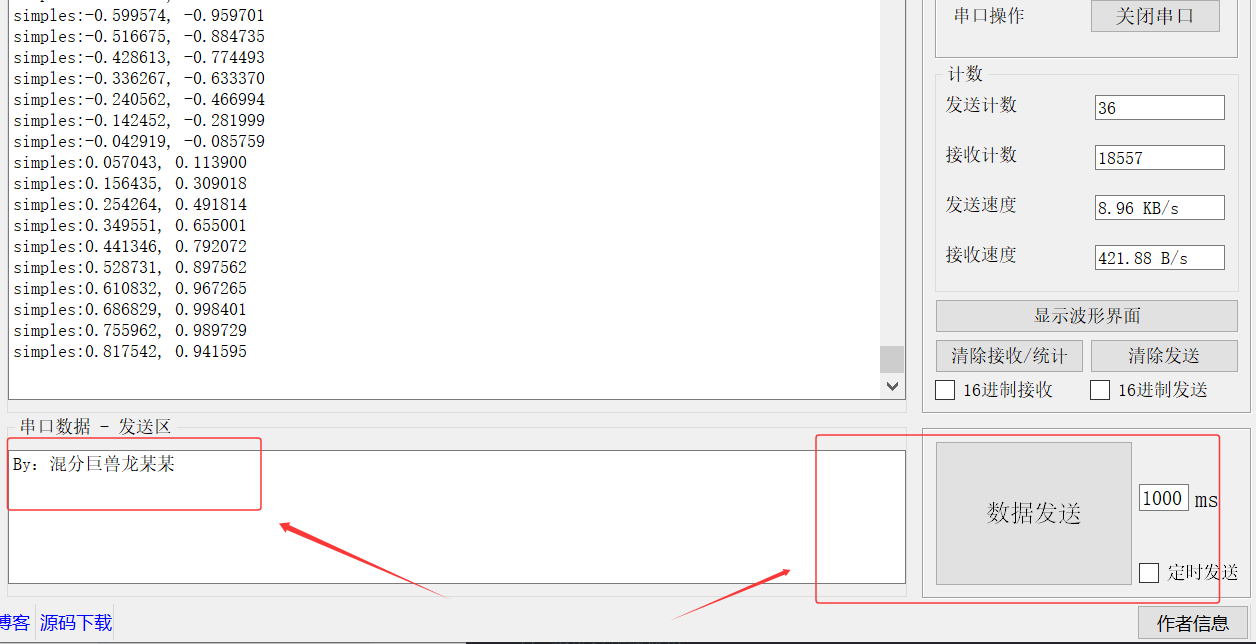
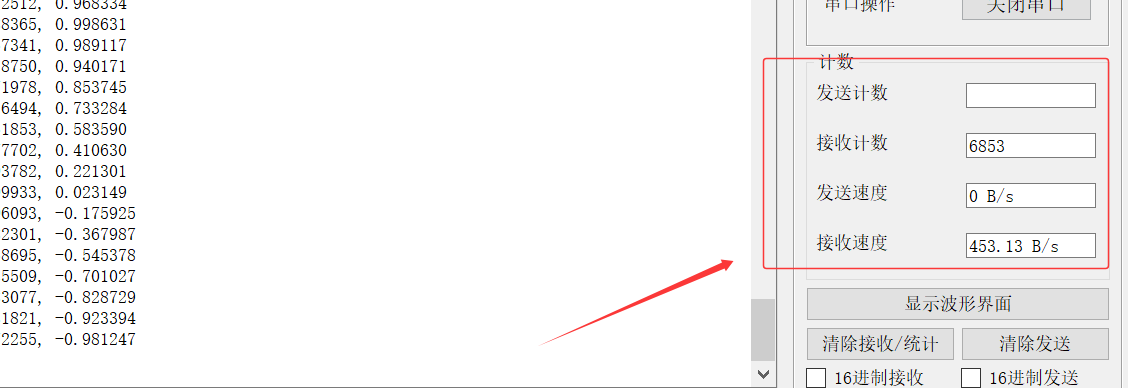
1、Serial Port 数据接收:
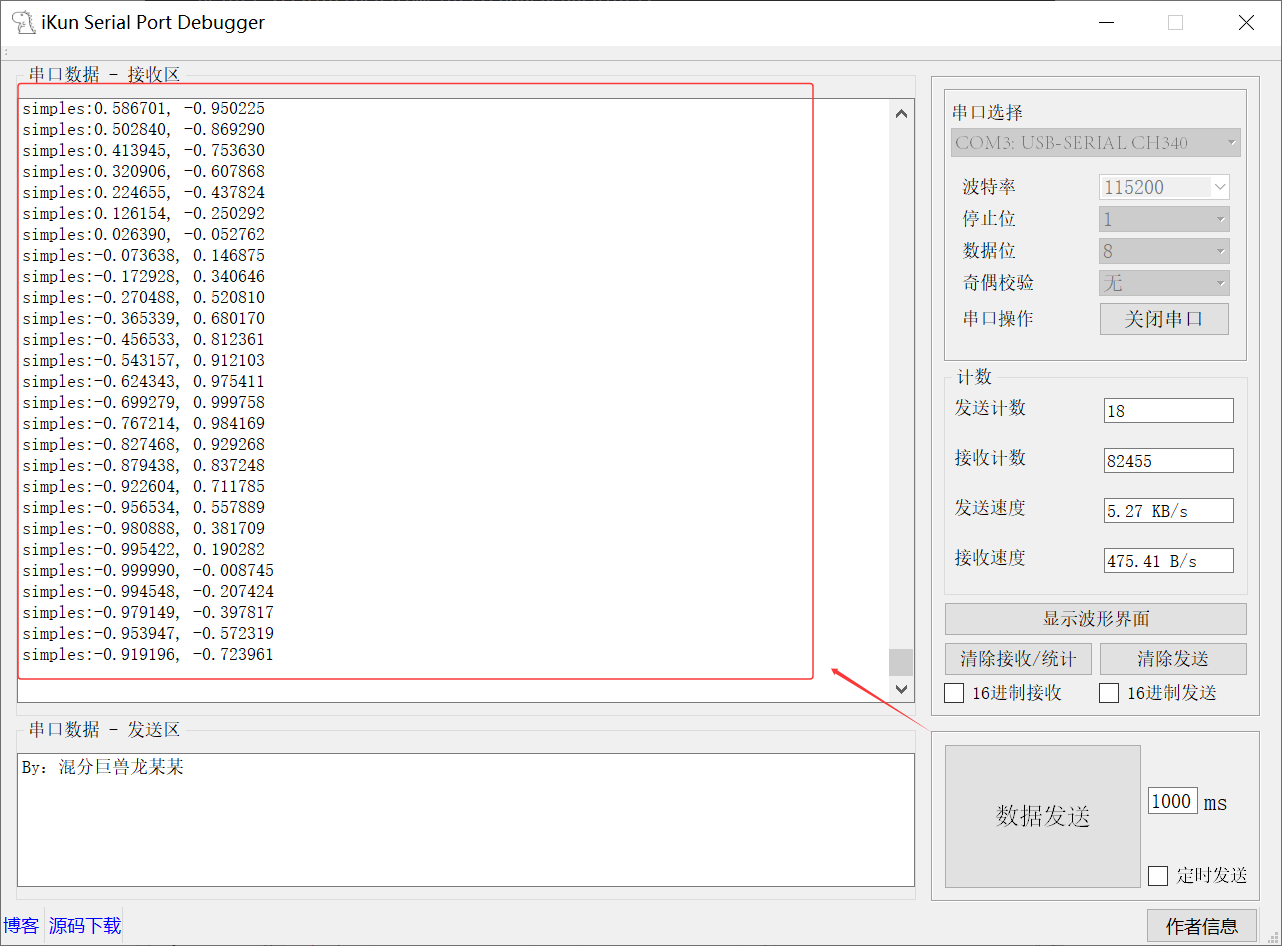
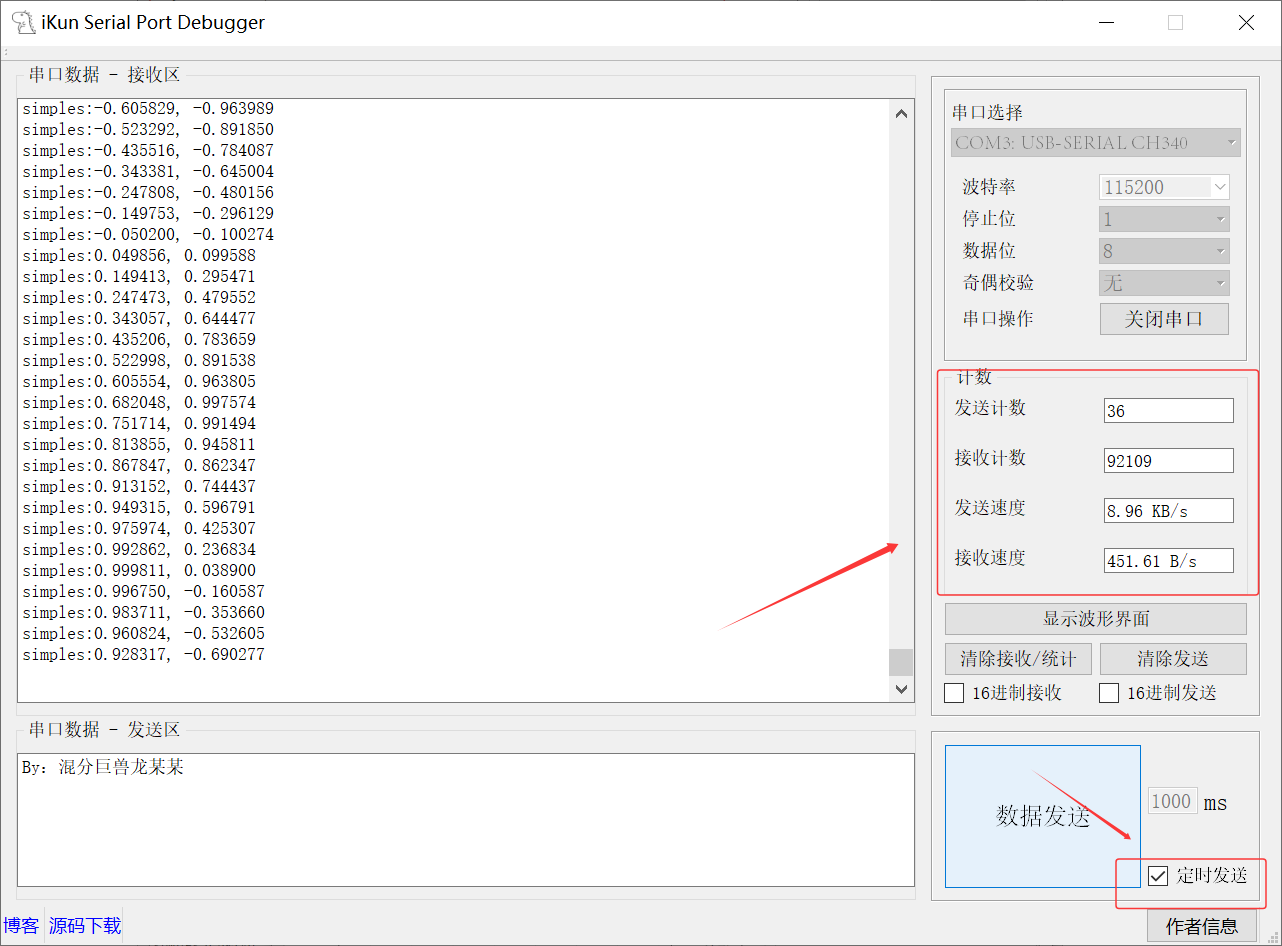
2、Serial Port 数据发送(含定时功能):
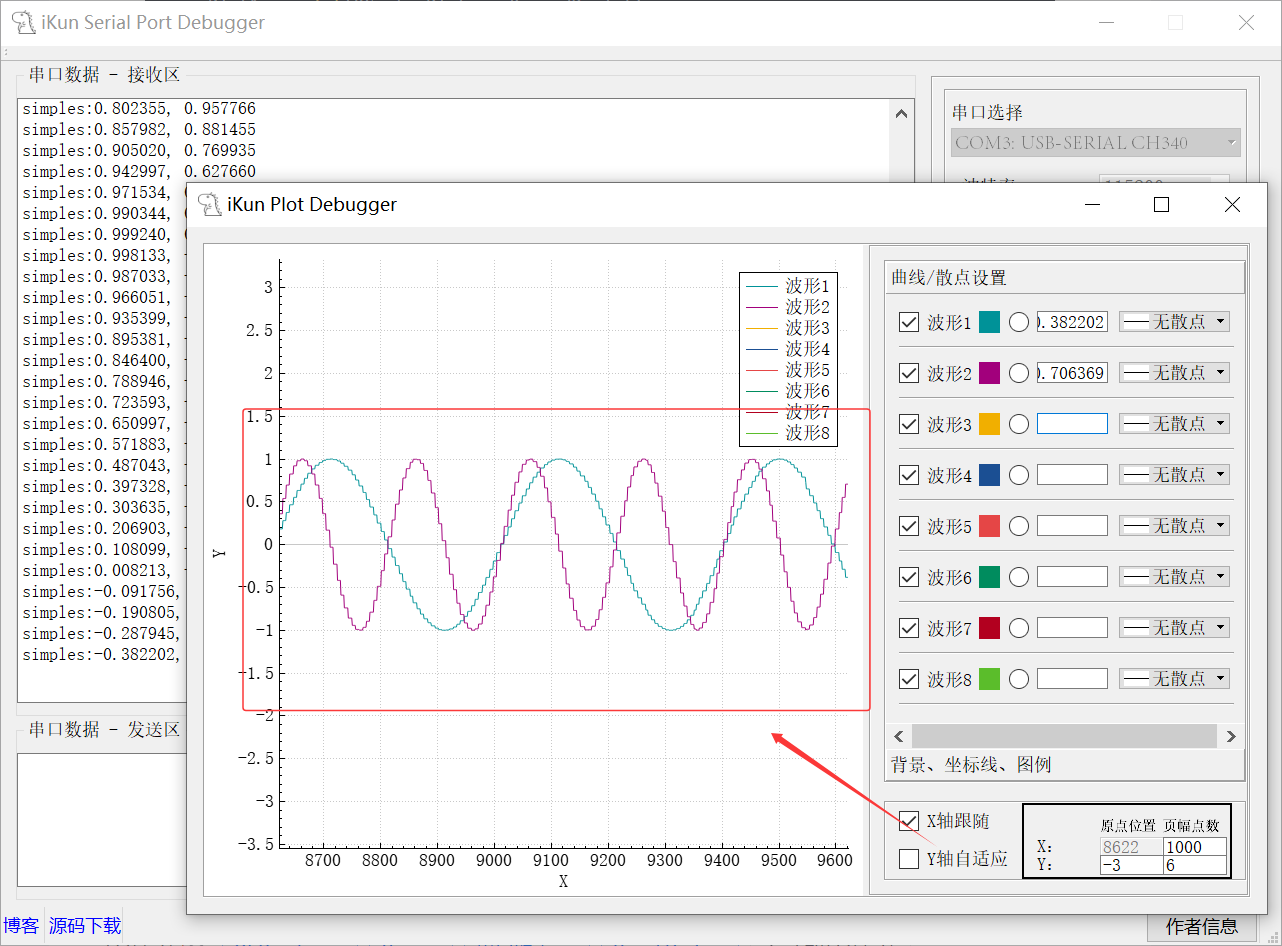
3、Plot 波形绘制:
六、代码开源
代码地址: 基于QtCreator的SerialPort串口调试助手项目代码资源-CSDN下载
如果积分不够的朋友,点波关注,评论区留下邮箱,作者无偿提供源码和后续问题解答。求求啦关注一波吧 !!!