Node.js-基础
一、Buffer 缓冲器
【1】概念
- Buffer 是一个类似于数组的 对象 ,用于表示固定长度的字节序列
- Buffer 本质是一段内存空间,专门用来处理 二进制数据 。
【2】特点
- Buffer 大小固定且无法调整
- Buffer 性能较好,可以直接对计算机内存进行操作
- 每个元素的大小为 1 字节(byte),1字节(Byte)等于8比特(bit)
【3】创建 Buffer
Node.js 中创建 Buffer 的方式主要如下几种:
-
Buffer.alloc
// 创建了一个长度为 10 字节的 Buffer,相当于申请了 10 字节的内存空间,每个字节的值为 0(自动重置为0) let buf = Buffer.alloc(10); console.log(buf); // <Buffer 00 00 00 00 00 00 00 00 00 00> -
Buffer.allocUnsafe
// 创建了一个长度为 10 字节的 Buffer,buffer 中可能存在旧的数据, 可能会影响执行结果,所以叫 unsafe let buf2 = Buffer.allocUnsafe(10); console.log(buf2); //<Buffer 00 32 00 46 00 00 00 00 00 00> -
Buffer.from
//通过字符串创建 Buffer
let buf3 = Buffer.from('hello');
// 结果是 16 进制
console.log(buf3); //<Buffer 68 65 6c 6c 6f>
//通过数组创建 Buffer
let buf4 = Buffer.from([105, 108, 111, 118, 101, 121, 111, 117]);
console.log(buf4) // <Buffer 69 6c 6f 76 65 79 6f 75>
【4】 Buffer 与字符串的转化
我们可以借助 toString 方法将 Buffer 转为字符串
toString 默认是按照 utf-8 编码方式进行转换的。
let buf4 = Buffer.from([105, 108, 111, 118, 101, 121, 111, 117]);
console.log(buf4.toString()); // iloveyou
【5】Buffer 的读写
Buffer 可以直接通过 [] 的方式对数据进行处理。
- 如果修改的数值超过 255 ,则超过 8 位的数据会被舍弃
- 一个 utf-8 的字符 一般 占 3 个字节
let buf3 = Buffer.from('hello');
// 结果是 16 进制
console.log(buf3); //<Buffer 68 65 6c 6c 6f>// 十进制
console.log(buf3[1]); // 101
buf3[1] = 97;
console.log(buf3.toString()); // hello
二、fs (file system)模块
fs 全称为 file system ,称之为文件系统 ,是 Node.js 中 内置模块 ,可以对计算机中的磁盘进行操作。
(一)文件写入
文件写入就是将 数据 保存到 文件 中,我们可以使用如下几个方法来实现该效果
| 方法 | 说明 |
|---|---|
| writeFile | 异步写入 |
| writeFileSync | 同步写入 |
| appendFile / appendFileSync | 追加写入 |
| createWriteStream | 流式写入 |
【1】 writeFile 异步写入
-
语法:
fs.writeFile(file, data[, options], callback) -
参数说明:
- file 文件名
- data 待写入的数据
- options 选项设置 (可选)
- callback 写入回调
-
返回值: undefined
// 1. 导入 fs 模块
const fs = require('fs');// 执行顺序1
console.log(1);// 2. 写入文件(文件不存在则自动创建)
fs.writeFile('./hello.txt', 'hello world', (error) => {// 执行顺序3console.log(3);// 写入失败时 error 是一个错误对象,写入成功时是 nullif (error) {console.log('写入失败', error);return;}console.log('写入成功');
});// 执行顺序2
console.log(2);
【2】 writeFileSyc 同步写入
Node.js 中的磁盘操作是由其他 线程 完成的,结果的处理有两种模式:
- 同步处理 JavaScript 主线程
会等待其他线程的执行结果,然后再继续执行主线程的代码,效率较低- 异步处理 JavaScript 主线程
不会等待其他线程的执行结果,直接执行后续的主线程代码,效率较好
-
语法: fs.writeFileSync(file, data[, options])`
-
参数与 fs.writeFile 大体一致,只是没有 callback 参数
-
返回值: undefined
const fs = require('fs');try {fs.writeFileSync('hello.txt', 'lallalal');
} catch (error) {console.log(error);
}
【3】appendFile / appendFileSync 追加写入
-
appendFile 作用是在文件尾部追加内容,appendFile 语法与 writeFile 语法完全相同
-
语法:
fs.appendFile(file, data[, options], callback)
fs.appendFileSync(file, data[, options]) -
返回值: 二者都为 undefined
const fs = require('fs');fs.appendFile('./hello.txt', 'ssssss', (error) => {if (error) {console.log('写入失败', error);return;}console.log('写入成功');
});
const fs = require('fs');try {fs.appendFileSync('./hello.txt', 'ttt'); } catch (error) {console.log(error); }
【4】createWriteStream 流式写入
- 语法:
fs.createWriteStream(path[, options]) - 参数说明:
- path 文件路径
- options 选项配置( 可选 )
- 返回值: Object
程序打开一个文件是需要消耗资源的 ,流式写入可以减少打开关闭文件的次数。
流式写入方式适用于 大文件写入或者频繁写入 的场景, writeFile 适合于 写入频率较低的场景
const fs = require('fs');// 创建写入流对象
const ws = fs.createWriteStream('hello.txt');// 写入数据
ws.write('写一句话\r\n');
ws.write('写二句话\r\n');
ws.write('写三句话');// 关闭通道(可选)
ws.close();
(二)文件读取
- 文件读取顾名思义,就是通过程序从文件中取出其中的数据,我们可以使用如下几种方式
| 方法 | 说明 |
|---|---|
| readFile | 异步读取 |
| readFileSync | 同步读取 |
| createReadStream | 流式读取 |
【1】readFile 异步读取
-
语法:
fs.readFile(path[, options], callback) -
参数说明:
- path 文件路径
- options 选项配置
- callback 回调函数
-
返回值: undefined
const fs = require('fs');fs.readFile('./hello.txt', (error, data) => {if (error) {console.log('读取文件失败', error);return;}console.log(data); // 是一个 buffer 数据console.log(data.toString()); // 转换成字符串
});
【2】readFileSync 同步读取
-
语法:
fs.readFileSync(path[, options]) -
参数说明:
- path 文件路径
- options 选项配置
-
返回值: string | Buffer
const fs = require('fs');try {const data = fs.readFileSync('./hello.txt');// const data = fs.readFileSync('./hello.txt', 'utf-8');console.log(data); // 是一个 buffer 数据(如果readFileSync有第二个参数,data 返回的就是字符串)console.log(data.toString()); // 转换成字符串
} catch (err) {console.log(err);
}
【3】createReadStream 流式读取
-
语法:
fs.createReadStream(path[, options]) -
参数说明:
- path 文件路径
- options 选项配置( 可选 )
-
返回值: Object
const fs = require('fs');
// 创建读取流
const rs = fs.createReadStream('./hello.txt');// 绑定 data 事件:每次取出 64k 数据后执行一次 data 回调
rs.on('data', (chunk) => {console.log(chunk); // chunk 是 Buffer 对象
});// 读取完毕后,将会触发(可选)
rs.on('end', () => {console.log('读取完成');
});
【4】复制文件
const fs = require('fs');try {const rs = fs.createReadStream('./hello.txt');const ws = fs.createWriteStream('./hello2.txt');rs.on('data', (chunk) => {ws.write(chunk);});rs.on('end', () => {ws.close();console.log('读取完成');});// 上边两个 on 绑定的事件,等同于// rs.pipe(ws);
} catch (error) {console.log(error);
}
(三)文件操作
【1】文件移动和重命名
-
在 Node.js 中,我们可以使用
rename或renameSync来移动或重命名 文件或文件夹 -
语法:
fs.rename(oldPath, newPath, callback),fs.renameSync(oldPath, newPath) -
参数说明:
- oldPath 文件当前的路径
- newPath 文件新的路径
- callback 操作后的回调
const fs = require('fs');fs.rename('./hello.txt', './world.txt', (error) => {if (error) {console.log('文件重命名失败', error);return;}console.log('文件重命名成功');
});
const fs = require('fs');fs.rename('./hello2.txt', './ceshi/hello.txt', (error) => {if (error) {console.log('文件移动失败', error);return;}console.log('文件移动成功'); });
【2】文件删除
-
在 Node.js 中,我们可以使用 unlink 或 unlinkSync 来删除文件
-
语法:
fs.unlink(path, callback),fs.unlinkSync(path) -
参数说明:
- path 文件路径
- callback 操作后的回调
const fs = require('fs');// fs.unlink('./hello.txt', (err) => {
//   if (err) {
//     console.log('删除文件失败', err);
//     return;
//   }
//   console.log('删除文件成功');
// });// 等同于上边代码,node > 14.4
fs.rm('./world.txt', (err) => {if (err) {console.log('删除文件失败', err);return;}console.log('删除文件成功');
});
(四)文件夹操作
- 借助 Node.js 的能力,我们可以对文件夹进行 创建 、 读取 、 删除 等操作
| 方法 | 说明 |
|---|---|
| mkdir / mkdirSync | 创建文件夹 |
| readdir / readdirSync | 读取文件夹 |
| rmdir / rmdirSync | 删除文件夹 |
【1】mkdir 创建文件夹
-
在 Node.js 中,我们可以使用 mkdir 或 mkdirSync 来创建文件夹
-
语法:
fs.mkdir(path[, options], callback),fs.mkdirSync(path[, options]) -
参数说明:
- path 文件夹路径
- options 选项配置( 可选 )
- callback 操作后的回调
const fs = require('fs');
// mkdir => make directory
fs.mkdir('./tmp', (error) => {if (error) {console.log('创建文件夹失败', error);return;}console.log('创建文件夹成功');
});// 创建多层目录: ./tmp/a/b 需要添加上 {recursive: true} 参数
fs.mkdir('./tmp2/a/b', { recursive: true }, (error) => {if (error) {console.log('创建文件夹失败', error);return;}console.log('创建文件夹成功');
});
【2】readdir 读取文件夹
-
在 Node.js 中,我们可以使用 readdir 或 readdirSync 来读取文件夹
-
语法:
fs.readdir(path[, options], callback),fs.readdirSync(path[, options]) -
参数说明:
- path 文件夹路径
- options 选项配置( 可选 )
- callback 操作后的回调
const { error } = require('console');
const fs = require('fs');// 读取当前文件夹
fs.readdir('./', (err, data) => {if (err) {console.log('读取失败', error);return;}console.log(data);
});
// const data = fs.readdirSync('./')
// console.log(data);
【3】rmdir 删除文件夹
-
在 Node.js 中,我们可以使用 rmdir 或 rmdirSync 来删除文件夹
-
语法:
fs.rmdir(path[, options], callback),fs.rmdirSync(path[, options]) -
参数说明:
- path 文件夹路径
- options 选项配置( 可选 )
- callback 操作后的回调
const fs = require('fs');
// 文件夹中只能是个空文件夹
// fs.rmdir('./tmp', (err) => {
//   if (err) {
//     console.log('删除失败', err);
//     return;
//   }//   console.log('删除文件夹成功');
// });// 递归删除文件夹及文件夹中的内容
// 已经不推荐
// fs.rmdir('./tmp', { recursive: true }, (err) => {
//   if (err) {
//     console.log('删除失败', err);
//     return;
//   }//   console.log('删除文件夹成功');
// });fs.rm('./tmp', { recursive: true }, (err) => {if (err) {console.log('删除失败', err);return;}console.log('删除文件夹成功');
});
(五)其他
【1】查看资源状态
- 在 Node.js 中,我们可以使用 stat 或 statSync 来查看资源的详细信息
- 语法:
fs.stat(path[, options], callback),fs.statSync(path[, options]) - 参数说明:
- path 文件夹路径
- options 选项配置( 可选 )
- callback 操作后的回调
const fs = require('fs');fs.stat('./tmp', (err, stats) => {if (err) {console.log('出错', err);return;}//   Stats {//   dev: 0,//   mode: 16822,//   nlink: 1,//   uid: 0,//   gid: 0,//   rdev: 0,//   blksize: 4096,//   ino: 1125899907116074,//   size: 0,//   blocks: 0,//   atimeMs: 1750126834826.6274,//   mtimeMs: 1750126834822.3652,//   ctimeMs: 1750126834822.3652,//   birthtimeMs: 1750126834822.3652// }console.log(stats);// 判断是不是文件console.log(stats.isFile()); // false// 判断是不是文件夹console.log(stats.isDirectory()); // true
});
【2】相对路径问题
- fs 模块对资源进行操作时,路径的写法有两种:
- 相对路径
./hello.txt当前目录下的hello.txthello.txt等效于上面的写法../hello.txt当前目录的上一级目录中的hello.txt
- 绝对路径
D:/Program Fileswindows 系统下的绝对路径/usr/binLinux 系统下的绝对路径
相对路径中所谓的 当前目录 ,指的是 命令行的工作目录 ,而并非是文件的所在目录
所以当命令行的工作目录与文件所在目录不一致时,会出现一些 BUG
【3】__dirname
__dirname与require类似,都是 Node.js 环境中的’全局’变量__dirname保存着当前文件所在目录的绝对路径 ,可以使用__dirname与文件名拼接成绝对路径
使用 fs 模块的时候,尽量使用 __dirname 将路径转化为绝对路径,这样可以避免相对路径产生的
Bug
const fs = require('fs');fs.readFile(__dirname + '/06.01.stat.js', (err, data) => {if (err) {console.log(err);return;}console.log(data.toString());
});
三、path 模块
- path 模块提供了 操作路径 的功能,我们将介绍如下几个较为常用的几个 API:
| API | 说明 |
|---|---|
| path.resolve | 拼接规范的绝对路径 |
| path.sep | 获取操作系统的路径分隔符 |
| path.parse | 解析路径并返回对象 |
| path.basename | 获取路径的基础名称 |
| path.dirname | 获取路径的目录名 |
| path.extname | 获得路径的扩展名 |
const path = require('path');// 注意路径斜线的方向已经改变:D:\webCode\edu-node\index.html
console.log(path.resolve(__dirname, './index.html'));// \
console.log(path.sep);const pathStr = 'D:\\webCode\\edu-node\\index.html';// {
//   root: 'D:\\',
//   dir: 'D:\\webCode\\edu-node',
//   base: 'index.html',
//   ext: '.html',
//   name: 'index'
// }
console.log(path.parse(pathStr));// index.html
console.log(path.basename(pathStr));// D:\webCode\edu-node
console.log(path.dirname(pathStr))//.html
console.log(path.extname(pathStr))
四、HTTP 协议
(一)概念
- HTTP(hypertext transport protocol)协议;中文叫超文本传输协议
是一种基于TCP/IP的应用层通信协议 - 这个协议详细规定了 浏览器 和万维网 服务器 之间互相通信的规则。
- 协议中主要规定了两个方面的内容
- 客户端:用来向服务器发送数据,可以被称之为请求报文
- 服务端:向客户端返回数据,可以被称之为响应报文
(二)请求报文的组成
请求报文由请求行、请求头、空行、请求体组成
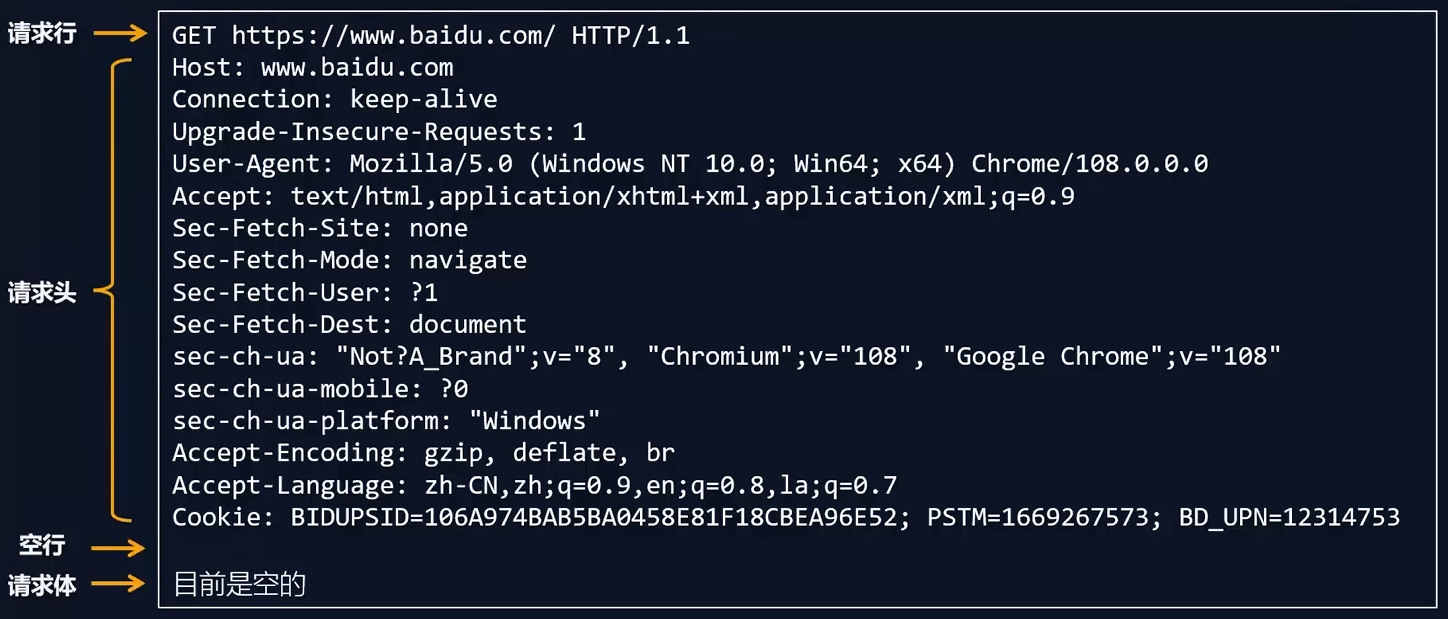
【1】HTTP 的请求行
请求行由请求方法、请求 URL、HTTP协议版本号组成
- 请求方法:
| 方法 | 作用 |
|---|---|
| GET | 主要用于获取数据 |
| POST | 主要用于新增数据 |
| PUT/ PATCH | 主要用于更新数据 |
| DELETE | 主要用于删除数据 |
| HEAD/ OPTIONS/ CONNECT/ TRACE | 使用相对较少 |
-
请求 URL(统一资源定位器)
- 例如:http://www.baidu.com:80/index.html?a=100&b=200#logo
http: 协议(https、ftp、ssh等)www.baidu.com:域名80:端口号/index.html:路径a=100&b=200:查询字符串#logo:哈希(锚点链接)
- 例如:http://www.baidu.com:80/index.html?a=100&b=200#logo
-
HTTP协议版本号

【2】HTTP 的请求头
- 格式:『头名:头值』
- 常见的请求头有:
| 请求头 | 解释 |
|---|---|
| Host | 主机名 |
| Connection | 连接的设置 keep-alive(保持连接);close(关闭连接) |
| Cache-Control | 缓存控制 max-age = 0 (没有缓存) |
| Upgrade-Insecure-Requests | 将网页中的http请求转化为https请求(很少用)老网站升级 |
| User-Agent | 用户代理,客户端字符串标识,服务器可以通过这个标识来识别这个请求来自 |
| 哪个客户端 ,一般在PC端和手机端的区分 | |
| Accept | 设置浏览器接收的数据类型 |
| Accept-Encoding | 设置接收的压缩方式 |
| Accept-Language | 设置接收的语言 q=0.7 为喜好系数,满分为1 |
| Cookie | 发送到用户浏览器并保存在浏览器上的一小块数据 |
【3】HTTP 的请求体
- 请求体内容的格式是非常灵活的,可以是空(GET请求),
也可以是字符串,还可以是JSON(POST请求)

(三)响应报文的组成
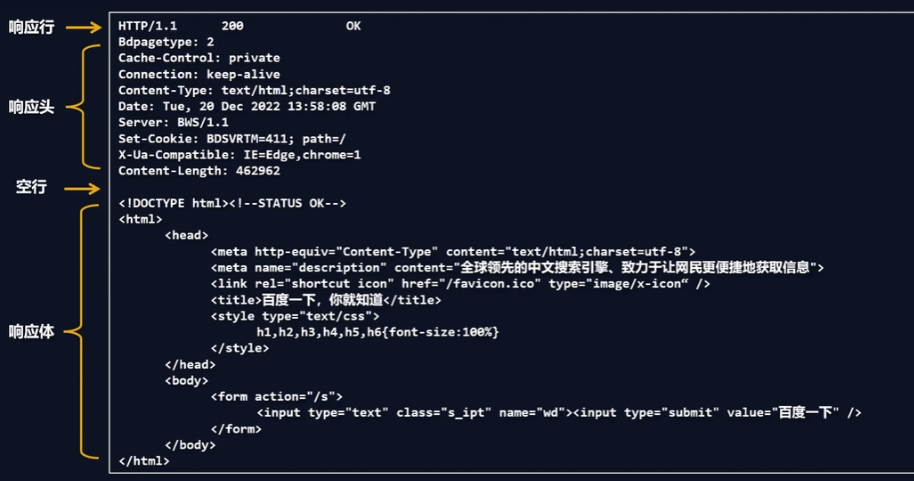
【1】响应行
HTTP/1.1 200 OK
HTTP/1.1:HTTP协议版本号200:响应状态码404 Not Found500 Internal Server Error,还有一些状态码,参考:https://developer.mozilla.org/zh-CN/docs/Web/HTTP/Status- OK:响应状态描述
响应状态码和响应字符串关系是一 一对应的。
【2】响应头
Cache-Control:缓存控制 private 私有的,只允许客户端缓存数据
Connection 链接设置
Content-Type:text/html;charset=utf-8 设置响应体的数据类型以及字符集,响应体为html,字符集 utf-8
Content-Length:响应体的长度,单位为字节
【3】响应体
- 响应体内容的类型是非常灵活的,常见的类型有 HTML、CSS、JS、图片、JSON
(四)HTTP 服务
【1】创建 HTTP 服务
-
编写代码,创建 http 服务,监听 9000 端口
const http = require('http');// 创建服务对象, // request 对象可以获得请求报文的数据 // response 对象可以设置响应报文数据 // 回调函数在接收到请求时执行 const server = http.createServer((request, response) => {//设置响应体response.end('hello world'); });// 监听端口,启动服务 server.listen(9000, () => {console.log('服务已经启动,9000端口监听中...'); }); -
在命令行窗口运行代码
-
在浏览器中请求对应的端口
http://127.0.0.1:9000
注意事项:
- 当服务启动后,更新代码
必须重启服务才能生效(可以自行安装nodemon来解决这个问题)- 响应内容中文乱码的解决办法
response.setHeader('content-type','text/html;charset=utf-8');- 端口号被占用
Error: listen EADDRINUSE: address already in use :::9000修改其他端口号- HTTP 协议默认端口是 80 。HTTPS 协议的默认端口是 443, HTTP 服务开发常用端口有 3000,8080,8090,9000 等
【2】解析 HTTP 请求报文
想要获取请求的数据,需要通过 request 对象
| 含义 | 语法 |
|---|---|
| 请求方法 | request.method |
| 请求版本 | request.httpVersion |
| 请求路径 | request.url |
| URL 路径 | require(‘url’).parse(request.url).pathname |
| URL 查询字符串 | require(‘url’).parse(request.url, true).query |
| 请求头 | request.headers |
| 请求体 | request.on(‘data’, function(chunk){}) request.on(‘end’, function(){}); |
注意事项:
- request.url 只能获取路径以及查询字符串,无法获取 URL 中的域名以及协议的内容
- request.headers 将请求信息转化成一个对象,并将属性名都转化成了『小写』
- 关于路径:如果访问网站的时候,只填写了 IP 地址或者是域名信息,此时请求的路径为『 / 』
- 关于 favicon.ico:这个请求是属于浏览器自动发送的请求
-
请求路径和查询参数
const http = require('http'); const url = require('url');const server = http.createServer((request, response) => {// 请求信息// 浏览器输入的 url: http://127.0.0.1:9000/index.html?a=1&b=2#footconsole.log(request.method); // GETconsole.log(request.url); // /index.html?a=1&b=2console.log(request.headers); ///* Url {protocol: null,slashes: null,auth: null,host: null,port: null,hostname: null,hash: null,search: '?a=1&b=2',query: 'a=1&b=2',pathname: '/index.html',path: '/index.html?a=1&b=2',href: '/index.html?a=1&b=2'}*/console.log(url.parse(request.url));console.log(url.parse(request.url).pathname); // /index.htmlconsole.log(url.parse(request.url).query); // a=1&b=2console.log(url.parse(request.url, true).query); // { a: '1', b: '2' }response.end('http'); });// 监听端口,启动服务 server.listen(9000, () => {console.log('服务已经启动,9000端口监听中...'); }); -
请求体
const http = require('http'); const server = http.createServer((request, response) => {// 请求体:需要通过表单发送一个 POST 请求,数据会放在 body 中let body = '';// 数据块接收中request.on('data', (chunk) => {body += chunk;});// 数据接收完毕request.on('end', () => {console.log(body); // username=kobe&username=123456// 数据接收完毕 发出响应response.end('end');}); });// 监听端口,启动服务 server.listen(9000, () => {console.log('服务已经启动,9000端口监听中...'); }); -
通过 URL 类解析请求路径和参数【推荐】
https://www.nodeapp.cn/url.html#url_class_urlconst http = require('http'); const server = http.createServer((request, response) => {let url = new URL(request.url, 'http://127.0.0.1:9000');/* URL {href: 'http://127.0.0.1:9000/index.html?a=1&b=2',origin: 'http://127.0.0.1:9000',protocol: 'http:',username: '',password: '',host: '127.0.0.1:9000',hostname: '127.0.0.1',port: '9000',pathname: '/index.html',search: '?a=1&b=2',searchParams: URLSearchParams { 'a' => '1', 'b' => '2' },hash: ''}*/console.log(url);console.log(url.searchParams.get('a')); // 1response.end('end'); });// 监听端口,启动服务 server.listen(9000, () => {console.log('服务已经启动,9000端口监听中...'); });
【3】设置 HTTP 响应报文
| 作用 | 语法 |
|---|---|
| 设置响应状态码 | response.statusCode |
| 设置响应状态描述 | response.statusMessage ( 用的非常少 ) |
| 设置响应头信息 | response.setHeader(‘头名’, ‘头值’) |
| 设置响应体 | response.write(‘xx’) response.end(‘xxx’) |
// write 和 end 的两种使用情况:
//1. write 和 end 的结合使用 响应体相对分散
response.write('xx');
response.write('xx');
response.write('xx');
response.end(); //每一个请求,在处理的时候必须要执行 end 方法的
//2. 单独使用 end 方法 响应体相对集中
response.end('xxx')
const http = require('http');// 创建服务对象,
// request 对象可以获得请求报文的数据
// response 对象可以设置响应报文数据
// 回调函数在接收到请求时执行
const server = http.createServer((request, response) => {// 请求信息console.log(request.headers);//设置响应体response.statusCode = 200;response.setHeader('Content-Type', 'text/plain;charset=utf-8');response.end('返回的数据:{data: 123}');
});// 监听端口,启动服务
server.listen(9000, () => {console.log('服务已经启动,9000端口监听中...');
});
(五)静态资源服务
- 静态资源是指 内容长时间不发生改变的资源 ,例如图片,视频,CSS 文件,JS文件,HTML文件,字体文件等
- 动态资源是指 内容经常更新的资源 ,例如百度首页,网易首页,京东搜索列表页面等
【1】网站根目录或静态资源目录
- HTTP 服务在哪个文件夹中寻找静态资源,那个文件夹就是
静态资源目录,也称之为网站根目录
【2】网页中的 URL 与路径
-
网页中的 URL 主要分为两大类:相对路径与绝对路径
-
绝对路径:绝对路径可靠性强,而且相对容易理解,在项目中运用较多
形式 特点 http://www.test.com/web 直接向目标资源发送请求,容易理解。网站的外链会用到此形式 //www.test.com/web 与当前打开的页面 URL 的协议拼接形成完整 URL 再发送请求。大型网站用的比较多 /web 与当前打开的页面 URL 的协议、主机名、端口拼接形成完整 URL 再发送请求。中小型网站
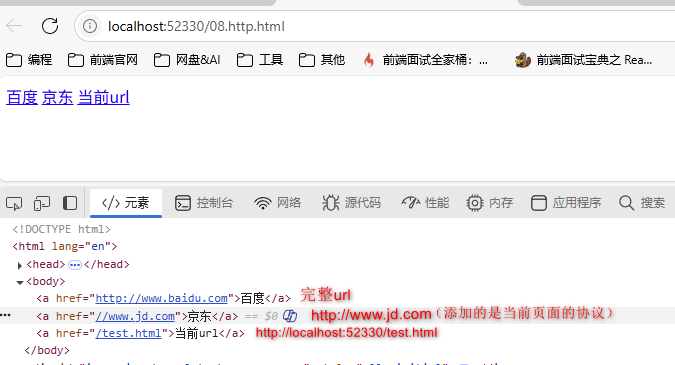
-
相对路径:相对路径在发送请求时,需要与当前页面 URL 路径进行
计算,得到完整 URL 后,再发送请求,学习阶段用的较多,例如当前网页 url 为 http://www.test.com/course/h5.html形式 最终的 URL ./css/app.css http://www.test.com/course/css/app.css js/app.js http://www.test.com/course/js/app.js …/img/logo.png http://www.test.com/img/logo.png …/…/mp4/show.mp4 http://www.test.com/mp4/show.mp4
【3】设置资源类型(mime类型)
-
媒体类型(通常称为 Multipurpose Internet Mail Extensions 或 MIME 类型 )是一种标准,用来表示文档、文件或字节流的性质和格式。
mime 类型结构: [type]/[subType] 例如: text/html text/css image/jpeg image/png application/json -
HTTP 服务可以设置响应头 Content-Type 来表明响应体的 MIME 类型,浏览器会根据该类型决定如何处理资源
-
下面是常见文件对应的 mime 类型
html: 'text/html',
css: 'text/css',
js: 'text/javascript',
png: 'image/png',
jpg: 'image/jpeg',
gif: 'image/gif',
mp4: 'video/mp4',
mp3: 'audio/mpeg',
json: 'application/json'
对于未知的资源类型,可以选择 application/octet-stream 类型,浏览器在遇到该类型的响应时,会对响应体内容进行独立存储,也就是我们常见的
下载效果
-
新建一个文件夹,在文件夹中创建 http.js 文件,用于创建一个 HTTP 服务,这个 HTTP 服务可以返回 CSS 、HTML 、JS 等文件
const http = require('http'); const fs = require('fs'); const path = require('path');const baseUrl = 'http://127.0.0.1:9000'; // 定义html css js 所在的根目录 const root = __dirname + '/page'; const mimes = {html: 'text/html',css: 'text/css',js: 'text/javascript',png: 'image/png',jpg: 'image/jpeg',gif: 'image/gif',mp4: 'video/mp4',mp3: 'audio/mpeg',json: 'application/json', };const server = http.createServer((request, response) => {const { pathname } = new URL(request.url, baseUrl);const filePath = root + pathname;fs.readFile(filePath, (err, course) => {if (err) {switch (err.code) {case 'ENOENT':response.statusCode = 404;response.end('<h1>404 Not Found</h1>');break;case 'EPERM':response.statusCode = 403;response.end('<h1>403 Forbidden</h1>');break;default:response.statusCode = 500;response.end('<h1>Internal Server Error</h1>');}return;}// 获取文件后缀const ext = path.extname(filePath).slice('1');if (mimes[ext]) {let charset = '';if (ext === 'html') {charset = ';charset=utf-8';}response.setHeader('Content-Type', mimes[ext] + charset);} else {response.setHeader('Content-Type', 'application/octet-stream;');}response.end(course);}); });server.listen('9000', () => {console.log('开始监听'); }); -
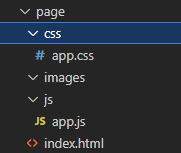
http.js 文件同目录下,创建 page 文件夹,该文件夹中创建 index.html,用于显示页面内容,同时 index.html 引入 page/css/app.css 文件,和 page/js/app.js
-
在控制台中启动 http 服务
-
在浏览器中输入 http://127.0.0.1:9000/index.html 即可看到 http 服务返回的 html 、css、js
(六)GET和POST请求的区别
- GET 和 POST 是 HTTP 协议请求的两种方式。
- GET 主要用来获取数据,POST 主要用来提交数据
- GET 带参数请求是将参数缀到 URL 之后,在地址栏中输入 url 访问网站就是 GET 请求,POST 带参数请求是将参数放到请求体中
- POST 请求相对 GET 安全一些,因为GET请求的参数会暴露在浏览器的地址栏
- GET 请求大小有限制,一般为 2K,而 POST 请求则没有大小限制
五、模块化
(一)概念
【1】什么是模块化与模块 ?
- 将一个复杂的程序文件依据一定规则(规范)拆分成多个文件的过程称之为 模块化
- 其中拆分出的
每个文件就是一个模块,模块的内部数据是私有的,不过模块可以暴露内部数据以便其他模块使用
【2】什么是模块化项目 ?
- 编码时是按照模块一个一个编码的, 整个项目就是一个模块化的项目
【3】模块化好处
- 防止命名冲突
- 高复用性
- 高维护性
(二)模块暴露数据
- 模块暴露数据的方式有两种:
- module.exports = value
- exports.name = value
使用时有几点注意:
- module.exports 可以暴露
任意数据- 不能使用
exports = value的形式暴露数据,模块内部 module 与 exports 的隐式关系exports = module.exports = {},require 返回的是目标模块中module.exports的值
-
新建 index.js 文件,用于引入 methods.js 暴露的方法
// 1. methods 只暴露一个 // const add = require('./methods'); // console.log(add(1,1));// 2. 暴露数字和字符串 // const num = require('./methods'); // console.log(num);// 3. 暴露多个 // const methods = require('./methods'); // console.log(methods.add(1, 1)); // console.log(methods.subtract(5, 1));// 3.暴露多个2 const { add, subtract } = require('./methods'); console.log(add(1, 1)); console.log(subtract(5, 1)); -
新建 methods.js 文件,用于创建和暴露方法
function add(num, num2) {return num + num2;
}function subtract(num, num2) {return num - num2;
}// module.exports 和 exports 指向同一个对象,
// 并且最终导出时是 module.exports 的值
// console.log(module.exports === exports); // true// 1.只暴露一个时
// module.exports = add;// 1.1 不能使用 export = value 的形式暴露数据
// 只改变了 exports 的值,没有改变 module.exports 的值
// 导出时导出的是 module.exports 的值,所以结果为 {}
// exports = add;// 2.暴露数字和字符串
// module.exports = 123
// module.exports = 'sss'// 3.暴露多个
// module.exports = {
//   add,
//   subtract,
// };// 3.1 暴露多个2
exports.add = add;
exports.subtract = subtract;
(三)导入(引入)模块
-
在模块中使用 require 传入文件路径即可引入文件
const methods = require('./methods'); -
require 使用的一些注意事项:
- 对于自己创建的模块,导入时路径建议写
相对路径,且不能省略./和../ js和json文件导入时可以不用写后缀,c/c++编写的node扩展文件也可以不写后缀,但是一般用不到- 如果导入其他类型的文件,会以
js文件进行处理 - 如果导入的路径是个文件夹,则会
首先检测该文件夹下package.json文件中main属性对应的文件,如果存在则导入,反之如果文件不存在会报错。
如果 main 属性不存在,或者 package.json 不存在,则会尝试导入文件夹下的 index.js 和 index.json ,如果还是没找到,就会报错 - 导入 node.js 内置模块时,直接 require 模块的名字即可,无需加
./和../
- 对于自己创建的模块,导入时路径建议写
(四)导入模块的基本流程
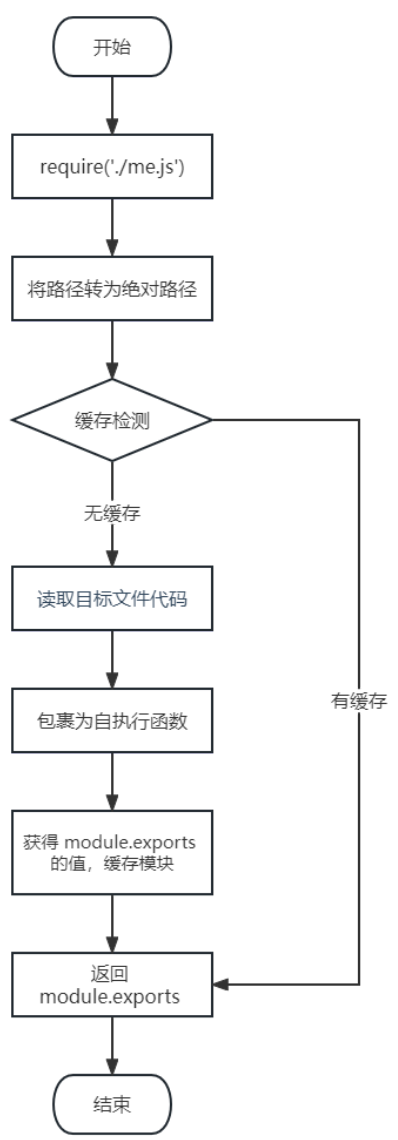
这里我们介绍一下 require 导入 自定义模块 的基本流程
-
将相对路径转为绝对路径,定位目标文件
-
缓存检测
-
读取目标文件代码
-
包裹为一个函数并执行(自执行函数)。通过 arguments.callee.toString() 查看自执行函数
function add(num, num2) {return num + num2; }/* function (exports, require, module, __filename, __dirname) {function add(num, num2) {return num + num2;}console.log(arguments.callee.toString());module.exports = add } */ console.log(arguments.callee.toString());module.exports = add -
缓存模块的值
-
返回 module.exports 的值
(五)CommonJS 规范
module.exports、exports以及require这些都是 CommonJS 模块化规范中的内容。- 而 Node.js 是实现了 CommonJS 模块化规范,二者关系有点像 JavaScript 与 ECMAScript