当前位置: 首页 > news >正文

Spring Cloud Alibaba快速入门02-Nacos(上)

文章目录

  • 前言
  • Nacos安装
  • 启动nacos单机模式
  • 实现注册中心-服务注册
    • 步骤1 - 启动微服务
    • 步骤2 - 引入服务发现依赖
    • 步骤3 - 配置Nacos地址
    • 步骤4 - 查看注册中心效果
    • 步骤5 - 集群模式启动测试


在这里插入图片描述

前言

Nacos(Naming Configuration Service)是一个更易于构建云原生应用的动态服务发现、配置管理和服务管理平台。

它由阿里巴巴开源,并已成为 Spring Cloud Alibaba 生态系统的核心组件,同时完美集成到 Spring Cloud 体系中,可以替代 Netflix Eureka、Consul、ZooKeeper 等组件。

它的核心功能可以拆解为两个词:

  1. Naming (服务发现与注册)
  2. Configuration (配置管理)

Nacos安装

  • Nacos /nɑ:kəʊs/ 是 Dynamic Naming and Configuration Service的首字母简称,一个更易于构建云原生应用的动态服务发现、配置管理和服务管理平台。
  • 官网:https://nacos.io/zh-cn/docs/v2/quickstart/quick-start.html
  • 安装:
    • 下载安装包【2.4.3】
    • 启动命令: startup.cmd -m standalone

nacos历史版本地址:https://nacos.io/download/release-history/?spm=5238cd80.47ee59c.0.0.189fcd36EUPree

启动nacos单机模式

1.解压nacos-server-2.4.3.zip后进入bin
2.cmd进入黑窗口
3.使用 startup.cmd -m standalone 命令启动nacos单机模式
在这里插入图片描述

实现注册中心-服务注册

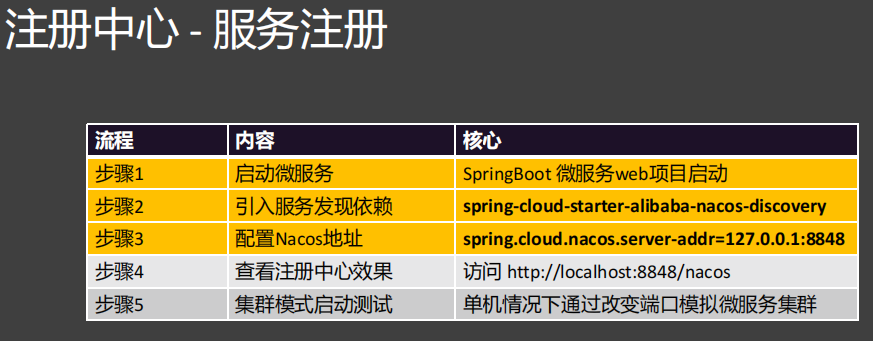
步骤流程如下
在这里插入图片描述

步骤1 - 启动微服务

进入services-order
pom.xml依赖

<dependencies><dependency><groupId>org.springframework.boot</groupId><artifactId>spring-boot-starter-web</artifactId></dependency>
</dependencies>

步骤2 - 引入服务发现依赖

因为要把order注册到注册中心,所以导入nacos依赖(这里在services父项目中已经导入)

步骤3 - 配置Nacos地址

现在需要将当前项目注册到注册中心,所以需要在application.yml中配置nacos地址(告诉当前应用nacos在哪里)
启动类

import org.springframework.boot.SpringApplication;
import org.springframework.boot.autoconfigure.SpringBootApplication;@SpringBootApplication
public class OrderApplication {public static void main(String[] args) {SpringApplication.run(OrderApplication.class, args);}
}

application.yml

server:port: 8080servlet:context-path: /
spring:application:name: qf-service-order# 配置nacos地址(告诉当前应用nacos在哪里)cloud:nacos:server-addr: 127.0.0.1:8848

项目结构
在这里插入图片描述

步骤4 - 查看注册中心效果

访问:http://127.0.0.1:8848/nacos/index.html
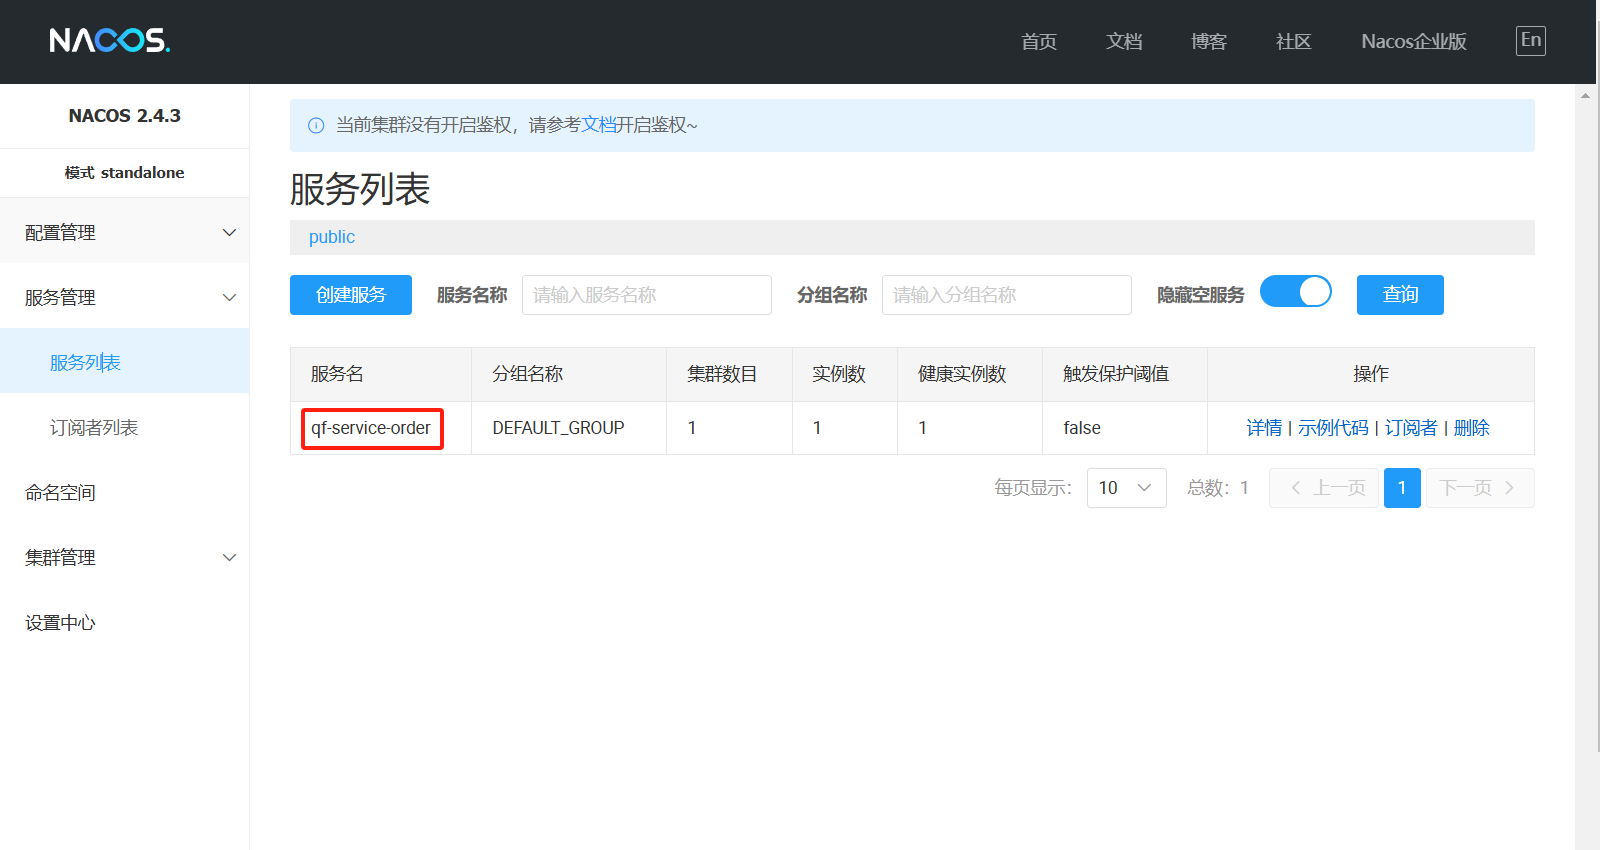
在这里插入图片描述

在这里插入图片描述

步骤5 - 集群模式启动测试

打开左下角Services
在这里插入图片描述
如果没有添加(为空),则需要先添加
在这里插入图片描述
选择其中spring boot选项
出现以下情况
在这里插入图片描述
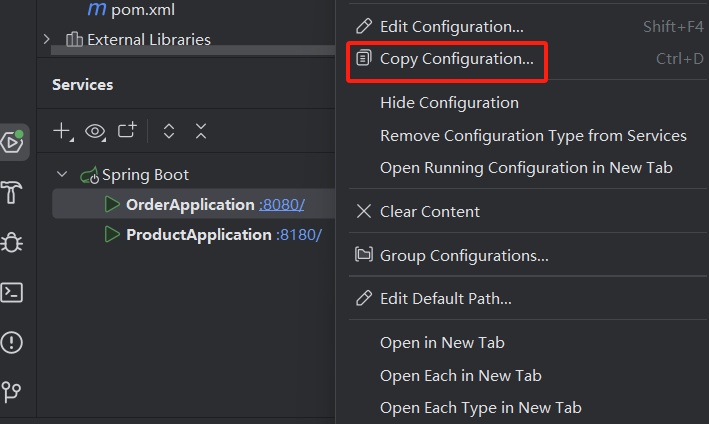
点击右键,复制一个服务
在这里插入图片描述
点击后修改服务名称,修改服务端口
在这里插入图片描述

在这里插入图片描述
完整配置
–server.port=8081
在这里插入图片描述
点击ok
配置完成后同一时间启动
1.shift选择要启动的项目
2.点击右键,选择Rerun
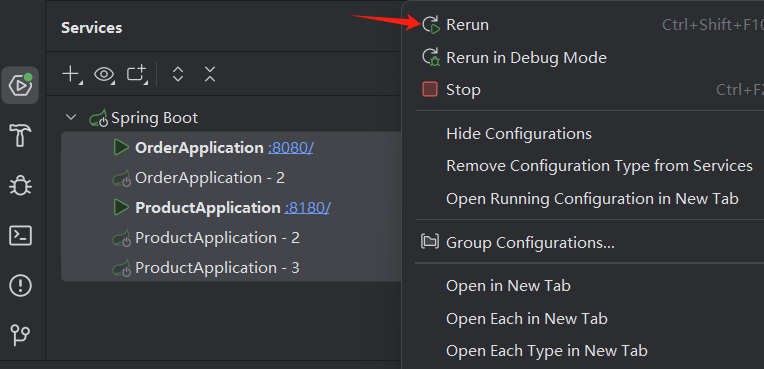
在这里插入图片描述
启动成功后可以在nacos上看到启动的服务
在这里插入图片描述


文章转载自:

http://phd6jZbM.rmxwm.cn
http://3qx1et9E.rmxwm.cn
http://eNbF9hX6.rmxwm.cn
http://ur8JFUD6.rmxwm.cn
http://ljR66NmW.rmxwm.cn
http://qZp6gUCJ.rmxwm.cn
http://m1eTYEwg.rmxwm.cn
http://MSK2VkZR.rmxwm.cn
http://LVrFa3Em.rmxwm.cn
http://f4YbWwYB.rmxwm.cn
http://9FD4B3NT.rmxwm.cn
http://NU5vnJZZ.rmxwm.cn
http://Ry5Xu9al.rmxwm.cn
http://YCC8ZGZ0.rmxwm.cn
http://N753ja9O.rmxwm.cn
http://WpyFvV2K.rmxwm.cn
http://2ykjPYY7.rmxwm.cn
http://vM8kLGo2.rmxwm.cn
http://8WqH9Sf7.rmxwm.cn
http://KkVzFvgv.rmxwm.cn
http://mOHpKwHc.rmxwm.cn
http://m5TJiWtN.rmxwm.cn
http://o3UCqcYY.rmxwm.cn
http://HO29lDlP.rmxwm.cn
http://76pLXikJ.rmxwm.cn
http://MfJiHEuk.rmxwm.cn
http://OZHfggFi.rmxwm.cn
http://JKDSqGk3.rmxwm.cn
http://TDbzhPHp.rmxwm.cn
http://DrmcER6H.rmxwm.cn
http://www.dtcms.com/a/371281.html

相关文章:

  • Selenium自动化测试
  • B.50.10.11-Spring框架核心与电商应用
  • 芯片ATE测试PAT(Part Average Testing)学习总结-20250916
  • Visual acoustic Field,360+X论文解读
  • Android系统更新系统webview. 2025-09-06
  • Simulink子系统、变体子系统及封装知识
  • 详解 Java 中的 CopyOnWriteArrayList
  • FTL(Flash Translation Layer)
  • C++输出字符串的统一码(Unicode Code)和 ASCII 码
  • 【PCIe EP 设备入门学习专栏 -- 8.1.2 PCIe EP 通路详细介绍】
  • nginx安装部署(备忘)
  • 6.虚拟化历史
  • 疯狂星期四文案网第62天运营日记
  • AI工程师对于AI的突发奇想
  • 模电仿真软件:MultSim14.3下载与安装
  • 心路历程-passwdusermod命令补充
  • 自旋锁/互斥锁 设备树 iic驱动总线 day66 67 68
  • 【尚跑】2025逐日者15KM社区赛西安湖站,74分安全完赛
  • 页面间的导航:`<Link>` 组件和 `useRouter`
  • 视频动作识别-VideoSwin
  • AI 自然语音对话接入客服系统的场景分析及实现
  • 【基础-判断】架构设计时需要考虑“一次开发,多端部署”,这样可以节省跨设备UI开发工作量,同时提升应用部署的伸缩性。
  • [光学原理与应用-428]:非线性光学 - 为什么要改变光的波长/频率,获得特点波长/频率的光?
  • 运筹学——求解线性规划的单纯形法
  • HTML标签之超链接
  • MySQL问题5
  • MyBatis Example模式SQL注入风险
  • C语言数据结构——详细讲解《二叉树与堆的基本概念》
  • 【杂类】I/O
  • import type在模块引入中的作用