PiscCode基于 Mediapipe 实现轨迹跟踪
在计算机视觉的诸多任务中,目标检测(Object Detection) 与 目标跟踪(Object Tracking) 是两个非常核心的环节。检测可以帮助我们在一张图像或视频帧中找出感兴趣的物体及其位置,而跟踪则是在视频流中维持物体身份的一致性。二者结合后,可以实现视频监控、行为分析、车流量统计、运动分析等实际应用。
本文将结合 Mediapipe 的轻量级目标检测模型与 OpenCV 的图像处理能力,构建一个简易的 实时检测+轨迹跟踪系统,并对代码实现与优化思路进行详细剖析。
一、背景与技术选型
1.1 目标检测与跟踪的区别
-
目标检测:在单帧中识别所有目标,并返回目标的边界框(Bounding Box)与类别。
例如 YOLO、SSD、Faster R-CNN 等模型。 -
目标跟踪:在视频流中维持目标身份,确保同一个物体在不同帧之间被赋予相同的 ID。
常见方法有 KCF、SORT、DeepSORT、ByteTrack 等。
在很多实际应用场景中,仅靠检测是不够的。例如:
-
交通监控中需要统计某辆车在多个路口的出现情况;
-
体育比赛中需要跟踪某个球员的跑动轨迹;
-
机器人视觉中需要持续识别并跟随目标。
因此,检测与跟踪往往需要结合。
1.2 为什么选择 Mediapipe
Mediapipe 是 Google 开源的一套跨平台机器学习视觉框架,优势在于:
-
模型轻量化:提供了基于 MobileNet、EfficientDet 的 tflite 模型,适合移动端和嵌入式部署。
-
接口简洁:相比 TensorFlow 或 PyTorch 推理,Mediapipe 封装了检测 API,调用更方便。
-
跨平台:支持 Android、iOS、Web 和 Python,方便移植。
-
内置优化:对 GPU/NNAPI 友好,推理速度快。
在本文中,我们使用 efficientdet_lite0.tflite 作为检测模型,它在准确率和速度之间取得了不错的平衡。
1.3 为什么使用 OpenCV
Mediapipe 负责检测,但在可视化、视频流处理、轨迹绘制等环节,OpenCV 是更灵活的选择。它可以:
-
读取/处理视频帧;
-
绘制检测框、文本、轨迹线条;
-
进行图像增强与后处理。
因此,Mediapipe 与 OpenCV 搭配,能实现一个轻量而实用的检测+跟踪方案。
二、整体架构设计
本文实现的 FrameObjectTracker 系统包含两个核心部分:
-
目标检测器(Detector)
使用 Mediapipe 的ObjectDetector,输入一帧图像,输出一组检测框和类别。 -
轨迹管理器(Tracker)
-
对检测结果进行匹配,维护 ID;
-
根据 IoU(交并比)将检测结果与已有轨迹绑定;
-
未匹配的检测创建新轨迹;
-
丢失的目标在超过一定阈值后删除;
-
保存轨迹点,用于绘制运动轨迹。
-
整体流程如下:
视频帧 → Mediapipe 检测 → 匹配/更新轨迹 → 可视化绘制 → 输出三、代码实现详解
以下为核心代码(你已经实现),我们逐块解析:
3.1 初始化检测器
base_options = python.BaseOptions(model_asset_path=model_path)
options = vision.ObjectDetectorOptions(base_options=base_options,score_threshold=score_threshold
)
self.detector = vision.ObjectDetector.create_from_options(options)
这里指定了模型路径 efficientdet_lite0.tflite,并设置检测的分数阈值(默认 0.5)。这样可以过滤掉置信度较低的结果。
3.2 轨迹对象(Track 类)
class Track:def __init__(self, tid, bbox, category, trace_len):self.id = tidself.bbox = bboxself.category = categoryself.lost = 0self.trace = []self.trace_len = trace_len
每个轨迹对象维护以下信息:
-
id:唯一 ID;
-
bbox:边界框;
-
category:类别(如 person、car 等);
-
lost:丢失计数器;
-
trace:历史中心点,用于绘制轨迹。
更新方法:
def update(self, bbox):self.bbox = bboxcx = (bbox[0] + bbox[2]) // 2cy = (bbox[1] + bbox[3]) // 2self.trace.append((cx, cy))if len(self.trace) > self.trace_len:self.trace.pop(0)
这样可以记录目标的运动轨迹。

3.3 IoU 匹配逻辑
@staticmethod
def _iou(boxA, boxB):...interArea = max(0, xB - xA) * max(0, yB - yA)boxAArea = ...boxBArea = ...return interArea / float(boxAArea + boxBArea - interArea + 1e-6)
在目标跟踪中,IoU 是最常见的匹配度量方法。
若 IoU 大于一定阈值(如 0.3),则认为是同一目标。否则可能是新目标或不同对象。
3.4 更新轨迹
核心逻辑:
def _update_tracks(self, detections):updated_tracks = []used_dets = set()# 尝试匹配已有轨迹for track in self.tracks:best_iou, best_det = 0, Nonefor i, det in enumerate(detections):if i in used_dets: continuebbox = det.bounding_boxbox_det = (bbox.origin_x, bbox.origin_y,bbox.origin_x + bbox.width,bbox.origin_y + bbox.height)iou_score = self._iou(track.bbox, box_det)if iou_score > best_iou:best_iou, best_det = iou_score, (i, det)# 匹配成功if best_det and best_iou > self.iou_threshold:...track.update(box_det)track.lost = 0updated_tracks.append(track)else:# 没匹配上,丢失+1track.lost += 1if track.lost <= self.max_lost:updated_tracks.append(track)# 新增未匹配检测for i, det in enumerate(detections):if i in used_dets: continue...new_track = self.Track(self.next_id, box_det, category, self.trace_len)new_track.update(box_det)self.next_id += 1updated_tracks.append(new_track)self.tracks = updated_tracks
逻辑总结:
-
遍历已有轨迹,尝试找到 IoU 最大的检测框;
-
若匹配上则更新轨迹;
-
若没匹配则增加丢失计数,超过
max_lost就删除; -
遍历未使用的检测,新建轨迹。
3.5 绘制轨迹
def _draw_tracks(self, frame):annotated = frame.copy()for t in self.tracks:x1, y1, x2, y2 = t.bboxcolor = self._get_color(t.category)cv2.rectangle(annotated, (x1, y1), (x2, y2), color, 2)label = f"ID {t.id} {t.category}"cv2.putText(annotated, label, (x1, y1 - 5),cv2.FONT_HERSHEY_SIMPLEX, 0.8, color, 2)# 画轨迹if len(t.trace) > 1:for i in range(1, len(t.trace)):cv2.line(annotated, t.trace[i-1], t.trace[i], color, 2)return annotated
每个目标绘制:
-
矩形框;
-
ID+类别文字;
-
历史轨迹(折线)。
这样就能清晰看到目标在视频中的运动轨迹。
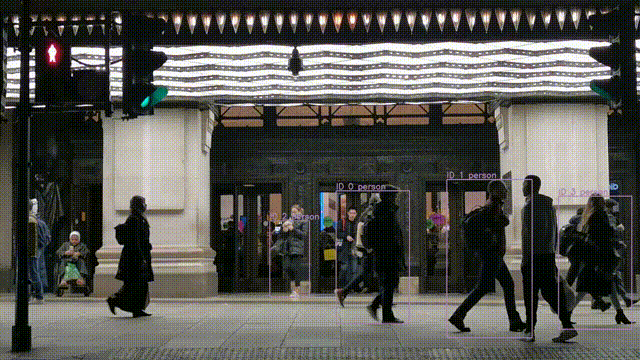
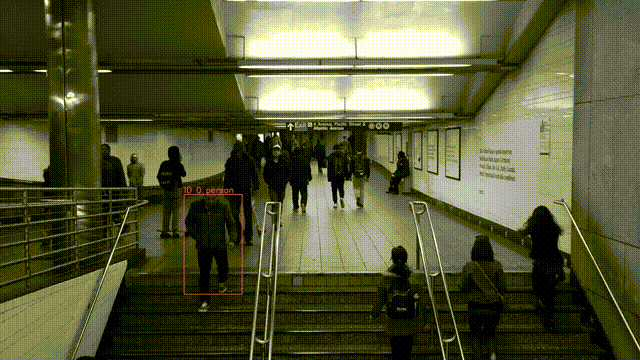
四、运行效果与应用场景
运行时,可以用以下代码调用:
cap = cv2.VideoCapture(0)
tracker = FrameObjectTracker()while cap.isOpened():ret, frame = cap.read()if not ret:breakannotated = tracker.do(frame, device="cpu")cv2.imshow("Tracking", annotated)if cv2.waitKey(1) & 0xFF == 27:break
cap.release()
cv2.destroyAllWindows()
效果:
-
能实时检测并跟踪视频流中的人、物体;
-
每个物体有独立 ID 和轨迹线。
应用场景包括:
-
智能监控:持续跟踪异常行为;
-
交通流量分析:跟踪车辆轨迹,统计车流量;
-
运动分析:记录球员/运动物体轨迹;
-
机器人视觉:实现目标跟随。
import cv2
import mediapipe as mp
import random
from mediapipe.tasks import python
from mediapipe.tasks.python import visionclass FrameObjectTracker:def __init__(self, model_path="文件地址/efficientdet_lite0.tflite",score_threshold=0.5, max_lost=5, iou_threshold=0.3,trace_len=30):"""Mediapipe 检测 + 简易轨迹跟踪:param model_path: mediapipe tflite 模型路径:param score_threshold: 检测分数阈值:param max_lost: 目标丢失多少帧后删除:param iou_threshold: IOU 阈值用于匹配:param trace_len: 保存的轨迹长度"""# 初始化 mediapipe detectorbase_options = python.BaseOptions(model_asset_path=model_path)options = vision.ObjectDetectorOptions(base_options=base_options,score_threshold=score_threshold)self.detector = vision.ObjectDetector.create_from_options(options)# tracker 参数self.category_colors = {}self.next_id = 0self.tracks = []self.max_lost = max_lostself.iou_threshold = iou_thresholdself.trace_len = trace_lenclass Track:"""轨迹对象"""def __init__(self, tid, bbox, category, trace_len):self.id = tidself.bbox = bbox  # (x1, y1, x2, y2)self.category = categoryself.lost = 0self.trace = []  # 历史轨迹点self.trace_len = trace_lendef update(self, bbox):self.bbox = bboxcx = (bbox[0] + bbox[2]) // 2cy = (bbox[1] + bbox[3]) // 2self.trace.append((cx, cy))if len(self.trace) > self.trace_len:self.trace.pop(0)@staticmethoddef _iou(boxA, boxB):"""计算两个框的 IOU"""xA = max(boxA[0], boxB[0])yA = max(boxA[1], boxB[1])xB = min(boxA[2], boxB[2])yB = min(boxA[3], boxB[3])interArea = max(0, xB - xA) * max(0, yB - yA)boxAArea = (boxA[2] - boxA[0]) * (boxA[3] - boxA[1])boxBArea = (boxB[2] - boxB[0]) * (boxB[3] - boxB[1])return interArea / float(boxAArea + boxBArea - interArea + 1e-6)def _get_color(self, category_name: str):if category_name not in self.category_colors:self.category_colors[category_name] = (random.randint(50, 255),random.randint(50, 255),random.randint(50, 255),)return self.category_colors[category_name]def _update_tracks(self, detections):updated_tracks = []used_dets = set()# 先尝试匹配已有轨迹for track in self.tracks:best_iou, best_det = 0, Nonefor i, det in enumerate(detections):if i in used_dets:continuebbox = det.bounding_boxbox_det = (bbox.origin_x, bbox.origin_y,bbox.origin_x + bbox.width,bbox.origin_y + bbox.height)iou_score = self._iou(track.bbox, box_det)if iou_score > best_iou:best_iou, best_det = iou_score, (i, det)if best_det and best_iou > self.iou_threshold:i, det = best_detused_dets.add(i)bbox = det.bounding_boxbox_det = (bbox.origin_x, bbox.origin_y,bbox.origin_x + bbox.width,bbox.origin_y + bbox.height)track.update(box_det)track.lost = 0updated_tracks.append(track)else:track.lost += 1if track.lost <= self.max_lost:updated_tracks.append(track)# 新增未匹配的检测for i, det in enumerate(detections):if i in used_dets:continuebbox = det.bounding_boxbox_det = (bbox.origin_x, bbox.origin_y,bbox.origin_x + bbox.width,bbox.origin_y + bbox.height)category = det.categories[0].category_name if det.categories else "obj"new_track = self.Track(self.next_id, box_det, category, self.trace_len)new_track.update(box_det)self.next_id += 1updated_tracks.append(new_track)self.tracks = updated_tracksdef _draw_tracks(self, frame):annotated = frame.copy()for t in self.tracks:x1, y1, x2, y2 = t.bboxcolor = self._get_color(t.category)cv2.rectangle(annotated, (x1, y1), (x2, y2), color, 2)label = f"ID {t.id} {t.category}"cv2.putText(annotated, label, (x1, y1 - 5),cv2.FONT_HERSHEY_SIMPLEX, 0.8, color, 2)# 画轨迹if len(t.trace) > 1:for i in range(1, len(t.trace)):cv2.line(annotated, t.trace[i-1], t.trace[i], color, 2)return annotateddef do(self, frame,device):"""处理一帧,返回带检测框和轨迹的图像"""if frame is None:return Nonemp_image = mp.Image(image_format=mp.ImageFormat.SRGB,data=cv2.cvtColor(frame, cv2.COLOR_BGR2RGB))detection_result = self.detector.detect(mp_image)detections = detection_result.detections or []self._update_tracks(detections)return self._draw_tracks(frame)
五、优化与扩展方向
5.1 匹配策略优化
目前使用 IoU 匹配,可能在目标交叉、遮挡时出错。可以考虑:
-
匈牙利算法:全局最优分配;
-
卡尔曼滤波器:预测下一个位置,提高鲁棒性;
-
ReID 特征:结合外观特征,避免 ID 混淆。
5.2 模型精度提升
-
使用 EfficientDet Lite2/3 或 YOLOv8n 等更强模型;
-
在特定数据集上微调模型,提升检测效果。
5.3 多目标统计
可以在轨迹层面增加逻辑,例如:
-
计算目标经过某个区域的次数;
-
统计平均速度、加速度。
5.4 GPU 加速
Mediapipe 在移动端支持 GPU/NNAPI,Python 下可以结合 TensorRT 或 OpenVINO 提速。
六、总结
本文介绍了一个基于 Mediapipe + OpenCV 的轻量级目标检测与轨迹跟踪系统。其核心思路是:
-
Mediapipe 负责目标检测;
-
使用 IoU 规则匹配检测结果与已有轨迹;
-
通过轨迹对象管理 ID、丢失计数和历史轨迹;
-
OpenCV 绘制可视化结果。
对 PiscTrace or PiscCode感兴趣?更多精彩内容请移步官网看看~🔗 PiscTrace