SpringBoot @RefreshScope 注解的极致玩法
引言:
- 本文总字数:约 9200 字
- 预计阅读时间:38 分钟
配置变更的 "老大难" 问题
想象一下这个场景:你负责的电商平台正在进行一年一度的大促活动,突然收到运营团队的紧急通知,需要临时调整优惠券的使用门槛。你修改了配置中心的参数,然后... 发现应用程序并没有读取到新的配置。为了让新配置生效,你不得不重启服务 —— 但这会导致正在进行的支付流程中断,直接影响销售额。
这不是虚构的场景,而是许多开发者在生产环境中都遇到过的真实困境。根据 Spring Cloud 官方文档(Cloud Native Applications),在传统 Spring 应用中,配置信息通常在应用启动时加载,并且在整个生命周期内保持不变。这意味着任何配置变更都需要重启应用才能生效,这在高可用要求的生产环境中是难以接受的。
SpringBoot 的 @RefreshScope 注解正是为解决这个问题而生。它能够让 Bean 在不重启应用的情况下刷新配置,实现配置的动态更新。作为一名资深 Java 技术专家,我将在本文中深入解析 @RefreshScope 的底层原理、使用方法和最佳实践,让你彻底掌握这一 "配置热更新" 的利器。
一、@RefreshScope 是什么?为什么需要它?
1.1 配置动态更新的业务价值
在微服务和云原生架构日益普及的今天,配置动态更新的需求变得越来越迫切:
- 敏捷运维:无需重启即可调整系统参数,如超时时间、限流阈值等
- 灰度发布:通过动态调整配置,实现功能的灰度发布和 A/B 测试
- 应急响应:在系统出现问题时,能够快速调整配置以恢复服务
- 节省资源:避免了频繁重启带来的资源消耗和服务中断
根据 DORA(DevOps Research and Assessment)的《2023 年 DevOps 状态报告》,高绩效组织的服务变更失败率比低绩效组织低 7 倍,而恢复服务的速度快 2,604 倍。实现配置动态更新是达到这种高绩效的关键能力之一。
1.2 @RefreshScope 的核心作用
@RefreshScope 是 Spring Cloud Commons 提供的一个注解,它的核心作用是:
- 标记需要在配置变更时重新创建的 Bean
- 当配置发生变更时,触发这些 Bean 的销毁和重新初始化
- 确保新创建的 Bean 使用最新的配置信息
简单来说,@RefreshScope 让 Bean 具备了 "热更新" 的能力,能够感知配置的变化并及时应用新配置。
1.3 没有 @RefreshScope 会怎样?
在没有 @RefreshScope 的情况下,Spring 容器中的 Bean 通常是单例的,并且在初始化时就绑定了配置信息。即使后续配置发生变化,这些 Bean 也不会重新读取配置,因此无法感知到变化。
例如,下面这个服务类依赖于一个配置参数:
import org.springframework.beans.factory.annotation.Value;
import org.springframework.stereotype.Service;
import lombok.extern.slf4j.Slf4j;@Service
@Slf4j
public class PromotionService {@Value("${promotion.discount:0.9}")private double discount;public double calculateDiscountPrice(double originalPrice) {log.info("使用折扣 {} 计算价格", discount);return originalPrice * discount;}
}
当promotion.discount配置发生变化时,PromotionService中的discount字段不会自动更新,因为它是在 Bean 初始化时注入的固定值。要让新配置生效,必须重启应用。
这就是 @RefreshScope 要解决的核心问题。
二、@RefreshScope 的底层原理
要真正掌握 @RefreshScope,必须理解其背后的实现原理。这不仅能帮助我们正确使用它,还能在出现问题时快速定位原因。
2.1 Spring 的 Scope 机制
@RefreshScope 的实现依赖于 Spring 的 Scope 机制。在 Spring 中,Scope 定义了 Bean 的生命周期和创建方式。常见的 Scope 包括:
- singleton:单例,整个应用中只有一个实例(默认)
- prototype:原型,每次获取时创建新实例
- request:请求,每个 HTTP 请求创建一个实例
- session:会话,每个用户会话创建一个实例
@RefreshScope 本质上是一个自定义的 Scope,它扩展了 Spring 的 Scope 机制,实现了 Bean 的动态刷新能力。
2.2 @RefreshScope 的工作原理
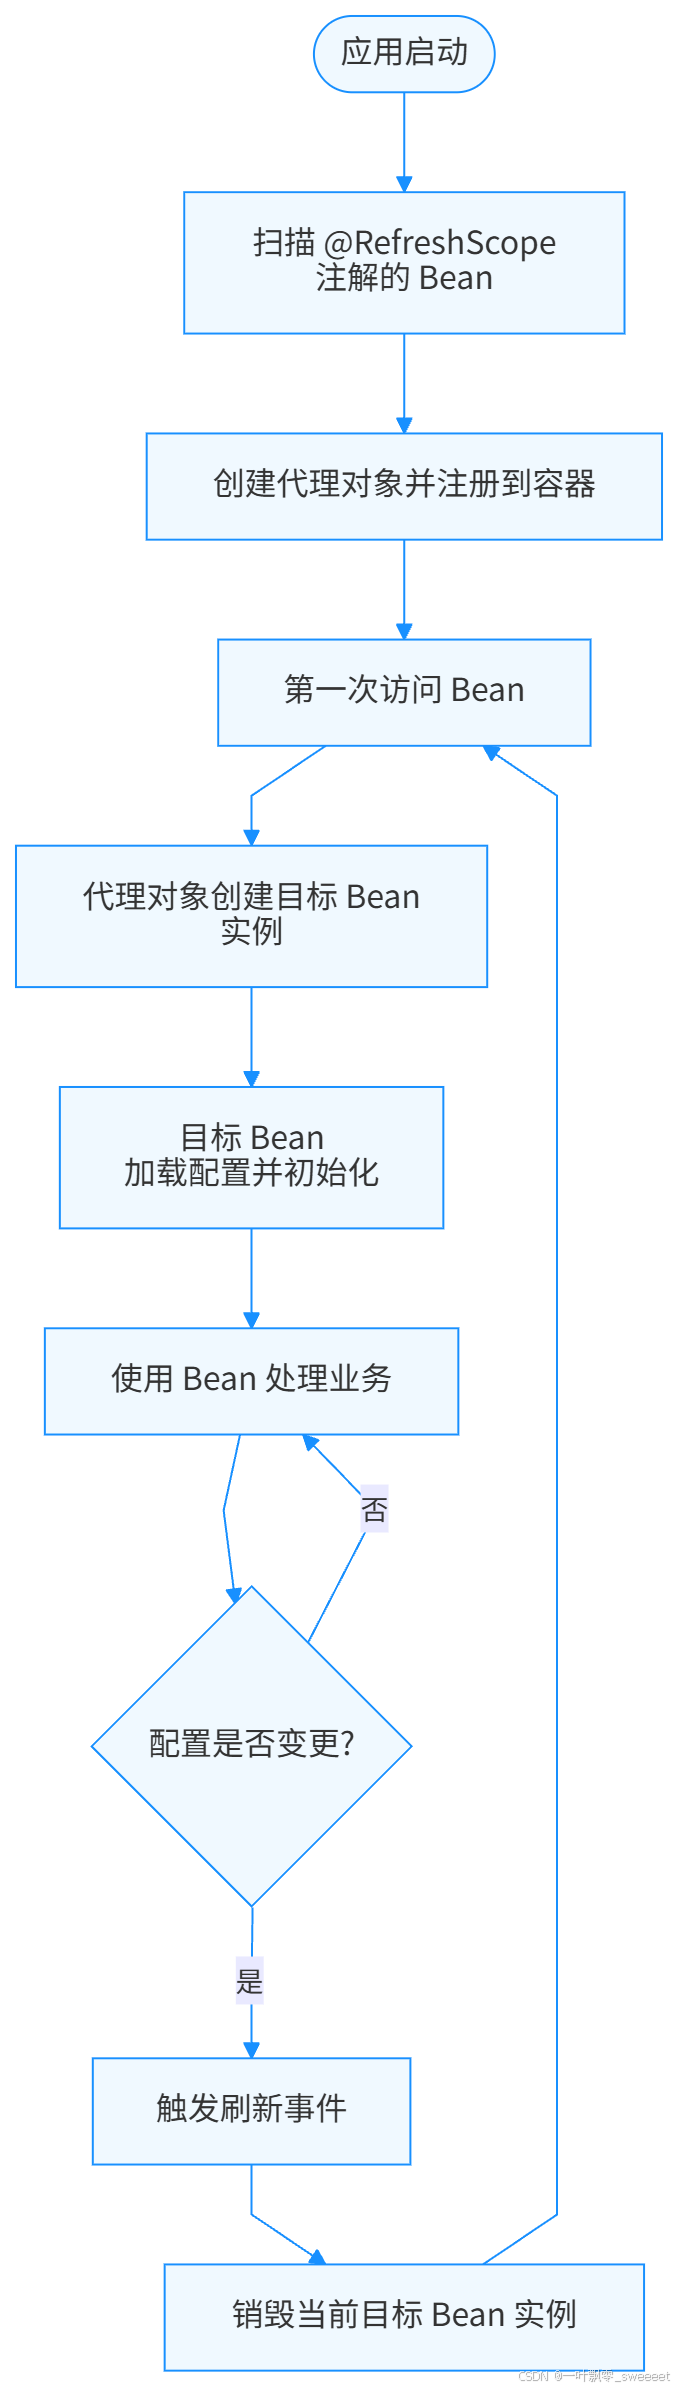
@RefreshScope 的工作流程可以概括为以下几个步骤:
- 当 Bean 被 @RefreshScope 标记时,Spring 会为其创建一个代理对象
- 这个代理对象会负责管理目标 Bean 的生命周期
- 当配置发生变更时,Spring 会触发一个刷新事件
- 收到事件后,@RefreshScope 会销毁当前的目标 Bean 实例
- 当下一次访问该 Bean 时,代理对象会创建一个新的目标 Bean 实例,该实例会加载最新的配置
流程图如下:
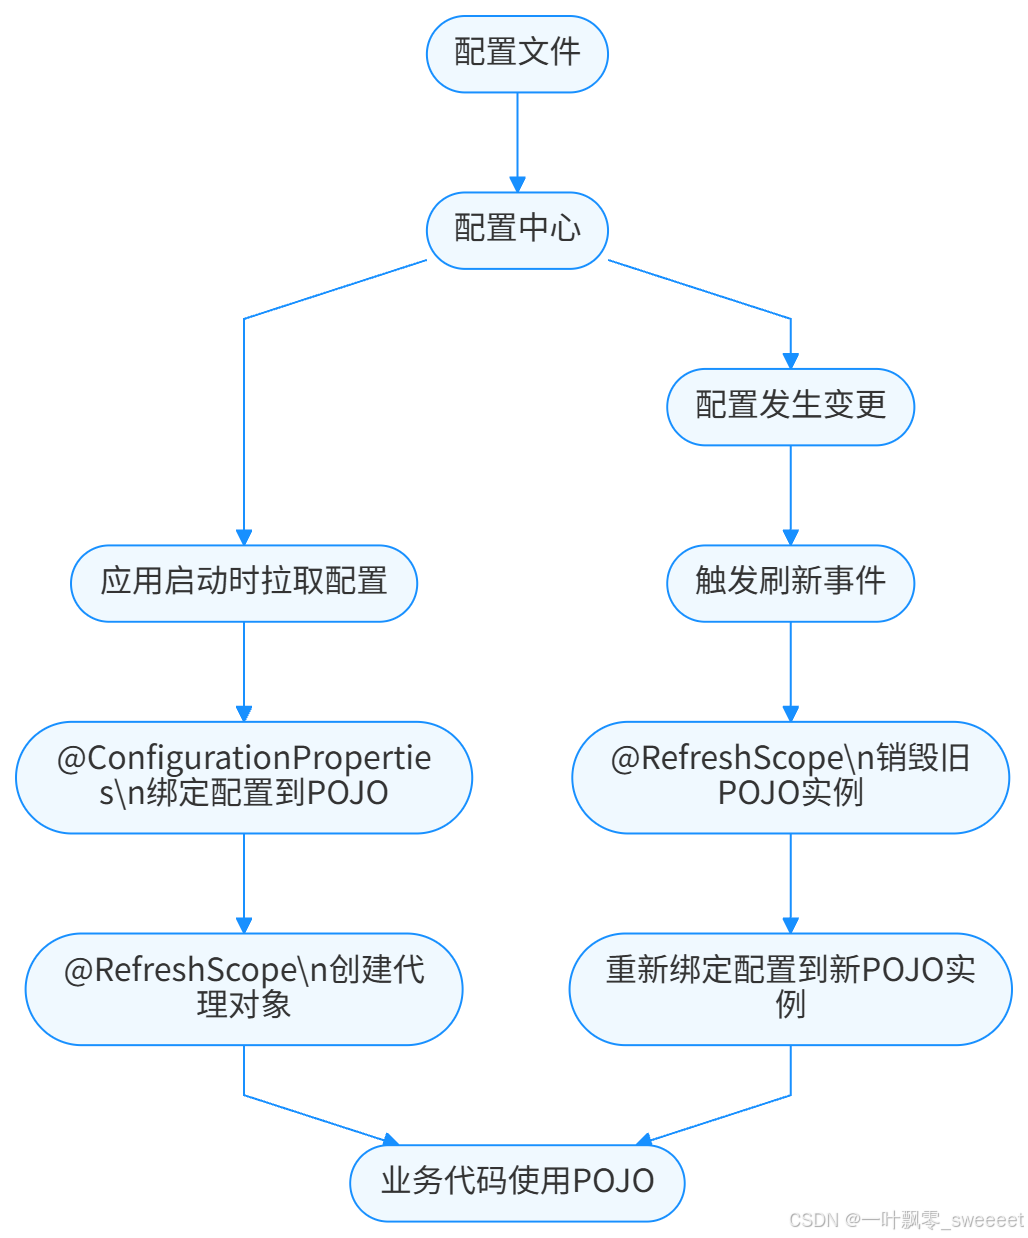
2.3 与 @ConfigurationProperties 的配合
@RefreshScope 通常与 @ConfigurationProperties 配合使用,以实现配置类的整体刷新。@ConfigurationProperties 用于将配置信息绑定到一个 POJO 类,而 @RefreshScope 则确保在配置变更时,这个 POJO 类会被重新创建并绑定最新的配置。
它们的配合流程如下:
2.4 刷新事件的传播机制
配置变更的感知和刷新事件的传播是 @RefreshScope 工作的关键环节。在 Spring Cloud 中,这通常通过以下组件实现:
- Config Server:集中式配置服务器,存储所有配置信息
- Config Client:在应用中运行,负责从 Config Server 拉取配置
- Spring Cloud Bus:用于在多个服务实例之间传播配置变更事件
当配置发生变更时,事件传播流程如下:
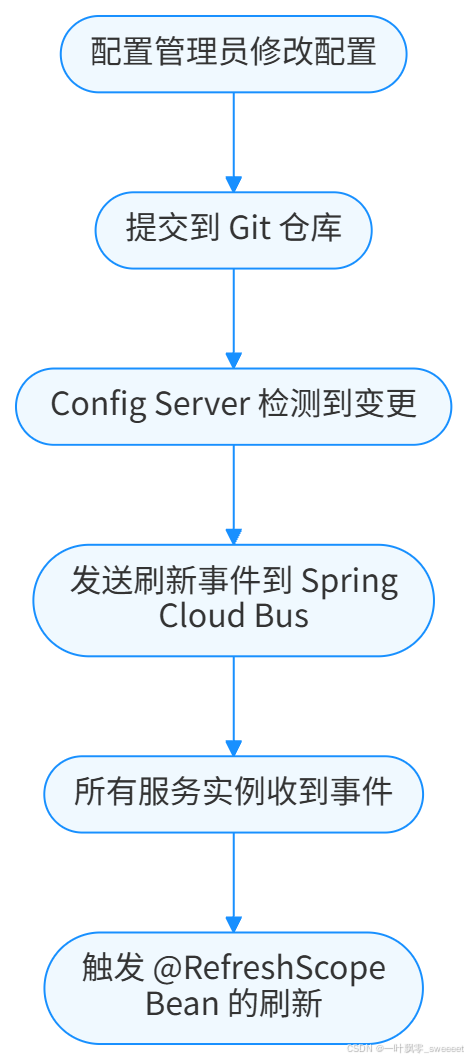
这种机制确保了所有服务实例都能及时感知配置变更并应用新配置。
三、快速上手:@RefreshScope 的基本使用
接下来,我们通过一个完整的示例来演示 @RefreshScope 的基本使用方法。这个示例将创建一个 SpringBoot 应用,实现配置的动态更新。
3.1 项目依赖配置
首先,我们需要在 pom.xml 中添加必要的依赖:
<?xml version="1.0" encoding="UTF-8"?>
<project xmlns="http://maven.apache.org/POM/4.0.0" xmlns:xsi="http://www.w3.org/2001/XMLSchema-instance"xsi:schemaLocation="http://maven.apache.org/POM/4.0.0 https://maven.apache.org/xsd/maven-4.0.0.xsd"><modelVersion>4.0.0</modelVersion><parent><groupId>org.springframework.boot</groupId><artifactId>spring-boot-starter-parent</artifactId><version>3.2.0</version><relativePath/></parent><groupId>com.jam</groupId><artifactId>refresh-scope-demo</artifactId><version>0.0.1-SNAPSHOT</version><name>refresh-scope-demo</name><description>Demo project for Spring Boot @RefreshScope</description><properties><java.version>17</java.version><spring-cloud.version>2023.0.0</spring-cloud.version></properties><dependencies><!-- Spring Boot Web --><dependency><groupId>org.springframework.boot</groupId><artifactId>spring-boot-starter-web</artifactId></dependency><!-- Spring Cloud Config Client --><dependency><groupId>org.springframework.cloud</groupId><artifactId>spring-cloud-starter-config</artifactId></dependency><!-- Spring Cloud Starter Bus AMQP (用于配置刷新事件传播) --><dependency><groupId>org.springframework.cloud</groupId><artifactId>spring-cloud-starter-bus-amqp</artifactId></dependency><!-- Spring Boot Actuator (提供/actuator/refresh端点) --><dependency><groupId>org.springframework.boot</groupId><artifactId>spring-boot-starter-actuator</artifactId></dependency><!-- Lombok --><dependency><groupId>org.projectlombok</groupId><artifactId>lombok</artifactId><version>1.18.30</version><optional>true</optional></dependency><!-- Swagger3 --><dependency><groupId>org.springdoc</groupId><artifactId>springdoc-openapi-starter-webmvc-ui</artifactId><version>2.1.0</version></dependency><!-- Commons Lang3 --><dependency><groupId>org.apache.commons</groupId><artifactId>commons-lang3</artifactId><version>3.14.0</version></dependency><dependency><groupId>org.springframework.boot</groupId><artifactId>spring-boot-starter-test</artifactId><scope>test</scope></dependency></dependencies><dependencyManagement><dependencies><dependency><groupId>org.springframework.cloud</groupId><artifactId>spring-cloud-dependencies</artifactId><version>${spring-cloud.version}</version><type>pom</type><scope>import</scope></dependency></dependencies></dependencyManagement><build><plugins><plugin><groupId>org.springframework.boot</groupId><artifactId>spring-boot-maven-plugin</artifactId><configuration><excludes><exclude><groupId>org.projectlombok</groupId><artifactId>lombok</artifactId></exclude></excludes></configuration></plugin></plugins></build>
</project>
3.2 配置文件
创建 bootstrap.yml 配置文件(注意是 bootstrap 而不是 application,因为配置客户端需要在应用启动早期加载配置):
spring:application:name: refresh-scope-democloud:config:uri: http://localhost:8888  # 配置服务器地址fail-fast: true  # 配置失败时快速失败bus:enabled: truetrace:enabled: truerabbitmq:host: localhostport: 5672username: guestpassword: guest# 暴露刷新端点
management:endpoints:web:exposure:include: refresh,bus-refresh,health,infoendpoint:health:show-details: always
3.3 使用 @RefreshScope 和 @ConfigurationProperties
创建一个配置类,用于绑定促销相关的配置:
import org.springframework.boot.context.properties.ConfigurationProperties;
import org.springframework.cloud.context.config.annotation.RefreshScope;
import org.springframework.stereotype.Component;
import lombok.Data;
import io.swagger.v3.oas.annotations.media.Schema;/*** 促销活动配置** @author 果酱*/
@Data
@Component
@RefreshScope
@ConfigurationProperties(prefix = "promotion")
@Schema(description = "促销活动配置")
public class PromotionConfig {/*** 折扣比例,如0.9表示9折*/@Schema(description = "折扣比例,如0.9表示9折")private double discount = 0.9;/*** 满减门槛,单位:元*/@Schema(description = "满减门槛,单位:元")private int fullReductionThreshold = 100;/*** 满减金额,单位:元*/@Schema(description = "满减金额,单位:元")private int fullReductionAmount = 10;/*** 活动是否开启*/@Schema(description = "活动是否开启")private boolean enabled = true;
}
3.4 创建业务服务
创建一个促销服务,使用上述配置:
import org.springframework.stereotype.Service;
import org.springframework.beans.factory.annotation.Autowired;
import java.math.BigDecimal;
import java.math.RoundingMode;
import lombok.extern.slf4j.Slf4j;
import io.swagger.v3.oas.annotations.tags.Tag;
import io.swagger.v3.oas.annotations.Operation;/*** 促销服务** @author 果酱*/
@Service
@Slf4j
@Tag(name = "促销服务", description = "提供促销相关的计算服务")
public class PromotionService {private final PromotionConfig promotionConfig;/*** 构造函数注入*/@Autowiredpublic PromotionService(PromotionConfig promotionConfig) {this.promotionConfig = promotionConfig;log.info("PromotionService初始化完成");}/*** 计算促销后的价格** @param originalPrice 原价* @return 促销后的价格*/@Operation(summary = "计算促销后价格", description = "根据当前促销规则计算商品的最终价格")public BigDecimal calculatePromotionPrice(BigDecimal originalPrice) {log.info("开始计算促销价格,原价:{}", originalPrice);// 检查活动是否开启if (!promotionConfig.isEnabled()) {log.info("促销活动未开启,返回原价");return originalPrice;}BigDecimal discountPrice = calculateDiscountPrice(originalPrice);BigDecimal fullReductionPrice = calculateFullReductionPrice(originalPrice);// 返回两种促销中价格更低的一种BigDecimal finalPrice = discountPrice.compareTo(fullReductionPrice) < 0 ? discountPrice : fullReductionPrice;log.info("促销计算完成,最终价格:{}", finalPrice);return finalPrice;}/*** 计算折扣价格*/private BigDecimal calculateDiscountPrice(BigDecimal originalPrice) {double discount = promotionConfig.getDiscount();log.info("应用折扣:{}", discount);return originalPrice.multiply(BigDecimal.valueOf(discount)).setScale(2, RoundingMode.HALF_UP);}/*** 计算满减价格*/private BigDecimal calculateFullReductionPrice(BigDecimal originalPrice) {int threshold = promotionConfig.getFullReductionThreshold();int amount = promotionConfig.getFullReductionAmount();log.info("应用满减:满{}减{}", threshold, amount);if (originalPrice.compareTo(BigDecimal.valueOf(threshold)) >= 0) {return originalPrice.subtract(BigDecimal.valueOf(amount)).setScale(2, RoundingMode.HALF_UP);}return originalPrice;}
}
3.5 创建控制器
创建一个 REST 控制器,提供 API 接口来测试配置的动态更新:
import org.springframework.web.bind.annotation.GetMapping;
import org.springframework.web.bind.annotation.RequestParam;
import org.springframework.web.bind.annotation.RestController;
import org.springframework.beans.factory.annotation.Autowired;
import java.math.BigDecimal;
import lombok.extern.slf4j.Slf4j;
import io.swagger.v3.oas.annotations.Operation;
import io.swagger.v3.oas.annotations.Parameter;
import io.swagger.v3.oas.annotations.tags.Tag;/*** 促销控制器** @author 果酱*/
@RestController
@Slf4j
@Tag(name = "促销控制器", description = "提供促销相关的API接口")
public class PromotionController {private final PromotionService promotionService;private final PromotionConfig promotionConfig;/*** 构造函数注入*/@Autowiredpublic PromotionController(PromotionService promotionService, PromotionConfig promotionConfig) {this.promotionService = promotionService;this.promotionConfig = promotionConfig;}/*** 计算促销价格*/@GetMapping("/promotion/price")@Operation(summary = "计算促销价格", description = "根据原价计算促销后的价格")public BigDecimal calculatePrice(@Parameter(description = "商品原价", required = true)@RequestParam BigDecimal originalPrice) {log.info("收到计算促销价格请求,原价:{}", originalPrice);return promotionService.calculatePromotionPrice(originalPrice);}/*** 获取当前促销配置*/@GetMapping("/promotion/config")@Operation(summary = "获取当前促销配置", description = "返回当前生效的促销配置信息")public PromotionConfig getPromotionConfig() {log.info("收到获取促销配置请求");return promotionConfig;}
}
3.6 启动类
创建应用启动类:
import org.springframework.boot.SpringApplication;
import org.springframework.boot.autoconfigure.SpringBootApplication;
import org.springframework.cloud.context.config.annotation.RefreshScope;
import io.swagger.v3.oas.annotations.OpenAPIDefinition;
import io.swagger.v3.oas.annotations.info.Info;/*** 应用启动类** @author 果酱*/
@SpringBootApplication
@RefreshScope
@OpenAPIDefinition(info = @Info(title = "RefreshScope Demo API", version = "1.0", description = "SpringBoot @RefreshScope示例项目API文档"))
public class RefreshScopeDemoApplication {public static void main(String[] args) {SpringApplication.run(RefreshScopeDemoApplication.class, args);}
}
3.7 测试配置动态更新
- 启动 Config Server(配置服务器),这里假设已经搭建好了一个简单的配置服务器,并且在配置仓库中有 refresh-scope-demo.yml 配置文件:
promotion:discount: 0.9fullReductionThreshold: 100fullReductionAmount: 10enabled: true
-
启动应用程序,访问http://localhost:8080/promotion/config,可以看到当前的配置信息。
-
访问http://localhost:8080/promotion/price?originalPrice=200,计算促销价格,此时应该返回 180.00(9 折)或 190.00(满 100 减 10,取较低的 180)。
-
修改配置仓库中的 refresh-scope-demo.yml 文件,例如将 discount 改为 0.8,fullReductionAmount 改为 20。
-
提交修改到配置仓库。
-
发送 POST 请求到http://localhost:8080/actuator/refresh,触发配置刷新。
-
再次访问http://localhost:8080/promotion/config,可以看到配置已经更新。
-
再次访问http://localhost:8080/promotion/price?originalPrice=200,此时应该返回 160.00(8 折)或 180.00(满 100 减 20,取较低的 160)。
通过这个简单的示例,我们可以看到 @RefreshScope 确实能够实现配置的动态更新,而无需重启应用。
四、深入进阶:@RefreshScope 的高级特性与陷阱
掌握了 @RefreshScope 的基本用法后,我们需要了解它的一些高级特性和使用陷阱,以便在实际项目中更好地应用。
4.1 @RefreshScope 的作用范围
@RefreshScope 可以标注在类上,也可以标注在方法上:
- 标注在类上:该类的所有实例都会受到 @RefreshScope 的管理
- 标注在 @Bean 方法上:只有该方法创建的 Bean 会受到 @RefreshScope 的管理
例如,我们可以在配置类的 @Bean 方法上使用 @RefreshScope:
import org.springframework.context.annotation.Bean;
import org.springframework.context.annotation.Configuration;
import org.springframework.cloud.context.config.annotation.RefreshScope;
import java.time.format.DateTimeFormatter;/*** 日期配置类** @author 果酱*/
@Configuration
public class DateConfig {/*** 创建日期格式化器,支持动态刷新*/@Bean@RefreshScopepublic DateTimeFormatter dateTimeFormatter(@Value("${date.format:yyyy-MM-dd HH:mm:ss}") String pattern) {return DateTimeFormatter.ofPattern(pattern);}
}
这种方式可以更精确地控制哪些 Bean 需要支持动态刷新。
4.2 与单例 Bean 的交互问题
当 @RefreshScope 标注的 Bean(我们称之为 "刷新 Bean")被单例 Bean 依赖时,需要特别注意:单例 Bean 在初始化时会获取刷新 Bean 的代理对象,而不是实际的目标对象。这确保了在刷新发生后,单例 Bean 仍然能通过代理对象访问到新的目标对象。
但是,如果单例 Bean 缓存了刷新 Bean 的状态或方法返回值,就会导致配置更新后无法获取新值。例如:
import org.springframework.stereotype.Service;
import org.springframework.beans.factory.annotation.Autowired;
import lombok.extern.slf4j.Slf4j;@Service
@Slf4j
public class OrderService {private final PromotionService promotionService;private final BigDecimal discountCache;  // 缓存折扣值@Autowiredpublic OrderService(PromotionService promotionService) {this.promotionService = promotionService;// 错误:在构造函数中缓存了折扣值this.discountCache = calculateDiscount(new BigDecimal("100"));}public BigDecimal calculateDiscount(BigDecimal price) {return promotionService.calculatePromotionPrice(price);}// 错误:使用缓存的折扣值,而不是实时计算public BigDecimal getCachedDiscount() {return discountCache;}
}
在这个例子中,OrderService是一个单例 Bean,它在构造函数中缓存了PromotionService(刷新 Bean)的计算结果。当PromotionService的配置更新后,OrderService的getCachedDiscount()方法仍然会返回旧的缓存值,而不是新的计算
解决这个问题的方法是:避免在单例 Bean 中缓存刷新 Bean 的状态或结果,每次需要时都直接调用刷新 Bean 的方法。
4.3 静态字段无法刷新
@RefreshScope 只能管理实例字段,不能管理静态字段。如果在刷新 Bean 中使用静态字段存储配置信息,这些字段的值不会在配置变更时更新。
错误示例:
import org.springframework.beans.factory.annotation.Value;
import org.springframework.cloud.context.config.annotation.RefreshScope;
import org.springframework.stereotype.Component;
import lombok.extern.slf4j.Slf4j;@Component
@RefreshScope
@Slf4j
public class StaticFieldDemo {// 错误:静态字段无法被@RefreshScope管理@Value("${demo.value:default}")private static String staticValue;public String getStaticValue() {return staticValue;}
}
正确的做法是使用实例字段:
import org.springframework.beans.factory.annotation.Value;
import org.springframework.cloud.context.config.annotation.RefreshScope;
import org.springframework.stereotype.Component;
import lombok.Getter;
import lombok.extern.slf4j.Slf4j;@Component
@RefreshScope
@Slf4j
public class InstanceFieldDemo {@Getter@Value("${demo.value:default}")private String instanceValue;  // 实例字段,可以被刷新
}
4.4 构造函数中的配置依赖问题
当刷新 Bean 在构造函数中依赖配置信息时,需要注意:构造函数只会在 Bean 首次创建时执行一次,当配置变更导致 Bean 刷新时,构造函数不会重新执行。因此,不应在构造函数中执行依赖配置的初始化逻辑。
错误示例:
import org.springframework.beans.factory.annotation.Value;
import org.springframework.cloud.context.config.annotation.RefreshScope;
import org.springframework.stereotype.Service;
import lombok.extern.slf4j.Slf4j;@Service
@RefreshScope
@Slf4j
public class ConstructorDependencyDemo {private final String configValue;private final String derivedValue;// 错误:derivedValue在构造函数中基于configValue计算,刷新时不会重新计算public ConstructorDependencyDemo(@Value("${demo.config:default}") String configValue) {this.configValue = configValue;this.derivedValue = deriveValue(configValue);  // 依赖配置的初始化逻辑log.info("ConstructorDependencyDemo初始化,configValue: {}", configValue);}private String deriveValue(String config) {return "Derived: " + config;}public String getDerivedValue() {return derivedValue;}
}
在这个例子中,当demo.config配置变更时,configValue会被更新(因为它直接绑定到 @Value),但derivedValue不会更新,因为它是在构造函数中计算的,而构造函数不会重新执行。
解决这个问题的方法是:将依赖配置的初始化逻辑移到方法中,每次使用时计算,而不是在构造函数中计算一次。
正确示例:
import org.springframework.beans.factory.annotation.Value;
import org.springframework.cloud.context.config.annotation.RefreshScope;
import org.springframework.stereotype.Service;
import lombok.Getter;
import lombok.extern.slf4j.Slf4j;@Service
@RefreshScope
@Slf4j
public class MethodDependencyDemo {@Getter@Value("${demo.config:default}")private String configValue;/*** 每次调用时基于当前configValue计算*/public String getDerivedValue() {return deriveValue(configValue);}private String deriveValue(String config) {return "Derived: " + config;}
}
4.5 与 @Scheduled 的配合问题
当 @RefreshScope 标注的 Bean 中包含 @Scheduled 定时任务时,可能会出现定时任务执行异常的情况。这是因为当 Bean 被刷新时,旧的实例会被销毁,而定时任务可能仍然持有对旧实例的引用。
错误示例:
import org.springframework.scheduling.annotation.Scheduled;
import org.springframework.cloud.context.config.annotation.RefreshScope;
import org.springframework.stereotype.Service;
import lombok.extern.slf4j.Slf4j;@Service
@RefreshScope
@Slf4j
public class ScheduledRefreshDemo {@Value("${schedule.message:default}")private String message;// 潜在问题:刷新后可能导致定时任务执行异常@Scheduled(fixedRate = 5000)public void scheduledTask() {log.info("Scheduled task executed: {}", message);}
}
解决这个问题的方法是:将定时任务和需要刷新的逻辑分离到不同的 Bean 中,定时任务所在的 Bean 不使用 @RefreshScope。
正确示例:
import org.springframework.scheduling.annotation.Scheduled;
import org.springframework.stereotype.Service;
import org.springframework.beans.factory.annotation.Autowired;
import lombok.extern.slf4j.Slf4j;/*** 定时任务服务(不使用@RefreshScope)*/
@Service
@Slf4j
public class ScheduledService {private final RefreshableService refreshableService;@Autowiredpublic ScheduledService(RefreshableService refreshableService) {this.refreshableService = refreshableService;}@Scheduled(fixedRate = 5000)public void scheduledTask() {log.info("Scheduled task executed: {}", refreshableService.getMessage());}
}/*** 可刷新的服务(使用@RefreshScope)*/
@Service
@RefreshScope
@Slf4j
class RefreshableService {@Value("${schedule.message:default}")private String message;public String getMessage() {return message;}
}
这种方式既保证了配置可以动态刷新,又避免了定时任务出现异常。
五、性能考量:@RefreshScope 的开销与优化
虽然 @RefreshScope 带来了极大的便利性,但它也不是没有代价的。在使用过程中,我们需要了解它的性能开销并进行适当的优化。
5.1 @RefreshScope 的性能开销
@RefreshScope 的性能开销主要来自以下几个方面:
-
代理对象的创建和管理:每个被 @RefreshScope 标注的 Bean 都会创建一个代理对象,这会增加一些内存开销。
-
Bean 的重新初始化:每次刷新时,相关的 Bean 都会被销毁并重新创建,这会消耗 CPU 和内存资源,尤其是当 Bean 的初始化过程比较复杂时。
-
缓存失效:如果 Bean 涉及缓存操作,刷新后缓存可能会失效,导致后续操作需要重新计算或查询数据库。
根据 Spring 官方的性能测试(https://spring.io/blog/2018/04/17/spring-cloud-greenwich-m1-released),在正常情况下,@RefreshScope 带来的性能开销是可以接受的,但在高频刷新或资源受限的环境中,可能需要进行优化。
5.2 优化策略
5.2.1 精确控制刷新范围
只对真正需要动态更新的 Bean 使用 @RefreshScope,避免过度使用。例如,对于那些配置很少变更的 Bean,就没有必要使用 @RefreshScope。
5.2.2 减少 Bean 的初始化成本
优化被 @RefreshScope 标注的 Bean 的初始化过程,避免在初始化时执行耗时操作。可以将耗时操作延迟到第一次使用时执行,而不是在构造函数中执行。
优化前:
@Service
@RefreshScope
@Slf4j
public class ExpensiveInitService {private final Map<String, Object> largeCache;public ExpensiveInitService() {// 初始化成本高的操作largeCache = loadLargeCache();}private Map<String, Object> loadLargeCache() {log.info("加载大型缓存...");// 模拟耗时操作try {Thread.sleep(5000);} catch (InterruptedException e) {Thread.currentThread().interrupt();}return new HashMap<>();}
}
优化后:
@Service
@RefreshScope
@Slf4j
public class LazyInitService {private Map<String, Object> largeCache;public LazyInitService() {// 构造函数中不执行耗时操作log.info("LazyInitService初始化");}/*** 延迟加载缓存,第一次使用时才加载*/private Map<String, Object> getLargeCache() {if (largeCache == null) {synchronized (this) {if (largeCache == null) {largeCache = loadLargeCache();}}}return largeCache;}private Map<String, Object> loadLargeCache() {log.info("加载大型缓存...");// 模拟耗时操作try {Thread.sleep(5000);} catch (InterruptedException e) {Thread.currentThread().interrupt();}return new HashMap<>();}
}
5.2.3 批量刷新而非频繁单个刷新
如果有多个配置需要变更,尽量将它们批量处理,而不是频繁地单个刷新。可以使用 Spring Cloud Bus 的 /bus-refresh 端点一次性刷新所有服务实例的配置。
# 批量刷新所有服务实例的配置
curl -X POST http://localhost:8080/actuator/bus-refresh
5.2.4 避免在高负载时段刷新
尽量在业务低峰期执行配置刷新操作,避免在高负载时段进行,以减少对正常业务的影响。
5.2.5 监控刷新操作的影响
通过监控工具(如 Prometheus + Grafana)监控刷新操作对系统性能的影响,包括响应时间、吞吐量、内存使用等指标,及时发现并解决问题。
六、最佳实践:@RefreshScope 在生产环境的应用
结合前面的内容,我们总结出 @RefreshScope 在生产环境中的最佳实践,帮助你在实际项目中更好地应用这一特性。
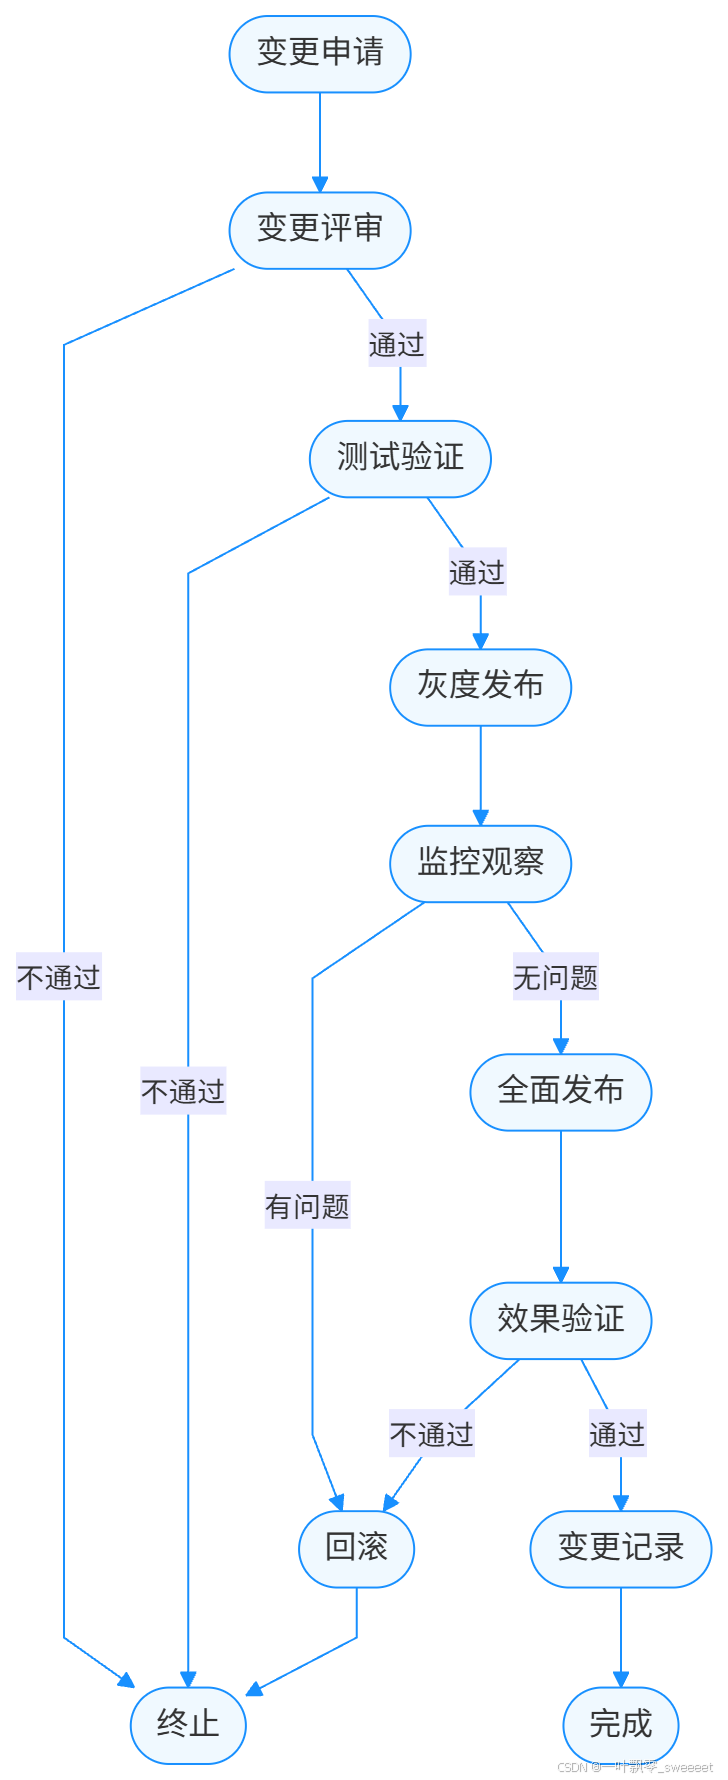
6.1 配置变更的完整流程
在生产环境中,配置变更应该遵循一个规范的流程,而不仅仅是修改配置然后调用刷新接口。一个完整的配置变更流程包括:
- 变更申请:提交配置变更申请,说明变更原因、内容、影响范围和回滚方案。
- 变更评审:由技术团队评审变更的合理性和风险。
- 测试验证:在测试环境验证配置变更的效果。
- 灰度发布:在部分生产实例上应用变更,观察效果。
- 全面发布:在所有实例上应用变更。
- 效果验证:确认变更达到预期效果。
- 变更记录:记录变更内容和结果,形成审计日志。
流程图如下:
6.2 配置变更的安全措施
为了确保配置变更的安全性,需要采取以下措施:
- 权限控制:严格控制配置修改和刷新操作的权限,只有授权人员才能执行。
- 操作审计:记录所有配置变更和刷新操作,包括操作人员、时间、内容等。
- 回滚机制:确保能够快速回滚到变更前的状态。
- 限流保护:防止频繁的刷新操作对系统造成冲击。
示例:使用 Spring Security 控制刷新端点的访问权限
import org.springframework.context.annotation.Bean;
import org.springframework.context.annotation.Configuration;
import org.springframework.security.config.annotation.web.builders.HttpSecurity;
import org.springframework.security.config.annotation.web.configuration.EnableWebSecurity;
import org.springframework.security.core.userdetails.User;
import org.springframework.security.core.userdetails.UserDetails;
import org.springframework.security.core.userdetails.UserDetailsService;
import org.springframework.security.provisioning.InMemoryUserDetailsManager;
import org.springframework.security.web.SecurityFilterChain;/*** 安全配置** @author 果酱*/
@Configuration
@EnableWebSecurity
public class SecurityConfig {@Beanpublic SecurityFilterChain securityFilterChain(HttpSecurity http) throws Exception {http.authorizeHttpRequests(authorize -> authorize// 允许匿名访问健康检查和API文档.requestMatchers("/actuator/health", "/v3/api-docs/**", "/swagger-ui/**").permitAll()// 刷新端点需要ADMIN角色.requestMatchers("/actuator/refresh", "/actuator/bus-refresh").hasRole("ADMIN")// 其他请求需要认证.anyRequest().authenticated()).httpBasic();return http.build();}@Beanpublic UserDetailsService userDetailsService() {UserDetails admin = User.withUsername("admin").password("{noop}admin123")  // 实际生产环境应使用加密密码.roles("ADMIN").build();return new InMemoryUserDetailsManager(admin);}
}
6.3 监控与告警
为 @RefreshScope 相关的操作添加监控和告警,及时发现并解决问题:
- 监控刷新频率:如果某个 Bean 的刷新频率过高,可能意味着配置不稳定或存在其他问题。
- 监控刷新耗时:记录每次刷新的耗时,耗时过长可能影响系统性能。
- 监控 Bean 创建次数:跟踪被 @RefreshScope 标注的 Bean 的创建次数,异常增长可能表示存在问题。
- 配置变更告警:当关键配置发生变更时,发送告警通知相关人员。
示例:使用 Micrometer 监控刷新操作
import org.springframework.cloud.context.refresh.event.RefreshEvent;
import org.springframework.context.event.EventListener;
import org.springframework.stereotype.Component;
import io.micrometer.core.instrument.Counter;
import io.micrometer.core.instrument.MeterRegistry;
import lombok.extern.slf4j.Slf4j;/*** 刷新事件监听器,用于监控刷新操作** @author 果酱*/
@Component
@Slf4j
public class RefreshMetricsListener {private final Counter refreshCounter;public RefreshMetricsListener(MeterRegistry meterRegistry) {// 创建刷新计数器this.refreshCounter = meterRegistry.counter("refresh.scope.events");}@EventListenerpublic void onRefreshEvent(RefreshEvent event) {log.info("收到刷新事件: {}", event);// 每次刷新事件发生时,计数器加1refreshCounter.increment();}
}
6.4 与配置中心的集成
在实际项目中,@RefreshScope 通常与配置中心(如 Spring Cloud Config、Apollo、Nacos 等)配合使用,实现更强大的配置管理能力。
以 Nacos 为例,集成步骤如下:
- 添加 Nacos 依赖:
<dependency><groupId>com.alibaba.cloud</groupId><artifactId>spring-cloud-starter-alibaba-nacos-config</artifactId><version>2022.0.0.0-RC2</version>
</dependency>
- 配置 Nacos 地址:
spring:cloud:nacos:config:server-addr: localhost:8848file-extension: yamlnamespace: your-namespacegroup: your-group
- 在 Nacos 控制台中创建配置,然后在应用中使用 @RefreshScope 和 @ConfigurationProperties 绑定配置。
Nacos 会自动推送配置变更通知,无需手动调用 /actuator/refresh 端点,进一步简化了配置动态更新的流程。
七、常见问题与解决方案
在使用 @RefreshScope 的过程中,可能会遇到各种问题。下面列举一些常见问题及其解决方案。
7.1 配置刷新后 Bean 没有被重新创建
问题现象:调用了 /actuator/refresh 端点,配置也确实更新了,但 @RefreshScope 标注的 Bean 没有被重新创建,仍然使用旧的配置。
可能原因及解决方案:
-
Bean 没有被 @RefreshScope 标注:确保需要刷新的 Bean 或其 @Bean 方法被 @RefreshScope 标注。
-
配置键名不匹配:检查 @ConfigurationProperties 的 prefix 是否与配置键名匹配,或 @Value 的值是否正确。
-
缓存导致的问题:如果 Bean 被 Spring 缓存(如 @Cacheable),可能需要清除缓存。
-
没有触发刷新事件:确保刷新端点被正确调用,并且没有权限问题。可以查看应用日志确认是否收到了刷新事件。
7.2 刷新后出现 NoSuchBeanDefinitionException
问题现象:配置刷新后,访问某个 Bean 时出现 NoSuchBeanDefinitionException 异常。
可能原因及解决方案:
-
循环依赖问题:@RefreshScope 的 Bean 与其他 Bean 存在循环依赖,刷新后导致依赖注入失败。解决方法是消除循环依赖,或使用 @Lazy 注解延迟注入。
-
Bean 的 Scope 不兼容:例如,将 @RefreshScope 的 Bean 注入到 @RequestScope 的 Bean 中,可能导致刷新后引用失效。解决方法是调整 Bean 的 Scope 或依赖关系。
7.3 配置刷新后状态丢失
问题现象:配置刷新后,Bean 的状态(如实例变量的值)丢失。
原因分析:@RefreshScope 的工作原理是销毁旧的 Bean 实例并创建新的实例,因此旧实例中的状态自然会丢失。
解决方案:
-
避免在 @RefreshScope 的 Bean 中存储状态,尽量设计成无状态 Bean。
-
如果必须存储状态,可以将状态存储到外部组件(如 Redis)中,而不是 Bean 的实例变量中。
示例:使用 Redis 存储状态
import org.springframework.data.redis.core.RedisTemplate;
import org.springframework.stereotype.Service;
import org.springframework.beans.factory.annotation.Autowired;
import java.time.Duration;
import lombok.extern.slf4j.Slf4j;
import org.springframework.cloud.context.config.annotation.RefreshScope;@Service
@RefreshScope
@Slf4j
public class StatefulService {private final RedisTemplate<String, Object> redisTemplate;// 状态存储在Redis中,而不是实例变量中private static final String COUNTER_KEY = "service:counter";@Autowiredpublic StatefulService(RedisTemplate<String, Object> redisTemplate) {this.redisTemplate = redisTemplate;}/*** 增加计数器*/public Long incrementCounter() {log.info("增加计数器");return redisTemplate.opsForValue().increment(COUNTER_KEY, 1);}/*** 获取当前计数器值*/public Long getCounter() {Object value = redisTemplate.opsForValue().get(COUNTER_KEY);return value != null ? (Long) value : 0L;}
}
7.4 频繁刷新导致性能下降
问题现象:频繁执行配置刷新导致系统性能下降,响应时间变长。
解决方案:
-
减少刷新频率,合并多次配置变更为一次刷新。
-
优化 Bean 的初始化过程,减少刷新时的开销。
-
考虑是否真的需要如此频繁地变更配置,是否可以通过其他方式实现需求。
-
对刷新操作进行限流,例如使用 Spring Cloud Gateway 的限流功能限制对 /actuator/refresh 端点的调用频率。
八、总结与展望
8.1 核心知识点回顾
-
@RefreshScope 是 Spring Cloud 提供的一个注解,用于实现配置的动态更新,避免了应用重启。
-
@RefreshScope 的底层原理是通过自定义 Scope 和代理模式,在配置变更时销毁旧的 Bean 实例并创建新的实例。
-
@RefreshScope 通常与 @ConfigurationProperties 配合使用,实现配置类的整体刷新。
-
使用 @RefreshScope 时需要注意与单例 Bean 的交互、静态字段、构造函数依赖等问题。
-
在生产环境中,需要制定规范的配置变更流程,并采取适当的安全措施和监控手段。
8.2 技术发展趋势
随着云原生技术的发展,配置动态更新的需求会越来越强烈,相关的技术也在不断演进:
更智能的配置刷新:未来的配置中心可能会根据配置的重要性和影响范围,智能决定是否需要刷新以及如何刷新。
-
细粒度的刷新控制:目前的 @RefreshScope 是基于 Bean 级别的刷新,未来可能会实现字段级别的细粒度刷新。
-
零感知刷新:通过更先进的技术(如字节码增强),实现真正的零感知配置刷新,无需代理和 Bean 重建。
-
与服务网格的集成:在 Service Mesh 架构中,配置刷新可能会下沉到数据平面,由 Sidecar 代理负责,进一步简化应用程序。
九、参考
-
Spring Cloud @RefreshScope 官方文档:Cloud Native Applications
-
Spring Cloud 配置刷新机制:Spring Cloud Config
-
Spring Security 官方文档:Spring Security :: Spring Security
-
Micrometer 官方文档:Micrometer Application Observability
-
Nacos 官方文档:Nacos 配置中心简介, Nacos 是什么 | Nacos 官网