20250823给荣品RD-RK3588开发板刷Rockchip原厂的Buildroot【linux-5.10】时调通AP6275P的WIFI【源码部分】
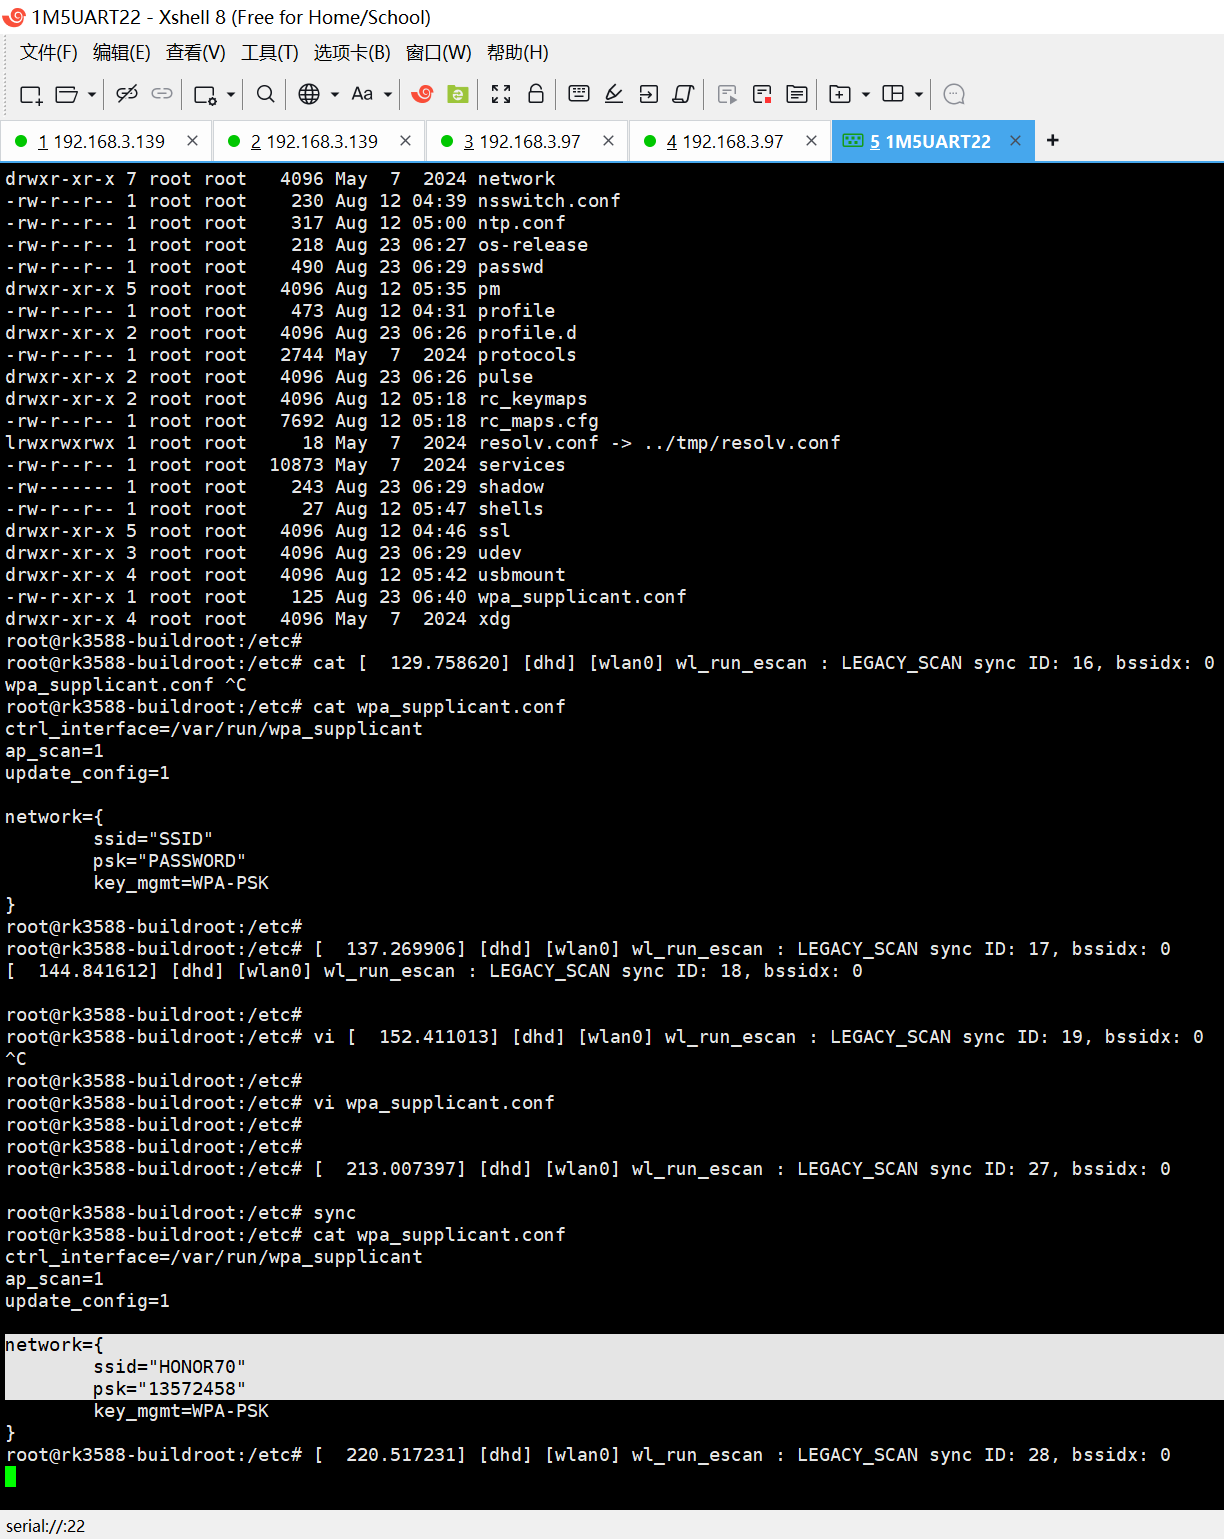
2、编辑/etc/wpa_supplicant.conf文件
root@rk3588-buildroot:/# cat /etc/wpa_supplicant.conf
ctrl_interface=/var/run/wpa_supplicant
ap_scan=1
update_config=1
network={
ssid="HONOR70"
psk="13572468"
key_mgmt=WPA-PSK
}
root@rk3588-buildroot:/#
3、【只需执行一次,下次重启就会自动连接了】
然后杀掉已经存在进程
killall wpa_supplicant
重新启动 wpa_supplicant 连接热点
wpa_supplicant -iwlan0 -Dnl80211 -c /etc/wpa_supplicant.conf -B
获取IP地址
udhcpc -i wlan0
连接成功
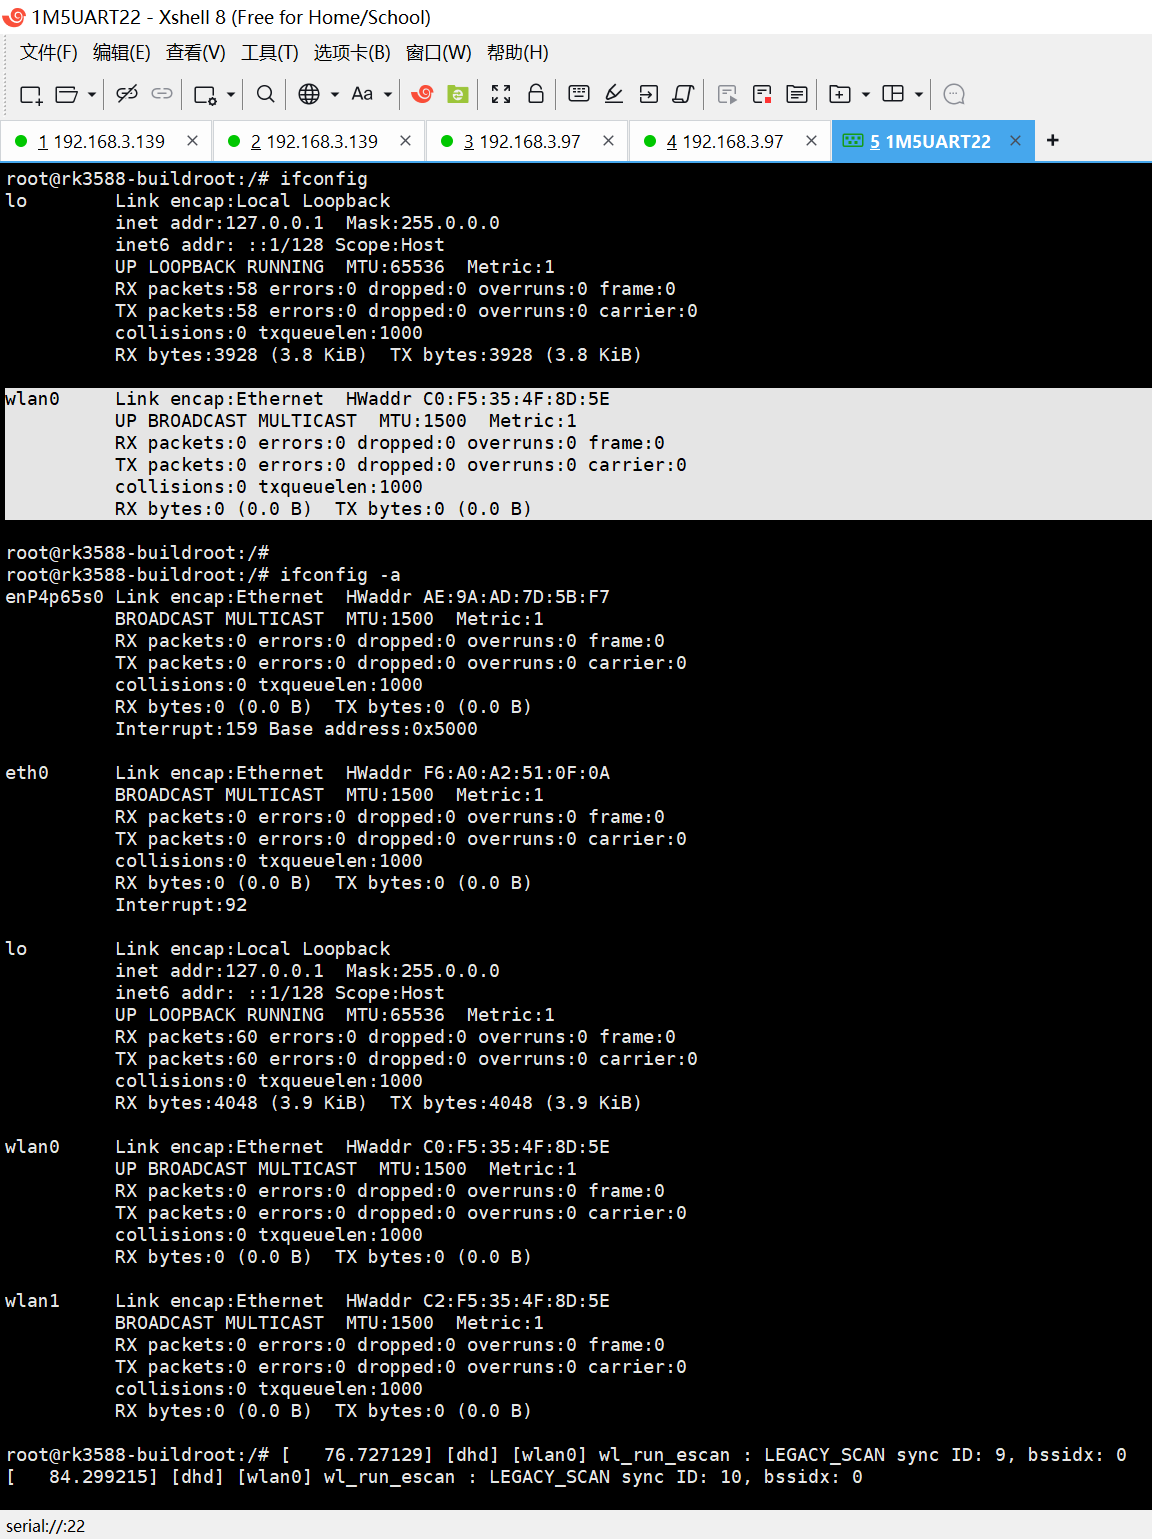
ifconfig wlan0
【可选:直接使用ifconfig】
【但是你不执行这些操作,直接重启,就会内核跑飞的!可以这个命令执行了一些操作/写配置文件!^_】

20250823给荣品RD-RK3588开发板刷Rockchip原厂的Buildroot【linux-5.10】时调通AP6275P的WIFI【源码部分】
2025/8/23 15:57
【我是先将这个DTSI文件中的代码块直接搬到rk3588-evb7-lp4.dtsi中,然后就可以上网了。接着就微调到最终版本!】
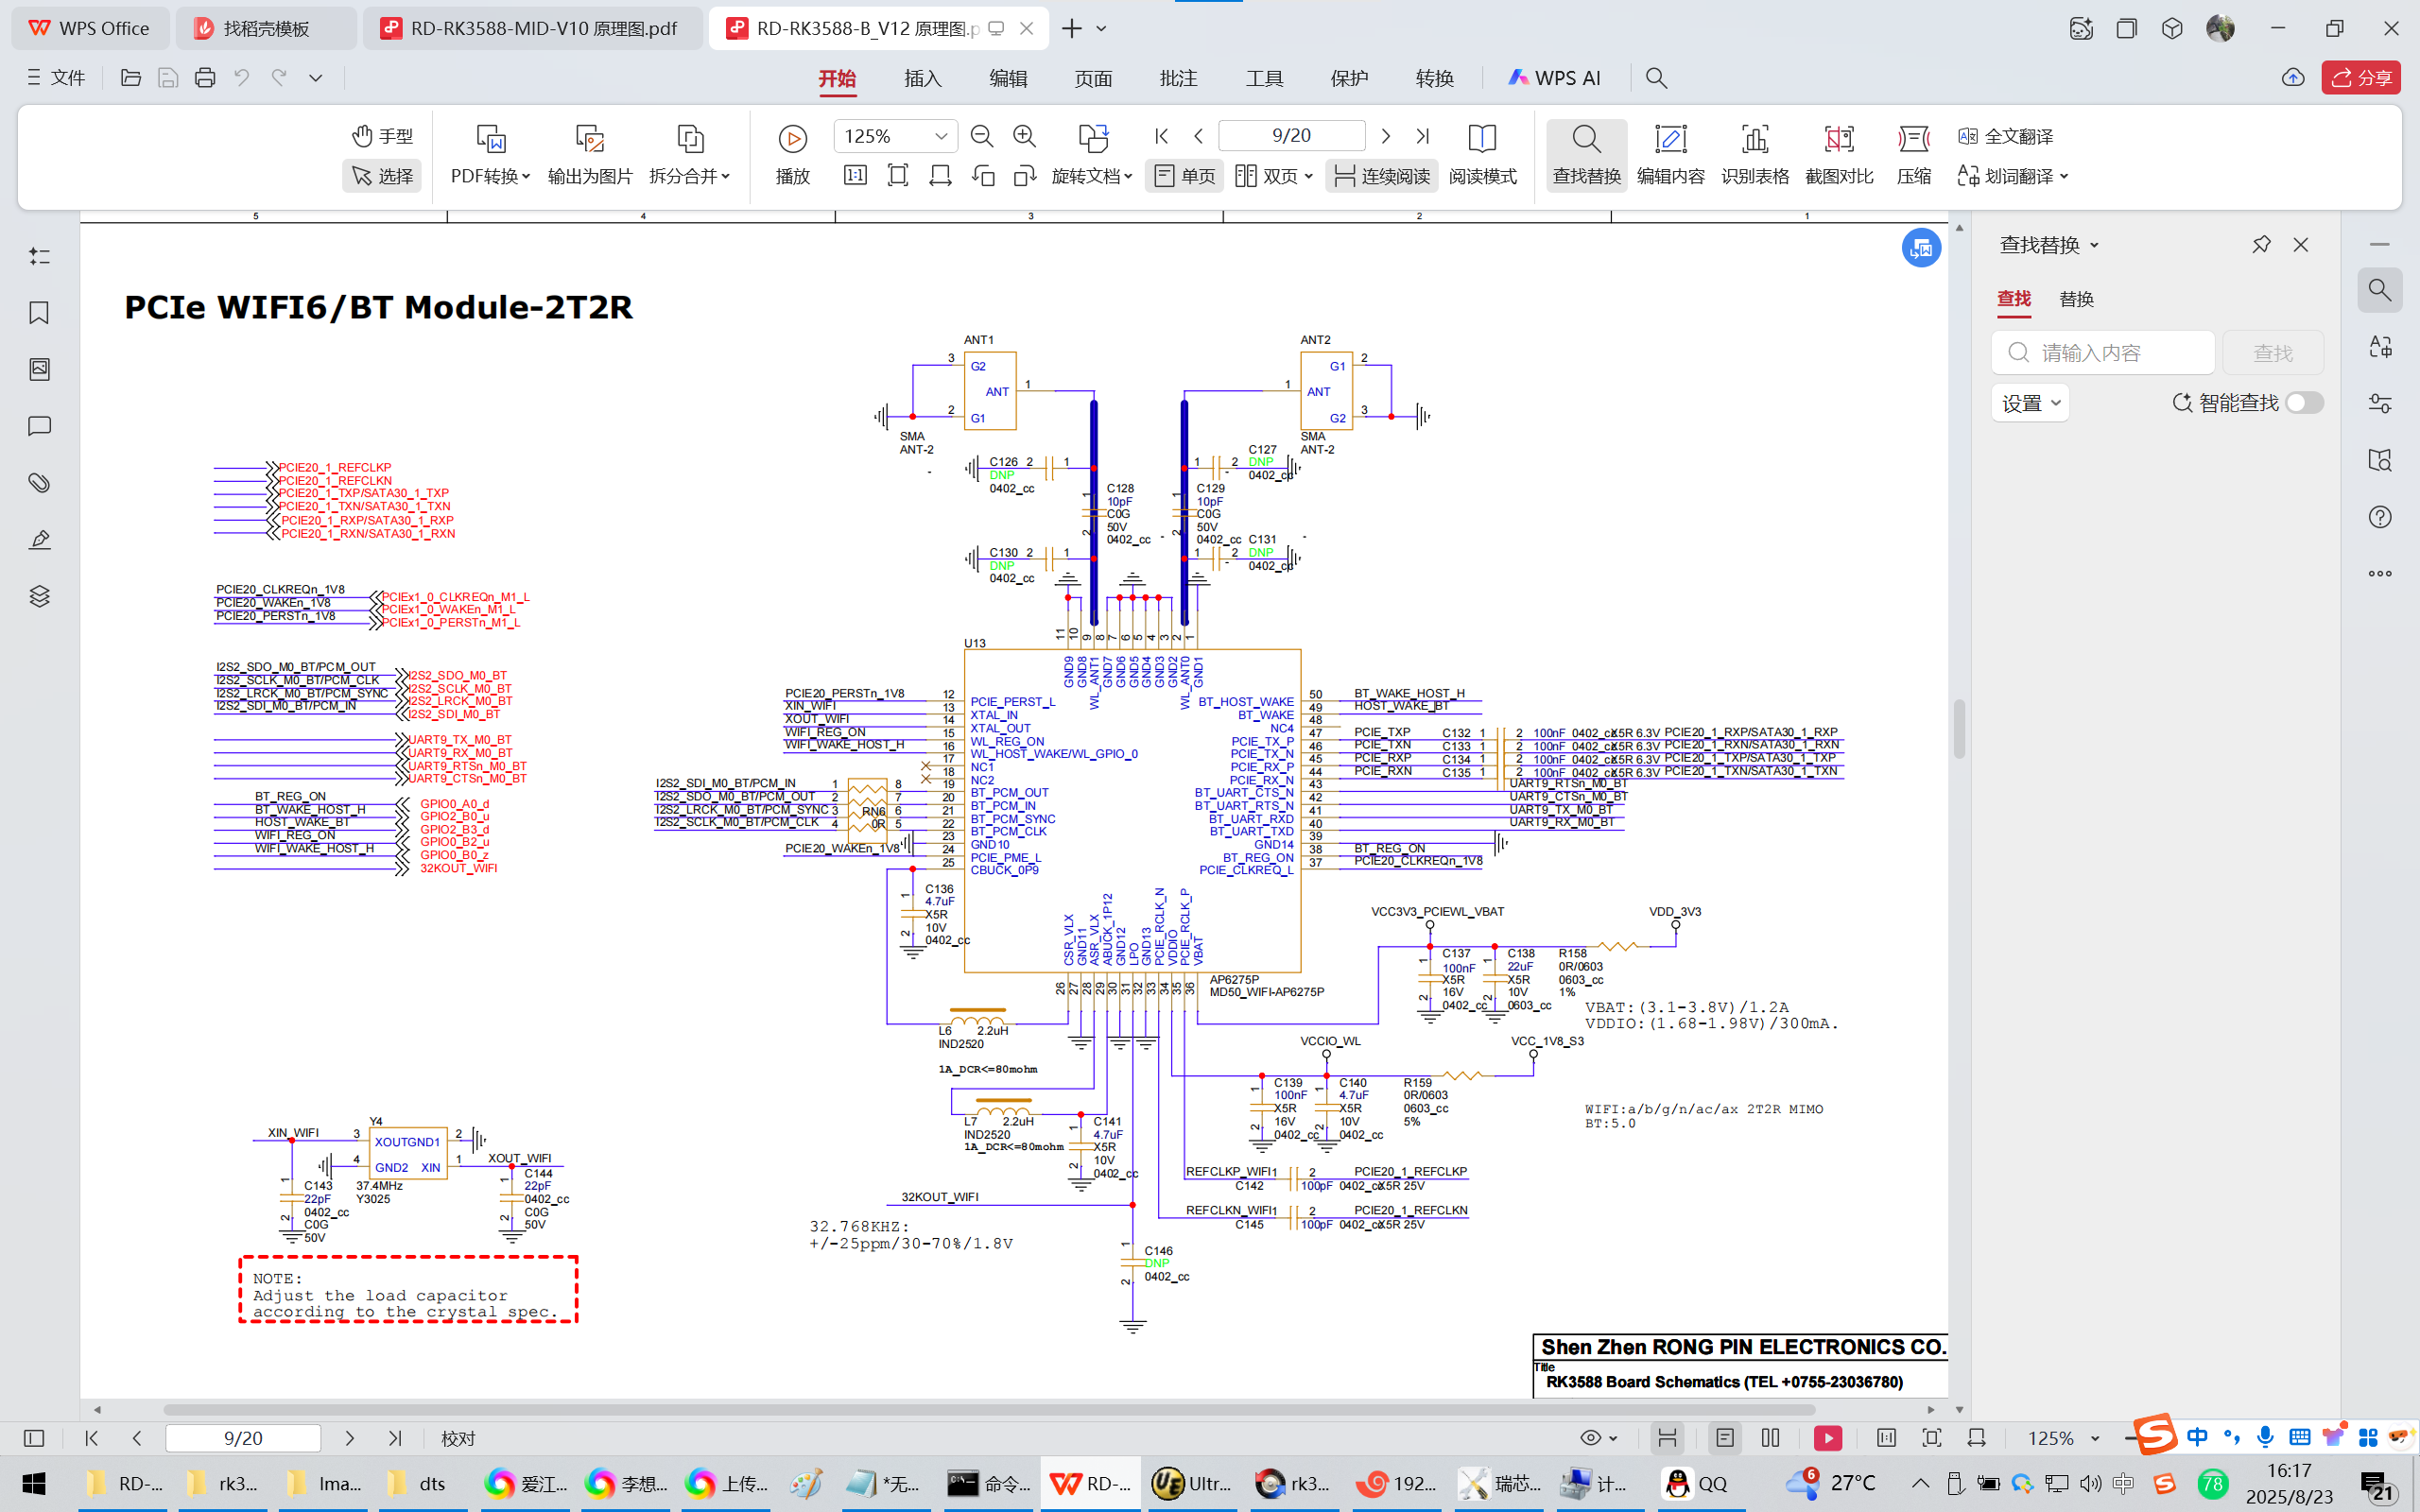
E:\RD-RK3588_Android13\kernel-5.10\arch\arm64\boot\dts\rockchip\rk3588\rp-wifi-bt-ap6275p-rk3588.dtsi
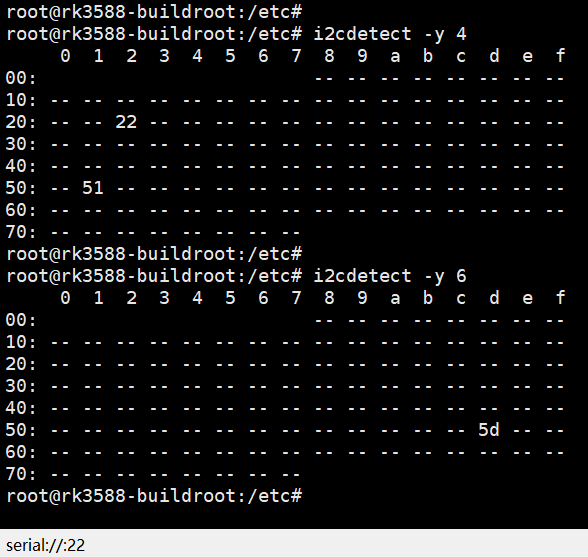
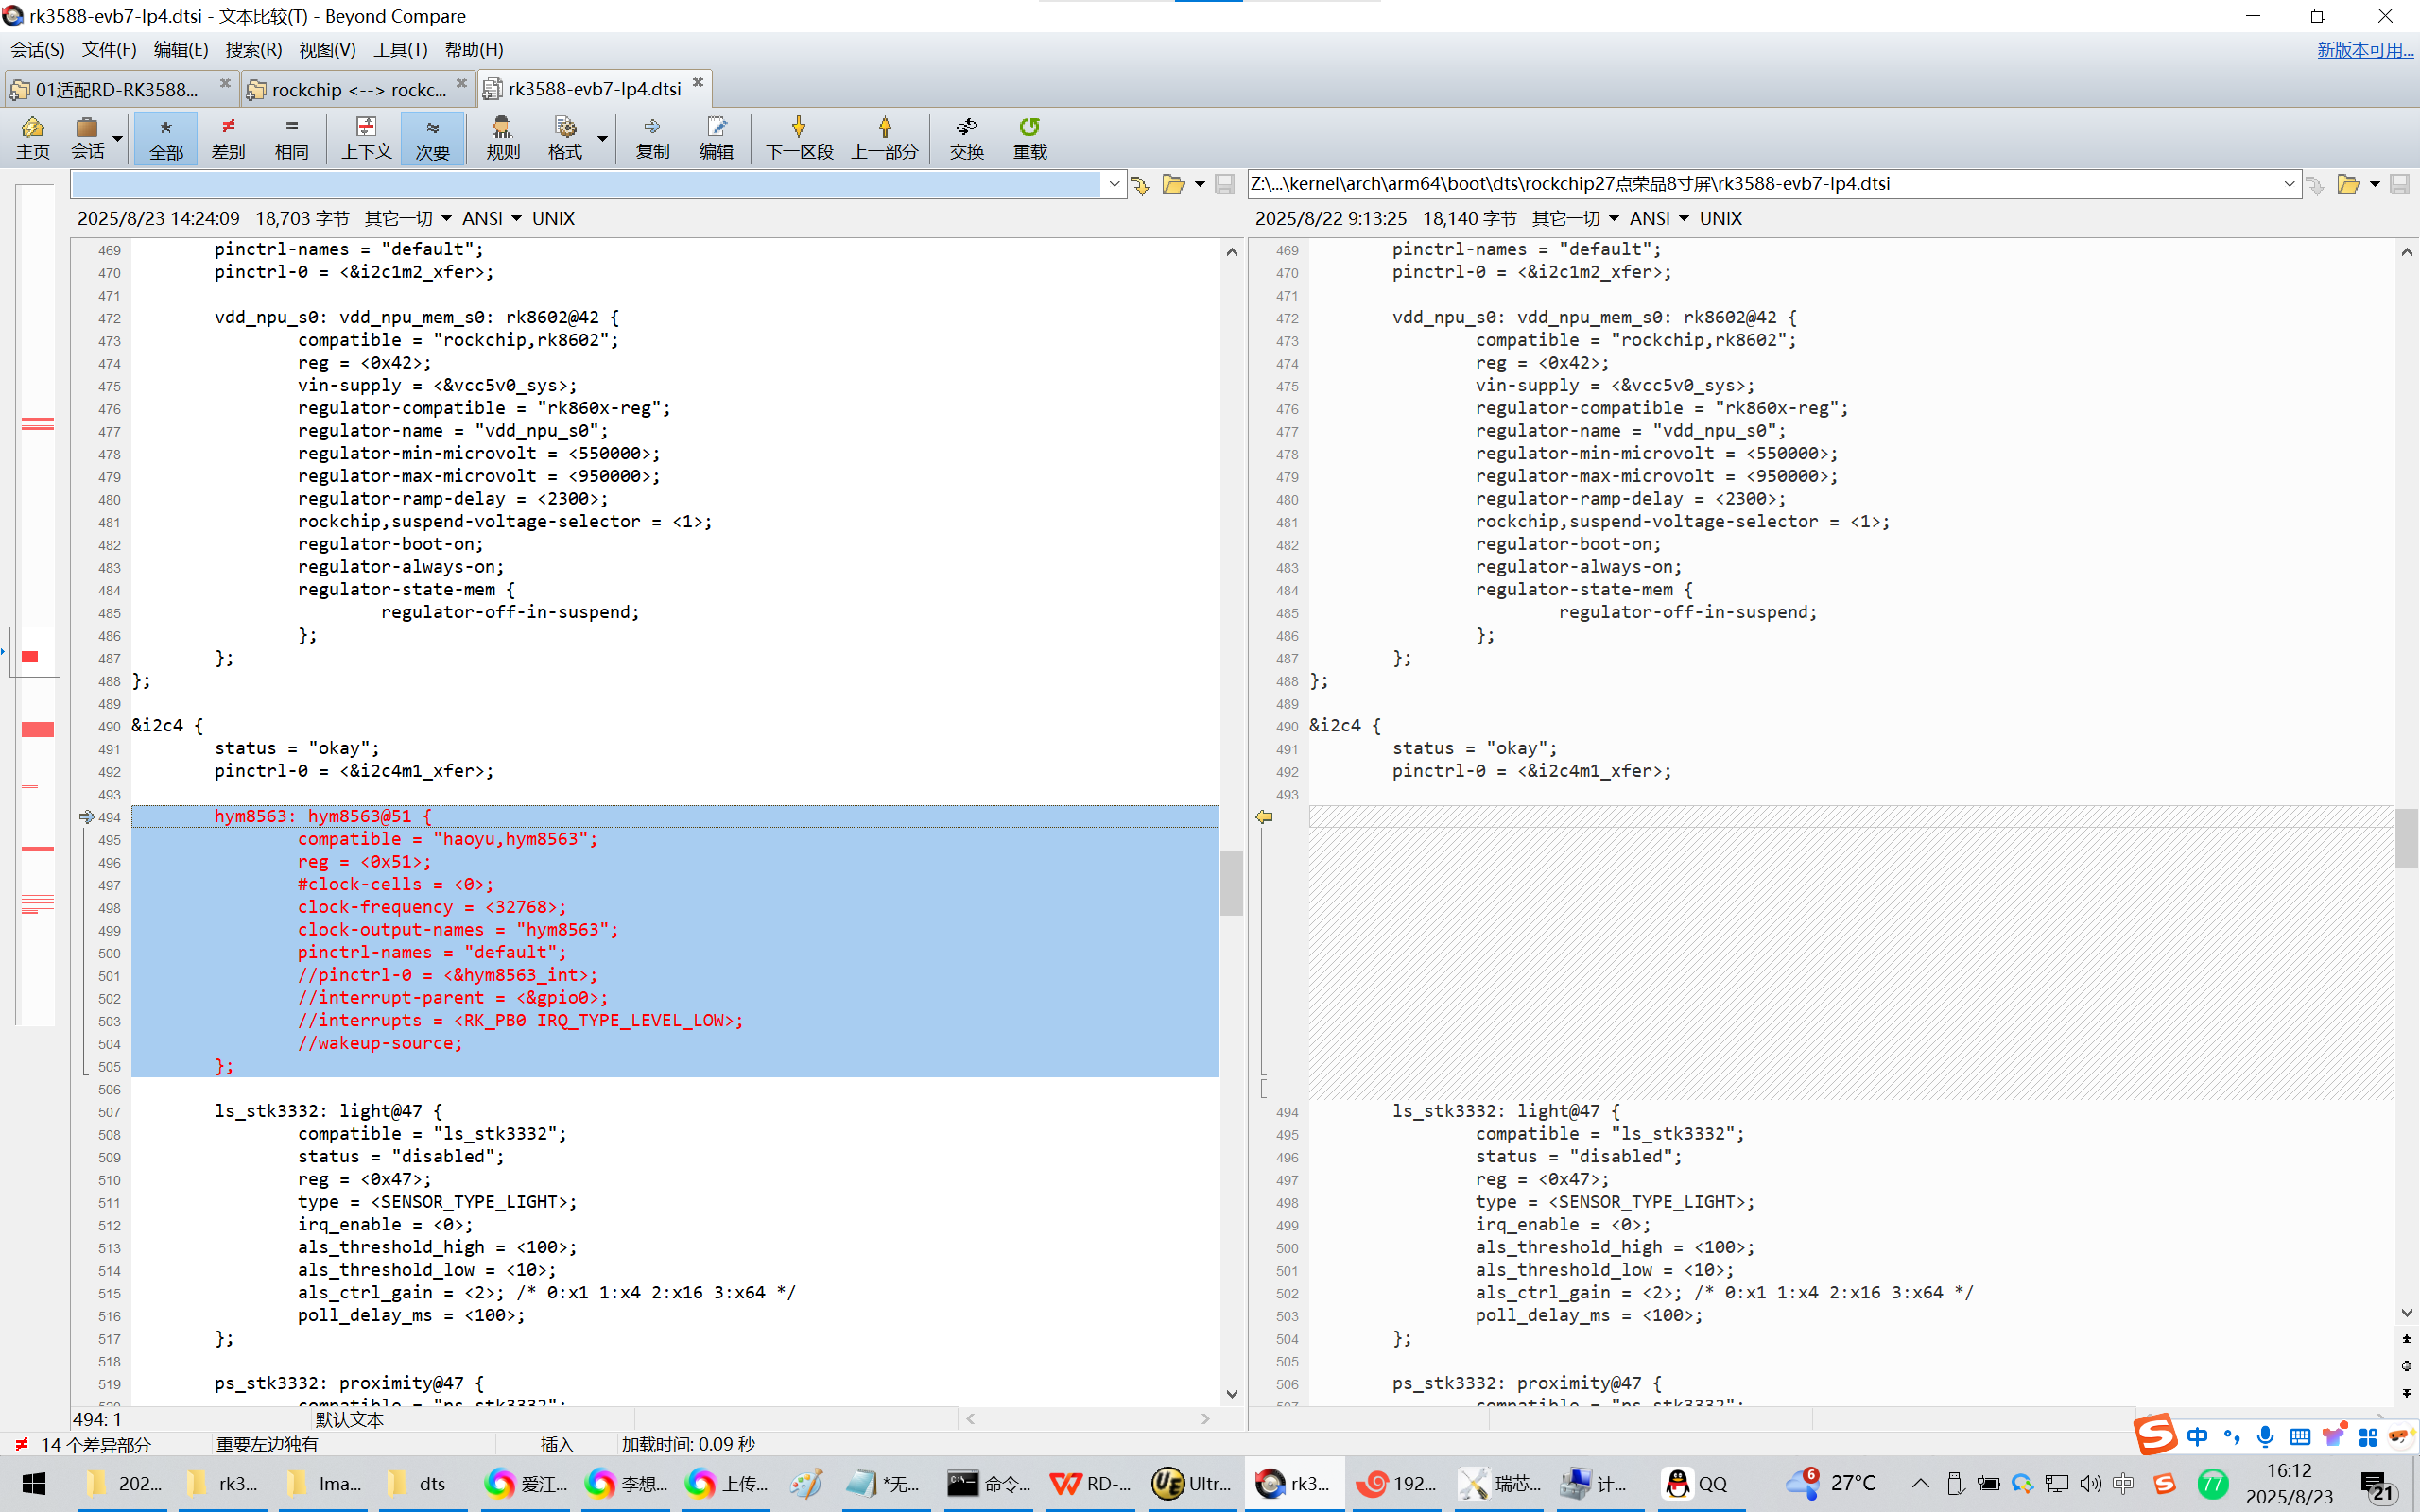
【这里只有RTC芯片hym8563】
E:\RD-RK3588_Android13\kernel-5.10\arch\arm64\boot\dts\rockchip\rk3588\rd-rk3588.dts
&i2c4 {
status = "okay";
pinctrl-names = "default";
pinctrl-0 = <&i2c4m1_xfer>;
hym8563: hym8563@51 {
compatible = "haoyu,hym8563";
reg = <0x51>;
#clock-cells = <0>;
clock-frequency = <32768>;
clock-output-names = "hym8563";
//pinctrl-names = "default";
//pinctrl-0 = <&hym8563_int>;
//interrupt-parent = <&gpio0>;
//interrupts = <RK_PD4 IRQ_TYPE_LEVEL_LOW>;
//wakeup-source;
};
};
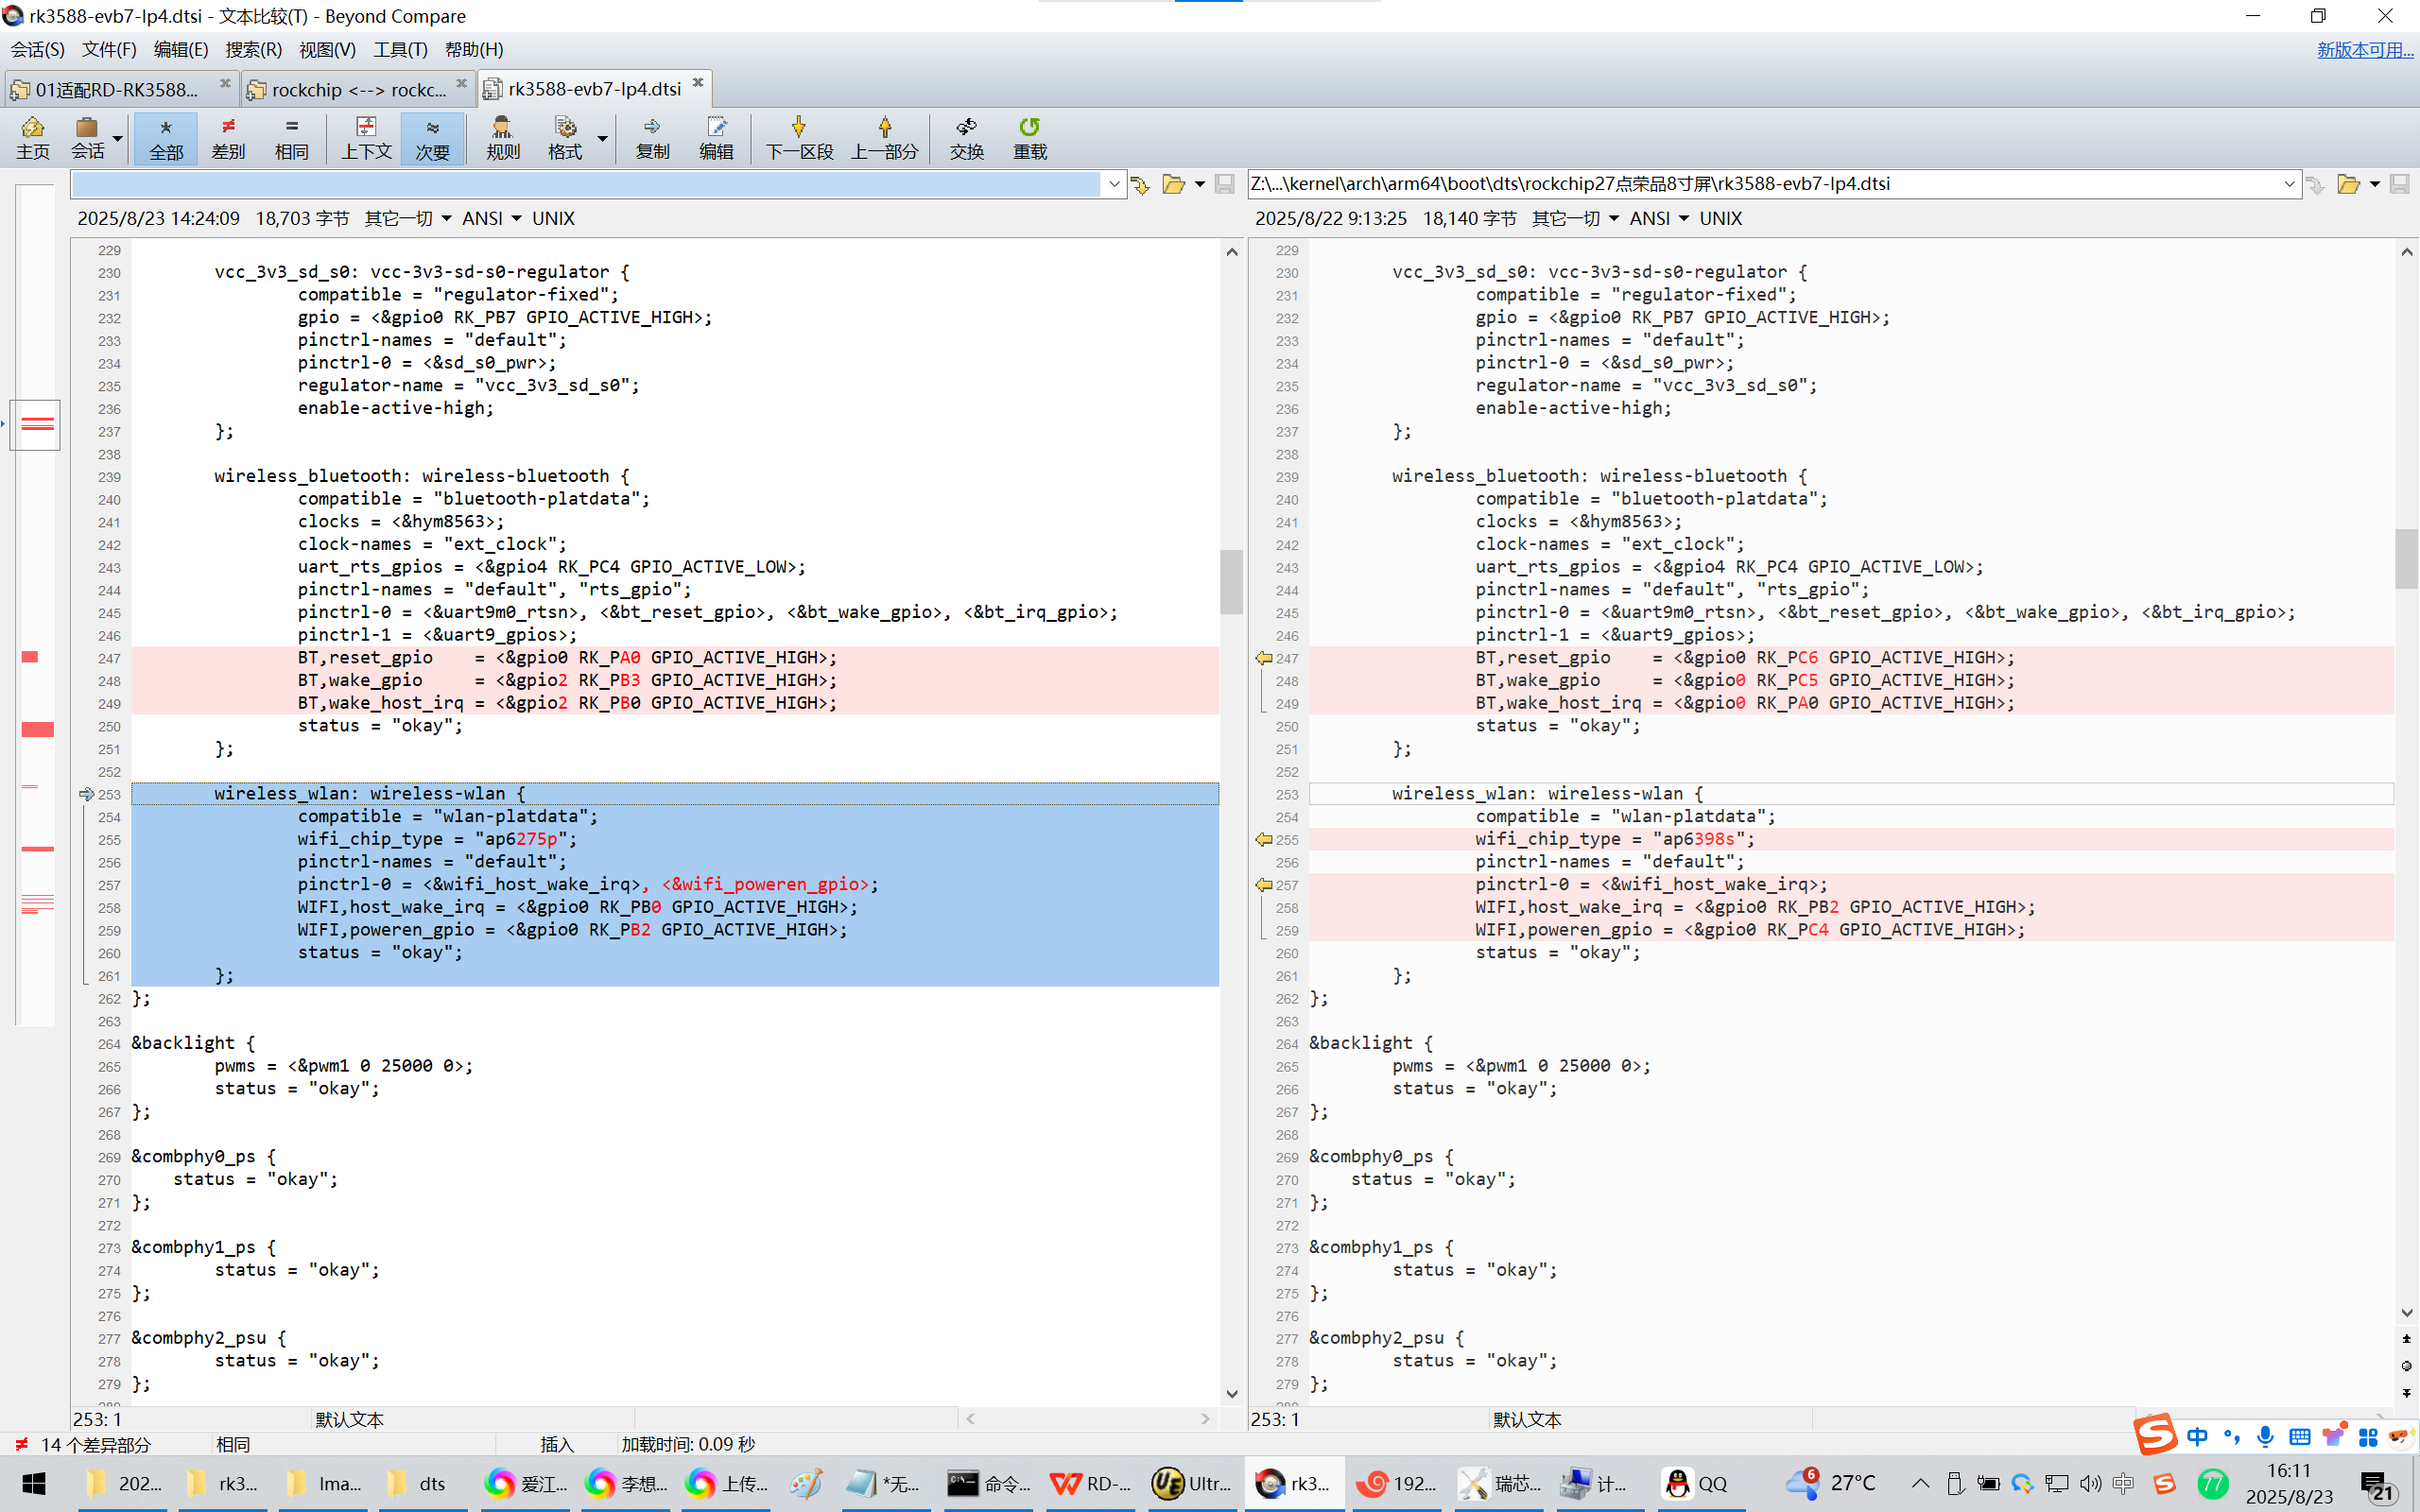
Z:\Rockchip_RK3588_Linux5.10_SDK_Release_V1.2.0_20230620\kernel\arch\arm64\boot\dts\rockchip\rk3588-evb7-lp4.dtsi
wireless_bluetooth: wireless-bluetooth {
compatible = "bluetooth-platdata";
clocks = <&hym8563>;
clock-names = "ext_clock";
uart_rts_gpios = <&gpio4 RK_PC4 GPIO_ACTIVE_LOW>;
pinctrl-names = "default", "rts_gpio";
pinctrl-0 = <&uart9m0_rtsn>, <&bt_reset_gpio>, <&bt_wake_gpio>, <&bt_irq_gpio>;
pinctrl-1 = <&uart9_gpios>;
BT,reset_gpio = <&gpio0 RK_PC6 GPIO_ACTIVE_HIGH>;
BT,wake_gpio = <&gpio0 RK_PC5 GPIO_ACTIVE_HIGH>;
BT,wake_host_irq = <&gpio0 RK_PA0 GPIO_ACTIVE_HIGH>;
status = "okay";
};
wireless_wlan: wireless-wlan {
compatible = "wlan-platdata";
wifi_chip_type = "ap6398s";
pinctrl-names = "default";
pinctrl-0 = <&wifi_host_wake_irq>;
WIFI,host_wake_irq = <&gpio0 RK_PB2 GPIO_ACTIVE_HIGH>;
WIFI,poweren_gpio = <&gpio0 RK_PC4 GPIO_ACTIVE_HIGH>;
status = "okay";
};
修改为:
wireless_bluetooth: wireless-bluetooth {
compatible = "bluetooth-platdata";
clocks = <&hym8563>;
clock-names = "ext_clock";
uart_rts_gpios = <&gpio4 RK_PC4 GPIO_ACTIVE_LOW>;
pinctrl-names = "default", "rts_gpio";
pinctrl-0 = <&uart9m0_rtsn>, <&bt_reset_gpio>, <&bt_wake_gpio>, <&bt_irq_gpio>;
pinctrl-1 = <&uart9_gpios>;
BT,reset_gpio = <&gpio0 RK_PA0 GPIO_ACTIVE_HIGH>;
BT,wake_gpio = <&gpio2 RK_PB3 GPIO_ACTIVE_HIGH>;
BT,wake_host_irq = <&gpio2 RK_PB0 GPIO_ACTIVE_HIGH>;
status = "okay";
};
wireless_wlan: wireless-wlan {
compatible = "wlan-platdata";
wifi_chip_type = "ap6275p";
pinctrl-names = "default";
pinctrl-0 = <&wifi_host_wake_irq>, <&wifi_poweren_gpio>;
WIFI,host_wake_irq = <&gpio0 RK_PB0 GPIO_ACTIVE_HIGH>;
WIFI,poweren_gpio = <&gpio0 RK_PB2 GPIO_ACTIVE_HIGH>;
status = "okay";
};
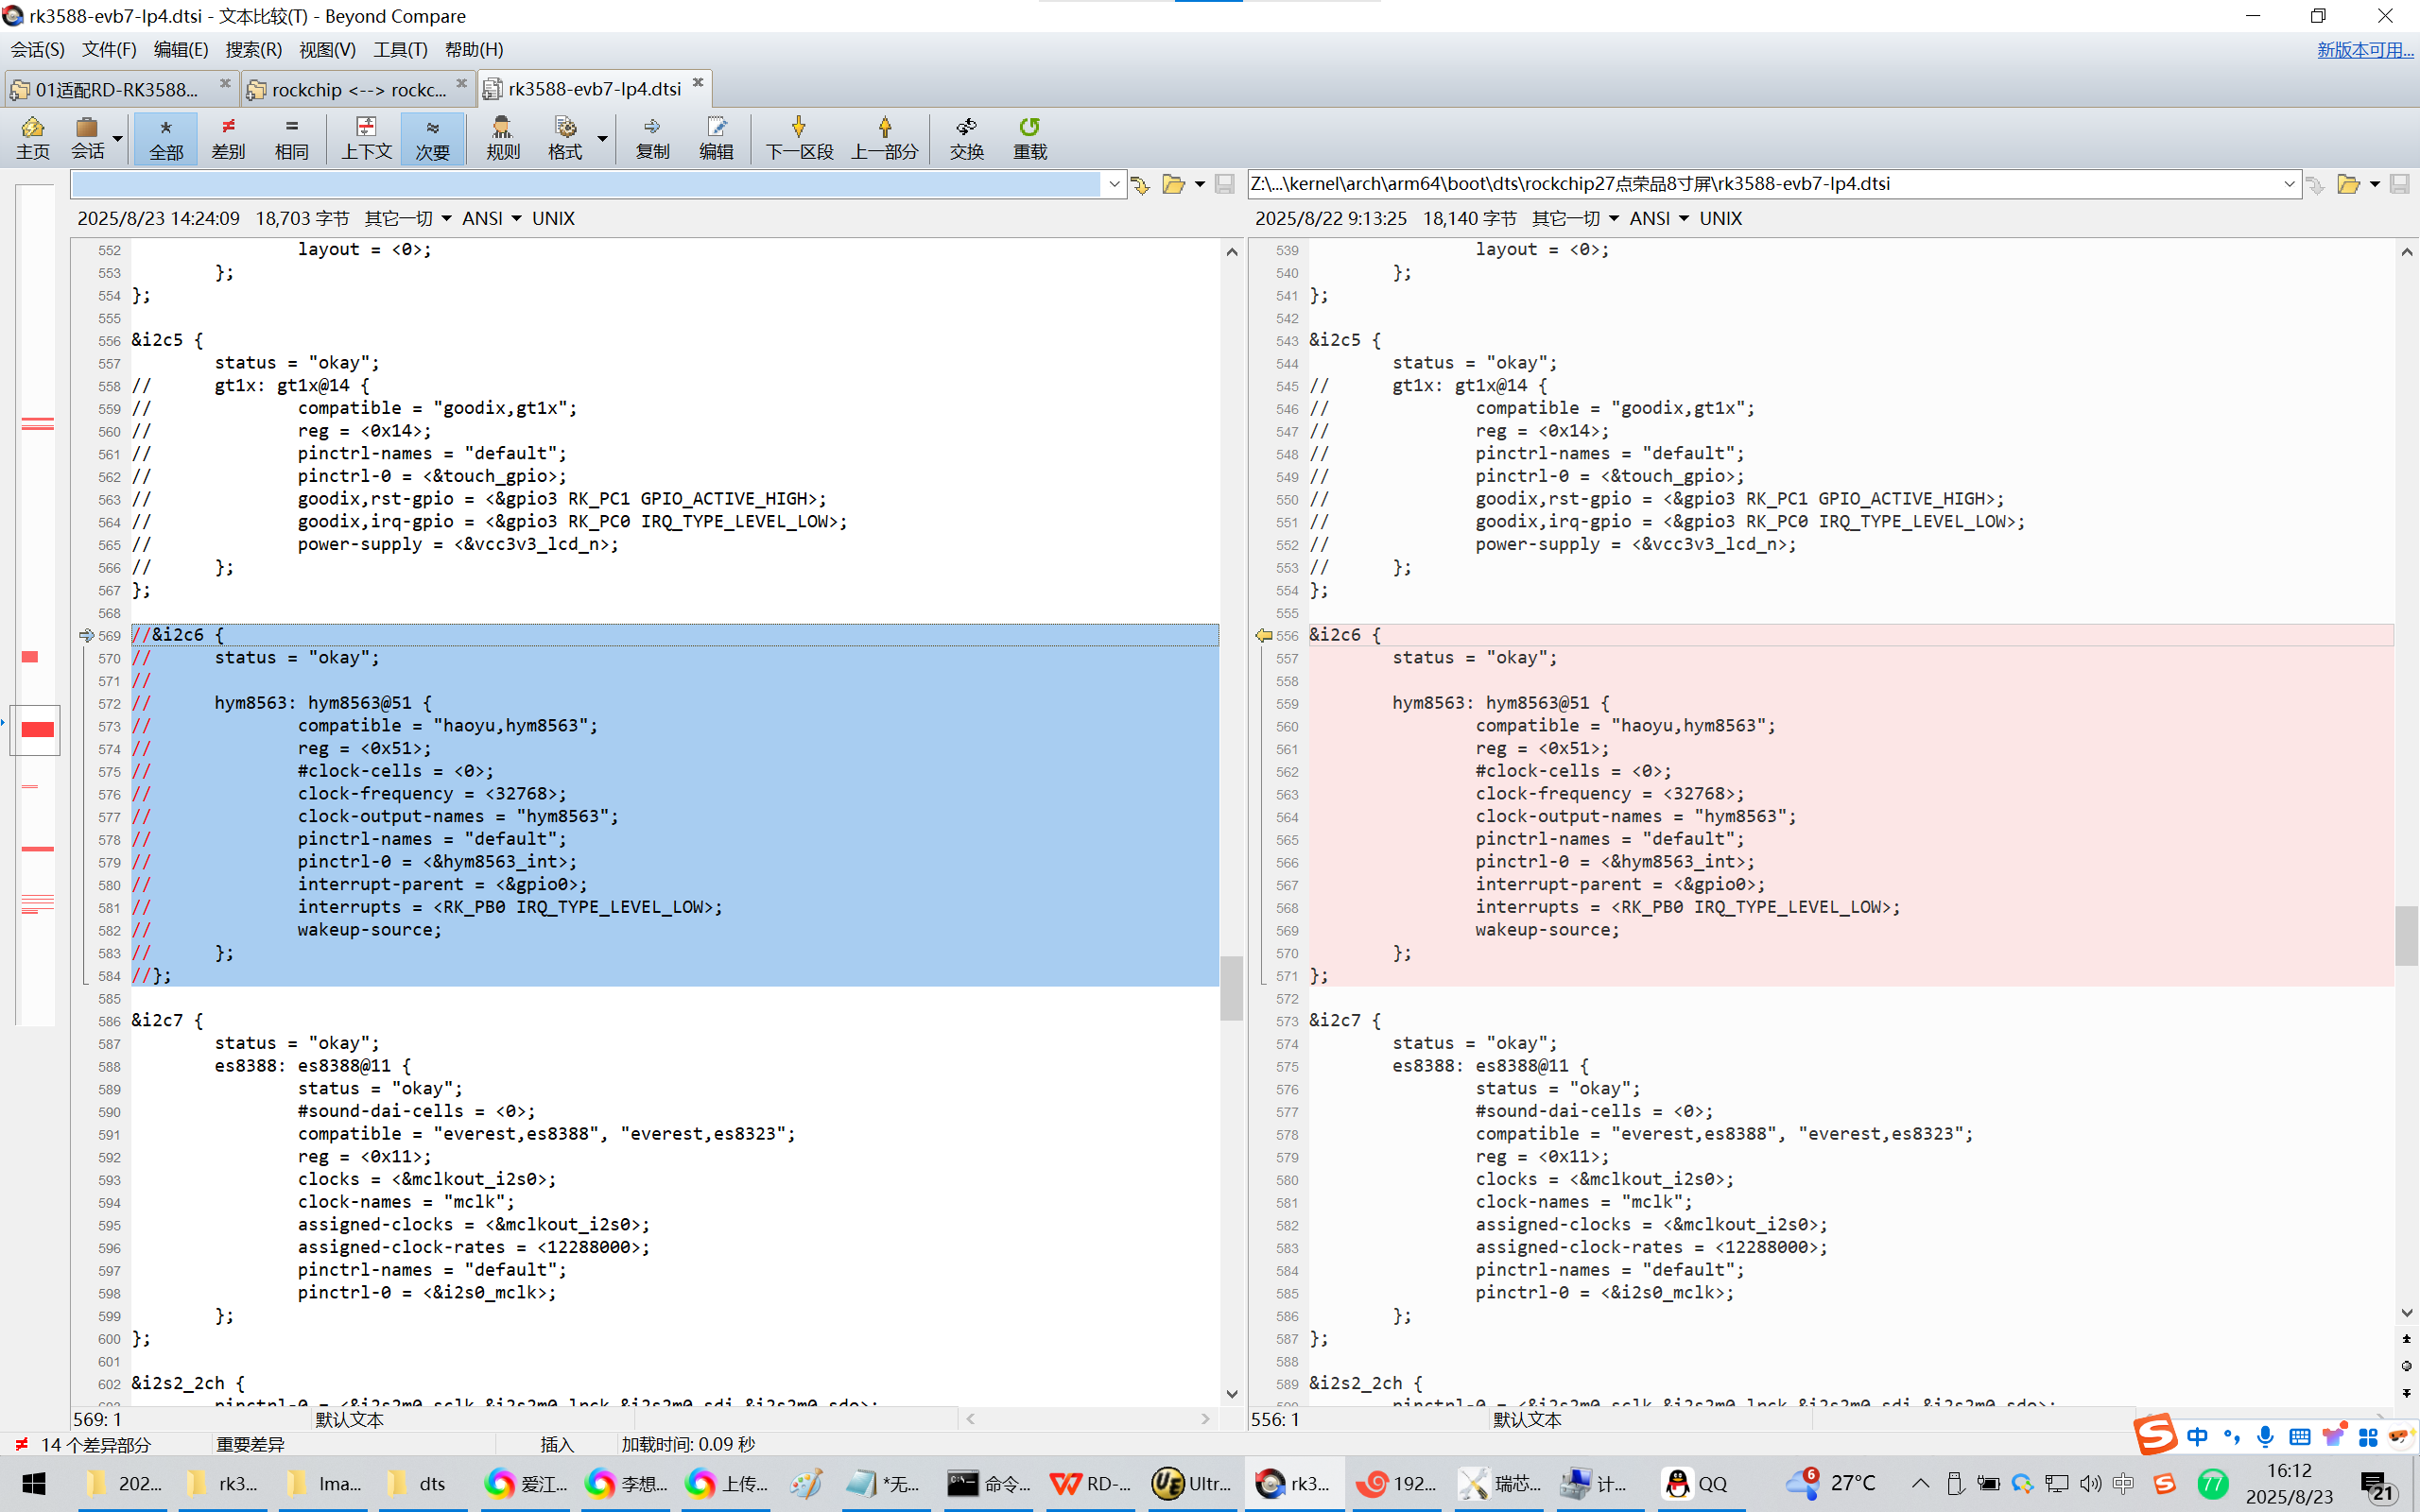
&i2c6 {
status = "okay";
hym8563: hym8563@51 {
compatible = "haoyu,hym8563";
reg = <0x51>;
#clock-cells = <0>;
clock-frequency = <32768>;
clock-output-names = "hym8563";
pinctrl-names = "default";
pinctrl-0 = <&hym8563_int>;
interrupt-parent = <&gpio0>;
interrupts = <RK_PB0 IRQ_TYPE_LEVEL_LOW>;
wakeup-source;
};
};
修改为:
//&i2c6 {
// status = "okay";
//
// hym8563: hym8563@51 {
// compatible = "haoyu,hym8563";
// reg = <0x51>;
// #clock-cells = <0>;
// clock-frequency = <32768>;
// clock-output-names = "hym8563";
// pinctrl-names = "default";
// pinctrl-0 = <&hym8563_int>;
// interrupt-parent = <&gpio0>;
// interrupts = <RK_PB0 IRQ_TYPE_LEVEL_LOW>;
// wakeup-source;
// };
//};
&i2c4 {
status = "okay";
pinctrl-0 = <&i2c4m1_xfer>;
hym8563: hym8563@51 {
compatible = "haoyu,hym8563";
reg = <0x51>;
#clock-cells = <0>;
clock-frequency = <32768>;
clock-output-names = "hym8563";
pinctrl-names = "default";
//pinctrl-0 = <&hym8563_int>;
//interrupt-parent = <&gpio0>;
//interrupts = <RK_PB0 IRQ_TYPE_LEVEL_LOW>;
//wakeup-source;
};
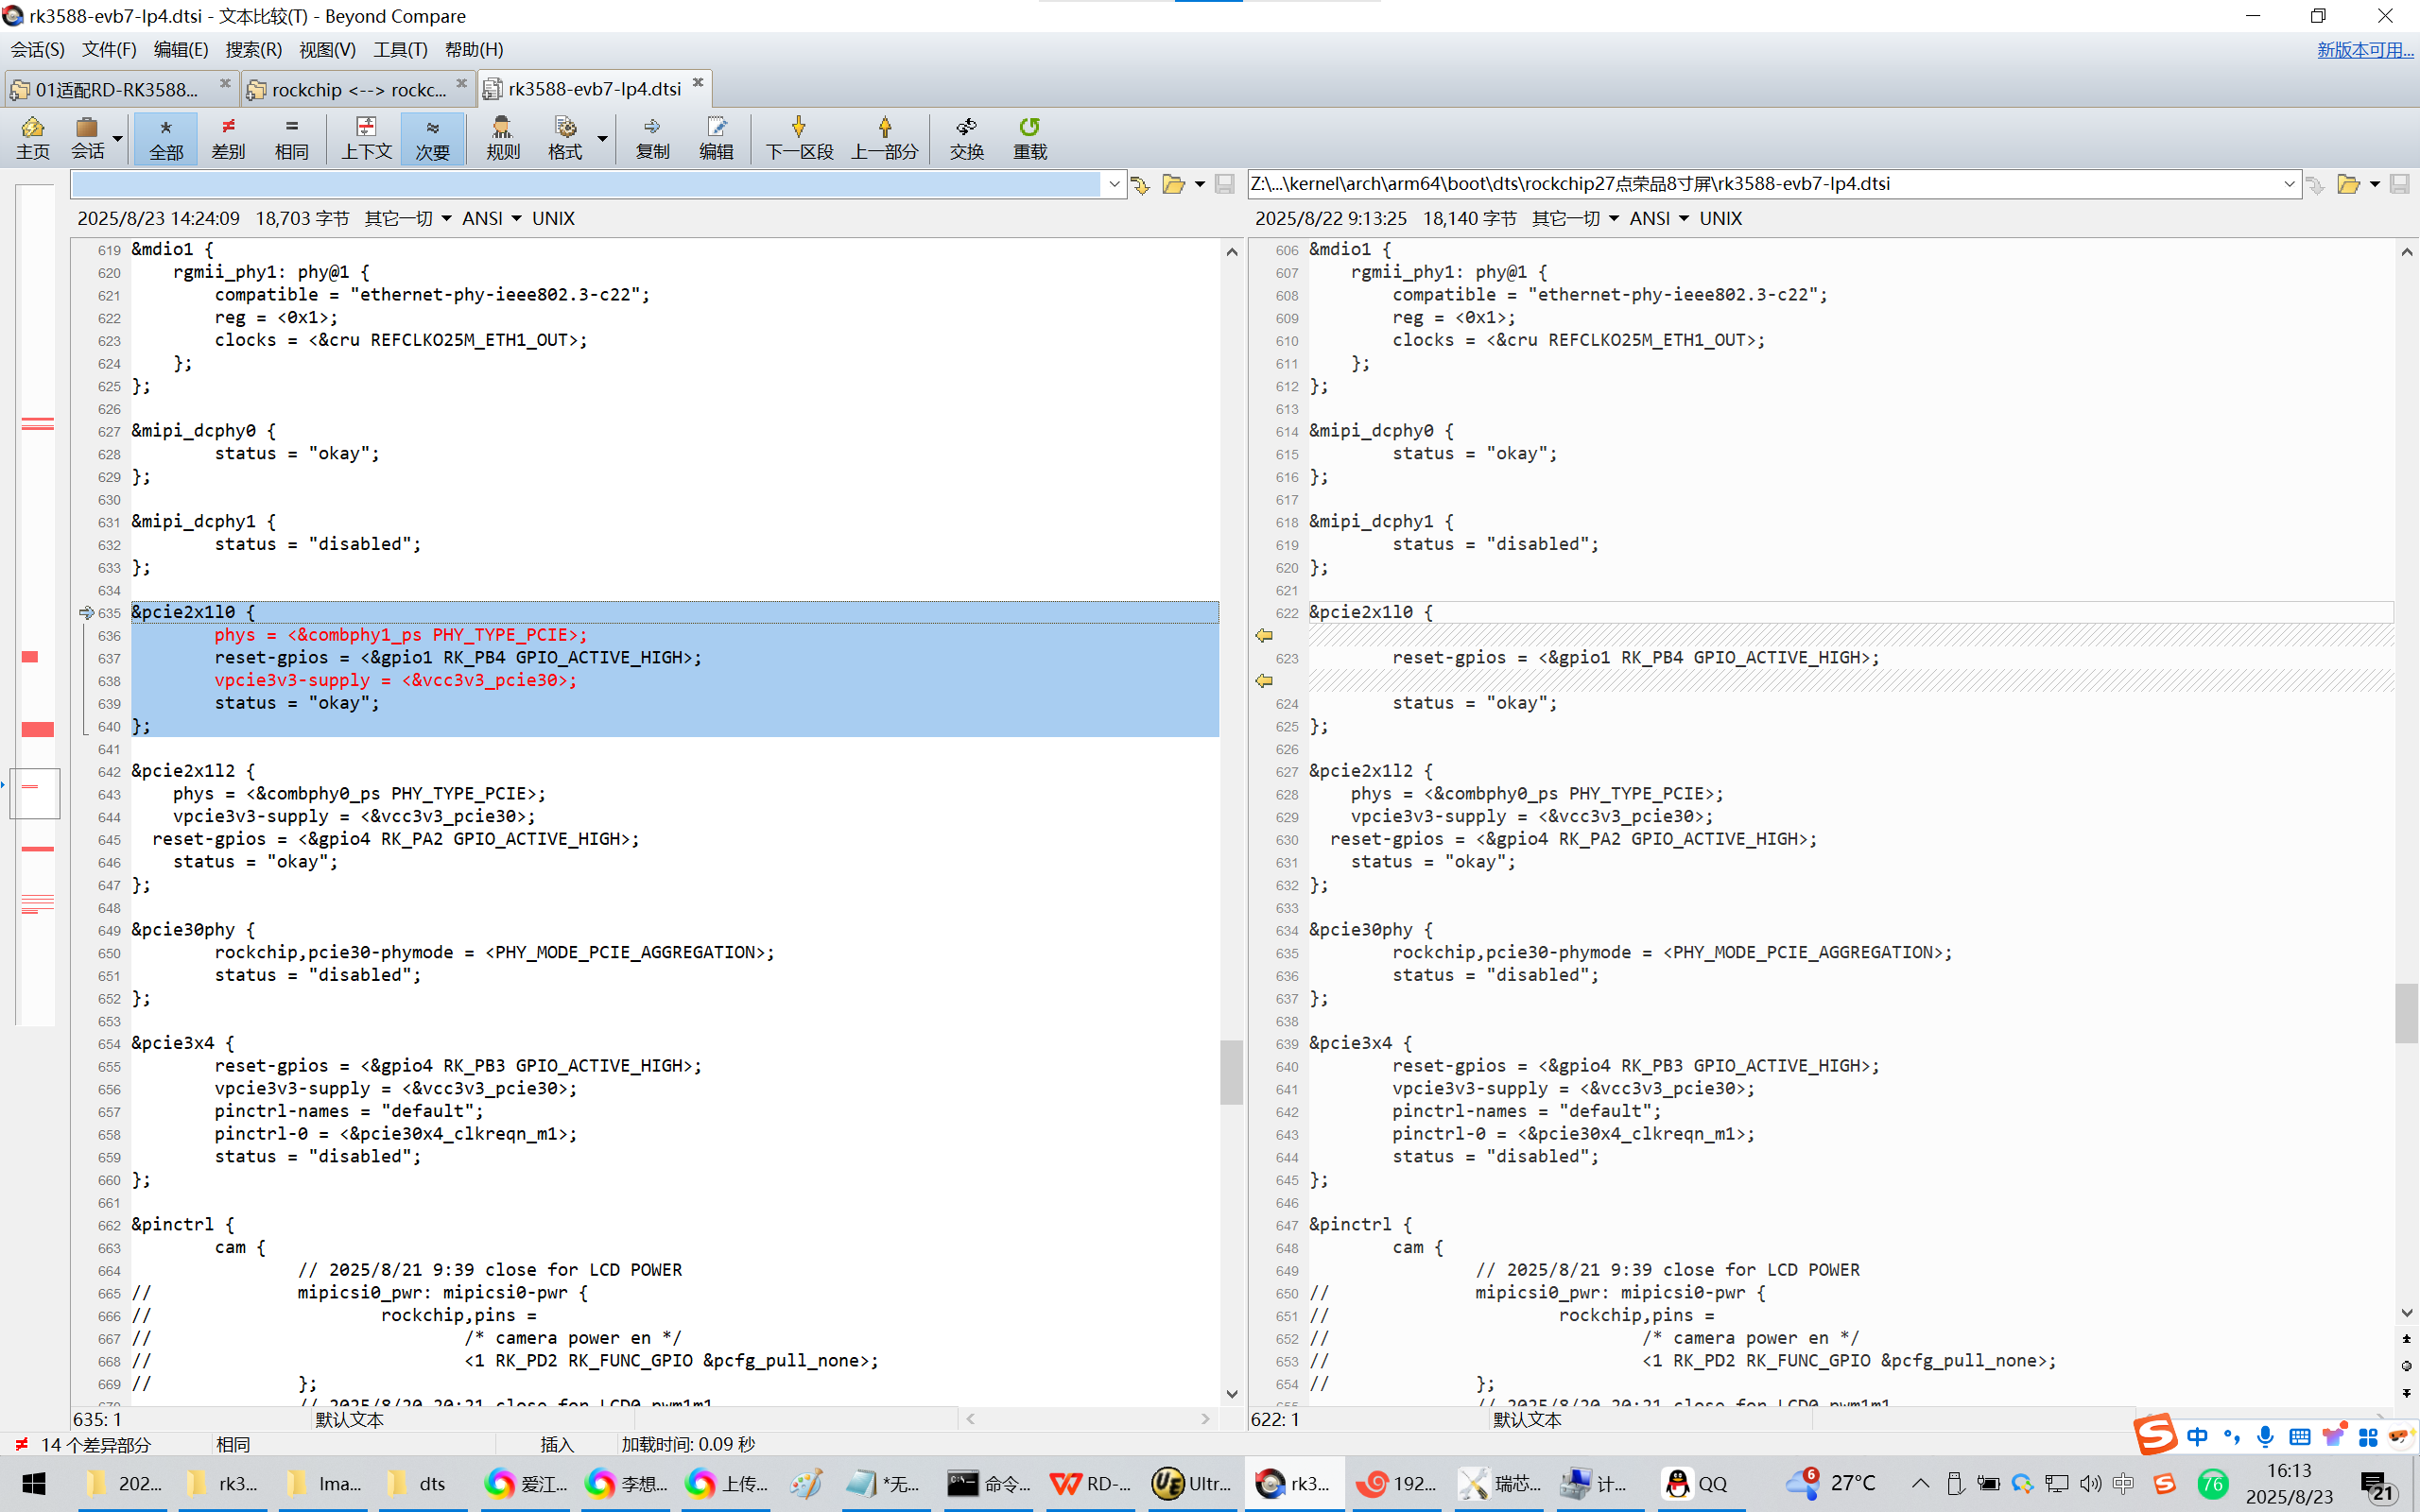
&pcie2x1l0 {
reset-gpios = <&gpio1 RK_PB4 GPIO_ACTIVE_HIGH>;
status = "okay";
};
修改为:
&pcie2x1l0 {
phys = <&combphy1_ps PHY_TYPE_PCIE>;
reset-gpios = <&gpio1 RK_PB4 GPIO_ACTIVE_HIGH>;
vpcie3v3-supply = <&vcc3v3_pcie30>;
status = "okay";
};
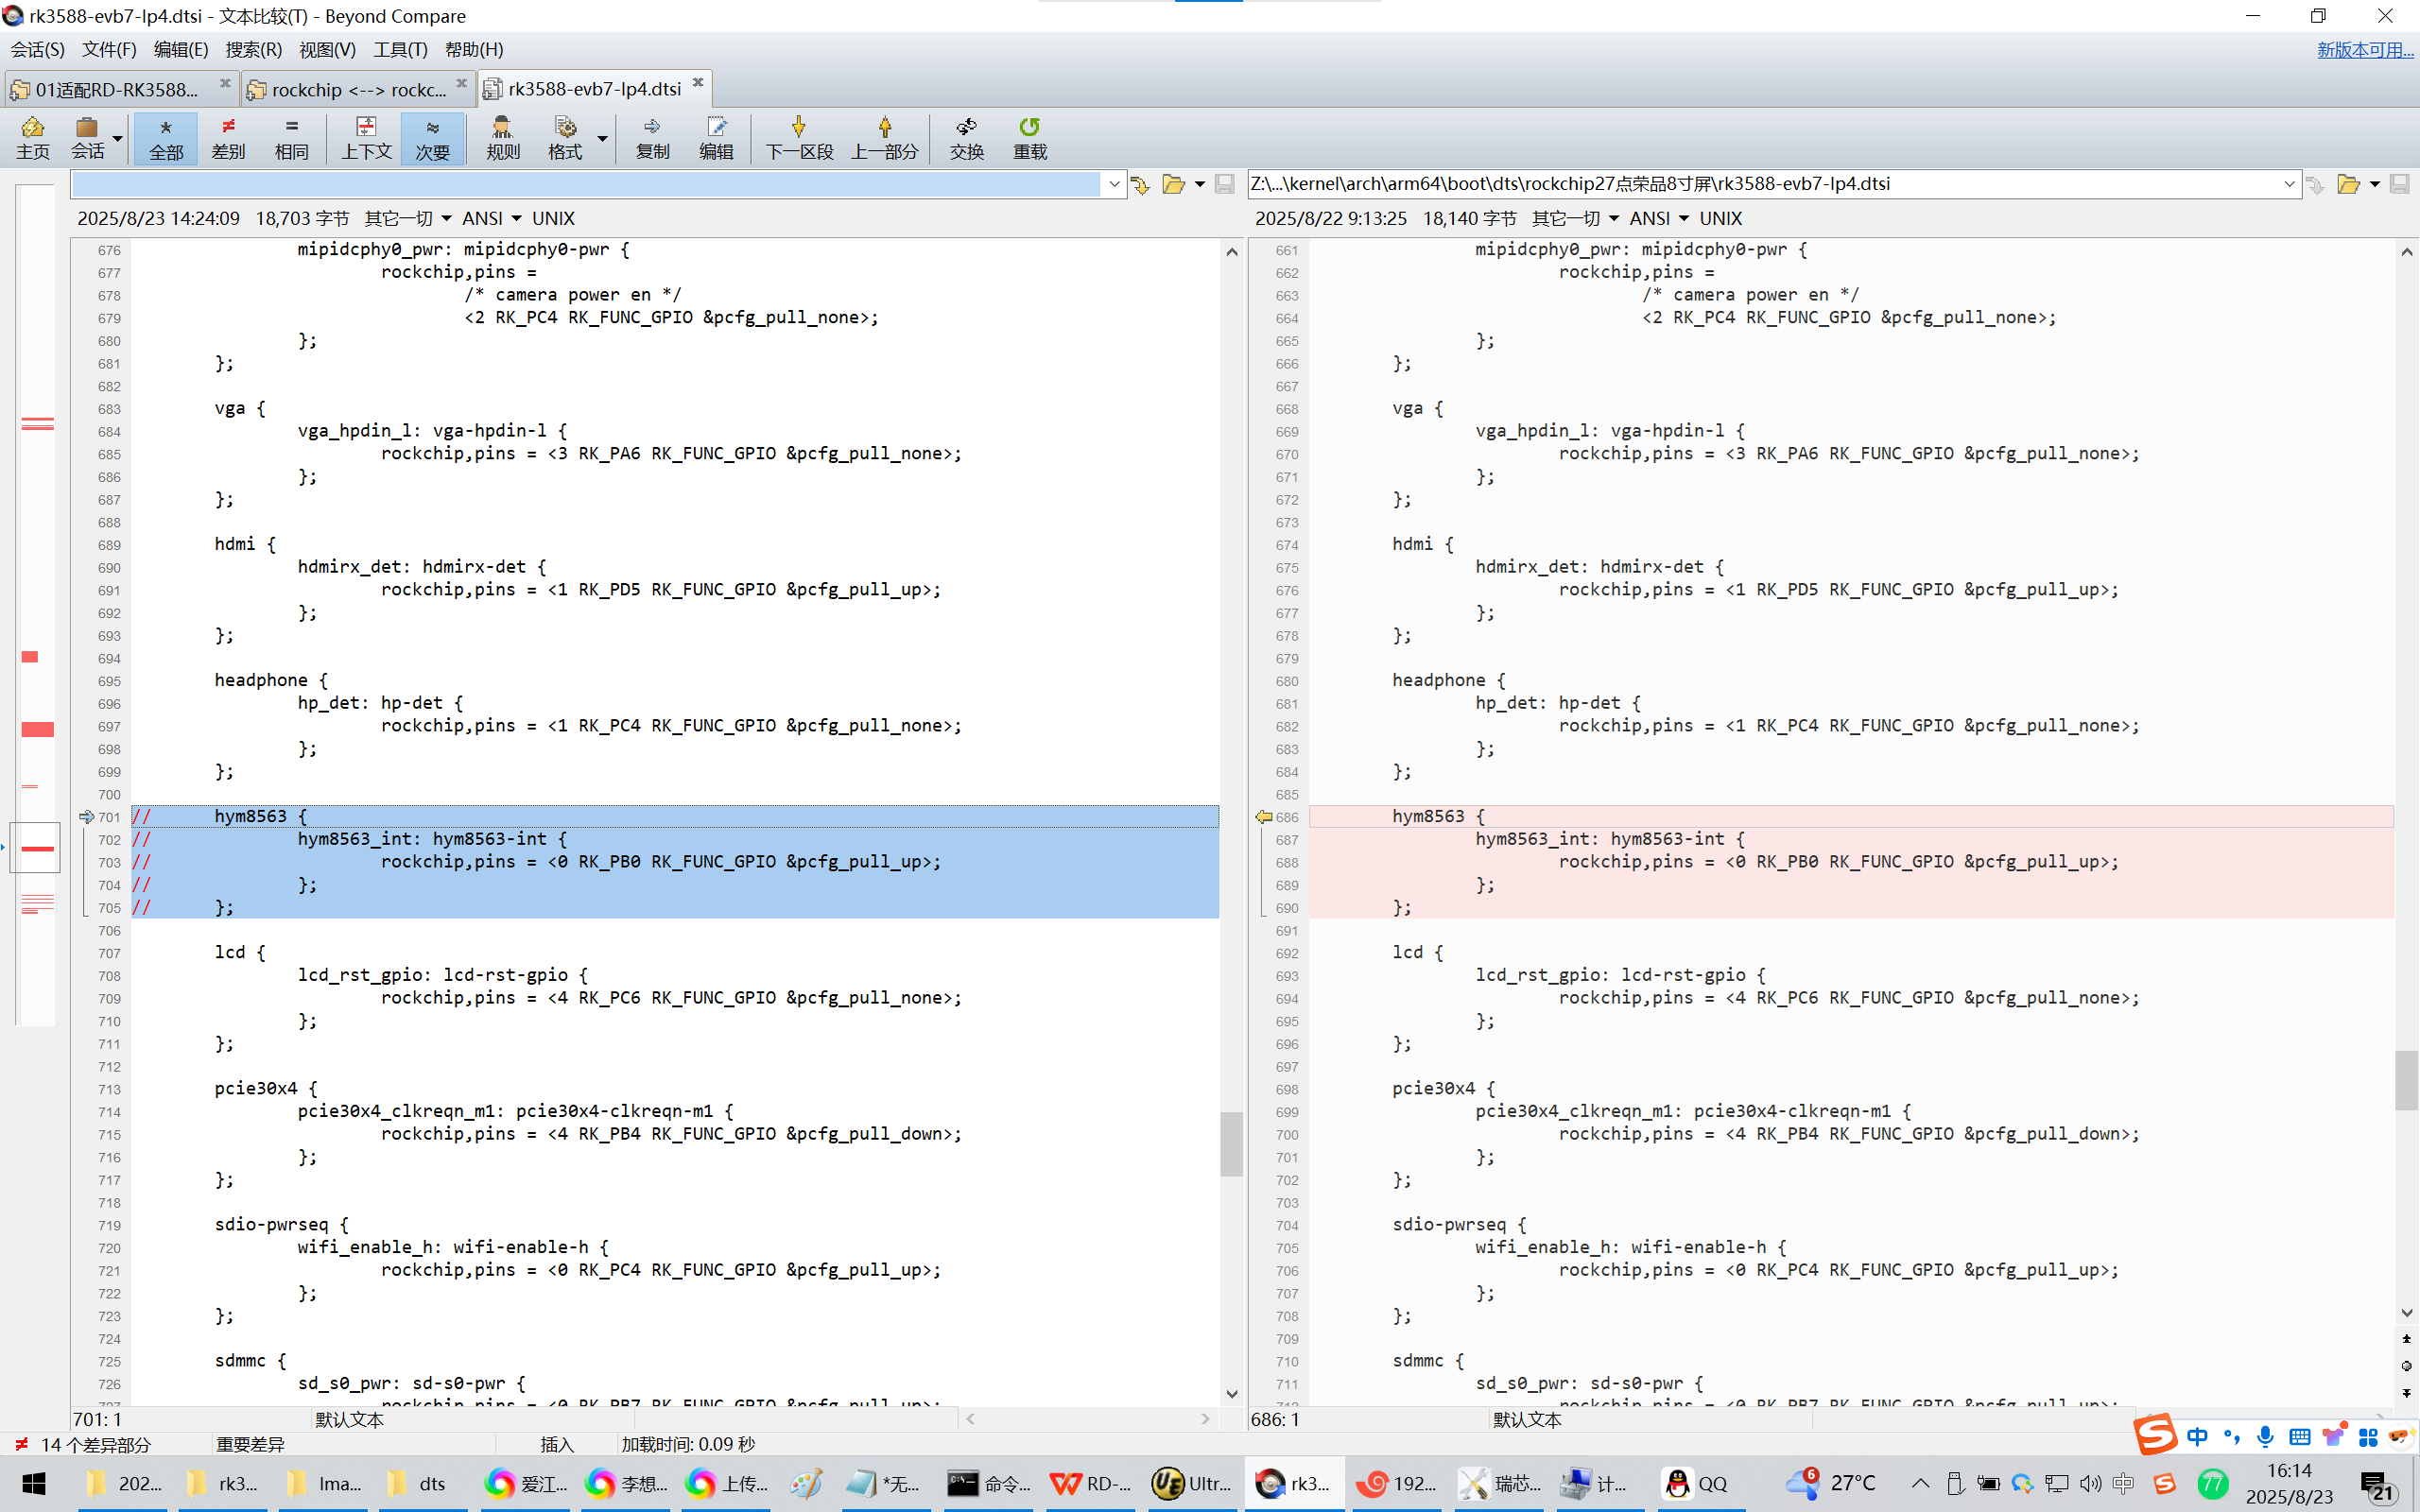
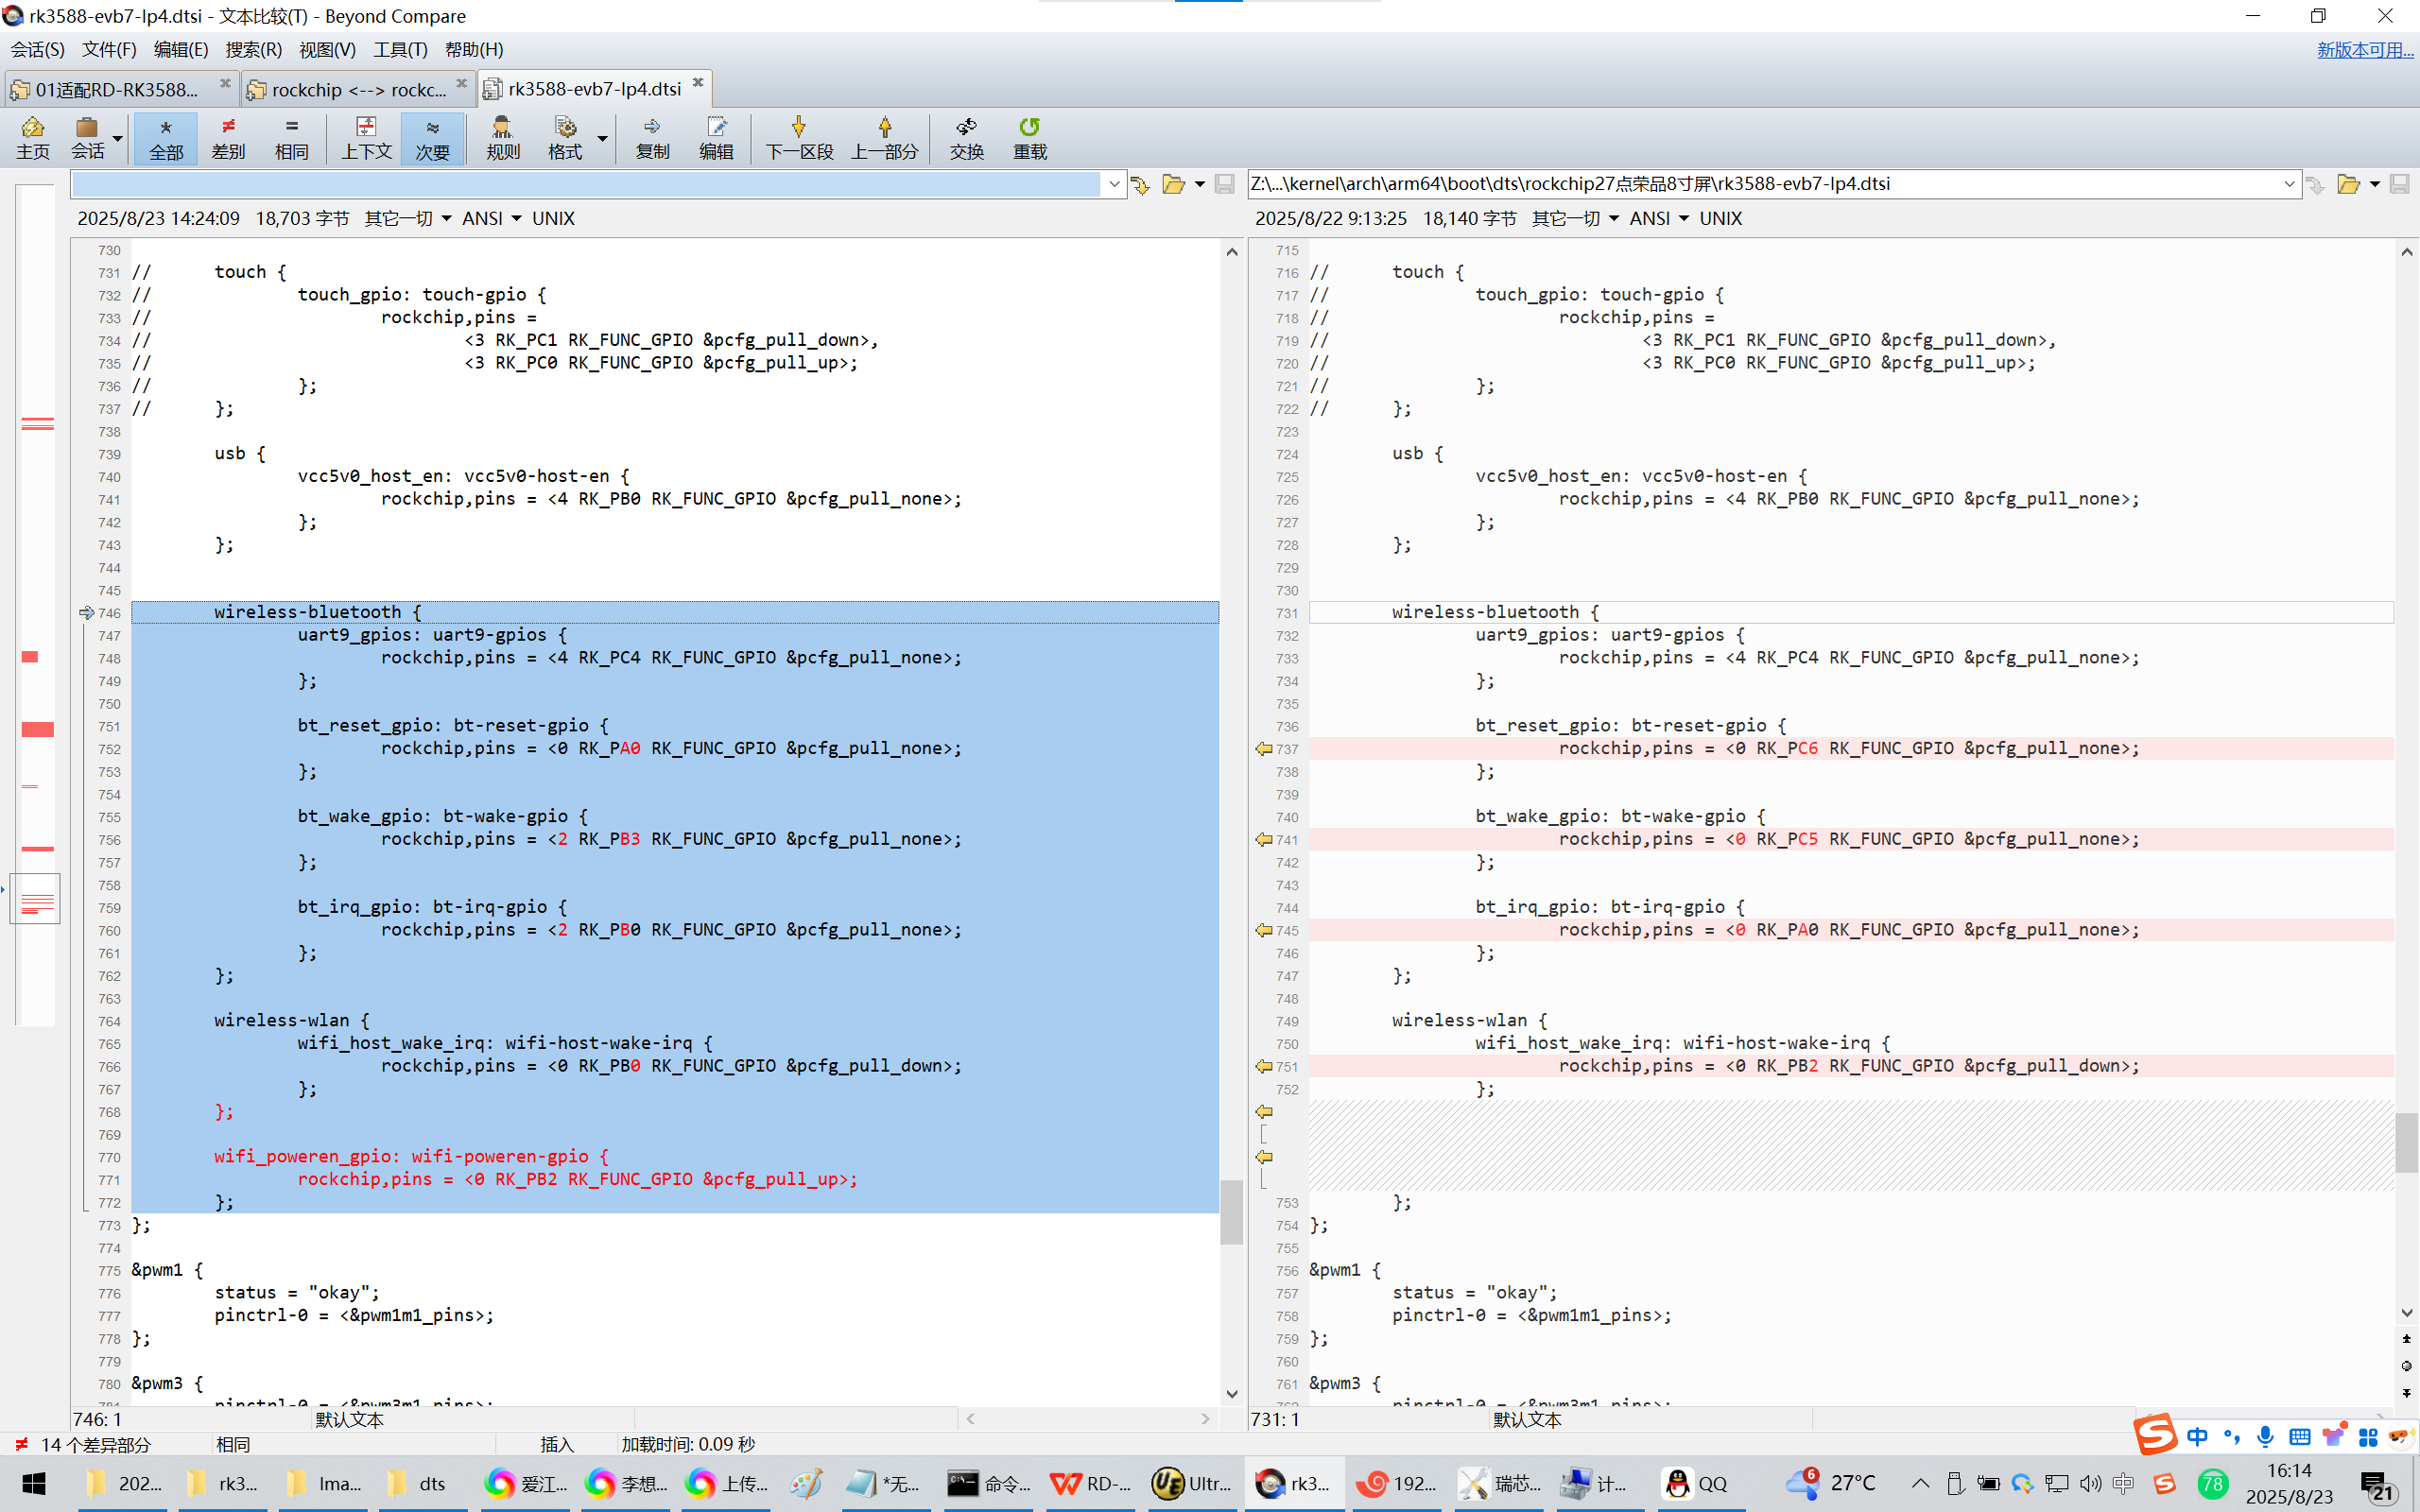
&pinctrl {
hym8563 {
hym8563_int: hym8563-int {
rockchip,pins = <0 RK_PB0 RK_FUNC_GPIO &pcfg_pull_up>;
};
};
wireless-bluetooth {
uart9_gpios: uart9-gpios {
rockchip,pins = <4 RK_PC4 RK_FUNC_GPIO &pcfg_pull_none>;
};
bt_reset_gpio: bt-reset-gpio {
rockchip,pins = <0 RK_PC6 RK_FUNC_GPIO &pcfg_pull_none>;
};
bt_wake_gpio: bt-wake-gpio {
rockchip,pins = <0 RK_PC5 RK_FUNC_GPIO &pcfg_pull_none>;
};
bt_irq_gpio: bt-irq-gpio {
rockchip,pins = <0 RK_PA0 RK_FUNC_GPIO &pcfg_pull_none>;
};
};
wireless-wlan {
wifi_host_wake_irq: wifi-host-wake-irq {
rockchip,pins = <0 RK_PB2 RK_FUNC_GPIO &pcfg_pull_down>;
};
};
};
修改为:
&pinctrl {
// hym8563 {
// hym8563_int: hym8563-int {
// rockchip,pins = <0 RK_PB0 RK_FUNC_GPIO &pcfg_pull_up>;
// };
// };
wireless-bluetooth {
uart9_gpios: uart9-gpios {
rockchip,pins = <4 RK_PC4 RK_FUNC_GPIO &pcfg_pull_none>;
};
bt_reset_gpio: bt-reset-gpio {
rockchip,pins = <0 RK_PA0 RK_FUNC_GPIO &pcfg_pull_none>;
};
bt_wake_gpio: bt-wake-gpio {
rockchip,pins = <2 RK_PB3 RK_FUNC_GPIO &pcfg_pull_none>;
};
bt_irq_gpio: bt-irq-gpio {
rockchip,pins = <2 RK_PB0 RK_FUNC_GPIO &pcfg_pull_none>;
};
};
wireless-wlan {
wifi_host_wake_irq: wifi-host-wake-irq {
rockchip,pins = <0 RK_PB0 RK_FUNC_GPIO &pcfg_pull_down>;
};
};
wifi_poweren_gpio: wifi-poweren-gpio {
rockchip,pins = <0 RK_PB2 RK_FUNC_GPIO &pcfg_pull_up>;
};
};
参考资料:
https://doc.rpdzkj.cn/#/zh_cn/%E7%91%9E%E8%8A%AF%E5%BE%AE%E7%B3%BB%E5%88%97/rk3588-rk3588s/7.%E6%8E%A5%E5%8F%A3%E4%BD%BF%E7%94%A8?id=buildroot
接口使用
Buildroot
Buildroot 上使用 wpa_supplicant 进行连接