Harbor私有仓库实战配置
一、概述
Harbor(港湾),是一个用于存储和分发 Docker 镜像的企业级 Registry 服务器。以前的镜像
私有仓库采用官方的 Docker Registry,不便于管理镜像。
Harbor 是由 VMWare 在 Docker Registry 的基础之上进行了二次封装,加进去了很多额外
程序,而且提供了一个 web 界面。其主要组件如下图:
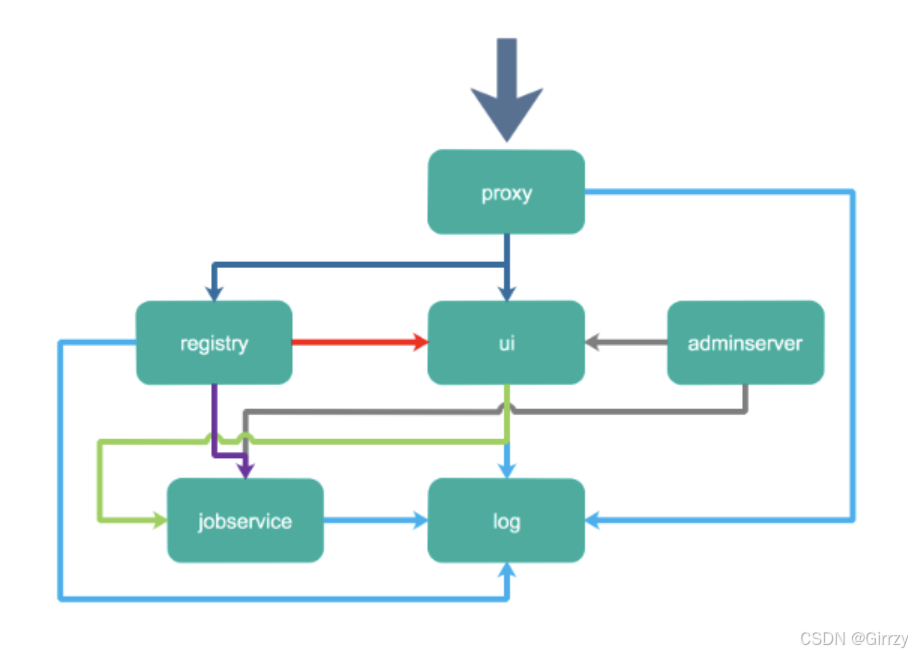
主要组件包括:
proxy:一个nginx前端代理,主要是分发前端页面ui访问和镜像上传和下载流量
ui:提供了一个web管理页面,当然还包括了一个前端页面和后端API,底层使用mysql 数据库。
registry:是镜像仓库,负责存储镜像文件,当镜像上传完毕后通过 hook 通知 ui 创建 repository。
adminserver:是系统的配置管理中心附带检查存储用量,ui 和 jobserver 启动时候需要加载adminserver 的配置,jobsevice 是负责镜像复制工作的,他和 registry 通信, 从一个registry pull 镜像然后 push 到另一个 registry,并记录 job_log。
log 是日志汇总组件,通过 docker 的 log-driver 把日志汇总到一起。
二、harbor服务端安装
1.环境准备
安装一个系统,CPU 2 核,内存 4 G,磁盘 100G,两块网卡,一块仅主机一块NAT。
1.1修改主机名
[root@localhost ~]# hostnamectl hostname harbor1.2开启路由转发
[root@harbor ~]# echo 'net.ipv4.ip_forward=1' >> /etc/sysctl.conf
[root@harbor ~]# sysctl -p
net.ipv4.ip_forward = 11.3配置主机映射
[root@harbor ~]# cat > /etc/hosts <<EOF
192.168.180.11 k8s-master01 m1
192.168.180.12 k8s-node01 n1
192.168.180.13 k8s-node02 n2
192.168.180.20 harbor.registry.com harbor
EOF
2安装Docker
# 安装必要工具
yum install -y yum-utils device-mapper-persistent-data lvm2# 安装 Docker
dnf install yum-utils -y [root@harbor ~]# yum-config-manager --add-repo https://mirrors.aliyun.com/docker-ce/linux/rhel/docker-ce.repodnf install docker-ce docker-ce-cli containerd.io docker-buildx-plugin docker-compose-plugin -y# 配置 Docker 镜像加速
cat > /etc/docker/daemon.json <<EOF
{"default-ipc-mode": "shareable","data-root": "/data/docker","exec-opts": ["native.cgroupdriver=systemd"],"log-driver": "json-file","log-opts": {"max-size": "100m","max-file": "50"},"insecure-registries": ["https://harbor.registry.com"],"registry-mirrors":["https://docker.m.daocloud.io","https://docker.imgdb.de","https://docker-0.unsee.tech","https://docker.hlmirror.com","https://docker.1ms.run","https://func.ink","https://lispy.org","https://docker.xiaogenban1993.com"]
}
EOF# 启动 Docker
systemctl daemon-reload
systemctl enable docker
systemctl start docker#验证Docker
[root@harbor ~]# docker info[root@harbor ~]# docker --version
Docker version 20.10.19, build d85ef84
3 安装docker-compose
#下载docker-compose 可根据情况选择不同版本
[root@harbor ~]# wget https://github.com/docker/compose/releases/download/v2.35.1/docker-compose-linux-x86_64 -y#安装docker-compose
[root@harbor ~]# mv docker-compose-linux-x86_64 /usr/bin/docker-compose#赋权[root@harbor ~]# chmod +x /usr/bin/docker-compose #验证
[root@harbor ~]# docker-compose --version
Docker Compose version v2.35.1
4 准备Harbor
#下载Harbor
1. 创建存储数据目录[root@harbor ~]# mkdir -p /data2. 切换目录[root@harbor ~]# cd /data3. 下载文件[root@harbor data]# wget https://github.com/goharbor/harbor/releases/download/v2.13.2/harbor-online-installer-v2.13.2.tgz#解压Harbor
1. 解压文件
[root@harbor data]# tar -xzf harbor-offline-installer-v2.13.0.tgz2. 切换目录
[root@harbor data]# cd harbor/3. 查看目录
[root@harbor harbor]# ls
common.sh  harbor.v2.13.2.tar.gz  harbor.yml.tmpl  install.sh  LICENSE  prepare
5.配置证书
具体流程可以从官网查阅Harbor docs | Configure HTTPS Access to Harbor
Harbor docs | Configure HTTPS Access to Harbor
https://goharbor.io/docs/2.13.0/install-config/configure-https/
Harbor docs | Configure HTTPS Access to Harbor5.1生成CA证书
1.创建证书文件目录[root@harbor harbor]# mkdir ssl[root@harbor harbor]# cd ssl2.生成CA证书私钥[root@harbor ssl]# openssl genrsa -out ca.key 40963. 生成CA证书[root@harbor ssl]# openssl req -x509 -new -nodes -sha512 -days 3650 \
-subj "/C=CN/ST=Chongqing/L=Banan/O=example/OU=Personal/CN=MyPersonalRoot CA" \
-key ca.key \
-out ca.crt4.查看文件[root@harbor ssl]# ls
ca.crt  ca.key5.2 生成服务器证书
证书通常包含一个.crt 文件和一个.key 文件1. 生成私钥[root@harbor ssl]# openssl genrsa -out harbor.registry.com.key 40962. 生成证书签名请求(CSR)[root@harbor ssl]# openssl req -sha512 -new \
-subj "/C=CN/ST=Chongqing/L=Banan/O=example/OU=Personal/CN=harbor.registry.com" \
-key harbor.registry.com.key \
-out harbor.registry.com.csr3. 生成一个x509 v3扩展文件[root@harbor ssl]# cat > v3.ext <<-EOF
authorityKeyIdentifier=keyid,issuer
basicConstraints=CA:FALSE
keyUsage = digitalSignature, nonRepudiation, keyEncipherment, dataEncipherment
extendedKeyUsage = serverAuth
subjectAltName = @alt_names[alt_names]
DNS.1=harbor.registry.com
DNS.2=harbor.registry
DNS.3=harbor
EOF4. 使用该v3.ext文件为您的Harbor主机生成证书[root@harbor ssl]# openssl x509 -req -sha512 -days 3650 \-extfile v3.ext \-CA ca.crt -CAkey ca.key -CAcreateserial \-in harbor.registry.com.csr \-out harbor.registry.com.crt
Certificate request self-signature ok
subject=C=CN, ST=Chongqing, L=Banan, O=example, OU=Personal, CN=harbor.registry.com[root@harbor ssl]# ls -l
total 32
-rw-r--r-- 1 root root 2061 Aug 20 10:57 ca.crt
-rw------- 1 root root 3243 Aug 20 10:57 ca.key
-rw-r--r-- 1 root root   41 Aug 20 11:01 ca.srl
-rw-r--r-- 1 root root 2139 Aug 20 11:01 harbor.registry.com.crt
-rw-r--r-- 1 root root 1716 Aug 20 11:01 harbor.registry.com.csr
-rw------- 1 root root 3243 Aug 20 10:57 harbor.registry.com.key
-rw-r--r-- 1 root root  273 Aug 20 10:58 v3.ext
[root@master01 ssl]# 5.3 向Harbor和Docker提供证书
生成文件后,您必须将它们提供给 Harbor 和 Docker,然后重新配置 Harbor 以使用它们。1. 将服务器证书和密钥复制到 Harbor 主机上的 certficates 文件夹中[root@harbor ssl]# mkdir /data/cert
[root@harbor ssl]# cp harbor.registry.com.crt /data/cert/
[root@harbor ssl]# cp harbor.registry.com.key /data/cert/2. 转换 harbor.registry.com.crt 为 harbor.registry.com.cert,供 Docker 使用[root@harbor ssl]# openssl x509 -inform PEM -in harbor.registry.com.crt -out harbor.registry.com.cert3. 将服务器证书、密钥和 CA 文件复制到 Harbor 主机上的 Docker 证书文件夹中。您必须先创建相应的文件夹。[root@harbor ssl]# mkdir -p /etc/docker/certs.d/harbor.registry.com:443
[root@harbor ssl]# cp harbor.registry.com.cert /etc/docker/certs.d/harbor.registry.com:443/
[root@harbor ssl]# cp harbor.registry.com.key /etc/docker/certs.d/harbor.registry.com:443/
[root@harbor ssl]# cp ca.crt /etc/docker/certs.d/harbor.registry.com:443/4. 重新启动Docker Engine
[root@harbor ssl]# systemctl restart docker
6.部署配置Harbor
6.1配置Harbor
1 从配置模板复制配置文件
[root@harbor harbor]# cp harbor.yml.tmpl harbor.yml2. 修改配置文件[root@harbor harbor]# vim harbor.yml# Configuration file of Harbor# The IP address or hostname to access admin UI and registry service.
# DO NOT use localhost or 127.0.0.1, because Harbor needs to be accessed by external clients.
hostname: harbor.registry.com# http related config
http:# port for http, default is 80. If https enabled, this port will redirect to https portport: 80# https related config
https:# https port for harbor, default is 443port: 443# The path of cert and key files for nginxcertificate: /data/cert/harbor.registry.com.crtprivate_key: /data/cert/harbor.registry.com.key# enable strong ssl ciphers (default: false)# strong_ssl_ciphers: false省略6.2 启动Harbor
[root@harbor harbor]# ./install.sh
略6.3 查看Harbor容器[root@harbor harbor]# docker-compose ps
NAME                IMAGE                                 COMMAND                  SERVICE             CREATED             STATUS                    PORTS
harbor-core         goharbor/harbor-core:v2.13.2          "/harbor/entrypoint.…"   core                28 hours ago        Up 28 hours (healthy)
harbor-db           goharbor/harbor-db:v2.13.2            "/docker-entrypoint.…"   postgresql          28 hours ago        Up 28 hours (healthy)
harbor-jobservice   goharbor/harbor-jobservice:v2.13.2    "/harbor/entrypoint.…"   jobservice          28 hours ago        Up 28 hours (unhealthy)
harbor-log          goharbor/harbor-log:v2.13.2           "/bin/sh -c /usr/loc…"   log                 28 hours ago        Up 28 hours (healthy)     127.0.0.1:1514->10514/tcp
harbor-portal       goharbor/harbor-portal:v2.13.2        "nginx -g 'daemon of…"   portal              28 hours ago        Up 28 hours (healthy)
nginx               goharbor/nginx-photon:v2.13.2         "nginx -g 'daemon of…"   proxy               28 hours ago        Up 28 hours (healthy)     0.0.0.0:80->8080/tcp, :::80->8080/tcp, 0.0.0.0:443->8443/tcp, :::443->8443/tcp
redis               goharbor/redis-photon:v2.13.2         "redis-server /etc/r…"   redis               28 hours ago        Up 28 hours (healthy)
registry            goharbor/registry-photon:v2.13.2      "/home/harbor/entryp…"   registry            28 hours ago        Up 28 hours (healthy)
registryctl         goharbor/harbor-registryctl:v2.13.2   "/home/harbor/start.…"   registryctl         28 hours ago        Up 28 hours (healthy)
[root@master01 ssl]#
7. 配置启动服务
7.1 停止Harbor
由于现在启动 Harbor 的操作必须是在 docker-compose.yml 文件所在目录下执行,非常不 方便。所以我们先使用 docker-compose 命令来关闭 Harbor 服务。[root@harbor harbor]# docker-compose down7.2 编写服务文件
为了方便在任意地方都可以启动服务而不是在 harbor 安装目录下,我们需要在 /usr/lib/systemd/system/ 目录下新建 harbor.service 服务启动文件。 [root@harbor harbor]#  vim /usr/lib/systemd/system/harbor.service文件的内容如下:[Unit]
Description=Harbor
After=docker.service systemd-networkd.service systemd-resolved.service
Requires=docker.service
Documentation=http://github.com/vmware/harbor[Service]
Type=simple
Restart=on-failure
RestartSec=5
ExecStart=/usr/bin/docker-compose --file /data/harbor/docker-compose.yml up
ExecStop=/usr/bin/docker-compose --file /data/harbor/docker-compose.yml down[Install]
WantedBy=multi-user.target7.3 启动Harbor服务
# 加载服务配置文件 [root@harbor harbor]# systemctl daemon-reload# 启动服务
[root@harbor harbor]# systemctl start harbor.service# 设置开机自启
[root@harbor harbor]# systemctl enable harbor.service
Created symlink /etc/systemd/system/multi-user.target.wants/harbor.service → /usr/lib/systemd/system/harbor.service.
8 作为harbor客户端使用私有仓库
8.1 配置映射
在客户端 的 hosts 文件中配置 IP 和主机映射。192.168.10.20  harbor.registry.com8.2 配置仓库
1、打开浏览器,输入 https://harbor.registry.com 2、输入用户名 admin,密码:Harbor12345 后进入管理界面。3、修改 daemon.json,默认 http 私有仓库不能访问,设置后才可以[root@harbor harbor]# cat /etc/docker/daemon.json
{"default-ipc-mode": "shareable","data-root": "/data/docker","exec-opts": ["native.cgroupdriver=systemd"],"log-driver": "json-file","log-opts": {"max-size": "100m","max-file": "50"},"insecure-registries": ["https://harbor.registry.com"],"registry-mirrors":["https://docker.m.daocloud.io","https://docker.imgdb.de","https://docker-0.unsee.tech","https://docker.hlmirror.com","https://docker.1ms.run","https://func.ink","https://lispy.org","https://docker.xiaogenban1993.com"]
}
9.拉取官方镜像并推送到私有仓库
9.1拉取官方镜像
[root@harbor harbor]# docker pull redis:8.0.09.2 镜像打标签
[root@harbor ~]# docker tag redis:8.0.0 harbor.registry.com/library/redis:8.0.09.3 登录仓库
[root@harbor ~]# docker login harbor.registry.com
Username: admin
Password:                         # 此处输入Harbor12345WARNING! Your credentials are stored unencrypted in '/root/.docker/config.json'.
Configure a credential helper to remove this warning. See
https://docs.docker.com/go/credential-store/Login Succeeded9.4 推送镜像到私有仓库
[root@harbor ~]# docker push harbor.registry.com/library/redis:8.0.0
三、habor图形界面使用
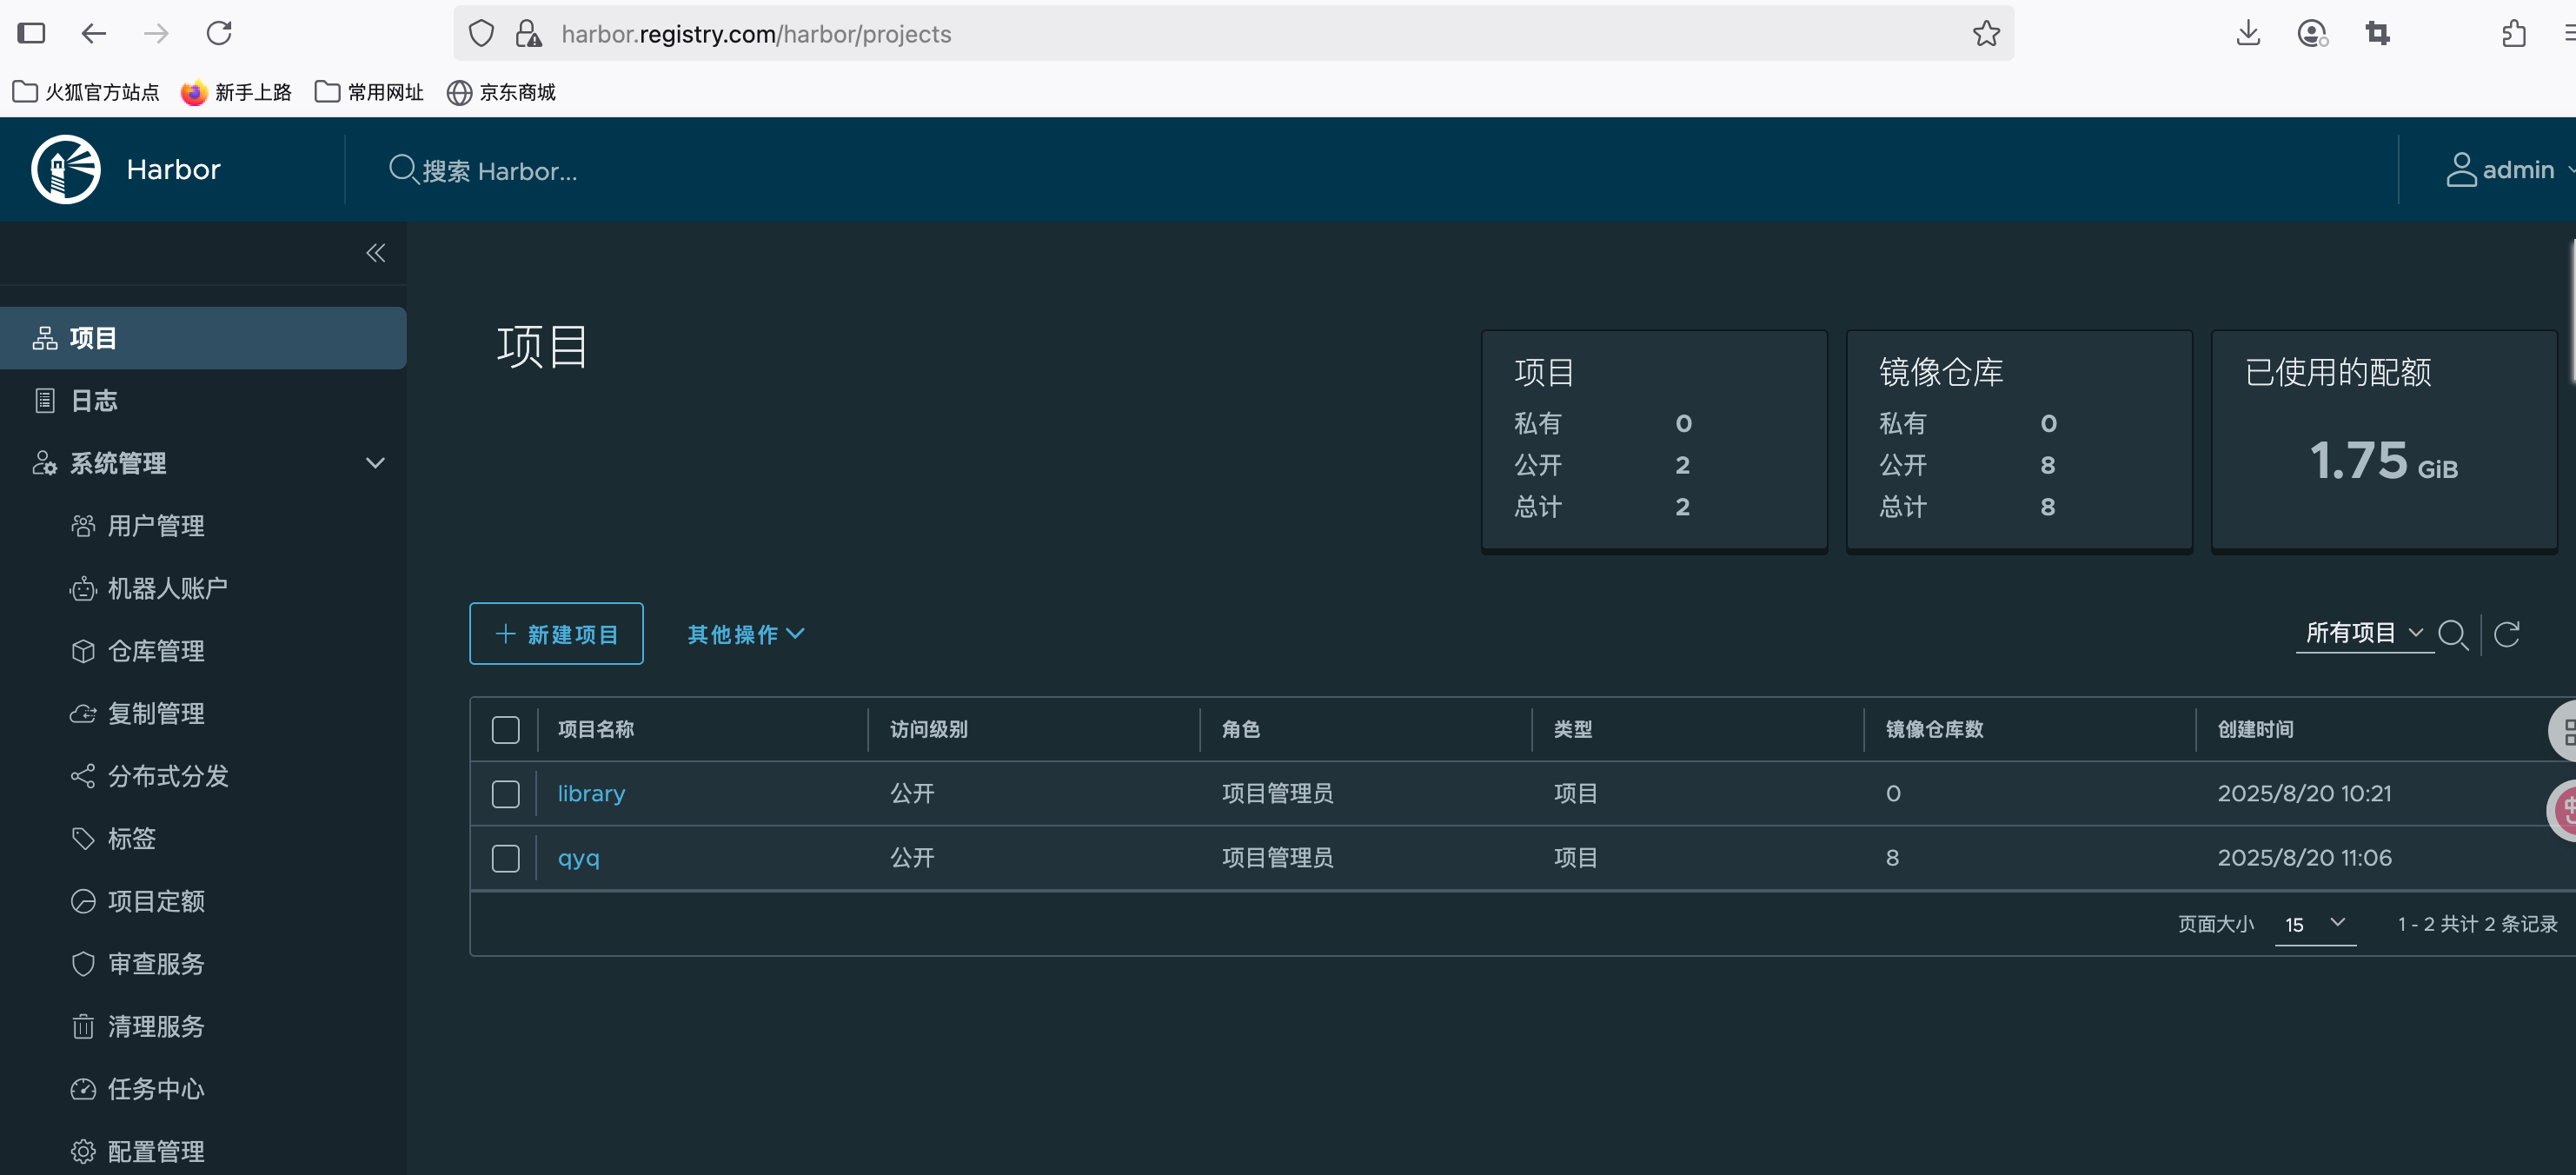
1.浏览器初次登录harbor
# 用户名: admin
# 密码: Harbor12345 (如果你修改过配置文件中的密码,使用修改后的密码)
https://harbor.registry.com
2.根据情况创建用户
创建之后,后续可以使用自建的用户来登录harbor仓库
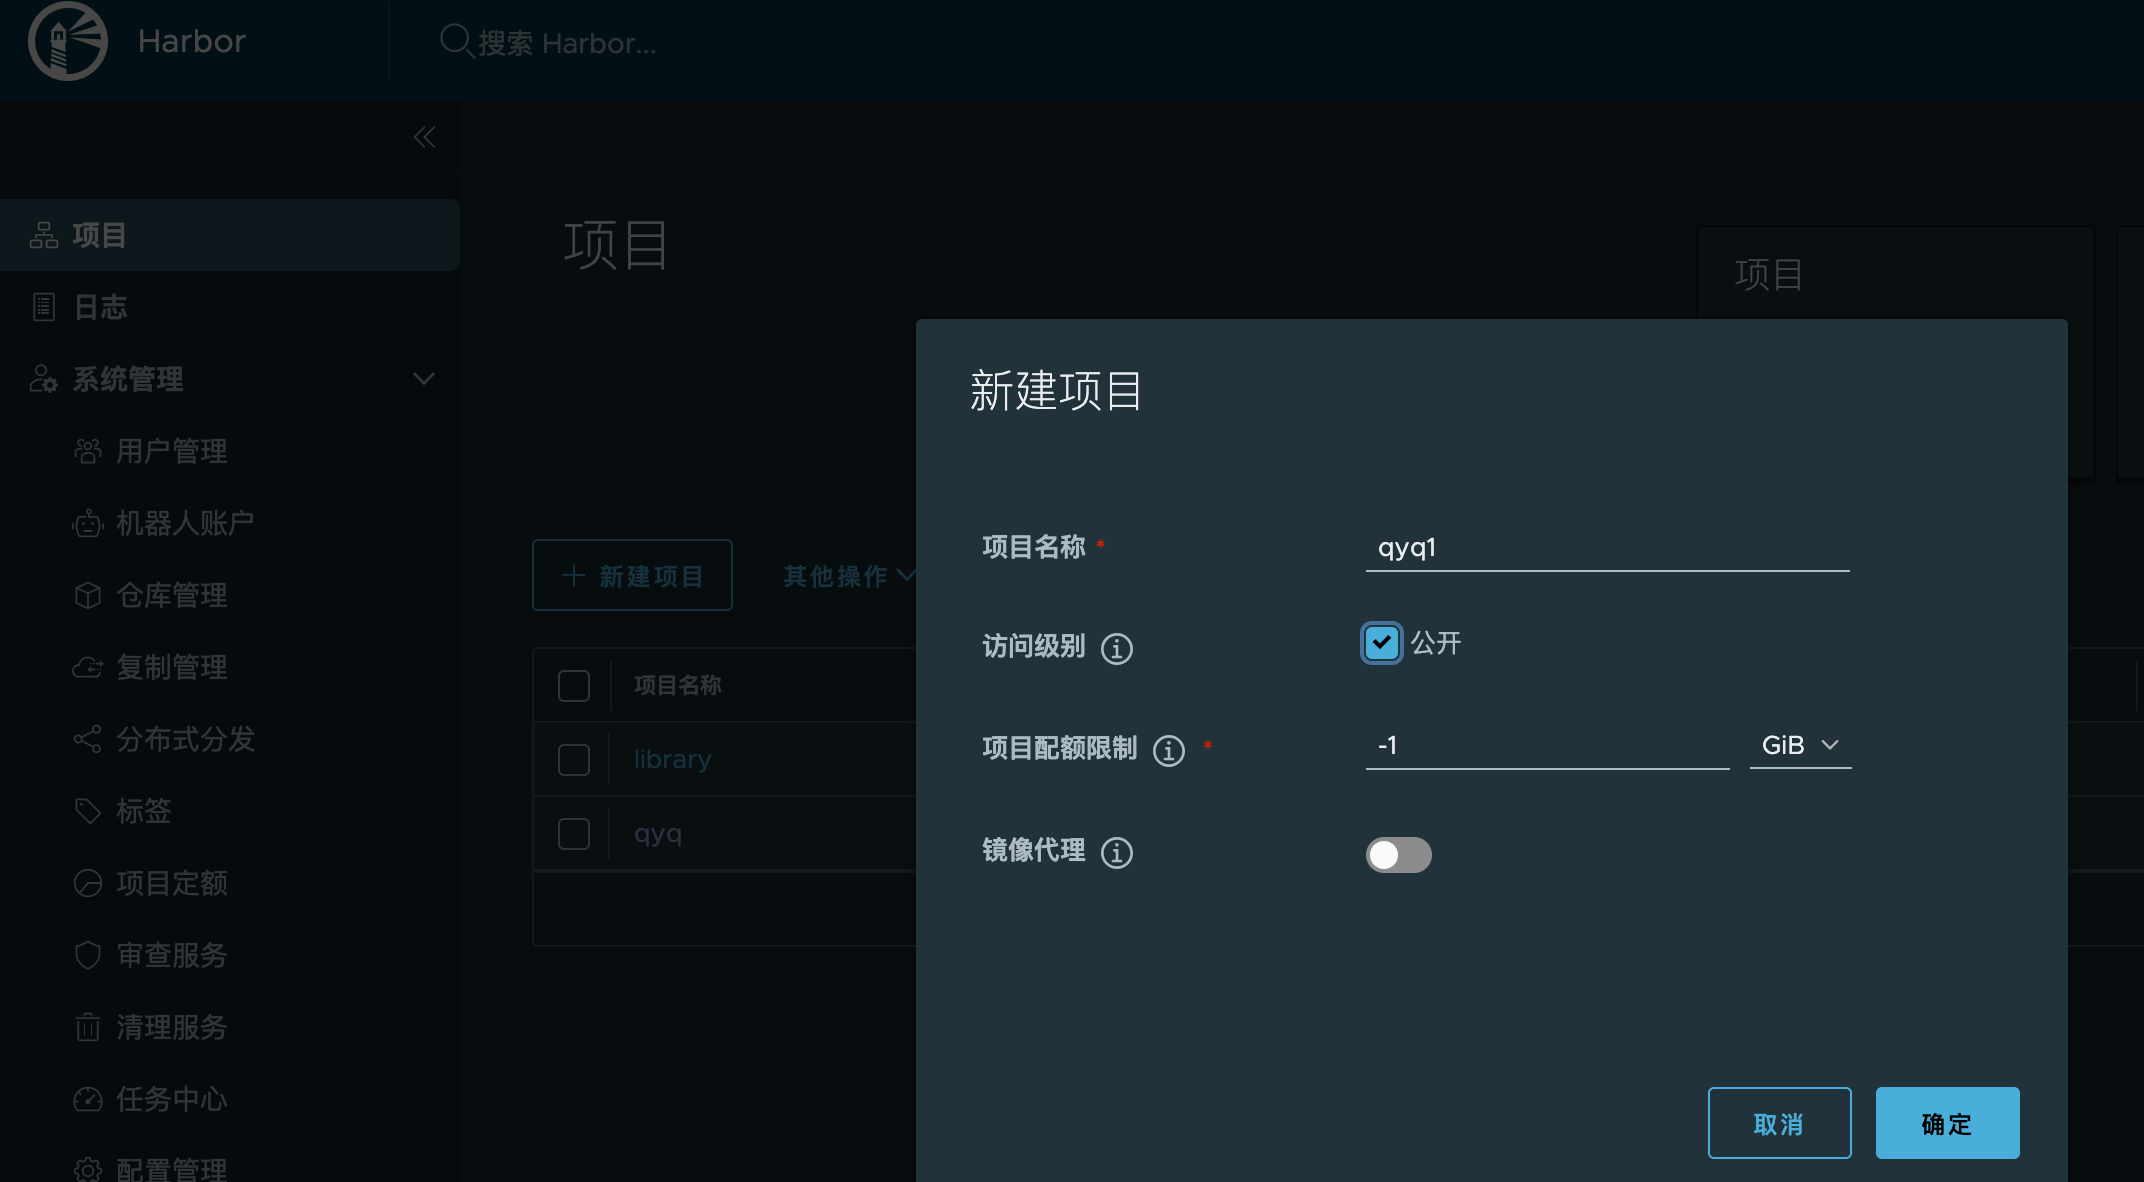
3.根据情况创建项目
四、遇到的问题
本地登录报错
[root@master01 harbor]# docker login harbor.registry.com
Username: admin
Password:
Error response from daemon: Get "https://harbor.registry.com/v2/": x509: certificate signed by unknown authority
[root@master01 harbor]#
解决方法:
1.到harbor服务端证书ssl目录
[root@master01 ssl]# ls
ca.crt  ca.key  ca.srl  harbor.registry.com.crt  harbor.registry.com.cs  harbor.registry.com.csr  harbor.registry.com.key  v3.ext2.使用harbor.registry.com.crt生成harbor.registry.com.cert
[root@master01 ssl]# openssl x509 -inform PEM -in harbor.registry.com.crt -out harbor.registry.com.cert3.创建目录并copy证书
[root@master01 ssl]# mkdir -p /etc/docker/certs.d/harbor.registry.com
[root@master01 ssl]# cp harbor.registry.com.cert /etc/docker/certs.d/harbor.registry.com:443/
[root@master01 ssl]# cp harbor.registry.com.key /etc/docker/certs.d/harbor.registry.com:443/
[root@master01 ssl]#4.重启docker服务
[root@master01 harbor.registry.com]# systemctl daemon-reload
[root@master01 harbor.registry.com]# systemctl restart docker5.再次登录Ok
[root@master01 harbor.registry.com]# docker login harbor.registry.com
Username: admin
Password:
WARNING! Your password will be stored unencrypted in /root/.docker/config.json.
Configure a credential helper to remove this warning. See
https://docs.docker.com/engine/reference/commandline/login/#credentials-storeLogin Succeeded
[root@master01 harbor.registry.com]#