Unity3D 中纯 Shader 的双色纹理的平铺计算与实现
Unity3D 中纯 Shader 的双色纹理的平铺计算与实现
- 1 创建自定义Shader
- 2 创建材质
- 3 创建控制脚本
- 4 将材质和脚本应用到物体
- 5 可视化配置
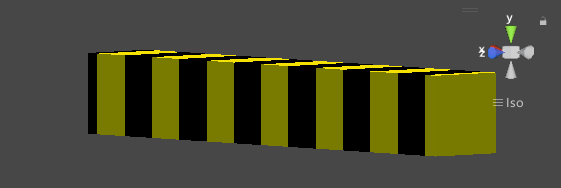
我们不使用纹理贴图,通过Shader程序化生成条纹来实现黑黄双色纹理的平铺,目的是确保在任何尺寸下都不会变形。
1 创建自定义Shader
在Unity编辑器的Project窗口中:
- 在【Assets】下创建【Shader】目录
- 右键点击【Shader】目录,选择 【Create > Shader > Standard Surface Shader】
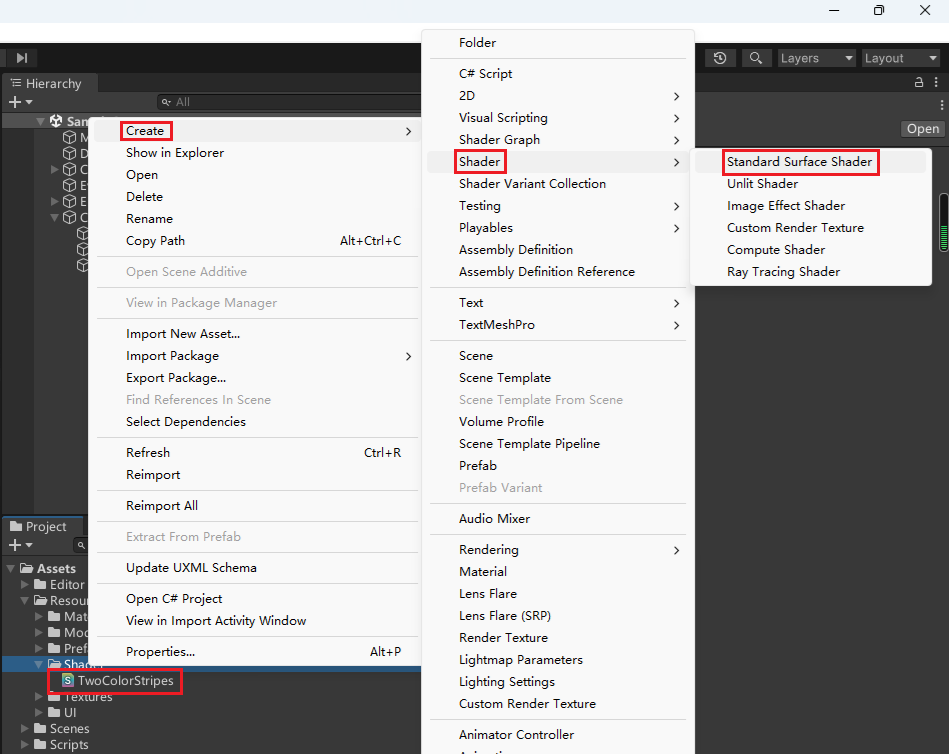
- 命名为 “TwoColorStripes.shader”
打开新创建的Shader文件,替换为以下代码:
Shader "Custom/TwoColorStripes"
{Properties{_ColorA ("Color A", Color) = (0,0,0,1)    // 黑色_ColorB ("Color B", Color) = (1,0.92,0.016,1) // 黄色(RGB:255,235,4)_StripeWidth ("Stripe Width", Float) = 0.5   // 每条条纹的宽度(单位:米)_Direction ("Direction", Vector) = (1,0,0,0) // 默认沿X轴方向[Toggle] _WorldSpace ("World Space", Float) = 0 // 是否使用世界坐标}SubShader{Tags { "RenderType"="Opaque" }CGPROGRAM#pragma surface surf Standard fullforwardshadows#pragma target 3.0struct Input{float3 worldPos; // 世界坐标};fixed4 _ColorA;fixed4 _ColorB;float _StripeWidth;float4 _Direction;float _WorldSpace;void surf (Input IN, inout SurfaceOutputStandard o){// 计算条纹位置float position;if (_WorldSpace > 0.5){// 使用世界坐标position = dot(IN.worldPos, _Direction.xyz);}else{// 使用物体本地坐标position = dot(IN.worldPos - unity_ObjectToWorld._m03_m13_m23, _Direction.xyz);}// 计算条纹模式float stripe = frac(position / _StripeWidth);// 选择颜色o.Albedo = (stripe < 0.5) ? _ColorA.rgb : _ColorB.rgb;o.Metallic = 0;o.Smoothness = 0;o.Alpha = 1;}ENDCG}FallBack "Diffuse"
}
如果使用了 Universal Render Pipeline (URP) ,我们需要创建URP兼容的Shader:
Shader "Custom/URP_TwoColorStripes"
{Properties{_ColorA ("Color A", Color) = (0,0,0,1)_ColorB ("Color B", Color) = (1,0.92,0.016,1)_StripeWidth ("Stripe Width", Float) = 0.5_Direction ("Direction", Vector) = (1,0,0,0)[Toggle] _WorldSpace ("World Space", Float) = 0}SubShader{Tags { "RenderType" = "Opaque""RenderPipeline" = "UniversalPipeline""Queue" = "Geometry"}Pass{Name "ForwardLit"Tags { "LightMode" = "UniversalForward" }HLSLPROGRAM#pragma vertex vert#pragma fragment frag#include "Packages/com.unity.render-pipelines.universal/ShaderLibrary/Core.hlsl"#include "Packages/com.unity.render-pipelines.universal/ShaderLibrary/Lighting.hlsl"struct Attributes{float4 positionOS   : POSITION;float3 normalOS     : NORMAL;};struct Varyings{float4 positionHCS  : SV_POSITION;float3 positionWS   : TEXCOORD0;float3 normalWS     : TEXCOORD1;};CBUFFER_START(UnityPerMaterial)half4 _ColorA;half4 _ColorB;float _StripeWidth;float4 _Direction;float _WorldSpace;CBUFFER_ENDVaryings vert(Attributes IN){Varyings OUT;// 顶点位置变换VertexPositionInputs vertexInput = GetVertexPositionInputs(IN.positionOS.xyz);OUT.positionHCS = vertexInput.positionCS;OUT.positionWS = vertexInput.positionWS;// 法线变换VertexNormalInputs normalInput = GetVertexNormalInputs(IN.normalOS);OUT.normalWS = normalInput.normalWS;return OUT;}half4 frag(Varyings IN) : SV_Target{// 计算条纹位置float position;if (_WorldSpace > 0.5){// 使用世界坐标position = dot(IN.positionWS, _Direction.xyz);}else{// 使用物体本地坐标float3 objectPos = mul(unity_WorldToObject, float4(IN.positionWS, 1.0)).xyz;position = dot(objectPos, _Direction.xyz);}// 计算条纹模式float stripe = frac(position / _StripeWidth);// 选择颜色half4 baseColor = (stripe < 0.5) ? _ColorA : _ColorB;// 基本光照计算Light mainLight = GetMainLight();float3 normal = normalize(IN.normalWS);float NdotL = saturate(dot(normal, mainLight.direction));half3 diffuse = mainLight.color * NdotL;// 组合最终颜色half3 color = baseColor.rgb * (diffuse + SampleSH(normal));return half4(color, baseColor.a);}ENDHLSL}}FallBack "Universal Render Pipeline/Simple Lit"
}
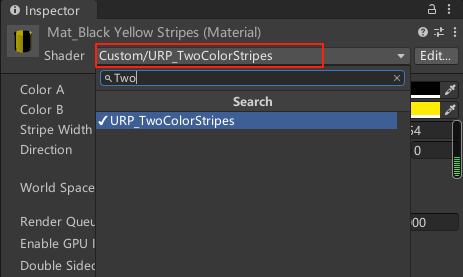
2 创建材质
在Project窗口中:
- 右键点击【Create > Material】
- 命名为 “Mat_BlackYellowStripes”
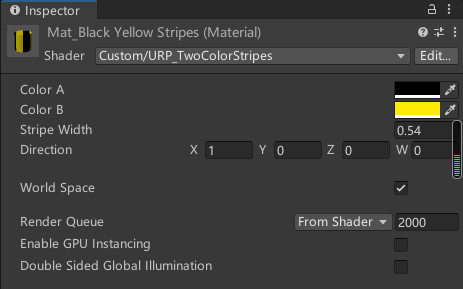
- 在 Material 的 Inspector,将Shader设置为 “Custom/TwoColorStripes”
- 按需调整材质属性:Color A为黑色 (0,0,0),Color B为黄色 (RGB: 255/255, 235/255, 4/255),Stripe Width为0.54
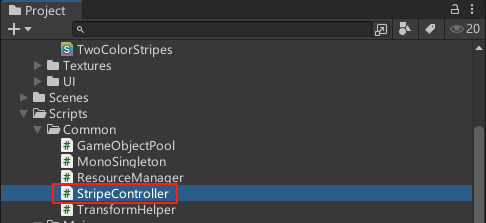
3 创建控制脚本
- 创建新的C#脚本 “StripeController.cs”:
using UnityEngine;[RequireComponent(typeof(Renderer))]
public class StripeController : MonoBehaviour
{[Header("条纹设置")]public int stripeCount = 8; // 条纹总数(偶数)public Vector3 direction = Vector3.right; // 条纹方向[Header("调试选项")]public bool updateInRuntime = true;private Material stripeMaterial;private Vector3 lastScale;void Start(){InitializeMaterial();UpdateStripeProperties();}void Update(){if (updateInRuntime && transform.hasChanged){UpdateStripeProperties();transform.hasChanged = false;}}private void InitializeMaterial(){Renderer renderer = GetComponent<Renderer>();// 创建材质实例(确保每个物体独立)stripeMaterial = new Material(renderer.sharedMaterial);renderer.material = stripeMaterial;}public void UpdateStripeProperties(){if (stripeMaterial == null) return;// 获取物体边界尺寸Bounds bounds = GetComponent<Renderer>().bounds;Vector3 size = bounds.size;// 计算实际长度(沿条纹方向)float length = Vector3.Dot(size, direction);// 计算条纹宽度float stripeWidth = length / stripeCount;// 更新材质属性stripeMaterial.SetFloat("_StripeWidth", stripeWidth);stripeMaterial.SetVector("_Direction", direction);// 可选:自动确定使用世界坐标还是本地坐标bool useWorldSpace = (transform.parent != null);stripeMaterial.SetFloat("_WorldSpace", useWorldSpace ? 1 : 0);Debug.Log($"更新条纹: 长度={length:F2}m, 条纹数={stripeCount}, 宽度={stripeWidth:F2}m");}// 针对特定尺寸的快捷设置public void Apply432Setup(){// 设置条纹数量为8(4黑+4黄)stripeCount = 8;// 默认沿X轴(物体长度方向)direction = Vector3.right;UpdateStripeProperties();}[ContextMenu("手动更新条纹设置")]public void ManualUpdate(){UpdateStripeProperties();}
}
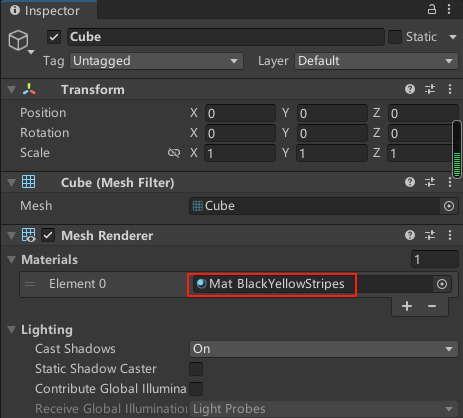
4 将材质和脚本应用到物体
-
在Hierarchy中创建一个选择您的踢脚线物体
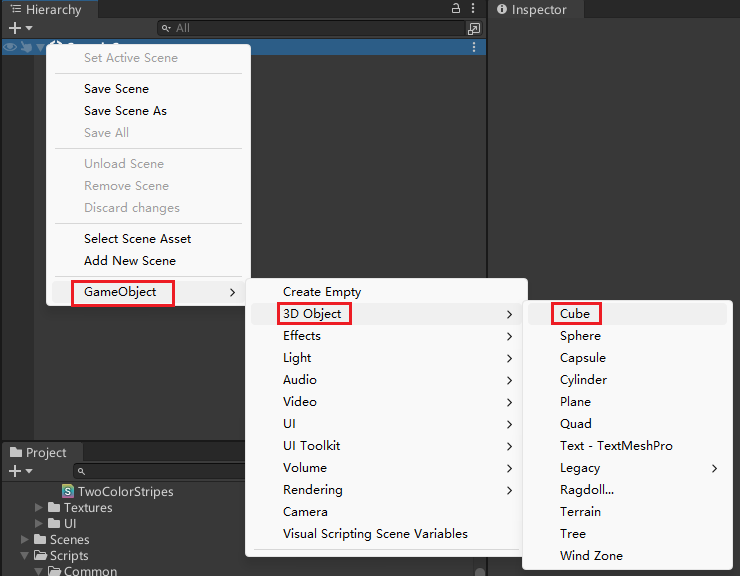
-
给物添加组件:
将 “Mat_BlackYellowStripes” 材质拖到Renderer组件的Material槽
-
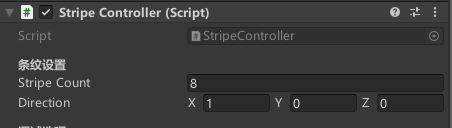
添加 “StripeController” 脚本组件
-
配置脚本参数:
设置Stripe Count为8(4条黑+4条黄)
设置Direction为物体长度方向(通常是X轴:1,0,0) -
点击运行测试:
物体应显示等宽的黑黄交替条纹
修改物体缩放时,条纹会自动调整
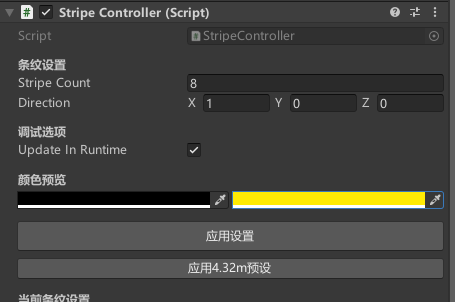
5 可视化配置
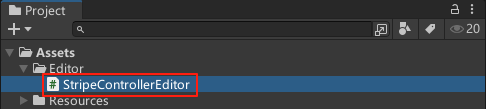
- 在Project中的【Assets】目录下创建【Editor】目录
- 创建编辑器扩展脚本 “StripeControllerEditor.cs”:
#if UNITY_EDITOR
using UnityEditor;
using UnityEngine;[CustomEditor(typeof(StripeController))]
public class StripeControllerEditor : Editor
{public override void OnInspectorGUI(){base.OnInspectorGUI();StripeController controller = (StripeController)target;GUILayout.Space(10);// 预览颜色EditorGUILayout.LabelField("颜色预览", EditorStyles.boldLabel);Material mat = controller.GetComponent<Renderer>().sharedMaterial;if (mat != null){Color colorA = mat.GetColor("_ColorA");Color colorB = mat.GetColor("_ColorB");EditorGUILayout.BeginHorizontal();EditorGUILayout.ColorField(colorA);EditorGUILayout.ColorField(colorB);EditorGUILayout.EndHorizontal();}// 操作按钮GUILayout.Space(10);if (GUILayout.Button("应用设置", GUILayout.Height(30))){controller.ManualUpdate();}// 针对4.32m物体的快捷按钮GUILayout.Space(5);if (GUILayout.Button("应用4.32m预设")){controller.Apply432Setup();}// 显示当前条纹信息GUILayout.Space(10);EditorGUILayout.LabelField("当前条纹设置", EditorStyles.boldLabel);if (mat != null){float stripeWidth = mat.GetFloat("_StripeWidth");Vector3 direction = mat.GetVector("_Direction");EditorGUILayout.LabelField($"条纹宽度: {stripeWidth:F2}m");EditorGUILayout.LabelField($"方向: ({direction.x:F1}, {direction.y:F1}, {direction.z:F1})");}}
}
#endif