【ros_humble】3.人脸检测python(服务通讯和参数通讯介绍)
服务通讯介绍
服务(Service)是 ROS 2 中节点间通信的一种方式,基于 请求-响应模型(客户端调用,服务端处理并返回结果),与话题(Topic)的发布-订阅模型不同。服务适用于需要即时响应的任务,例如计算、状态查询或短时操作
核心特点:
双向通信:客户端发送请求,服务端返回响应。
同步性:客户端会阻塞等待响应(除非使用异步调用)。
唯一性:同一服务名称只能有一个服务端,但可以有多个客户端
服务的接口通过 .srv 文件定义,包含 请求(Request) 和 响应(Response) 两部分,以 --- 分隔
int64 a  # 请求参数
int64 b
---
int64 sum  # 响应结果
服务与话题的对比
| 特性 | 服务(Service) | 话题(Topic) |
|---|---|---|
| 通信模型 | 请求-响应(同步) | 发布-订阅(异步) |
| 数据流 | 一次性交互 | 持续数据流 |
| 适用场景 | 短时任务(如计算、控制指令) | 传感器数据、状态广播 |
| 多节点支持 | 单服务端,多客户端 | 多发布者,多订阅者。 |
命令行工具
打开小海龟节点,查看服务,前面第一个是服务名,第二个是服务消息接口,使用call进行服务用到。
ros2 service list -t # 查看服务
/clear [std_srvs/srv/Empty]
/kill [turtlesim/srv/Kill]
/reset [std_srvs/srv/Empty]
/spawn [turtlesim/srv/Spawn]
"{x: 1,y: 1}"冒号后面有空格(YAML格式)
ros2 service list #列出所有服务
ros2 service type /service_name # 查看服务类型
ros2 service call /spawn turtlesim/srv/Spawn "{x: 2, y: 2, theta: 0.2, name: ''}" #调用服务(YAML 格式参数)
rqt可视化查看
注意事项
避免长时间任务:服务设计为快速响应,长时间任务应使用 动作(Action)。
错误处理:客户端需处理服务端未响应或超时的情况。
参数通讯介绍
参数通信(Parameter Communication) 是一种动态配置节点行为的机制,允许节点在运行时通过键值对(key-value)的形式获取、设置或监听参数。
作用:动态调整节点配置(如算法参数、模式切换),无需重新编译或重启节点。
存储形式:键值对(例如
{"max_speed": 2.0, "use_gps": True})。通信方式:基于服务(Service)和话题(Topic)实现,底层使用 ROS 2 的中间件。
命令行
列出所有参数
ros2 param list
获取参数值
ros2 param get /node_name param_name
设置参数值
ros2 param set /node_name param_name value
查看节点信息
ros2 param describe /node_name param_name
导出/导入参数(YAML 格式)
ros2 param dump /node_name > params.yaml # 导出
ros2 param load /node_name params.yaml # 导入
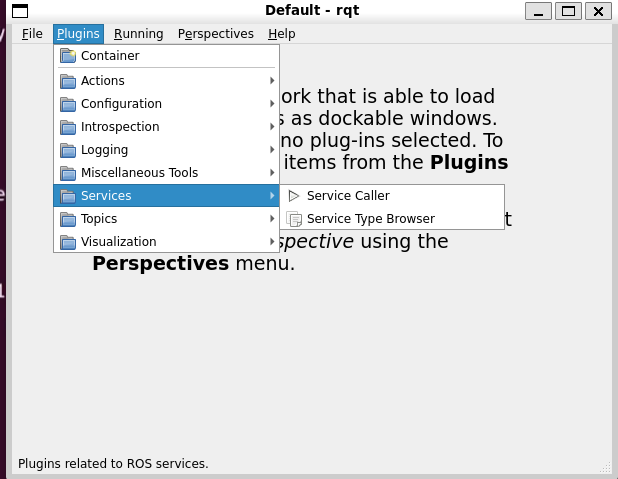
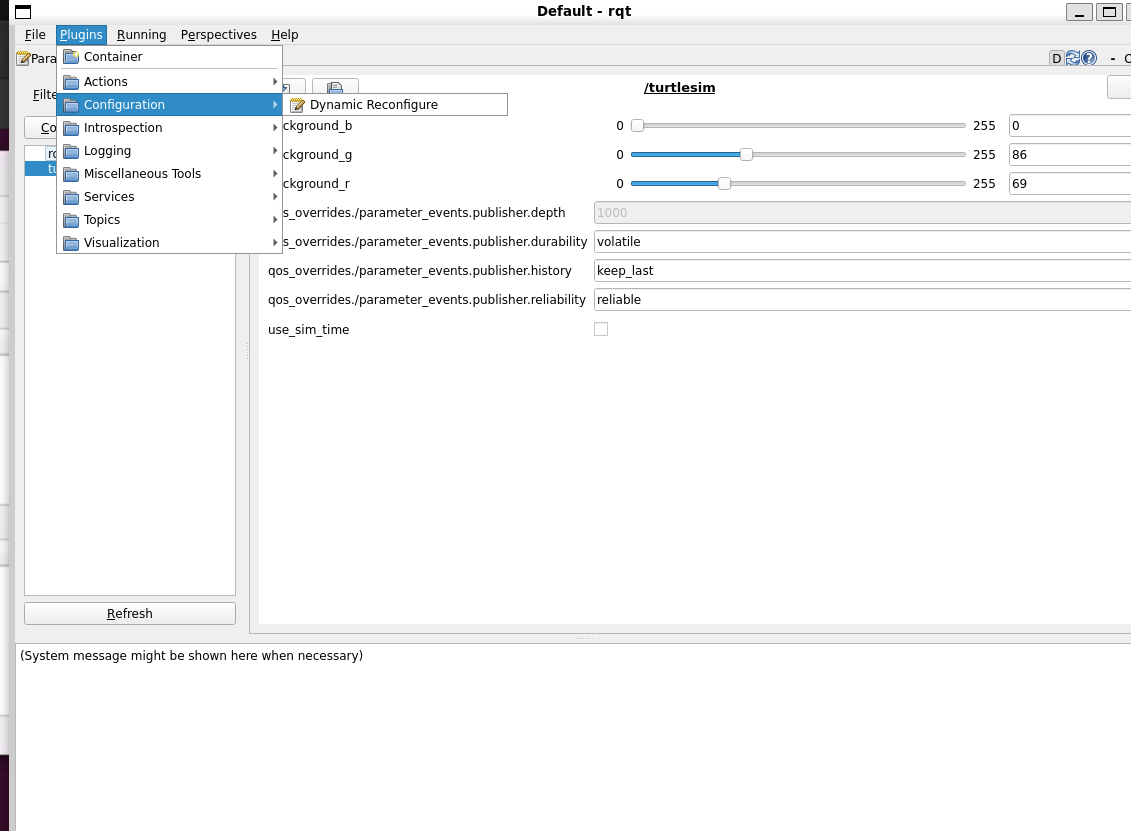
ros2 run turtlesim turtlesim_node --ros-args --params-file params.yaml #启动时导入配置rqt可视化查看
人脸检测example
创建服务接口
创建新的功能包
ros2 pkg create chapt4_interfaces --dependencies sensor_msgs rosidl_default_generators --license Apache-2.0留下CMakeLists.txt package.xml License三个文件,创建srv文件夹新建FaceDetector.srv文件写入以下内容
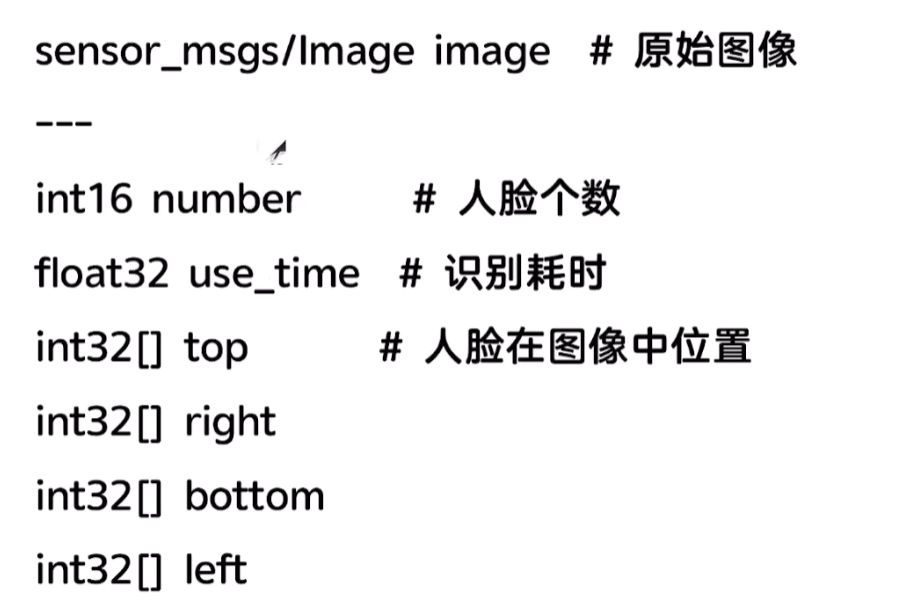
修改CMakeLists.txt文件和package.xml文件
CMakeLists
rosidl_generate_interfaces(${PROJECT_NAME}"srv/FaceDetector.srv"DEPENDENCIES sensor_msgs
)
package<member_of_group>rosidl_interface_packages</member_of_group>
获取python人脸识别库
pip3 install face_recognition -i https://pypi.tuna.tsinghua.edu.cn/simple测试人脸识别库
创建新的功能包
ros2 pkg create python_service --build-type ament_python --dependencies rclpy chapt4_interfaces --license Apache-2.0在python_service创建learn_face_detect.py写入以下内容,以下是使用这个库的方法不要求掌握
其中添加了一个图片default.png在resource文件夹下
import face_recognition
import cv2 #opencv
from ament_index_python.packages import get_package_share_directory # 获取功能包share的绝对目录def main():#获取图片路径default_image_path = get_package_share_directory('python_service')+'/resource/default.png'print(f"{default_image_path}")# cv加载图片image = cv2.imread(default_image_path)face_locations = face_recognition.face_locations(image,number_of_times_to_upsample = 2,model='hog')#绘制人脸框for top,right ,bottom,left in face_locations:cv2.rectangle(image,(left,top),(right,bottom),(255,0,0),4)#结果cv2.imshow('Face Detecte Result',image)cv2.waitKey(0)
修改setup.py文件,目的是确保这些文件在安装过程中被正确部署到目标系统的特定位置,以便 ROS 2 节点在运行时能够访问它们。
data_files=[('share/ament_index/resource_index/packages',['resource/' + package_name]),('share/' + package_name, ['package.xml']),('share/' + package_name + '/resource', ['resource/default.png']), ],entry_points={'console_scripts': ['face_detect = python_service.learn_face_detect:main',],编写人脸识别服务节点
在python_service功能包的python_service下创建face_detect_node.py并写入以下内容
import rclpy
from chapt4_interfaces.srv import FaceDetector
from rclpy.node import Node
from cv_bridge import CvBridge
import face_recognition
import cv2 #opencv
from ament_index_python.packages import get_package_share_directory # 获取功能包share的绝对目录
import time # 时间class FaceDetectNode(Node):def __init__(self, node_name):super().__init__(node_name)self._service = self.create_service(FaceDetector,'face_detect',self.callback)self.bridge = CvBridge()self.number_of_times_to_upsample = 1self.model = 'hog'self.default_image_path = get_package_share_directory('python_service')+'/resource/default.png'self.get_logger().info(f'face_detect_node init!')def callback(self,request,response):# cv加载图片if request.image.data: # sensor_image 转换为cvimagecv_image = self.bridge.imgmsg_to_cv2(request.image)self.get_logger().info(f'成功接收图片')else:cv_image = cv2.imread(self.default_image_path) # 默认处理self.get_logger().info(f'无图片传入,处理默认图片')start_time = time.time()face_locations = face_recognition.face_locations(cv_image,self.number_of_times_to_upsample,self.model)end_time = time.time()#绘制人脸for top,right,bottom,left in face_locations:response.top.append(top)response.right.append(right)response.bottom.append(bottom)response.left.append(left)cv2.rectangle(cv_image,(left,top),(right,bottom),(255,0,0),4) response.number = len(face_locations)response.use_time = end_time - start_time        return responsedef main():rclpy.init()node = FaceDetectNode('face_detect_node')rclpy.spin(node)rclpy.shutdown()