【ros-humble】2.自定义通讯接口发布者python,qt使用(话题)
本节内容目的是练习:
工作空间
创建新的工作空间topic_practice_ws,创建src文件夹并创建功能包
ros2 pkg create status_interfaces --dependencies builtin_interfaces rosidl_default_generators --license Apache-2.0
builtin_interfaces这个依赖有时间戳,rosidl_default_generators 是 ROS 2 接口定义(IDL)的默认代码生成器,这个依赖可以将自定义的消息和文件转化为C++和python的源码。创建msg文件夹,目录留下CMakeLists.txt LICENSE msg package.xml,其他删除。
自定义通讯接口
创建消息接口文件*.msg
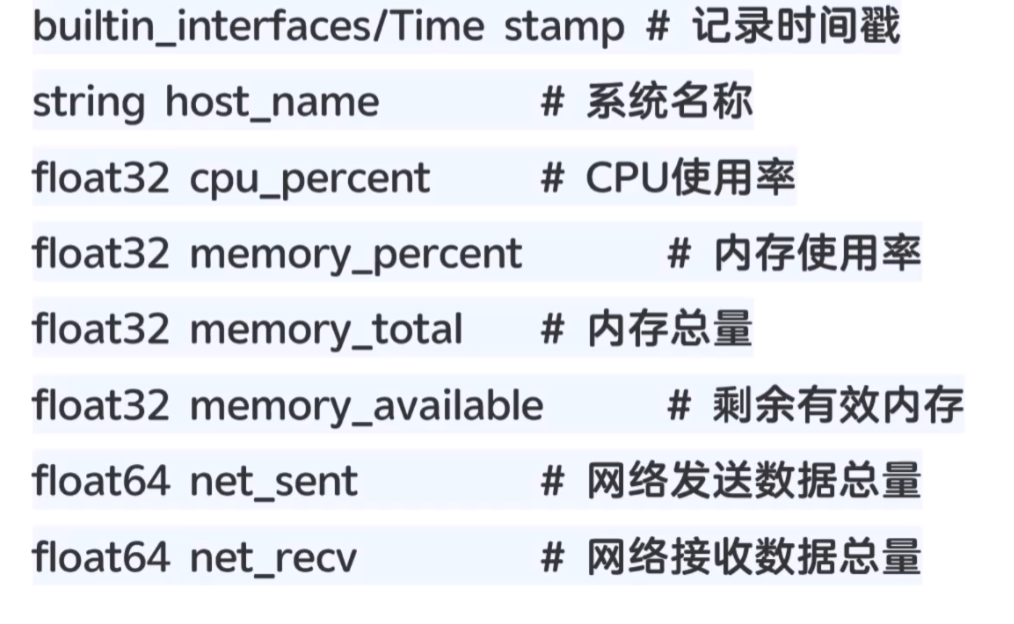
在msg文件夹下新建SystemStatus.msg文件(消息类型名会变为SystemStatus),编写以下内容,如果是system_status.msg ,消息类型还是SystemStatus(驼峰命名法)
创建的消息接口文件路径#include "<pkg_name>/msg/system_status.hpp"hpp保持原名
builtin_interfaces/Time stamp #时间戳
string host_name #主机名称
float32 cpu_percent #cpu使用率
float32 memory_percent #内存使用率
float32 memory_total #内存总大小
float32 memory_available #内存总大小
float64 net_sent #网络发送数据总量 MB
float64 net_recv #网络数据接收总量 MB
第一行的写法使用的数据类型来着builtin_interfaces ,其中msg,不要(编写规则)
ros2 interface list | grep Time #查看
输出内容有
builtin_interfaces/msg/Time
修改package.xml文件
有添加一下内容即可
在 ROS 2 的 package.xml 和 CMakeLists.txt 中添加这些依赖项,主要是为了 正确生成和使用自定义接口(消息/服务/动作)。
<member_of_group>rosidl_interface_packages</member_of_group>作用
-
将该包声明为
rosidl_default_generators组的成员,表示它 依赖 ROS 2 默认的接口代码生成工具链。 -
通常用于 自定义接口包(如定义
.msg、.srv或.action文件的包)。
<member_of_group>rosidl_interface_packages</member_of_group><depend>builtin_interfaces</depend><depend>rosidl_default_generators</depend>修改CMakeList.txt文件
添加以下内容,添加后编译会自动生成消息接口,类型名称为${PROJECT_NAME}
# 将消息接口定义文件转化为库或者头文件
rosidl_generate_interfaces(${PROJECT_NAME}"msg/SystemStatus.msg"DEPENDENCIES builtin_interfaces
)
编译查看
在工作空间目录下
colcon build
source install/setup.bash
ros2 interface show status_interfaces/msg/SystemStatus
编译发布者Python写法
create_publisher的参数说明
def create_publisher(msg_type,          # 消息类型topic_name,        # 话题名称qos_profile,       # QoS 配置(队列长度或完整的 QoSProfile 对象)*,                 # 关键字参数分隔符callback_group=None # 回调组(可选)
)
import rclpy
from status_interfaces.msg import SystemStatus
from rclpy.node import Node
# 获取系统信息库
import psutil
import platformclass SysStatusPub(Node):def __init__(self, node_name):super.__init__(node_name) #调用父类函数self._status_publisher = self.create_publisher(SystemStatus,'sys_status',10)self._timer = self.create_timer(1.0,self.timer_callback)def timer_callback(self):cpu_percent = psutil.cpu_percent()memory_info = psutil.virtual_memory()net_io_counters = psutil.net_io_counters()msg = SystemStatus()msg.stamp = self.get_clock().now().to_msg()msg.host_name = platform.node()msg.cpu_percent = cpu_percentmsg.memory_percent = memory_info.percentmsg.memory_total = memory_info.total/1024/1024 #字节转MBmsg.memory_available = memory_info.available/1024/1024msg.net_sent = net_io_counters.bytes_sent/1024/1024msg.net_recv = net_io_counters.bytes_recv/1024/1024self.get_logger().info(f'{str(msg)}') #打印输出信息self._status_publisher.publish(msg) #发布def main():rclpy.init()node = SysStatusPub('sys_status_pub')rclpy.spin(node)rclpy.shutdown()修改setup.py文件
entry_points={'console_scripts': ['sys_status_pub = status_publisher.sys_status_pub:main'#按照功能包文件main指定],查看结果
工作空间下colcon build,source install/setup.bash, ros2 run <工作包> <node_name>
新开终端,并进行source ,在运行ros2 topic echo /sys_status
Qt显示部分
工作空间的src下在创建新的功能包
ros2 pkg create status_display --dependencies rclcpp status_interfaces --license Apache-2.0测试qt
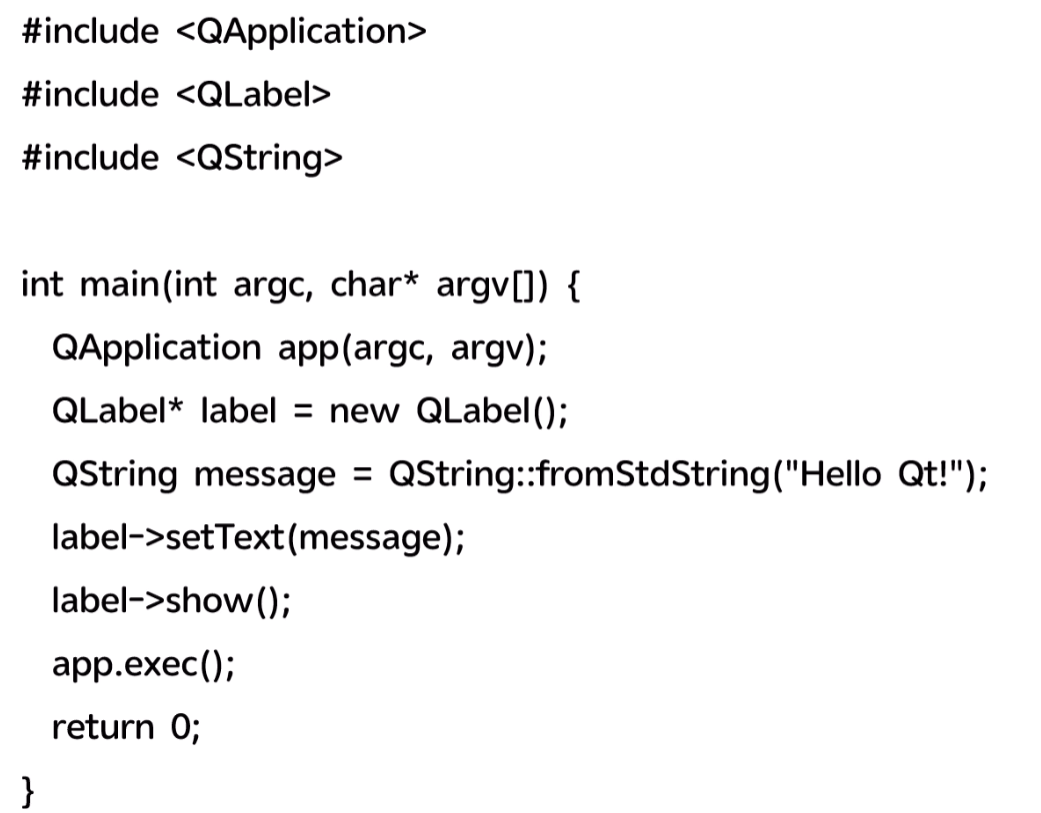
在工作包的src下创建hello_qt.cpp文件,并编写以下内容(测试内容)
修改CMakeLists.txt文件
find_package(Qt5 REQUIRED COMPONENTS Widgets) #qt5的组件add_executable(hello_qt src/hello_qt.cpp)
target_link_libraries(hello_qt Qt5::Widgets) #qt5非ros的库#末尾添加
install(TARGETS hello_qt
DESTINATION lib/${PROJECT_NAME}
)
尝试编译运行会看到一个小框
正文
在工作包的src下创建sys_status_display.cpp文件,并编写以下内容
#include <QApplication>
#include <QLabel>
#include <QString>
#include <rclcpp/rclcpp.hpp>
#include <status_interfaces/msg/system_status.hpp>
using SystemStatus = status_interfaces::msg::SystemStatus; // 代替使用class SysStatusDisplay : public rclcpp::Node
{
public:SysStatusDisplay(const std::string &string) : Node(string){_label = new QLabel();_subscriptions = this->create_subscription<SystemStatus>("sys_status", 10,[&](const SystemStatus::SharedPtr msg) -> void{_label->setText(get_qstr_from_msg(msg));}); // lambda_label->setText(get_qstr_from_msg(std::make_shared<SystemStatus>()));_label->show();}~SysStatusDisplay();QString get_qstr_from_msg(const SystemStatus::SharedPtr msg){std::stringstream show_str;show_str << "=============status_display==============\n"<< "时间:\t" << msg->stamp.sec << "\t\n"<< "主机名称:\t" << msg->host_name << "\t\n"<< "cpu使用率:\t" << msg->cpu_percent << "\t\n"<< "内存总大小:\t" << msg->memory_total << "\t\n"<< "内存使用率:\t" << msg->memory_percent << "\t\n"<< "剩余有效内存:\t" << msg->memory_available << "\t\n"<< "网络发送:\t" << msg->net_sent << "\t\n"<< "网络接收:\t" << msg->net_recv << "\t\n"<< "=============status_display==============\n";return QString::fromStdString(show_str.str());}
private:rclcpp::Subscription<SystemStatus>::SharedPtr _subscriptions;QLabel *_label;
};int main(int argc, char *argv[])
{rclcpp::init(argc, argv);auto node = std::make_shared<SysStatusDisplay>("sys_status_display");QApplication app(argc, argv);std::thread spin_thread([&]() -> void{ rclcpp::spin(node); });spin_thread.detach();app.exec();return 0;
}
匿名函数
python使用
lambda: self.get_logger().info("Timer triggered!")C++使用
#include <algorithm> //有时候不用
auto a = [&](<params>) -> int {return 0;};
修改CMakeLists.txt文件
add_executable(sys_status_display src/sys_status_display.cpp)
target_link_libraries(sys_status_display Qt5::Widgets)
ament_target_dependencies(sys_status_display rclcpp status_interfaces)install(TARGETS sys_status_display
DESTINATION lib/${PROJECT_NAME}
)
运行,先运行发布者在运行qt显示
高级开发参考https://www.bilibili.com/video/BV18z4y1V7sX/