cartographer 概率栅格地图
目录
概率栅格地图简介
地图的坐标系与原点
cartographer中的栅格地图的相关概念与公式
贝汉明算法
概率栅格地图简介
栅格地图是二维激光SLAM的特点, 能够将环境通过地图的形式表达出来.
栅格地图的实现是二维激光SLAM的一个难点
三维激光SLAM形成的点云地图不需要自己手动实现点云的数据结构, PCL中有写好的数据类型, 直接调用就行. 视觉 SLAM形成的点云地图也可以用PCL来实现
唯独二维激光SLAM的栅格地图需要自己手动实现, 目前所有的二维激光SLAM的栅格地图都是SLAM作者自己写的, 没有通用的数据结构
地图的坐标系与原点
/**
* ros的地图坐标系 cartographer的地图坐标系 cartographer地图的像素坐标系
*
* ^ y ^ x 0------> x
* | | |
* | | |
* 0 ------> x y <------0 y
*
* ros的地图坐标系: 左下角为原点, 向右为x正方向, 向上为y正方向, 角度以x轴正向为0度, 逆时针为正
* cartographer的地图坐标系: 坐标系右下角为原点, 向上为x正方向, 向左为y正方向
* 角度正方向以x轴正向为0度, 逆时针为正
* cartographer地图的像素坐标系: 左上角为原点, 向右为x正方向, 向下为y正方向
*/
栅格地图的原点的设置
sensor::RangeData range_data_in_local =
TransformRangeData(gravity_aligned_range_data,
transform::Embed3D(pose_estimate_2d->cast<float>()));
// 将校正后的雷达数据写入submap
std::unique_ptr<InsertionResult> insertion_result = InsertIntoSubmap(
time, range_data_in_local, filtered_gravity_aligned_point_cloud,
pose_estimate, gravity_alignment.rotation());
// 将点云数据写入到submap中
std::vector<std::shared_ptr<const Submap2D>> ActiveSubmaps2D::InsertRangeData(
const sensor::RangeData& range_data) {
if (submaps_.empty() ||
submaps_.back()->num_range_data() == options_.num_range_data()) {
AddSubmap(range_data.origin.head<2>());
}
return submaps();
}
void ActiveSubmaps2D::AddSubmap(const Eigen::Vector2f& origin) {
if (submaps_.size() >= 2) {
submaps_.erase(submaps_.begin());
}
// 新建一个子图
submaps_.push_back(absl::make_unique<Submap2D>(
origin,
std::unique_ptr<Grid2D>(
static_cast<Grid2D*>(CreateGrid(origin).release())),
&conversion_tables_));
}
第一个雷达数据到来时的栅格地图的原点是如何确定的
std::unique_ptr<transform::Rigid2d> LocalTrajectoryBuilder2D::ScanMatch(
const common::Time time, const transform::Rigid2d& pose_prediction,
const sensor::PointCloud& filtered_gravity_aligned_point_cloud) {
if (active_submaps_.submaps().empty()) {
return absl::make_unique<transform::Rigid2d>(pose_prediction);
}
//...
}
std::unique_ptr<LocalTrajectoryBuilder2D::MatchingResult>
LocalTrajectoryBuilder2D::AddAccumulatedRangeData(){
const transform::Rigid3d non_gravity_aligned_pose_prediction =
extrapolator_->ExtrapolatePose(time);
// 将三维位姿先旋转到姿态为0, 再取xy坐标将三维位姿转成二维位姿
const transform::Rigid2d pose_prediction = transform::Project2D(
non_gravity_aligned_pose_prediction * gravity_alignment.inverse());
}
// 预测得到time时刻 tracking frame 在 local 坐标系下的位姿
transform::Rigid3d PoseExtrapolator::ExtrapolatePose(const common::Time time) {
const TimedPose& newest_timed_pose = timed_pose_queue_.back();
CHECK_GE(time, newest_timed_pose.time);
// 如果本次预测时间与上次计算时间相同 就不再重复计算
if (cached_extrapolated_pose_.time != time) {
// 预测tracking frame在local坐标系下time时刻的位置
const Eigen::Vector3d translation =
ExtrapolateTranslation(time) + newest_timed_pose.pose.translation();
// 预测tracking frame在local坐标系下time时刻的姿态
const Eigen::Quaterniond rotation =
newest_timed_pose.pose.rotation() *
ExtrapolateRotation(time, extrapolation_imu_tracker_.get());
cached_extrapolated_pose_ =
TimedPose{time, transform::Rigid3d{translation, rotation}};
}
return cached_extrapolated_pose_.pose;
}
// 如果Extrapolator没有初始化就进行初始化
void LocalTrajectoryBuilder2D::InitializeExtrapolator(const common::Time time) {
// 如果已经初始化过了就直接返回
if (extrapolator_ != nullptr) {
return;
}
// 初始化位姿推测器
extrapolator_ = absl::make_unique<PoseExtrapolator>(
::cartographer::common::FromSeconds(options_.pose_extrapolator_options()
.constant_velocity()
.pose_queue_duration()), // 0.001s
options_.pose_extrapolator_options()
.constant_velocity()
.imu_gravity_time_constant()); // 10
// 添加初始位姿
extrapolator_->AddPose(time, transform::Rigid3d::Identity());
}cartographer中的栅格地图的相关概念与公式
probability: 栅格被占据的概率
kMinProbability = 0.1, kMaxProbability = 0.9, kUnknownProbabilityValue = 0
Odds: probability / (1.0f - probability)
CorrespondenceCost: 栅格是free的概率; CorrespondenceCost + probability = 1
kMinCorrespondenceCost = 0.1, kMaxCorrespondenceCost = 0.9
kUnknownCorrespondenceValue = 0, kUpdateMarker = 32768
Value: 代码里存储的栅格值, 是[0, 32767]范围内的 uint16 整数
value_to_correspondence_cost_table_: 将[0, 1~32767] 映射到 [0, 0.1~0.9] 的转换表
hit_table_ 计算[0, 1~32767] 按照占用概率0.55更新之后的值
miss_table_ 计算[0, 1~32767] 按照空闲概率0.49更新之后的值
贝汉明算法
Bresenham画线算法 https://www.jianshu.com/p/d63bf63a0e28
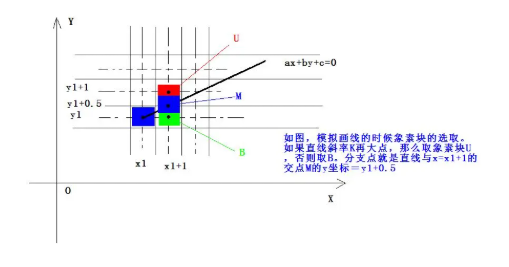
Bresenham算法主要思路说白了就是:下一个要画的点该画在哪里,要么在斜边,要么在侧边。斜边就是x坐标加1的同时y坐标也加1 。侧边就是只加x或者只加y坐标。要如何确定画在哪个边呢?因为已知起点坐标和终点坐标分别(x1, y1),(x2, y2),所以可以确定这条线段的位置。最后根据要画的这个点距离这个线段的位置的大小,来确定该画在斜边还是侧边。斜边近就画斜边,侧边近就画侧边
图解 cartographer之雷达模型CastRay https://blog.csdn.net/chaosir1991/article/details/109561010

