单片机学习笔记.PWM
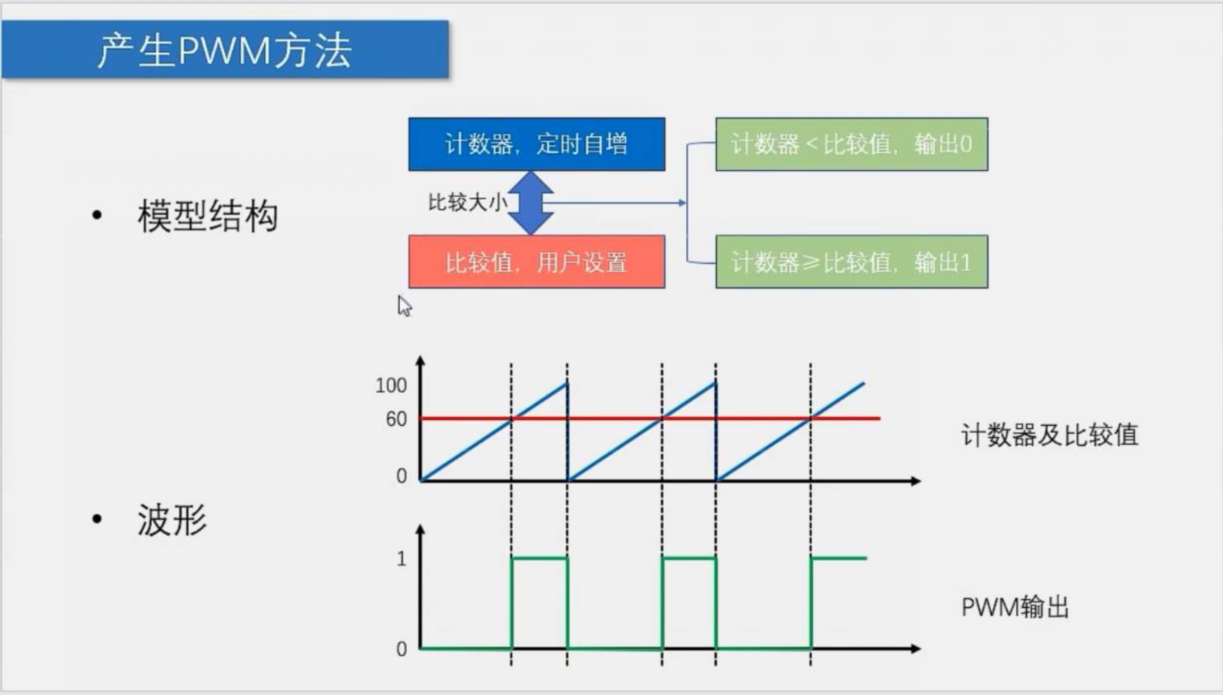
PWM原理:
- 频率=
- 占空比:
- 精度=占空比变化步距
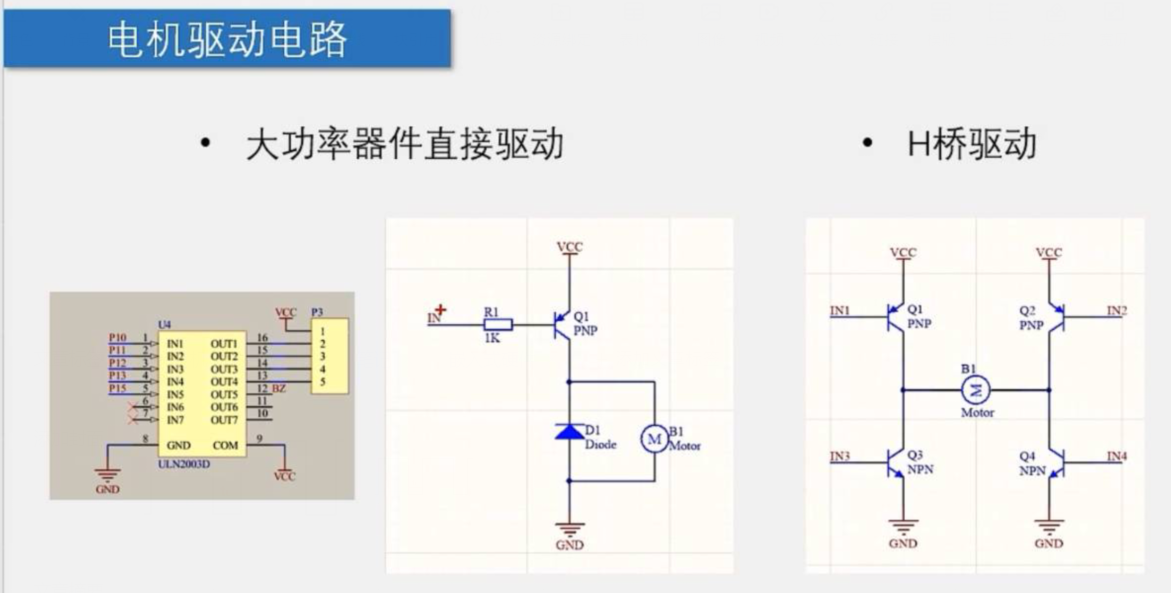
电机驱动电路:
利用PWM实现呼吸灯代码
sbit LED=P2^0;//引脚定义unsigned char Time,i;//变量定义void Delay(unsigned int t)//定义延时 {while(t--); }main函数里:
int main()
{unsigned char Time,i;while(1){for(Time=0;Time<255;Time++)//呼吸灯{for(i=0;i<20;i++){LED=0;Delay(Time);LED=1;Delay(255-Time);}}for(Time=255;Time>0;Time--){for(i=0;i<20;i++){LED=0;Delay(Time);LED=1;Delay(255-Time);}}}
}
利用定时器中断产生PWM波实现电机调速:
主函数:
#include <REGX52.H>
#include "Delay.h"
#include "key.h"
#include "SEG.h"
#include "timer.h"extern unsigned char Compare;
unsigned char KeyNum,Speed;
int main()
{TIM0_Init();while(1){KeyNum=Key();if(KeyNum==1){Speed++;Speed%=4;if(Speed==0){Compare=0;}if(Speed==1){Compare=50;}if(Speed==2){Compare=75;}if(Speed==3){Compare=100;}}SegDisplay(1,Speed);}
}
延时函数部分:
#include "Delay.h"void Delayms(unsigned char xms)		//@12.000MHz
{unsigned char i, j;while(xms){i = 2;j = 239;do{while (--j);}while (--i);xms--;}
}
按键部分:
#include "key.h"
#include <REGX52.H>
#include "Delay.h"extern unsigned char LEDMode;
extern unsigned int Password;
unsigned char Count=0;
/*** @brief  矩阵键盘读取按键键码* @param  传入的参数 无* @retval 返回值 KeyNumber:按下按键的键码值*/
unsigned char MatrixKey()//按列扫描
{unsigned char KeyNumber=0;P1=0XFF;P1_3=0;if(P1_7==0){Delayms(20);while(P1_7==0);Delayms(20);KeyNumber=1;}//按键释放后有效if(P1_6==0){Delayms(20);while(P1_6==0);Delayms(20);KeyNumber=5;}if(P1_5==0){Delayms(20);while(P1_5==0);Delayms(20);KeyNumber=9;}if(P1_4==0){Delayms(20);while(P1_4==0);Delayms(20);KeyNumber=13;}P1=0XFF;P1_2=0;if(P1_7==0){Delayms(20);while(P1_7==0);Delayms(20);KeyNumber=2;}if(P1_6==0){Delayms(20);while(P1_6==0);Delayms(20);KeyNumber=6;}if(P1_5==0){Delayms(20);while(P1_5==0);Delayms(20);KeyNumber=10;}if(P1_4==0){Delayms(20);while(P1_4==0);Delayms(20);KeyNumber=14;}P1=0XFF;P1_1=0;if(P1_7==0){Delayms(20);while(P1_7==0);Delayms(20);KeyNumber=3;}if(P1_6==0){Delayms(20);while(P1_6==0);Delayms(20);KeyNumber=7;}if(P1_5==0){Delayms(20);while(P1_5==0);Delayms(20);KeyNumber=11;}if(P1_4==0){Delayms(20);while(P1_4==0);Delayms(20);KeyNumber=15;}P1=0XFF;P1_0=0;if(P1_7==0){Delayms(20);while(P1_7==0);Delayms(20);KeyNumber=4;}if(P1_6==0){Delayms(20);while(P1_6==0);Delayms(20);KeyNumber=8;}if(P1_5==0){Delayms(20);while(P1_5==0);Delayms(20);KeyNumber=12;}if(P1_4==0){Delayms(20);while(P1_4==0);Delayms(20);KeyNumber=16;}return KeyNumber;
}/*** @brief  独立按键* @param  无* @retval 返回值 KeyNumber:按下按键的键码值*/
unsigned char Key()
{unsigned char KeyNumber=0;if(P3_1==0){Delayms(20);while(P3_1==0);Delayms(20);KeyNumber=1;}//按键释放后有效if(P3_0==0){Delayms(20);while(P3_0==0);Delayms(20);KeyNumber=2;}if(P3_2==0){Delayms(20);while(P3_2==0);Delayms(20);KeyNumber=3;}//按键释放后有效if(P3_3==0){Delayms(20);while(P3_3==0);Delayms(20);KeyNumber=4;}return KeyNumber;
}
数码管部分:
#include <REGX52.H>
#include "Delay.h"/*共阴断码0~9,A~F*/
unsigned char SegTable[]={0x3f,0x06,0x5b,0x4f,0x66,0x6d,0x7d,0x07,0x7f,0x6f,0x77,0x7c,0x39,0x5e,0x79,0x71,0x00};void SegDisplay(unsigned char Location,Number)//1位显示数据
{switch(Location){case 1:P2_4=1;P2_3=1;P2_2=1;break;case 2:P2_4=1;P2_3=1;P2_2=0;break;case 3:P2_4=1;P2_3=0;P2_2=1;break;case 4:P2_4=1;P2_3=0;P2_2=0;break;case 5:P2_4=0;P2_3=1;P2_2=1;break;case 6:P2_4=0;P2_3=1;P2_2=0;break;case 7:P2_4=0;P2_3=0;P2_2=1;break;case 8:P2_4=0;P2_3=0;P2_2=0;break;}P0=SegTable[Number];
//	Delayms(1);/*消影:位选 段选(清0)位选 段选 位选 段选 */
//	P0=0x00;
}
void SegTest(void)
{unsigned char a=1,b=0;SegDisplay(a,b++);Delayms(1000);if(b==10){b=0;a++;}if(a==9){a=1;}}
定时器部分:
#include "timer.h"
#include <REGX52.H>
#include "INTRINS.H"unsigned char Compare;
sbit Motor=P1^0;/*** @brief  定时器0初始化,12Mhz,100us* @param  无* @retval 无*/
void TIM0_Init()
{//TMOD=0X01;//模式1TMOD&=0XF0;//	TMOD=TMOD&0XF0;//把TMOD的低4位清零,高4位不变TMOD|=0X01;//	TMOD=TMOD|0X01;//把TMOD的最低位置1,高4位不变TF0=0;TR0=1;//开始计时TL0 = 0x9C;		//设置定时初值TH0 = 0xFF;		//设置定时初值
//中断配置ET0=1;EA=1;PT0=0;//关闭高优先级
}void TIM0_NVIC(void) interrupt 1
{static unsigned int Tim0_Count;TL0 = 0x9C;//重装初值TH0 = 0xFF;
//	Tim0_Count++;
//	if(Tim0_Count>=100)
//	{
//			Tim0_Count=0;
//	}Tim0_Count%=100;//与上述效果一致if(Tim0_Count<Compare){Motor=1;}else{Motor=0;}
}
利用定时器中断产生PWM电机调速核心代码:
extern unsigned char Compare;
unsigned char KeyNum,Speed;
int main()
{TIM0_Init();while(1){KeyNum=Key();if(KeyNum==1){Speed++;Speed%=4;if(Speed==0){Compare=0;}if(Speed==1){Compare=50;}if(Speed==2){Compare=75;}if(Speed==3){Compare=100;}}SegDisplay(1,Speed);}
}
void TIM0_NVIC(void) interrupt 1 {static unsigned int Tim0_Count;TL0 = 0x9C;//重装初值TH0 = 0xFF; // Tim0_Count++; // if(Tim0_Count>=100) // { // Tim0_Count=0; // }Tim0_Count%=100;//与上述效果一致if(Tim0_Count<Compare){Motor=1;}else{Motor=0;} }