JavaSE-接口
概念
在Java中,接口可以被看成是一种公共规范,是一种引用数据类型。
语法
1.接口的定义格式与类的定义格式基本相同,将class关键字替换为interface关键字:
public interface IShape {}
2.类与接口之间使用implements关键字来实现接口,并且这个类中必须重写实现接口中的抽象方法
public interface IShape {void draw();
}public class Cycle implements IShape{public void draw(){System.out.println("画一个圆圈---");}
}
抽象类和接口的区别:
1.抽象类中可以存在普通成员变量和方法,而接口中只能存在常量和抽象方法。
2.抽象类可以有构造方法,接口没有构造方法。
接口使用
下面是一个简单的接口实现电脑使用的例子:
public interface USB {void openDevice();void closeDevice();
}public class Mouse implements USB{public void openDevice(){System.out.println("打开鼠标");}public void closeDevice(){System.out.println("关闭鼠标");}public void click(){System.out.println("鼠标点击");}
}public class KeyBoard implements USB{@Overridepublic void openDevice() {System.out.println("打开键盘");}@Overridepublic void closeDevice() {System.out.println("关闭键盘");}public void input(){System.out.println("键盘打字");}
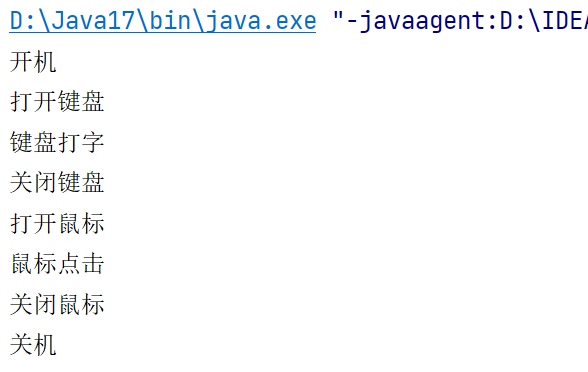
}public class test {public static void main(String[] args) {Computer computer = new Computer();computer.open();computer.useUsbDevice(new KeyBoard());computer.useUsbDevice(new Mouse());computer.close();}
}
运行结果:
接口特性
1.接口是一种引用类型,但不能直接new接口的对象:
public class TestUSB {public static void main(String[] args) {USB usb = new USB();//编译报错}
}
2.在接口中,所有成员方法默认是抽象方法,没有具体的实现,由public abstrct修饰,即便不写
public interface IShape {public static final int a=1;public int b=2;static int c=3;final int d=4;int e=5;//这五种形式本质均相同,由public static final 修饰public abstract void fun1();public void fun2();abstract void fun3();void fun4();//这四种形式本质均相同,由public abstract修饰
}
3.接口中的方法不能再接口中实现,必须由实现接口的类来实现:
public interface USB {void openDevice();void closeDevice(){System.out.println("关闭USB设备");}// 编译失败:因为接口中的方式默认为抽象方法
}
4.重写接口中的方法时,不能使用默认权限修饰符:
public interface USB {void openDevice(); // 默认是public的void closeDevice(); // 默认是public的
}
public class Mouse implements USB {@Overridevoid openDevice() {System.out.println("打开鼠标");}// 编译报错,重写USB中openDevice方法时,不能使用默认修饰符
}
5.在接口中,所有成员变量默认由public static final 修饰,即便不写
public interface IShape {public static final int a=1;public int b=2;static int c=3;final int d=4;int e=5;//这五种形式本质均相同,由public static final 修饰
}
6. 在接口中,由default关键字和static关键字修饰的成员方法可以有具体的实现。
default void fun5(){System.out.println("default方法");}static void fun6(){System.out.println("static方法");}7.接口中不能有静态代码块和构造方法。
8.接口虽然不是类,但是接口编译完成后字节码文件的后缀格式也是.class
实现多个接口
在Java中,类和类之间不支持多继承,一个子类只能有一个父类,但是一个类可以实现多个接口,下面通过类来表示一组动物:
public class Animal {protected String name;public Animal(String name) {this.name = name;}
}
另外我们再提供一组接口, 分别表示 "会飞的", "会跑的", "会游泳的"
public interface IRunning {void run();
}public interface ISwiming {void swim();
}public interface IFlying {void fly();
}
下面我们创建几个具体的动物:
猫,会跑:
public class Cat extends Animal implements IRunning{public Cat(String name) {super(name);}@Overridepublic void run() {System.out.println(this.name + "正在用四条腿跑");}
}
鱼,会游泳:
public class Fish extends Animal implements ISwiming{public Fish(String name) {super(name);}@Overridepublic void swim() {System.out.println(this.name + "正在用尾巴游泳");}
}
鸭子,会跑会游泳又会飞:
public class Duck extends Animal implements ISwiming,IFlying,IRunning{public Duck(String name) {super(name);}@Overridepublic void fly() {System.out.println(this.name + "正在用翅膀飞");}@Overridepublic void run() {System.out.println(this.name + "正在用两条腿跑");}@Overridepublic void swim() {System.out.println(this.name + "正在漂在水上");}
}
上面的代码展示了Java面向对象编程最常见的用法:一个类继承一个父类同时实现多个接口。
子类和父类的关系相当于“is a”,而类与接口之间的关系就像是这个类具有XX特性。
接口间的继承
在Java中,类和类之间是单继承的,一个类可以实现多个接口,接口与接口之间可以多继承。即:用接口可以达到多继承的目的。
接口可以继承一个接口, 达到复用的效果. 使用 extends 关键字。
interface IRunning {void run();
}
interface ISwimming {void swim();
}interface IAmphibious extends IRunning, ISwimming {}class Frog implements IAmphibious {}
//注意Frog类要重写run()和swim()方法
浅拷贝与深拷贝
Java 中内置了一些很有用的接口, Cloneable 就是其中之一。一个类实现Clonable接口代表这个类是可克隆的。
Object类是Java默认提供的一个类,所有的类都默认继承自Object类,这个类中存在一个clone方法,调用这个方法可以创建一个对象的拷贝。
观察下列代码:
class Animal implements Cloneable {public String name;@Overridepublic Animal clone() {Animal o = null;try {o = (Animal)super.clone();} catch (CloneNotSupportedException e) {e.printStackTrace();}return o;}public Animal(String name){this.name=name;}
}public class test {public static void main(String[] args) {Animal animal = new Animal("大黄");Animal animal2 = animal.clone();System.out.println(animal.name);System.out.println("-----------");System.out.println(animal2.name);}
}
其中try---catch语句使用到了异常的支持,这个后面再讲。这段代码主要内容是用一个Animal类实现了Cloneable接口,在Animal类中重写了Object类中的clone方法,创建一个与对象相同的Animal对象并返回。代码输出结果如下:
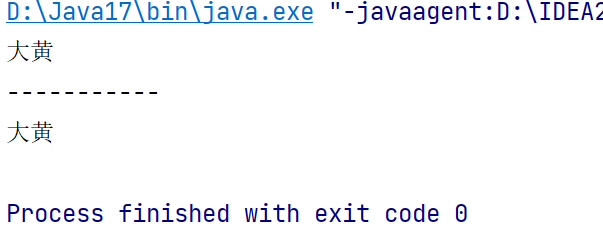
可以看出animal2克隆了animal的成员变量name。
浅拷贝
我们在之前代码的基础上添加一个Age类,并在Animal类中实例化,在测试类中修改被克隆的对象animal2中的Age类的实例化对象a的成员变量age:
class Age{public int age = 10;
}
class Animal implements Cloneable {public String name;public Age a=new Age();@Overridepublic Animal clone() {Animal o = null;try {o = (Animal)super.clone();} catch (CloneNotSupportedException e) {e.printStackTrace();}return o;}public Animal(String name){this.name=name;}
}public class test {public static void main(String[] args) {Animal animal = new Animal("大黄");Animal animal2 = animal.clone();System.out.println("修改前:"+animal.a.age);System.out.println("修改前:"+animal2.a.age);System.out.println("-----------");animal2.a.age=20;System.out.println("修改后:"+animal.a.age);System.out.println("修改后:"+animal2.a.age);}
}
运行结果如下:
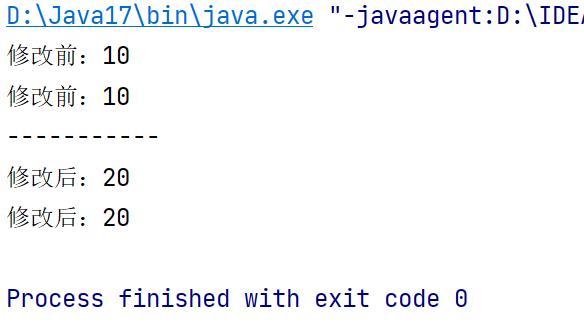
可以看出在单独修改了animal2中对象的情况下 animal一起被改变了。由此看出aniimal和animal2共同使用对象a,所以这种拷贝被称为浅拷贝。
深拷贝
class Age implements Cloneable{public int age = 10;@Overridepublic Object clone()throws CloneNotSupportedException {return super.clone();}
}
class Animal implements Cloneable {public String name;public Age a=new Age();@Overrideprotected Object clone()throws CloneNotSupportedException {//return super.clone();Animal tmp = (Animal)super.clone();tmp.a=(Age)this.a.clone();return tmp;}public Animal(String name){this.name=name;}
}public class test {public static void main(String[] args)throws CloneNotSupportedException{Animal animal = new Animal("大黄");Animal animal2 = (Animal)animal.clone();System.out.println("修改前:"+animal.a.age);System.out.println("修改前:"+animal2.a.age);System.out.println("-----------");animal2.a.age=20;System.out.println("修改后:"+animal.a.age);System.out.println("修改后:"+animal2.a.age);}
}
将Age类同样实现Cloneable接口并重写clone方法,再在Animal的clone方法中使用Age的clone方法克隆Age对象,这样就实现了深拷贝,注意方法返回值的类型问题,以及在每个方法后加上
throws CloneNotSupportedException
这段处理异常的代码。
运行结果:
