pycharm最近遇到的一些问题
遇到的问题
use pycharm visit NCBI but the SDK is fault and report the ecoding is wrong
so I need to know how to config python and anacoda SDK again
1.SDK encoding问题
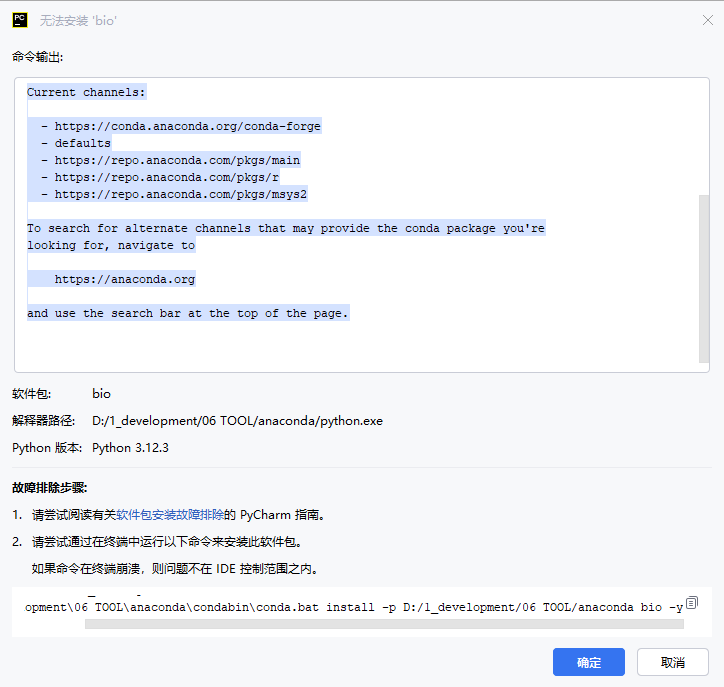
2.anaconda安装包失败
C:\Users\>conda list python
# packages in environment at D:\1_development\06 TOOL\anaconda:
#
# Name                    Version                   Build  Channel
brotli-python             1.0.9           py312hd77b12b_8
gitpython                 3.1.43          py312haa95532_0
ipython                   8.27.0          py312haa95532_0
ipython_genutils          0.2.0              pyhd3eb1b0_1
msgpack-python            1.0.3           py312h59b6b97_0
python                    3.12.3          h2628c8c_0_cpython    conda-forge
python-dateutil           2.9.0post0      py312haa95532_2
python-dotenv             0.21.0          py312haa95532_0
python-fastjsonschema     2.16.2          py312haa95532_0
python-json-logger        2.0.7           py312haa95532_0
python-libarchive-c       5.1                pyhd3eb1b0_0
python-lmdb               1.4.1           py312hd77b12b_0
python-lsp-black          2.0.0           py312haa95532_0
python-lsp-jsonrpc        1.1.2              pyhd3eb1b0_0
python-lsp-server         1.10.0          py312haa95532_0
python-slugify            5.0.2              pyhd3eb1b0_0
python-tzdata             2023.3             pyhd3eb1b0_0
python_abi                3.12                    5_cp312    conda-forgeC:\Users\>python -c "import encodings; print(encodings.__file__)"
D:\1_development\06 TOOL\anaconda\Lib\encodings\__init__.pyC:\Users\>
查看环境变量
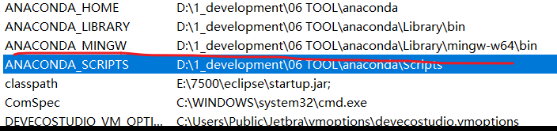

版本
C:\Users>python --version
Python 3.12.3
C:\Users>pip --version
pip 24.2 from D:\1_development\06 TOOL\anaconda\Lib\site-packages\pip (python 3.12)
C:\Users>conda --version
conda 24.9.2
解决
卸载原来的anaconda和python
重新安装miniconda在D/1dev 目录下 配置python解释器
用python跑访问NCBI的代码
# 查看已安装的包
conda list# 停用环境
conda deactivate# 删除环境(不需要时)
conda env remove -n ncbi
# 使用 conda 安装 Biopython(推荐)
conda install -c conda-forge biopython
python -c "from Bio import Entrez; print('Biopython 已成功安装')"
访问NCBI数据库
from Bio import Entrez
from Bio import SeqIO
import time# 设置你的邮箱(NCBI要求)
Entrez.email = "your_email@example.com"  # 替换为你的真实邮箱def search_ncbi(query, max_results=5):"""在NCBI中搜索条目"""print(f"\n搜索: {query}")handle = Entrez.esearch(db="nucleotide", term=query, retmax=max_results)record = Entrez.read(handle)handle.close()return record["IdList"]def fetch_genbank_records(id_list):"""获取GenBank记录"""ids = ",".join(id_list)handle = Entrez.efetch(db="nucleotide", id=ids, rettype="gb", retmode="text")records = list(SeqIO.parse(handle, "gb"))handle.close()return recordsdef fetch_abstract(pubmed_id):"""获取PubMed摘要"""handle = Entrez.efetch(db="pubmed", id=pubmed_id, retmode="xml")record = Entrez.read(handle)handle.close()return recorddef main():try:# 示例1: 搜索核苷酸序列query = "Homo sapiens[Organism] AND COX1[Gene]"ids = search_ncbi(query)print(f"找到的ID: {ids}")# 示例2: 获取GenBank记录if ids:records = fetch_genbank_records(ids[:2])  # 只取前两个for i, record in enumerate(records, 1):print(f"\n记录 {i}:")print(f"ID: {record.id}")print(f"描述: {record.description}")print(f"序列长度: {len(record.seq)} bp")# print(f"序列: {record.seq}")  # 取消注释查看完整序列# 示例3: 搜索PubMed文章pubmed_query = "COVID-19 vaccine"pubmed_ids = search_ncbi(pubmed_query, db="pubmed")if pubmed_ids:abstract = fetch_abstract(pubmed_ids[0])print("\nPubMed摘要示例:")print(abstract[0]['MedlineCitation']['Article']['Abstract']['AbstractText'][0])except Exception as e:print(f"发生错误: {e}")finally:# NCBI要求不要频繁请求,每次请求后暂停time.sleep(1)if __name__ == "__main__":main()
安装Django
conda comaand always use
命令	说明
conda list	查看已安装的包
conda deactivate	退出当前环境
conda env list	列出所有环境
conda remove -n django_env --all	删除环境
conda install -c conda-forge django
安装pytorch
conda install pytorch torchvision torchaudio cpuonly -c pytorch
conda install pytorch torchvision torchaudio pytorch-cuda=11.7 -c pytorch -c nvidia
import torch# 检查PyTorch版本
print(torch.__version__)# 检查CUDA是否可用(GPU版本)
print(torch.cuda.is_available())# 尝试简单张量运算
x = torch.rand(5, 3)
print(x)
#delete
conda remove pytorch torchvision torchaudio
conda clean --all
code example
import torch
import torch.nn as nn
import torch.optim as optim
import torchvision
import torchvision.transforms as transforms
from torch.utils.data import DataLoader
from tqdm import tqdm  # 进度条工具# 1. 设置随机种子保证可重复性
torch.manual_seed(42)
device = torch.device("cuda" if torch.cuda.is_available() else "cpu")
print(f"Using device: {device}")# 2. 数据准备
transform = transforms.Compose([transforms.ToTensor(),transforms.Normalize((0.5,), (0.5,))
])# 加载MNIST数据集
train_set = torchvision.datasets.MNIST(root='./data', train=True,download=True,transform=transform
)
test_set = torchvision.datasets.MNIST(root='./data',train=False,download=True,transform=transform
)train_loader = DataLoader(train_set, batch_size=64, shuffle=True)
test_loader = DataLoader(test_set, batch_size=64, shuffle=False)# 3. 定义神经网络模型
class SimpleCNN(nn.Module):def __init__(self):super(SimpleCNN, self).__init__()self.conv1 = nn.Conv2d(1, 32, kernel_size=3, padding=1)self.conv2 = nn.Conv2d(32, 64, kernel_size=3, padding=1)self.pool = nn.MaxPool2d(2, 2)self.fc1 = nn.Linear(64*7*7, 128)self.fc2 = nn.Linear(128, 10)self.dropout = nn.Dropout(0.25)def forward(self, x):x = self.pool(torch.relu(self.conv1(x)))x = self.pool(torch.relu(self.conv2(x)))x = x.view(-1, 64*7*7)x = self.dropout(x)x = torch.relu(self.fc1(x))x = self.dropout(x)x = self.fc2(x)return xmodel = SimpleCNN().to(device)# 4. 定义损失函数和优化器
criterion = nn.CrossEntropyLoss()
optimizer = optim.Adam(model.parameters(), lr=0.001)# 5. 训练函数
def train(model, loader, criterion, optimizer, epoch):model.train()running_loss = 0.0correct = 0total = 0pbar = tqdm(loader, desc=f'Epoch {epoch}')for images, labels in pbar:images, labels = images.to(device), labels.to(device)optimizer.zero_grad()outputs = model(images)loss = criterion(outputs, labels)loss.backward()optimizer.step()running_loss += loss.item()_, predicted = torch.max(outputs.data, 1)total += labels.size(0)correct += (predicted == labels).sum().item()pbar.set_postfix({'loss': running_loss/(pbar.n+1),'acc': 100.*correct/total})return running_loss/len(loader), correct/total# 6. 测试函数
def test(model, loader, criterion):model.eval()running_loss = 0.0correct = 0total = 0with torch.no_grad():for images, labels in loader:images, labels = images.to(device), labels.to(device)outputs = model(images)loss = criterion(outputs, labels)running_loss += loss.item()_, predicted = torch.max(outputs.data, 1)total += labels.size(0)correct += (predicted == labels).sum().item()return running_loss/len(loader), correct/total# 7. 训练循环
num_epochs = 5
for epoch in range(1, num_epochs+1):train_loss, train_acc = train(model, train_loader, criterion, optimizer, epoch)test_loss, test_acc = test(model, test_loader, criterion)print(f'\nEpoch {epoch}:')print(f'Train Loss: {train_loss:.4f}, Acc: {train_acc:.2f}%')print(f'Test Loss: {test_loss:.4f}, Acc: {test_acc:.2f}%')# 8. 保存模型
torch.save(model.state_dict(), 'mnist_cnn.pth')
print("Model saved to mnist_cnn.pth")# 9. 示例预测
sample_image, _ = test_set[0]
model.eval()
with torch.no_grad():output = model(sample_image.unsqueeze(0).to(device))_, predicted = torch.max(output, 1)print(f"\nSample prediction: {predicted.item()}")