苍穹外卖07 缓存菜品缓存套餐 添加购物车
2-12 缓存菜品&缓存套餐
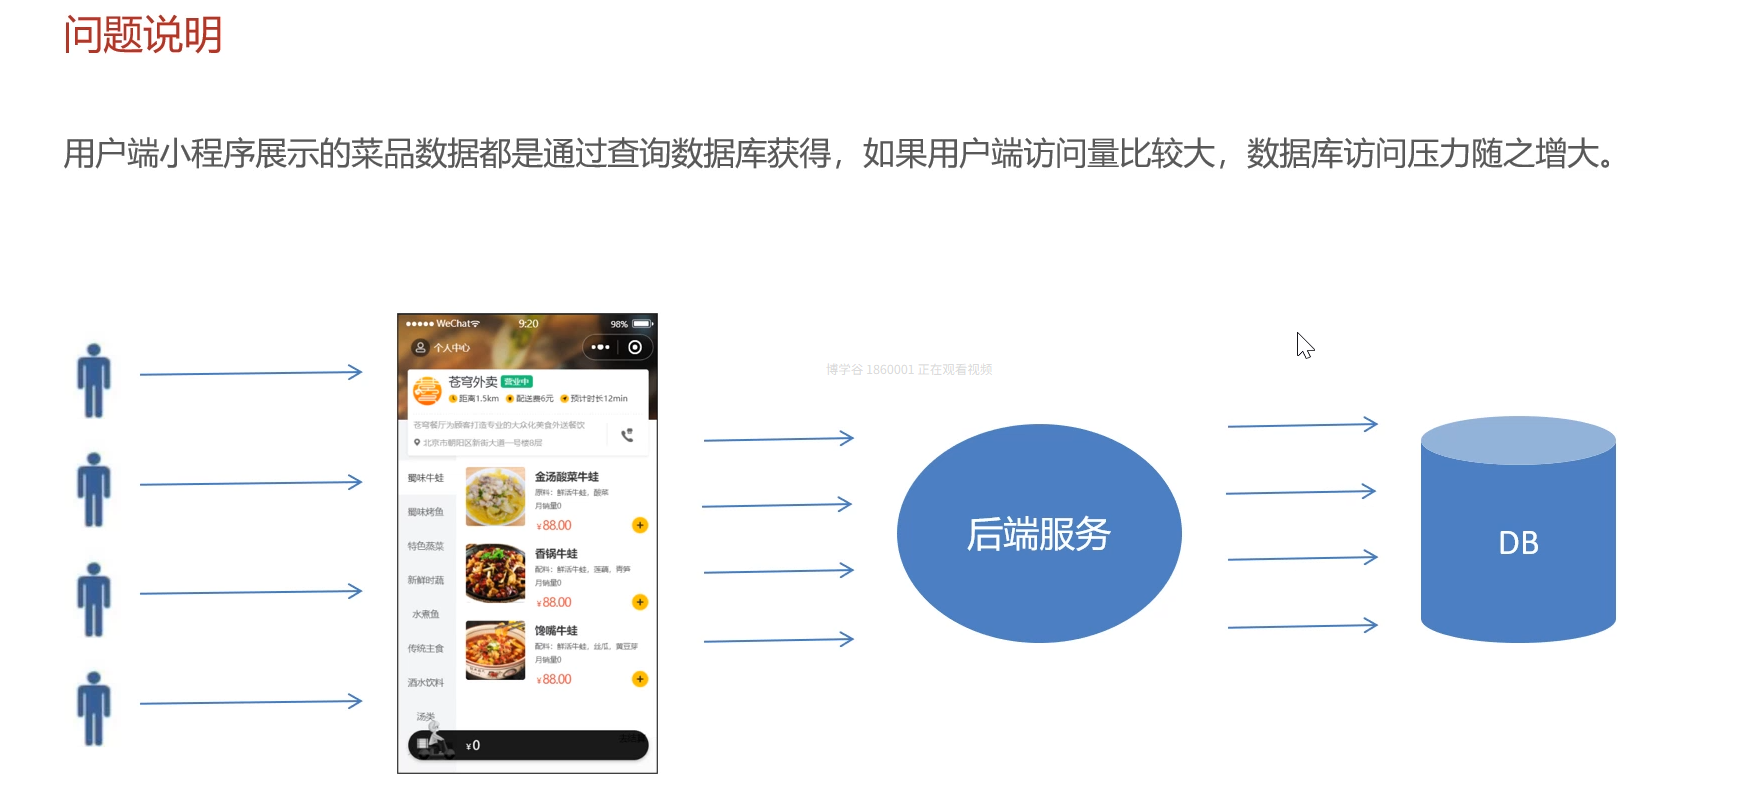
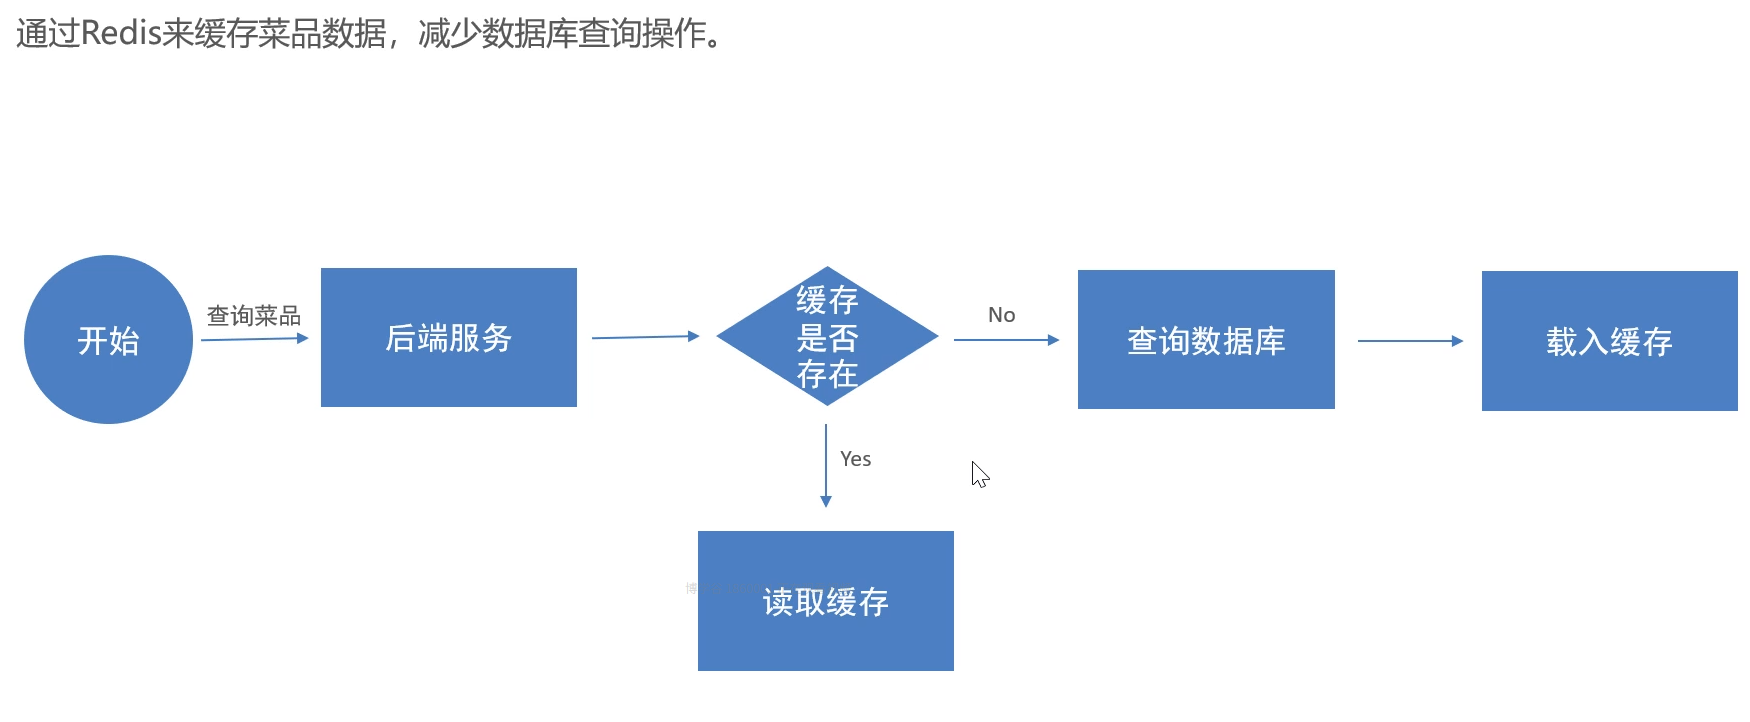
02 02-缓存菜品_问题分析和实现思路
实现思路:
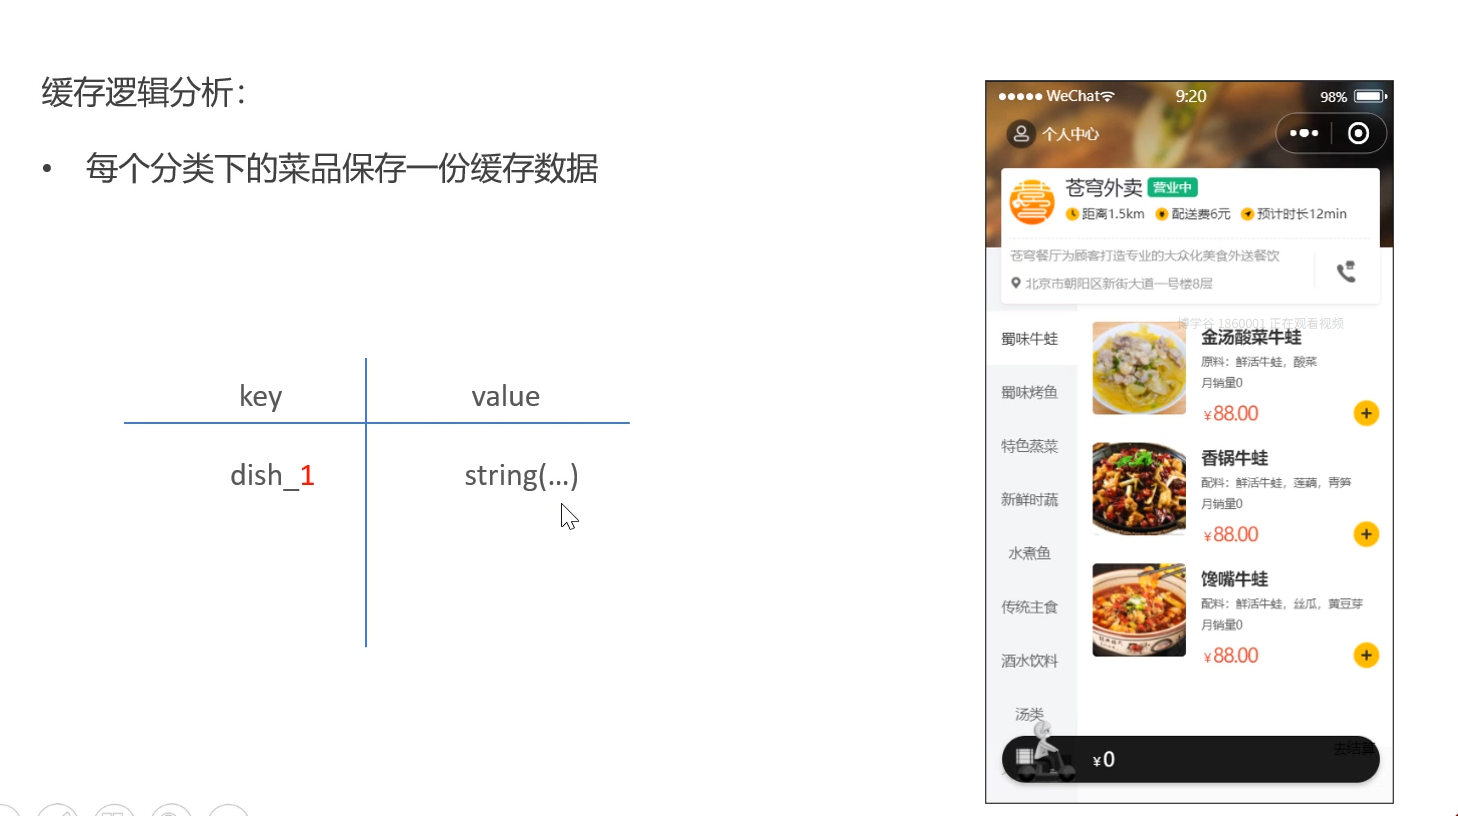
03 03-缓存菜品_代码开发_缓存菜品数据
代码实现如下:
改造了查询菜品的方法
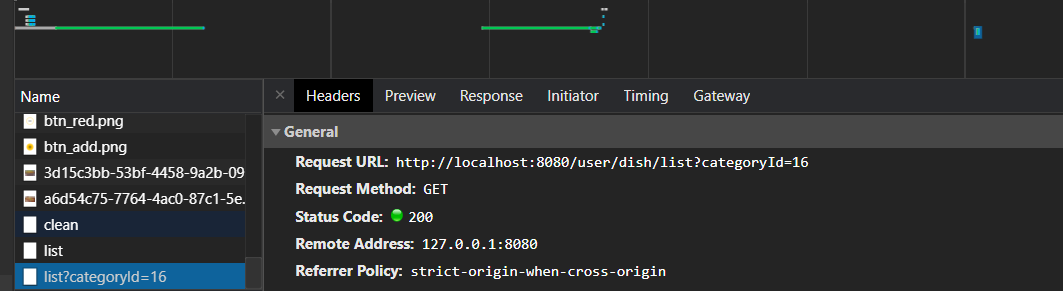
/*** 根据分类id查询菜品* @param categoryId* @return*/@GetMapping("/list")@ApiOperation("根据分类id查询菜品")public Result<List<DishVO>> list(Long categoryId){//构造redis中的keyString key = "dish_" + categoryId;//查询redis中有无菜品数据:List<DishVO> list = (List<DishVO>) redisTemplate.opsForValue().get(key);if (list != null && list.size() > 0) {//如果有则直接返回,无需查询数据库return Result.success(list);}Dish Dish = new Dish();Dish.setCategoryId(categoryId);Dish.setStatus(StatusConstant.ENABLE);//查询起售中的菜品//如果没有则查询数据库,将数据保存到redis中list = dishService.listWithFlavor(Dish);//将数据保存到redis中redisTemplate.opsForValue().set(key, list);return Result.success(list);}写这段代码的时候一定要看清楚啊,别像我一样傻乎乎的就在admincontroller中修改了

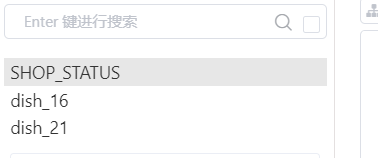
可以看到我们的菜品数据确实存储在了redis中了。
04 04-缓存菜品_代码开发_清理缓存数据
我们虽然将数据存储在缓存中,实实在在的解决了我们高频次用户访问会导致的频繁访问数据库的问题,但是也会出现一个很重要的问题:如果我们在管理端修改了菜品数据,但是没有清理缓存,我们修改后的菜品数据是无法正常上传给用户端的。所以:
我们对菜品管理接口中涉及到数据库修改的方法进行了清楚redis缓存的处理,操作代码如下:
import java.util.List;
import java.util.Set;@RequestMapping("/admin/dish")
@RestController
@Api(tags = "菜品管理接口")
@Slf4j
public class DishController {@Autowiredprivate DishService dishService;@Autowiredprivate RedisTemplate redisTemplate;/*** 新增菜品* @param dishDTO* @return*/@ApiOperation("新增菜品")@PostMappingpublic Result save(@RequestBody DishDTO dishDTO) {log.info("新增菜品:{}", dishDTO);dishService.saveWithFlavor(dishDTO);//清理当前缓存数据String key="dish_"+dishDTO.getCategoryId();clearCache(key);return Result.success();}/*** 菜品分页查询* @param dishPageQueryDTO* @return*/@ApiOperation("菜品分页查询")@GetMapping("/page")public Result<Object> page(DishPageQueryDTO dishPageQueryDTO) {log.info("菜品分页查询:{}", dishPageQueryDTO);PageResult pageResult =dishService.pageQuery(dishPageQueryDTO);return Result.success(pageResult);}/*** 批量删除菜品* @param ids* @return*/@ApiOperation("批量删除菜品")@DeleteMappingpublic Result delete(@RequestParam List<Long> ids) {log.info("批量删除菜品:{}", ids);dishService.deleteBatch(ids);// 清理所有菜品的缓存数据clearCache("dish_*");return Result.success();}/*** 根据id查询菜品* @param id* @return*/@ApiOperation("根据菜品id查询菜品")@GetMapping("/{id}")public Result<DishVO> getById(@PathVariable Long id) {log.info("根据菜品id查询菜品:{}", id);DishVO dishVO = dishService.getByIdWithFlavor(id);return Result.success(dishVO);}/*** 修改菜品* @param dishDTO* @return*/@ApiOperation("修改菜品")@PutMappingpublic Result update(@RequestBody DishDTO dishDTO) {log.info("修改菜品:{}", dishDTO);dishService.update(dishDTO);//清理全部缓存clearCache("dish_*");return Result.success();}/*** 控制起售停售* @param status* @param id* @return*/@ApiOperation("控制起售停售")@PostMapping("/status/{status}")public Result<String> startOrStop(@PathVariable("status") Integer status, Long id) {log.info("控制起售停售:{},{}", status, id);dishService.startOrStop(status, id);return Result.success();}/*** 根据分类id查询菜品* @param categoryId* @return*/@GetMapping("/list")@ApiOperation("根据分类id查询菜品")public Result<List<Dish>> list(Long categoryId){List<Dish> list = dishService.list(categoryId);return Result.success(list);}/*** 清理缓存* @param pattern*/private void clearCache(String pattern){Set keys = redisTemplate.keys(pattern);redisTemplate.delete(keys);}}
测试结果成功,修改菜品后redis的缓存被清除!
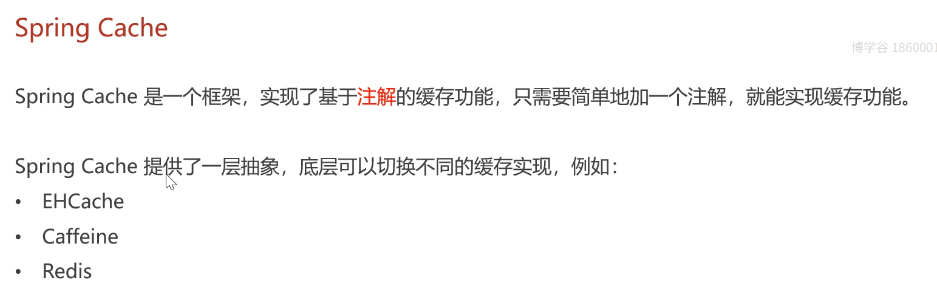
06 06-缓存套餐_Spring Cache_介绍和常用注解
使用这个需要存在依赖:
<dependency><groupId>org.springframework.boot</groupId><artifactId>spring-boot-starter-cache</artifactId></dependency>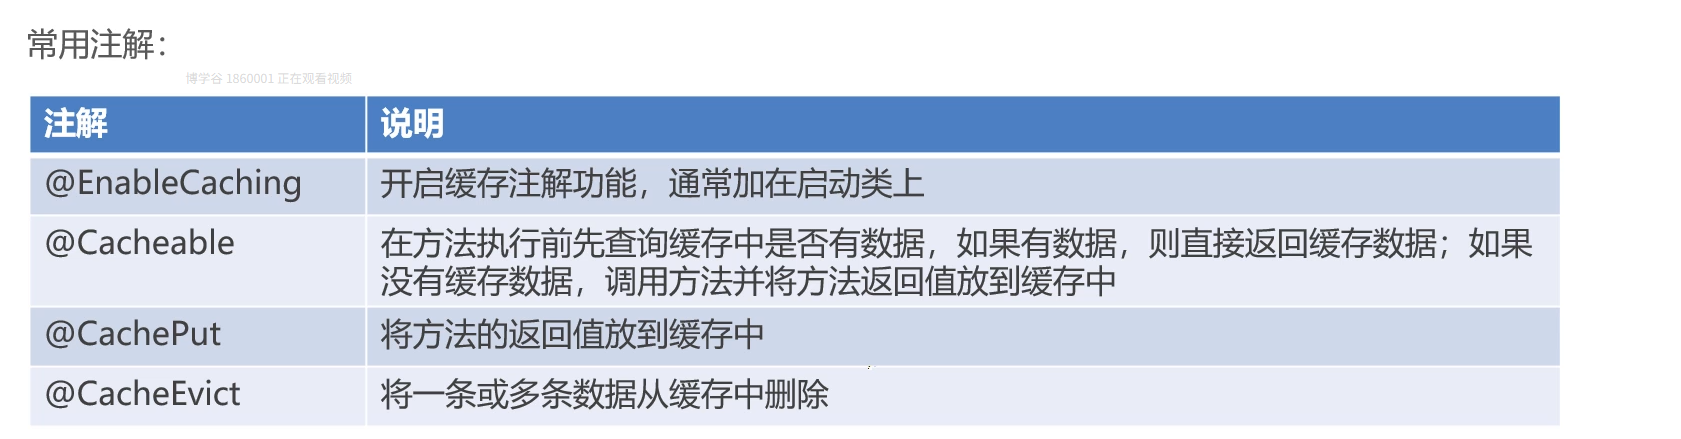
使用测试:使用前记得在启动类上加@EnableCaching
@CachePut注解: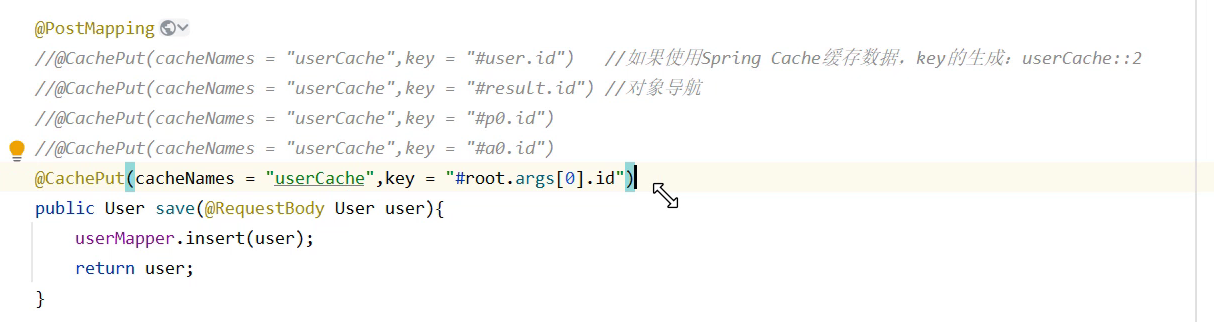
这五种格式都可以,都是在获取第一个形参中的id值作为生成唯一key的要素。
生成的格式就是cachename加两个冒号加key
冒号相当于是创建了子包,他们是一个树形的关系。双冒号不是这个作用哦。
@Cacheable注解:

这个注解在使用后其实是会自动生成一个代理对象,然后用这个代理对象去查询redis看有无数据缓存,如果有是不需要调用方法体的,会直接使用缓存,如果没有,在方法体完成查询返回的时候,会把数据缓存在redis中。
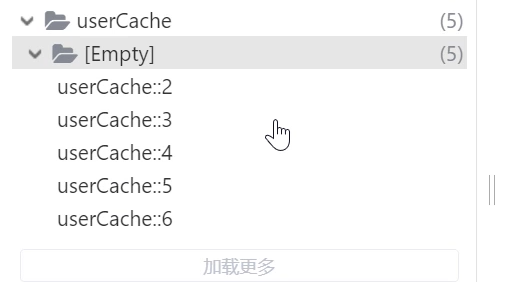
@CacheEvict注解:
删除单条:

这里使用key=#id,用于获取指定id删除指定缓存。
删除多条:
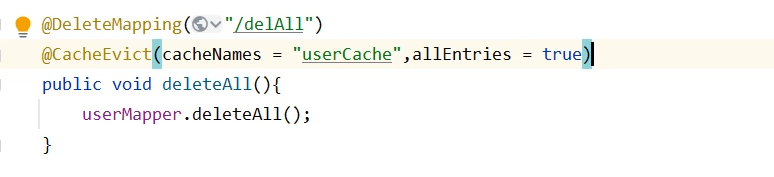
这里不再使用key,使用allentrie=true
用途在于,删除userCache下的所有缓存。如下图,都将被删除:
04 11-缓存套餐_代码开发
1,在启动类上加入@EnableCaching注解开启缓存注解功能:(略)
2,在用户端接口setmealcontroller中的list方法上加上@Chacheable注解:
/*** 条件查询** @param categoryId* @return*/@Cacheable(cacheNames = "setmealCache", key = "#categoryId")@GetMapping("/list")@ApiOperation("根据分类id查询套餐")public Result<List<Setmeal>> list(Long categoryId) {Setmeal setmeal = new Setmeal();setmeal.setCategoryId(categoryId);setmeal.setStatus(StatusConstant.ENABLE);List<Setmeal> list = setmealService.list(setmeal);return Result.success(list);}3, 在管理端接口SetmealController的save,delete,update,startOrStop等方法上加入CacheEvict注解:
@RestController
@Api(tags="套餐相关接口")
@RequestMapping("/admin/setmeal")
@Slf4j
public class SetmealController {@Autowiredprivate SetmealService setmealService;/*** 新增套餐* @param setmealDTO* @return*/@CacheEvict(value = "setmealCache",key = "#setmealDTO.categoryId")@PostMapping@ApiOperation("新增套餐")public Result save(@RequestBody SetmealDTO setmealDTO) {setmealService.saveWithDish(setmealDTO);return Result.success();}/*** 套餐分页查询* @param* @return*/@ApiOperation("套餐分页查询")@GetMapping("/page")public Result<Object> page(SetmealPageQueryDTO setmealPageQueryDTO) {log.info("菜品分页查询:{}", setmealPageQueryDTO);PageResult pageResult =setmealService.pageQuery(setmealPageQueryDTO);return Result.success(pageResult);}/*** 批量删除套餐* @param ids* @return*/@CacheEvict(value = "setmealCache",allEntries = true)@ApiOperation("批量删除套餐")@DeleteMappingpublic Result delete(@RequestParam List<Long> ids) {log.info("批量删除套餐,ids:{}", ids);setmealService.deleteBatch(ids);return Result.success();}/*** 根据id查询套餐* @param id* @return*/@ApiOperation("根据id查询套餐")@GetMapping("/{id}")public Result<SetmealVO> getById(@PathVariable Long id) {log.info("根据id查询套餐:{}", id);SetmealVO setmealVO = setmealService.getByIdWithDish(id);return Result.success(setmealVO);}/***  修改套餐* @param setmealDTO* @return*/@CacheEvict(value = "setmealCache",allEntries = true)@ApiOperation("修改套餐")@PutMappingpublic Result update(@RequestBody SetmealDTO setmealDTO) {log.info("修改套餐:{}", setmealDTO);setmealService.update(setmealDTO);return Result.success();}/*** 套餐起售、停售* @param status* @param id* @return*/@CacheEvict(value = "setmealCache",allEntries = true)@ApiOperation("套餐起售、停售")@PostMapping("/status/{status}")public Result<String> startOrStop(@PathVariable("status") Integer status, Long id) {log.info("控制起售停售:{},{}", status, id);setmealService.startOrStop(status, id);return Result.success();}}
记得测试的时候确定一下自己的套餐到底有没有起售,默认都是为起售的状态。
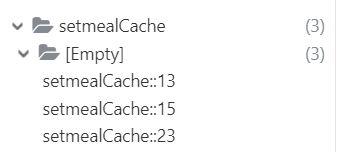
正常状态如上图,调整套餐状态或修改删除之后:
可以看到缓存确实有被删除。代码开发成功。
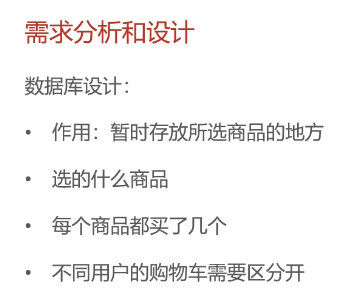
2-13 添加购物车
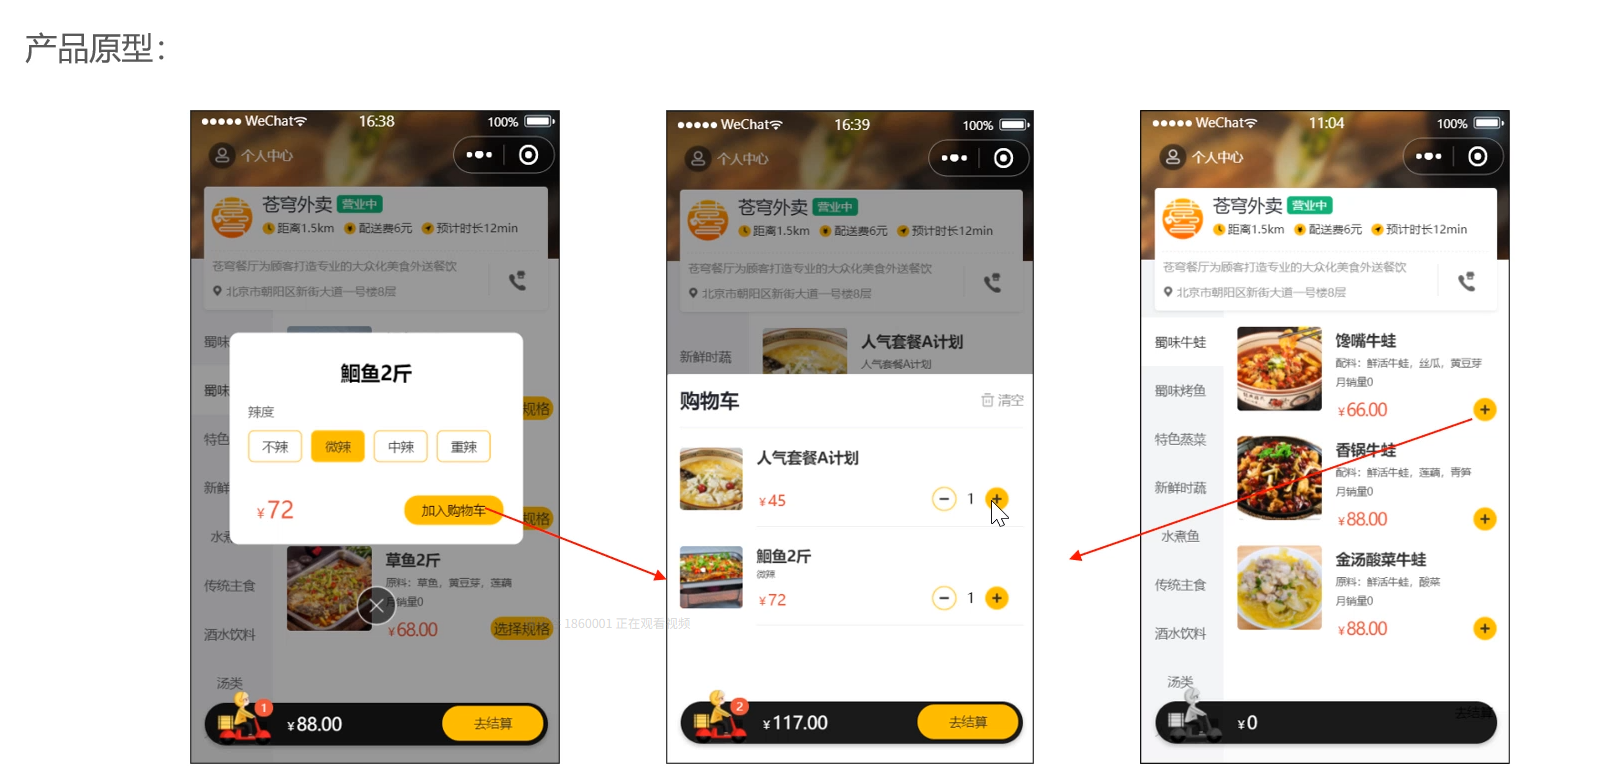
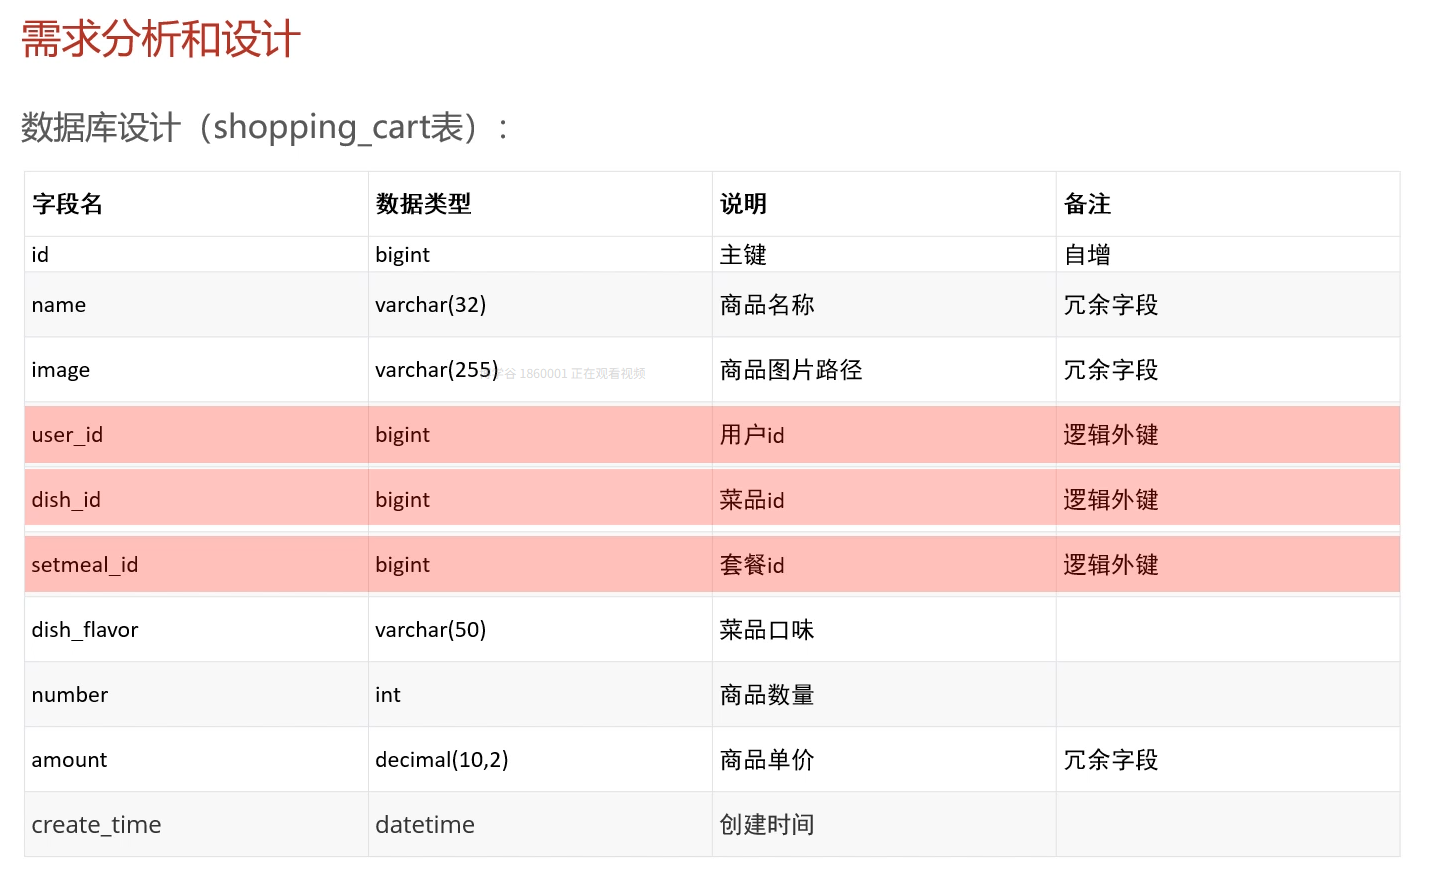
这里设定了冗余字段,作用是让我们不必进行多表查询去获取冗余字段的值,单表查询就可以了。
冗余字段不建议大量使用,且可以作为冗余字段的值应该是不易轻易更改的,稳定的值。
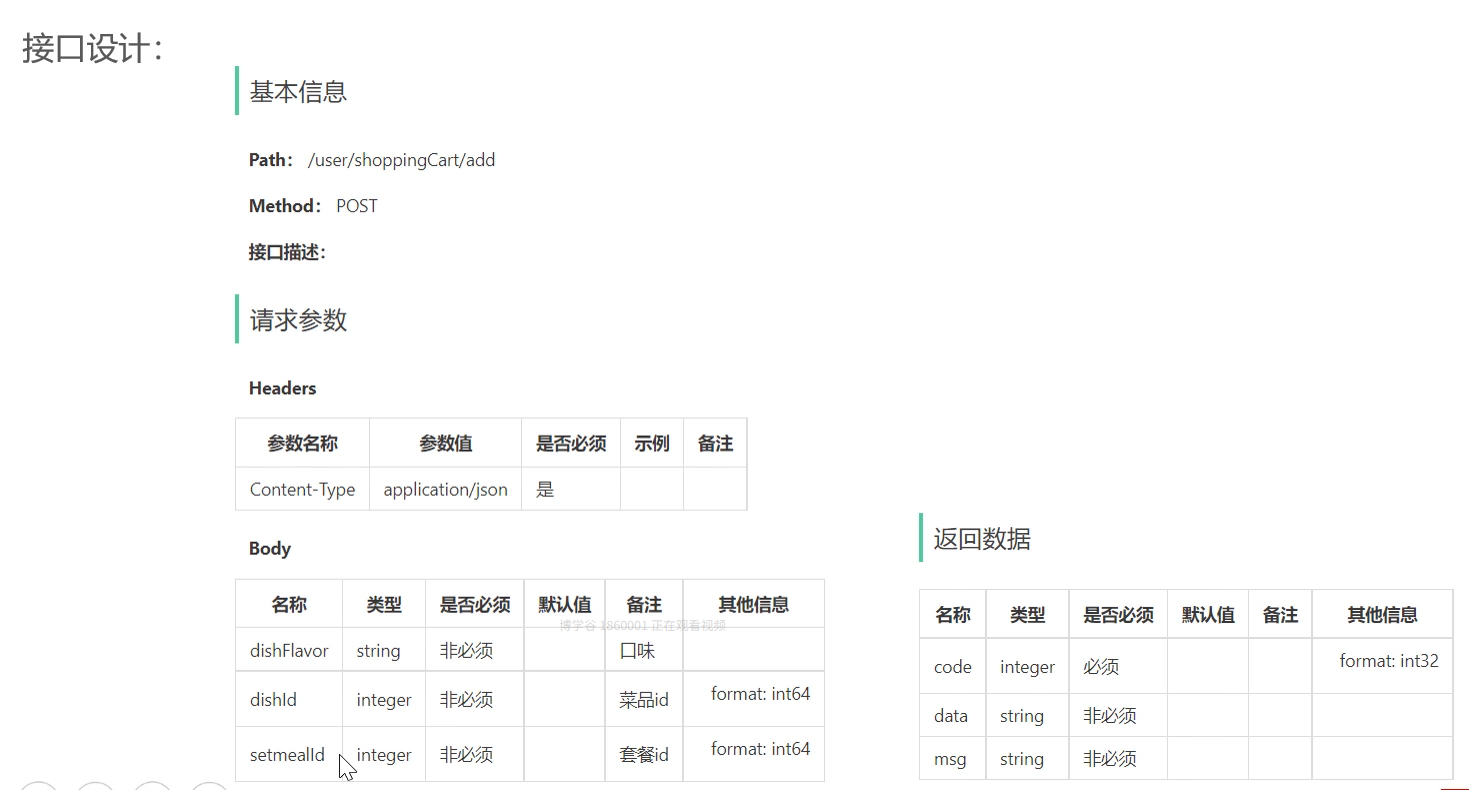
01 14-添加购物车_代码开发
1,做条件判断,实现添加购物车的时候需要先查询购物车当中到底有无当前数据,如果有则执行修改操作,让其数量加一,如果没有则开始添加商品到购物车。
这时候问题就来了。我们需要做查询的sql语法有很多条,
比如传输的是套餐id,我们就要根据套餐id查询。
如果传输的是菜品id,我们就需要通过菜品id查询。
如果传输的菜品口味不同,也不能按照购物车已有数据来处理。所以可能还需要查询到口味
所以我们尝试使用动态sql去处理这个问题:
<select id="list" resultType="com.sky.entity.ShoppingCart">select * from shopping_cart<where><if test="userId != null"> and user_id = #{userId} </if><if test="dishId != null"> and dish_id = #{dishId} </if><if test="setmealId != null"> and setmeal_id = #{setmealId} </if></where></select>核心代码实现如下:
/*** 添加购物车* @param shoppingCartDTO* @return*/@ApiOperation("添加购物车")@RequestMapping("/add")public Result add(@RequestBody ShoppingCartDTO shoppingCartDTO) {log.info("添加购物车:{}", shoppingCartDTO);shoppingCartService.add(shoppingCartDTO);return Result.success();}/*** 添加购物车* @param shoppingCartDTO* @return*/@Overridepublic void add(ShoppingCartDTO shoppingCartDTO) {// 获取当前登录用户id,用id获取对应用户的购物车ShoppingCart shoppingCart = new ShoppingCart();BeanUtils.copyProperties(shoppingCartDTO, shoppingCart);Long userId = BaseContext.getCurrentId();//拦截器中有拦截,可以获取当前用户idshoppingCart.setUserId(userId);List<ShoppingCart> list = shoppingCartMapper.list(shoppingCart);//判断购物车中是否有该菜品或套餐if (list != null && list.size() > 0){//如果存在,数量加1ShoppingCart cart = list.get(0);cart.setNumber(cart.getNumber() + 1);//购物车中数量加1,然后要将数据保存到数据库中shoppingCartMapper.updateNumberById(cart);}else {//如果不存在,添加到购物车//判断当前添加的是菜品还是套餐Long dishId = shoppingCartDTO.getDishId();if (dishId != null){//当前添加的是菜品Dish dish = dishMapper.getById(dishId);//补充获取dishdto中没有的属性shoppingCart.setName(dish.getName());shoppingCart.setImage(dish.getImage());shoppingCart.setAmount(dish.getPrice());}else {//当前添加的是套餐//获取套餐信息,补充获取dishdto中没有的属性Long setmealId = shoppingCartDTO.getSetmealId();Setmeal setmeal = setmealMapper.getByIds(setmealId);shoppingCart.setName(setmeal.getName());shoppingCart.setImage(setmeal.getImage());shoppingCart.setAmount(setmeal.getPrice());}//插入公共数据shoppingCart.setNumber(1);shoppingCart.setCreateTime(LocalDateTime.now());//统一插入数据shoppingCartMapper.insert(shoppingCart);}}05 18-查看购物车
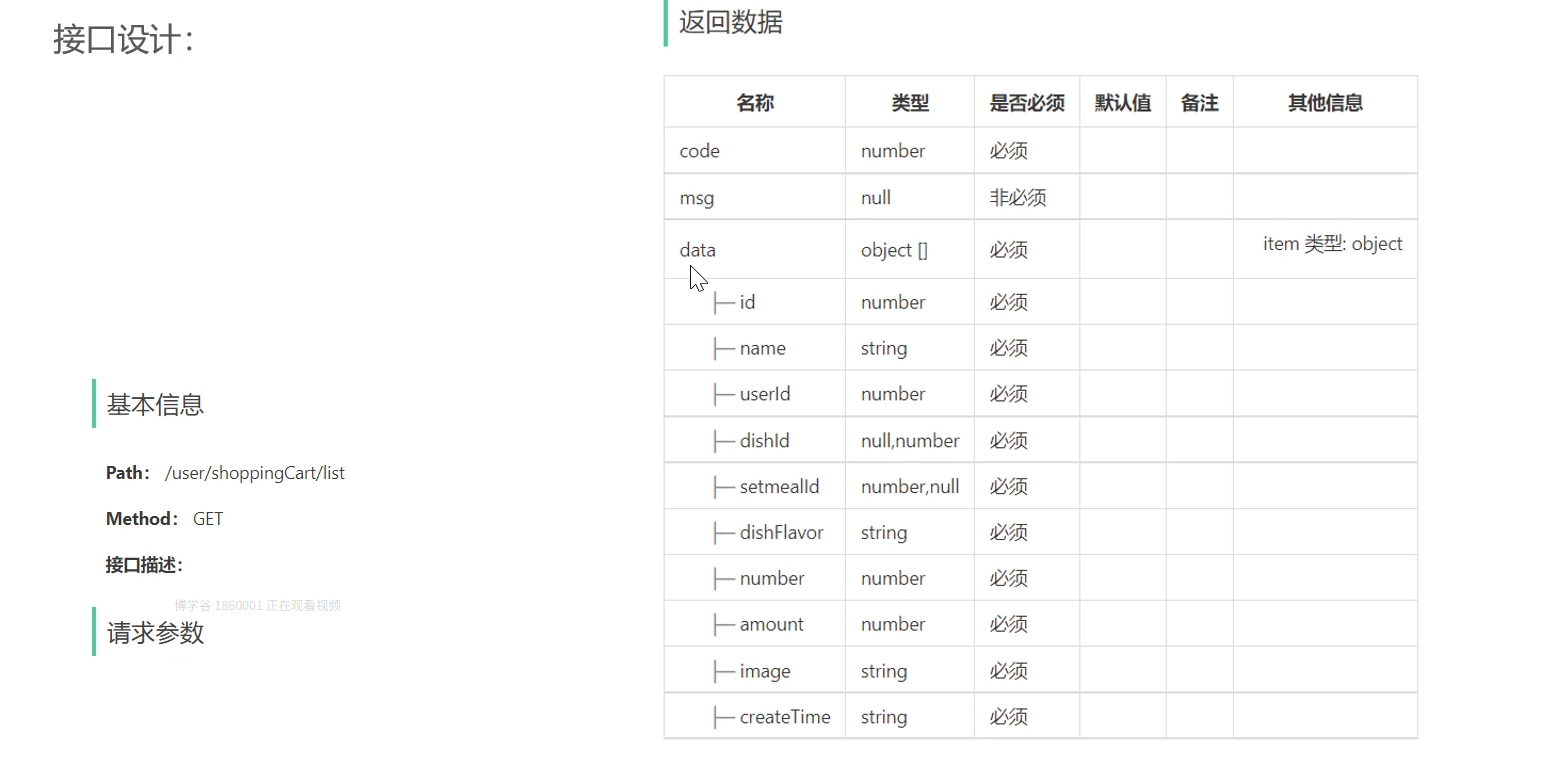
代码实现如下:
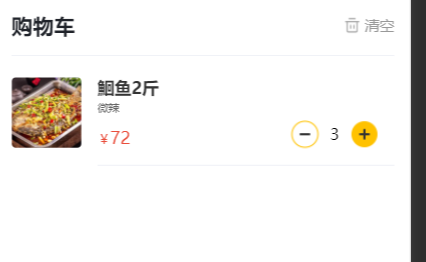
/*** 查看购物车* @return*/@ApiOperation("查看购物车")@GetMapping("/list")public Result<List<ShoppingCart>> list(){List<ShoppingCart> list = shoppingCartService.showShoppingCart();return Result.success(list);}/*** 查看购物车* @return*/@Overridepublic List<ShoppingCart> showShoppingCart() {//获取当前用户idLong userId = BaseContext.getCurrentId();ShoppingCart shoppingCart = ShoppingCart.builder().userId(userId).build();List<ShoppingCart> list = shoppingCartMapper.list(shoppingCart);return list;}测试结果如下:
06 19-清空购物车
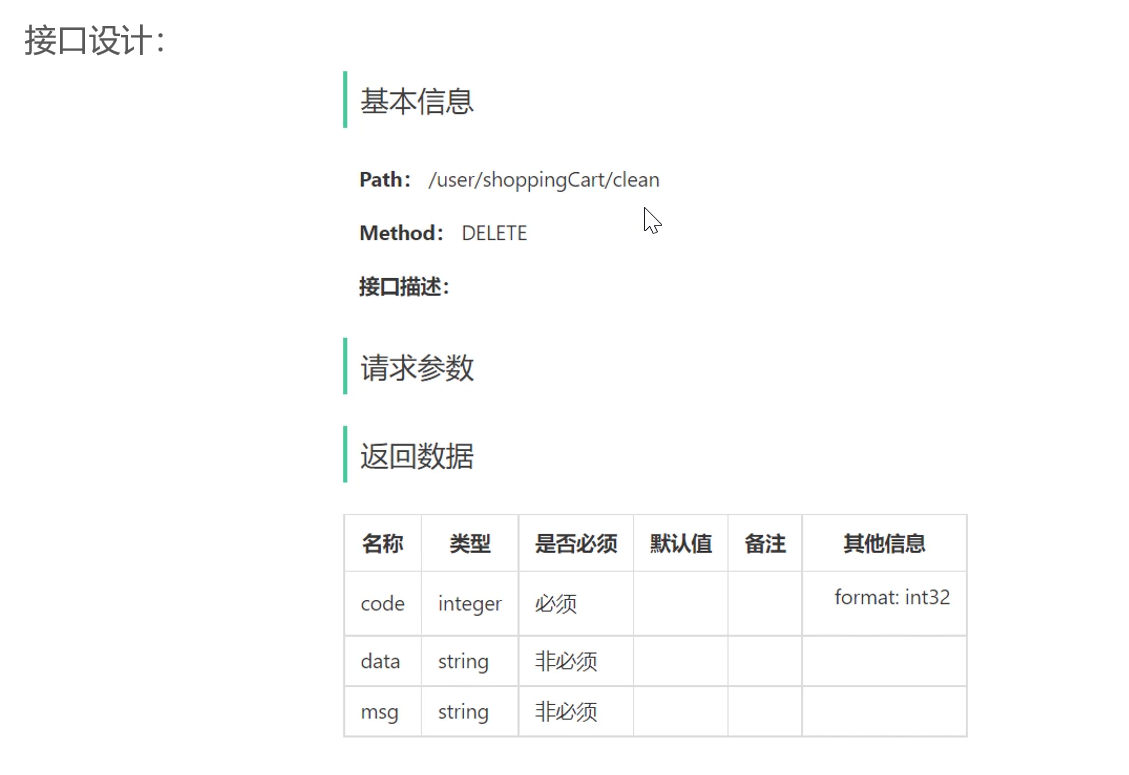
核心也就是这一个sql了,没什么区别
/*** 清空购物车* @return*/@Delete("delete from shopping_cart where user_id = #{userId}")void deleteByUserId(Long userId);测试成功: